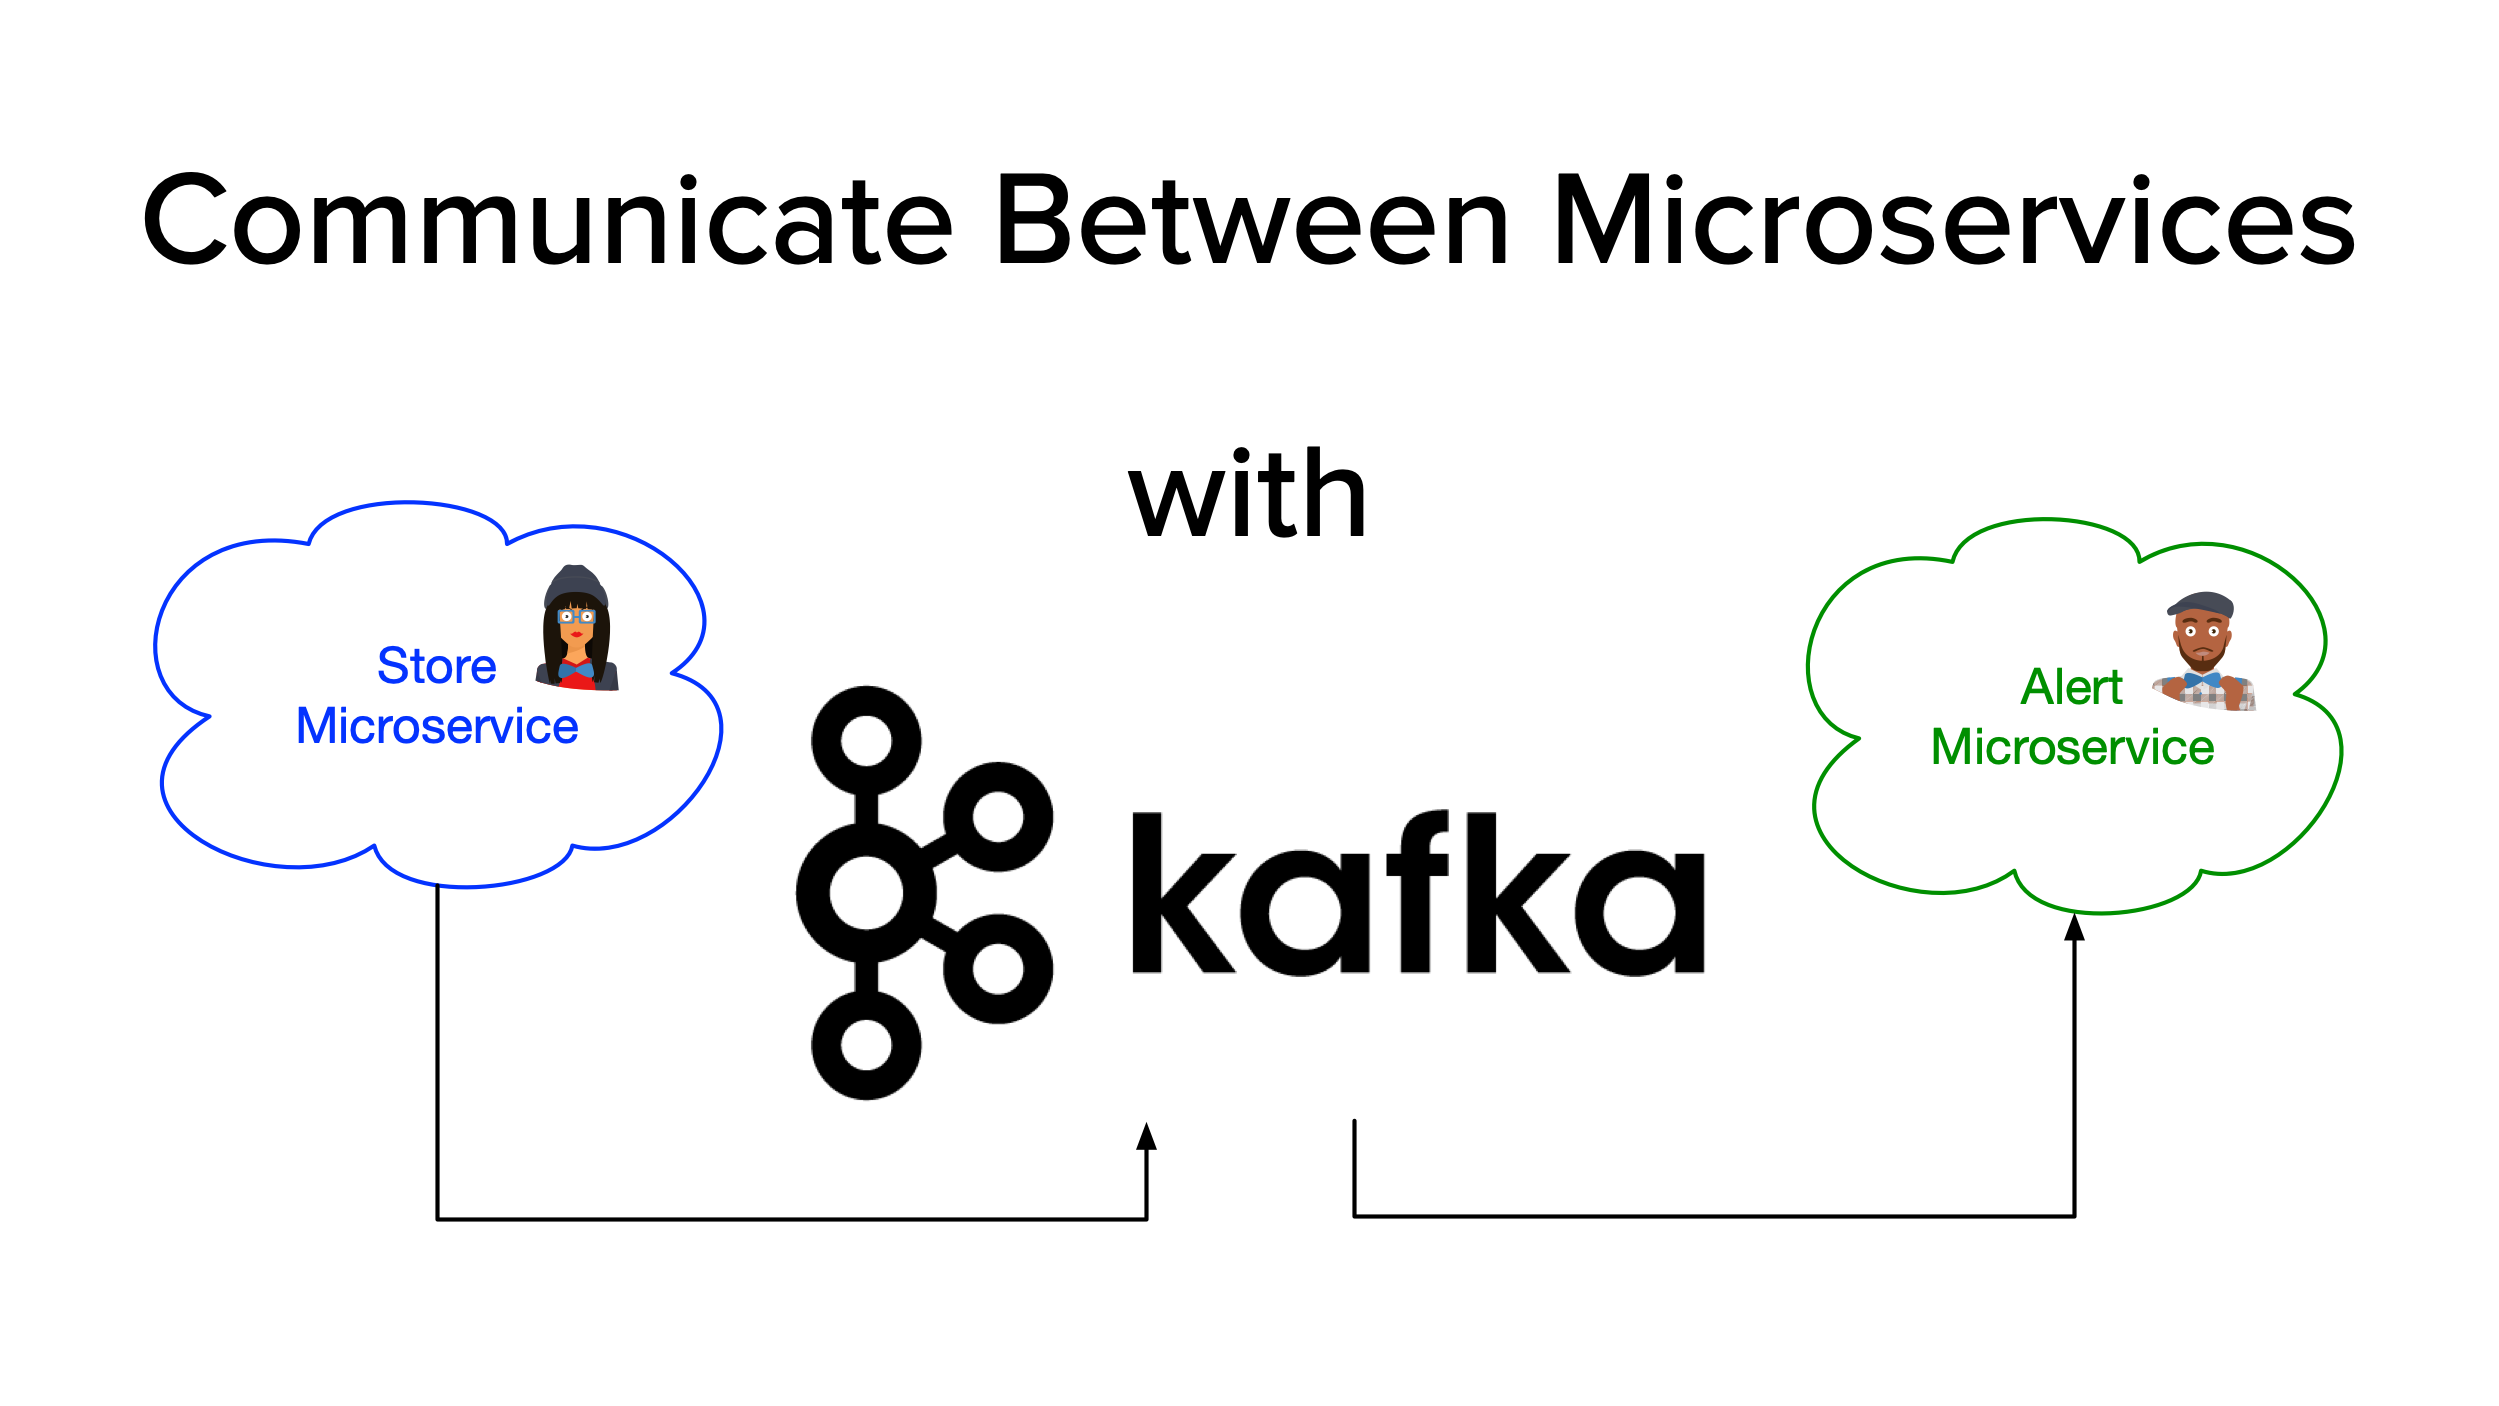
Communicate Between Microservices with Apache Kafka
One of the traditional approaches for communicating between microservices is through their REST APIs. However, as your system evolves and the number of microservices grows, communication becomes more complex, and the architecture might start resembling our old friend the spaghetti anti-pattern, with services depending on each other or tightly coupled, slowing down development teams. This model can exhibit low latency but only works if services are made highly available.
To overcome this design disadvantage, new architectures aim to decouple senders from receivers, with asynchronous messaging. In a Kafka-centric architecture, low latency is preserved, with additional advantages like message balancing among available consumers and centralized management.
When dealing with a brownfield platform (legacy), a recommended way to decouple a monolith and ready it for a move to microservices is to implement asynchronous messaging.
In this tutorial you will learn how to:
- Create a microservices architecture with JHipster
- Enable Kafka integration for communicating microservices
- Set up Okta as the authentication provider
Table of Contents
- What is Kafka?
- Microservices communication with Kafka
- Configure microservices deployment with Docker Compose
- Add OpenID Connect (OIDC) authentication
- Communicate between store and alert microservices
- Microservices + Kafka container deployment
- Learn more about Kafka and microservices
Note: In May 2025, the Okta Integrator Free Plan replaced Okta Developer Edition Accounts, and the Okta CLI was deprecated.
We preserved this post for reference, but the instructions no longer work exactly as written. Replace the Okta CLI commands by manually configuring Okta following the instructions in our Developer Documentation.
What is Kafka?
Apache Kafka is a distributed streaming platform. It was initially conceived as a message queue and open-sourced by LinkedIn in 2011. Its community evolved Kafka to provide key capabilities:
- Publish and Subscribe to streams of records, like a message queue.
- Storage system so messages can be consumed asynchronously. Kafka writes data to a scalable disk structure and replicates it for fault-tolerance. Producers can wait for write acknowledgments.
- Stream processing with Kafka Streams API, enables complex aggregations or joins of input streams onto an output stream of processed data.
Traditional messaging models are queue and publish-subscribe. In a queue, each record goes to one consumer. In publish-subscribe, the record is received by all consumers.
The Consumer Group in Kafka is an abstraction that combines both models. Record processing can be load balanced among the members of a consumer group and Kafka allows you to broadcast messages to multiple consumer groups. It is the same publish-subscribe semantic where the subscriber is a cluster of consumers instead of a single process.
Popular use cases of Kafka include:
- Traditional messaging, to decouple data producers from processors with better latency and scalability.
- Site activity tracking with real-time publish-subscribe feeds.
- As a replacement for file-based log aggregation, where event data becomes a stream of messages.
- Data pipelines where data consumed from topics is transformed and fed to new topics.
- As an external commit log for a distributed system.
- As backend log storage for event sourcing applications, where each state change is logged in time order.
Microservices communication with Kafka
Let’s build a microservices architecture with JHipster and Kafka support. In this tutorial, you’ll create store and alert microservices. The store microservices will create and update store records. The alert microservice will receive update events from store and send an email alert.
Prerequisites:
Install JHipster.
npm install -g generator-jhipster@7.9.3
The --version command should output something like this:
$ jhipster --version
INFO! Using bundled JHipster
7.9.3
Create a directory for the project.
mkdir jhipster-kafka
cd jhipster-kafka
Create an apps.jdl file that defines the store, alert, and gateway applications in JHipster Domain Language (JDL). Kafka integration is enabled by adding messageBroker kafka to the store and alert app definitions.
application {
  config {
    baseName gateway,
    packageName com.okta.developer.gateway,
    applicationType gateway,
    authenticationType oauth2,
    prodDatabaseType postgresql,
    serviceDiscoveryType eureka,
    testFrameworks [cypress]
  }
  entities Store, StoreAlert
}

application {
  config {
    baseName store,
    packageName com.okta.developer.store,
    applicationType microservice,
    authenticationType oauth2,
    databaseType mongodb,
    devDatabaseType mongodb,
    prodDatabaseType mongodb,
    enableHibernateCache false,
    serverPort 8082,
    serviceDiscoveryType eureka
    messageBroker kafka
  }
  entities Store
}

application {
  config {
    baseName alert,
    packageName com.okta.developer.alert,
    applicationType microservice,
    authenticationType oauth2,
    serverPort 8082,
    serviceDiscoveryType eureka
    messageBroker kafka
  }
  entities StoreAlert
}

enum StoreStatus {
  OPEN,
  CLOSED
}

entity Store {
  name String required,
  address String required,
  status StoreStatus,
  createTimestamp Instant required,
  updateTimestamp Instant
}

entity StoreAlert {
  storeName String required,
  storeStatus String required,
  timestamp Instant required
}

microservice Store with store
microservice StoreAlert with alert
Now, in your jhipster-kafka folder, import this file with the following command:
jhipster jdl apps.jdl
Configure microservices deployment with Docker Compose
In the project folder, create a sub-folder for Docker Compose and run JHipster’s docker-compose sub-generator.
mkdir docker-compose
cd docker-compose
jhipster docker-compose
The generator will ask you to define the following things:
- Type of application: Microservice application
- Type of gateway: JHipster gateway based on Spring Cloud Gateway
- Leave the root directory for services as default: ../
- Which applications to include: gateway, store, alert
- Which applications do you want to use with clustered databases: (none)
- If monitoring should be enabled: No
- Password for JHipster Registry:
<default>
Almost when the generator completes, a warning shows in the output:
WARNING! Docker Compose configuration generated, but no Jib cache found
If you forgot to generate the Docker image for this application, please run:
To generate the missing Docker image(s), please run:
 ./mvnw -ntp -Pprod verify jib:dockerBuild in /home/indiepopart/jhipster-kafka/alert
 ./mvnw -ntp -Pprod verify jib:dockerBuild in /home/indiepopart/jhipster-kafka/gateway
 ./mvnw -ntp -Pprod verify jib:dockerBuild in /home/indiepopart/jhipster-kafka/store
You will generate the images later, but first, let’s add some security and Kafka integration to your microservices.
Add OpenID Connect (OIDC) authentication
This microservices architecture is set up to authenticate against Keycloak. Let’s update the settings to use Okta as the authentication provider.
Before you begin, you’ll need a free Okta developer account. Install the Okta CLI and run okta register to sign up for a new account. If you already have an account, run okta login.
Then, run okta apps create jhipster. Select the default app name, or change it as you see fit.
Then, change the Redirect URIs to:
http://localhost:8081/login/oauth2/code/oidc,http://localhost:8761/login/oauth2/code/oidc
Use http://localhost:8081,http://localhost:8761 for the Logout Redirect URIs.
What does the Okta CLI do?
The Okta CLI streamlines configuring a JHipster app and does several things for you:
- Creates an OIDC app with the correct (see above, below are the default values) redirect URIs:
- login:
http://localhost:8080/login/oauth2/code/oidcandhttp://localhost:8761/login/oauth2/code/oidc - logout:
http://localhost:8080andhttp://localhost:8761
- login:
- Creates
ROLE_ADMINandROLE_USERgroups that JHipster expects - Adds your current user to the
ROLE_ADMINandROLE_USERgroups - Creates a
groupsclaim in your default authorization server and adds the user’s groups to it
NOTE: The http://localhost:8761* redirect URIs are for the JHipster Registry, which is often used when creating microservices with JHipster. The Okta CLI adds these by default.
You will see output like the following when it’s finished:
Okta application configuration has been written to: /path/to/app/.okta.env
Run cat .okta.env (or type .okta.env on Windows) to see the issuer and credentials for your app. It will look like this (except the placeholder values will be populated):
export SPRING_SECURITY_OAUTH2_CLIENT_PROVIDER_OIDC_ISSUER_URI="https://{yourOktaDomain}/oauth2/default"
export SPRING_SECURITY_OAUTH2_CLIENT_REGISTRATION_OIDC_CLIENT_ID="{clientId}"
export SPRING_SECURITY_OAUTH2_CLIENT_REGISTRATION_OIDC_CLIENT_SECRET="{clientSecret}"
NOTE: You can also use the Okta Admin Console to create your app. See Create a JHipster App on Okta for more information.
In the project, create a docker-compose/.env file and add the following variables. For the values, use the settings from the Okta web application you created:
OIDC_ISSUER_URI={yourIssuer}
OIDC_CLIENT_ID={yourClientId}
OIDC_CLIENT_SECRET={yourClientSecret}
Edit docker-compose/docker-compose.yml and update the SPRING_SECURITY_* settings for the services store-app, alert-app, gateway-app, and jhipster-registry:
- SPRING_SECURITY_OAUTH2_CLIENT_PROVIDER_OIDC_ISSUER_URI=${OIDC_ISSUER_URI}
- SPRING_SECURITY_OAUTH2_CLIENT_REGISTRATION_OIDC_CLIENT_ID=${OIDC_CLIENT_ID}
- SPRING_SECURITY_OAUTH2_CLIENT_REGISTRATION_OIDC_CLIENT_SECRET=${OIDC_CLIENT_SECRET}
Use Spring Cloud Config to override OIDC settings
An alternative to setting environment variables for each application in docker-compose.yml is to use Spring Cloud Config. JHipster Registry includes Spring Cloud Config, so it’s pretty easy to do.
Open docker-compose/central-server-config/application.yml and add your Okta settings there.
spring:
  security:
    oauth2:
      client:
        provider:
          oidc:
            issuer-uri: https://{yourOktaDomain}/oauth2/default
        registration:
          oidc:
            client-id: {yourClientId}
            client-secret: {yourClientSecret}
The registry, gateway, store, and alert applications are all configured to read this configuration on startup.
Communicate between store and alert microservices
The JHipster generator adds a spring-cloud-starter-stream-kafka dependency to applications that declare messageBroker kafka (in JDL), enabling the Spring Cloud Stream programming model with the Apache Kafka binder for using Kafka as the messaging middleware.
Spring Cloud Stream was recently added back to JHipster. Now, instead of working with Kafka Core APIs, we can use the binder abstraction, declaring input/output arguments in the code, and letting the specific binder implementation handle the mapping to the broker destination.
IMPORTANT NOTE: At this moment, JHipster includes Spring Cloud Stream 3.2.4, which has deprecated the annotation-based programming model, @EnableBinding and @StreamListener annotations, in favor of the functional programming model. Stay tuned for future JHipster updates.
For the sake of this example, update the store microservice to send a message to the alert microservice through Kafka, whenever a store entity is updated.
First, create an outbound binding for a new topic store-alerts. Add the interface KafkaStoreAlertProducer:
package com.okta.developer.store.config;

import org.springframework.cloud.stream.annotation.Output;
import org.springframework.messaging.MessageChannel;

public interface KafkaStoreAlertProducer {
    String CHANNELNAME = "binding-out-store-alert";

    @Output(CHANNELNAME)
    MessageChannel output();
}
Include the outbound binding in the WebConfigurer:
package com.okta.developer.store.config;

@EnableBinding({ KafkaSseConsumer.class, KafkaSseProducer.class, KafkaStoreAlertProducer.class })
@Configuration
public class WebConfigurer implements ServletContextInitializer {
...
Add the binding configuration to application.yml:
spring:
  cloud:
    stream:
      ...
      bindings:
        ...
        binding-out-store-alert:
          destination: store-alerts-topic
          content-type: application/json
          group: store-alerts
In the store project, create an AlertService for sending the event details.
package com.okta.developer.store.service;

import com.okta.developer.store.config.KafkaStoreAlertProducer;
import com.okta.developer.store.domain.Store;
import com.okta.developer.store.service.dto.StoreAlertDTO;
import org.slf4j.Logger;
import org.slf4j.LoggerFactory;
import org.springframework.beans.factory.annotation.Qualifier;
import org.springframework.messaging.MessageChannel;
import org.springframework.messaging.MessageHeaders;
import org.springframework.messaging.support.GenericMessage;
import org.springframework.stereotype.Service;
import org.springframework.util.MimeTypeUtils;

import java.util.HashMap;
import java.util.Map;

@Service
public class AlertService {

    private final Logger log = LoggerFactory.getLogger(AlertService.class);

    private final MessageChannel output;

    public AlertService(@Qualifier(KafkaStoreAlertProducer.CHANNELNAME) MessageChannel output) {
        this.output = output;
    }

    public void alertStoreStatus(Store store) {
        try {
            StoreAlertDTO storeAlertDTO = new StoreAlertDTO(store);
            log.debug("Request the message : {} to send to store-alert topic ", storeAlertDTO);

            Map<String, Object> map = new HashMap<>();
            map.put(MessageHeaders.CONTENT_TYPE, MimeTypeUtils.APPLICATION_JSON);
            MessageHeaders headers = new MessageHeaders(map);
            output.send(new GenericMessage<>(storeAlertDTO, headers));
        } catch (Exception e){
            log.error("Could not send store alert", e);
            throw new AlertServiceException(e);
        }
    }
}
Create the referenced AlertServiceException class.
package com.okta.developer.store.service;

public class AlertServiceException extends RuntimeException {

    public AlertServiceException(Throwable e) {
        super(e);
    }
}
And add a StoreAlertDTO class in the ...service.dto package.
package com.okta.developer.store.service.dto;

import com.okta.developer.store.domain.Store;

public class StoreAlertDTO {

    private String storeName;
    private String storeStatus;

    public StoreAlertDTO(Store store){
        this.storeName = store.getName();
        this.storeStatus = store.getStatus().name();
    }

    public String getStoreName() {
        return storeName;
    }

    public void setStoreName(String storeName) {
        this.storeName = storeName;
    }

    public String getStoreStatus() {
        return storeStatus;
    }

    public void setStoreStatus(String storeStatus) {
        this.storeStatus = storeStatus;
    }

}
Inject the AlertService into the StoreResource API implementation, modifying its constructor. Also modify the updateStore call to publish a StoreAlertDTO for the alert service:
@RestController
@RequestMapping("/api")
public class StoreResource {

    ...
    private final StoreRepository storeRepository;
    private final AlertService alertService;

    public StoreResource(StoreRepository storeRepository, AlertService alertService) {
        this.storeRepository = storeRepository;
        this.alertService = alertService;
    }

    ...

    @PutMapping("/stores/{id}")
    public ResponseEntity<Store> updateStore(
        @PathVariable(value = "id", required = false) final String id,
        @Valid @RequestBody Store store
    ) throws URISyntaxException {
        ...

        Store result = storeRepository.save(store);

        log.debug("SEND store alert for Store: {}", store);
        alertService.alertStoreStatus(result);

        ...
    }

   ...
}
Enable debug logging in production
Since you are going to deploy the prod profile, let’s enable logging in production. Modify the store/src/main/java/com/okta/.../config/LoggingAspectConfiguration.java class:
@Configuration
@EnableAspectJAutoProxy
public class LoggingAspectConfiguration {

    @Bean
    @Profile({JHipsterConstants.SPRING_PROFILE_DEVELOPMENT, JHipsterConstants.SPRING_PROFILE_PRODUCTION})
    public LoggingAspect loggingAspect(Environment env) {
        return new LoggingAspect(env);
    }
}
Edit store/src/main/resources/config/application-prod.yml and change the log level to DEBUG for the store application:
logging:
  level:
    ROOT: INFO
    tech.jhipster: INFO
    com.okta.developer.store: DEBUG
Add an EmailService to the alert microservice
Now let’s customize the alert microservice. First, add the consumer declaration KafkaStoreAlertConsumer to the config:
package com.okta.developer.alert.config;

import org.springframework.cloud.stream.annotation.Input;
import org.springframework.messaging.MessageChannel;

public interface KafkaStoreAlertConsumer {
    String CHANNELNAME = "binding-in-store-alert";

    @Input(CHANNELNAME)
    MessageChannel input();
}
Include the binding in the WebConfigurer:
package com.okta.developer.alert.config;

@EnableBinding({ KafkaSseConsumer.class, KafkaSseProducer.class, KafkaStoreAlertConsumer.class })
@Configuration
public class WebConfigurer implements ServletContextInitializer {
...
Add the inbound binding configuration to application.yml:
spring:
  cloud:
    stream:
      bindings:
        ...
        binding-in-store-alert:
          destination: store-alerts-topic
          content-type: application/json
          group: store-alerts
Create an EmailService to send the store update notification, using the Spring Framework’s JavaMailSender.
package com.okta.developer.alert.service;

import com.okta.developer.alert.service.dto.StoreAlertDTO;
import org.springframework.beans.factory.annotation.Value;
import org.springframework.mail.SimpleMailMessage;
import org.springframework.mail.javamail.JavaMailSender;
import org.springframework.stereotype.Service;

@Service
public class EmailService {

    private JavaMailSender emailSender;

    @Value("${alert.distribution-list}")
    private String distributionList;

    public EmailService(JavaMailSender emailSender){
        this.emailSender = emailSender;
    }

    public void sendSimpleMessage(StoreAlertDTO alertDTO){
        try {
            SimpleMailMessage message = new SimpleMailMessage();
            message.setTo(distributionList);
            message.setSubject("Store Alert: " + alertDTO.getStoreName());
            message.setText(alertDTO.getStoreStatus());
            message.setFrom("StoreAlert");
            emailSender.send(message);
        } catch (Exception exception) {
            throw new EmailServiceException(exception);
        }
    }
}
Create the referenced EmailServiceException.
package com.okta.developer.alert.service;

public class EmailServiceException extends RuntimeException {

    public EmailServiceException(Exception exception) {
        super(exception);
    }
}
Add a StoreAlertDTO class in the ...service.dto package.
package com.okta.developer.alert.service.dto;

public class StoreAlertDTO {

    private String storeName;
    private String storeStatus;

    public String getStoreName() {
        return storeName;
    }

    public void setStoreName(String storeName) {
        this.storeName = storeName;
    }

    public String getStoreStatus() {
        return storeStatus;
    }

    public void setStoreStatus(String storeStatus) {
        this.storeStatus = storeStatus;
    }

}
Add a new property to alert/src/main/resources/config/application.yml and to alert/src/test/resources/config/application.yml for the destination email of the store alert.
alert:
  distribution-list: {distributionListAddress}
NOTE: You’ll need to set a value for the email (e.g. list@email.com will work) in src/test/.../application.yml for tests to pass. For Docker, you’ll override the {distributionListAddress} and {username} + {password} placeholder values with environment variables below.
Update spring.mail.* properties in application-prod.yml to set Gmail as the email service:
spring:
  ...
  mail:
    host: smtp.gmail.com
    port: 587
    username: {username}
    protocol: smtp
    tls: true
    properties.mail.smtp:
      auth: true
      starttls.enable: true
Add a Kafka consumer to persist alert and send email
Create an AlertConsumer service to persist a StoreAlert and send the email notification when receiving an alert message through Kafka. Add KafkaProperties, StoreAlertRepository, and EmailService as constructor arguments. Then add a start() method to initialize the consumer and enter the processing loop.
package com.okta.developer.alert.service;

import com.okta.developer.alert.config.KafkaStoreAlertConsumer;
import com.okta.developer.alert.domain.StoreAlert;
import com.okta.developer.alert.repository.StoreAlertRepository;
import com.okta.developer.alert.service.dto.StoreAlertDTO;
import org.slf4j.Logger;
import org.slf4j.LoggerFactory;
import org.springframework.cloud.stream.annotation.StreamListener;
import org.springframework.messaging.Message;
import org.springframework.stereotype.Service;

import java.time.Instant;
@Service
public class AlertConsumer {

    private final Logger log = LoggerFactory.getLogger(AlertConsumer.class);

    private StoreAlertRepository storeAlertRepository;

    private EmailService emailService;

    public AlertConsumer(StoreAlertRepository storeAlertRepository, EmailService emailService) {
        this.storeAlertRepository = storeAlertRepository;
        this.emailService = emailService;
    }

    @StreamListener(value = KafkaStoreAlertConsumer.CHANNELNAME, copyHeaders = "false")
    public void consume(Message<StoreAlertDTO> message) {
        StoreAlertDTO dto = message.getPayload();
        log.info("Got message from kafka stream: {} {}", dto.getStoreName(), dto.getStoreStatus());
        try {
            StoreAlert storeAlert = new StoreAlert();
            storeAlert.setStoreName(dto.getStoreName());
            storeAlert.setStoreStatus(dto.getStoreStatus());
            storeAlert.setTimestamp(Instant.now());

            storeAlertRepository.save(storeAlert);
            emailService.sendSimpleMessage(dto);
        } catch (Exception e) {
            log.error(e.getMessage(), e);
        }
    }
}
NOTE: Any unhandled exception during message processing will make the service leave the consumer group. That’s why there’s code above that catches Exception.
As a last customization step, update the logging configuration the same way you did for the store microservice.
Microservices + Kafka container deployment
Modify docker-compose/docker-compose.yml and add the following environment variables for the alert application:
- SPRING_MAIL_USERNAME=${MAIL_USERNAME}
- SPRING_MAIL_PASSWORD=${MAIL_PASSWORD}
- ALERT_DISTRIBUTION_LIST=${DISTRIBUTION_LIST}
Edit docker-compose/.env and add values for the new environment variables:
MAIL_USERNAME={yourGmailAccount}
MAIL_PASSWORD={yourPassword}
DISTRIBUTION_LIST={anotherEmailAccount}
Make sure Docker Desktop is running, then generate the Docker image for the store microservice. Run the following command from the store directory.
./mvnw -ntp -Pprod verify jib:dockerBuild
# `npm run java:docker` is a shortcut for the above command
NOTE: If you’re using Apple Silicon, you’ll need to use npm run java:docker:arm64.
Repeat for the alert and gateway apps.
Before you run your microservices architecture, make sure you have enough RAM allocated. Docker Desktop’s default is 2GB, I recommend 8GB. This setting is under Docker > Resources > Advanced.
Then, run everything using Docker Compose:
cd docker-compose
docker compose up
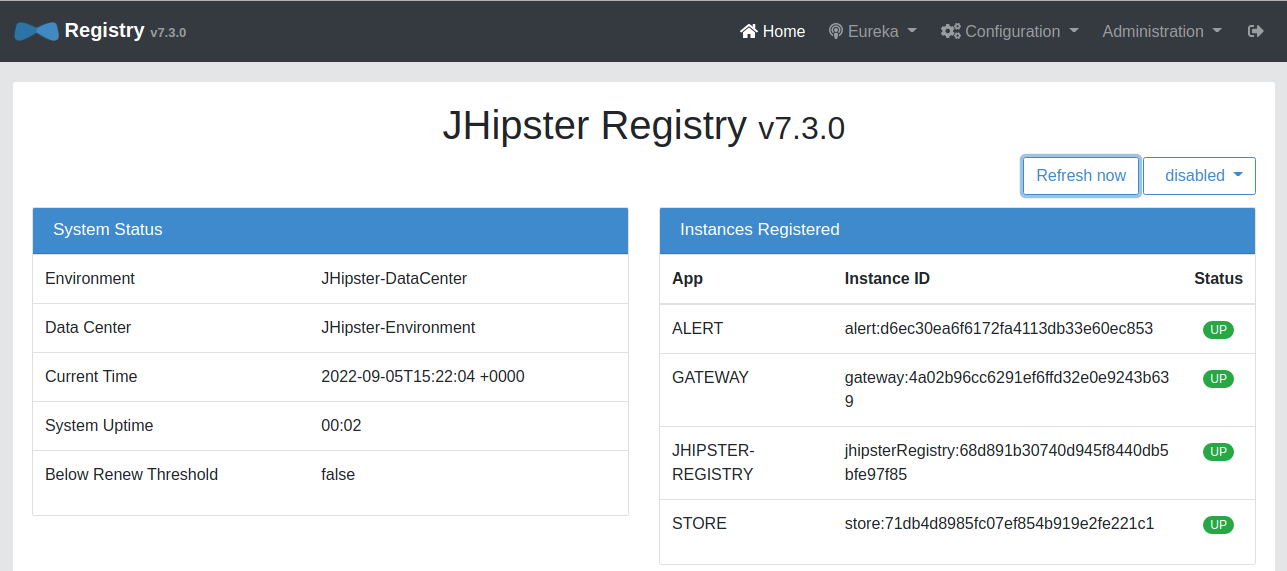
You will see a huge amount of logging while each service starts. Wait a minute or two, then open http://localhost:8761 and log in with your Okta account. This is the JHipster Registry which you can use to monitor your apps’ statuses. Wait for all the services to be up.
Open a new terminal window and tail the alert microservice logs to verify it’s processing StoreAlert records:
docker logs -f docker-compose-alert-1 | grep Consumer
You should see log entries indicating the consumer group to which the alert microservice joined on startup:
2022-09-05 15:20:44.146  INFO 1 --- [           main] org.apache.kafka.clients.Metadata        : [Consumer clientId=consumer-store-alerts-4, groupId=store-alerts] Cluster ID: pyoOBVa3T3Gr1VP3rJBOlQ
2022-09-05 15:20:44.151  INFO 1 --- [           main] o.a.k.c.c.internals.ConsumerCoordinator  : [Consumer clientId=consumer-store-alerts-4, groupId=store-alerts] Resetting generation due to: consumer pro-actively leaving the group
2022-09-05 15:20:44.151  INFO 1 --- [           main] o.a.k.c.c.internals.ConsumerCoordinator  : [Consumer clientId=consumer-store-alerts-4, groupId=store-alerts] Request joining group due to: consumer pro-actively leaving the group
2022-09-05 15:20:44.162  INFO 1 --- [           main] o.a.k.clients.consumer.ConsumerConfig    : ConsumerConfig values:
2022-09-05 15:20:44.190  INFO 1 --- [           main] o.a.k.clients.consumer.KafkaConsumer     : [Consumer clientId=consumer-store-alerts-5, groupId=store-alerts] Subscribed to topic(s): store-alerts-topic
2022-09-05 15:20:44.225  INFO 1 --- [container-0-C-1] org.apache.kafka.clients.Metadata        : [Consumer clientId=consumer-store-alerts-5, groupId=store-alerts] Resetting the last seen epoch of partition store-alerts-topic-0 to 0 since the associated topicId changed from null to 0G-IFWw-S9C3fEGLXDCOrw
2022-09-05 15:20:44.226  INFO 1 --- [container-0-C-1] org.apache.kafka.clients.Metadata        : [Consumer clientId=consumer-store-alerts-5, groupId=store-alerts] Cluster ID: pyoOBVa3T3Gr1VP3rJBOlQ
2022-09-05 15:20:44.227  INFO 1 --- [container-0-C-1] o.a.k.c.c.internals.ConsumerCoordinator  : [Consumer clientId=consumer-store-alerts-5, groupId=store-alerts] Discovered group coordinator kafka:9092 (id: 2147483645 rack: null)
2022-09-05 15:20:44.229  INFO 1 --- [container-0-C-1] o.a.k.c.c.internals.ConsumerCoordinator  : [Consumer clientId=consumer-store-alerts-5, groupId=store-alerts] (Re-)joining group
2022-09-05 15:20:44.238  INFO 1 --- [container-0-C-1] o.a.k.c.c.internals.ConsumerCoordinator  : [Consumer clientId=consumer-store-alerts-5, groupId=store-alerts] Request joining group due to: need to re-join with the given member-id
2022-09-05 15:20:44.239  INFO 1 --- [container-0-C-1] o.a.k.c.c.internals.ConsumerCoordinator  : [Consumer clientId=consumer-store-alerts-5, groupId=store-alerts] (Re-)joining group
Once everything is up, go to the gateway at http://localhost:8081 and log in. Create a store entity and then update it. The alert microservice should log entries when processing the received message from the store service.
2022-09-05 18:08:31.546 INFO 1 --- [container-0-C-1] c.o.d.alert.service.AlertConsumer : Got message from kafka stream: Candle Shop CLOSED
If you see a MailAuthenticationException in the alert microservices log when attempting to send the notification, it might be your Gmail security configuration.
alert-app_1           | org.springframework.mail.MailAuthenticationException: Authentication failed; nested exception is javax.mail.AuthenticationFailedException: 535-5.7.8 Username and Password not accepted. Learn more at
alert-app_1           | 535 5.7.8  https://support.google.com/mail/?p=BadCredentials *** - gsmtp
alert-app_1           |
alert-app_1           | 	at org.springframework.mail.javamail.JavaMailSenderImpl.doSend(JavaMailSenderImpl.java:440)
To enable the login from the alert application, go to https://myaccount.google.com and then choose the Security tab. Turn on 2-Step Verification for your account. In the section Signing in to Google, choose App passwords and create a new app password. In the Select app dropdown set Other (Custom name) and type the name for this password. Click Generate and copy the password. Update docker-compose/.env and set the app password for Gmail authentication.
MAIL_PASSWORD={yourAppPassword}
IMPORTANT: Don’t forget to delete the app password once the test is done.
Stop all the containers with CTRL+C and restart again with docker compose up.
Update a store again and you should receive an email with the store’s status this time.
In this tutorial, authentication (of producers and consumers), authorization (of read/write operations), and encryption (of data) were not covered, as security in Kafka is optional. See Kafka’s documentation on security to learn how to enable these features.
Learn more about Kafka and microservices
This tutorial showed how a Kafka-centric architecture allows decoupling microservices to simplify the design and development of distributed systems. To continue learning about these topics check out the following links:
You can find all the code for this tutorial on GitHub in the @oktadev/okta-kafka-microservices-example repository.
There are also a few tutorials on Kafka, microservices, and JHipster that you might enjoy on this blog:
- Reactive Java Microservices with Spring Boot and JHipster
- Secure Kafka Streams with Quarkus and Java
- A Quick Guide to Spring Cloud Stream
Please follow us @oktadev on Twitter for more tutorials like this one. We also have a YouTube channel where we frequently publish videos.
Okta Developer Blog Comment Policy
We welcome relevant and respectful comments. Off-topic comments may be removed.