Build Continuous Integration with Jenkins in C#

“It works on my machine.”
If you’re a developer, or you work with developers, you’ve heard this phrase one too many times. If you’ve been in the industry for a while, you may even have the coffee mug, tee shirt, or mouse pad. It’s fair to say that if Bart Simpson decides to embark on a career in software, “It works on my machine” will be the new “Eat my shorts”.
Jokes aside, it represents a real problem. Developers work on code on their laptops, and when the time comes to unveil the finished product, things rarely go smoothly. Integration is hard and always takes longer than expected.
However, all is not lost! It doesn’t have to be this way. There is a growing recognition of the importance of DevOps, and in this post, I’ll talk about one of the pillars of DevOps - continuous integration and how you can use tools such as Jenkins to make your development process efficient and predictable.
To work through this post, you’ll need a few things:
- Free Okta Developer Account
- ASP.NET Core SDK and a suitable IDE (such as VS Code or Visual Studio)
- Jenkins installation - choose the Long-term Support version for your platform
Note: In May 2025, the Okta Integrator Free Plan replaced Okta Developer Edition Accounts, and the Okta CLI was deprecated.
We preserved this post for reference, but the instructions no longer work exactly as written. Replace the Okta CLI commands by manually configuring Okta following the instructions in our Developer Documentation.
Install the Jenkins Continuous Integration Server
Jenkins is a Java-based application and as such can run on any platform that has the appropriate Java runtime. There are also installer packages for many major operating systems as well as virtual machine templates that you can deploy to your favourite cloud provider. The steps required will vary depending on your operating system, and you can find specific details at https://jenkins.io/doc/book/installing/
For the purposes of this walkthrough, we’ll assume you’re installing on Windows 10.
- Download the latest LTS version of Jenkins for Windows from
https://jenkins.io/download/ - Unzip the downloaded zip file to obtain the windows installer (jenkins.msi) file
- Run the installer using the default options.
- When the installation has been completed, your browser will be opened and pointed to
http://localhost:8080. On Windows systems it can take a minute or so before the Jenkins service starts so you may see a 404 error initially. If that happens, refresh the page until you see the ‘Unlock Jenkins’ page.
Note: It is possible to run Jenkins as a Docker container on your local machine. For this post, we don’t recommend that approach since it adds complexity to the configuration.
Setup Jenkins Continuous Integration Server
Once you have Jenkins installed and running, the configuration process will be the same regardless of the operating system you’re using. You’ll start by navigating to http://localhost:8080 and following the prompts to create a new admin user. Installing on some platforms will require you to provide a system-generated admin password. If you’re installing on Windows you can retrieve the unlock code using:
type "C:\Program Files (x86)\Jenkins\secrets\initialAdminPassword"
Jenkins uses role-based access control and, so that you can administer the server, the first user you need to create will be an administrator. Generally speaking, there should only be one administrator account that’s used for administering other accounts. Additional accounts should be created with only the required permissions for a users job role. For example, developers commonly don’t require administrative access since they’re only interested in the outcome of the CI process as opposed to actually defining the process itself.
Once you have a new admin user, you’ll be prompted to select the plugins that you want to install. Note that there are many plugins available, but for this post, you can accept the defaults.
Important Note: The order of these steps varies depending on that platform you’re using. For example, on Windows you’ll select the plugins to install before creating an admin user, whereas on Linux, you’ll create the admin user first.
Congratulations, you’re now the proud owner of a new Continuous Integration server thanks to Jenkins!
Add Source Control for Continuous Integration
So that we can put Jenkins through its paces, we’ll create a simple ASP.Net web application that makes use of Okta to provide identity management.
Jenkins and other continuous integration systems work by detecting changes to source control systems and automatically integrating the changed code into the wider application - that’s where the terms continuous integration comes from. To see this in action, the first thing we’ll need is source control. You can use any Git-based provider such as GitHub or Azure DevOps as long as it is accessible from the server that’s running Jenkins. For this post, I’ll assume you’re using a GitHub account, but the steps will be pretty similar for any hosted Git Provider.
- Login to GitHub
- Create a new repository called OktaJenkinsCI.
- Grab the appropriate URL for the repository
For example, in GitHub, if you’re using Linux or Visual Studio Code, you’ll want the ssh URL at:
git@github.com:your-username/OktaJenkinsCI.git. Whereas, if you’re using Visual Studio or Windows, life will be simpler if you use the https URL:https://github.com/your-username/OktaJenkinsCI.git
Build an ASP.NET Core MVC Application
Now that you’ve set up your source control system and configured Jenkins, you can start building your app. To carry out these steps, you’ll need the ASP.NET Core SDK and an IDE.
Visual Studio Code
You can create a new MVC application by opening a command prompt or terminal session and using:
mkdir OktaJenkinsCI
cd OktaJenkinsCI
dotnet new MVC
Then you can hook it up to your Git repository using:
git init
git remote add origin <your-git-ssh-url>
Before you commit your code, you should create a .gitignore file to exclude compilation output. The file should include:
/bin/**
/obj/**
With that added, you’re ready to commit your empty project:
git add -A
git commit -a -m "Initial check-in"
git push -u origin master
Visual Studio 2017
You can use the New Project Wizard in Visual Studio to create a new MVC application.
- Select File > New > Visual C# > .NET Core > ASP.NET Core Web Application
- Check the ‘Create new Git repository’ option
- Select the Web Application (Model-View-Controller) project type and ensure that ‘Configure for HTTPS’ is checked
- Type ‘Control+E+C’ to open the Team Explorer window
- Under ‘Push to Remote Repository’ enter your git https url. Example:
https://github.com/your-username/OktaJenkinsCI.git. - Enter your credentials if prompted and check in your first commit, then push it!
Add Authentication to Your ASP.NET Core App
With a blank template in place, you can move on to adding the nuts and bolts of your application.
Starting with your Startup.cs file, add some using statements at the top of the page.
using Microsoft.AspNetCore.Authentication.Cookies;
using Microsoft.AspNetCore.Authentication.OpenIdConnect;
using Microsoft.IdentityModel.Tokens;
Then in your ConfigureServices() method, before the call to services.AddMvc(), add this code to hook up Okta using the ASP.NET Core OpenID Connect provider.
services.AddAuthentication(sharedOptions =>
{
  sharedOptions.DefaultAuthenticateScheme = CookieAuthenticationDefaults.AuthenticationScheme;
  sharedOptions.DefaultSignInScheme = CookieAuthenticationDefaults.AuthenticationScheme;
  sharedOptions.DefaultChallengeScheme = OpenIdConnectDefaults.AuthenticationScheme;
})
.AddCookie()
.AddOpenIdConnect(options =>
{
  options.ClientId = Configuration["okta:ClientId"];
  options.ClientSecret = Configuration["okta:ClientSecret"];
  options.Authority = Configuration["okta:Issuer"];
  options.CallbackPath = "/authorization-code/callback";
  options.ResponseType = "code";
  options.SaveTokens = true;
  options.UseTokenLifetime = false;
  options.GetClaimsFromUserInfoEndpoint = true;
  options.Scope.Add("openid");
  options.Scope.Add("profile");
  options.TokenValidationParameters = new TokenValidationParameters
  {
    NameClaimType = "name"
  };
});
With the AuthenticationService configured to use OpenIdConnect, the next step is to tell your application to use authentication. You can do that by adding app.UseAuthentication(); to the Configure() method before the call to app.UseMvc().
public void Configure(IApplicationBuilder app, IHostingEnvironment env)
{
    if (env.IsDevelopment())
    {
        app.UseDeveloperExceptionPage();
    }
    else
    {
        app.UseExceptionHandler("/Home/Error");
        app.UseHsts();
    }
    app.UseHttpsRedirection();
    app.UseStaticFiles();
    app.UseCookiePolicy();
    app.UseAuthentication();
    app.UseMvc(routes =>
    {
        routes.MapRoute(
            name: "default",
            template: "{controller=Home}/{action=Index}/{id?}");
    });
}
Configure Identity Management for Your ASP.NET Core App
With source control configured, let’s set up an application that incorporates secure identity management using the Okta developer service. Okta is an identity access and management company that provides a whole host of software-as-service identity products.
Our API enables you to:
- Authenticate and authorize your users
- Store data about your users
- Perform password-based and social login
- Secure your application with multi-factor authentication
- And much more! Check out our product documentation for more information
Start by registering for a forever-free developer account, and when you’re done, come back to learn more about Continuous Integration using Jenkins.
Once you’ve signed into the Okta developer console, select Applications from the top menu and click on the Add Application button. Choose Web and click Next.
Update the application settings to match the image below.
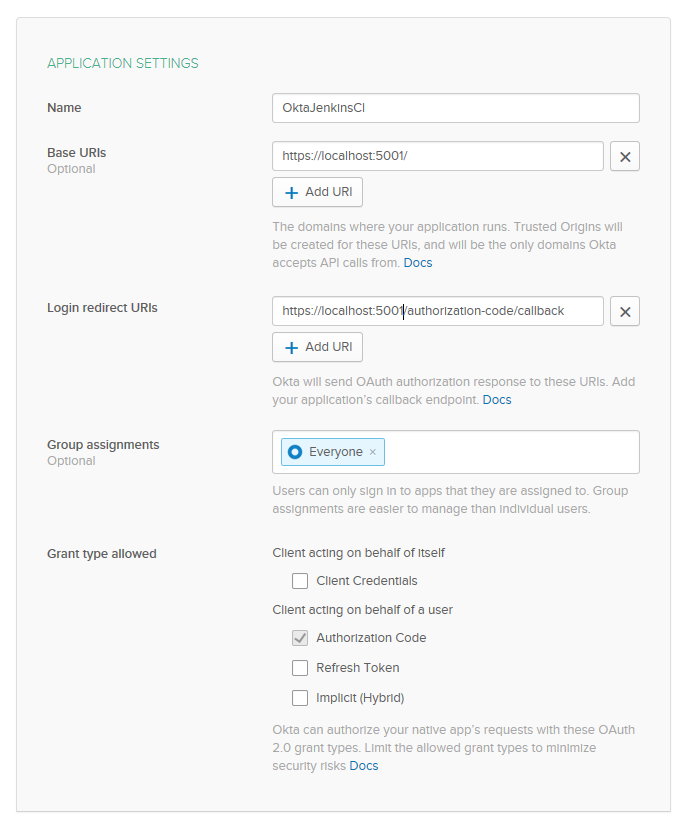
Once you’ve created the application, click Edit to change a few settings.
- Logout redirect URIs:
https://localhost:5001/signout-callback-oidc - Initiate login URI:
https://localhost:5001/authorization-code/callback

At the bottom of the page, you’ll see Client Credentials, including a ClientID and a Client secret. Take a note of these values as we’ll need them later.
Add MVC Elements to Your ASP.NET Application
So far so good, your application is now set up to authenticate users with Okta as the Identity Provider via OpenID Connect over OAuth2. However… the app doesn’t do anything yet. You’ll need to add some models, views, and controllers before the fun can begin!
In the Controllers folder, add a new controller called AccountController.cs with the following code:
using Microsoft.AspNetCore.Authentication.OpenIdConnect;
using Microsoft.AspNetCore.Mvc;
namespace OktaJenkinsCI.Controllers
{
  public class AccountController : Controller
  {
    public IActionResult Login()
    {
      if (!HttpContext.User.Identity.IsAuthenticated)
        return Challenge(OpenIdConnectDefaults.AuthenticationScheme);
      return RedirectToAction("Index", "Home");
    }
  }
}
The controller is pretty simple. It provides a Login() action that returns an HTTP Challenge() response if the user hasn’t authenticated. You determine the implementation of the challenge response via the authentication configuration that you added to Startup.cs. In this application, we’re using OpenID Connect. If the user has authenticated, then the action redirects to the Index() action on the Home controller.
So that you can see the authentication mechanism in action, make some changes to the default _Layout.cshtml file in the Views/Shared folder.
In the header navbar add:
<body>
    <nav class="navbar navbar-inverse navbar-fixed-top">
        <div class="container">
            <div class="navbar-header">
                <button type="button" class="navbar-toggle" data-toggle="collapse" data-target=".navbar-collapse">
                    <span class="sr-only">Toggle navigation</span>
                    <span class="icon-bar"></span>
                    <span class="icon-bar"></span>
                    <span class="icon-bar"></span>
                </button>
                <a asp-area="" asp-controller="Home" asp-action="Index" class="navbar-brand">OktaJenkinsCI</a>
            </div>
            <div class="navbar-collapse collapse">
                <ul class="nav navbar-nav">
                    <li><a asp-area="" asp-controller="Home" asp-action="Index">Home</a></li>
                    <li><a asp-area="" asp-controller="Home" asp-action="About">About</a></li>
                    <li><a asp-area="" asp-controller="Home" asp-action="Contact">Contact</a></li>
                </ul>
            </div>
            @*---Start of additions*@
            @if (User.Identity.IsAuthenticated)
            {
                <ul class="nav navbar-nav navbar-right">
                    <li><p class="navbar-text">Hello, @User.Identity.Name</p></li>
                </ul>
            }
            else
            {
                <ul class="nav navbar-nav navbar-right">
                    <li><a asp-controller="Account" asp-action="Login">Log in</a></li>
                </ul>
            }
            @*---End of additions*@
        </div>
    </nav>
....
This UI change will show the name of the authenticated user. If there isn’t an authenticated user, it will provide a login button that will call the Login() action that you added to the AccountController.
So now you’ve got an application that does something, but before we can run it, we’ll need some configuration information. You’ll notice that in startup.cs, in the ConfigureServices() method, we’re looking for a few configuration values:
options.ClientId = Configuration["okta:ClientId"];
options.ClientSecret = Configuration["okta:ClientSecret"];
options.Authority = Configuration["okta:Issuer"];
You could add these values to appsettings.json, but you’d be running the risk of having them committed to GitHub accidentally. There, they would be up there for all the world to see. Ay, ca-ram-ba!
Instead, you can add a separate configuration file and expressly exclude that from being committed to your git repository by editing .gitignore.
Create a new file at the root of the project called authconfig.json and add the following JSON, replacing the values with the settings from your Okta developer account:
{
   "Okta": {
       "ClientId": "<your-okta-client-id>",
       "ClientSecret": "<your-okta-client-secret>",
       "Issuer": "<your-okta-issuer>"
   }
}
Note: These are the values that you discovered earlier when configuring Okta Identity Management. Your issuer can be found by taking the URL shown in the top right corner of your Okta Dashboard page and appending /oauth2/default. For example,
https://dev-107646.okta.com/oauth2/default
Edit .gitignore to include:
/bin/**
/obj/**
authconfig.json
Type Ctrl-Alt-F7 to bring up the list of changes
Right-click on authconfig.json and select ‘Ignore this local item’
Finally, you need to tweak your code to pick up this additional config file. In Program.cs, replace the CreateWebHostBuilder() method with the code below:
        public static IWebHostBuilder CreateWebHostBuilder(string[] args) =>
            WebHost.CreateDefaultBuilder(args)
                .ConfigureAppConfiguration((context, config) =>
                {
                        config.AddJsonFile("authconfig.json");
                })
                .UseStartup<Startup>();
Now you’re good to go, and you can see the fruits of your labor using:
dotnet run
Or by pressing F5, or selecting Debug > Start Debugging in Visual Studio
Note: Debugging uses a self-signed certificate that may generate a trust warning in your browser. It’s safe to ignore this warning and continue. Alternatively, if you’re using Visual Studio, you’ll be prompted to trust the certificate. Clicking ‘Yes’ will prevent the browser warning.
If everything is working as expected, your browser will be directed to https://localhost:5001 and you’ll see a Login link in the upper right corner. Clicking that will take you to Okta to log in to your application.
Once everything is working as expected, commit your changes to source control using:
Visual Studio Code
git add -A
git commit –a -m "some commit message."
OR
Visual Studio
- Right-click on the OktaJenkinsCI project node in the Solution Explorer
- Select Source Control > Commit
- Add ‘some commit message’ to the text box and click on Commit All
Note that you haven’t pushed your changes to the remote repository yet. Before we do that, we want to hook up Jenkins.
Use Jenkins to Deploy Your Code Continuously
As mentioned earlier, continuous integration works by scanning your source control system for changes and then engaging a pipeline to incorporate those changes into your application. To make that work, you’ll need to configure Jenkins to talk to your source control system. Jenkins to talk to your source control system, you’ll need to provide credentials. Usually, this will be in the form of an SSH key, especially if you’re using GitHub, but it’s also possible to use a username and password. The process is pretty much the same regardless of the credential type:
- Go to the Jenkins admin console at
http://localhost:8080 - Select Credentials from the menu on the left
- On the context menu for the Global credential domain, select Add Credentials
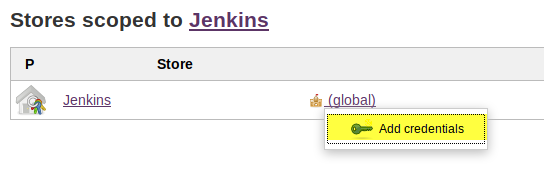
- On the Add Credentials page, select the appropriate type. Either, SSH Username with private key or Username with password.
If you’re using an SSH username, be sure to upload the private key as opposed to the public key. Example:
id_rsaas opposed toid_rsa.pub
Create a Continuous Integration Pipeline with Jenkins
With credentials setup, you’re ready to hook Jenkins up to your source code and create a new continuous integration pipeline.
- Navigate to the Jenkins admin page at
http://localhost:8080 - From the menu on the left, select New Item
- Create a Freestyle project and set the item name to
OktaJenkinsCI - Select the Source Code Management tab, then the Git radio button
- Add details of your source control repo in the
Repository URLbox. Eg. git@github.com:your-username/OktaJenkinsCI.git - From the Credentials drop-down, select the credential that you added in the previous step.
Note that when you add the Repository URL, Jenkins will try to connect with no credentials and will fail. However, when you select your credential from the drop-down list, Jenkins will try again, and the error text should disappear. If it doesn’t, check that your credential is properly configured in both Jenkins and in your source control system. So that your pipeline is triggered whenever anybody adds or edits the source code, we’ll setup Jenkins to poll every 5 minutes and build if there are any changes.
- From the ‘Build Triggers’ section, select the ‘Poll SCM’ checkbox and add
'H/5 * * * *'as the schedule.
The schedule is specified using cron-like syntax. However, the use of H/5 instead of */5 allows Jenkins to better manage the load by adding a variable to the start time. So rather than the polling occurring at 0:05, 0:010, 0:015 etc. it occurs at 0:08, 0:13, 0:18 etc. This variation prevents spikes if multiple jobs use the same schedule since the variable value will be different.
- With the Schedule set, the last thing you need to do is tell Jenkins what to do with your source code. You can do that by selecting the Build tab and clicking Add build step. Since you’re using ASP.NET Core, and Jenkins is running on your local machine, you already have everything you need to build your project. In real-life, where Jenkins is running on a separate server, you’d need to ensure that the appropriate tools had been installed on the server. So go ahead and add an ‘Execute Shell’ task with the command:
dotnet build
With that final step completed, you can click on Save, and your Continuous Integration pipeline is ready to roll.
You can test it out by pushing the code changes that you made earlier.
git push
After a few minutes, Jenkins will detect that the HEAD commit has changed in your repository and will kick off your new Continuous Integration pipeline. You can check the progress by navigating to the OktaJenkinsCI pipeline from the Jenkins admin page. Once the job has been completed, you’ll see ‘job #1’ and clicking on that will let you view the console output for the pipeline. If all is well, the console output will confirm that your code was pulled from your source control system and build successfully.
Add Continuous Integration Plugins
Your continuous Integration pipeline is pretty basic at the moment. It builds your source code, and that’s about it. So that you can run the compiled code, you’ll need to add a few things, and that’s where Jenkins plugins can help.
The first thing you’ll need is some way to deploy the code that you’ve built. In real life, you’d copy the Jenkins binaries to a web server, but for this post, we’ll simply copy to a separate folder in the local file system.
Also, you’ll remember that earlier we stored our auth configuration for our ASP.NET Core app in a separate file and excluded from source control. Without this file, your application won’t function so you’ll need some way to inject that as part of the continuous integration pipeline.
Add the plugins
- From the Jenkins Admin home page, select Manage Jenkins from the menu on the left
- Select Manage Plugins
- Select the Available tab and check the boxes next to
Artifact Deployer Plugin-inandConfig File Provider Plugin - At the bottom of the page select Install without restart
- On the progress page select Restart Jenkins ……
- After a few minutes, the plugins will be downloaded and installed and Jenkins will restart.
Setup the Auth configuration file
- From the Jenkins Admin home page, select Manage Jenkins from the menu on the left
- Select Managed Files and then select Add a new Config from the menu on the left
- Select JSON file as the type and then click Submit
- Change the default name from
JsonConfigtoOktaAuthConfig - In the Content box copy the content of your local
authconfig.jsonfile - Click Submit to save the changes.
Modify the Continuous Integration pipeline
The final step is to modify your continuous integration pipeline to make use of these new plugins. You can do that by navigating to the OktaJenkinsCI pipeline and selecting Configure from the menu on the left.
- Select the Build tab to scroll to the appropriate part of the page.
- Modify the
Execute Shelltask that you added earlier to:
dotnet publish -c Release -o published
This change will build and publish your code using the release configuration.
- Click on Add a build step. So that you can inject your auth configuration, select Provide configuration files. From the dropdown list of files select,
OktaAuthConfig. Set the Target value topublished/authconfig.json - So far, all of this work occurs with a temporary workspace in the filesystem that is managed by Jenkins. So that you can run your code, you can have Jenkins deploy it to some other permanent location. To do that you can add another build step and select Deploy the artifacts from build workspace to remote locations. Set the Artifacts to deploy to
published/and set the Remote File Location to some folder in your local filesystem.
Jenkins needs permissions to read and write to the folder so if you’re using a Linux based system,
chmod 766should do the trick.
- Click Save to commit your modified and pipeline and then, to test it all out, click on Build Now from the menu on the right. Once your pipeline completes, Jenkins will copy your compiled code to the folder that you specified above, and you’ll be able to run your application using:
dotnet OktaJenkinsCI.dll
You’ll be able to connect to the application at https://localhost:5001 and authenticate using Okta Identity Management, confirming that Jenkins has injected your auth configuration as expected.
Note: You may run into permissions problems when trying to run the application. If this happens, make sure that your user account has read, write and execute permissions for your release folder.
Continuous Integration with Jenkins and C# Summary
By working through this guide, you’ve learned how to:
- Install and configure Jenkins
- Set up Continuous Integration for an ASP.NET Core application
- Inject configuration values into an application during compilation
Continuous Integration is a simple concept that often requires complex implementation. Tools like Jenkins provide a platform for these complex implementations and, in this post, you’ve seen how to set up a simple pipeline that makes sure that changes to your code don’t prevent it from compiling. You’ve also seen how to inject consistent configuration values to ensure that the final baked deployment works consistently every time.
Using these tools and techniques means that you can reframe the definition of ‘done’ from ‘it works on my machine’ to ‘it works when the Continuous Integration pipeline completes successfully’. And by adding further checks to your pipeline, you can ensure that your application is ready to deploy after each and every commit.
Learn More About Identity Management and ASP.NET Core
To learn more about identity management and ASP.NET Core, be sure to check out more of these posts.
- Build a CRUD App with ASP.NET Core 2.2 and SQL Server
- Build a GraphQL API with ASP.NET Core
- Build a CRUD App with ASP.NET Core 2.2 and Entity Framework Core
As always, leave comments below and don’t forget to follow us on Twitter and YouTube.
Okta Developer Blog Comment Policy
We welcome relevant and respectful comments. Off-topic comments may be removed.