Configure .NET Authentication in OWIN

The Open Web Interface for .NET (OWIN) is a standard that defines the interface between a web application and a web server. Prior to this standard in .NET, there was a tight coupling between .NET applications and Internet Information Server (IIS), which led to great difficulties when trying to expand to different web application/server technologies. The introduction of OWIN has created an abstraction between application and server that completely decouples one from the other. Thanks to this the whole process is a lot easier, whether you want to use .NET applications with an alternative web server, or you want to use an alternative web application technology with IIS. This standard was an integral part of the creation of ASP.NET Core as it streamlines the dependencies required on both sides.
In this tutorial you’ll learn about the basic concepts of OWIN, and then apply this acquired knowledge in the implementation of user authentication within your very own ASP.NET web application. All you’ll need to follow along is a copy of Visual Studio.
Note: In May 2025, the Okta Integrator Free Plan replaced Okta Developer Edition Accounts, and the Okta CLI was deprecated.
We preserved this post for reference, but the instructions no longer work exactly as written. Replace the Okta CLI commands by manually configuring Okta following the instructions in our Developer Documentation.
Understand The OWIN Contract
The contract defined by OWIN for application/server communication can be found within the IAppBuilder interface and at its core is boiled down into two pieces: the environment dictionary and a function to register middleware.
The environment dictionary outlines the state of the request/response and simplifies it down to a mapping of string key to object within the Properties property. Within the domain of the .NET Framework for each HTTP request there are the following required keys:
| Key | Type | Description |
|---|---|---|
owin.RequestBody |
Stream |
The body of the request |
owin.RequestHeaders |
IDictionary<string, string[]> |
The headers of the request |
owin.RequestMethod |
string |
The HTTP request method (e.g. “Post”, “Get”) |
owin.RequestPath |
string |
The path of the request relative to the root of the application delegate |
owin.RequestPathBase |
string |
The ‘root’ part of the request path |
owin.RequestProtocol |
string |
The protocol name and version (e.g. “HTTP/1.1”) |
owin.RequestQueryString |
string |
The query string component of the request URI sans the leading “?” (e.g. “mkt=en-US&id=123”) |
owin.RequestScheme |
string |
The URI scheme (e.g. “https”) |
Fortunately, there is no need to remember these keys as all their values (plus the optional ones not listed above) are abstracted away as properties of the everpresent IOwinContext instance (think HttpContext instance but streamlined for OWIN).
The second part of the contract is to register middleware. Middleware in this sense is a module that sits in between the user sending the request and the developer’s handling of it. For example, if we had authentication and geolocation middleware components on our server it would look like the following:
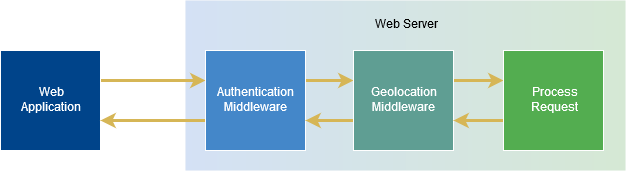
In programmatic terms we can view middleware as a Func that returns a Task object (the async equivalent of void). This function takes in the abovementioned IOwinContext instance, and what is essentially a pointer to the next function in the chain (e.g. next middleware module). With the structure in this style we can within one function process the request, invoke the next component, and then process the response. In code this would look like:
async (context, nextFunction) =>
{
    if (context.Request.Query.GetValues("mkt").Count > 1)
    {
        // There are multiple market query parameters
    }

    // Invoke following function in the pipeline
    await nextFunction.Invoke();

    if (context.Response.StatusCode != 200)
    {
        // Did not return status code 200
        // (Note owin.ResponseStatusCode is an optional field)
    }
});
Add OWIN Authentication to a .NET Framework Web Application
As mentioned before OWIN is standard for .NET Core however for the .NET Framework it requires some extra effort to get it implemented, and so for this tutorial you’ll be working with the latter. Additionally, to authenticate I’ll be using the Okta platform with the sign in page we host.
Create a New ASP.NET Project
First, create a new project in Visual Studio of type ASP.NET Web Application (.NET Framework). Name it whatever you want and on the next screen select the MVC template with No Authentication. Note: Okta also works great with Web API; if you’d like to read more on this topic there’s another great blog post about it.
Once the ASP.NET MVC project has finished setting up you’ll need to add some new NuGet packages:
Microsoft.Owin.Host.SystemWeb- This is an integral part of running the OWIN pipeline on IIS and provides the OWIN context from theHttpContext.Microsoft.Owin.Security.Cookies- This is required for cookie-based authentication.Okta.AspNet- This contains the middleware and all the functionality for authenticating users.
Once these packages and their dependencies have been installed you have an environment ready to work with. However, to make things a little easier later on, alter the port on the project URL to the standard 8080. To make this change go to your project’s properties and onto the ‘Web’ tab. On this page you should see the ‘Project Url’ text field with a value of ‘http://localhost:
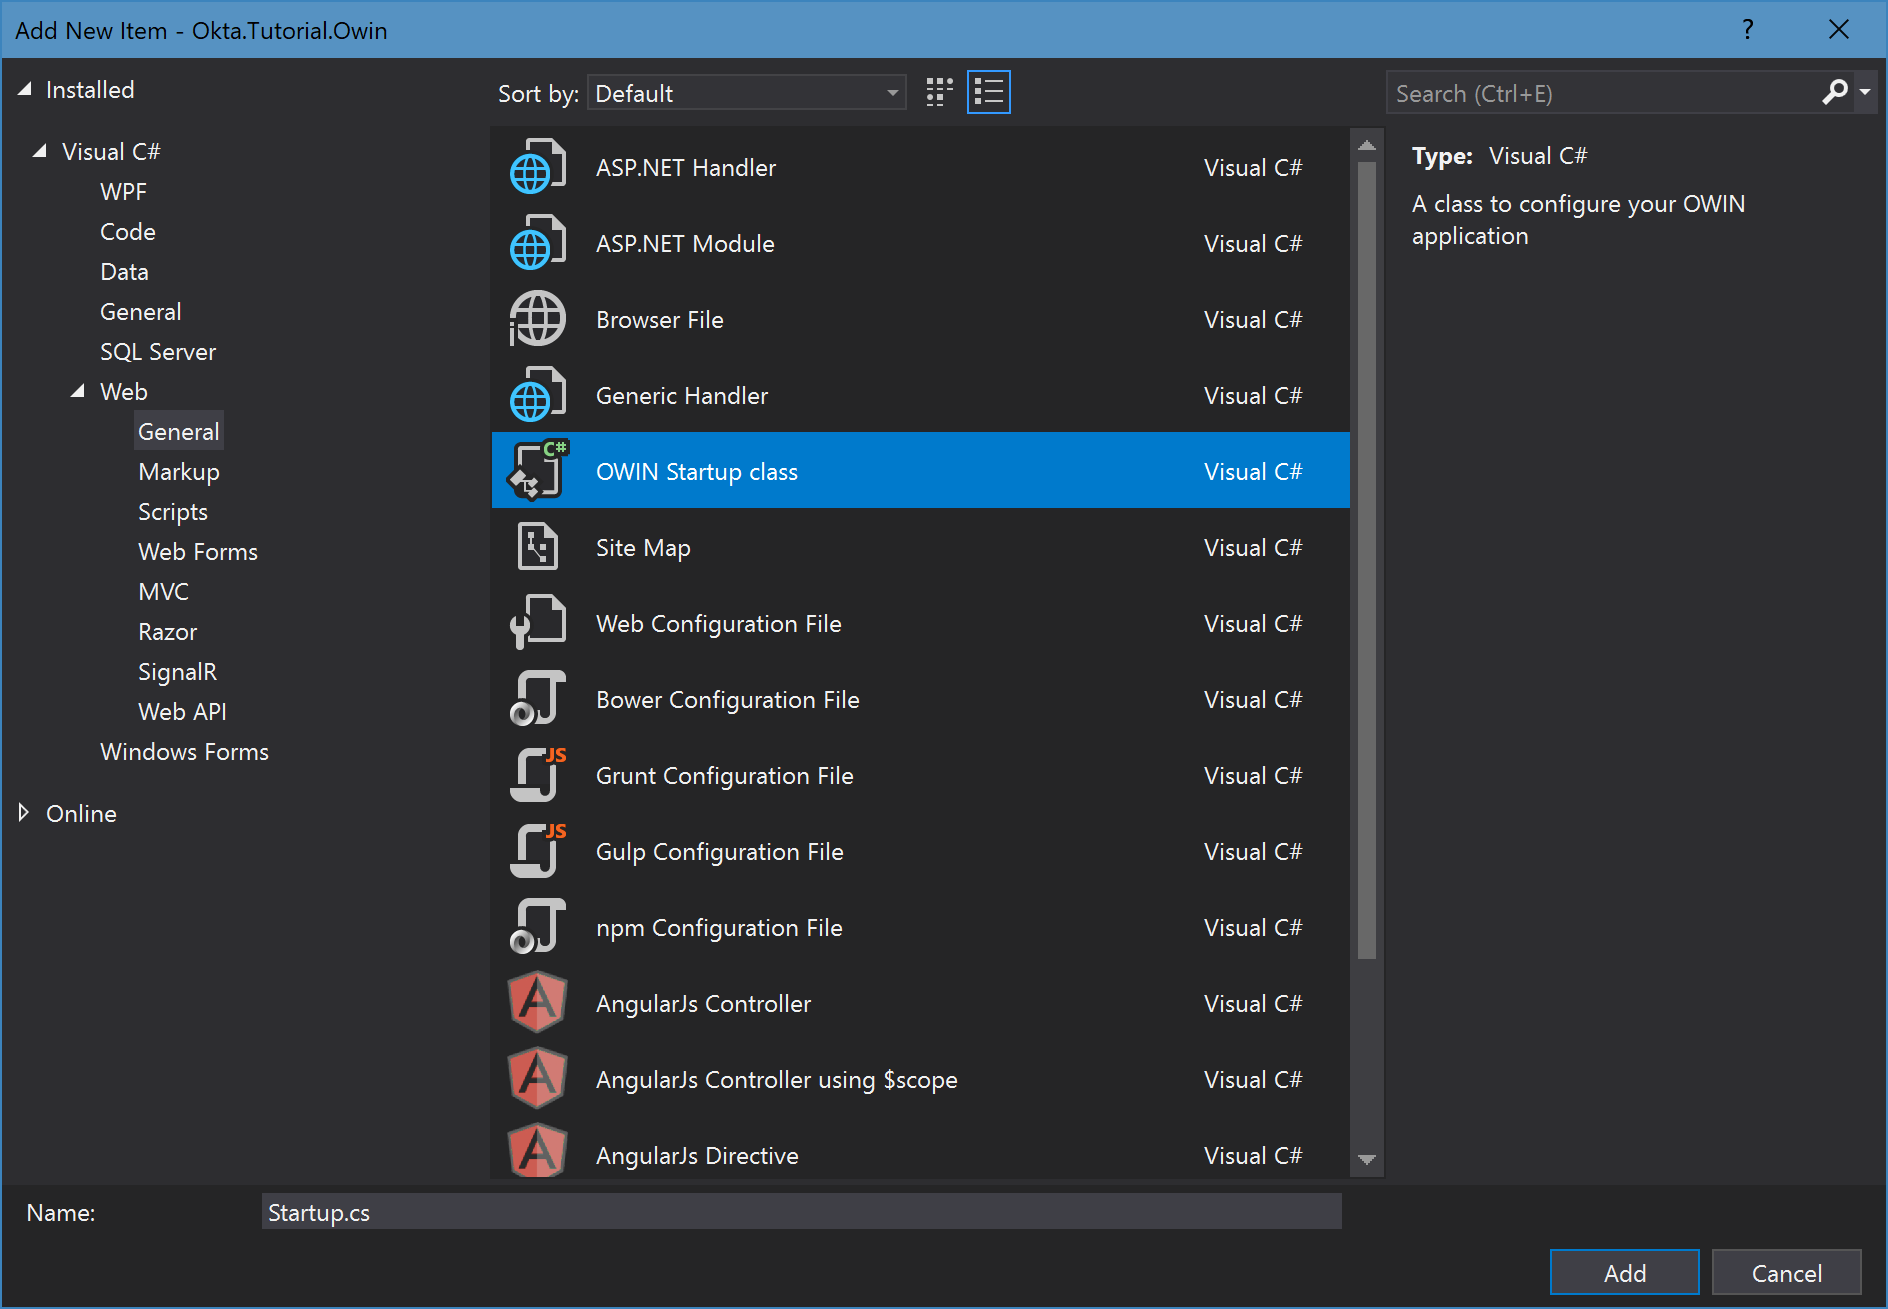
Add the OWIN Startup File
OWIN is set up by means of a Startup.cs file. This file contains by definition a Configuration() method which takes in the IAppBuilder instance (the aforementioned OWIN contract) and it’s where you declare what middleware you require. Visual Studio has a template specifically for this file that you can add by selecting the ‘New Item…’ option in the context menu. In this example, call it the standard name Startup.cs:
Once that’s completed, you’ll have a new class with the Configuration() method created for you. For this tutorial you have two objectives here: set cookie authentication as default and add the Okta middleware to handle the authentication. As they’re two separate concerns it is best to write them into two separate methods that I’ll go into more detail about after:
public void Configuration(IAppBuilder app)
{
    SetCookieAuthenticationAsDefault(app);
    AddOktaAuthenticationMiddleware(app);
}
To use cookie authentication, you need to state that as your intention plus set the default authentication type:
private void SetCookieAuthenticationAsDefault(IAppBuilder app)
{
    app.SetDefaultSignInAsAuthenticationType(CookieAuthenticationDefaults.AuthenticationType);
    app.UseCookieAuthentication(new CookieAuthenticationOptions());
}
To add the authentication middleware, Okta have made it really easy by adding an extension method specifically to the IAppBuilder instance, that you call with predefined options:
private void AddOktaAuthenticationMiddleware(IAppBuilder app)
{
    app.UseOktaMvc(new OktaMvcOptions()
    {
        OktaDomain = ConfigurationManager.AppSettings["okta:OktaDomain"],
        ClientId = ConfigurationManager.AppSettings["okta:ClientId"],
        ClientSecret = ConfigurationManager.AppSettings["okta:ClientSecret"],
        RedirectUri = ConfigurationManager.AppSettings["okta:RedirectUri"],
        PostLogoutRedirectUri = ConfigurationManager.AppSettings["okta:PostLogoutRedirectUri"],
        GetClaimsFromUserInfoEndpoint = true,
        Scope = new List<string> { "openid", "profile", "email" },
    });
}
Note: This uses the System.Configuration ConfigurationManager so you can express these variables with ease as part of the web.config file. For now, don’t worry about their values, I’ll get into that later once you’ve set up your Okta account.
Startup File Recognition
As the Startup.cs file doesn’t need to follow a set naming convention, nor does it implement a specific interface, a common question is how does the application know what file to use? The answer is one of three possible options:
- Default namespace and naming convention
The application will check under the default namespace for a
Startup.csfile. This option has the lowest precedence. - OwinStartup assembly attribute If you’ve been following along with the example, you may have noticed that as part of the template-created Startup.cs file there is an attribute defined at the top:
[assembly: OwinStartup(typeof(Okta.Tutorial.Owin.Startup))]
This in turn tells the application where to find the Startup method.
- Adding a new appSetting ‘appStartup’ to the Configuration file
Alternatively, you could outline the Startup file you wish to use within the
web.configfile’sappSettings. This option has the highest precedence and will override any of the first 2 options:
<add key="owin:appStartup" value="Okta.Tutorial.Owin.Startup" />
If you’d like to read more about this and further examples, there’s a brilliant write up on Microsoft Docs.
Set Up Authentication with Okta
Now it’s time to set up the application in our Okta account. If you’ve not got one yet, it’s really easy to create a new forever-free developer account.
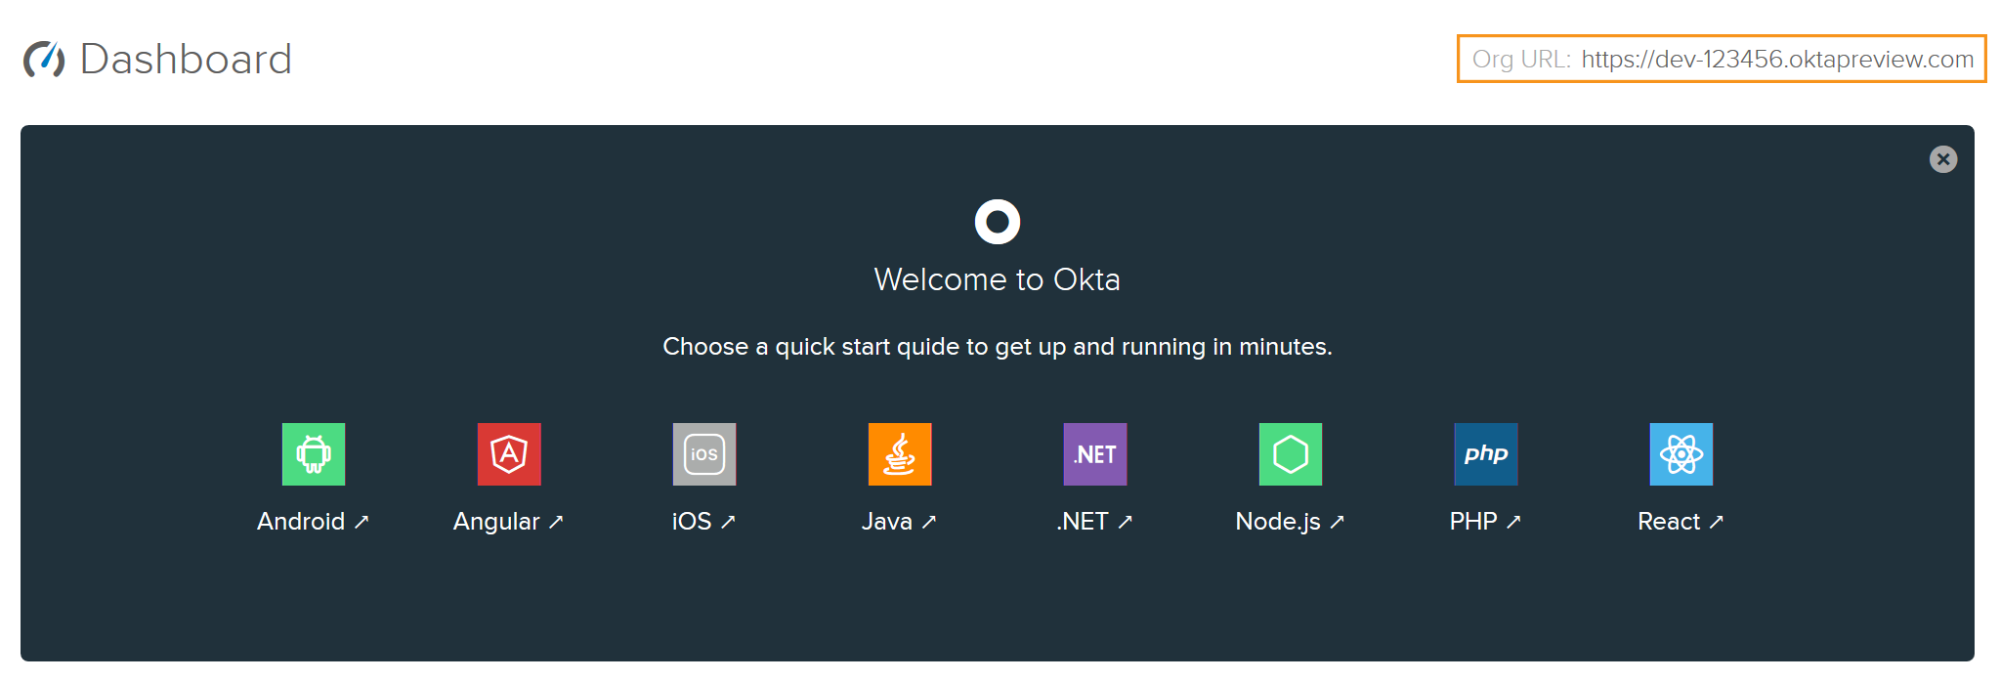
Once that’s complete and you’ve logged in to the developer dashboard, take a note of the Org URL as we’ll need that later:
Create an Okta Application
From the dashboard go to the ‘Applications’ tab and from there ‘Add Application’. You’re creating a .NET web application so it’s best to pick the ‘Web’ platform template.
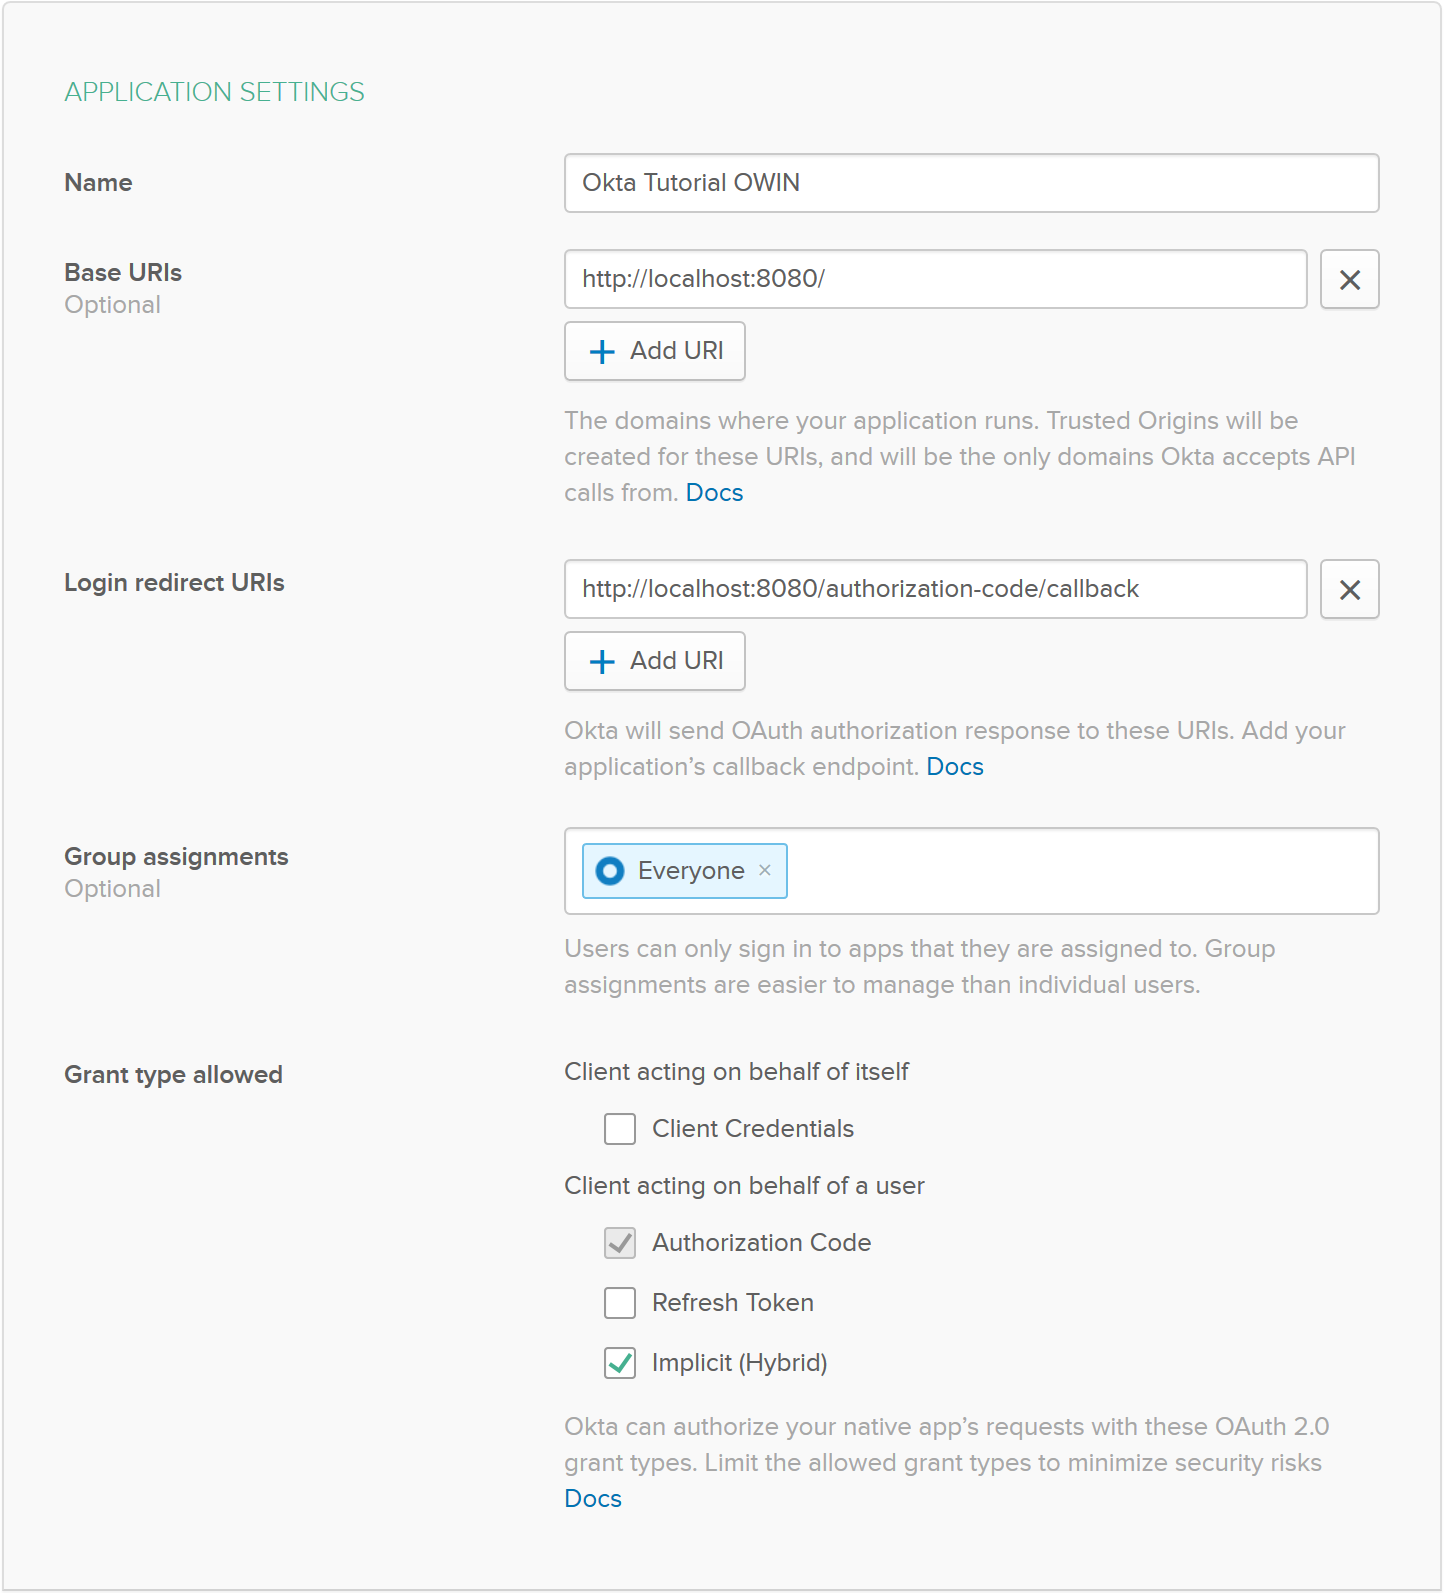
From this page add a name for your application and check the ‘Implicit (Hybrid)’ Grant type allowed box. You might notice that the URIs are defaulted to port 8080; the value you set your project URL to. If you didn’t make that change prior, you’ll want to update the ports here to your port value. Either way when complete the settings will look like this:
Save it and you’ll be presented with the application’s dashboard. From here you’ll need to manually edit a couple extra settings (the edit button is in the top right of the pane):
- Set Logout redirect URIs to
http://localhost:8080/Authentication/PostSignOut. In doing this you whitelist your post signing out method, so you are able to logout and return to the home page. This URI is constructed from your base URI plus the name of the Controller you will use for handling authentication (AuthenticationController) and the name of the post sign out method within it (PostSignOut()). - Set the Initiate login URI to the same value as your Login redirect URIs value.
These changes will look like the following:

Take a note of the Login redirect URI, Logout redirect URI, Client ID and Client secret from this page, as they’re all about to come in handy.
Define Application Variables
As previously written when creating the Startup.cs file, you have 5 variables that are due to come from the configuration file. These values are the Org URL, Login redirect URI, Logout redirect URI, Client ID and Client secret that you gained from creating your application in Okta. Now it’s just a case of adding these values to the web.config file:
<!-- Client ID -->
<add key="okta:ClientId" value="{yourClientId}" />
<!-- Client Secret -->
<add key="okta:ClientSecret" value="{yourClientSecret}" />
<!-- Org URL -->
<add key="okta:OktaDomain" value="https://{yourOktaDomain}" />
<!-- Login redirect URI -->
<add key="okta:RedirectUri" value="http://localhost:8080/authorization-code/callback" />
<!-- Logout redirect URI -->
<add key="okta:PostLogoutRedirectUri" value="http://localhost:8080/Authentication/PostSignOut" />
Handle Authentication Methods in the Controller
To take care of the authentication functionality, you need to create a new controller AuthenticationController with three methods to handle signing in, signing out, and the post sign out redirect.
public ActionResult SignIn()
{
    if (!HttpContext.User.Identity.IsAuthenticated)
    {
        HttpContext.GetOwinContext().Authentication.Challenge(
        OktaDefaults.MvcAuthenticationType);
        return new HttpUnauthorizedResult();
    }

    return RedirectToAction("Index", "Home");
}
A convenient part of OWIN is that it automatically combines into the Identity component of HttpContext, and so you can use the IsAuthenticated method to define whether the user is already signed in or not. If not, you get the OWIN context and ask the Okta middleware to challenge the user for their authentication.
[HttpPost]
public ActionResult SignOut()
{
    if (HttpContext.User.Identity.IsAuthenticated)
    {
        HttpContext.GetOwinContext().Authentication.SignOut(
            CookieAuthenticationDefaults.AuthenticationType,
            OktaDefaults.MvcAuthenticationType);
    }

    return RedirectToAction("Index", "Home");
}
The process of signing out is fairly straight forward by checking that the user is signed in currently and then asking the Okta middleware to sign them out. Note this will only ever be done by HTTP Post so the method has been tagged with the appropriate attribute.
public ActionResult PostSignOut()
{
    return RedirectToAction("Index", "Home");
}
Once the user is signed out, the Okta middleware needs to redirect them somewhere, and that is to the homepage.
Update Your View with Authentication Capabilities
Now that the Controller is complete, it’s time to update the View to enable this functionality. The goal is a very simple one to add a Sign In/Sign Out button in the top right-hand corner of your template web page, and if the user is signed in, the application should display the user’s name. To implement this, you need to make edits to the _Layout.cshtml file (found under the Views/Shared directory). This code will be going in the div tag of class navbar-collapse collapse, under the pre-existing unordered list (ul) tag.
@if (Context.User.Identity.IsAuthenticated)
{
<ul class="nav navbar-nav navbar-right">
    <li>
        <p class="navbar-text">@Context.User.Identity.Name</p>
    </li>
    <li>
        <a onclick="document.getElementById('signout_form').submit();" style="cursor: pointer;">Sign Out</a>
    </li>
</ul>
<form action="/Authentication/SignOut" method="post" id="signout_form"></form>
}
else
{
<ul class="nav navbar-nav navbar-right">
    <li>@Html.ActionLink("Sign In", "SignIn", "Authentication")</li>
</ul>
}
Breaking down this code snippet, the if statement asks whether the user is signed in or not. Should the user be authenticated, add a new unordered list to the right-most of the navbar with two items: the user’s name, and a link to sign out. This Sign Out link will Post the form declared below itself (notably with the action as /<controller name>/<sign out method name>) to initiate the sign out process. If the user is not authenticated currently, then display a button with label “Sign In”, that runs the SignIn method within the AuthenticationController.
Run Your ASP.NET Web Application
Upon running the web application, you should be presented with a nice new “Sign In” button in the top right corner:
Upon clicking to sign in, and entering your user’s credentials into the Okta sign-in page, you should be redirected back to your application successfully logged in:

Learn More About OWIN, ASP.NET Core, and Secure Authentication
With this tutorial you’ve managed to set up a simple ASP.NET MVC Web Application complete with fully functional user authentication thanks to the Okta service. It was quite a quick introduction so don’t worry if you’re having troubles comprehending it all; with practice will come mastery.
To see the code from this post in full head over to our GitHub page.
If you’re interested in finding out more about working with other ASP.NET frameworks and applications I’d thoroughly encourage you to look into the following resources:
- Add Login to your ASP.NET Core application
- Deploy your ASP.NET Core application to Azure
- Secure Your ASP.NET Web Forms Application with OpenID Connect and Okta
As always if you have any questions, comments, or concerns about this post feel free to leave a comment below. For other great content from the Okta Dev Team, follow us on Twitter @OktaDev, Facebook, LinkedIn and YouTube!
Okta Developer Blog Comment Policy
We welcome relevant and respectful comments. Off-topic comments may be removed.