Build a Basic CRUD App with Laravel and React

Laravel is an amazing web application framework which regularly tops the lists of best PHP frameworks available today. This is partly because its based on PHP which runs 80% of the web today and the learning curve is relatively small (despite it being packed with advanced features, you can understand the basic concepts easily). However, the real reason for its popularity is its robust ecosystem and abundance of high-quality learning resources available for free (like this blog post!).
Laravel is configured with Vue and build tools (based on webpack) out of the box so you can set up a development environment for building dynamic, single-page applications with little hassle. You are not limited to Vue though - you can also use Laravel as a backend that powers a frontend built in your preferred framework. Today I’ll show you how you can build a Laravel API and connect it to a React frontend. We’ll use Okta for user authentication and authorization which will allow us to implement a top-notch security system in (almost) no time at all.
Before you start, you’ll need to set up a development environment with PHP 7 and Node.js 8+/npm. You will also need an Okta developer account.
Note: In May 2025, the Okta Integrator Free Plan replaced Okta Developer Edition Accounts, and the Okta CLI was deprecated.
We preserved this post for reference, but the instructions no longer work exactly as written. Replace the Okta CLI commands by manually configuring Okta following the instructions in our Developer Documentation.
Add Okta for Authentication
Well, we might be biased, but we think Okta makes identity management easier, more secure, and more scalable than what you’re used to. Okta is an API service that allows you to create, edit, and securely store user accounts and user account data, and connect them with one or more applications.
Start Your Laravel + React CRUD Application
The application we are going to build is a simple game interface for trivia quizzes. It allows you to register the players, generate new questions from a free API and mark the answers of the players as either right or wrong.
Here’s what the finished app will look like:
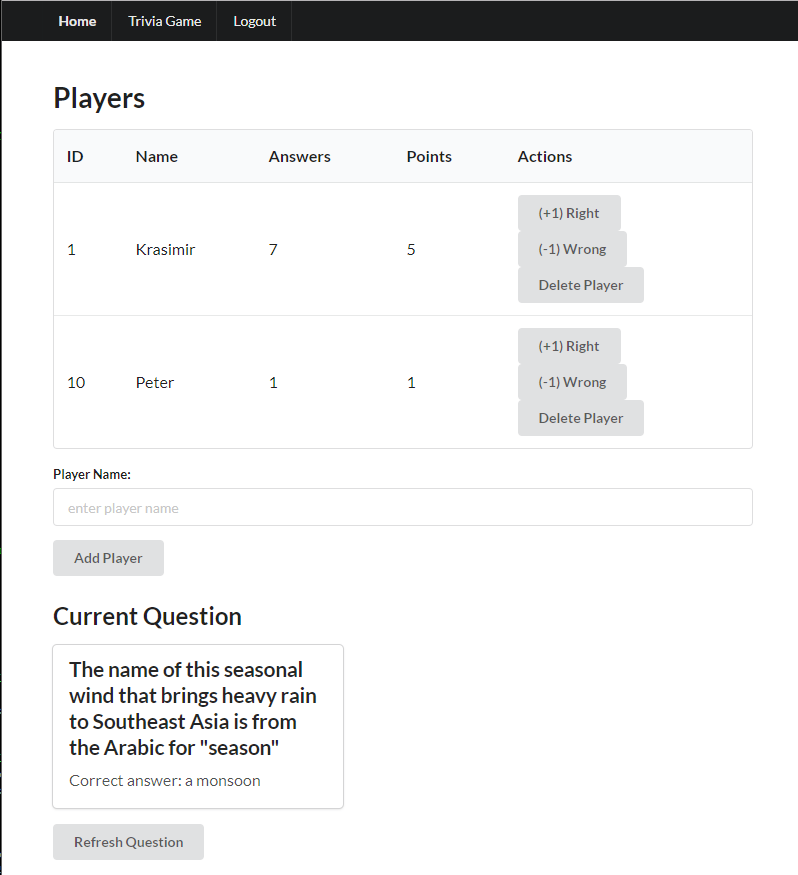
Here’s how to play:
- One of the players assumes the role of host and doesn’t participate in the rankings
- The host reads the question to the players
- The players ‘race’ to answer the question
- If the answer is correct, the player gets +1 point. If the answer is wrong, the player gets -1 point
- When the question is answered correctly, the host can hit ‘Refresh Question’ to load the next question
Set Up Your Okta Dev Account
Before you begin, you’ll need a free Okta developer account. Install the Okta CLI and run okta register to sign up for a new account. If you already have an account, run okta login.
Then, run okta apps create. Select the default app name, or change it as you see fit.
Choose Single-Page App and press Enter.
Use http://localhost:3000/callback for the Redirect URI and accept the default Logout Redirect URI of http://localhost:3000.
What does the Okta CLI do?
The Okta CLI will create an OIDC Single-Page App in your Okta Org. It will add the redirect URIs you specified and grant access to the Everyone group. It will also add a trusted origin for http://localhost:3000. You will see output like the following when it’s finished:
Okta application configuration:
Issuer:    https://dev-133337.okta.com/oauth2/default
Client ID: 0oab8eb55Kb9jdMIr5d6
NOTE: You can also use the Okta Admin Console to create your app. See Create a React App for more information.
Set Up Laravel
Install the laravel command globally on your system through composer. Then create a new Laravel project, navigate to it and start the development PHP server:
composer create-project laravel/laravel="5.6.*" trivia-web-service
cd trivia-web-service
php artisan serve
Now create a MySQL database and user for your app (of course, if you prefer a different database engine like PostgreSQL, you can use it instead):
mysql -uroot -p
CREATE DATABASE trivia CHARACTER SET utf8mb4 COLLATE utf8mb4_unicode_ci;
CREATE USER 'trivia'@'localhost' identified by 'trivia';
GRANT ALL on trivia.* to 'trivia'@'localhost';
quit
The configuration variables are stored in the .env file in the main project directory. Let’s put your database credentials there:
.env
DB_DATABASE=trivia
DB_USERNAME=trivia
DB_PASSWORD=trivia
Note: You’ll need to restart the php artisan serve command after you’ve made changes to the .env file.
Create a Laravel API
Our project will have a single entity (Player). Let’s create a model and a migration for it:
php artisan make:model Player -m
Model created successfully.
Created Migration: 2018_11_28_094351_create_players_table
(the -m option is short for --migration)
Edit the migration and put the code that creates our database table in the up() method:
database/migrations/2018_11_28_094351_create_players_table.php
public function up()
{
    Schema::create('players', function (Blueprint $table) {
        $table->increments('id');
        $table->string('name');
        $table->integer('answers')->default(0);
        $table->integer('points')->default(0);
        $table->timestamps();
    });
}
Run the migration to apply the changes to our database:
php artisan migrate
We need to define the $fillable attribute of our model so we can tell Laravel which fields can be mass-assigned in create() and update() operations on the model:
app/Player.php
class Player extends Model
{
    protected $fillable = ['name', 'answers', 'points'];
}
We also need to create two API resources (this is a relatively new feature in Laravel, introduced in 5.6, which allows us to deal with the JSON representation of our objects more efficiently). The resources we need are: Player (dealing with an individual player) and PlayerCollection (dealing with a collection of players).
php artisan make:resource Player
php artisan make:resource PlayerCollection
Modify the toArray() functions of the resources:
app/Http/Resources/Player.php
public function toArray($request)
{
    return [
        'id'         => $this->id,
        'name'       => $this->name,
        'answers'    => (int) $this->answers,
        'points'     => (int) $this->points,
        'created_at' => $this->created_at,
        'updated_at' => $this->updated_at,
    ];
}
app/Http/Resources/PlayerCollection.php
public function toArray($request)
{
    return [
        'data' => $this->collection
    ];
}
We can now create the routes and controller for our REST API.
php artisan make:controller PlayerController
routes/api.php
Route::get('/players', 'PlayerController@index');
Route::get('/players/{id}', 'PlayerController@show');
Route::post('/players', 'PlayerController@store');
Route::post('/players/{id}/answers', 'PlayerController@answer');
Route::delete('/players/{id}', 'PlayerController@delete');
Route::delete('/players/{id}/answers', 'PlayerController@resetAnswers');
app/Http/Controllers/PlayerController.php
...
use App\Player;
use App\Http\Resources\Player as PlayerResource;
use App\Http\Resources\PlayerCollection;
...

class PlayerController extends Controller
{
    public function index()
    {
        return new PlayerCollection(Player::all());
    }

    public function show($id)
    {
        return new PlayerResource(Player::findOrFail($id));
    }

    public function store(Request $request)
    {
        $request->validate([
            'name' => 'required|max:255',
        ]);

        $player = Player::create($request->all());

        return (new PlayerResource($player))
                ->response()
                ->setStatusCode(201);
    }

    public function answer($id, Request $request)
    {
        $request->merge(['correct' => (bool) json_decode($request->get('correct'))]);
        $request->validate([
            'correct' => 'required|boolean'
        ]);

        $player = Player::findOrFail($id);
        $player->answers++;
        $player->points = ($request->get('correct')
                           ? $player->points + 1
                           : $player->points - 1);
        $player->save();

        return new PlayerResource($player);
    }

    public function delete($id)
    {
        $player = Player::findOrFail($id);
        $player->delete();

        return response()->json(null, 204);
    }

    public function resetAnswers($id)
    {
        $player = Player::findOrFail($id);
        $player->answers = 0;
        $player->points = 0;

        return new PlayerResource($player);
    }
}
The API supports methods for retrieving all players or a specific player, adding/deleting players, marking answers as right/wrong and resetting the player’s score. There’s validation of the requests and the code generates JSON responses with the appropriate status codes in a rather modest amount of code.
We also need to enable CORS so we can access our API from the frontend application:
composer require fruitcake/laravel-cors
app/Http/Kernel.php
protected $middleware = [
        ...
        \Fruitcake\Cors\HandleCors::class,
];
Publish the CORS library config:
php artisan vendor:publish --tag="cors"
Then edit the config file created:
config/cors.php
  ...
  'paths' => ['api/*'],
  ...
You can add some placeholder data to the database or use the Faker library to automate the process of generating test data. Once you have some data, you can access these URLs:
- http://127.0.0.1:8000/api/players
- http://127.0.0.1:8000/api/players/1
If you also want to test the POST/PUT/DELETE requests (for example with Postman), make sure to set the following header on each request, so the validation errors will be returned in JSON format.
Accept: "application/json"
Install React and Set Up the React Frontend
We’ll use react-create-app (installed globally) to create our application. We will also install all the dependencies we will need in advance (React Router, Semantic UI React, Okta React) and run the development server:
npm install --global create-react-app
npx create-react-app trivia-web-client-react
cd trivia-web-client-react
yarn add react-router-dom@5.2.0 semantic-ui-react@2.0.3
yarn add @okta/okta-react@4.1.0 @okta/okta-auth-js@4.8.0
yarn start
The default React application should now load on http://localhost:3000.
Add Authentication and Basic Routing to React
We will start with the most basic React application possible. Let’s delete everything except the index.js and App.js files from the /src folder, and change their contents like this:
src/index.js
import React from 'react';
import ReactDOM from 'react-dom';
import App from './App';

ReactDOM.render(<App />, document.getElementById('root'));
src/App.js
import React, { Component } from 'react';

class App extends Component {
  render() {
    return (
      <div>
        App
      </div>
    );
  }
}

export default App;
We’ll create a Semantic UI navbar and a Router with two basic routes: Home (not secure) and Trivia Game (secure). Then we’ll integrate the Okta authentication and implement the Login/Logout buttons. We’ll follow the Okta Authentication Quick Start Guide for React.
public/index.html
Add:
<link rel="stylesheet" href="//cdnjs.cloudflare.com/ajax/libs/semantic-ui/2.3.3/semantic.min.css"></link>
src/Home.js
import React, { Component } from 'react';

class Home extends Component {
    render() {
        return <div>Home page</div>
    }
}

export default Home
src/Trivia.js
import React, { Component } from 'react';

class Trivia extends Component {
  render() {
    return <div>Trivia Game page</div>
  }
}

export default Trivia
src/Navbar.js
import React, { Component } from 'react';
import { withOktaAuth } from '@okta/okta-react';

import { Container, Menu } from 'semantic-ui-react';

export default withOktaAuth(class Navbar extends Component {
  constructor(props) {
    super(props);
    this.state = { authenticated: null };
    this.checkAuthentication = this.checkAuthentication.bind(this);
    this.login = this.login.bind(this);
    this.logout = this.logout.bind(this);
  }

  async componentDidMount() {
    this.checkAuthentication();
  }

  async componentDidUpdate() {
    this.checkAuthentication();
  }

  async login() {
    this.props.oktaAuth.signInWithRedirect();
  }

  async logout() {
    this.props.oktaAuth.signOut('/');
  }

  async checkAuthentication() {
    const authenticated = this.props.authState.isAuthenticated;
    if (authenticated !== this.state.authenticated) {
      this.setState({ authenticated });
    }
  }

  render() {
    return (
      <div>
        <Menu fixed="top" inverted>
          <Container>
            <Menu.Item as="a" header href="/">
              Home
            </Menu.Item>
            {this.state.authenticated === true && <Menu.Item id="trivia-button" as="a" href="/trivia">Trivia Game</Menu.Item>}
            {this.state.authenticated === true && <Menu.Item id="logout-button" as="a" onClick={this.logout}>Logout</Menu.Item>}
            {this.state.authenticated === false && <Menu.Item as="a" onClick={this.login}>Login</Menu.Item>}
          </Container>
        </Menu>
      </div>
    );
  }
});
src/App.js
import React, { Component } from 'react';
import { BrowserRouter as Router, Route } from 'react-router-dom';
import { Container } from 'semantic-ui-react';

import { Security, SecureRoute, LoginCallback } from '@okta/okta-react';
import { OktaAuth } from '@okta/okta-auth-js';

import Navbar from './Navbar';
import Home from './Home'
import Trivia from './Trivia'

class App extends Component {
  constructor(props) {
    super(props);
    this.oktaAuth = new OktaAuth({
      issuer: 'https://{yourOktaDomain}/oauth2/default',
      clientId: '{yourClientId}',
      redirectUri: window.location.origin + '/callback'
    });
  }

  render() {
    return (
        <Router>
            <Security oktaAuth={this.oktaAuth}>
            <Navbar />
            <Container text style={{ marginTop: '7em' }}>
                <Route path="/" exact component={Home} />
                <Route path="/callback" component={LoginCallback} />
                <SecureRoute path="/trivia" component={Trivia} />
            </Container>
        </Security>
      </Router>
    );
  }
}

export default App
Don’t forget to replace the config values for issuer and client_id with your own!
The app now contains a navbar with placeholder pages for Home, Trivia (only available when logged in), Login or Logout button (depending on the login state) and the login/logout actions work through Okta. We are ready to add the business logic of the application and connect it to the backend API.
Display Your Players List Using React
We will display the list of players in a table on the Trivia page. We’ll get the list from the API and add a ‘Loading…’ message until the API request completes.
We’ll create a new config.js file and define our base API URL there:
src/config.js
export const API_BASE_URL = 'http://localhost:8000/api';
We can now modify our Trivia.js component so that it looks like the below:
import React, { Component } from 'react';
import { Header, Message, Table } from 'semantic-ui-react';
import { withOktaAuth } from '@okta/okta-react';

import { API_BASE_URL } from './config'

export default withOktaAuth(class Trivia extends Component {

    constructor(props) {
        super(props);
        this.state = {
            players: null,
            isLoading: null
        };
    }

    componentDidMount() {
        this.getPlayers();
    }

    async getPlayers() {
        if (! this.state.players) {
            try {
                this.setState({ isLoading: true });
                const accessToken = this.props.authState.accessToken;
                const response = await fetch(API_BASE_URL + '/players', {
                    headers: {
                        Authorization: `Bearer ${accessToken}`,
                    },
                });
                const playersList = await response.json();
                this.setState({ players: playersList.data, isLoading: false});
            } catch (err) {
                this.setState({ isLoading: false });
                console.error(err);
            }
        }
    }

    render() {
        return (
            <div>
                <Header as="h1">Players</Header>
                {this.state.isLoading && <Message info header="Loading players..." />}
                {this.state.players &&
                    <div>
                        <Table>
                            <thead>
                                <tr>
                                    <th>ID</th>
                                    <th>Name</th>
                                    <th>Answers</th>
                                    <th>Points</th>
                                    <th>Actions</th>
                                </tr>
                            </thead>
                            <tbody>
                            {this.state.players.map(
                                    player =>
                                        <tr id={player.id} key={player.id}>
                                            <td>{player.id}</td>
                                            <td>{player.name}</td>
                                            <td>{player.answers}</td>
                                            <td>{player.points}</td>
                                            <td>
                                                Action buttons placeholder
                                            </td>
                                        </tr>
                            )}
                            </tbody>
                        </Table>
                    </div>
                }
            </div>
        );
    }

});
Add Authentication to Your Laravel API
We need to secure our backend API so it uses the Okta token to allow only authorized requests. We need to install the JWT Verifier package and add a custom middleware for API authentication:
composer require okta/jwt-verifier:"^0.2" spomky-labs/jose:"^7.1" guzzlehttp/psr7:"^1.4"
php artisan make:middleware AuthenticateWithOkta
app/Http/Middleware/AuthenticateWithOkta.php
<?php
namespace App\Http\Middleware;

use Closure;

class AuthenticateWithOkta
{
    /**
     * Handle an incoming request.
     *
     * @param  \Illuminate\Http\Request  $request
     * @param  \Closure  $next
     * @return mixed
     */
    public function handle($request, Closure $next)
    {
        if ($this->isAuthorized($request)) {
            return $next($request);
        } else {
            return response('Unauthorized.', 401);
        }
    }

    public function isAuthorized($request)
    {
        if (! $request->header('Authorization')) {
            return false;
        }

        $authType = null;
        $authData = null;

        // Extract the auth type and the data from the Authorization header.
        @list($authType, $authData) = explode(" ", $request->header('Authorization'), 2);

        // If the Authorization Header is not a bearer type, return a 401.
        if ($authType != 'Bearer') {
            return false;
        }

        // Attempt authorization with the provided token
        try {

            // Setup the JWT Verifier
            $jwtVerifier = (new \Okta\JwtVerifier\JwtVerifierBuilder())
                            ->setAdaptor(new \Okta\JwtVerifier\Adaptors\SpomkyLabsJose())
                            ->setAudience('api://default')
                            ->setClientId('{YOUR_CLIENT_ID}')
                            ->setIssuer('{YOUR_ISSUER_URL}')
                            ->build();

            // Verify the JWT from the Authorization Header.
            $jwt = $jwtVerifier->verify($authData);
        } catch (\Exception $e) {

            // We encountered an error, return a 401.
            return false;
        }

        return true;
    }

}
app/Http/Kernel.php
    protected $middlewareGroups = [
        'web' => [
            ...
        ],

        'api' => [
            ...
            \App\Http\Middleware\AuthenticateWithOkta::class,
        ],
    ];
Don’t forget to replace the client ID and issuer URL with your own! I also recommend to extract these variables into the .env file (they are not secrets and they are visible in the frontend application so it’s not a security concern to keep them in the repo, but it’s not convenient if you have multiple environments).
If you did everything correctly, http://localhost:8000/api/players should now show you an ‘Unauthorized.’ message but loading the list of players in the React frontend should work fine (when you are logged in).
Create a New Player Component in React
We need a new React component for the Add Player form that we will add below the table on the Trivia page. First, we will modify Trivia.js to include the form and we will add a new method to updates the list of players when a new player is added:
src/Trivia.js
import PlayerForm from './PlayerForm';

(replace the constructor method)
    constructor(props) {
        super(props);
        this.state = {
            players: null,
            isLoading: null
        };
        this.onAddition = this.onAddition.bind(this);
    }

(add a new method)
    onAddition(player) {
        this.setState({
            players: [...this.state.players, player]
        })
    }
(below the closing </Table> tag in the render() method):
<PlayerForm onAddition={this.onAddition} />
We also need to create a new PlayerForm component:
src/PlayerForm.js
import React, { Component } from 'react';
import { Button, Form, Message } from 'semantic-ui-react'
import { withOktaAuth } from '@okta/okta-react';

import { API_BASE_URL } from './config'

export default withOktaAuth(class PlayerForm extends Component {

    constructor (props) {
        super(props);
        this.state = {
            name: '',
            errorMessage: '',
            error: false,
            isLoading: false
        }
        this.handleChange = this.handleChange.bind(this);
        this.onSubmit = this.onSubmit.bind(this);
    }

    handleChange(e) {
        this.setState({
            name: e.target.value
        })
    }

    async onSubmit(e) {
        e.preventDefault();
        this.setState({
            isLoading: true,
            error: false,
            errorMessage: ''
        });

        const accessToken = this.props.authState.accessToken;
        const response = await fetch(API_BASE_URL + '/players', {
            method: 'POST',
            headers: {
                'Content-Type':'application/json',
                Authorization: `Bearer ${accessToken}`,
                Accept: 'application/json'
            },
            body: JSON.stringify({
                "name": this.state.name
            })
        });
        const player = await response.json();

        if (player.errors) {
            this.setState({
                isLoading: false,
                error: true,
                errorMessage: player.errors
            });
        } else {
            this.setState({
                name: '',
                isLoading: false,
                error: false,
                errorMessage: ''
            });
            this.props.onAddition(player.data);
        }
    }

    render() {
        return (
            <Form error={this.state.error} onSubmit={this.onSubmit}>
                <Form.Field error={this.state.error}>
                    <label>Player Name:</label>
                    <input placeholder='enter player name' value={this.state.name} onChange={this.handleChange}/>
                { this.state.error &&
                <Message
                    error
                    header='Error creating player'
                    content={this.state.errorMessage}
                />
                }
                </Form.Field>
                <Button type='submit' loading={this.state.isLoading}>Add Player</Button>
            </Form>
        )
    }
});
We can add more players to our game now using the form we just created.
Add a Delete Player Button to React
The next step is to implement the “Delete Player” button. We’ll create a new component for the button and pass the player ID as a property.
src/Trivia.js
import DeletePlayerButton from './DeletePlayerButton';

    constructor(props) {
        super(props);
        this.state = {
            players: null,
            isLoading: null
        };
        this.onAddition = this.onAddition.bind(this);
        this.onDelete = this.onDelete.bind(this);
    }

   onDelete(id) {
        let players = this.state.players;
        let index = players.findIndex(player => player.id === id)
        players.splice(index, 1)
        this.setState({
            players: players
        })
    }
Replacing the action buttons placeholder text in the table inside the render() method:
<DeletePlayerButton onDelete={this.onDelete} playerId={player.id} />
src/DeletePlayerButton.js
import React, { Component } from 'react';
import { Form, Button } from 'semantic-ui-react'
import { withOktaAuth } from '@okta/okta-react';

import { API_BASE_URL } from './config'

export default withOktaAuth(class DeletePlayerButton extends Component {

    constructor (props) {
        super(props);
        this.state = {
            id: props.playerId,
            isUpdating: false
        }
        this.onSubmit = this.onSubmit.bind(this);
    }

    async onSubmit(e) {
        e.preventDefault();
        this.setState({
            isUpdating: true
        });

        const accessToken = this.props.authState.accessToken;
        const response = await fetch(API_BASE_URL + '/players/' + this.state.id, {
            method: 'DELETE',
            headers: {
                'Content-Type':'application/json',
                Authorization: `Bearer ${accessToken}`,
                Accept: 'application/json'
            }
        });

        await response;
        await this.setState({
            isUpdating: false
        });
        this.props.onDelete(this.state.id);
    }

    render() {
        return (
            <Form onSubmit={this.onSubmit}>
                <Button type='submit' loading={this.state.isUpdating}>Delete Player</Button>
            </Form>
        )
    }
});
Add the Trivia Service to React
We’ll use a public API for trivia questions. This is a free service that provides random quiz questions from various topics. We’ll define the URL in the config.js file and get an initial question when the Trivia page is loaded. We will also modify the render() method of the Trivia component so the html includes a card with the question and answer, and buttons to indicate correct and wrong answer for each player:
src/config.js
export const TRIVIA_ENDPOINT = 'http://jservice.io/api/random?count=1';
src/Trivia.js
Changes:

    import { Header, Message, Table, Card, Button } from 'semantic-ui-react';
    import { API_BASE_URL, TRIVIA_ENDPOINT } from './config'

    constructor(props) {
        super(props);
        this.state = {
           players: null,
            isLoading: null,
            question: null,
            isQuestionLoading: null
        };
        this.onAddition = this.onAddition.bind(this);
        this.onDelete = this.onDelete.bind(this);
        this.getQuestion = this.getQuestion.bind(this);
    }


    componentDidMount() {
        this.getPlayers()
        this.getQuestion()
    }

    async getQuestion() {
        try {
            this.setState({ isQuestionLoading: true });
            const response = await fetch(TRIVIA_ENDPOINT);
            const questions = await response.json();
            this.setState({ question: questions[0], isQuestionLoading: false });
        } catch (err) {
            this.setState({ isQuestionLoading: false });
            console.error(err);
        }
    }


    render() {
        return (
            <div>
                <Header as="h1">Players</Header>
                {this.state.isLoading && <Message info header="Loading players..." />}
                {this.state.players &&
                    <div>
                        <Table>
                            <thead>
                                <tr>
                                    <th>ID</th>
                                    <th>Name</th>
                                    <th>Answers</th>
                                    <th>Points</th>
                                    <th>Actions</th>
                                </tr>
                            </thead>
                            <tbody>
                            {this.state.players.map(
                                    player =>
                                        <tr id={player.id} key={player.id}>
                                            <td>{player.id}</td>
                                            <td>{player.name}</td>
                                            <td>{player.answers}</td>
                                            <td>{player.points}</td>
                                            <td>
                                                <DeletePlayerButton onDelete={this.onDelete} playerId={player.id} />
                                            </td>
                                        </tr>
                            )}
                            </tbody>
                        </Table>
                        <PlayerForm onAddition={this.onAddition} />
                    </div>
                }
                <Header as="h2">Current Question</Header>
                {this.state.isQuestionLoading && <Message info header="Loading question..." />}
                {this.state.question &&
                    <div>
                        <Card>
                            <Card.Content>
                              <Card.Header>{this.state.question.question}</Card.Header>
                              <Card.Description> Correct answer: {this.state.question.answer}</Card.Description>
                            </Card.Content>
                        </Card>
                        <Button type='button' onClick={this.getQuestion}>Refresh Question</Button>
                    </div>
                }
            </div>
        );
    }
When you load the Trivia page, a question will automatically show now. Click ‘Refresh Question’ to display a new question.
Add Buttons to Indicate Right and Wrong Answers
We’ll add buttons to indicate right and wrong answers by the players similarly to the “Delete Player” button we already added.
src/Trivia.js
import RightAnswerButton from './RightAnswerButton';
import WrongAnswerButton from './WrongAnswerButton';

   constructor(props) {
        super(props);
        this.state = {
            players: null,
            isLoading: null,
            question: null,
            isQuestionLoading: null
        };
        this.onAddition = this.onAddition.bind(this);
        this.onDelete = this.onDelete.bind(this);
        this.getQuestion = this.getQuestion.bind(this);
        this.onAnswer = this.onAnswer.bind(this);
    }


    onAnswer(id, data) {
        let players = this.state.players
        let player = players.findIndex(player => player.id === id)
        players[player] = data
        this.setState({
            players: players
        })
    }

(add the following before `DeletePlayerButton` inside the `render()` method):

<RightAnswerButton onRightAnswer={this.onAnswer} playerId={player.id} />
<WrongAnswerButton onWrongAnswer={this.onAnswer} playerId={player.id} />
src/RightAnswerButton.js
import React, { Component } from 'react';
import { Form, Button } from 'semantic-ui-react'
import { withOktaAuth } from '@okta/okta-react';

import { API_BASE_URL } from './config'

export default withOktaAuth(class RightAnswerButton extends Component {

    constructor (props) {
        super(props);
        this.state = {
            id: props.playerId,
            isUpdating: false
        }
        this.onSubmit = this.onSubmit.bind(this);
    }

    async onSubmit(e) {
        e.preventDefault();
        this.setState({
            isUpdating: true
        });

        const accessToken = this.props.authState.accessToken;
        const response = await fetch(API_BASE_URL + '/players/' + this.state.id + '/answers', {
            method: 'POST',
            headers: {
                'Content-Type':'application/json',
                Authorization: `Bearer ${accessToken}`,
                Accept: 'application/json'
            },
            body: JSON.stringify({
                "correct": true
            })
        });

        const player = await response.json();
        await this.setState({
            isUpdating: false
        });
        this.props.onRightAnswer(this.state.id, player.data);
    }

    render() {
        return (
            <Form onSubmit={this.onSubmit}>
                <Button type='submit' loading={this.state.isUpdating}>(+1) Right</Button>
            </Form>
        )
    }
});
src/WrongAnswerButton.js
import React, { Component } from 'react';
import { Form, Button } from 'semantic-ui-react'
import { withOktaAuth } from '@okta/okta-react';

import { API_BASE_URL } from './config'

export default withOktaAuth(class WrongAnswerButton extends Component {

    constructor (props) {
        super(props);
        this.state = {
            id: props.playerId,
            isUpdating: false
        }
        this.onSubmit = this.onSubmit.bind(this);
    }

    async onSubmit(e) {
        e.preventDefault();
        this.setState({
            isUpdating: true
        });

        const accessToken = this.props.authState.accessToken;
        const response = await fetch(API_BASE_URL + '/players/' + this.state.id + '/answers', {
            method: 'POST',
            headers: {
                'Content-Type':'application/json',
                Authorization: `Bearer ${accessToken}`,
                Accept: 'application/json'
            },
            body: JSON.stringify({
                "correct": false
            })
        });

        const player = await response.json();
        await this.setState({
            isUpdating: false
        });
        this.props.onWrongAnswer(this.state.id, player.data);
    }

    render() {
        return (
            <Form onSubmit={this.onSubmit}>
                <Button type='submit' loading={this.state.isUpdating}>(-1) Wrong</Button>
            </Form>
        )
    }
});
You can refactor RightAnswerButton and WrongAnswerButton to remove the code duplication as an exercise. The application is complete at this point! You can register players, ask them questions and record their answers as right or wrong.
Learn More About Laravel, React and Okta
You can improve the code further by extracting the API boilerplate code (retrieving the auth token, sending the Authorization header, sending a request and receiving a response) into a service class. React does not provide dependency injection out of the box (like Angular, for example) but you can use higher-order component functions to wrap your components and decorate them with the API-related functionality (the approach would be similar to the withOktaAuth() decoration applied to Trivia.js, PlayerForm.js and DeletePlayerButton.js for example).
You can find the full code here: https://github.com/oktadeveloper/okta-php-trivia-react/.
If you would like to dig deeper into the topics covered in this article, the following resources are a great starting point:
As always, we’d love to hear from you. Hit us up with questions or feedback in the comments, or on Twitter @oktadev!
Changelog:
- Apr 16, 2021: Updated to use Okta React v4.1.0 and streamline setup with the Okta CLI. Updated Laravel CORS library from barryvdh to fruitcake. See changes in okta-blog#681; example app changes are in okta-php-trivia-react#1;
Okta Developer Blog Comment Policy
We welcome relevant and respectful comments. Off-topic comments may be removed.