Build a Simple CRUD App with Spring Boot and Vue.js

You will use Vue and Spring Boot to build a todo list web application. The application will include CRUD abilities, meaning that you can create, read, update, and delete the todo items on the Spring Boot API via the client. The Vue frontend client will use the Quasar framework for the presentation. OAuth 2.0 and OpenID Connect (OIDC) will secure the Spring Boot API and the Vue client, initially by using Okta as the security provider. Then, at the end of the tutorial, you will also see how to use Auth0 as the security provider.

This project has two major parts:
- Spring Boot API
- Vue client
The Spring Boot app will include an H2 in-memory database and will use Spring Data JPA to map our todo data model to a database table for persistence. As you’ll see, the server will leverage Spring Boot’s ability to quickly expose data via a REST API with minimal configuration.
The client will use Vue 3 and the Quasar framework. The Quasar framework provides components and layout tools to help build Vue applications quickly with a consistent, high-quality user interface.
Before you dig into the tutorial, I want to quickly introduce the technologies for those that might be unfamiliar. Feel free to skip down to the prerequisites section if you’re already familiar with Vue and Spring Boot.
If you’re more of a visual learner, this tutorial is also available as a screencast.
Table of Contents
- What is Vue.js?
- Introducing the Quasar Framework
- About Spring Boot
- Create an OpenID Connect app
- Bootstrap a Spring Boot app using Spring Initializr
- Configure Spring Security
- Test your Vue and Spring Boot app
- Secure your Spring Boot API
- Create a Vue JavaScript client
- Confirm your Spring Boot and Vue todo app works
- Use Auth0 to secure the API
- Update the Vue client to use Auth0
- Do more with Spring Boot, Vue, and Okta
Note: In May 2025, the Okta Integrator Free Plan replaced Okta Developer Edition Accounts, and the Okta CLI was deprecated.
We preserved this post for reference, but the instructions no longer work exactly as written. Replace the Okta CLI commands by manually configuring Okta following the instructions in our Developer Documentation.
What is Vue.js?
Vue is a JavaScript view library, like React and Angular. It’s designed to be incrementally adoptable, and the core library focuses solely on the view layer.
In my experience, Vue.js is a great alternative to React. I learned React first and came to use Vue later. Like React, Vue uses a virtual DOM, provides reactive and composable view components, and enforces a strict one-way parent-child relationship when defining properties and state. This means that it is performant and avoids many confusing state relationships that can occur without one-way data binding.
However, unlike React, Vue uses templates instead of JSX (a potentially welcome and more immediately accessible option). Vue gives you component-scoped CSS using style tags in single-file components. In practice, this difference is pretty significant because, in React, the JSX and CSS-like syntax are close enough to HTML and CSS to be confusing but not the same, which creates problems initially. (Ever gone from a language that doesn’t require semicolons back to one that does? It’s something like that.)
I find Vue to be a simpler, cleaner implementation. React requires a deep dive. You gotta take the red pill and go all the way. It’s a super powerful system, but you have to be all in. Vue is a little friendlier and a little easier to get started.
Introducing the Quasar Framework
The Quasar Framework builds on top of Vue to add a cross-platform component library and grid layout system. It also provides many tools for deploying Vue-based applications to basically any platform you can think of, from web single-page and progressive web apps to mobile apps and Electron-based desktop apps. In this tutorial, you’ll only be using the layout and component library features. Still, Quasar’s big push is to allow developers to write a single web application and deploy it to any platform with a consistent look with minimal changes.
About Spring Boot
The server technology you’re going to use is Spring Boot. Pure, unadulterated Spring (pre-Spring Boot) is a bit of a behemoth: super powerful but potentially time-sucking and frustrating. I’m pretty sure the whole computer conference phenomena came about so that people could learn and understand old-school Spring XML files. It certainly drove large sections of the computer publishing empires.
Spring Boot was Spring’s answer to this complexity (and to frameworks like Ruby on Rails and Grails). They did a great job of distilling down all the power of Spring into a simple, quick, easy-to-use web framework. You can have a fully functioning resource server with a ridiculously small number of lines of code and a few annotations.
Plus, when you’re ready, you have all the power of Spring under the hood, just waiting.
Before you start, please make sure you have the following prerequisites installed (or install them now).
- Java 17: or use SDKMAN! to manage and install multiple versions
- Okta CLI: the Okta command-line interface
- HTTPie: a simple tool for making HTTP requests from a Bash shell
- Node 18+
- Vue CLI: you’ll use this to bootstrap the Vue client
You will need a free Okta Developer account if you don’t already have one. But you can wait until later in the tutorial and use the Okta CLI to log in or register for a new account.
Instead of building the project, you can also clone the repo and follow the instructions there to configure it.
Create an OpenID Connect app
Open a Bash shell. Create a parent directory for the project. Eventually, this will include both the resource server and client projects.
mkdir spring-boot-vue-crud
cd spring-boot-vue-crud
Before you begin, you’ll need a free Okta developer account. Install the Okta CLI and run okta register to sign up for a new account. If you already have an account, run okta login.
Then, run okta apps create. Select the default app name, or change it as you see fit.
Choose Single-Page App and press Enter.
Use http://localhost:8080/callback for the Redirect URI and accept the default Logout Redirect URI of http://localhost:8080.
What does the Okta CLI do?
The Okta CLI will create an OIDC Single-Page App in your Okta Org. It will add the redirect URIs you specified and grant access to the Everyone group. It will also add a trusted origin for http://localhost:8080. You will see output like the following when it’s finished:
Okta application configuration:
Issuer:    https://dev-133337.okta.com/oauth2/default
Client ID: 0oab8eb55Kb9jdMIr5d6
NOTE: You can also use the Okta Admin Console to create your app. See Create a Vue App for more information.
Copy the client ID and issuer URI somewhere safe. You’ll need them for both the client and resource server applications.
TIP: You can also use Auth0 to secure Spring Boot and the Vue client.
Bootstrap a Spring Boot app using Spring Initializr
You’re going to use the Spring Initializr to create a starter project for the resource server. You can look at the project website if you want, but here you’ll use the REST API to download a pre-configured starter.
The following command will download the starter project and un-tar it to a new directory named resource-server.
curl https://start.spring.io/starter.tgz \
  -d bootVersion=3.0.6 \
  -d javaVersion=17 \
  -d dependencies=web,data-rest,lombok,data-jpa,h2,okta \
  -d type=gradle-project \
  -d baseDir=resource-server \
| tar -xzvf - && cd resource-server
The dependencies you’re including are:
web: Spring Web MVC, adds basic HTTP REST functionalitydata-jpa: Spring Data JPA, makes it easy to create JPA-based repositoriesdata-rest: Spring Data REST, exposes Spring Data repositories as resource serversh2: the H2 in-memory database used for demonstration purposeslombok: Project Lombok, adds some helpful annotations that eliminate the need to write a lot of getters and settersokta: Okta Spring Boot Starter that helps OAuth 2.0 and OIDC configuration
Project Lombok saves a lot of clutter and ceremony code. However, if you’re using an IDE, you’ll need to install a plugin for Lombok. See the project’s installation docs for more information.
Configure Spring Security
Open the application properties file and update it. You’re changing the server port so it doesn’t conflict with the default Vue local server (which also defaults 8080).
src/main/resources/application.properties
server.port=9000
okta.oauth2.issuer=<your-issuer-uri>
okta.oauth2.clientId=<your-client-id>
You need to replace the two bracketed values with the values you generated above for the OIDC app using the Okta CLI.
You can run the bootstrapped project right now and see if it starts. It should start but won’t do much.
./gradlew bootRun
Create a SecurityConfiguration class to configure Spring Security. The class below configures web security to allow all requests, effectively bypassing security. This is just so you can test the resource server initially. You’ll enable security shortly.
src/main/java/com/example/demo/SecurityConfiguration.java
package com.example.demo;

import org.springframework.context.annotation.Bean;
import org.springframework.context.annotation.Configuration;
import org.springframework.security.config.annotation.web.builders.HttpSecurity;
import org.springframework.security.web.SecurityFilterChain;

@Configuration
public class SecurityConfiguration {

    @Bean
    public SecurityFilterChain filterChain(HttpSecurity http) throws Exception {
        http.authorizeHttpRequests()
            .anyRequest().permitAll();
        return http.build();
    }

}
Replace the DemoApplication.java file with the following.
src/main/java/com/example/demo/DemoApplication.java
package com.example.demo;

import org.springframework.boot.ApplicationRunner;
import org.springframework.boot.SpringApplication;
import org.springframework.boot.autoconfigure.SpringBootApplication;
import org.springframework.boot.web.servlet.FilterRegistrationBean;
import org.springframework.context.annotation.Bean;
import org.springframework.core.Ordered;
import org.springframework.data.rest.core.config.RepositoryRestConfiguration;
import org.springframework.data.rest.webmvc.config.RepositoryRestConfigurer;
import org.springframework.stereotype.Component;
import org.springframework.web.cors.CorsConfiguration;
import org.springframework.web.cors.UrlBasedCorsConfigurationSource;
import org.springframework.web.filter.CorsFilter;
import org.springframework.web.servlet.config.annotation.CorsRegistry;

import java.util.Collections;
import java.util.Random;
import java.util.stream.Stream;

@SpringBootApplication
public class DemoApplication {

    public static void main(String[] args) {
        SpringApplication.run(DemoApplication.class, args);
    }

    // Bootstrap some test data into the in-memory database
    @Bean
    ApplicationRunner init(TodoRepository repository) {
        return args -> {
            Random rd = new Random();
            Stream.of("Buy milk", "Eat pizza", "Update tutorial", "Study Vue", "Go kayaking").forEach(name -> {
                Todo todo = new Todo();
                todo.setTitle(name);
                todo.setCompleted(rd.nextBoolean());
                repository.save(todo);
            });
            repository.findAll().forEach(System.out::println);
        };
    }

    // Fix the CORS errors
    @Bean
    public FilterRegistrationBean simpleCorsFilter() {
        UrlBasedCorsConfigurationSource source = new UrlBasedCorsConfigurationSource();
        CorsConfiguration config = new CorsConfiguration();
        config.setAllowCredentials(true);
        // *** URL below needs to match the Vue client URL and port ***
        config.setAllowedOrigins(Collections.singletonList("http://localhost:8080"));
        config.setAllowedMethods(Collections.singletonList("*"));
        config.setAllowedHeaders(Collections.singletonList("*"));
        source.registerCorsConfiguration("/**", config);
        FilterRegistrationBean bean = new FilterRegistrationBean<>(new CorsFilter(source));
        bean.setOrder(Ordered.HIGHEST_PRECEDENCE);
        return bean;
    }

    // Expose IDs of Todo items
    @Component
    class RestRepositoryConfigurator implements RepositoryRestConfigurer {
        public void configureRepositoryRestConfiguration(RepositoryRestConfiguration config, CorsRegistry cors) {
            config.exposeIdsFor(Todo.class);
        }
    }

}
This demo application does three things that are helpful for demonstration purposes. First, it loads some test todo items into the repository.
Second, it configures the REST repository to expose IDs for the todo items.
Third, it defines a filter to allow cross-origin requests from http://localhost:8080. This is necessary so that the Vue application, which is loaded from http://localhost:9000 via the local test server, can load data from the Spring Boot resource server at http://localhost:8080.
For more info on CORS (cross-origin resource sharing), take a look at the Mozilla docs.
Now, create the data model for the todo items.
src/main/java/com/example/demo/Todo.java
package com.example.demo;

import lombok.*;

import jakarta.persistence.Id;
import jakarta.persistence.GeneratedValue;
import jakarta.persistence.Entity;

@Entity
@Data
@NoArgsConstructor
public class Todo {

    @Id
    @GeneratedValue
    private Long id;

    @NonNull
    private String title;

    private Boolean completed = false;

}
Notice the use of the Lombok annotations (@Entity, @Data, and @NoArgsConstructor) to keep the code simple and clean.
The todo items have two fields: a title string and a completed boolean. The fields are annotated with Spring Data JPA annotations that allow the Java class to be mapped to a database table for persistence.
Create a repository to persist the data model.
src/main/java/com/example/demo/TodoRepository.java
package com.example.demo;

import org.springframework.data.jpa.repository.JpaRepository;
import org.springframework.data.rest.core.annotation.RepositoryRestResource;

@RepositoryRestResource
interface TodoRepository extends JpaRepository<Todo, Long> {}
This is a Spring Data JpaRepository that can persist the data model you just defined. Because it is annotated with @RepositoryRestResource (and because the data-rest dependency was included), this repository will be automatically exposed as a web resource.
Test your Vue and Spring Boot app
Run the app using the following command from the resource-server subdirectory.
./gradlew bootRun
Open a new Bash shell and use HTTPie to test the resource server.
http :9000/todos
You should see a response like the following:
HTTP/1.1 200
...

{
  "_embedded": {
    "todos": [
      {
        "_links": {
          "self": {
            "href": "http://localhost:9000/todos/1"
          },
          "todo": {
            "href": "http://localhost:9000/todos/1"
          }
        },
        "completed": false,
        "id": 1,
        "title": "Buy milk"
      },
      {
        "_links": {
          "self": {
            "href": "http://localhost:9000/todos/2"
          },
          "todo": {
            "href": "http://localhost:9000/todos/2"
          }
        },
        "completed": true,
        "id": 2,
        "title": "Eat pizza"
      },
      ...
    ]
  },
  ...
}
Stop the resource server using CTRL + C.
Secure your Spring Boot API
Edit the SecurityConfiguration.java file and change the filter chain’s bean definition to enable a resource server.
src/main/java/com/example/demo/OAuth2ResourceServerSecurityConfiguration.java
@Bean
public SecurityFilterChain filterChain(HttpSecurity http) throws Exception {
    http.authorizeHttpRequests((authz) -> {
        authz.anyRequest().permitAll();
    });
    http.oauth2ResourceServer().jwt();

    return http.build();
}
This configuration requires JWT auth on all requests.
Restart the server. Use CTRL + C to stop it if it’s running.
./gradlew bootRun
Use HTTPie again to try and request the todo items.
http :9000/todos
You will get an error.
HTTP/1.1 401
...

401 Unauthorized
The resource server is finished. The next step is to create the Vue client.
Create a Vue JavaScript client
Use the Vue CLI to create a new application from the project’s root directory and navigate into the newly created client directory. Install the Vue CLI if you don’t have it installed with npm i -g @vue/cli@5.
vue create client
Pick Default ([Vue 3] babel, eslint) when prompted. Wait for it to finish.
cd client
Add the Quasar framework.
vue add quasar
You can just accept the defaults. For me, they were the following.
- Allow Quasar to replace App.vue, About.vue, Home.vue and (if available) router.js? Yes
- Pick your favorite CSS preprocessor: Sass with indented syntax
- Choose Quasar Icon Set: Material Icons (recommended)
- Default Quasar language pack: en-US
- Use RTL support? No
- Select features: Enter to select none
Add additional dependencies for HTTP requests, logging, routing, and authentication.
npm i axios@1.3.6 vuejs3-logger@1.0.0 vue-router@4.1.6 @okta/okta-vue@5.6.0
axios: an HTTP client request libraryvuejs3-logger: a logging libraryvue-router: the standard for routing between pages in Vueokta/okta-vue: the Okta helper for Vue
To learn more about how Okta integrates with Vue, look at the GitHub page for the okta/okta-vue project. More resources and example applications are listed in the Okta docs for Vue.
Replace main.js with the following. Look at the OktaAuth configuration object. Notice the client ID and issuer URI are pulled from a .env file.
src/main.js
import { createApp } from 'vue'
import App from './App.vue'
import { Quasar } from 'quasar'
import quasarUserOptions from './quasar-user-options'
import VueLogger from 'vuejs3-logger'
import router from './router'
import createApi from './Api'

import { OktaAuth } from '@okta/okta-auth-js'
import OktaVue from '@okta/okta-vue'

if (process.env.VUE_APP_ISSUER_URI == null || process.env.VUE_APP_CLIENT_ID == null || process.env.VUE_APP_SERVER_URI == null) {
  throw 'Please define VUE_APP_ISSUER_URI, VUE_APP_CLIENT_ID, and VUE_APP_SERVER_URI in .env file'
}

const oktaAuth = new OktaAuth({
  issuer: process.env.VUE_APP_ISSUER_URI,  // pulled from .env file
  clientId: process.env.VUE_APP_CLIENT_ID,  // pulled from .env file
  redirectUri: window.location.origin + '/callback',
  scopes: ['openid', 'profile', 'email']
})

const options = {
  isEnabled: true,
  logLevel: 'debug',
  stringifyArguments: false,
  showLogLevel: true,
  showMethodName: false,
  separator: '|',
  showConsoleColors: true
};

const app = createApp(App)
  .use(Quasar, quasarUserOptions)
  .use(VueLogger, options)
  .use(OktaVue, {oktaAuth})
  .use(router)

app.config.globalProperties.$api = createApi(app.config.globalProperties.$auth)

app.mount('#app')
Stated very briefly, the file above creates the main Vue app and configures it to use the dependencies you added: Quasar, VueLogger, OktaVue, and the router. It also creates the API class that handles the requests to the resource server and passes it the $auth object it needs to get the JWT.
Create a .env file in the client project root directory. The Client ID and Issuer URI are the values you used above in the Spring Boot application.properties file. The Server URI is the local URI for the Spring Boot API. You can leave this unless you made a change (this gets used in the Api.js file).
.env
VUE_APP_CLIENT_ID=<your-client-id>
VUE_APP_ISSUER_URI=<your-issuer-uri>
VUE_APP_SERVER_URI=http://localhost:9000
It’s important to note that putting values like this in a .env file in a client application does not make them secure. It helps by keeping them out of a repository. However, they are still public because they are necessarily visible in the JavaScript code sent to the browser. In this use case, it’s more of a configuration and organizational tool than a security tool.
If you want to keep the .env file out of the repository, you need to update the .gitignore file. There’s no particular need to do this for the Client ID as it will be publicly available anyway.
Replace App.vue with the following.
src/App.vue
<template>
  <q-layout view="hHh lpR fFf">

    <q-header elevated class="bg-primary text-white">
      <q-toolbar>
        <q-toolbar-title>
          <q-avatar>
            <q-icon name="kayaking" size="30px"></q-icon>
          </q-avatar>
          Todo App
        </q-toolbar-title>
        {{ this.claims && this.claims.email ? claims.email : '' }}
        <q-btn flat round dense icon="logout" v-if='authState && authState.isAuthenticated' @click="logout"/>
        <q-btn flat round dense icon="account_circle" v-else @click="login"/>
      </q-toolbar>
    </q-header>

    <q-page-container>
      <router-view></router-view>
    </q-page-container>

  </q-layout>
</template>

<script>
export default {
  name: 'LayoutDefault',
  data: function () {
    return {
      claims: null
    }
  },
  watch: {
    'authState.isAuthenticated'() {
      this.$log.debug(('watch triggered!'))
      this.updateClaims()
    }
  },
  created() {
    this.updateClaims()
  },
  methods: {
    async updateClaims() {
      if (this.authState && this.authState.isAuthenticated) {
        this.claims = await this.$auth.getUser()
      }
    },
    async login() {
      await this.$auth.signInWithRedirect({ originalUri: '/todos' })
    },
    async logout() {
      await this.$auth.signOut()
    }
  },
}
</script>
This top-level component defines the header bar and includes the router component. The header bar has a login or logout button and will show the authenticated user’s email address when logged in.
The app gets the authenticated user’s email address from the JWT claims. (A claim is a piece of information asserted about the subject by the authenticating authority.) This happens in the updateClaims() method, which is triggered when the component is created, and is also triggered by a watch method so that it is updated as the authenticated state changes.
Create a new file to encapsulate the resource server access logic.
src/Api.js
import axios from 'axios'

const instance = axios.create({
  baseURL: process.env.VUE_APP_SERVER_URI,
  timeout: 2000
});

const createApi = (auth) => {

  instance.interceptors.request.use(async function (config) {
    const accessToken = auth.getAccessToken()
    config.headers = {
      Authorization: `Bearer ${accessToken}`
    }
    return config;
  }, function (error) {
    return Promise.reject(error);
  });

  return {

    // (C)reate
    createNew(text, completed) {
      return instance.post('/todos', {title: text, completed: completed})
    },

    // (R)ead
    getAll() {
      return instance.get('/todos', {
        transformResponse: [function (data) {
          return data ? JSON.parse(data)._embedded.todos : data;
        }]
      })
    },

    // (U)pdate
    updateForId(id, text, completed) {
      return instance.put('todos/' + id, {title: text, completed: completed})
    },

    // (D)elete
    removeForId(id) {
      return instance.delete('todos/' + id)
    }
  }
}

export default createApi
All of the requests to the server go through this module. Take a look at how the access token is retrieved from the global auth object and injected into every request.
Create the router file.
src/router/index.js
import { createRouter, createWebHistory } from 'vue-router'
import { navigationGuard } from '@okta/okta-vue'
import Todos from '@/components/Todos';
import Home from '@/components/Home';
import { LoginCallback } from '@okta/okta-vue'

const routes = [
  {
    path: '/',
    component: Home
  },
  {
    path: '/todos',
    component: Todos,
    meta: {
      requiresAuth: true
    }
  },
  { path: '/callback', component: LoginCallback },
]

const router = createRouter({
  history: createWebHistory(process.env.BASE_URL),
  routes,
})

router.beforeEach(navigationGuard)

export default router
The router has three paths. The home path and the todos path are straightforward. The Okta Vue SDK provides the last path, /callback, to handle the login redirect from the Okta servers after authentication.
Create the Home component.
src/components/Home.vue
<template>
<div class="column justify-center items-center" id="row-container">
<q-card class="my-card">
<q-card-section style="text-align: center">
<div v-if='authState && authState.isAuthenticated'>
<h6 v-if="claims && claims.email">You are logged in as {{ claims.email }}</h6>
<h6 v-else>You are logged in</h6>
<q-btn flat color="primary" @click="todo">Go to Todo app</q-btn>
<q-btn flat @click="logout">Log out</q-btn>
</div>
<div v-else>
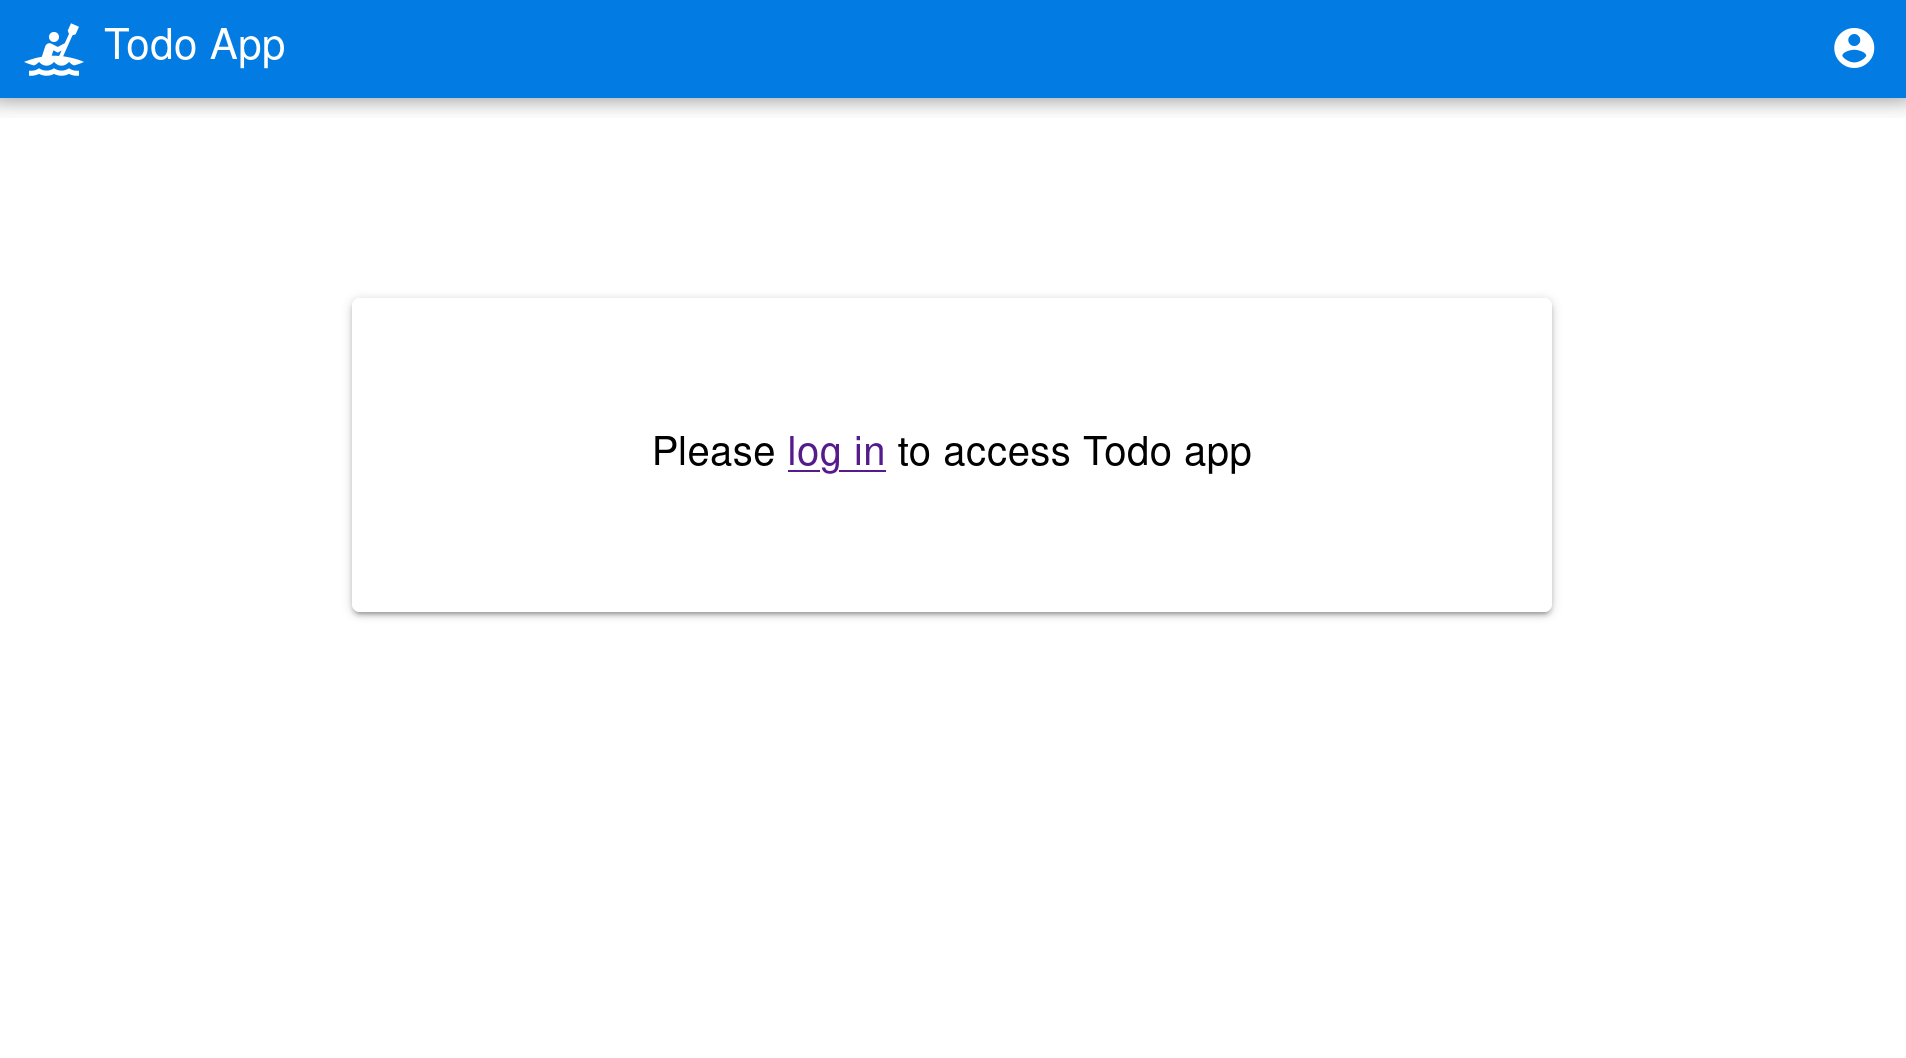
<h6>Please <a href="#" @click.prevent="login">log in</a> to access Todo app</h6>
</div>
</q-card-section>
</q-card>
</div>
</template>
<script>
export default {
name: 'home-component',
data: function () {
return {
claims: ''
}
},
created() {
this.setup()
},
methods: {
async setup() {
if (this.authState && this.authState.isAuthenticated) {
this.claims = await this.$auth.getUser()
}
},
todo() {
this.$router.push('/todos')
},
async login() {
await this.$auth.signInWithRedirect({ originalUri: '/todos' })
},
async logout() {
await this.$auth.signOut()
}
}
}
</script>
Create the TodoItem component.
src/components/TodoItem.vue
<template>
  <q-item-section avatar class="check-icon" v-if="this.item.completed">
    <q-icon color="green" name="done" @click="handleClickSetCompleted(false)"/>
  </q-item-section>
  <q-item-section avatar class="check-icon" v-else>
    <q-icon color="gray" name="check_box_outline_blank" @click="handleClickSetCompleted(true)"/>
  </q-item-section>
  <q-item-section v-if="!editing">{{ this.item.title }}</q-item-section>
  <q-item-section v-else>
    <input
        class="list-item-input"
        type="text"
        name="textinput"
        ref="input"
        v-model="editingTitle"
        @change="handleDoneEditing"
        @blur="handleCancelEditing"
    />
  </q-item-section>
  <q-item-section avatar class="hide-icon" @click="handleClickEdit">
    <q-icon color="primary" name="edit"/>
  </q-item-section>
  <q-item-section avatar class="hide-icon close-icon" @click="handleClickDelete">
    <q-icon color="red" name="close"/>
  </q-item-section>
</template>
<script>

import { nextTick } from 'vue'

export default {
  name: 'TodoItem',
  props: {
    item: Object,
    deleteMe: Function,
    showError: Function,
    setCompleted: Function,
    setTitle: Function
  },
  data: function () {
    return {
      editing: false,
      editingTitle: this.item.title,
    }
  },
  methods: {
    handleClickEdit() {
      this.editing = true
      this.editingTitle = this.item.title
      nextTick(function () {
        this.$refs.input.focus()
      }.bind(this))
    },
    handleCancelEditing() {
      this.editing = false
    },
    handleDoneEditing() {
      this.editing = false
      this.$api.updateForId(this.item.id, this.editingTitle, this.item.completed).then((response) => {
        this.setTitle(this.item.id, this.editingTitle)
        this.$log.info('Item updated:', response.data);
      }).catch((error) => {
        this.showError('Failed to update todo title')
        this.$log.debug(error)
      });
    },
    handleClickSetCompleted(value) {
      this.$api.updateForId(this.item.id, this.item.title, value).then((response) => {
        this.setCompleted(this.item.id, value)
        this.$log.info('Item updated:', response.data);
      }).catch((error) => {
        this.showError('Failed to update todo completed status')
        this.$log.debug(error)
      });
    },
    handleClickDelete() {
      this.deleteMe(this.item.id)
    }
  }
}
</script>

<style scoped>
.todo-item .close-icon {
  min-width: 0px;
  padding-left: 5px !important;
}

.todo-item .hide-icon {
  opacity: 0.1;
}

.todo-item:hover .hide-icon {
  opacity: 0.8;
}

.check-icon {
  min-width: 0px;
  padding-right: 5px !important;
}

input.list-item-input {
  border: none;
}
</style>
This component encapsulates a single todo item. It has logic for editing the title, setting the completed status, and deleting items. If you look closely at the code, you’ll notice that it sends changes to the server and updates the local copy stored in the todos array in the parent component.
Create the Todos component.
src/components/Todos.vue
<template>
  <div class="column justify-center items-center" id="row-container">
    <q-card class="my-card">
      <q-card-section>
        <div class="text-h4">Todos</div>
        <q-list padding>
          <q-item
              v-for="item in filteredTodos" :key="item.id"
              clickable
              v-ripple
              rounded
              class="todo-item"
          >
            <TodoItem
                :item="item"
                :deleteMe="handleClickDelete"
                :showError="handleShowError"
                :setCompleted="handleSetCompleted"
                :setTitle="handleSetTitle"
                v-if="filter === 'all' || (filter === 'incomplete' && !item.completed) || (filter === 'complete' && item.completed)"
            ></TodoItem>
          </q-item>
        </q-list>
      </q-card-section>
      <q-card-section>
        <q-item>
          <q-item-section avatar class="add-item-icon">
            <q-icon color="green" name="add_circle_outline"/>
          </q-item-section>
          <q-item-section>
            <input
                type="text"
                ref="newTodoInput"
                v-model="newTodoTitle"
                @change="handleDoneEditingNewTodo"
                @blur="handleCancelEditingNewTodo"
            />
          </q-item-section>
        </q-item>
      </q-card-section>
      <q-card-section style="text-align: center">
        <q-btn color="amber" text-color="black" label="Remove Completed" style="margin-right: 10px"
               @click="handleDeleteCompleted"></q-btn>
        <q-btn-group>
          <q-btn glossy :color="filter === 'all' ? 'primary' : 'white'" text-color="black" label="All"
                 @click="handleSetFilter('all')"/>
          <q-btn glossy :color="filter === 'complete' ? 'primary' : 'white'" text-color="black" label="Completed"
                 @click="handleSetFilter('complete')"/>
          <q-btn glossy :color="filter === 'incomplete' ? 'primary' : 'white'" text-color="black" label="Incomplete"
                 @click="handleSetFilter('incomplete')"/>
          <q-tooltip>
            Filter the todos
          </q-tooltip>
        </q-btn-group>
      </q-card-section>
    </q-card>
    <div v-if="error" class="error">
      <q-banner inline-actions class="text-white bg-red" @click="handleErrorClick">
        ERROR: {{ this.error }}
      </q-banner>
    </div>
  </div>
</template>

<script>

import TodoItem from '@/components/TodoItem';
import { ref } from 'vue'

export default {
  name: 'LayoutDefault',
  components: {
    TodoItem
  },

  data: function() {
    return {
      todos: [],
      newTodoTitle: '',
      visibility: 'all',
      loading: true,
      error: '',
      filter: 'all'
    }
  },

  setup() {
    return {
      alert: ref(false),
    }
  },
  mounted() {
    this.$api.getAll()
        .then(response => {
          this.$log.debug('Data loaded: ', response.data)
          this.todos = response.data
        })
        .catch(error => {
          this.$log.debug(error)
          this.error = 'Failed to load todos'
        })
        .finally(() => this.loading = false)
  },

  computed: {
    filteredTodos() {
      if (this.filter === 'all') return this.todos
      else if (this.filter === 'complete') return this.todos.filter(todo => todo.completed)
      else if (this.filter === 'incomplete') return this.todos.filter(todo => !todo.completed)
      else return []
    }
  },

  methods: {
    handleSetFilter(value) {
      this.filter = value
    },

    handleClickDelete(id) {
      const todoToRemove = this.todos.find(todo => todo.id === id)
      this.$api.removeForId(id).then(() => {
        this.$log.debug('Item removed:', todoToRemove);
        this.todos.splice(this.todos.indexOf(todoToRemove), 1)
      }).catch((error) => {
        this.$log.debug(error);
        this.error = 'Failed to remove todo'
      });
    },

    handleDeleteCompleted() {
      const completed = this.todos.filter(todo => todo.completed)
      Promise.all(completed.map(todoToRemove => {
        return this.$api.removeForId(todoToRemove.id).then(() => {
          this.$log.debug('Item removed:', todoToRemove);
          this.todos.splice(this.todos.indexOf(todoToRemove), 1)
        }).catch((error) => {
          this.$log.debug(error);
          this.error = 'Failed to remove todo'
          return error
        })
      }))
    },

    handleDoneEditingNewTodo() {
      const value = this.newTodoTitle && this.newTodoTitle.trim()
      if (!value) {
        return
      }
      this.$api.createNew(value, false).then((response) => {
        this.$log.debug('New item created:', response)
        this.newTodoTitle = ''
        this.todos.push({
          id: response.data.id,
          title: value,
          completed: false
        })
        this.$refs.newTodoInput.blur()
      }).catch((error) => {
        this.$log.debug(error);
        this.error = 'Failed to add todo'
      });
    },
    handleCancelEditingNewTodo() {
      this.newTodoTitle = ''
    },

    handleSetCompleted(id, value) {
      let todo = this.todos.find(todo => id === todo.id)
      todo.completed = value
    },

    handleSetTitle(id, value) {
      let todo = this.todos.find(todo => id === todo.id)
      todo.title = value
    },

    handleShowError(message) {
      this.error = message
    },

    handleErrorClick() {
      this.error = null;
    },
  },
}
</script>

<style>
#row-container {
  margin-top: 100px;
}

.my-card {
  min-width: 600px;
}

.error {
  color: red;
  text-align: center;
  min-width: 600px;
  margin-top: 10px;
}
</style>
This component encapsulates the card that holds all of the todos and the todo-associated interface elements. It also handles the rest of the functions related to updating todos on the server and in the local cache.
You’re welcome to delete the HelloWorld.vue component if you want. Or you can leave it. It’s not needed.
Confirm your Spring Boot and Vue todo app works
Make sure the Spring Boot API is still running. In a separate Bash shell, from the resource server directory, run the following command (if it is not already still running).
./gradlew bootRun
Start the Vue app using the embedded development server. From the client directory:
npm run serve
Open a browser and navigate to http://localhost:8080. You’ll see the “please log in” page.
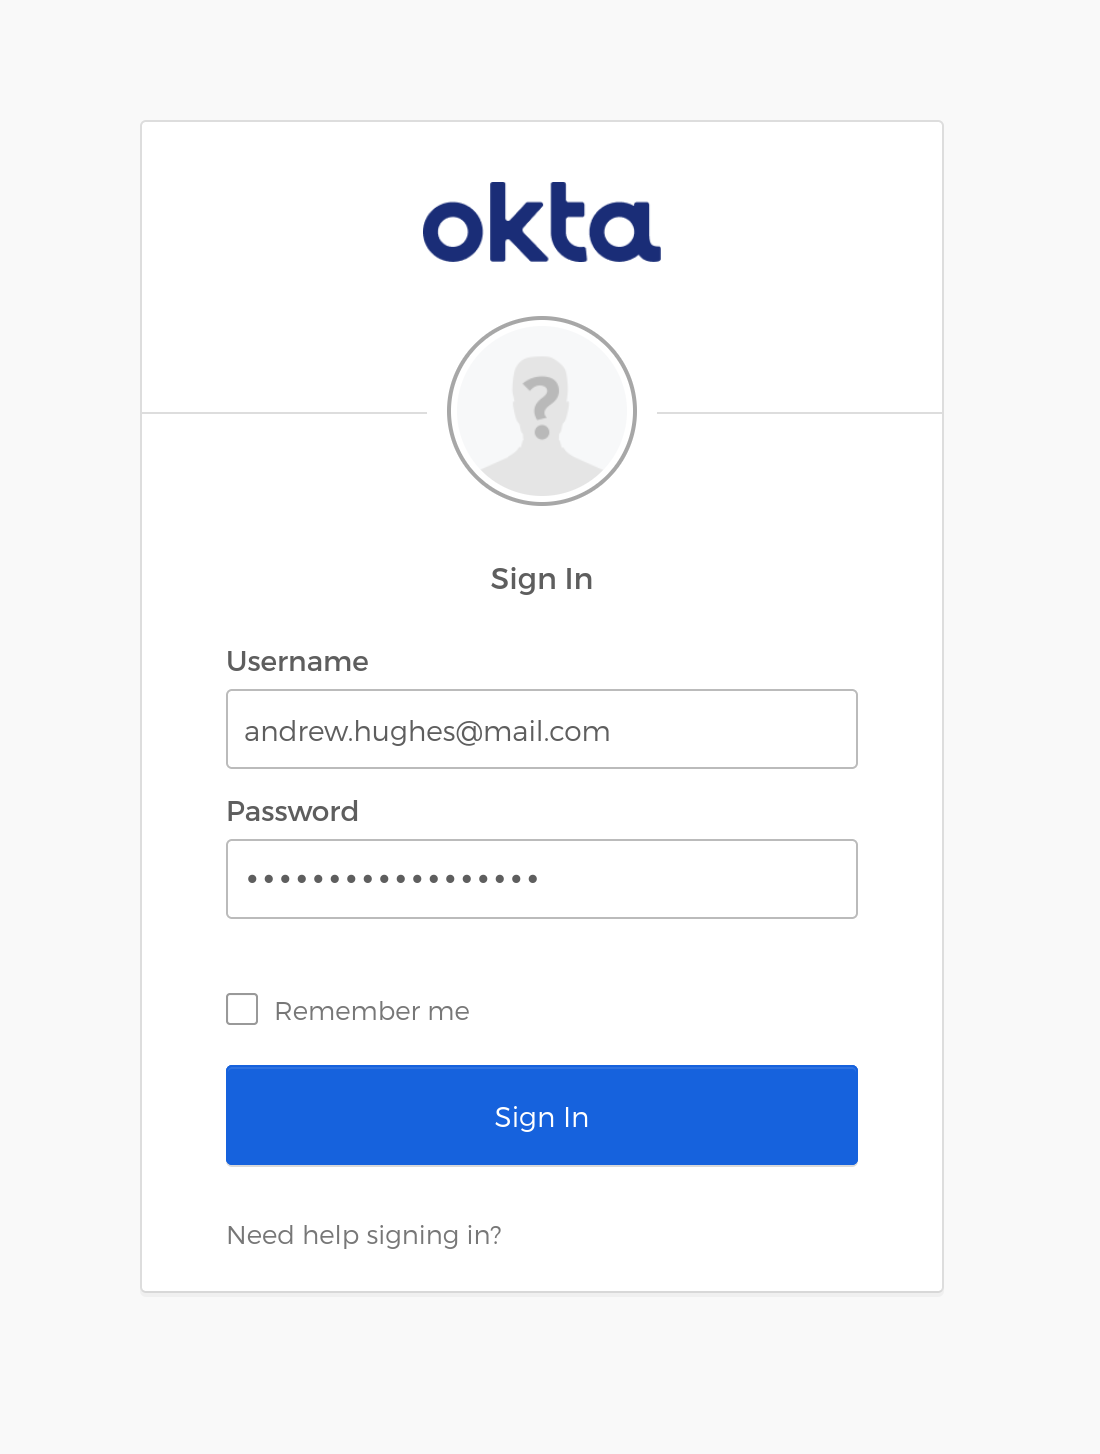
Log into the app using Okta’s sign-in interface.
That will redirect you to the Todo app’s main screen.
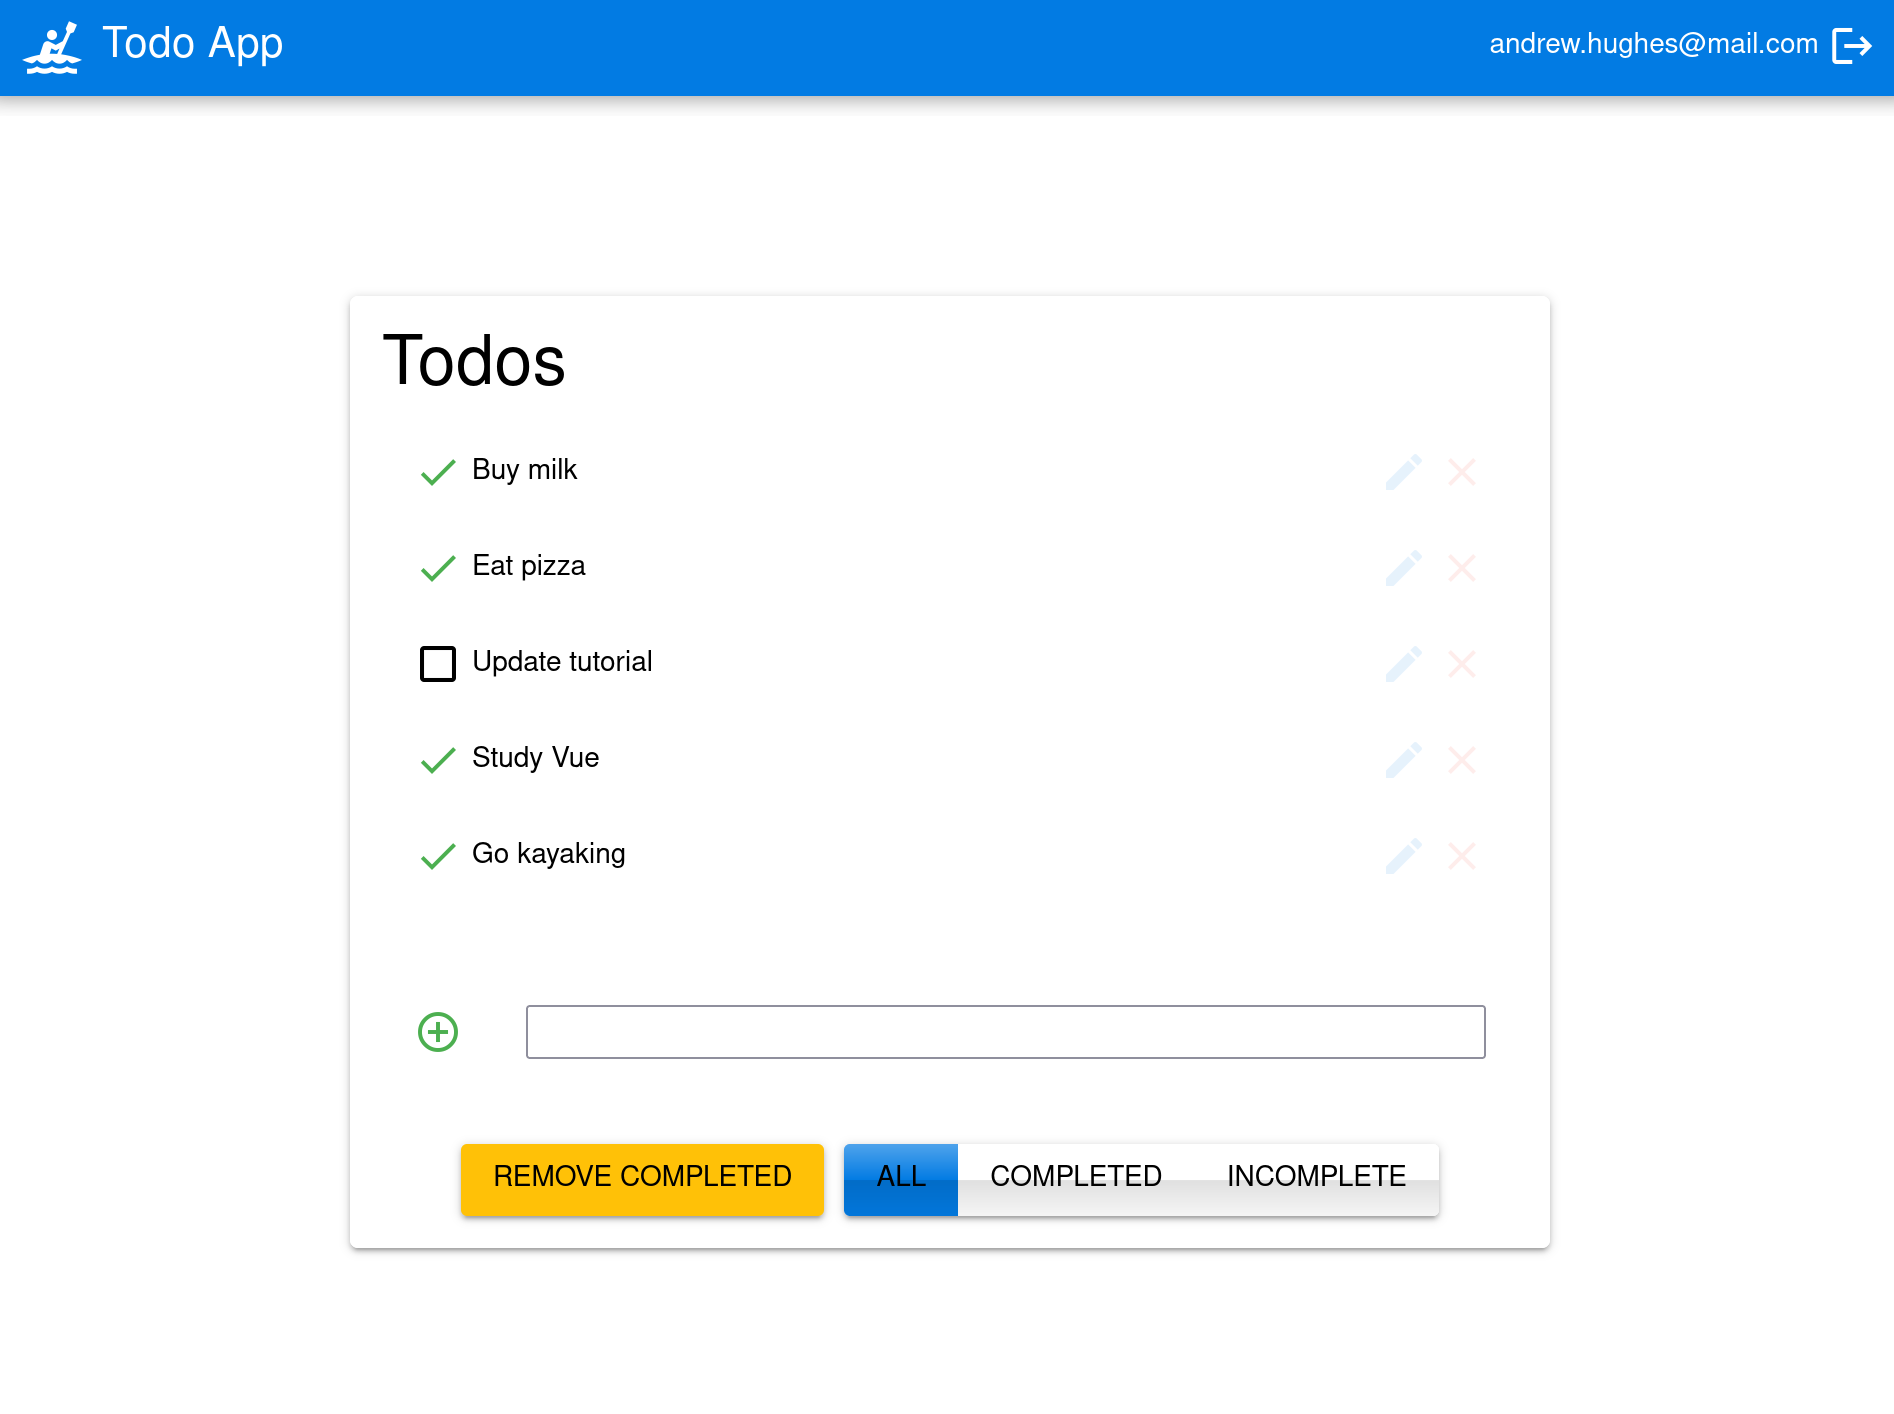
You should be able to delete items, add new items, rename, and filter items. All data is stored on the Spring Boot resource server and is presented by the Vue + Quasar frontend.
Use Auth0 to secure the API
You can also use Auth0 to secure the application! Let’s start with the API (in the resource-server directory of the GitHub repo or your main project).
The first step is to install the Auth0 CLI and run auth0 login in a terminal.
Waiting for the login to complete in the browser... done

 ▸    Successfully logged in.
 ▸    Tenant: dev-0xb84jzp.us.auth0.com
Take note of the domain listed as the tenant. This is your Auth0 domain. If you need to find it again later, you can use auth0 tenants list.
Update src/main/resources/application.properties. Fill in your actual Auth0 domain.
server.port=9000
okta.oauth2.issuer=https://<your-auth0-domain>/
okta.oauth2.audience=http://my-api
Start the API.
./gradlew bootRun
Make sure it starts successfully.
2022-10-06 10:09:59.535  INFO 89160 --- [           main] o.s.b.w.embedded.tomcat.TomcatWebServer  : Tomcat started on port(s): 9000 (http) with context path ''
2022-10-06 10:09:59.541  INFO 89160 --- [           main] com.example.demo.DemoApplication         : Started DemoApplication in 3.014 seconds (JVM running for 3.252)
Todo(id=1, title=Buy milk, completed=false)
Todo(id=2, title=Eat pizza, completed=false)
Todo(id=3, title=Update tutorial, completed=true)
Todo(id=4, title=Study Vue, completed=false)
Todo(id=5, title=Go kayaking, completed=true)
<==========---> 80% EXECUTING [2m 58s]
> :bootRun
Open a second terminal window in the same directory. Create a test Auth0 API. The Auth0 API is what exposes identity functionality for all authentication and authorization protocols, such as OpenID Connect and OAuth.
auth0 apis create -n myapi --identifier http://my-api
Just press enter three times to accept the default values for scopes, token lifetime, and allow offline access. The scopes here refer to custom scopes, not the standard scopes (email, profile, and openid) that you will need for OIDC and OAuth.
 Scopes:
 Token Lifetime: 86400
 Allow Offline Access: No

=== dev-0xb84jzp.us.auth0.com API created

  ID                    6323478u98u98919206c2f73e6d
  NAME                  myapi
  IDENTIFIER            http://my-api
  SCOPES
  TOKEN LIFETIME        86400
  ALLOW OFFLINE ACCESS  ✗
Use Auth0 CLI to create a token. Don’t forget to set the audience!
auth0 test token -a http://my-api
If you don’t use the -a flag to set the audience to your Auth0 API, the test token you create will be an opaque token that cannot be verified and will not work. If you decide to use a different Auth0 API for some reason, you need to make sure the audience identifiers match in the application.properties file and the command to create a test token.
Save the token in a shell variable.
TOKEN=eyJhbGciOiJSUzI1NiIsInR5cCI6IkpXVCIsImtpZCI6Im5yMWZw...
You can verify that the endpoint is protected.
http :9000/todos
And test the protected endpoint using the token.
http :9000/todos "Authorization: Bearer $TOKEN"
Update the Vue client to use Auth0
Auth0 has helpful docs for integrating with Vue. The first step is to create an OpenID Connect (OIDC) application on the Auth0 servers using their CLI. Open a terminal and navigate to the client project directory.
auth0 apps create
- Name:
vue-spring-boot - Type: Single Page Web Application
- All the URLs:
http://localhost:8080
 Name: vue-spring-boot
 Description:
 Type: Single Page Web Application
 Callback URLs: http://localhost:8080
 Allowed Logout URLs: http://localhost:8080
 Allowed Origin URLs: http://localhost:8080
 Allowed Web Origin URLs: http://localhost:8080

=== dev-0rb77iup.us.auth0.com application created
Update the .env file. Fill in the OIDC Client ID and Auth0 domain.
VUE_APP_CLIENT_ID=<your-client-id>
VUE_APP_AUTH0_DOMAIN=<your-auth0-domain>
VUE_APP_AUTH0_AUDIENCE=http://my-api
VUE_APP_SERVER_URI=http://localhost:9000
Notice that the audience is the same as the audience used to create the test token, which is the Auth0 API.
Install the Auth0 Vue SDK. Make sure you’re in the client directory.
npm install @auth0/auth0-vue@2
If you want, you can remove the Okta Vue SDK.
npm remove @okta/okta-vue
Update src/main.js to the following. This configures and installs the Auth0 plugin for Vue.
import { createApp } from 'vue'
import App from './App.vue'
import { Quasar } from 'quasar'
import quasarUserOptions from './quasar-user-options'
import VueLogger from 'vuejs3-logger'
import router from './router'
import createApi from './Api'

import { createAuth0 } from '@auth0/auth0-vue';

const options = {
  isEnabled: true,
  logLevel: 'debug',
  stringifyArguments: false,
  showLogLevel: true,
  showMethodName: false,
  separator: '|',
  showConsoleColors: true
};

const app = createApp(App)
  .use(Quasar, quasarUserOptions)
  .use(VueLogger, options)
  .use(router)
  .use(createAuth0({
      domain: process.env.VUE_APP_AUTH0_DOMAIN,
      clientId: process.env.VUE_APP_CLIENT_ID,
      authorizationParams: {
        redirect_uri: window.location.origin,
        audience: process.env.VUE_APP_AUTH0_AUDIENCE
      }
    })
  );

// pass auth0 to the api (to get a JWT), which is set as a global property
app.config.globalProperties.$api = createApi(app.config.globalProperties.$auth0)

app.mount('#app')
Update one line in src/Api.js. You need to change the following line.
const accessToken = auth.getAccessToken()
To this.
const accessToken = await auth.getAccessTokenSilently();
As is seen below.
import axios from 'axios'

...

const createApi = (auth) => {

  instance.interceptors.request.use(async function (config) {
    const accessToken = await auth.getAccessTokenSilently(); // UPDATE ME
    config.headers = {
      Authorization: `Bearer ${accessToken}`
    }
    return config;
  }, function (error) {
    return Promise.reject(error);
  });

  ...

}

export default createApi
Update src/App.vue.
<template>
  <q-layout view="hHh lpR fFf">

    <q-header elevated class="bg-primary text-white">
      <q-toolbar>
        <q-toolbar-title>
          <q-avatar>
            <q-icon name="kayaking" size="30px"></q-icon>
          </q-avatar>
          Todo App
        </q-toolbar-title>
        {{ isAuthenticated ? user.email : "" }}
        <q-btn flat round dense icon="logout" v-if='isAuthenticated' @click="logout"/>
        <q-btn flat round dense icon="account_circle" v-else @click="login"/>
      </q-toolbar>
    </q-header>

    <q-page-container>
      <router-view></router-view>
    </q-page-container>

  </q-layout>
</template>

<script>

import { useAuth0 } from '@auth0/auth0-vue';

export default {
  setup() {

    const { loginWithRedirect, user, isAuthenticated, logout } = useAuth0();

    return {
      login: () => {
        loginWithRedirect();
      },
      logout: () => {
        logout({ logoutParams: { returnTo: window.location.origin } });
      },
      user,
      isAuthenticated
    };
  }
}
</script>
Update src/components/Home.vue.
<template>
  <div class="column justify-center items-center" id="row-container">
    <q-card class="my-card">
      <q-card-section style="text-align: center">
        <div v-if='isAuthenticated'>
          <h6>You are logged in as {{user.email}}</h6>
          <q-btn flat color="primary" @click="todo">Go to Todo app</q-btn>
          <q-btn flat @click="logout">Log out</q-btn>
        </div>
        <div v-else>
          <h6>Please <a href="#" @click.prevent="login">log in</a> to access Todo app</h6>
        </div>
      </q-card-section>
    </q-card>
  </div>
</template>

<script>

import { useAuth0 } from '@auth0/auth0-vue';
import { useRouter } from 'vue-router'

export default {
  name: 'HomeComponent',
  setup() {

    const { loginWithRedirect, user, isAuthenticated, logout } = useAuth0();
    const router = useRouter()

    return {
      login: () => {
        loginWithRedirect();
      },
      logout: () => {
        logout({ returnTo: window.location.origin });
      },
      todo() {
        router.push('/todos')
      },
      user,
      isAuthenticated
    };
  }
}
</script>
Finally, update src/router/index.js.
import { createRouter, createWebHistory } from 'vue-router'
import Todos from '@/components/Todos';
import Home from '@/components/Home';

const routes = [
  {
    path: '/',
    component: Home
  },
  {
    path: '/todos',
    component: Todos,
    meta: {
      requiresAuth: true
    }
  },
]

const router = createRouter({
  history: createWebHistory(process.env.BASE_URL),
  routes,
})

export default router
The usage of the Auth0 SDK is pretty similar to the Okta Vue SDK. If you have any questions, take a look at the auth0-vue GitHub repository.
Make sure your Spring Boot API is still running. Run the client.
npm run serve
This time when you log in you will be directed to Auth0.
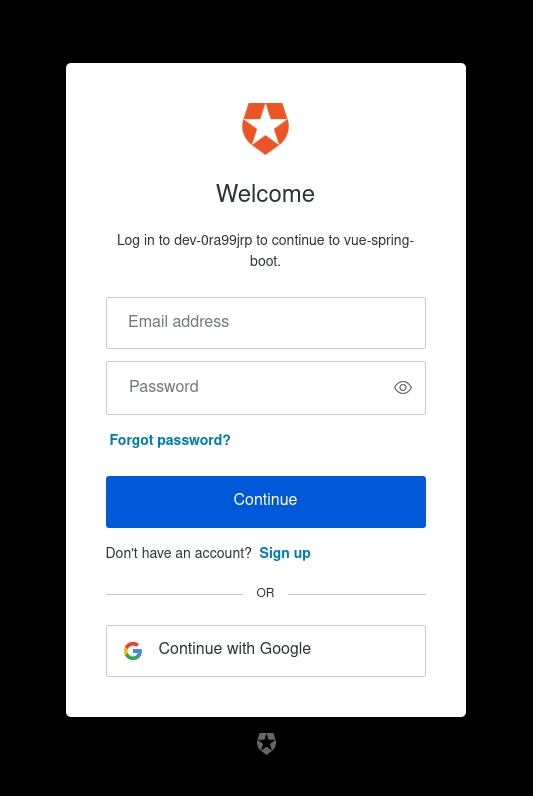
After that, you will be redirected back to the todo app.
Do more with Spring Boot, Vue, and Okta
You built a Spring Boot resource server backend and a Vue frontend in this tutorial. The Vue client used the latest Vue 3 version with the Quasar framework. The app included full CRUD (create, read, update, and delete) capabilities. It was all secured first using Okta, and then, a second time, via Auth0.
You can find the source code for this example on GitHub in the @oktadev/okta-spring-boot-vue-crud-example repository.
If you liked this post, there’s a good chance you’ll like similar ones:
- Introducing Spring Native for JHipster: Serverless Full-Stack Made Easy
- Add Authentication to Your Vanilla JavaScript App in 20 Minutes
- Mobile Development with Ionic, React Native, and JHipster
- Fast Java Made Easy with Quarkus and JHipster
- Build a CRUD App with Vue.js, Spring Boot, and Kotlin
- Add OpenID Connect to Angular Apps Quickly
If you have questions, please ask them in the comments below! If you’re into social media, follow us: @oktadev on Twitter, Okta for Developers on LinkedIn, and OktaDev on Facebook. If you like learning via video, subscribe to our YouTube channel.
Changelog:
- May 19, 2025: Added warning about org type name change
- Apr 26, 2023: Updated to use the Okta Spring Boot starter, which supports Auth0 in v3.0.3. You can find the changes to this post in okta-blog#1365 and the example app’s changes in okta-spring-boot-vue-crud-example#8.
- Jan 20, 2023: Updated post to add Auth0 and use Spring Boot 3.0. You can find the changes to this post in okta-blog#1284. Example app changes can be found in okta-spring-boot-vue-crud-example#6.
Okta Developer Blog Comment Policy
We welcome relevant and respectful comments. Off-topic comments may be removed.