CI/CD Java Microservices with CircleCI and Spinnaker

Continuous integration and delivery (CI/CD) are essential practices for modern software development. In this post we cover the basics of how to add CI/CD for a JHipster microservices architecture and Kubernetes as the target cloud deployment environment.
Briefly, continuous integration is the practice of integrating code into the main branch of a shared repository early and often. Instead of integrating features at the end of a development cycle, code is integrated with the shared repository multiple times throughout the day. Each commit triggers automated tests, so issues are detected and fixed earlier and faster, improving team confidence and productivity. The chosen continuous integration platform is from CircleCI, a company founded in 2011 and headquartered in San Francisco. They offer a free cloud to test their services.
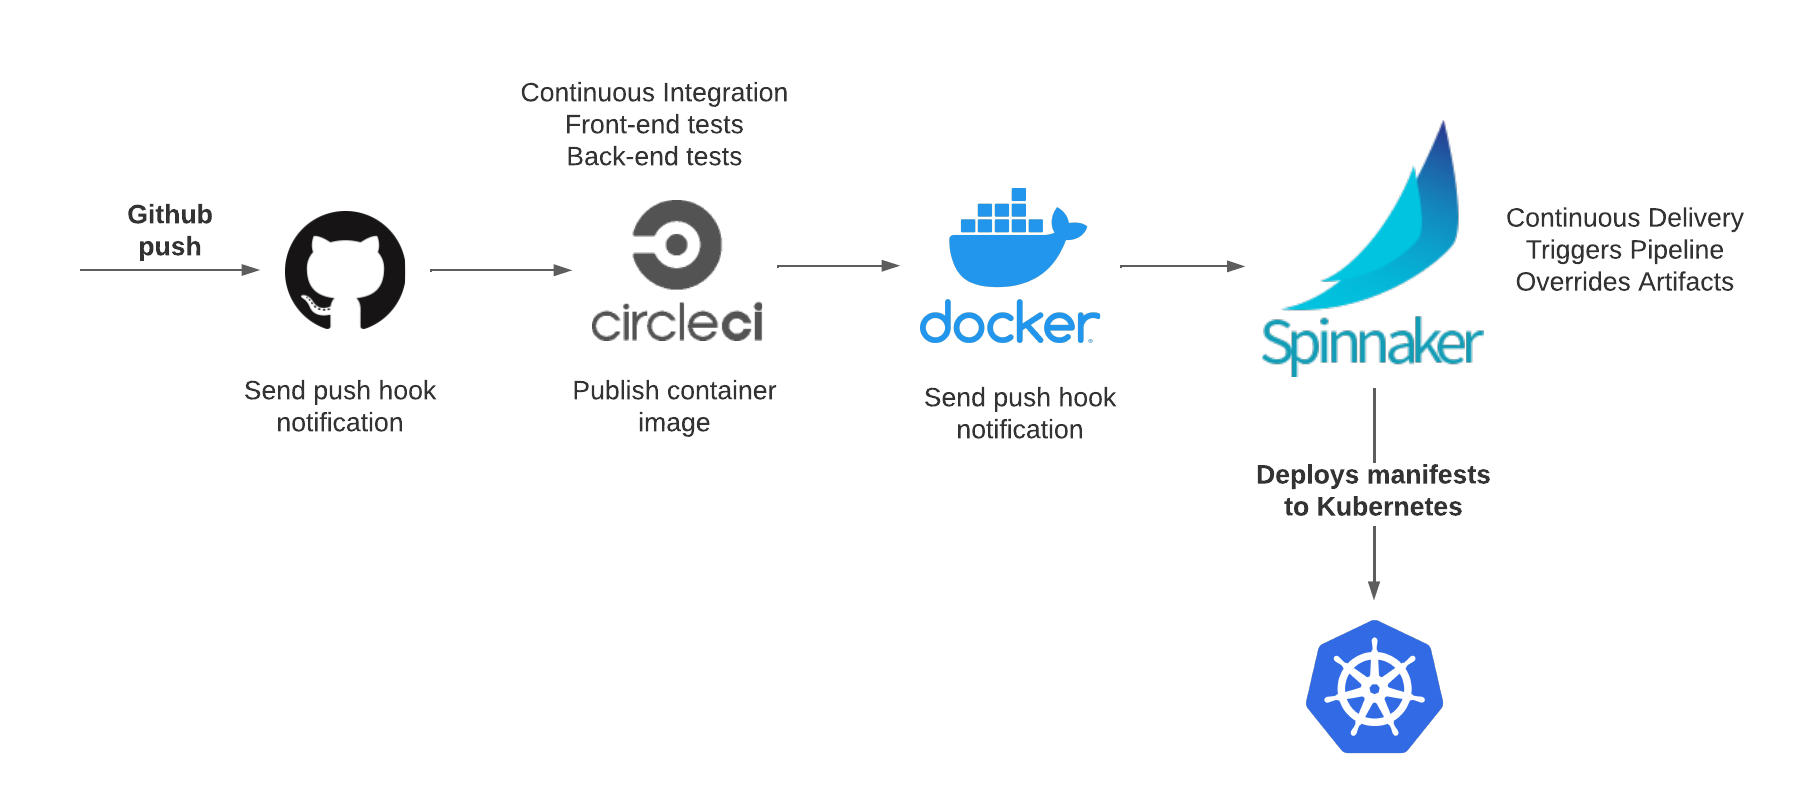
Continuous delivery is the practice of releasing to production often in a fast, safe, and automated way, allowing faster innovation and feedback loops. Its adoption requires the implementation of techniques and tools like Spinnaker, an open-source, multi-cloud, continuous delivery platform that provides application management and deployment features. The intersection between CI and CD is not always clear, but for this example, we assume CI produces and validates the artifacts and CD deploys them. The CI/CD workflow for the exploration of the proposed tools is illustrated below.
This tutorial was created with the following frameworks and tools:
- JHipster 7.9.2
- Java OpenJDK 11
- Okta CLI 0.10.0
- Halyard 1.44.1
- kubectl 1.23
- gcloud CLI 391.0.0
- k9s v0.25.18
- Docker 20.10.12
Table of Contents
- Create a Java microservices architecture
- Set up CI for JHipster with CircleCI
- Install Spinnaker on Google Kubernetes Engine
- Set up CD for a JHipster microservices architecture
- Spinnaker features and best practices
- Learn more about JHipster, microservices, and Kubernetes
Note: In May 2025, the Okta Integrator Free Plan replaced Okta Developer Edition Accounts, and the Okta CLI was deprecated.
We preserved this post for reference, but the instructions no longer work exactly as written. Replace the Okta CLI commands by manually configuring Okta following the instructions in our Developer Documentation.
Create a Java microservices architecture
If you haven’t tried JHipster yet, you can do the classical local installation with npm.
npm install -g generator-jhipster@7.9.2
If you’d rather use Yarn or Docker, follow the instructions at jhipster.tech.
You can also use the example reactive-jhipster from GitHub, a reactive microservices architecture with Spring Cloud Gateway and Spring WebFlux, Vue as the client framework, and Gradle as the build tool. You can find the complete instructions for building the architecture in a previous post: Reactive Java Microservices with Spring Boot and JHipster.
Create a project folder jhipster-ci-cd.
cd jhipster-ci-cd
http -d https://raw.githubusercontent.com/oktadev/java-microservices-examples/bc7cbeeb1296bd0fcc6a09f4e39f4e6e472a076a/reactive-jhipster/reactive-ms.jdl
jhipster jdl reactive-ms.jdl
After the generation, you will find sub-folders were created for the gateway, store, and blog services. The gateway will act as the front-end application and as a secure router to the store and blog microservices.
The next step is to generate the Kubernetes deployment descriptors. In the project root folder, create a kubernetes directory and run the k8s JHipster sub-generator:
mkdir kubernetes
cd kubernetes
jhipster k8s
NOTE: You must set up the Docker repository name for the cloud deployment, so go ahead and create a Docker Hub personal account, if you don’t have one, before running the k8s sub-generator.
Choose the following options when prompted:
- Type of application: Microservice application
- Root directory: ../
- Which applications? (select all)
- Set up monitoring? No
- Which applications with clustered databases? select store
- Admin password for JHipster Registry: (generate one)
- Kubernetes namespace: demo
- Docker repository name: your-dockerhub-username
- Command to push Docker image:
docker push - Enable Istio? No
- Kubernetes service type? LoadBalancer
- Use dynamic storage provisioning? Yes
- Use a specific storage class? (leave empty)
Configure Okta for OIDC authentication
One more configuration step before building the applications, let’s configure Okta for authentication. You must run the commands at the root folder of the project.
Before you begin, you’ll need a free Okta developer account. Install the Okta CLI and run okta register to sign up for a new account. If you already have an account, run okta login.
Then, run okta apps create jhipster. Select the default app name, or change it as you see fit.
Accept the default Redirect URI values provided for you.
What does the Okta CLI do?
The Okta CLI streamlines configuring a JHipster app and does several things for you:
- Creates an OIDC app with the correct redirect URIs:
- login:
http://localhost:8080/login/oauth2/code/oidcandhttp://localhost:8761/login/oauth2/code/oidc - logout:
http://localhost:8080andhttp://localhost:8761
- login:
- Creates
ROLE_ADMINandROLE_USERgroups that JHipster expects - Adds your current user to the
ROLE_ADMINandROLE_USERgroups - Creates a
groupsclaim in your default authorization server and adds the user’s groups to it
NOTE: The http://localhost:8761* redirect URIs are for the JHipster Registry, which is often used when creating microservices with JHipster. The Okta CLI adds these by default.
You will see output like the following when it’s finished:
Okta application configuration has been written to: /path/to/app/.okta.env
Run cat .okta.env (or type .okta.env on Windows) to see the issuer and credentials for your app. It will look like this (except the placeholder values will be populated):
export SPRING_SECURITY_OAUTH2_CLIENT_PROVIDER_OIDC_ISSUER_URI="https://{yourOktaDomain}/oauth2/default"
export SPRING_SECURITY_OAUTH2_CLIENT_REGISTRATION_OIDC_CLIENT_ID="{clientId}"
export SPRING_SECURITY_OAUTH2_CLIENT_REGISTRATION_OIDC_CLIENT_SECRET="{clientSecret}"
NOTE: You can also use the Okta Admin Console to create your app. See Create a JHipster App on Okta for more information.
Add the settings from the generated .okta.env to kubernetes/registry-k8s/application-configmap.yml:
data:
  application.yml: |-
    ...
    spring:
      security:
        oauth2:
          client:
            provider:
              oidc:
                issuer-uri: https://<your-okta-domain>/oauth2/default
            registration:
              oidc:
                client-id: <client-id>
                client-secret: <client-secret>
Enable the OIDC authentication in the jhipster-registry service by adding the oauth2 profile in the kubernetes/registry-k8s/jhipster-registry.yml file:
- name: SPRING_PROFILES_ACTIVE
  value: prod,k8s,oauth2
We are going to build the gateway and store in a continuous integration workflow with CircleCI.
Set up CI for JHipster with CircleCI
First, create the CircleCI configuration for the store microservice and the gateway. “What about the blog app?”, you might ask. I’m not including it in this example to streamline this tutorial. You should be able to configure it similar to the store if you want to deploy everything.
cd store
jhipster ci-cd
cd gateway
jhipster ci-cd
For both applications, choose the following options:
- What CI/CD pipeline do you want to generate? CircleCI
- What tasks/integrations do you want to include? (none)
You must tweak the generated configuration at store/.circleci/config.yml, as the following changes are required for successful execution:
- Change the execution environment of the workflow to a dedicated VM, as that is required by the TestContainers dependency in tests. The chosen environment is LinuxVM, a standalone Ubuntu 20.04 virtual machine.
- As the dedicated VM includes Docker, the Docker installation step in the configuration must be removed.
- Add a conditional step for building and pushing the image to Docker Hub, only if the branch name is
main.
Note: You can also configure the job to only build specific branches.
The final config.yml must look like this:
version: 2.1
jobs:
  build:
    environment:
      DOCKERHUB_USER: your-dockerhub-username
      IMAGE_NAME: your-dockerhub-username/store
    machine:
      image: ubuntu-2004:current
    resource_class: large
    steps:
      - checkout
      - restore_cache:
          keys:
            - v1-dependencies-{{ checksum "build.gradle" }}-{{ checksum "package-lock.json" }}
            # Perform a Partial Cache Restore (https://circleci.com/docs/2.0/caching/#restoring-cache)
            - v1-dependencies-
      - run:
          name: Print Java Version
          command: 'java -version'
      - run:
          name: Print Node Version
          command: 'node -v'
      - run:
          name: Print NPM Version
          command: 'npm -v'
      - run:
          name: Install Node Modules
          command: 'npm install'
      - save_cache:
          paths:
            - node
            - node_modules
            - ~/.gradle
          key: v1-dependencies-{{ checksum "build.gradle" }}-{{ checksum "package-lock.json" }}
      - run:
          name: Give Executable Power
          command: 'chmod +x gradlew'
      - run:
          name: Backend tests
          command: npm run ci:backend:test
      - when:
          condition:
            equal: [ main, << pipeline.git.branch >> ]
          steps:
            - run:
                name: Build and Publish Docker Image
                command: |
                  ./gradlew -Pprod bootJar jib \
                    -Djib.to.image=$IMAGE_NAME \
                    -Djib.to.auth.username=$DOCKERHUB_USER \
                    -Djib.to.auth.password=$DOCKERHUB_PASS
Do the same updates to the gateway/.circleci/config.yml file. Additionally, the following change is required:
- Add
~/.cache/Cypressas a cache path
Be sure to replace your-dockerhub-username and set the correct IMAGE_NAME.
The final config.yml for the gateway must look like this:
version: 2.1
jobs:
  build:
    environment:
      DOCKERHUB_USER: your-dockerhub-username
      IMAGE_NAME: your-dockerhub-username/gateway
    machine:
      image: ubuntu-2004:current
    resource_class: large
    steps:
      - checkout
      - restore_cache:
          keys:
            - v1-dependencies-{{ checksum "build.gradle" }}-{{ checksum "package-lock.json" }}
            # Perform a Partial Cache Restore (https://circleci.com/docs/2.0/caching/#restoring-cache)
            - v1-dependencies-
      - run:
          name: Print Java Version
          command: 'java -version'
      - run:
          name: Print Node Version
          command: 'node -v'
      - run:
          name: Print NPM Version
          command: 'npm -v'
      - run:
          name: Install Node Modules
          command: 'npm install'
      - save_cache:
          paths:
            - node
            - node_modules
            - ~/.gradle
            - ~/.cache/Cypress
          key: v1-dependencies-{{ checksum "build.gradle" }}-{{ checksum "package-lock.json" }}
      - run:
          name: Give Executable Power
          command: 'chmod +x gradlew'
      - run:
          name: Backend tests
          command: npm run ci:backend:test
      - run:
          name: Run Front End Tests
          command: npm run ci:frontend:test
      - when:
          condition:
            equal: [ main, << pipeline.git.branch >> ]
          steps:
            - run:
                name: Build and Publish Docker Image
                command: |
                  ./gradlew -Pprod bootJar jib \
                    -Djib.to.image=$IMAGE_NAME \
                    -Djib.to.auth.username=$DOCKERHUB_USER \
                    -Djib.to.auth.password=$DOCKERHUB_PASS
To take advantage of the one-step GitHub integration of CircleCI, you need a GitHub account. After signing in to GitHub, create a new public repository store. Follow the instructions to push the existing repository from your local machine to GitHub using the command line. Do the same with the gateway project.
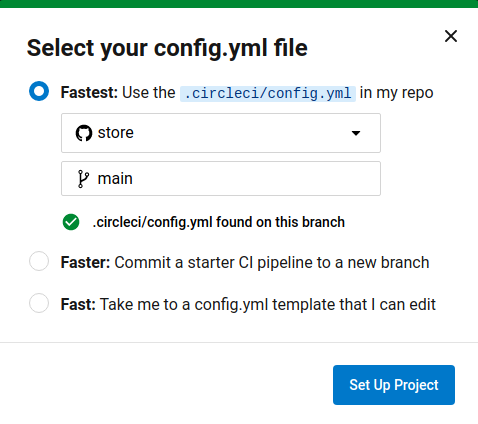
Sign up at CircleCI with your GitHub account, and on the left menu choose Projects. Find the store project and click Set Up Project. Configure the project to use the Fastest option (Use the .circleci/config.yml in my repo) and type main for the branch. Click Set Up Project to continue.
Do the same for the gateway project. The configuration triggers an initial pipeline execution that will fail, because you still must set up Docker Hub credentials for both projects, allowing CircleCI to push the container images. At the store project page, on the top right, choose Project Settings. Then choose Environment Variables. Click Add Environment Variable. and set the following values:
- Name:
DOCKERHUB_PASS - Value: your Docker Hub password, or better, a Docker Hub access token if you have 2FA enabled.
NOTE: For creating a Docker Hub access token, sign in to Docker Hub, and choose Account Settings in the top right user menu. Then, on the left menu, choose Security. Click New Access Token and set a description for the token, for example, circleci. Then click Generate and copy the new token. You can use the same token for both projects store and gateway.
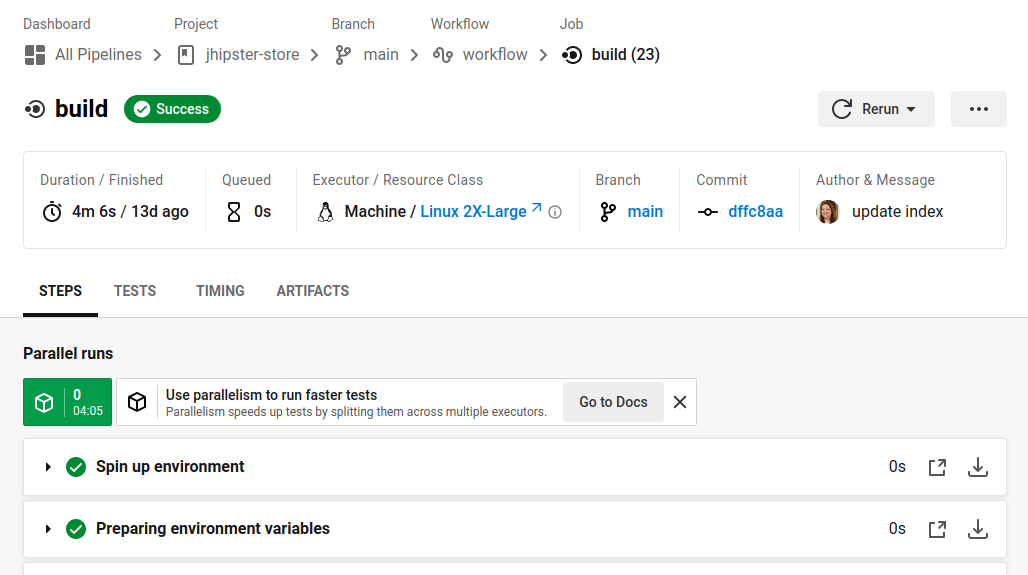
Once a project is set up in CircleCI, a pipeline is triggered each time a commit is pushed to the configured branch. The pipeline in execution appears on the Dashboard page. You can also manually trigger the pipeline from the Dashboard if you choose the project and branch from the pipeline filters, and then click Trigger Pipeline. Before moving on to the next section, manually execute the store pipeline and the gateway pipeline once, to push the first image of each to Docker Hub.
NOTE: If you modify the configuration, and encounter CircleCI cache errors, the only way I found to recreate the cache is to update the version prefix, for example:
v2-dependencies-{{ checksum "build.gradle" }}-{{ checksum "package-lock.json" }}
Install Spinnaker on Google Kubernetes Engine
Although CircleCI supports deployment for common targets, Spinnaker is a deployment manager that supports multiple cloud providers, promoting artifacts through stages (dev, staging, UAT, production), and creating continuous delivery workflows. Spinnaker does not support CI, but it can listen to events and collect artifacts produced by external CI systems.
You can choose among the following installation environments for Spinnaker:
- Distributed installation on Kubernetes
- Local installation of Debian packages
- Local git installation from GitHub
For this example, the distributed alternative was selected. But before the installation, learn about some key concepts in Spinnaker configuration.
Understand Spinnaker artifacts and accounts
A Spinnaker artifact is a named JSON object that refers to an external resource, for example, a Docker image or a file stored in GitHub. In a pipeline trigger, you can specify an expected artifact, and Spinnaker will compare the incoming artifact from the trigger and bind it to be used by the trigger or another stage in the pipeline. Also in Kubernetes, the deployed manifests can be provided statically or as an artifact. In this example, manifests are provided as artifacts stored in GitHub.
For Spinnaker to access and act on resources, like Docker registries, cloud providers, and code repositories, different types of accounts must be enabled in the Spinnaker configuration, along with the credentials. In addition, the configuration has the optional step of associating Spinnaker with a Kubernetes service account, allowing you to restrict permissions over the cluster resources granted to Spinnaker.
Install Halyard
As described in Spinnaker docs, the first step is to install Halyard. For a local install in MacOS:
curl -O https://raw.githubusercontent.com/spinnaker/halyard/master/install/macos/InstallHalyard.sh
sudo bash InstallHalyard.sh
Verify the installation with:
hal -v
You must also install kubectl, the Kubernetes command line tool, to run commands against the clusters.
Choose GKE for Spinnaker deployment
The second step is to choose a cloud provider for the environment in which you will install Spinnaker. For Kubernetes, Spinnaker needs a kubeconfig file, to access and manage the cluster. For creating a kubeconfig for a GKE cluster, you must first create the cluster. Google Cloud provides a free tier of their services that grants you $300 in free credits if you are a new user.
After you sign up, install gcloud CLI. When you reach the end of the process, the last step is to run gcloud init and set up authorization for the tool. Also install the Kubectl authentication plugin.
Create the cluster for the Spinnaker deployment with the following line:
gcloud container clusters create spinnaker-cluster \
--zone southamerica-east1-a \
--machine-type n1-standard-4 \
--enable-autorepair \
--enable-autoupgrade
Then fetch the cluster credentials with:
gcloud container clusters get-credentials spinnaker-cluster --zone southamerica-east1-a
get-credentials will update a kubeconfig file with appropriate credentials and endpoint information to point kubectl at a specific cluster in Google Kubernetes Engine.
Create a namespace for the Spinnaker cluster:
kubectl create namespace spinnaker
The Spinnaker documentation recommends creating a Kubernetes service account, using Kubernetes role definitions that restrict the permissions granted to the Spinnaker account. Create a spinnaker folder in the root folder or any other location. Add the file spinnaker-service-account.yml with the following content:
apiVersion: rbac.authorization.k8s.io/v1
kind: ClusterRole
metadata:
  name: spinnaker-role
rules:
  - apiGroups: ['']
    resources:
      [
        'namespaces',
        'configmaps',
        'events',
        'replicationcontrollers',
        'serviceaccounts',
        'pods/log',
      ]
    verbs: ['get', 'list']
  - apiGroups: ['']
    resources: ['pods', 'services', 'secrets']
    verbs:
      [
        'create',
        'delete',
        'deletecollection',
        'get',
        'list',
        'patch',
        'update',
        'watch',
      ]
  - apiGroups: ['autoscaling']
    resources: ['horizontalpodautoscalers']
    verbs: ['list', 'get']
  - apiGroups: ['apps']
    resources: ['controllerrevisions']
    verbs: ['list']
  - apiGroups: ['extensions', 'apps']
    resources: ['daemonsets', 'deployments', 'deployments/scale', 'ingresses', 'replicasets', 'statefulsets']
    verbs:
      [
        'create',
        'delete',
        'deletecollection',
        'get',
        'list',
        'patch',
        'update',
        'watch',
      ]
  # These permissions are necessary for Halyard to operate. We use this role also to deploy Spinnaker itself.
  - apiGroups: ['']
    resources: ['services/proxy', 'pods/portforward']
    verbs:
      [
        'create',
        'delete',
        'deletecollection',
        'get',
        'list',
        'patch',
        'update',
        'watch',
      ]
---
apiVersion: rbac.authorization.k8s.io/v1
kind: ClusterRoleBinding
metadata:
  name: spinnaker-role-binding
roleRef:
  apiGroup: rbac.authorization.k8s.io
  kind: ClusterRole
  name: spinnaker-role
subjects:
  - namespace: spinnaker
    kind: ServiceAccount
    name: spinnaker-service-account
---
apiVersion: v1
kind: ServiceAccount
metadata:
  name: spinnaker-service-account
  namespace: spinnaker
Then execute the following commands to create the service account in the current context:
CONTEXT=$(kubectl config current-context)

kubectl apply --context $CONTEXT \
    -f ./spinnaker-service-account.yml

TOKEN=$(kubectl get secret --context $CONTEXT \
   $(kubectl get serviceaccount spinnaker-service-account \
       --context $CONTEXT \
       -n spinnaker \
       -o jsonpath='{.secrets[0].name}') \
   -n spinnaker \
   -o jsonpath='{.data.token}' | base64 --decode)

kubectl config set-credentials ${CONTEXT}-token-user --token $TOKEN

kubectl config set-context $CONTEXT --user ${CONTEXT}-token-user
Enable the Kubernetes provider in Halyard:
hal config provider kubernetes enable
NOTE: You will see warnings related to missing configuration. Be patient, in the following steps all will be solved.
Add the service account to the Halyard configuration:
CONTEXT=$(kubectl config current-context)

hal config provider kubernetes account add spinnaker-gke-account \
    --context $CONTEXT
Choose the installation environment
The Distributed installation on Kubernetes deploys each Spinnaker’s microservice separately to a remote cloud, and it is the recommended environment for zero-downtime updates of Spinnaker.
Select the distributed deployment with:
hal config deploy edit --type distributed --account-name spinnaker-gke-account
Choose a storage service
Spinnaker requires an external storage provider for persisting application settings and configured pipelines. To avoid losing this data, using a hosted storage solution is recommended. For this example, we use Google Cloud Storage. Hosting the data externally allows us to delete clusters in between sessions, and keep the pipelines once the clusters have been recreated.
In the spinnaker folder, run the following code:
SERVICE_ACCOUNT_NAME=spinnaker-gcs-account
SERVICE_ACCOUNT_DEST=~/.gcp/gcs-account.json

gcloud iam service-accounts create \
    $SERVICE_ACCOUNT_NAME \
    --display-name $SERVICE_ACCOUNT_NAME

SA_EMAIL=$(gcloud iam service-accounts list \
    --filter="displayName:$SERVICE_ACCOUNT_NAME" \
    --format='value(email)')

PROJECT=$(gcloud config get-value project)

gcloud projects add-iam-policy-binding $PROJECT \
    --role roles/storage.admin --member serviceAccount:$SA_EMAIL

mkdir -p $(dirname $SERVICE_ACCOUNT_DEST)

gcloud iam service-accounts keys create $SERVICE_ACCOUNT_DEST \
    --iam-account $SA_EMAIL

BUCKET_LOCATION=us

hal config storage gcs edit --project $PROJECT \
    --bucket-location $BUCKET_LOCATION \
    --json-path $SERVICE_ACCOUNT_DEST

hal config storage edit --type gcs
The last hal commands edit the storage settings and set the storage source to GCS.
Deploy Spinnaker
You can verify the deployment configuration with:
hal config deploy
And the storage configuration with:
hal config storage
List the available Spinnaker versions:
hal version list
Set the version for the deployment with:
hal config version edit --version 1.27.0
Deploy Spinnaker to GKE:
hal deploy apply
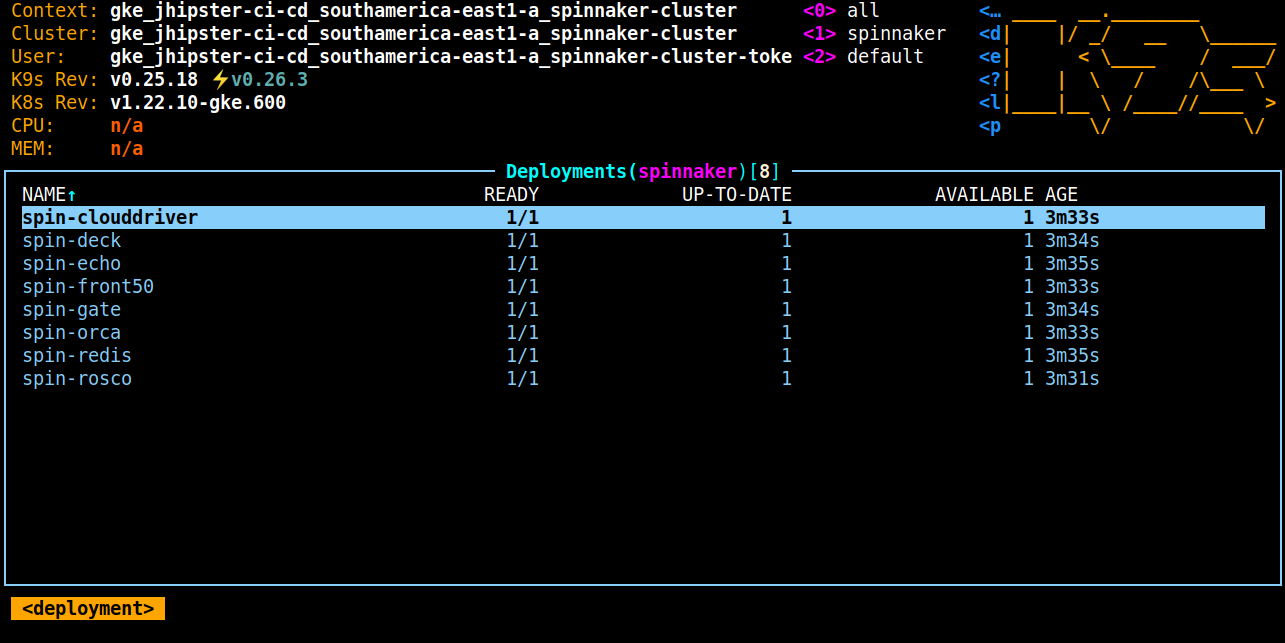
Even if hal deploy apply returns successfully, the installation may not be complete yet. Check if the pods are ready with k9s:
k9s -n spinnaker
A healthy Spinnaker deployment will look like this:
You can connect to the Spinnaker UI using the following command:
hal deploy connect
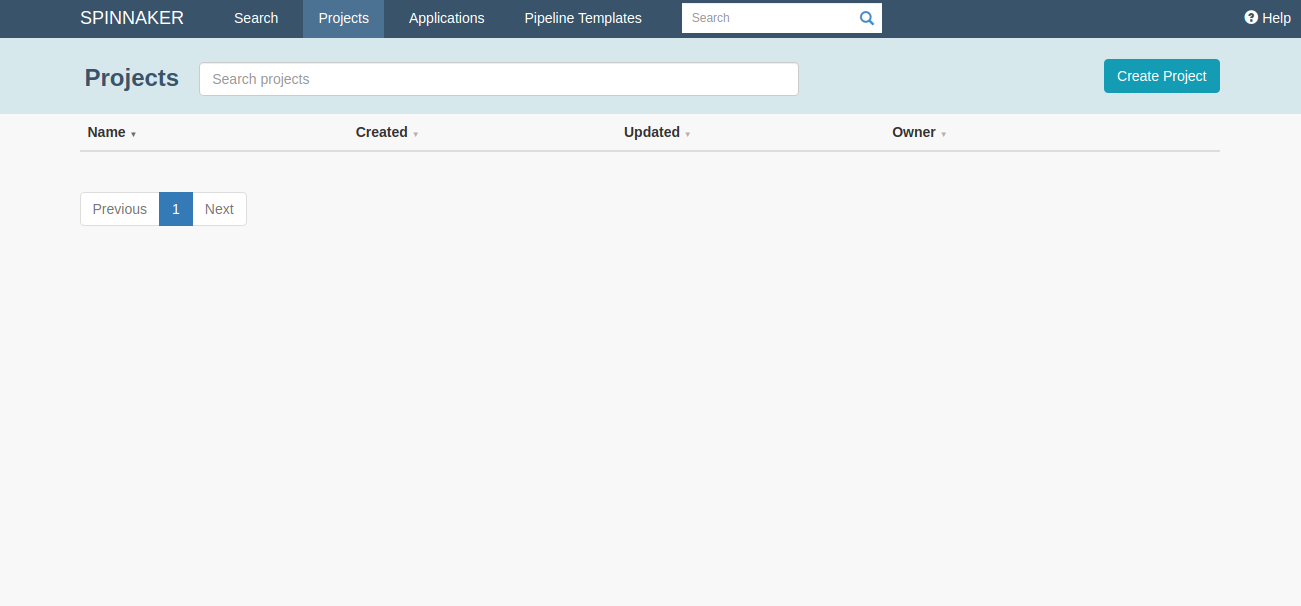
Navigate to http://localhost:9000 and the UI should load. The Projects tab should look like the screenshot below.
Set up CD for a JHipster microservices architecture
Spinnaker is multi-cloud because it can manage delivery to multiple cloud providers. Some companies use different platforms for production and test environments. In this example, the same cloud provider (GKE) was chosen both for Spinnaker deployment and for the application test deployment.
Use GKE for Kubernetes deployment
Now I’ll show you how to add a new Kubernetes account for a different cluster, which will be used for application deployment.
Create a cluster for the JHipster microservices architecture:
gcloud container clusters create jhipster-cluster \
--zone southamerica-east1-a \
--machine-type n1-standard-4 \
--enable-autorepair \
--enable-autoupgrade
Fetch the cluster credentials:
gcloud container clusters get-credentials jhipster-cluster --zone southamerica-east1-a
Create the namespace demo for your microservices:
kubectl create namespace demo
In the spinnaker directory, create the file jhipster-service-account.yml:
apiVersion: rbac.authorization.k8s.io/v1
kind: ClusterRole
metadata:
  name: jhipster-role
rules:
  - apiGroups: ['']
    resources:
      [
        'namespaces',
        'events',
        'replicationcontrollers',
        'serviceaccounts',
        'pods/log',
      ]
    verbs: ['get', 'list']
  - apiGroups: ['']
    resources: ['pods', 'services', 'secrets', 'configmaps', 'persistentvolumeclaims']
    verbs:
      [
        'create',
        'delete',
        'deletecollection',
        'get',
        'list',
        'patch',
        'update',
        'watch',
      ]
  - apiGroups: ['autoscaling']
    resources: ['horizontalpodautoscalers']
    verbs: ['list', 'get']
  - apiGroups: ['apps']
    resources: ['controllerrevisions']
    verbs: ['list']
  - apiGroups: ['extensions', 'apps']
    resources: ['daemonsets', 'deployments', 'deployments/scale', 'ingresses', 'replicasets', 'statefulsets']
    verbs:
      [
        'create',
        'delete',
        'deletecollection',
        'get',
        'list',
        'patch',
        'update',
        'watch',
      ]
  # These permissions are necessary for Halyard to operate. We use this role also to deploy Spinnaker itself.
  - apiGroups: ['']
    resources: ['services/proxy', 'pods/portforward']
    verbs:
      [
        'create',
        'delete',
        'deletecollection',
        'get',
        'list',
        'patch',
        'update',
        'watch',
      ]
---
apiVersion: rbac.authorization.k8s.io/v1
kind: ClusterRoleBinding
metadata:
  name: jhipster-role-binding
roleRef:
  apiGroup: rbac.authorization.k8s.io
  kind: ClusterRole
  name: jhipster-role
subjects:
  - namespace: demo
    kind: ServiceAccount
    name: jhipster-service-account
---
apiVersion: v1
kind: ServiceAccount
metadata:
  name: jhipster-service-account
  namespace: demo
Notice there are some differences with the Spinnaker service account. The k8s manifests generated by JHipster include the creation of secrets, configmaps, and persistentvolumeclaims. The management of those Kubernetes resources must be granted to the service account used for deploying the JHipster k8s manifests.
Create the Kubernetes jhipster-service-account:
CONTEXT=$(kubectl config current-context)

kubectl apply --context $CONTEXT \
    -f ./jhipster-service-account.yml
TOKEN=$(kubectl get secret --context $CONTEXT \
   $(kubectl get serviceaccount jhipster-service-account \
       --context $CONTEXT \
       -n demo \
       -o jsonpath='{.secrets[0].name}') \
   -n demo \
   -o jsonpath='{.data.token}' | base64 --decode)

kubectl config set-credentials ${CONTEXT}-token-user --token $TOKEN

kubectl config set-context $CONTEXT --user ${CONTEXT}-token-user
Add the account to the Halyard configuration:
CONTEXT=$(kubectl config current-context)

hal config provider kubernetes account add jhipster-gke-account \
    --context $CONTEXT
Add a Docker registry account
As the goal is to trigger the pipeline execution when a new image is pushed to Docker Hub, you need to configure a Docker Registry provider with Halyard.
First, enable the Docker Registry provider:
hal config provider docker-registry enable
The following hal config line will prompt for your password (or access token if you have 2FA enabled). Make sure to replace your-dockerhub-username.
ADDRESS=index.docker.io
USERNAME=your-dockerhub-username

hal config provider docker-registry account add docker-account \
    --address $ADDRESS \
    --repositories $USERNAME/store $USERNAME/gateway \
    --username $USERNAME \
    --password
Add a GitHub artifact account
The pipeline will deploy k8s manifests from a GitHub repository, so you must also configure a GitHub artifact account. First, enable the feature:
hal config artifact github enable
Generate an access token on GitHub. Sign in, and in the user menu choose Settings. Then on the left menu choose Developer settings. On the left menu choose Personal access tokens. Click Generate new token and copy the token.
Then add your GitHub username and set the new token when prompted:
ARTIFACT_ACCOUNT_NAME=your-github-username

hal config artifact github account add $ARTIFACT_ACCOUNT_NAME \
    --token
The new GKE, Docker, and GitHub account configurations must be applied to the deployment before starting the pipeline design:
hal deploy apply
Create the store microservice pipeline
The pipeline is the central concept in deployment management with Spinnaker. It is compounded by a sequence of actions, named stages. A pipeline can be triggered manually or automatically, and have an execution history. Connect to the Spinnaker UI again to create the first pipeline.
hal deploy connect
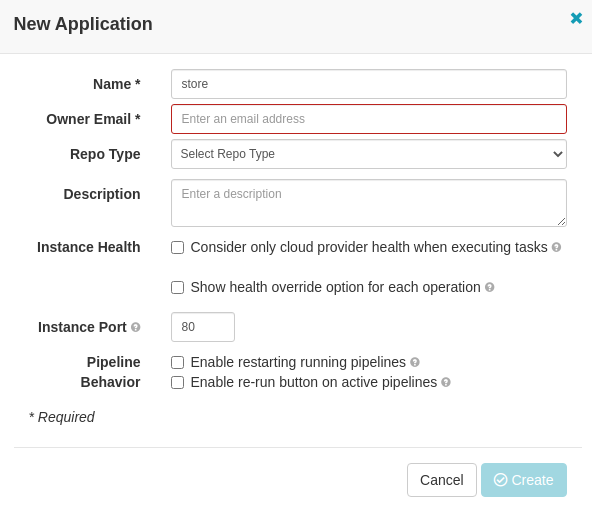
Navigate to https://localhost:9000 > Applications. Click Create Application and just set the application name and owner email. The repository type and additional fields are not mandatory and you can leave all blank for this test.
Then, on the left menu, choose Pipelines and click Configure a new pipeline. Set a name for the pipeline, for example, store-cd.
Configure the Docker image triggers
In the pipeline configuration, click Add Trigger. Set the following configuration for the trigger:
- Type: Docker Registry
- Registry Name: docker-account
- Organization: your-dockerhub-username
- Image: your-dockerhub-username/store
- Artifact Constraints: Choose Define new artifact
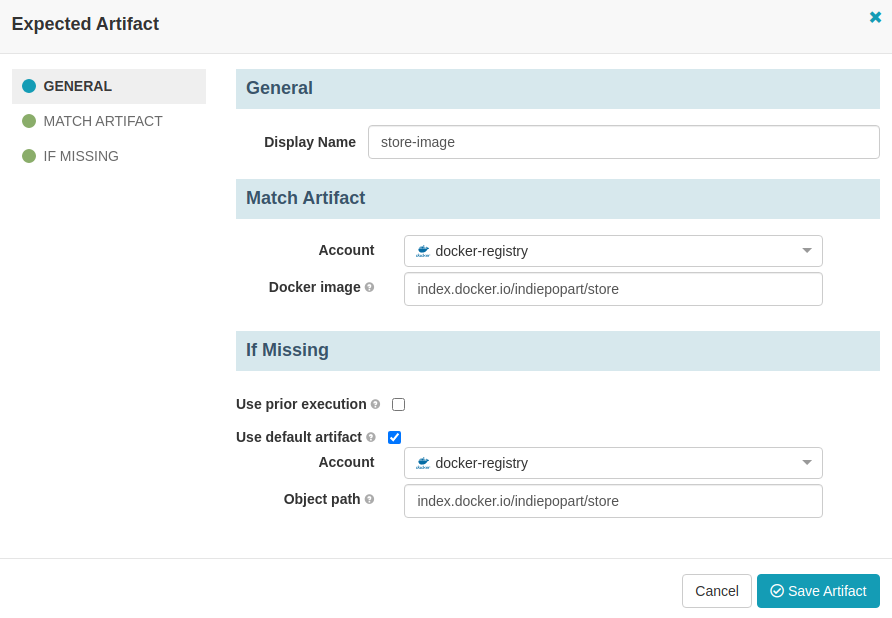
In the Expected Artifact form, set the following values:
- Display Name: store-image
- Account: docker-registry
- Docker image: Fully qualified index.docker.io/your-dockerhub-username/store
- Use prior execution: yes
- Use default artifact: yes (set the same account and object path as before)
Click Save Artifact.
IMPORTANT NOTE: Spinnaker provides a mechanism to override the version of Docker images, Kubernetes ConfigMaps, and Secrets in manifests, injecting new versions when one of these objects exists in the pipeline context. However, Spinnaker documentation does not have a clear example of the trigger configuration for the Docker image to be available in the pipeline context. To make it happen, you must set it as an artifact constraint in the trigger. If the artifact constraint is not defined, the original image version in the manifests will be deployed, instead of the new image that triggered the pipeline. If no version is in the manifests, latest will be the default.
Add a second Docker registry trigger for the gateway image pushes and click Save Changes.
Configure the deployment stages
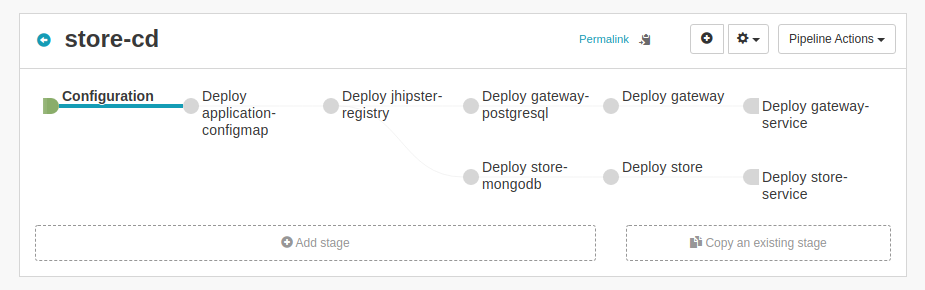
The store pipeline will execute the following stages:
- Deploy the application ConfigMap
- Deploy the JHipster Registry
- Deploy the gateway database PostgreSQL
- Deploy the store clustered database MongoDB
- Deploy the gateway microservice
- Deploy the store microservice
- Enable the gateway service
- Enable the store service
The Kubernetes configuration created in the folder jhipster-ci-cd/kubernetes must be pushed to a GitHub repository, so Spinnaker can access it using the GitHub artifact account created earlier. But before you push, edit kubernetes/store-k8s/store-deployment.yml and set the image name with the fully qualified address:
- name: store-app
  image: index.docker.io/indiepopart/store
Do the same for kubernetes/gateway-k8s/gateway-deployment.yml. This is also required for the artifact substitution to work.
Sign in to GitHub and create a public repository jhipster-k8s. Follow the instructions to push the existing kubernetes folder from your local using the command line.
IMPORTANT NOTE: At this point, you will be pushing plain secrets contained in the application and Kubernetes configuration. To avoid this insecure anti-pattern, you can run the JHipster registry locally to encrypt application configuration, and also set up kubeseal for Kubernetes secrets encryption. The process is described in a previous post: Kubernetes to the Cloud with Spring Boot and JHipster.
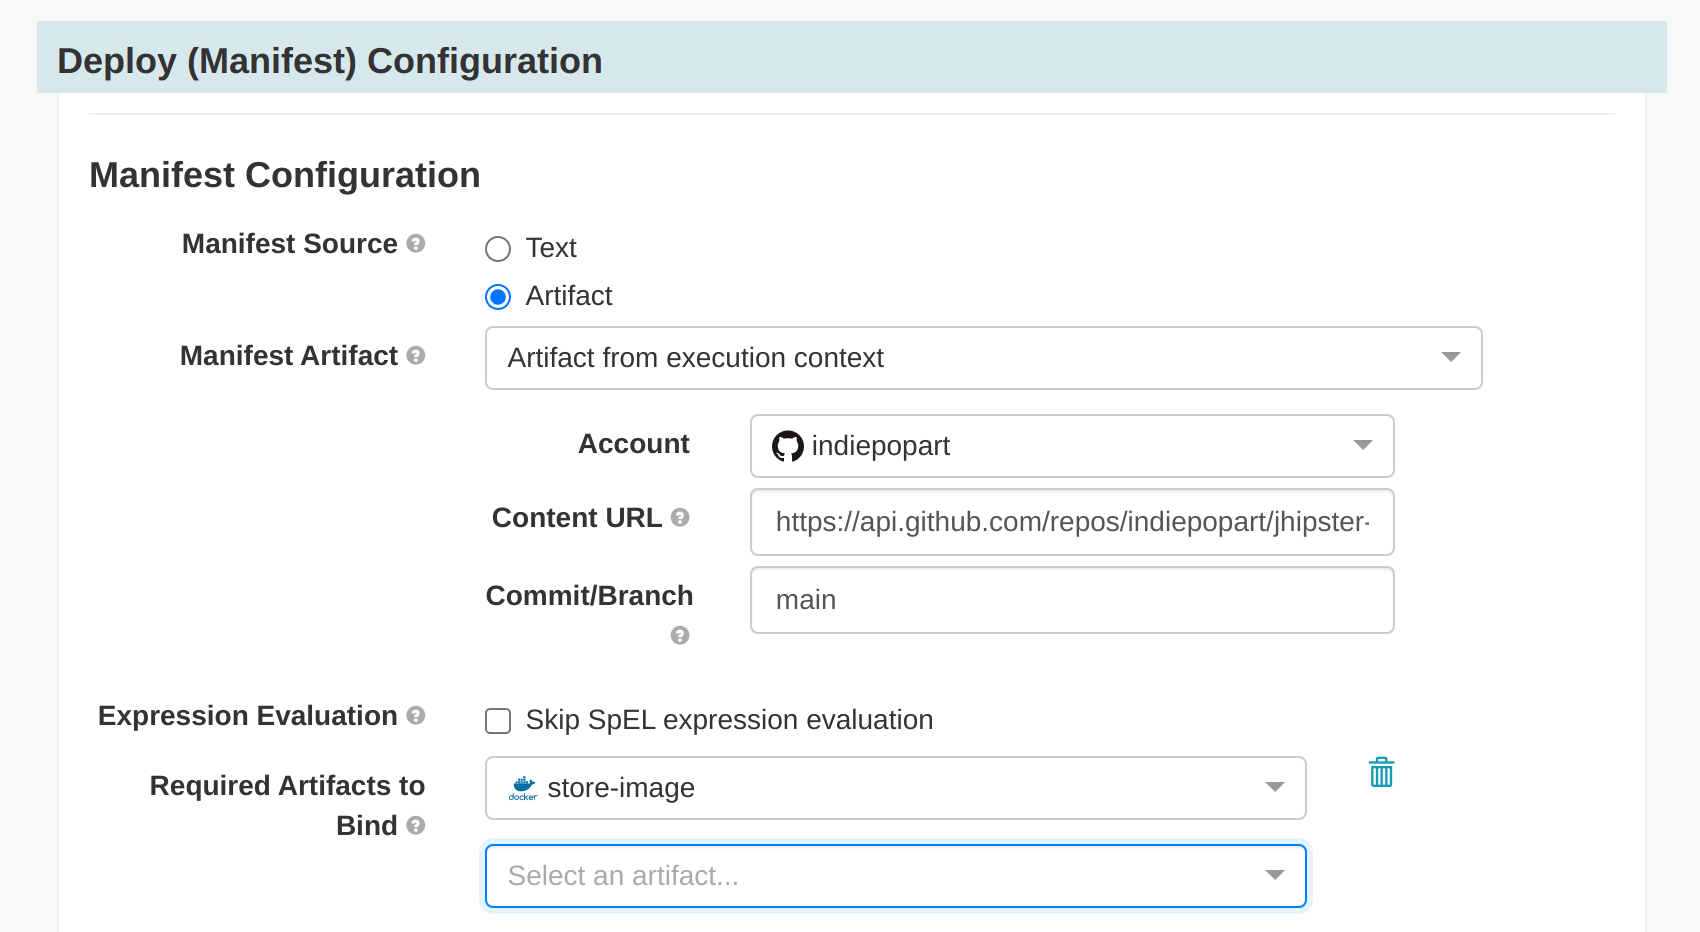
Go back to Spinnaker UI, and in the pipeline configuration choose Add Stage and set the following values:
- Type: Deploy (Manifest)
- Stage Name: deploy application-configmap
- Account: jhipster-gke-account
- Override Namespace: yes
- Namespace: demo
- Manifest Source: Artifact
- Manifest Artifact: Define a new artifact
In the artifact fields, set the following values:
- Account: your-github-username
- Content URL: https://api.github.com/repos/your-github-username/jhipster-k8s/contents/registry-k8s/application-configmap.yml
- Commit/Branch: main
Click Save Changes.
Repeat the process for adding stages to deploy jhipster-registry.yml, which must depend on the previous manifest. Also repeat for gateway-postgresql.yml, store-mongodb.yml manifests, which both should depend on the jhipster-registry stage. Make sure to set the correct Content URL for the GitHub artifact. It must have the form https://api.github.com/repos/<your-github-username>/<repo-name>/contents/<path>. If you open the URL in a browser, it should render a JSON response.
Add a stage for the store-deployment.yml manifest, it must depend on the store-mongodb stage. For this manifest, you must bind the Docker image from the context. In the deploy manifest configuration, in Required Artifacts to Bind, choose store-image. The option must be available, as the image was set as an artifact constraint in the trigger configuration, making the artifact available in the pipeline context.
Also add a stage for the gateway-deployment.yml, binding the gateway Docker image. It must depend on the gateway-postgresql stage.
Finally, add a stage for store-service.yml, which must depend on the store-deployment stage, and a stage for gateway-service.yml, which must depend on the gateway-postgresql stage. Notice that Docker images have to be bound only for the manifests that contain a reference to the image.
The complete pipeline must look like this:
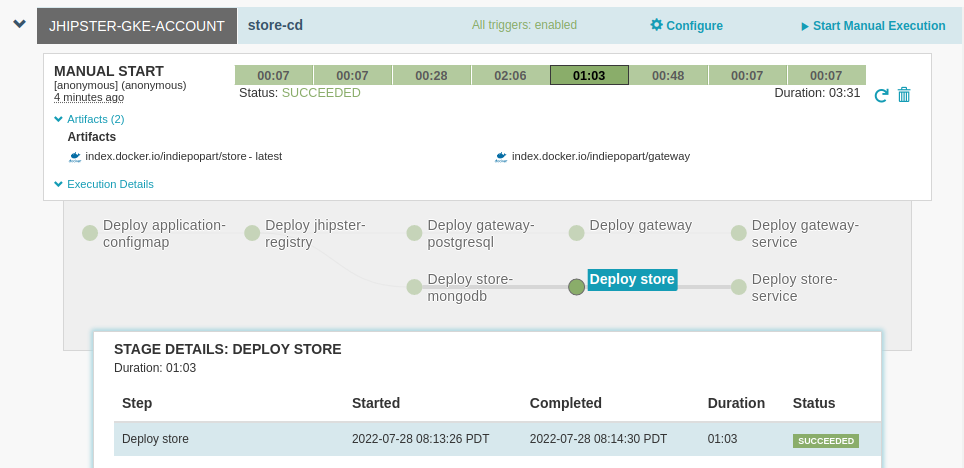
Test the pipeline manually once. Go to Pipelines and select Start Manual Execution for the store-cd pipeline. Set the following options:
- Trigger: leave docker-account: your-dockerhub-username/store
- Type: Tag
- Tag: latest
Successful execution will show all stages in a green state:
Get the external IP of the gateway:
kubectl get svc gateway -n demo
Update the redirect URIs in Okta to allow the gateway address as a valid redirect. Run okta login, open the returned URL in your browser, and sign in to the Okta Admin Console. Go to the Applications section, find your application, edit, and add:
- Sign-in redirect URIs:
http://<external-ip>:8080/login/oauth2/code/oidc - Sign-out redirect URIs:
http://<external-ip>:8080
Navigate to http://<external-ip>:8080 and sign in to the application with your Okta credentials. Then try creating a Product:

Trigger the CI/CD pipeline with a GitHub push
For testing the workflow, make a code change in the gateway. Edit src/main/webapp/content/scss/_bootstrap-variables.scss and update the following variable:
$body-bg: steelblue;
Also, the pipeline under test will only trigger if a new image tag is detected. So edit .circleci/confg.yml and update the image name:
IMAGE_NAME: indiepopart/gateway:v1
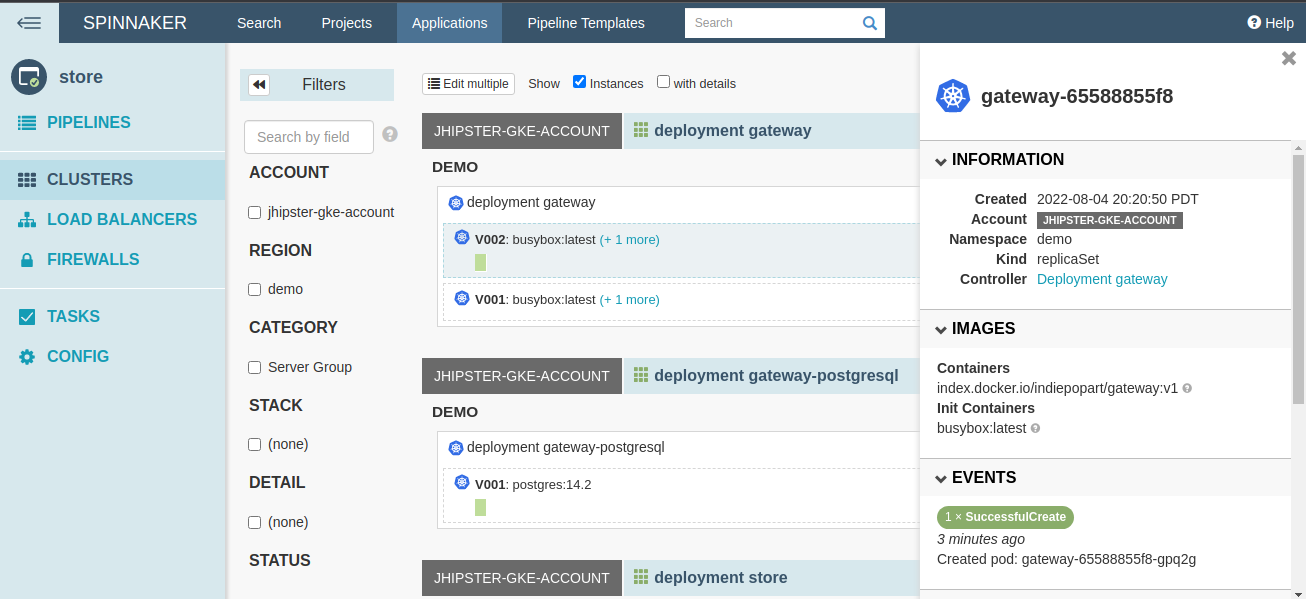
Commit and push the change to the main branch, and watch the CircleCI CI pipeline triggers. After the new gateway image is pushed to Docker Hub, watch the Spinnaker CD pipeline trigger and deploy the updated gateway. On the left menu choose Clusters, and verify the active gateway deployment now has a V002. If you click over the V002 box, you can also verify the image tag that was deployed.
You can delete clusters in between sessions to save costs with the following gcloud commands:
gcloud container clusters delete <cluster-name> \
  --zone <cluster-zone>
The cloud storage used by Spinnaker for pipeline persistence generates some costs, you can also delete it with the CLI or using the web console.
Inspect Spinnaker logs
For pipeline and trigger debugging, the Spinnaker services spin-echo and spin-igor inform Docker monitoring events and indicate the reasons why an execution was skipped.
kubectl get pods -n spinnaker
kubectl logs spin-igor-7c8bdd94f5-lx5dl -n spinnaker | grep v1
Found 1 new images for docker-account. Images: [{imageId=igor:dockerRegistry:v2:docker-account:indiepopart/gateway:v1, sendEvent=true}]
New tagged image: account=docker-account, image=igor:dockerRegistry:v2:docker-account:indiepopart/gateway:v1. Digest is now [null].
Sending tagged image info to echo: account=docker-account: image=igor:dockerRegistry:v2:docker-account:indiepopart/gateway:v1
Spinnaker features and best practices
When implementing continuous delivery, here are some best practices and key features to be aware of:
- Deploy Docker images by digest: Spinnaker documentation recommends deploying images by digest instead of tag, because the tag might reference different content each time. The digest is a content-based hash of the image and it uniquely identifies it. Spinnaker’s artifact substitution allows deploying the same manifest, with the image digest supplied by the pipeline trigger. Using the proposed trigger and a free Docker Hub account as the registry, the digest data seems not to be available. It is also recommended to trigger a CD pipeline off of a push to a Docker registry instead of a GitHub push or Jenkins job, allowing development teams to choose their delivery process without more constraints.
- Rollbacks: Just as there is a stage for deploying manifests, there are also stages for deleting, scaling, and rolling back manifests. Spinnaker also supports automated rollbacks, as it exposes the Undo Rollout functionality as a stage, which can be configured to run when other stages fail, and to roll back by a number of revisions of the deployed object. ConfigMaps and Secrets must be versioned for the automated rollback to actually roll back code or configuration.
- Manual judgments: The pipeline can include a manual judgment stage, that will make the execution interrupt, asking for user input to continue or cancel. This can be used to ask for confirmation before promoting a staging deployment to production.
- Pipeline management: Spinnaker represents pipelines as JSON behind the scenes, and maintains a revision history of the changes made to the pipeline. It also supports pipeline templates, that can be managed through the
spin CLI, and help with pipeline sharing and distribution. - Canary: You can automate Canary analysis by creating canary stages for your pipeline. Canary must be enabled in the Spinnaker installation using
halcommands. The Canary analysis consists of the evaluation of metrics chosen during configuration, comparing a partial rollout with the current deployment. The stage will fail based on the deviation criteria configured for the metric. - Secrets management: Spinnaker does not directly support secrets management. Secrets should be encrypted at rest and in transit. Credentials encryption for application secrets and Kubernetes secrets was covered in a recent post: Kubernetes to the Cloud with Spring Boot and JHipster.
- Rollout strategies: The Spinnaker Kubernetes provider supports running dark, highlander, and red/black rollouts. In the Deploy Manifest stage, there is a strategy option that allows associating workload to a service, sending traffic to it, and choosing how to handle any previous versions of the workload in the same cluster and namespace.
Learn more about JHipster, microservices, and Kubernetes
This article looks at the nuts and bolts of JHipster deployments. CI and CD propose several organizational and technical practices aimed at improving team confidence, efficiency, and productivity. Spinnaker is a powerful tool for continuous deployment, with more than 200 companies around the world contributing to its growth.
As each architecture and organization is different, your pipeline design must be customized to your particular use case. I hope this brief introduction will help you get the most out of these wonderful tools.
To learn more about JHipster and its microservices support, check out the following links:
- JHipster Microservices on AWS with Amazon Elastic Kubernetes Service
- Run Microservices on DigitalOcean with Kubernetes
- Kubernetes Microservices on Azure with Cosmos DB
- Kubernetes to the Cloud with Spring Boot and JHipster
Be sure to follow us on Twitter and subscribe to our YouTube Channel so that you never miss any of our excellent content!
Okta Developer Blog Comment Policy
We welcome relevant and respectful comments. Off-topic comments may be removed.