Build a One-time Password Token for MFA with Okta
Okta has a great multi-factor authentication (MFA) service that you can use right away with a free developer account. It provides additional security by requiring a second factor after authentication and supports a variety of factor types including SMS, soft tokens like Google Authenticator, hard tokens like Yubikey and the Okta Verify soft token with push notification.
Google Authenticator and Okta Verify are a type of factor called time-based one-time password (TOTP) tokens. They use an algorithm based on a shared secret and a system clock with a high degree of precision. Okta adds an additional level of convenience without sacrificing security by supporting push notifications in the Okta Verify mobile app.
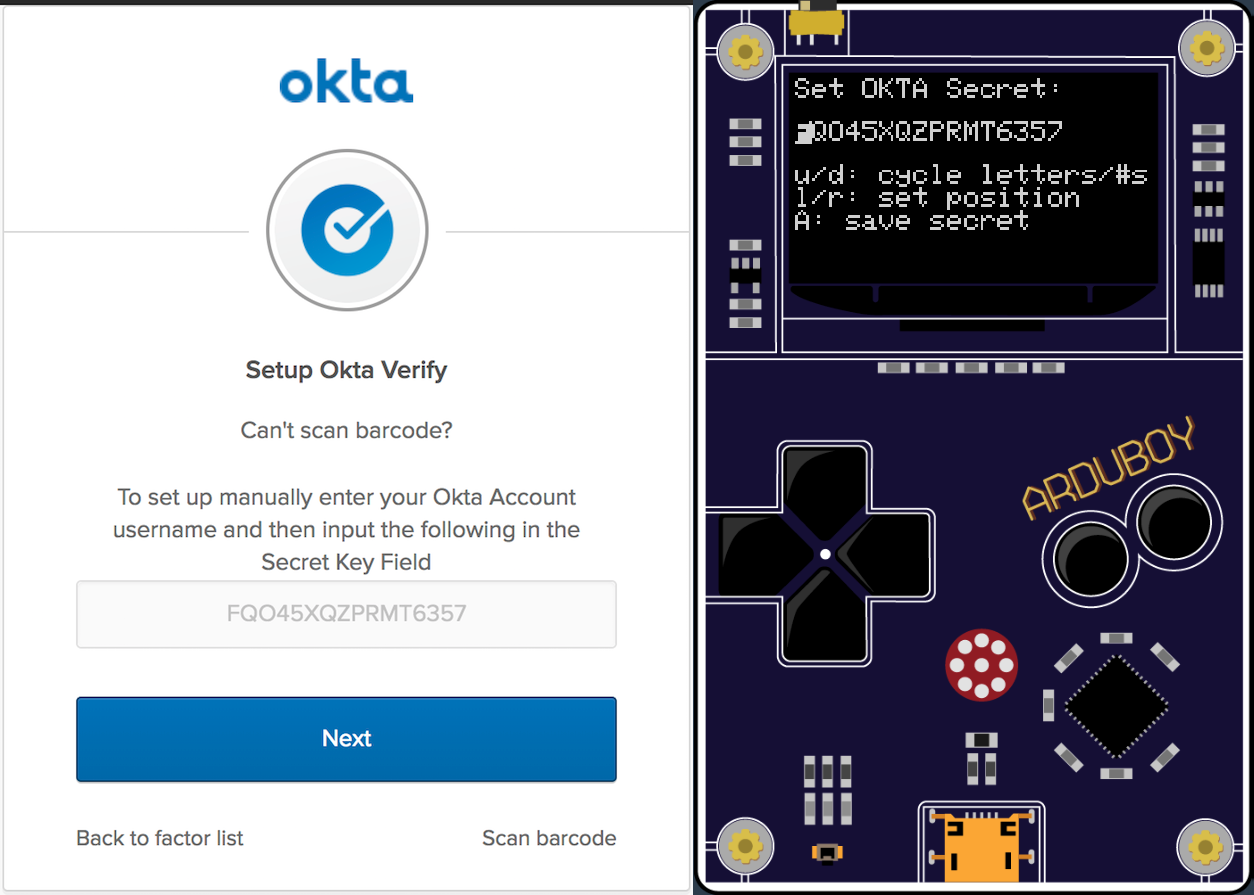
Okta Verify uses a QR Code to read in the shared secret when enrolling in MFA.
In this post, I use the shared secret in a less-convenient but fun way, while still keeping the same level of security. The ArduBoy project combines an Arduino microprocessor with a monochrome OLED screen and a set of buttons that look suspiciously like a classic Nintendo GameBoy. All this fits into a credit card size form-factor. This open-source programming platform makes for the perfect vehicle to use the TOTP standard to create a hardware and software based hybrid token for MFA.
Well, maybe not perfect. But, fun!
The biggest challenge is that when you turn off an ArduBoy, it’s really off. There’s no realtime clock that continues to run when the ArduBoy is off. We take this for granted on our computers or mobile devices that either have hardware to keep the clock running, have the ability to automatically set the time over a network on boot or both. Not so with the ArduBoy! In order to really use this as your go-to TOTP device, you need to keep it on and charge it before it dies.
What the application does to mitigate this is use the onboard EEPROM (Electrically Erasable Programmable Read-Only Memory) to (a) save the secret and (b) save the last date and time set. The next time you turn on the ArduBoy, it checks to see if a secret has been set. If so, it goes directly to setting the date and time. On the date and time setting screen, it starts with the last set date and time to make it easier to update.
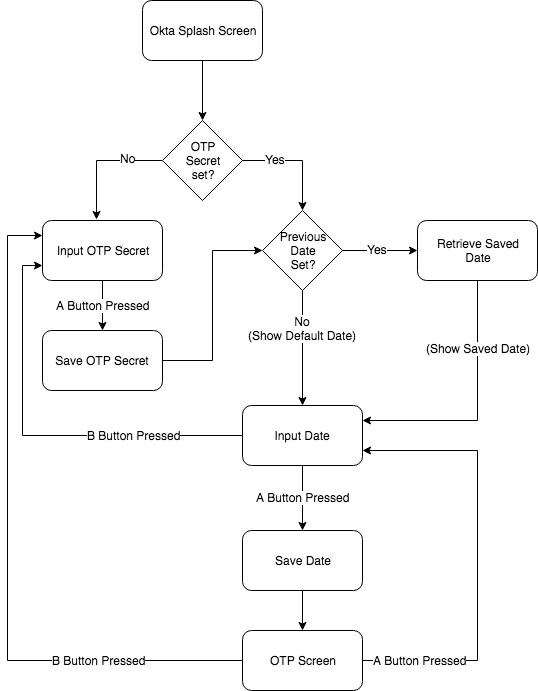
This is a fun way to learn a little about TOTP and see it working against a real Okta organization.
In “real life”, you’ll want to use the Okta Verify mobile app (available on iOS and Android). There’s a lot less manual labor involved.
Note: In May 2025, the Okta Integrator Free Plan replaced Okta Developer Edition Accounts, and the Okta CLI was deprecated.
We preserved this post for reference, but the instructions no longer work exactly as written. Replace the Okta CLI commands by manually configuring Okta following the instructions in our Developer Documentation.
Get Up and Running with an Okta Verify Token
The source code (including a pre-built binary) can be found on the GitHub repository.
If you have an ArduBoy and want to see the app running, you can install the latest binary .hex file directly.
You can also drop the .hex file right onto the ProjectABE ArduBoy emulator site to see it in action without having an actual ArduBoy yourself.
NOTE: ProjectABE does not have the ability to save data to the EEPROM. So, if you restart the application there, you’ll need to re-set both the shared secret and the date and time.
The easiest way to install OktaArduToken onto an actual ArduBoy is to use the
Arduino IDE. This allows you to both edit and upload the source as well as providing the command line tool, avrdude, to upload binaries.
Here’s an example install command using avrdude on Mac:
/Applications/Arduino.app/Contents/Java/hardware/tools/avr/bin/avrdude -v \
-C /Applications/Arduino.app/Contents/Java/hardware/tools/avr/etc/avrdude.conf \
-p atmega32u4 \
-c avr109 \
-P /dev/cu.usbmodem1411 \
-U flash:w:<path to OktaArduToken project>/OktaArduToken.hex
NOTE: The -p parameter specifies the ArduBoy part number and the -c parameter specifies the ArduBoy programmer type. The -P parameter will be different on your Mac. You can see the list of available serial ports by using this command:
ls -la /dev/cu.*
You’re looking for the entry that contains usbmodem in it.
Working with Source Code and Dependencies
If you want to work with the source code in the Arduino IDE, compile it, and upload it to your ArduBoy, you’ll need to install a few libraries. For each of these, navigate to: Sketch -> Include Library -> Manage Libraries.
You’ll need:
- Arduboy2 - An alternative library for the Arduboy miniature game system
- swRTC - A software real-time clock
- TOTP-Arduino - Library to generate time-based one-time Passwords
- Base32 - a library to encode strings into and decode strings from Base32
The Base32 library is the only one that you can’t install via the library manager in Arduino IDE. It’s easy enough to install by cloning the GitHub repository to your local Arduino IDE libraries folder. On Mac, it looks like this:
cd ~/Documents/Arduino/libraries/
git clone https://github.com/NetRat/Base32.git
If all your libraries are in place, you can navigate to: File -> Open... in the Arduino IDE and choose the OktaArduToken.ino file. You should then be able to navigate to: Sketch -> Verify/Compile to compile the code. If you get any errors, make sure that all the above libraries are installed.
Navigating around the OktaArduToken Interface
OktaArduToken is unique among TOTP examples for Arduino or ArduBoy in that it has an interface to set the shared secret and to set the date and time. Most examples require you to hardcode the secret into the source code before uploading.
With a total of 6 buttons, the interface to set the shared secret and the date and time may remind you of a ’90s era flip phone. ;)
Set the Shared Secret
When you first launch that app, you’ll see the shared secret setting screen:
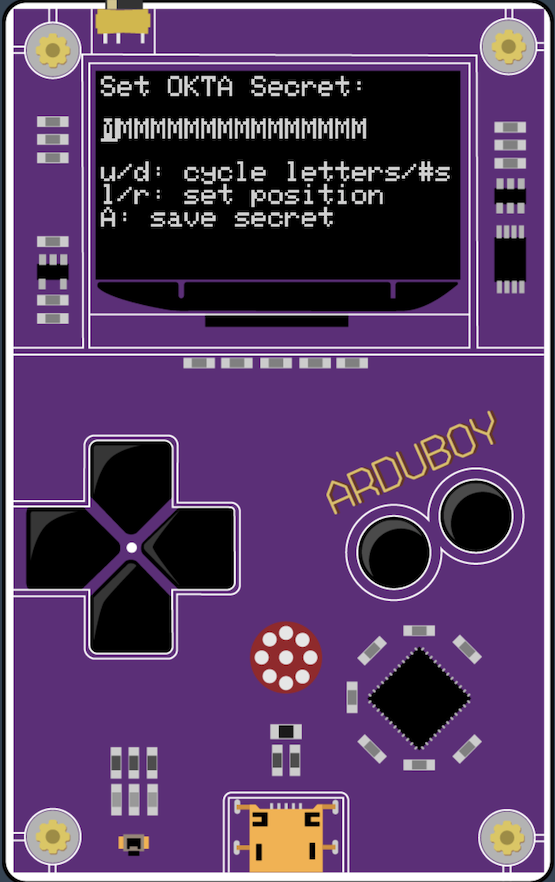
Okta Verify uses a 16-byte Base32 encoded string for the shared secret. Initially, this is shown as 16 Ms. You can use the up and down buttons to navigate around the set of capital letters and the numbers from 0 - 9. You can use the left and right buttons to move positions within the available 16 characters.
The interface automatically wraps. That is, hitting the right button when you’re on the 16th character moves the cursor back to the 1st character. Hitting the left button when you’re on the 1st character moves the cursor to the 16th character. Likewise, hitting the up button when 9 is showing, will change that character to A. Hitting the down arrow when A is showing, will change that character to 9 (it goes A-Z and then 0-9).
When the shared secret is set, press the A button to move on to the date and time setting screen.
NOTE: See below for how to configure Okta for MFA and obtain the shared secret to program in.
Set the Date and Time
Once you’ve saved the shared secret, you’ll see the date and time setting screen:

You can use the up and down arrows to change the numbers for each part of the date and time. You can use the right and left buttons to change positions on the date and time interface. The interface will automatically skip over separators and will automatically wrap around in a similar way to the shared secret interface.
Once the date and time are set, press the A button to move on to the TOTP screen.
NOTE: Precision is important, so it is recommended that you set the time ahead by 10 seconds, watch a clock with a seconds counter and hit the A button the moment at which the times match. Also, the date and time that you set should always be GMT regardless of your current time zone. Also, There is currently NO error checking of any kind. That is, if you put in an invalid date and/or time, you will get unexpected results.
You can press the B button to return to the shared secret screen from here.
The TOTP Display
Once the shared secret and date and time are set, you see the TOTP screen. At the top of the screen, in a large font, you see the current passcode. This passcode changes every 30 seconds. Below the passcode, you see the full date and time which updates every second.
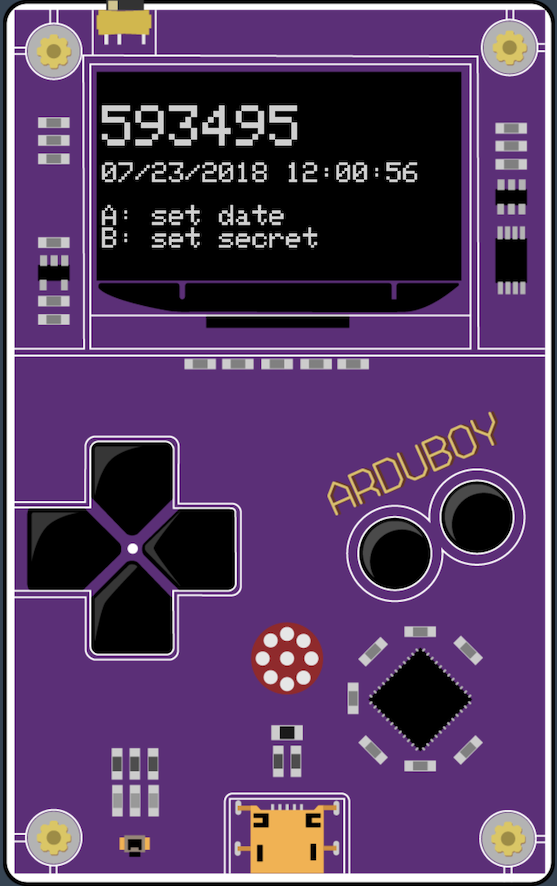
Press the A button to return to the set date and time screen. Press the B button to return to the set shared secret screen.
Configure Okta for Multi-factor Authentication
In Okta, there are two complimentary pieces to MFA: enrollment and enforcement. An MFA enrollment policy drives the conditions under which a user will be required to enroll in MFA and what configured factors they must enroll in. A Signon Policy can be configured to require a second factor after authentication. That’s the MFA enforcement part of the policy.
To get started, signup for a free Okta Developer org at https://developer.okta.com/signup/
Setup an Okta group and a new user to make testing the MFA policies easier.
Log into the admin console of your Okta org. Switch from the Developer Console to the Classic UI by selecting the dropdown in the upper left:
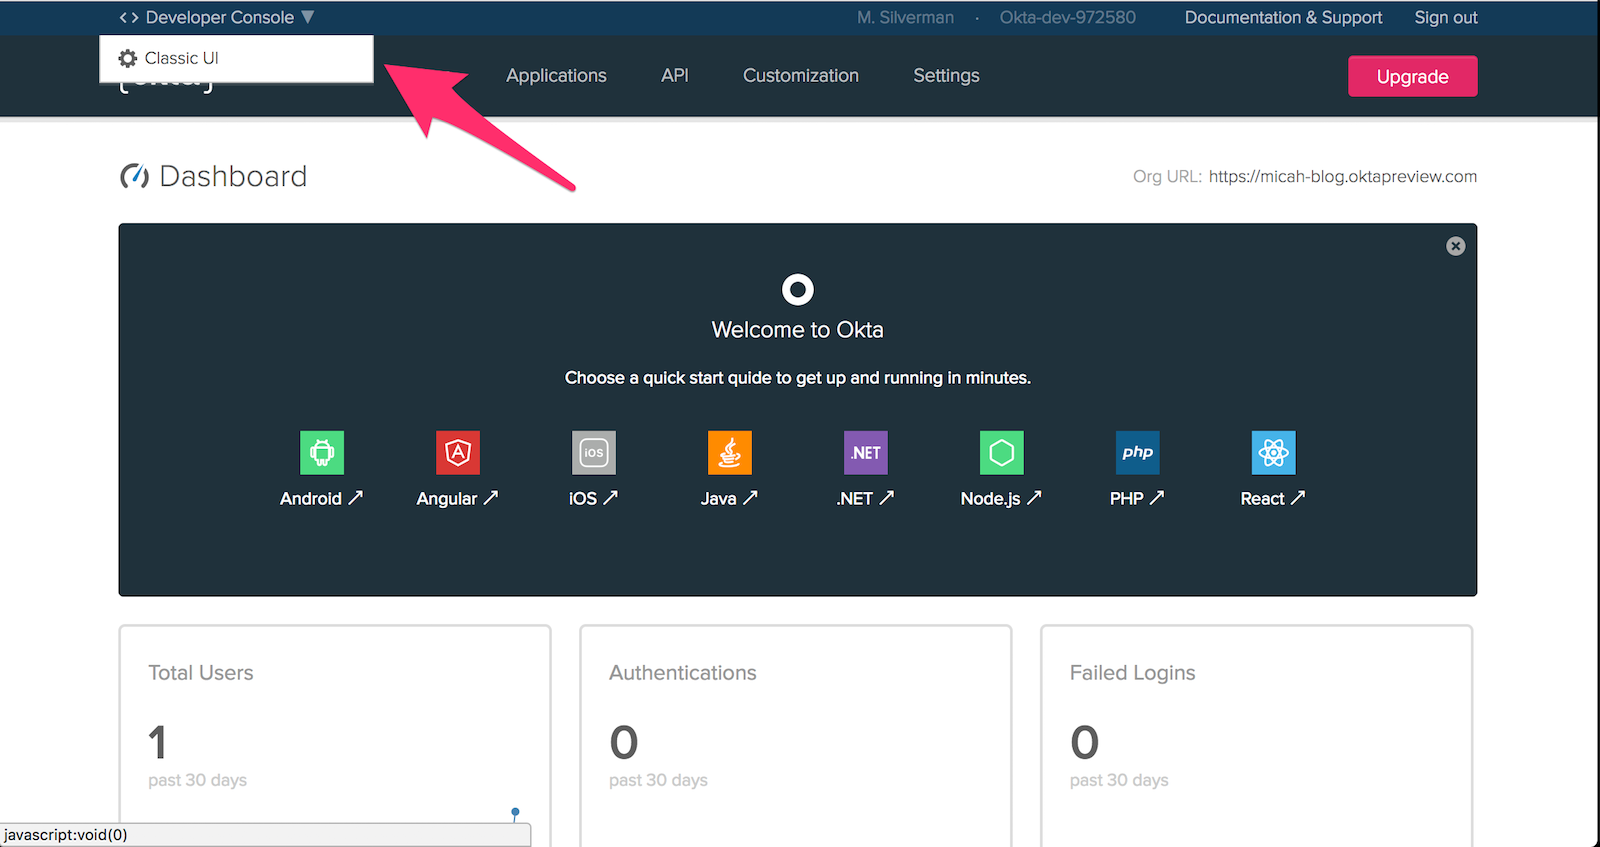
Next, choose: Directory > Groups from the top menu of the admin console. Click Add Group and enter mfaers for the Name field. Click Add Group.
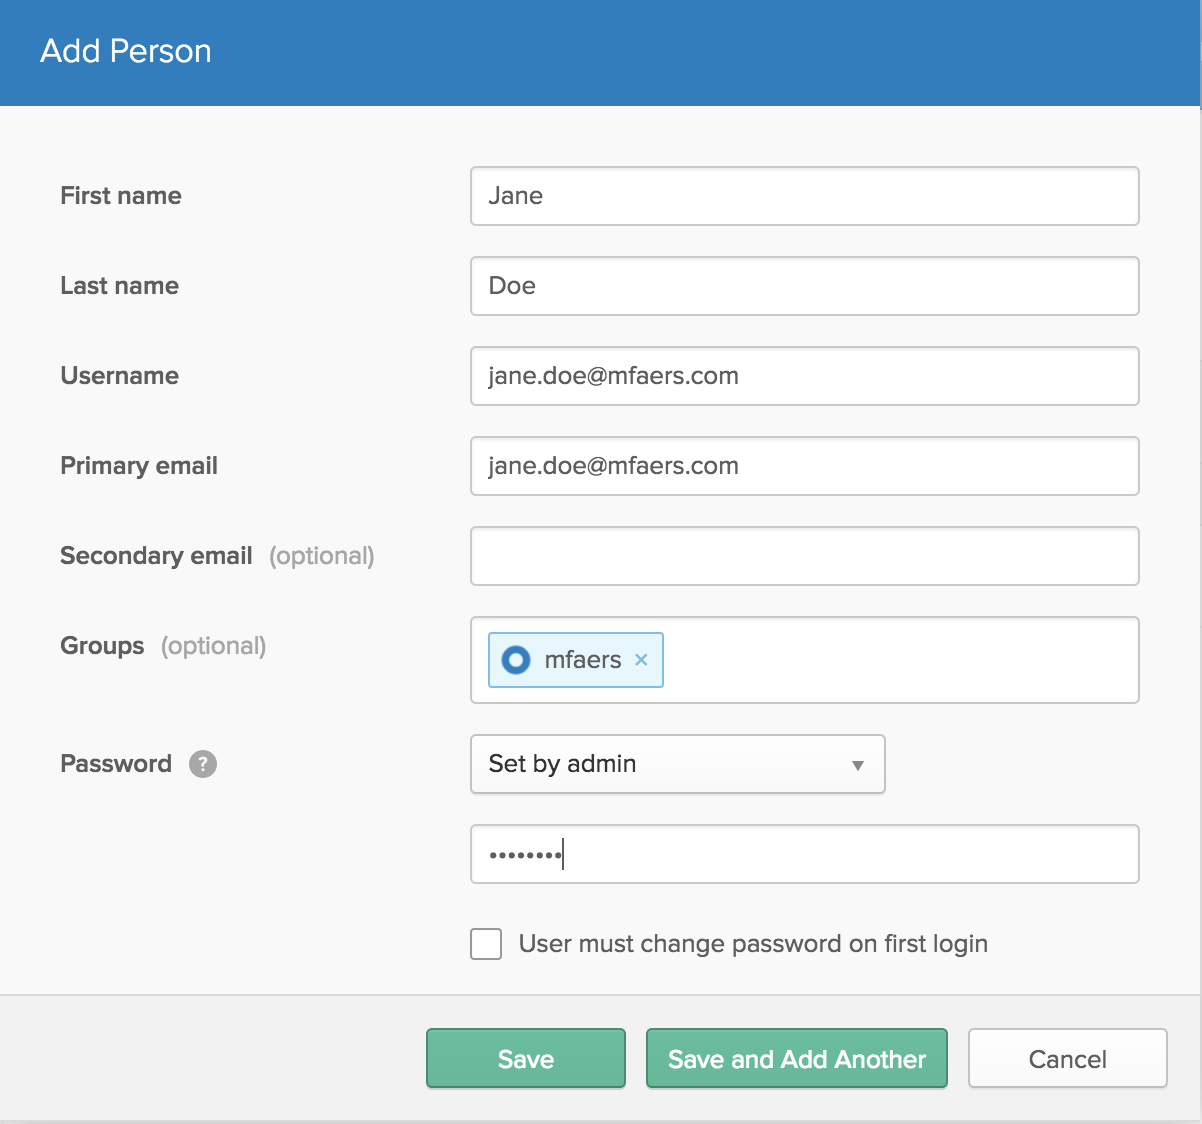
Choose: Directory > People from the top menu of the admin console. Click Add Person and fill in the fields as follows:
| field | value |
|---|---|
| First name | Jane |
| Last name | Doe |
| Username | jane.doe@mfaers.com |
| primary email | jane.doe@mfaers.com |
| Groups | mfaers |
| Password | Set by admin |
| User must change password on first login | (unchecked) |
Enter a password of your choice. Click Save.
Configure an MFA Enrollment Policy
Select Security > Multifactor from the top menu of the admin console.
On the Factor Types tab, select Active next to Okta Verify.
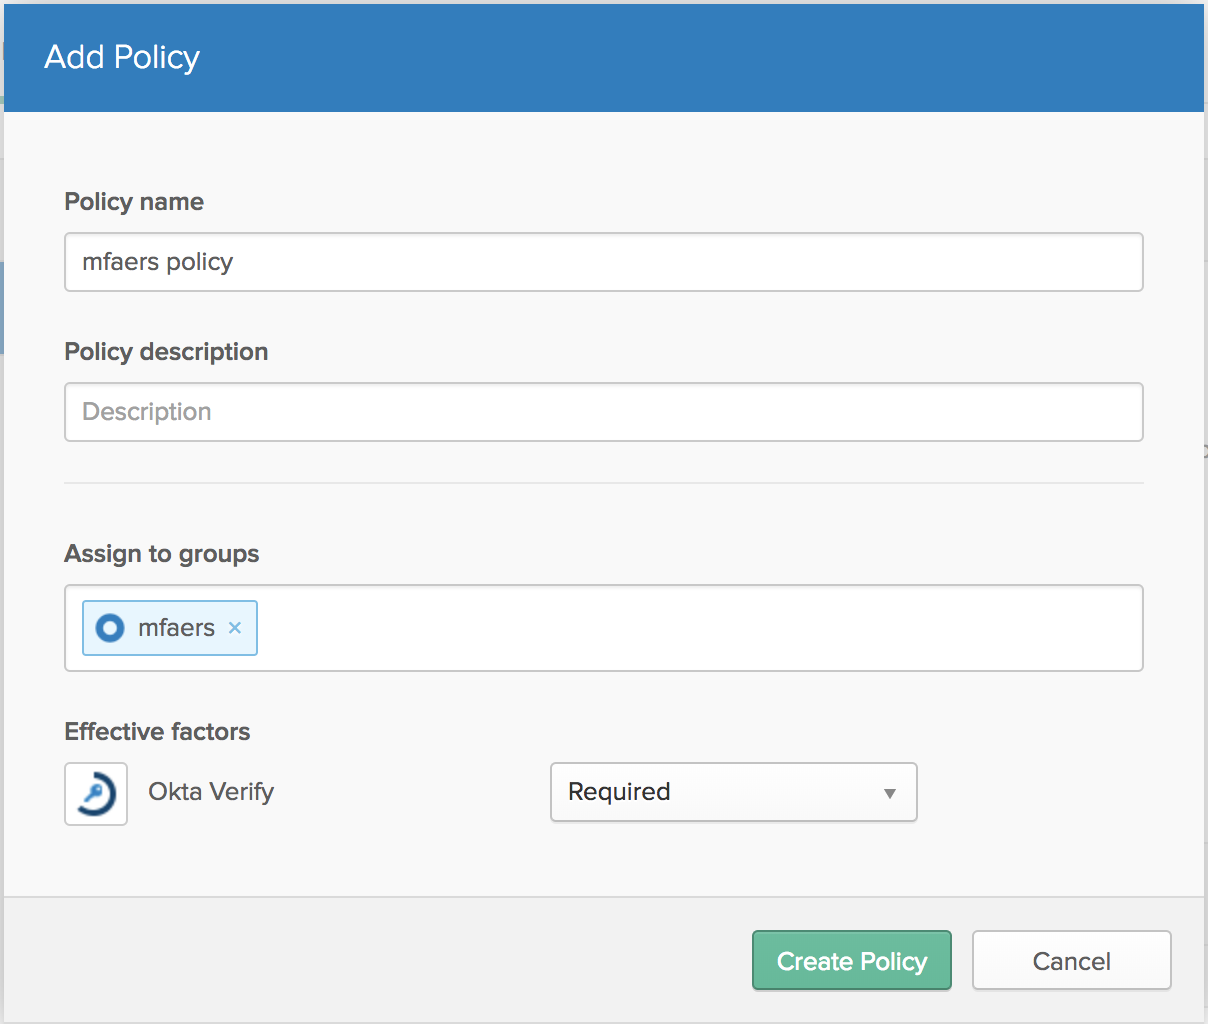
Select the Factor Enrollment tab. Click Add Multifactor Policy, enter mfaers policy for Policy name and choose mfaers for Assign to groups. Select required from the dropdown next to Okta Verify. Click Create Policy.
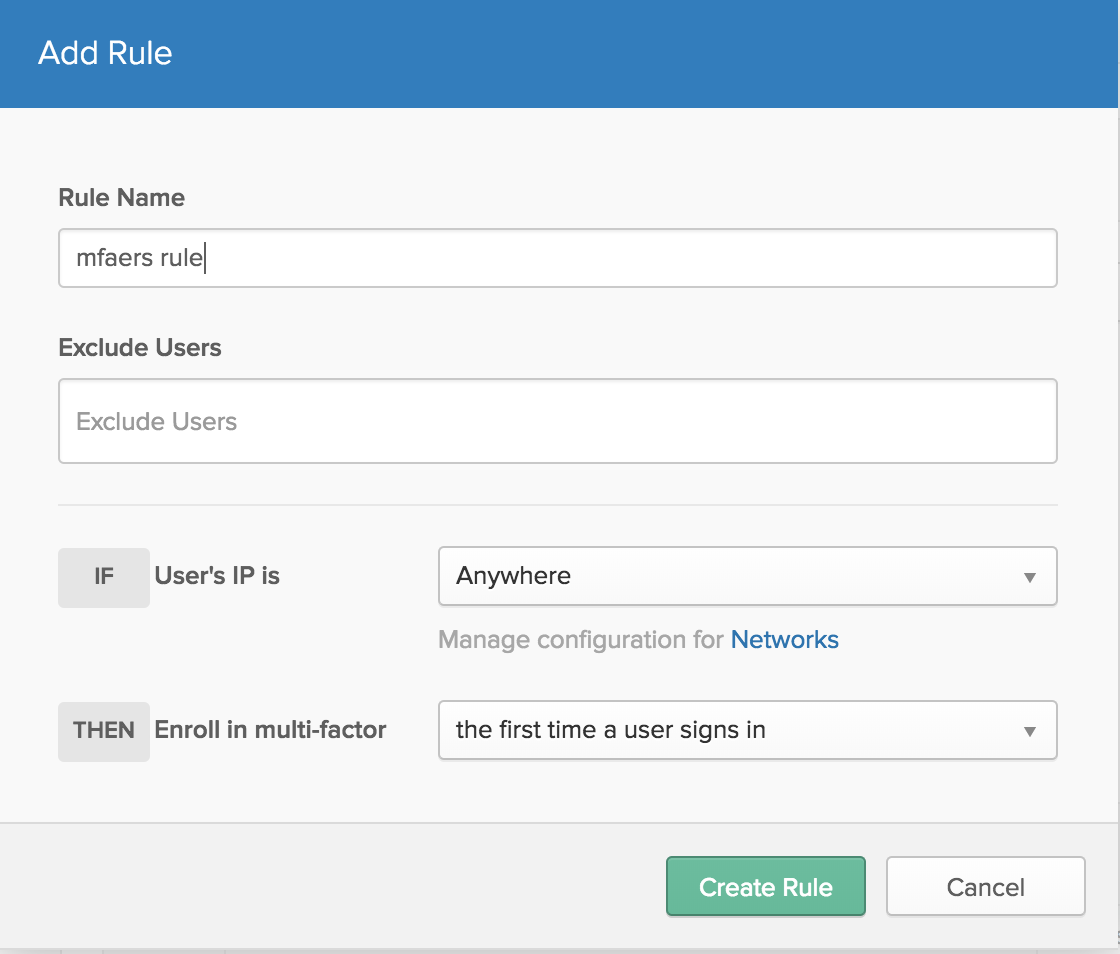
In the Add Rule dialog, enter mfaers rule for Rule name and select the first time a user signs in in the dropdown next to Enroll in multi-factor. Click Create Rule.
That’s all that’s needed to configure MFA enrollment!
Configure an MFA Enforcement Policy
Select Security > Authentication from the top menu of the admin console. Click Sign On > Add New Okta Sign-on Policy.
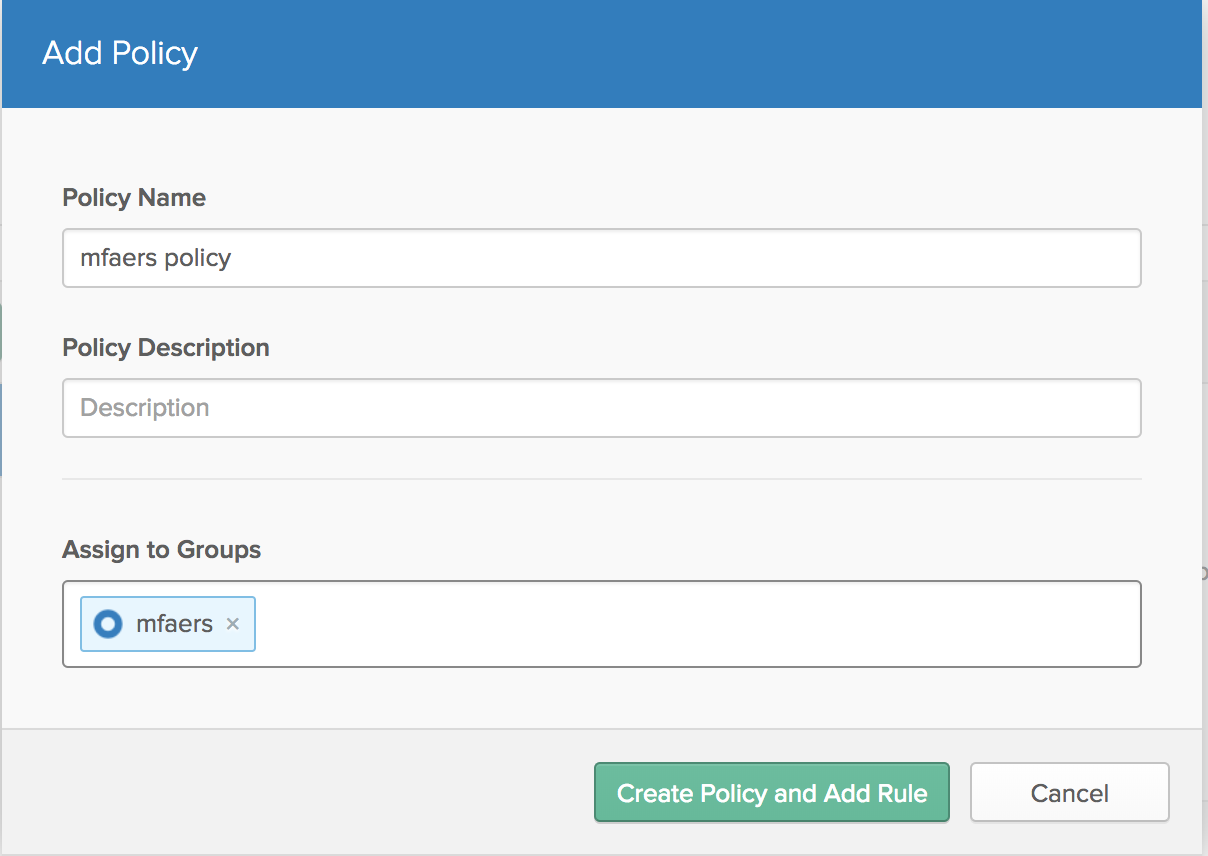
Enter mfaers policy in Policy Name and choose mfaers in Assign to Groups.
Click Create Policy and Add Rule.
Enter mfaers rule for Rule Name and check Prompt for Factor. Select Every Time > Create Rule.
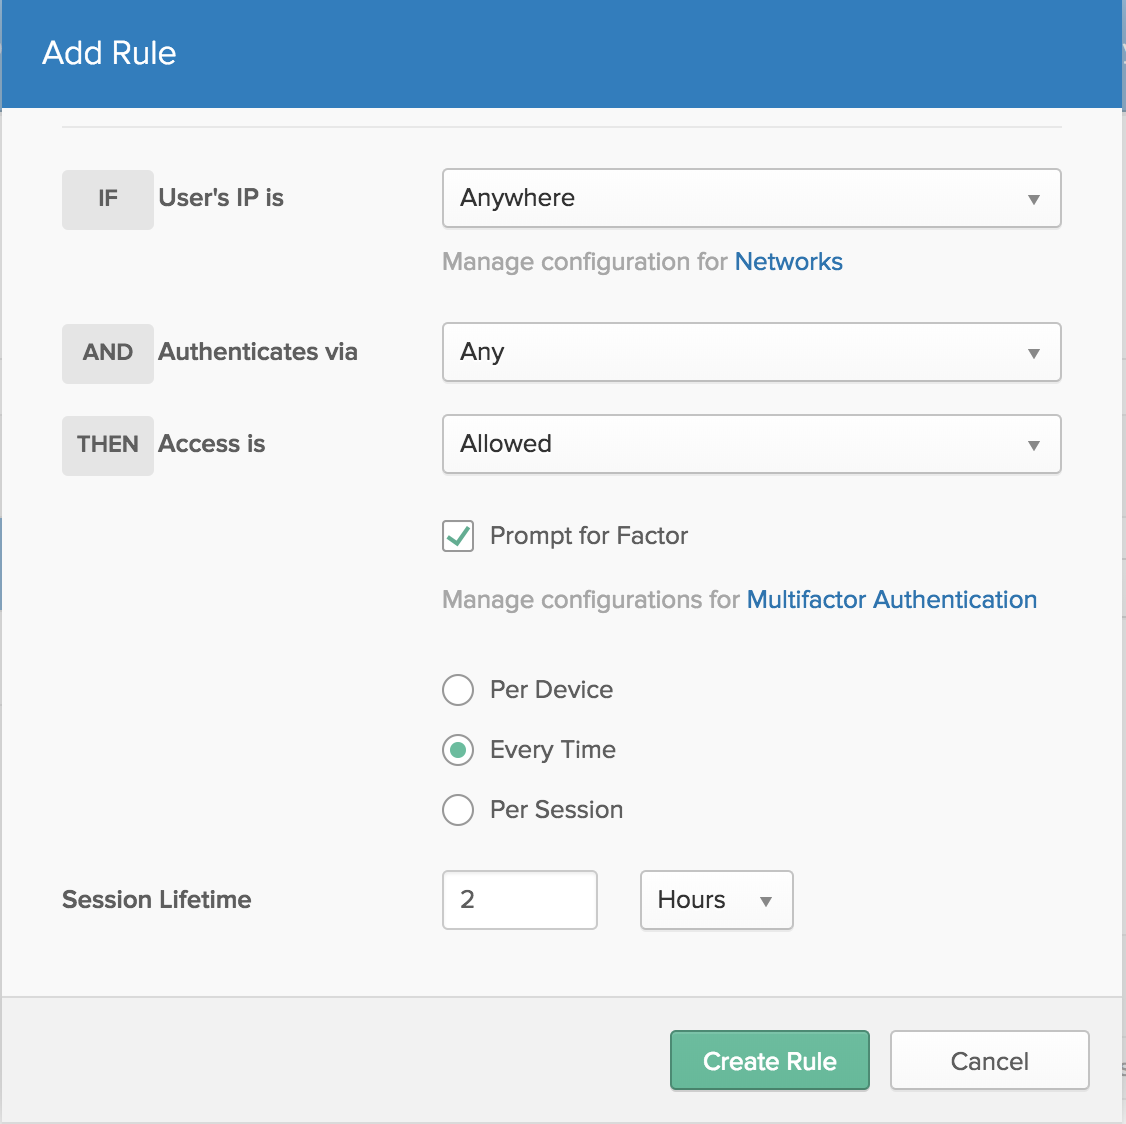
That’s all that’s needed to configure MFA enforcement.
Authenticate with Okta and the OktaArduToken
In a private browsing window, navigate to your okta org and login as jane.doe@mfaers.com.
You should see a screen to setup Okta Verify. Click Configure factor.
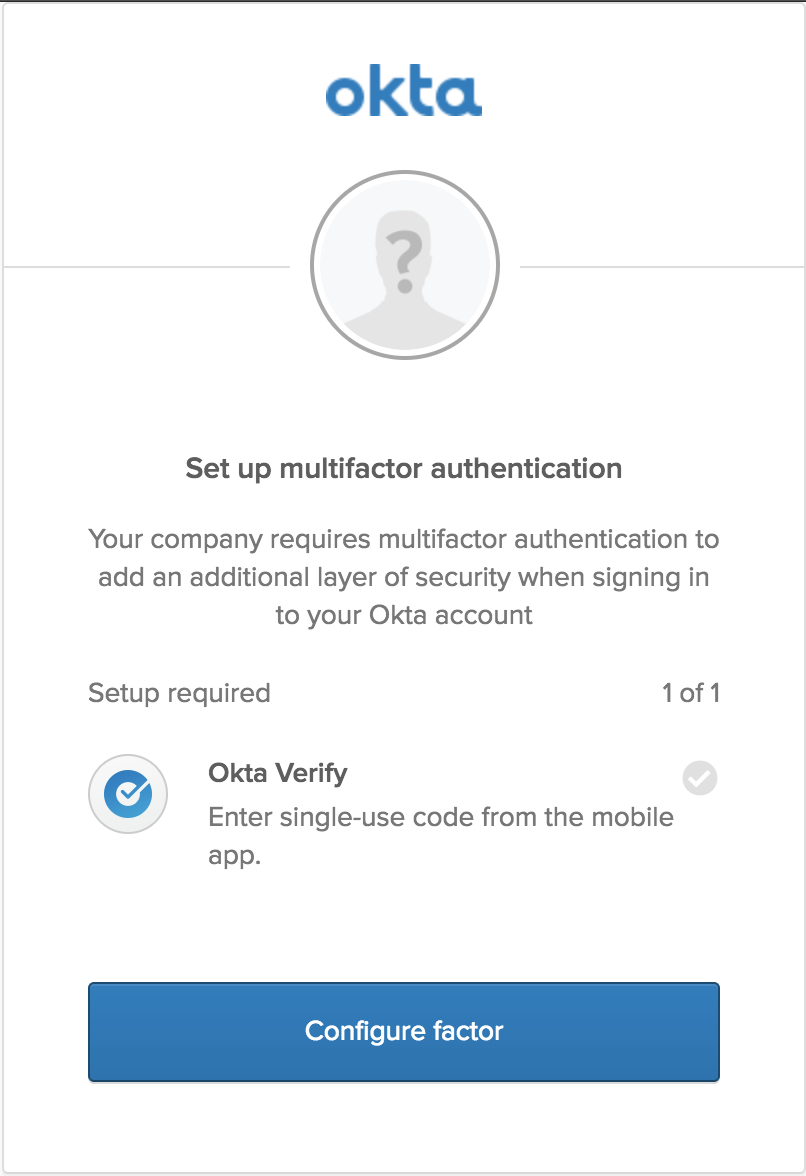
On the next screen select any device type (it doesn’t matter since we’ll be setting up our ArduBoy anyway). Click Next.
On the Setup Okta Verify screen, click Can’t scan?
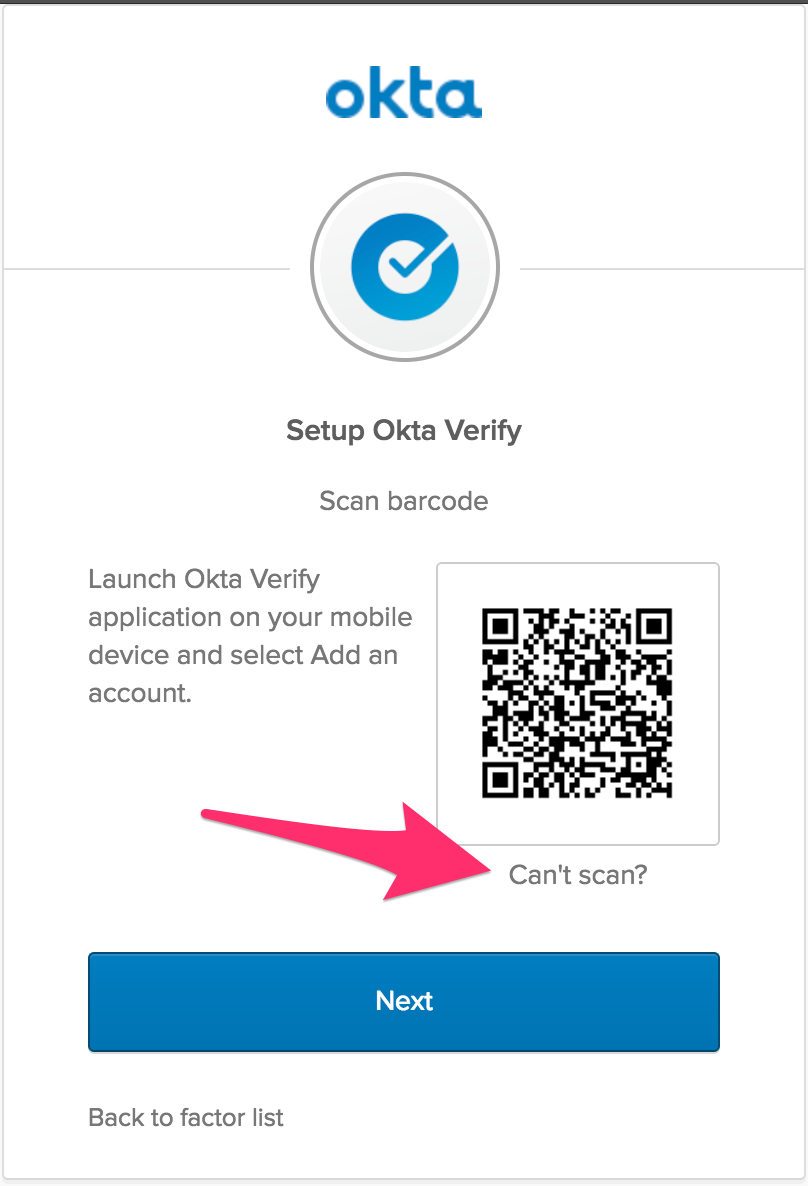
You’ll then see the Secret Key Field. Turn on your ArduBoy (or use ProjectABE) and enter the shared secret value.

On the Arduboy, press the A button and enter in the correct date and time (GMT timezone). Press the A button. This will bring you to the TOTP screen.
Click Next on the Setup Okta Verify dialog. Enter in the code displayed on the ArduBoy and click Next.
If all goes well, you’ll see a screen asking for you to set a security question and answer to finish configuring your account.
You’ve now completed enrollment in Okta Verify using an ArduBoy as a hardware token! Pretty cool stuff.
You could logout and login again and you will be prompted to put in a code again which you would get from the ArduBoy.
NOTE: The clock component in ProjectABE is not very accurate and will get behind or ahead very quickly. You can always press the A button to set the time once again so that the passcode shown is correct.
You can also program in the value in the actual Okta Verify app on your mobile device and confirm that the passcode shown is the same as the passcode on the ArduBoy.
Here’s the OktaArduToken side-by-side with the Okta Verify mobile app:
A look at the TOTP Arduino Code
The code for OktaArduToken is in a single sketch file: OktaArduToken.ino. I am sure this is not best practice and would benefit from some C++ objectification, but it works for a quick little hobby project.
It all boils down to three lines of code in the ShowTotpCode() method, thanks to the TOTP and swRTC libraries:
TOTP totp = TOTP(hmacKey, 10);
long GMT = rtc.getTimestamp();
totpCode = totp.getCode(GMT);
It uses the hmacKey, which is the Base32 decoded value of the shared secret along with the current timestamp to compute the current totpCode. It is this 6-digit code that is displayed on the ArduBoy screen.
The other key enabling feature is the ability to write the shared secret and current time to EEPROM and to read those values back out.
void writeTotpInfo(TotpInfo totpInfo) {
  writeString(TOTP_SECRET_SAVE_ADDRESS, totpInfo.secret);
  writeInt(TOTP_SEC_SAVE_ADDRESS, totpInfo.sec);
  writeInt(TOTP_MIN_SAVE_ADDRESS, totpInfo.minu);
  writeInt(TOTP_HOUR_SAVE_ADDRESS, totpInfo.hour);
  writeInt(TOTP_DAY_SAVE_ADDRESS, totpInfo.day);
  writeInt(TOTP_MON_SAVE_ADDRESS, totpInfo.mon);
  writeInt(TOTP_YEAR_SAVE_ADDRESS, totpInfo.year);
  DEBUG_PRINTLN("Wrote totpInfo to eeprom.");
}

TotpInfo readTotpInfo() {
  TotpInfo ret = {};

  ret.secret = readString(TOTP_SECRET_SAVE_ADDRESS, 16);
  ret.sec = readInt(TOTP_SEC_SAVE_ADDRESS);
  ret.minu = readInt(TOTP_MIN_SAVE_ADDRESS);
  ret.hour = readInt(TOTP_HOUR_SAVE_ADDRESS);
  ret.day = readInt(TOTP_DAY_SAVE_ADDRESS);
  ret.mon = readInt(TOTP_MON_SAVE_ADDRESS);
  ret.year = readInt(TOTP_YEAR_SAVE_ADDRESS);

  return ret;
}
There’s a bunch of supporting methods to handle the input interfaces for the shared secret and date and time as well as displaying things in the right spot on the display.
Being a bit of a n00b to Arduino program, I am sure this code could be improved on. I <3 pull requests!
Learn More About Okta Verify and Multi-factor Authentication
I hope you enjoyed seeing how authentication with MFA using Okta Verify works along with alternate token devices. The requirements for creating your own token are a programmable microprocessor with a clock and a display
If you’d like to learn more about MFA with Okta, check out these posts:
- MFA: 4 challenges faced by developers
- Secure Your Spring Boot Application with Multi-Factor Authentication
- Use Multi-factor from the Command Line
- Simple Multi-factor authentication in Node
- Set Up and Enforce MFA with the Okta API
Finally, please follow us on Twitter to find more great resources like this, request other topics for us to write about, and follow along with our new open source libraries and projects!
P.S.: If you liked this project and want to see the source code in one place, please go checkout and star its GitHub repository.
And… If you have any questions, please leave a comment below!
Okta Developer Blog Comment Policy
We welcome relevant and respectful comments. Off-topic comments may be removed.