Use nginx to Add Authentication to Any Application

Ever found yourself wanting to put an application behind a login form, but dreading writing all that code to deal with OAuth 2.0 or passwords? In this tutorial, I’ll show you how to use the nginx auth_request module to protect any application running behind your nginx server with OAuth 2.0, without writing any code! Vouch, a microservice written in Go, handles the OAuth dance to any number of different auth providers so you don’t have to.
Tip: If you want to add login (and URL based authorization) to more apps via a UI, integrate with more complex apps like Oracle or SAP, or replace legacy Single Sign-On on-prem, check the Okta Access Gateway.
Note: In May 2025, the Okta Integrator Free Plan replaced Okta Developer Edition Accounts, and the Okta CLI was deprecated.
We preserved this post for reference, but the instructions no longer work exactly as written. Replace the Okta CLI commands by manually configuring Okta following the instructions in our Developer Documentation.
Why Authenticate at the Web Server?
Imagine you use nginx to run a small private wiki for your team. At first, you probably start out with adding a wiki user account for each person. It’s not too bad, adding new accounts for new hires, and removing them when they leave.
A few months later, as your team and company start growing, you add some server monitoring software, and you want to put that behind a login so only your company can view it. Since it’s not very sophisticated software, the easiest way to do that is to create a single password for everyone in an .htpasswd file, and share that user with the office.
Another month goes by, and you add a continuous integration system, and that comes with GitHub authentication as an option, which seems reasonable since most of your team has GitHub accounts already.
At this point, when someone new joins, you have to create a wiki account for them, add them to the GitHub organization, and give them the shared password for the other system. When someone leaves, you can delete their wiki account and remove them from GitHub, but let’s face it, you probably won’t change the shared password for a while since it’s annoying having to distribute that to everyone again.
Surely there must be a better way to integrate all these systems to use a common shared login system! The problem is the wiki is written in PHP, the server monitoring system just ends up publishing a folder of static HTML, and the CI system is written in Ruby which only one person on your team feels comfortable writing.
If the web server could handle authenticating users, then each backend system wouldn’t need to worry about it, since the only requests that could make it through would already be authenticated!
Using the nginx auth_request Module
Enter the nginx auth_request module.
This module is shipped with nginx, but requires enabling when you compile nginx. When you download the nginx source and compile, just include the --with-http_auth_request_module flag along with any others that you use.
The auth_request module sits between the internet and your backend server that nginx passes requests onto, and any time a request comes in, it first forwards the request to a separate server to check whether the user is authenticated, and uses the HTTP response to decide whether to allow the request to continue to the backend.
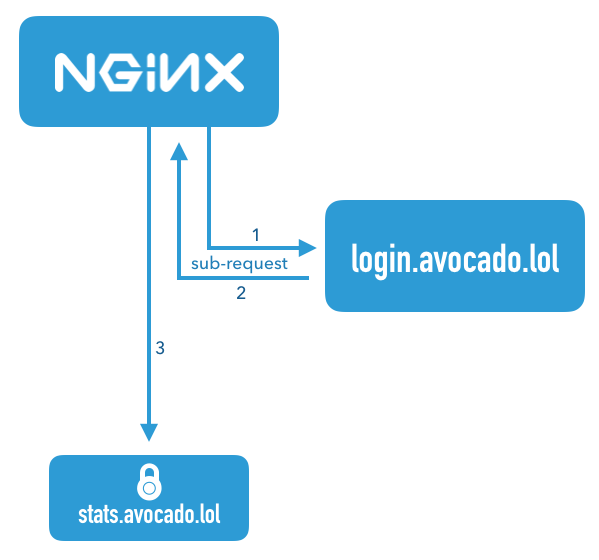
This diagram illustrates a request that comes in for the server name stats.avocado.lol. First, nginx fires off a sub-request to login.avocado.lol (1), and if the response (2) to that request returns HTTP 200, it then continues forwarding the request on to the backend stats.avocado.lol.
Choosing an Auth Proxy
Since the nginx auth_request module has no concept of users or how to authenticate anyone, we need something else in the mix that can actually handle logging users in. In the diagram above, this is illustrated by the server name login.avocado.lol.
This server needs to handle an HTTP request and return HTTP 200 or 401 depending on whether the user is logged in. If the user is not logged in, it needs to know how to get them to log in and set a session cookie.
To accomplish this, we’ll use the open source project “Vouch”. Vouch is written in Go, so it’s super easy to deploy. Everything can be configured via a single YAML file. Vouch can be configured to authenticate users via a variety of OAuth and OpenID Connect backends such as GitHub, Google, Okta or any other custom servers.
We’ll come back to configuring Vouch in a few minutes, but for now, let’s continue on to set up your protected server in nginx.
Configure Your Protected nginx Host
Starting with a typical nginx server block, you just need to add a couple lines to enable the auth_request module. Here is an example server block that should look similar to your own config. This example just serves a folder of static HTML files, but the same idea applies whether you’re passing the request on to a fastcgi backend or using proxy_pass.
server {
  listen 443 ssl http2;
  server_name stats.avocado.lol;

  ssl_certificate /etc/letsencrypt/live/avocado.lol/fullchain.pem;
  ssl_certificate_key /etc/letsencrypt/live/avocado.lol/privkey.pem;

  root /web/sites/stats.avocado.lol;

  index index.html;
}
Add the following to your existing server block:
# Any request to this server will first be sent to this URL
auth_request /vouch-validate;

location = /vouch-validate {
  # This address is where Vouch will be listening on
  proxy_pass http://127.0.0.1:9090/validate;
  proxy_pass_request_body off; # no need to send the POST body

  proxy_set_header Content-Length "";
  proxy_set_header X-Real-IP $remote_addr;
  proxy_set_header X-Forwarded-For $proxy_add_x_forwarded_for;
  proxy_set_header X-Forwarded-Proto $scheme;

  # these return values are passed to the @error401 call
  auth_request_set $auth_resp_jwt $upstream_http_x_vouch_jwt;
  auth_request_set $auth_resp_err $upstream_http_x_vouch_err;
  auth_request_set $auth_resp_failcount $upstream_http_x_vouch_failcount;
}

error_page 401 = @error401;

# If the user is not logged in, redirect them to Vouch's login URL
location @error401 {
  return 302 https://login.avocado.lol/login?url=https://$http_host$request_uri&vouch-failcount=$auth_resp_failcount&X-Vouch-Token=$auth_resp_jwt&error=$auth_resp_err;
}
Let’s look at what’s going on here. The first line, auth_request /vouch-validate; is what enables this flow. This tells the auth_request module to first send any request to this URL before deciding whether it’s allowed to continue to the backend server.
The block location = /vouch-validate captures that URL, and proxies it to the Vouch server that will be listening on port 9090. We don’t need to send the POST body to Vouch, since all we really care about is the cookie.
The line error_page 401 = @error401; tells nginx what to do if Vouch returns an HTTP 401 response, which is to pass it to the block defined by location @error401. That block will redirect the user’s browser to Vouch’s login URL which will kick off the flow to the real authentication backend.
Configure a Server Block for Vouch
Next, configure a new server block for Vouch so that it has a publicly accessible URL like https://login.avocado.lol. All this needs to do is proxy the request to the backend Vouch server.
server {
  listen 443 ssl;
  server_name login.avocado.lol;

  ssl_certificate /etc/letsencrypt/live/login.avocado.lol/fullchain.pem;
  ssl_certificate_key /etc/letsencrypt/live/login.avocado.lol/privkey.pem;

  # Proxy to your Vouch instance
  location / {
    proxy_set_header  Host  login.avocado.lol;
    proxy_set_header  X-Forwarded-Proto https;
    proxy_pass        http://127.0.0.1:9090;
  }
}
Configure and Deploy Vouch
You’ll need to download Vouch and compile the Go binary for your platform. You can follow the instructions in the project’s README file.
Once you’ve got a binary, you’ll need to create the config file to define the way you want Vouch to authenticate users.
Copy config/config.yml_example to config/config.yml and read through the settings there. Most of the defaults will be fine, but you’ll want to create your own JWT secret string and replace the placeholder value of your_random_string.
The easiest way to configure Vouch is to have it allow any user that can authenticate at the OAuth server be allowed to access the backend. This works great if you’re using a private OAuth server like Okta to manage your users. Go ahead and set allowAllUsers: true to enable this behavior, and comment out the domains: chunk.
You’ll need to choose an OAuth 2.0 provider to use to actually authenticate users. In this example we’ll use Okta, since that’s the easiest way to have a full OAuth/OpenID Connect server and be able to manage all your user accounts from a single dashboard.
Before you begin, you’ll need a free Okta developer account. Install the Okta CLI and run okta register to sign up for a new account. If you already have an account, run okta login.
Then, run okta apps create. Select the default app name, or change it as you see fit.
Choose Web and press Enter.
Select Other.
Then, change the Redirect URI to https://login.avocado.lol/auth and use https://login.avocado.lol for the Logout Redirect URI.
What does the Okta CLI do?
The Okta CLI will create an OIDC Web App in your Okta Org. It will add the redirect URIs you specified and grant access to the Everyone group. You will see output like the following when it’s finished:
Okta application configuration has been written to: /path/to/app/.okta.env
Run cat .okta.env (or type .okta.env on Windows) to see the issuer and credentials for your app.
export OKTA_OAUTH2_ISSUER="https://dev-133337.okta.com/oauth2/default"
export OKTA_OAUTH2_CLIENT_ID="0oab8eb55Kb9jdMIr5d6"
export OKTA_OAUTH2_CLIENT_SECRET="NEVER-SHOW-SECRETS"
Your Okta domain is the first part of your issuer, before /oauth2/default.
NOTE: You can also use the Okta Admin Console to create your app. See Create a Web App for more information.
Now that you’ve registered the application in Okta, you’ll have a client ID and secret which you’ll need to include in the config file. You’ll also need to set the URLs for your authorization endpoint, token endpoint and userinfo endpoint. These will most likely look like the below using your Okta domain.
config.yml
oauth:
  provider: oidc
  client_id: {yourClientID}
  client_secret: {yourClientSecret}
  auth_url: https://{yourOktaDomain}/oauth2/default/v1/authorize
  token_url: https://{yourOktaDomain}/oauth2/default/v1/token
  user_info_url: https://{yourOktaDomain}/oauth2/default/v1/userinfo
  scopes:
    - openid
    - email
  # Set the callback URL to the domain that Vouch is running on
  callback_url: https://login.avocado.lol/auth
Now you can run Vouch! It will listen on port 9090, which is where you’ve configured nginx to send the auth_request verifications as well as serve traffic from login.avocado.lol.
When you reload the nginx config, all requests to stats.avocado.lol will require that you log in via Okta first!
Bonus: Who Logged In?
If you’re putting a dynamic web app behind nginx and you care not only about whether someone was able to log in, but also who they are, there is one more trick we can use.
By default, Vouch will extract a user ID via OpenID Connect (or GitHub or Google if you’ve configured those as your auth providers), and will include that user ID in an HTTP header that gets passed back up to the main server.
In your main server block, just below the line auth_request /vouch-validate; which enables the auth_request module, add the following:
auth_request_set $auth_user $upstream_http_x_vouch_user;
This will take the HTTP header that Vouch sets, X-Vouch-User, and assign it to the nginx variable $auth_user. Then, depending on whether you use fastcgi or proxy_pass, include one of the two lines below in your server block:
fastcgi_param REMOTE_USER $auth_user;
proxy_set_header Remote-User $auth_user;
These will set an HTTP header with the value of $auth_user that your backend server can read in order to know who logged in. For example, in PHP you can access this data using:
<?php
echo 'Hello, ' . $_SERVER['REMOTE_USER'] . '!';
Now you can be sure that your internal app can only be accessed by authenticated users!
Learn More About OAuth 2.0 and Secure User Management with Okta
For more information and tutorials about OAuth 2.0, check out some of our other blog posts!
- Add Authentication to your PHP App in 5 Minutes
- What is the OAuth 2.0 Authorization Code Grant Type?
- What is the OAuth 2.0 Implicit Grant Type?
As always, we’d love to hear from you about this post, or really anything else! Hit us up in the comments, or on Twitter @oktadev!
Changelog:
- May 17, 2019: The Lasso project was renamed to Vouch in 2019, so all references to Lasso in this post have been updated to Vouch.
Aaron Parecki is a Senior Security Architect at Okta. He is the author of OAuth 2.0 Simplified, and maintains oauth.net. He regularly writes and gives talks about OAuth and online security. He is an editor of several internet specs, and is the co-founder of IndieWebCamp, a conference focusing on data ownership and online identity. Aaron has spoken at conferences around the world about OAuth, data ownership, quantified self, and home automation, and his work has been featured in Wired, Fast Company and more.
Okta Developer Blog Comment Policy
We welcome relevant and respectful comments. Off-topic comments may be removed.