Add Single Sign-On to Your Spring Boot Web App in 15 Minutes
Heads up... this blog post is old!
For an updated version of this blog post, see OAuth 2.0 Java Guide: Secure Your App in 5 Minutes.
Need a secure web server right now? With Spring Boot and Okta, you can spin up an enterprise-quality REST server with complete user identity and authorization management in less than 20 minutes. Out of the box, Spring Boot and its Starter packages supply a near instant production-ready Tomcat server, and Okta hardens your APIs with a variety of OAuth flows just as fast. This tutorial will walk you through the complete process. The cherry on top will be using Okta to add fully featured client authentication and user administration with just a few lines of code and config! By the end of this tutorial, your secured Spring Boot server will be able to serve web content or function as a backend API, but only to users who have registered with you. Ready? Let’s go!
This post assumes some basic familiarity with Java, including an understanding of a typical Java project structure, packages, JAR files, annotations, generics, etc. No prior use of Spring, Maven, or any other Java framework is necessary.
Note: In May 2025, the Okta Integrator Free Plan replaced Okta Developer Edition Accounts, and the Okta CLI was deprecated.
We preserved this post for reference, but the instructions no longer work exactly as written. Replace the Okta CLI commands by manually configuring Okta following the instructions in our Developer Documentation.
Get Started with Spring Boot and Okta
Going from zero to secure web server doesn’t happen in a flash. To complete this project you’ll:
- Download a brand new Spring Boot starter project using Spring Initializr
- Create a new Okta account and access your administration dashboard
- Add a few lines of code and config
- See Single Sign-On in action on your new server!
Why Spring?
![]()
Spring is a mature, widely used, and well-documented set of tools and libraries that were built to make your life easier as a Java developer. It offers an enormous amount of functionality, from easy database connections and server creation (as we’ll see in this tutorial) to turn-key security, messaging, mobile development, and more.
Spring Boot is a sub-project of Spring that focuses on making it super fast and easy to bootstrap a new Spring application. One of its primary attractions is that it requires no mucking around with messy configuration files (a common complaint heard about the early Spring ecosystem). As we’ll soon see, the use of a few simple annotations and Maven dependencies will take us from zero to secured web server in minutes.
Download and Initialize a New Spring Boot Project
Spring offers a tool called Spring Initializr that allows you to create and download a zip file containing a new Spring Boot project with a single click. Head on over there and create a new project that includes the Web and Security starters. I left the default artifact and group intact and unzipped the demo.zip file in my home directory. That unpacked the following files:
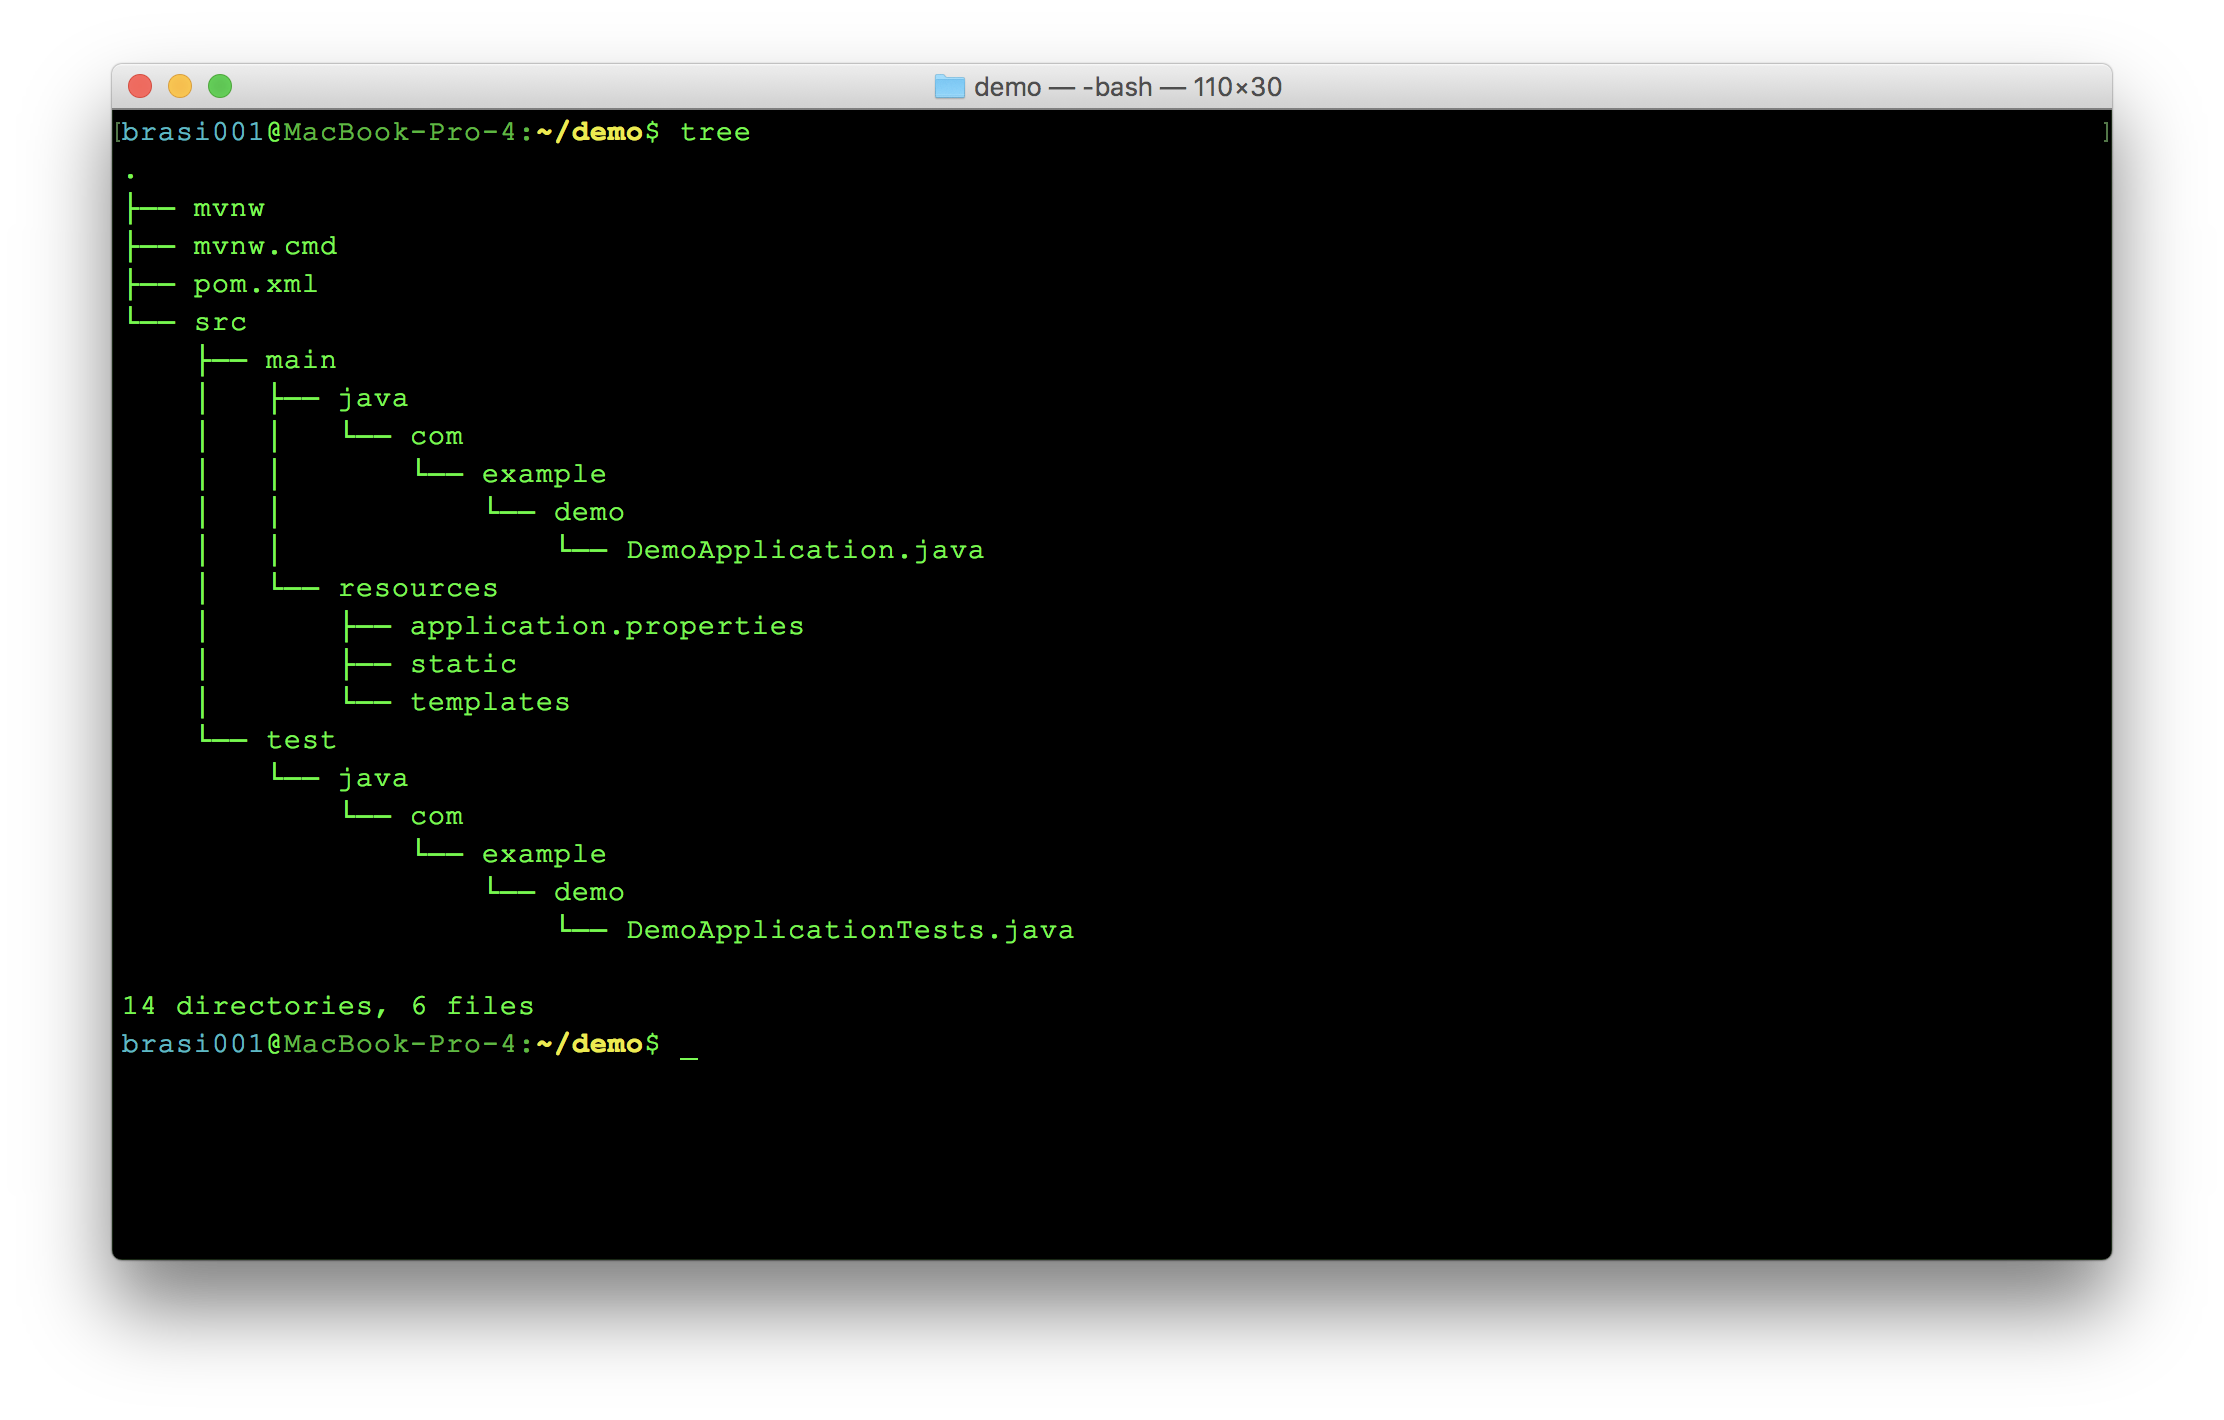
Those of you familiar with Maven will recognize the pom.xml file. Just four little dependencies pull in an enormous amount of functionality from Spring:
<dependency>
    <groupId>org.springframework.boot</groupId>
    <artifactId>spring-boot-starter-security</artifactId>
</dependency>
<dependency>
    <groupId>org.springframework.boot</groupId>
    <artifactId>spring-boot-starter-web</artifactId>
</dependency>
<dependency>
    <groupId>org.springframework.boot</groupId>
    <artifactId>spring-boot-starter-test</artifactId>
    <scope>test</scope>
</dependency>
<dependency>
    <groupId>org.springframework.security</groupId>
    <artifactId>spring-security-test</artifactId>
    <scope>test</scope>
</dependency>
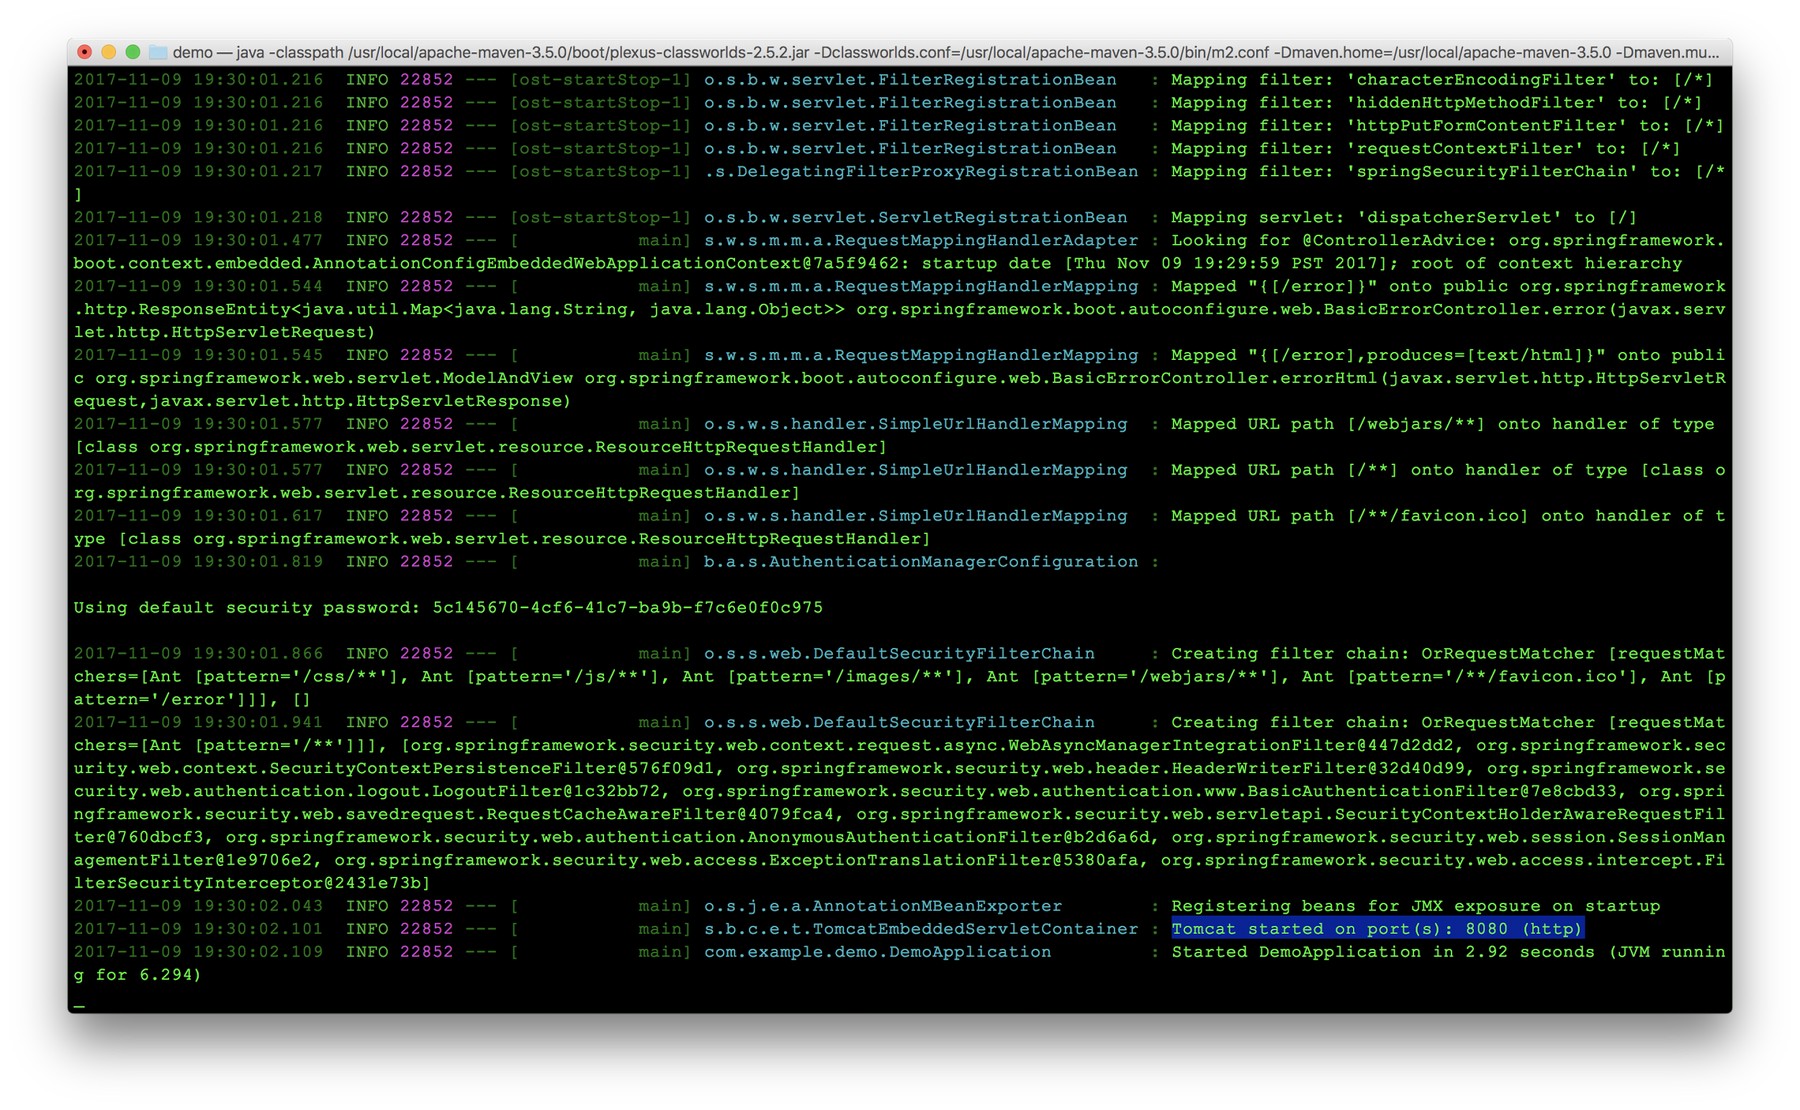
Before getting to the fun stuff, make sure everything is kosher by running the server via:
./mvnw spring-boot:run
Amid all the colorful log statements, the one to look for is likely second to the last:
Tomcat started on port(s): 8080 (http)
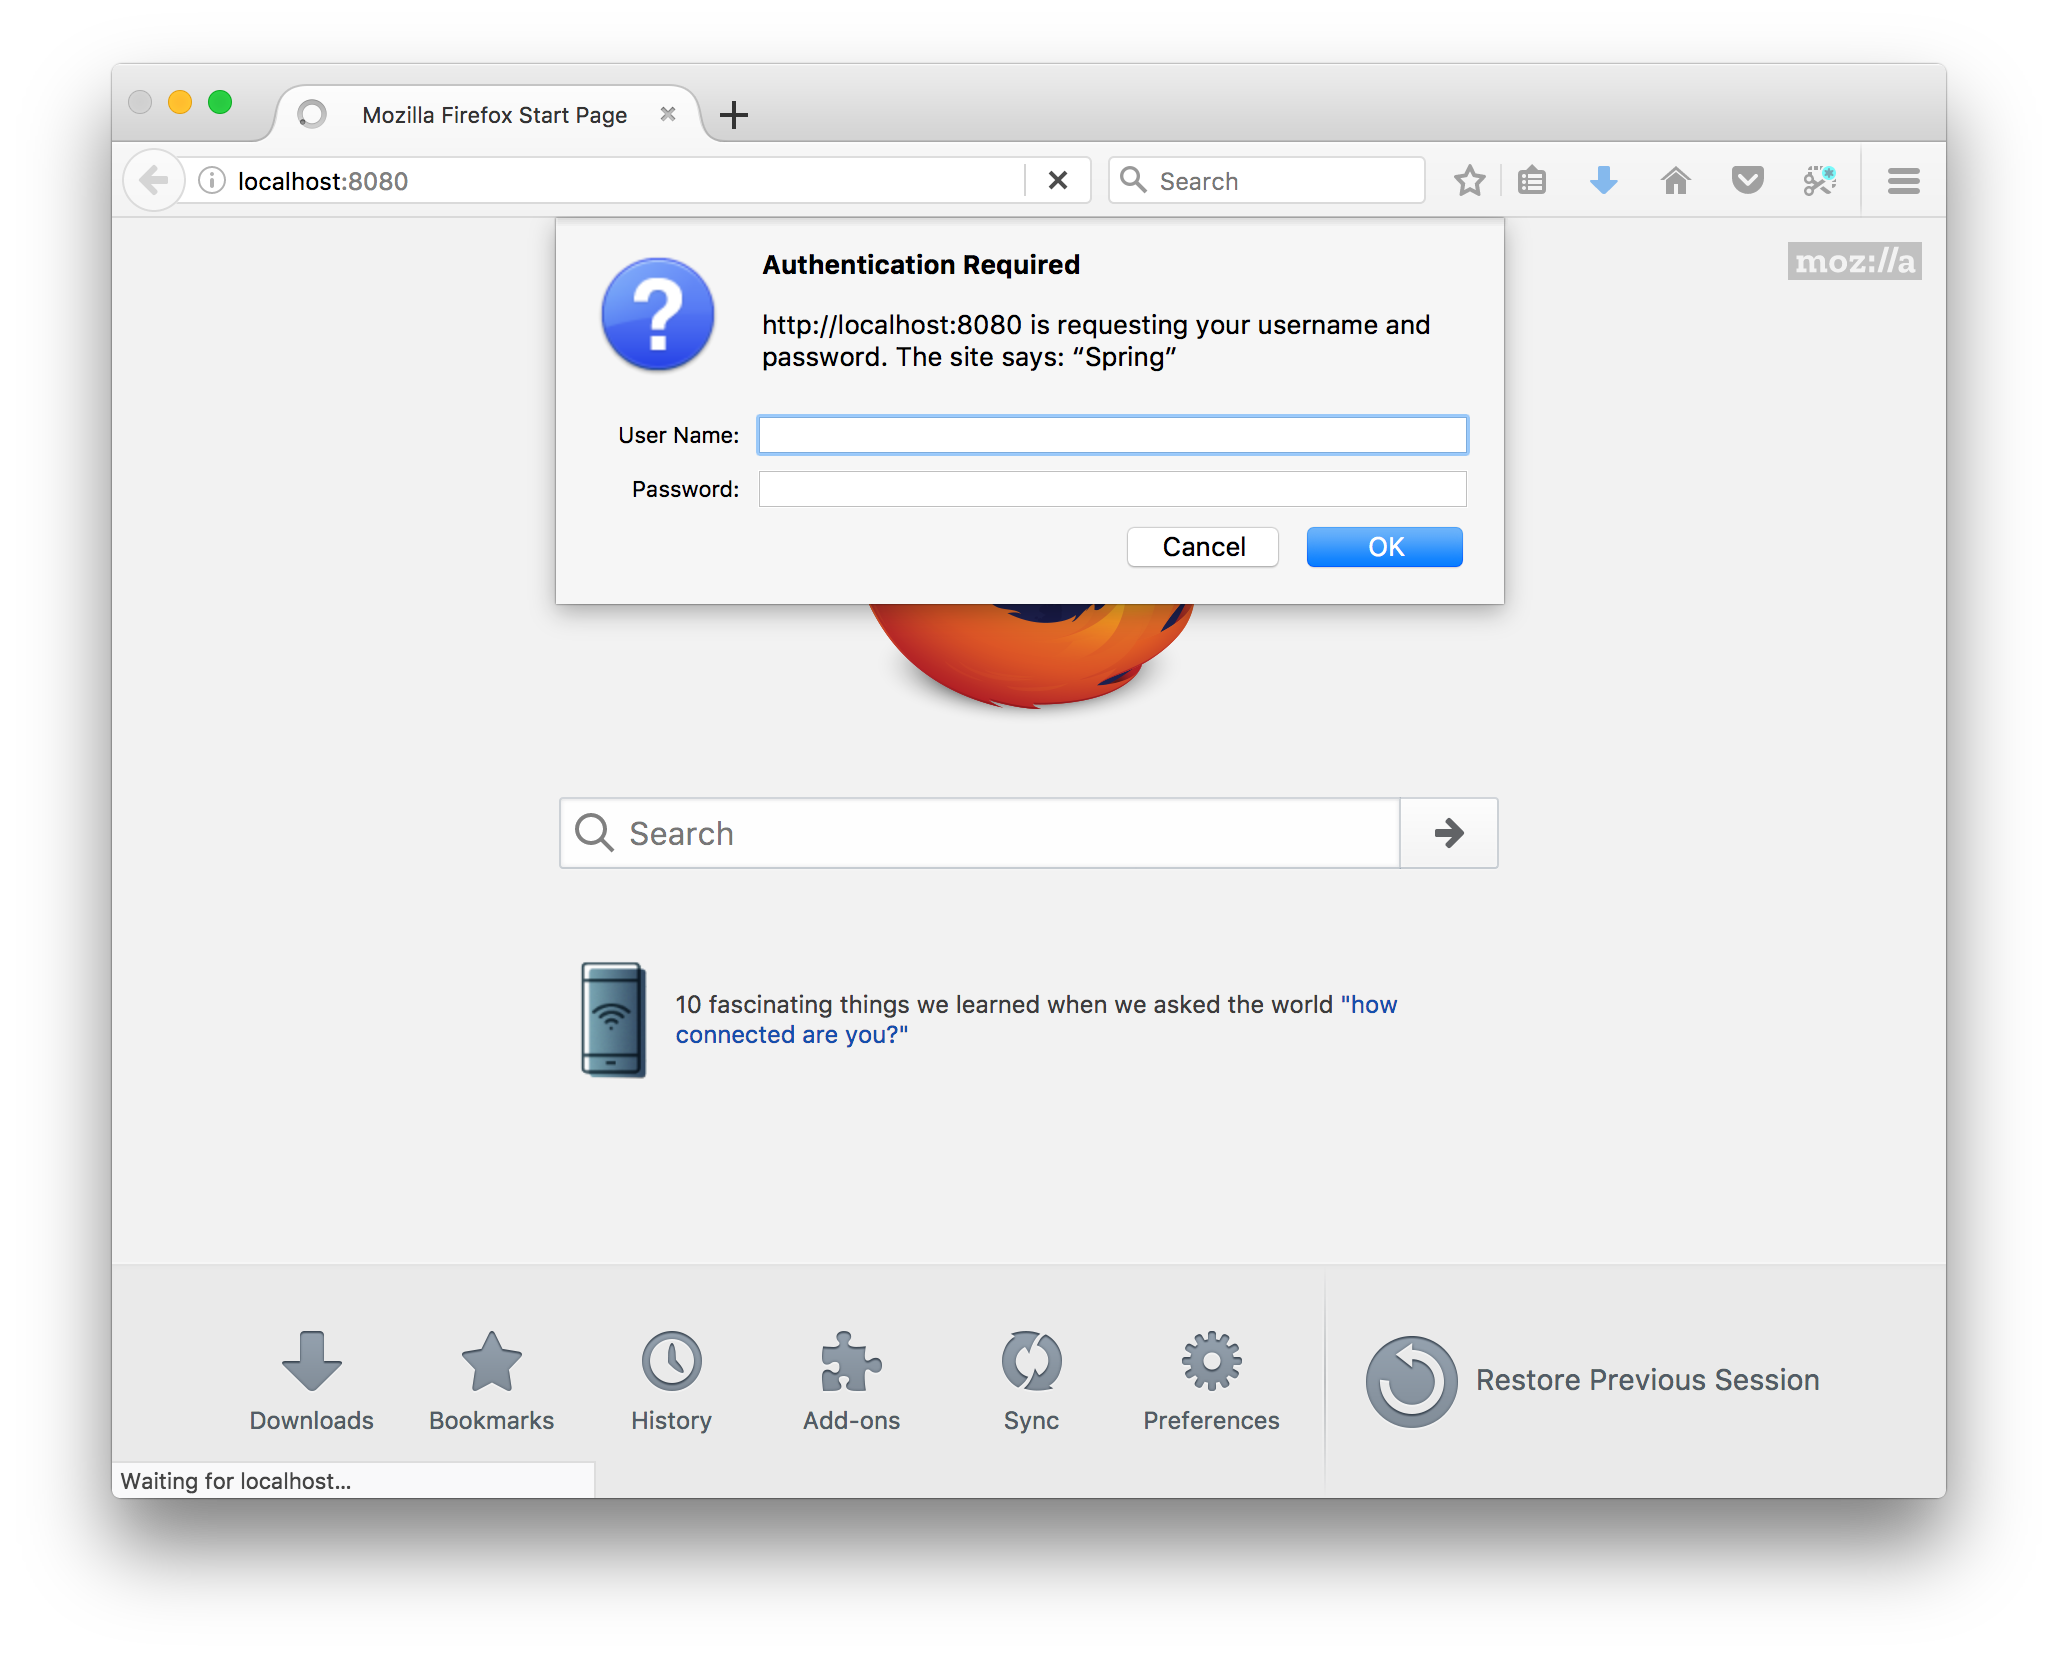
Because you requested the Spring Security Starter package when you created the project, the server is protected by default using Basic Authentication. This can be verified by opening a browser and visiting:
http://localhost:8080
A browser dialog should appear asking for your username and password (which you haven’t set up yet):
Rather than bother with setting up a hard coded username and password in your new server, wouldn’t it be better to suddenly have access to full-fledged OAuth session management, user administration, site statistics, and more? We can do that in just minutes with Okta!
Add OAuth Authentication to Your Server with Okta
Now it’s time to enhance your server with user management, key and credential storage and rotation, OAuth server maintenance, forgotten password handling, and a slick administration UI. That sounds like a lot of work! Fortunately, it’s done for you with Okta’s user management and authorization services. You merely plug Okta dependencies into your Spring Boot project, configure a few security settings, and you get all of that and a bag of chips in just a few simple steps. Here’s how.
Get Your Okta Credentials
If you’re new to Okta, you can sign up here for a free developer account. You’ll receive an invitation email with your username (your email address) and a temporary password. Follow the link provided in the email, sign in using these credentials, and create your admin account for the first time. You’ll be asked to create a new password, and after completing this page, you will find your Okta developer console. There is much to explore here, so if you’d like, feel free to take a break and browse around!
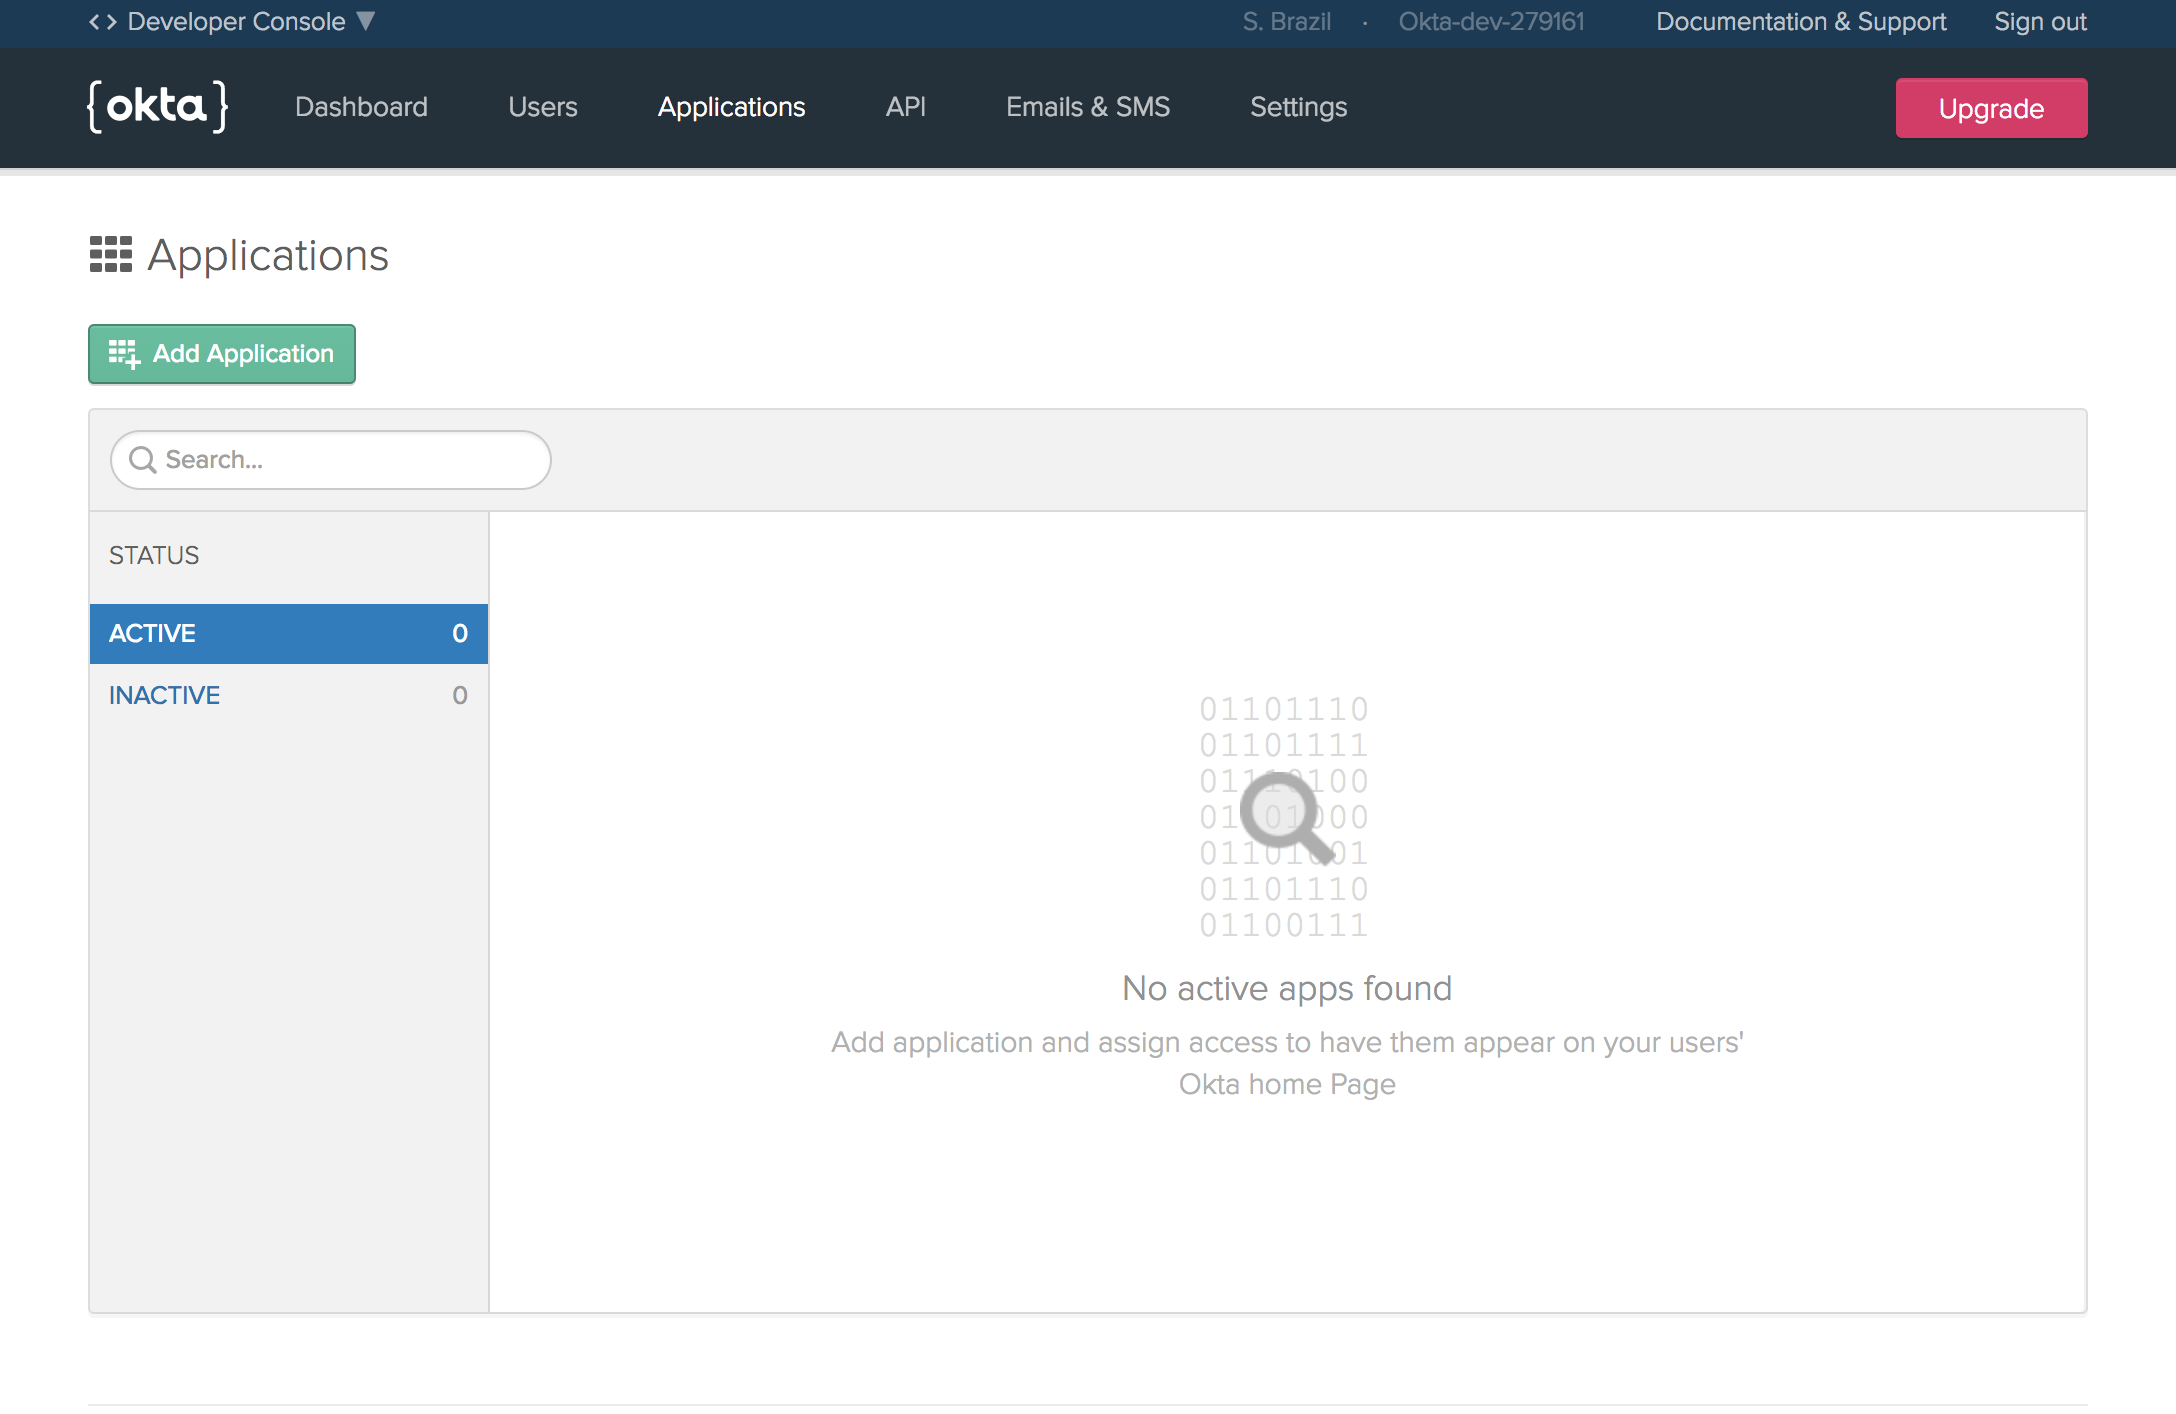
When you’re ready to proceed, go to the Applications tab in your Okta dashboard. It should look something like this:
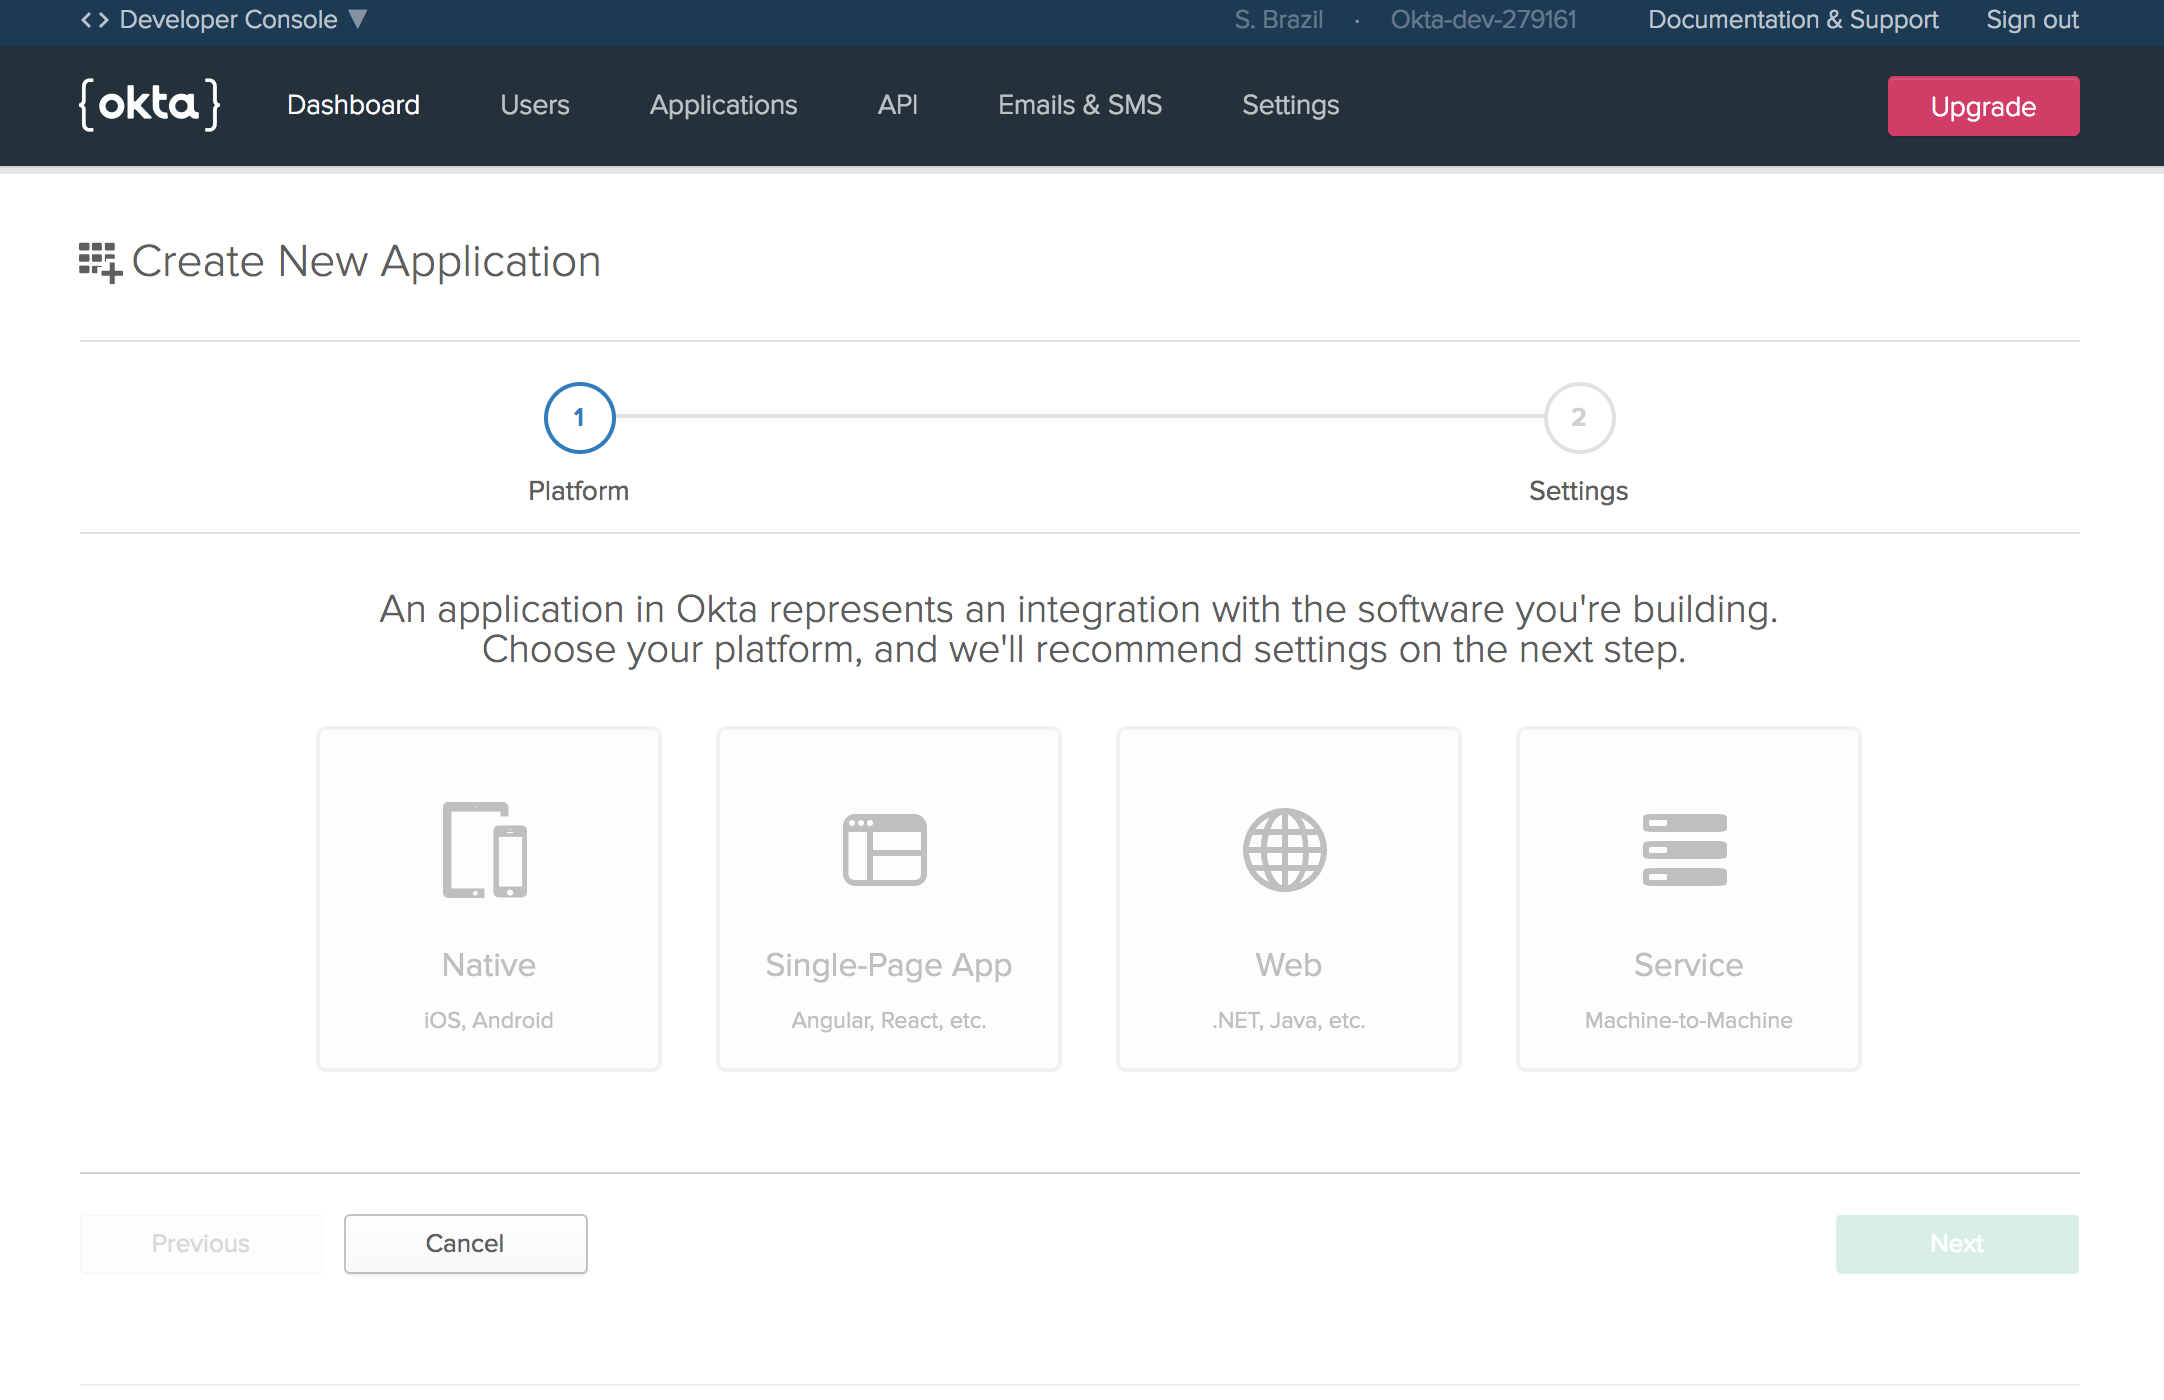
Click on the green Add Application button, and since you’re building a web server, select Web (.NET, Java, etc.) as the application type and click Next:
In the settings page that follows, there is one default value to change. In the Login Redirect URIs field, replace the default value with:
http://localhost:8080/login
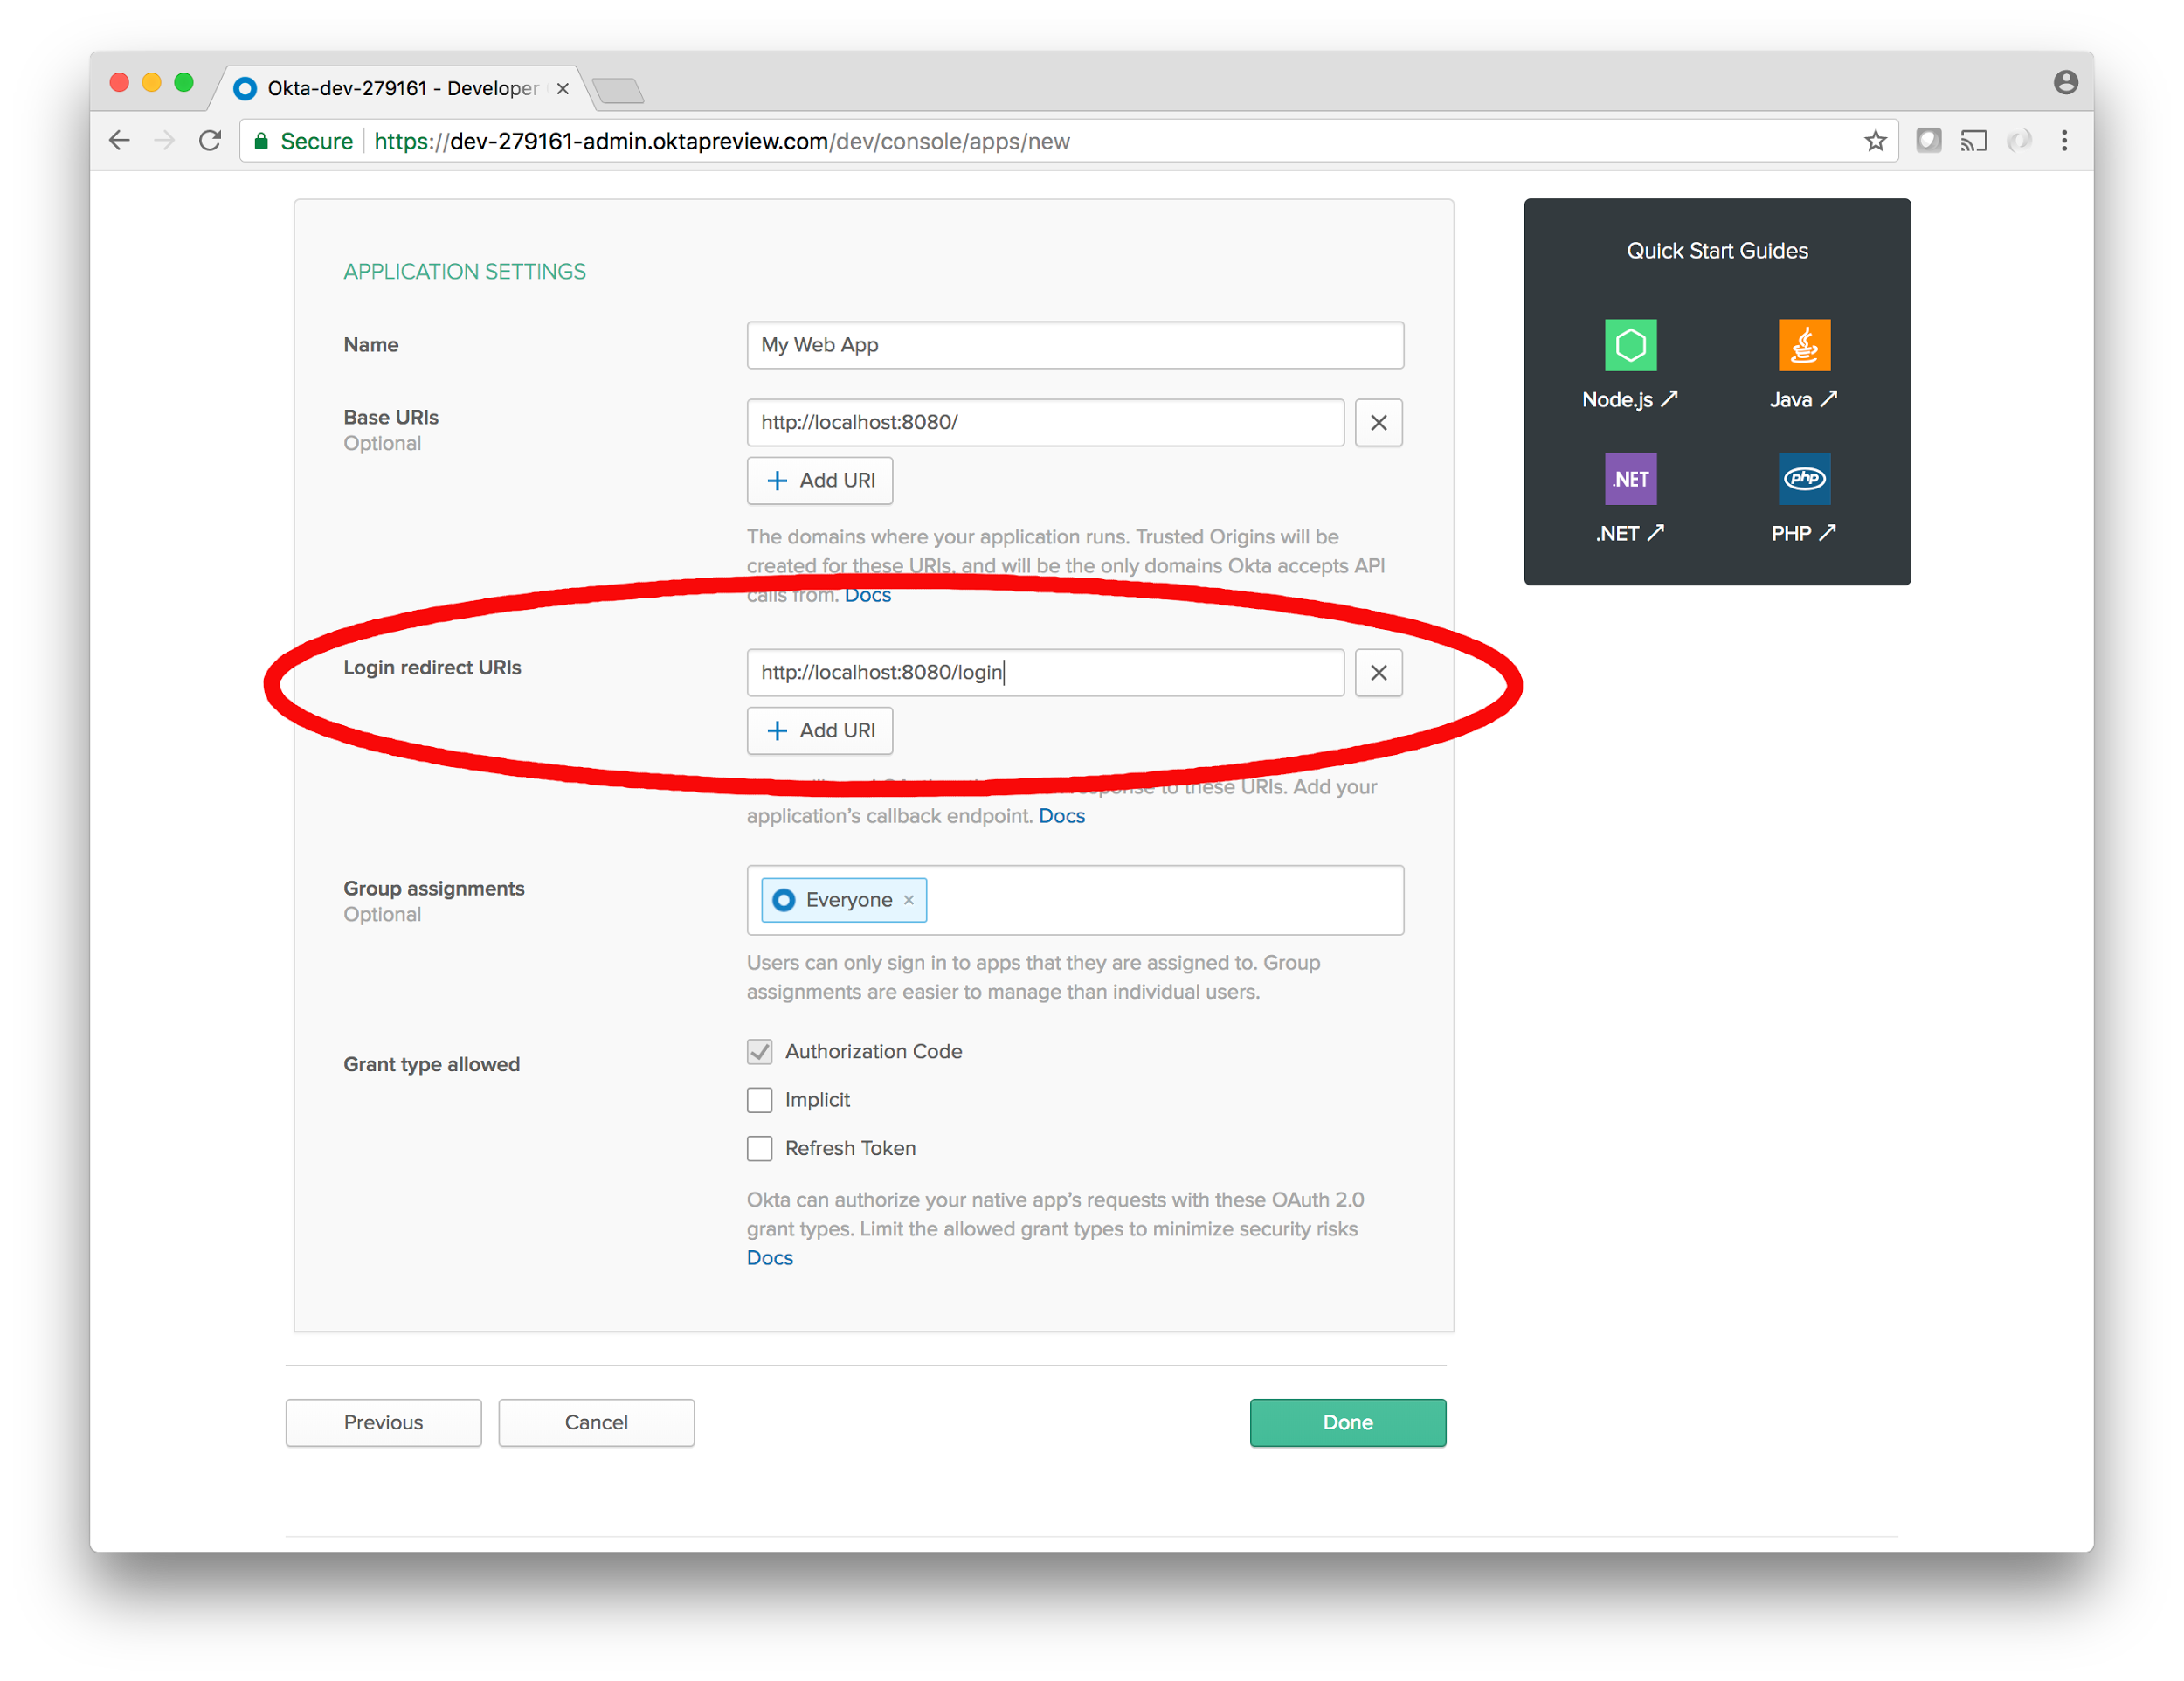
Then, click Done. This takes you to home base for your new application. There are a lot of features here too but for now you’ll want to take note of a few pieces of information in the General sub-tab of the Application main tab in the dashboard. The first two are the Client ID and Client Secret located near the bottom of the page:
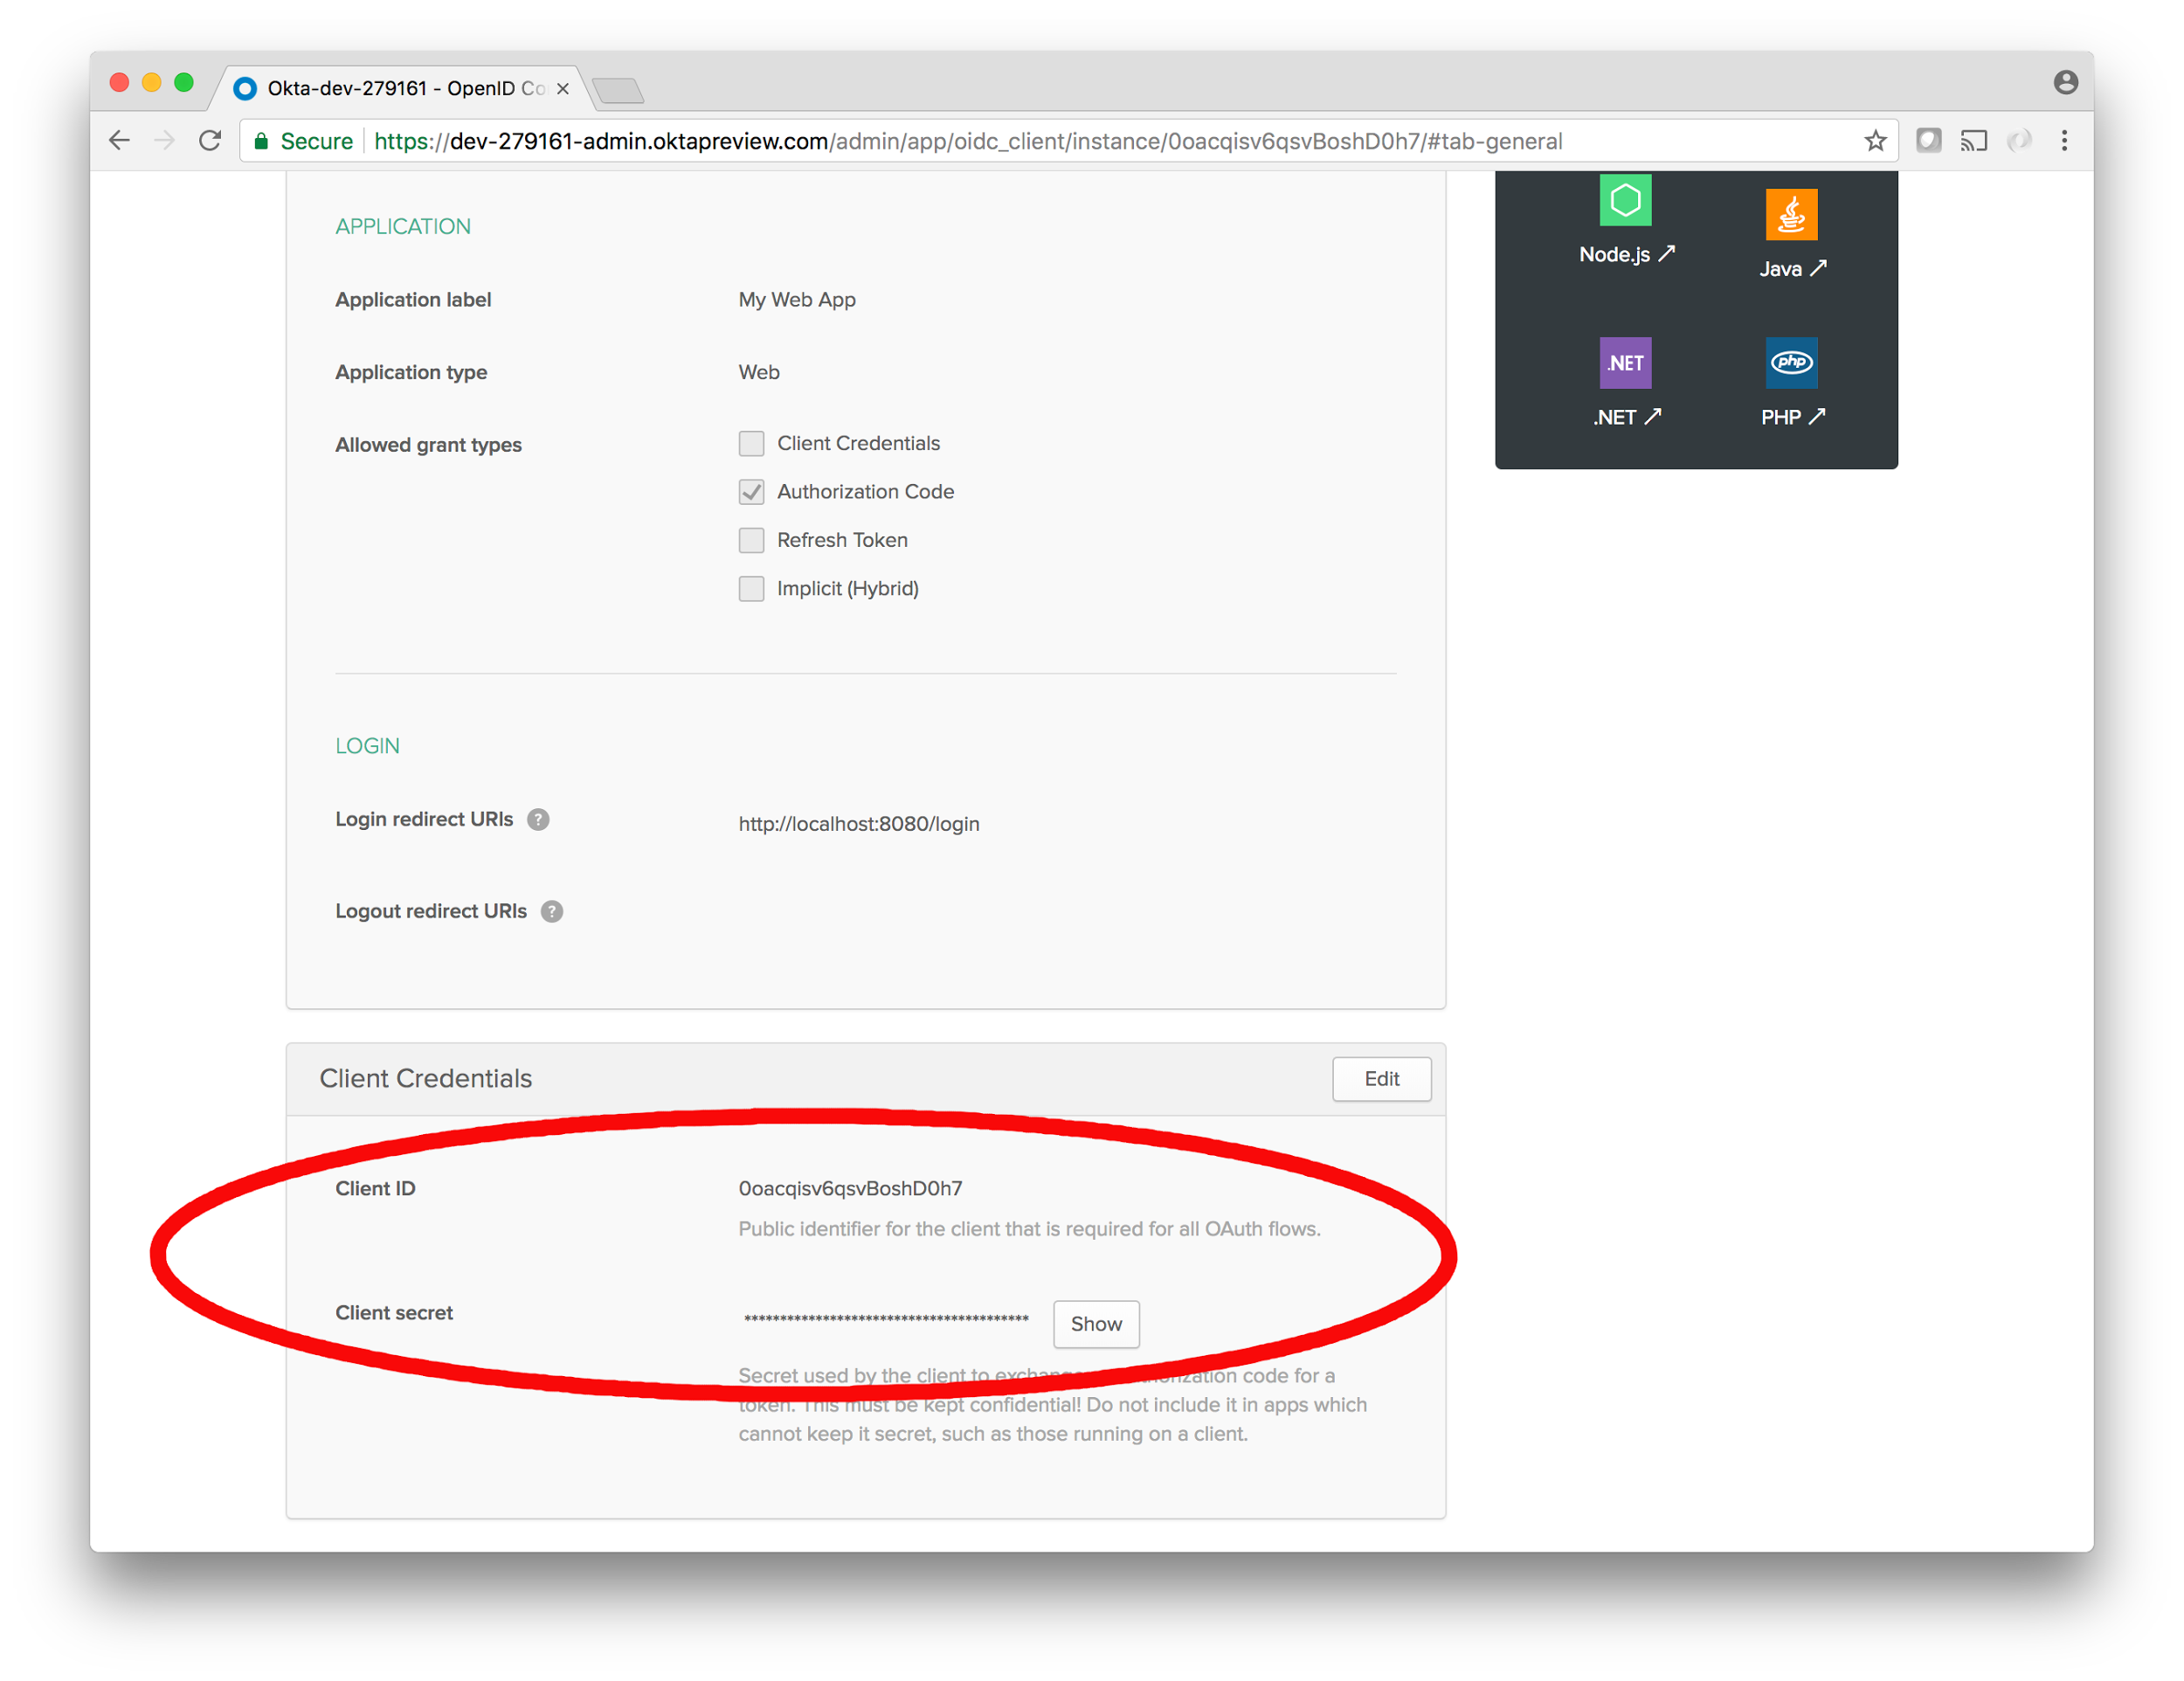
Keep those handy, and keep them safe! You’ll use them in your Spring Boot server to authenticate with Okta.
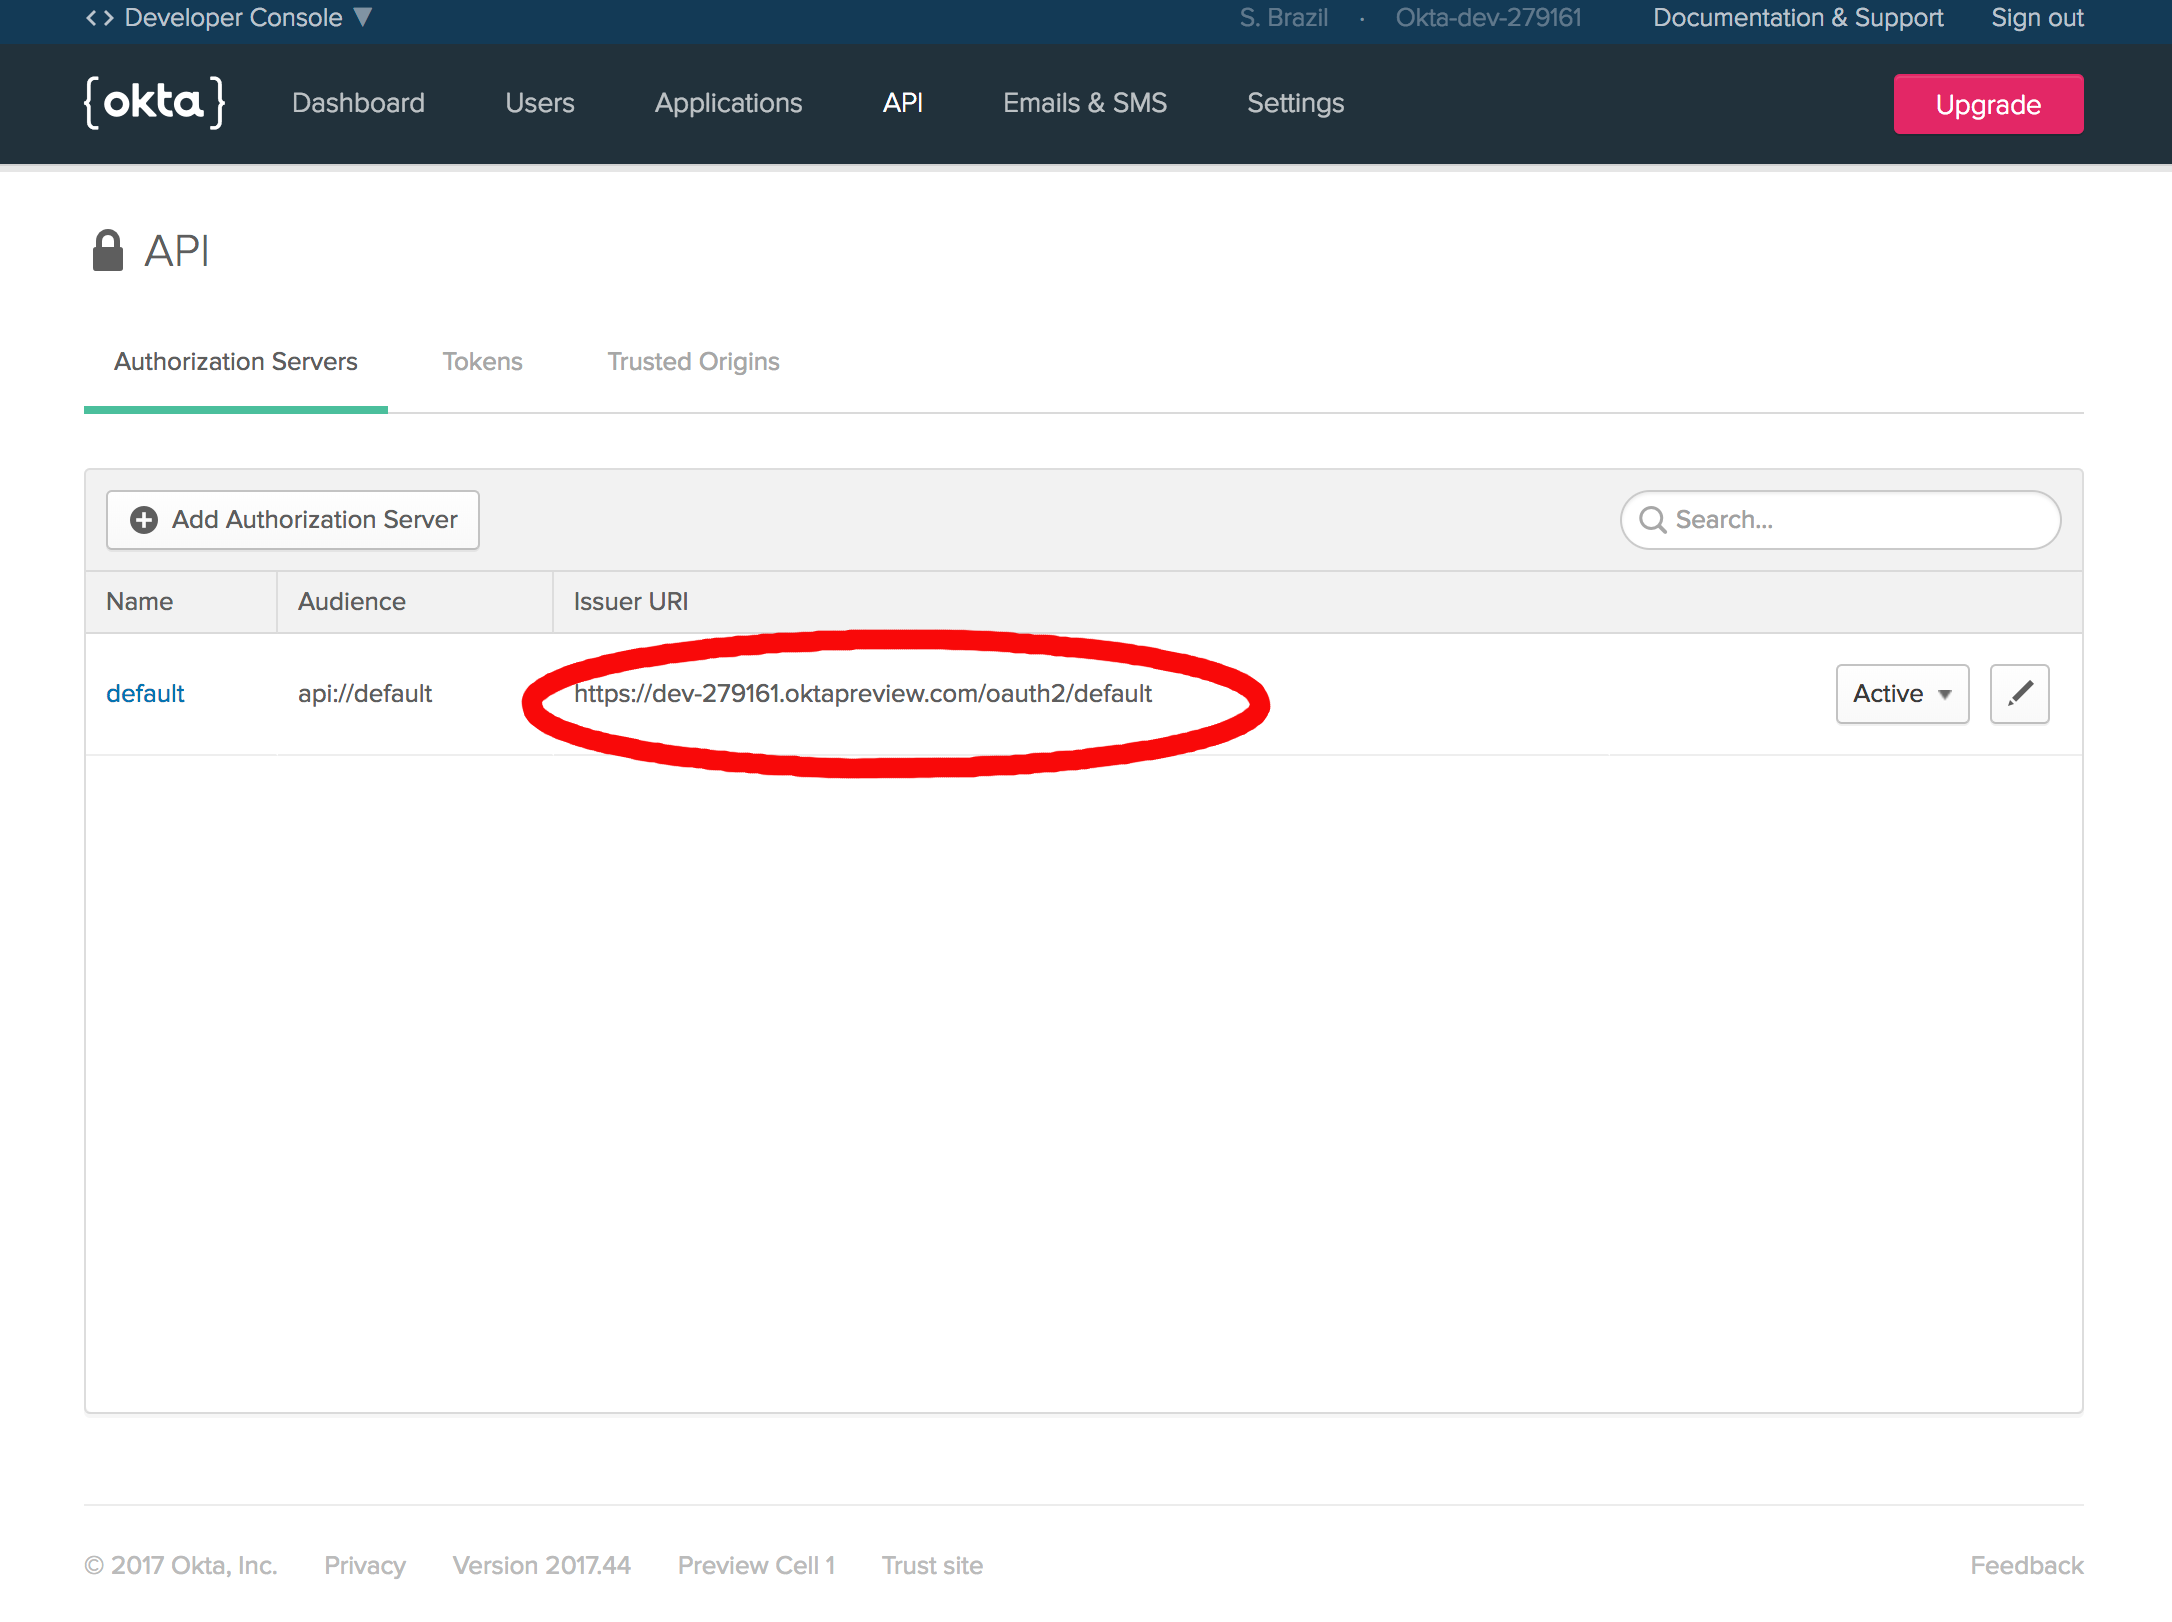
Next, go to the API tab at the top of the dashboard, and in this screen, take note of the Issuer URI. If you don’t see it, make sure you’re on the Authorization Servers sub-tab. This is the Okta OAuth Authorization server that your server will communicate with.
Now that your Client ID, Client Secret, and Issuer URI are stashed somewhere safely; it’s time to plug Okta into your server. Add the Okta and Spring OAuth dependencies along with the others in the pom.xml file:
<dependency>
    <groupId>com.okta.spring</groupId>
    <artifactId>okta-spring-boot-starter</artifactId>
    <version>0.2.0</version>
</dependency>
<dependency>
    <groupId>org.springframework.security.oauth</groupId>
    <artifactId>spring-security-oauth2</artifactId>
    <version>2.2.0.RELEASE</version>
</dependency>
Next you’ll add three values to: src/main/resources/application.properties
okta.oauth2.issuer=https://{yourOktaDomain}/oauth2/default
okta.oauth2.clientId={clientId}
okta.oauth2.clientSecret={clientSecret}
One last bit to do before reaping all that Okta can offer – use it on your server! For this post, the goal is to add single sign-on authentication, so that only users that have registered with you will be able to log into your server and interact with it. The main application class needs to tell the Okta client library to enable single sign-on, and that’s done by adding the following annotation to the main application class at: src/main/java/com/example/demo/DemoApplication.java
@EnableOAuth2Sso
While you’re at it, might as well add an endpoint that does something with the new user information we’re about to get. You can give the main Application class the ability to handle requests by decorating it with:
@RestController
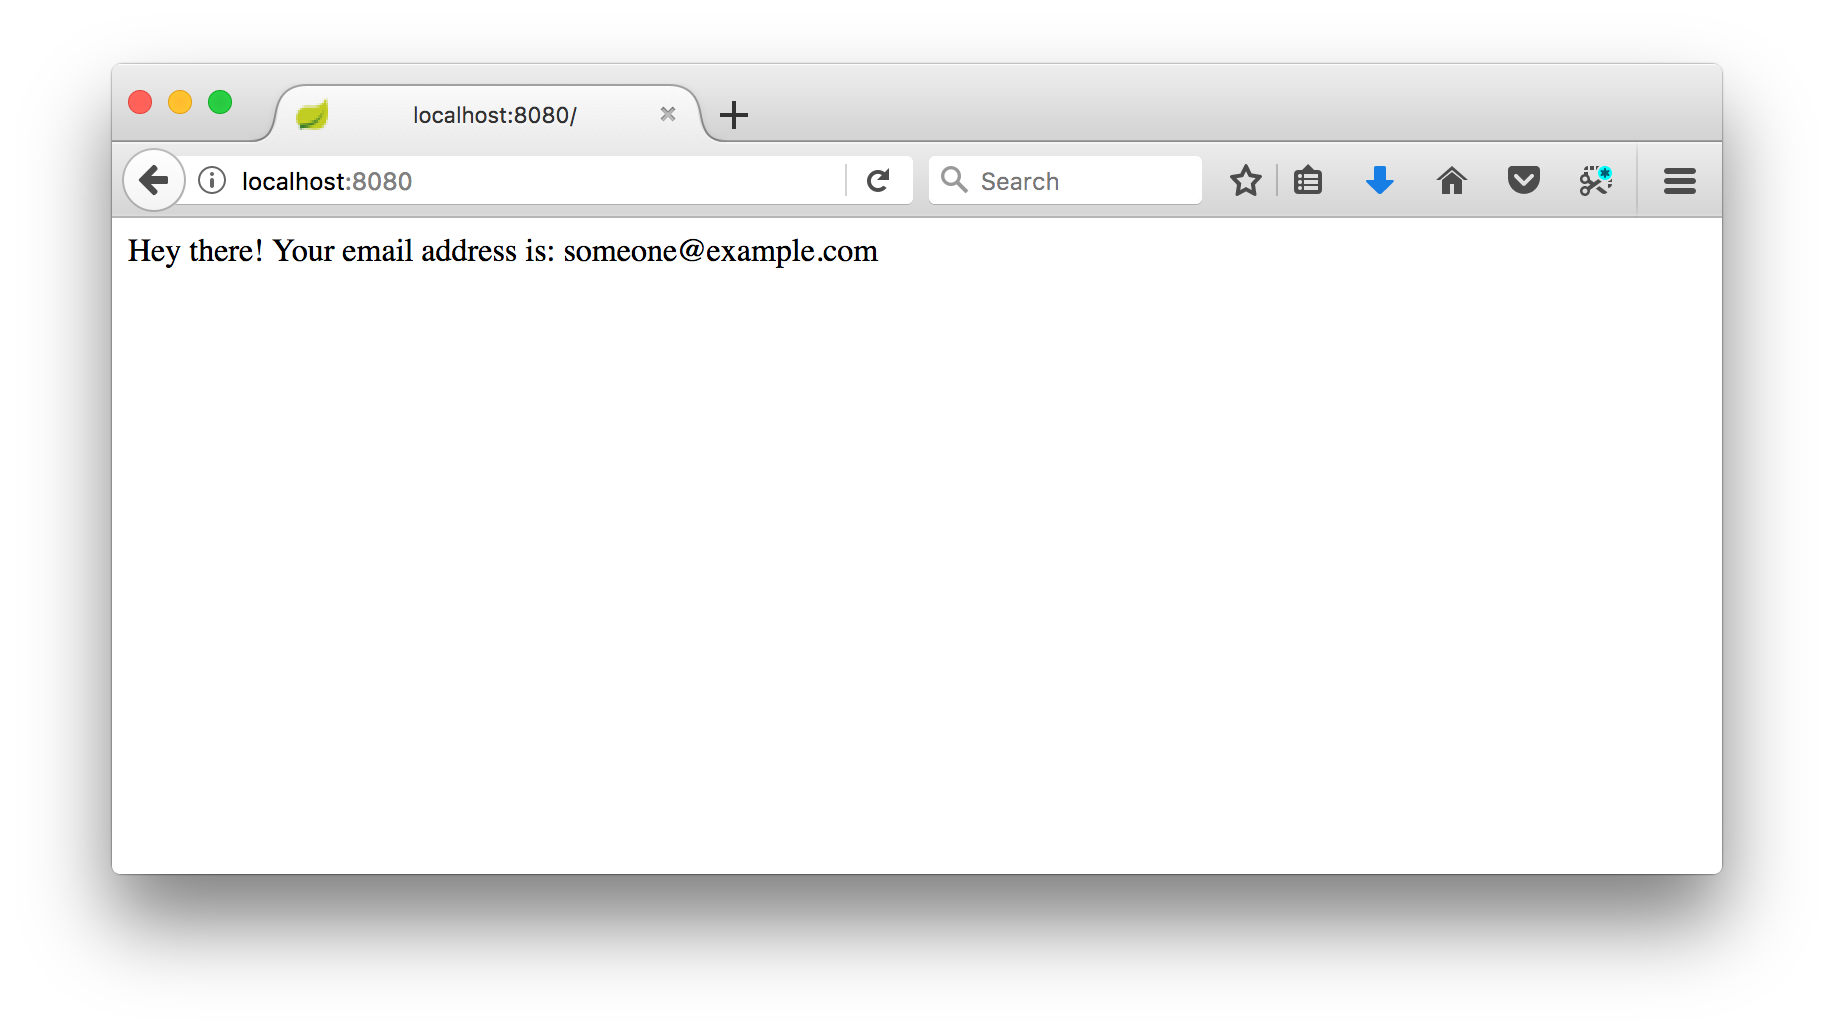
Okta provides the user ID of the caller via the java.security.Principal interface. By default, this is the user’s email address. You can add a request handler that echoes the user’s email address like so:
@GetMapping("/")
public String echoTheUsersEmailAddress(Principal principal) {
   return "Hey there! Your email address is: " + principal.getName();
}
With the new imports, annotations, and request handler, the main DemoApplication.java should look like this:
package com.example.demo;

import org.springframework.boot.SpringApplication;
import org.springframework.boot.autoconfigure.SpringBootApplication;
import org.springframework.boot.autoconfigure.security.oauth2.client.EnableOAuth2Sso;
import org.springframework.web.bind.annotation.GetMapping;
import org.springframework.web.bind.annotation.RestController;
import java.security.Principal;

@RestController
@EnableOAuth2Sso
@SpringBootApplication
public class DemoApplication {

    public static void main(String[] args) {
        SpringApplication.run(DemoApplication.class, args);
    }

    @GetMapping("/")
    public String echoTheUsersEmailAddress(Principal principal) {
        return "Hey there! Your email address is: " + principal.getName();
    }
}
When you restart the server via ./mvnw spring-boot:run and visit http://localhost:8080 in your browser, you’ll be taken to your personal Okta subdomain to log in:
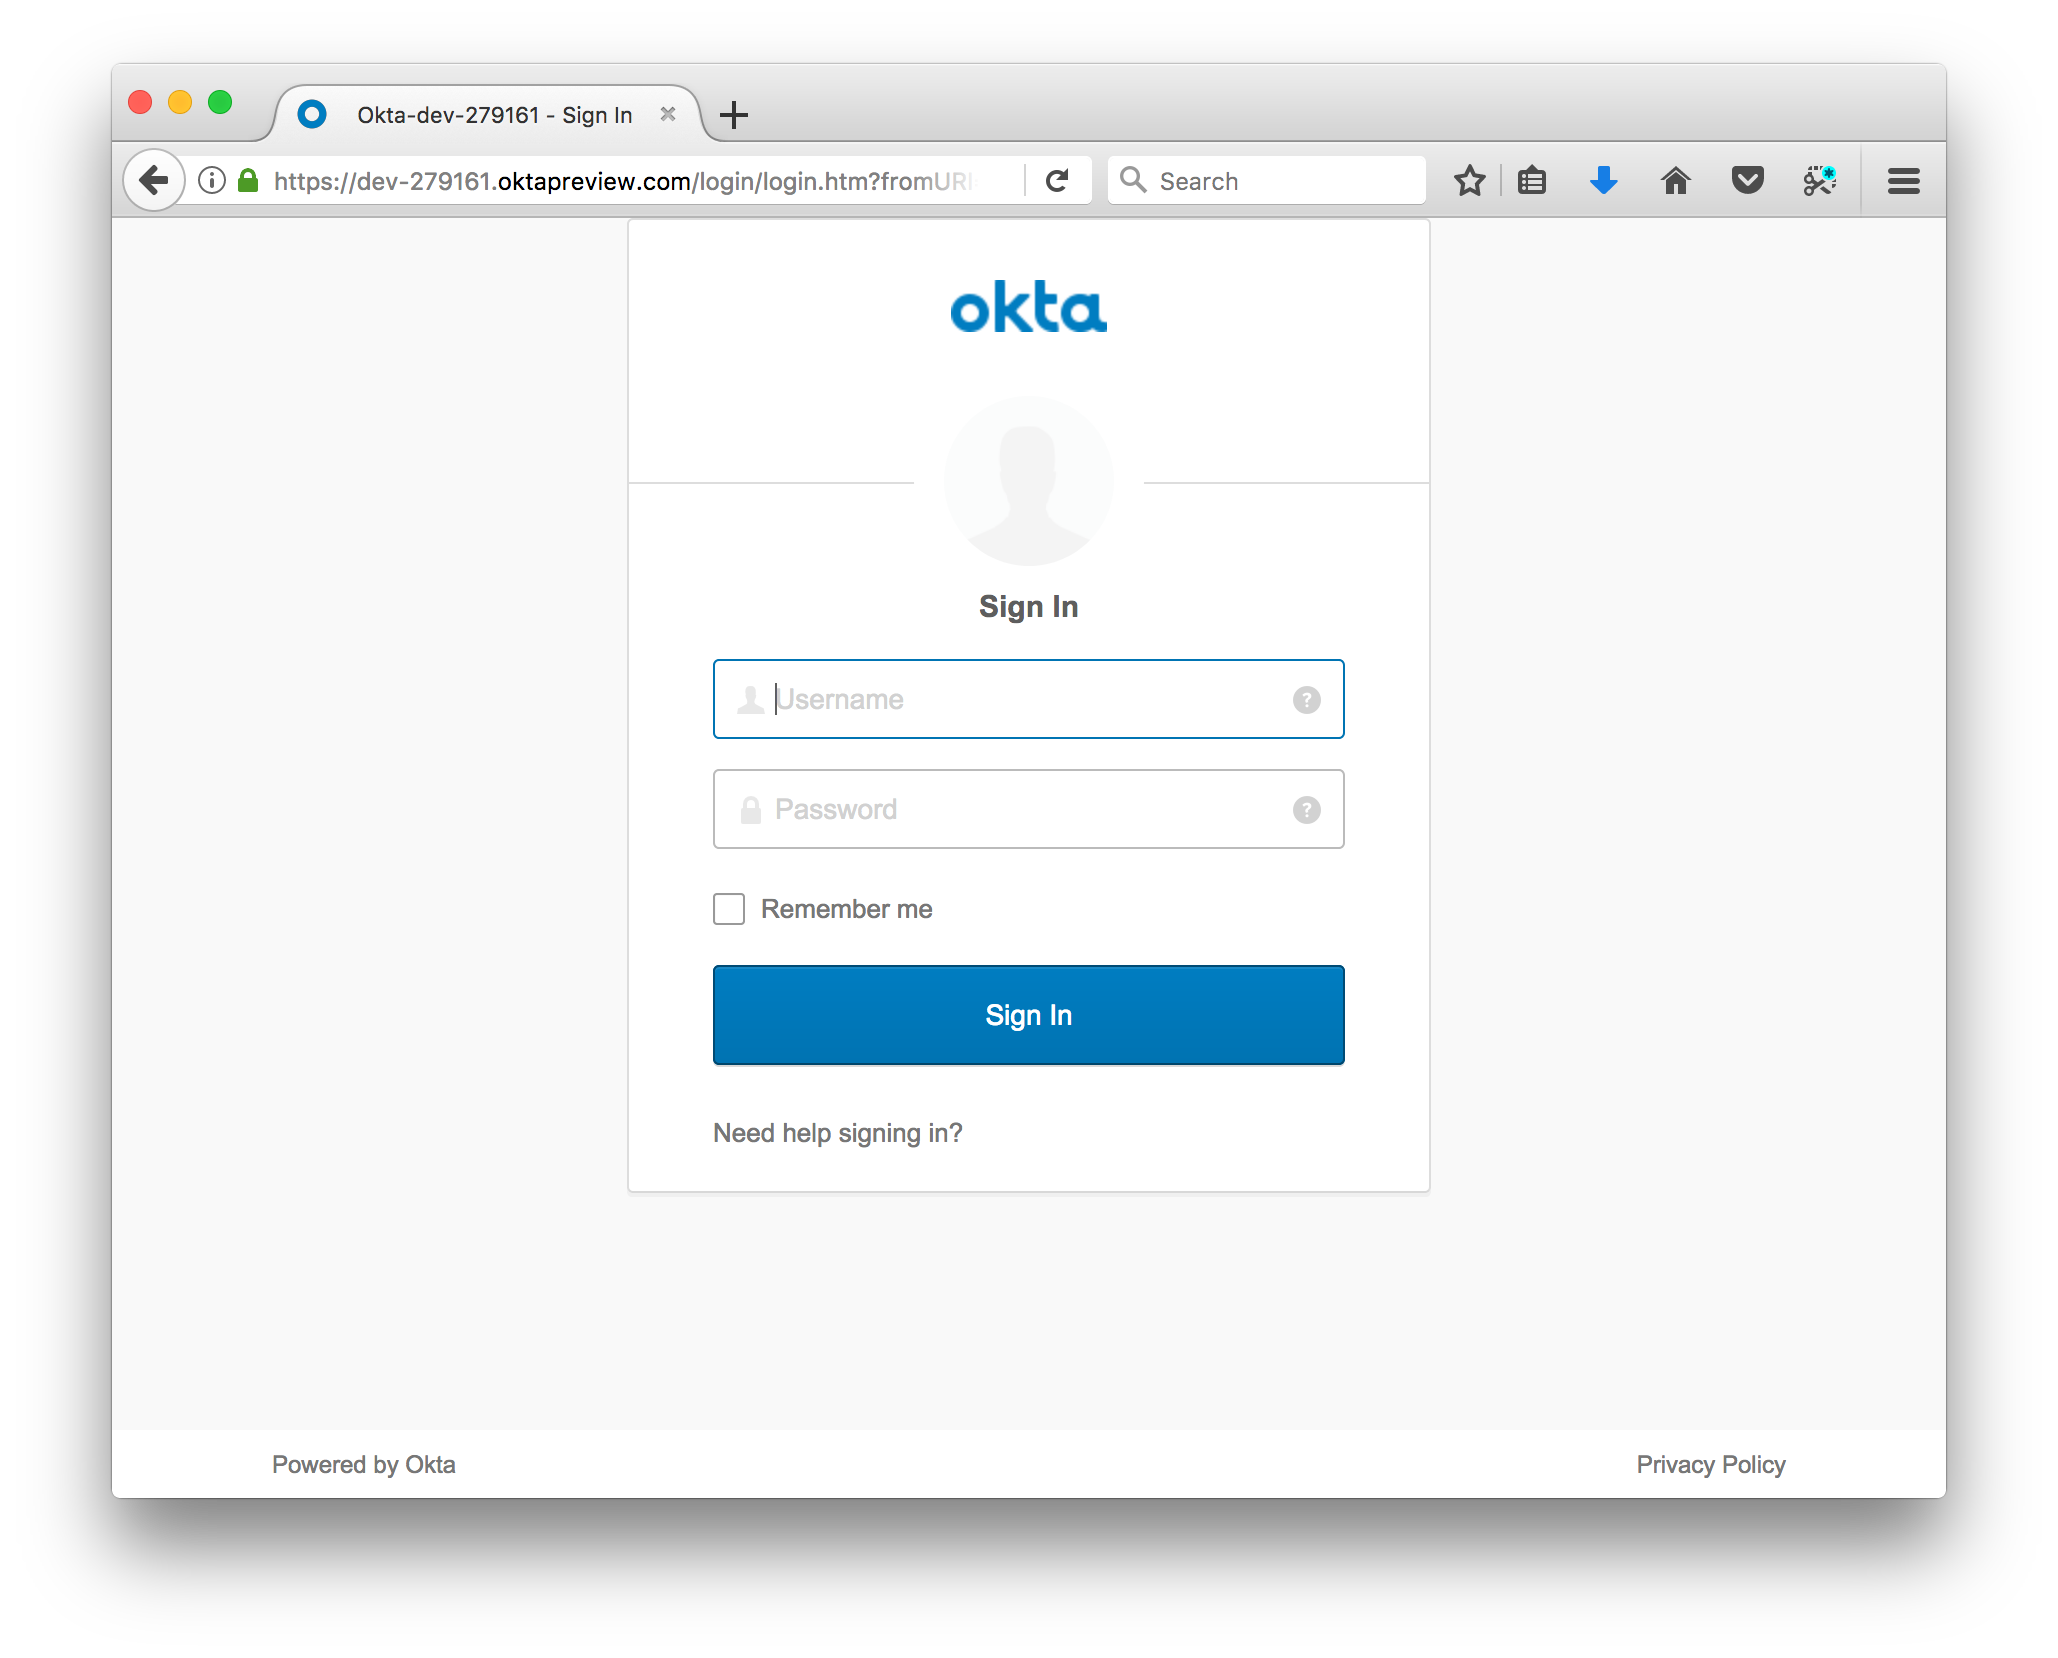
You can log in using the email and password you set when you created your Okta account, because you were added by default as a user in the “My Web App” Okta application. Unless you created a new user back in the administration dashboard, this is the only user that has been given permission to access your site.
Once you’ve logged in, you will be redirected back to your site as an authenticated user, and should be seeing your email address echoed back to you!
What’s Next?
Now the real fun begins, as you create or onboard new users to your app! Take some time to experiment with different permission levels. Check out the audit logs to see what your users’ activities have been. Add users to groups, and customize and control email and text message communications.
Interested in learning more? Check out these other Java resources:
- Our Java Product Documentation
- Secure Your SPA with Spring Boot and OAuth
- Add Role-Based Access Control to Your App with Spring Security and Thymeleaf
And if you have questions about this or any of our other content (or just want to chat!) hit us up on Twitter @OktaDev. We’d love to hear from you!
Okta Developer Blog Comment Policy
We welcome relevant and respectful comments. Off-topic comments may be removed.