Play Zork, Learn OAuth
In the early ’80s, some of the best “video” games were text-based adventures. These games would print out descriptive text of your surroundings and you would interact with the game using simple, but natural language commands like: “go north” or “take sword”. Fast forward some 30 years and a specification for an authorization framework called OAuth 2.0 was published. This framework allows an application to receive a token from an external party (like Okta) that indicates a user is authorized to use the application. What do these two things have in common? Absolutely nothing. But, I thought it would be fun to mash them together to demonstrate how OAuth works by playing a text-based game.
Infocom was a popular producer of text-based games and they standardized a file format and interpreter for them called zMachine. There’s a great zMachine interpreter written in Java. I incorporated this into a Spring Boot / Spring Security application that interacts with Okta for OAuth so that you can play Zork - one of the most iconic of these games. The application is available on the Okta Developer GitHub account.
Let’s jump right in so you can see it in action and then we’ll break down how everything works.
Note: In May 2025, the Okta Integrator Free Plan replaced Okta Developer Edition Accounts, and the Okta CLI was deprecated.
We preserved this post for reference, but the instructions no longer work exactly as written. Replace the Okta CLI commands by manually configuring Okta following the instructions in our Developer Documentation.
Play Zork in 3 Clicks
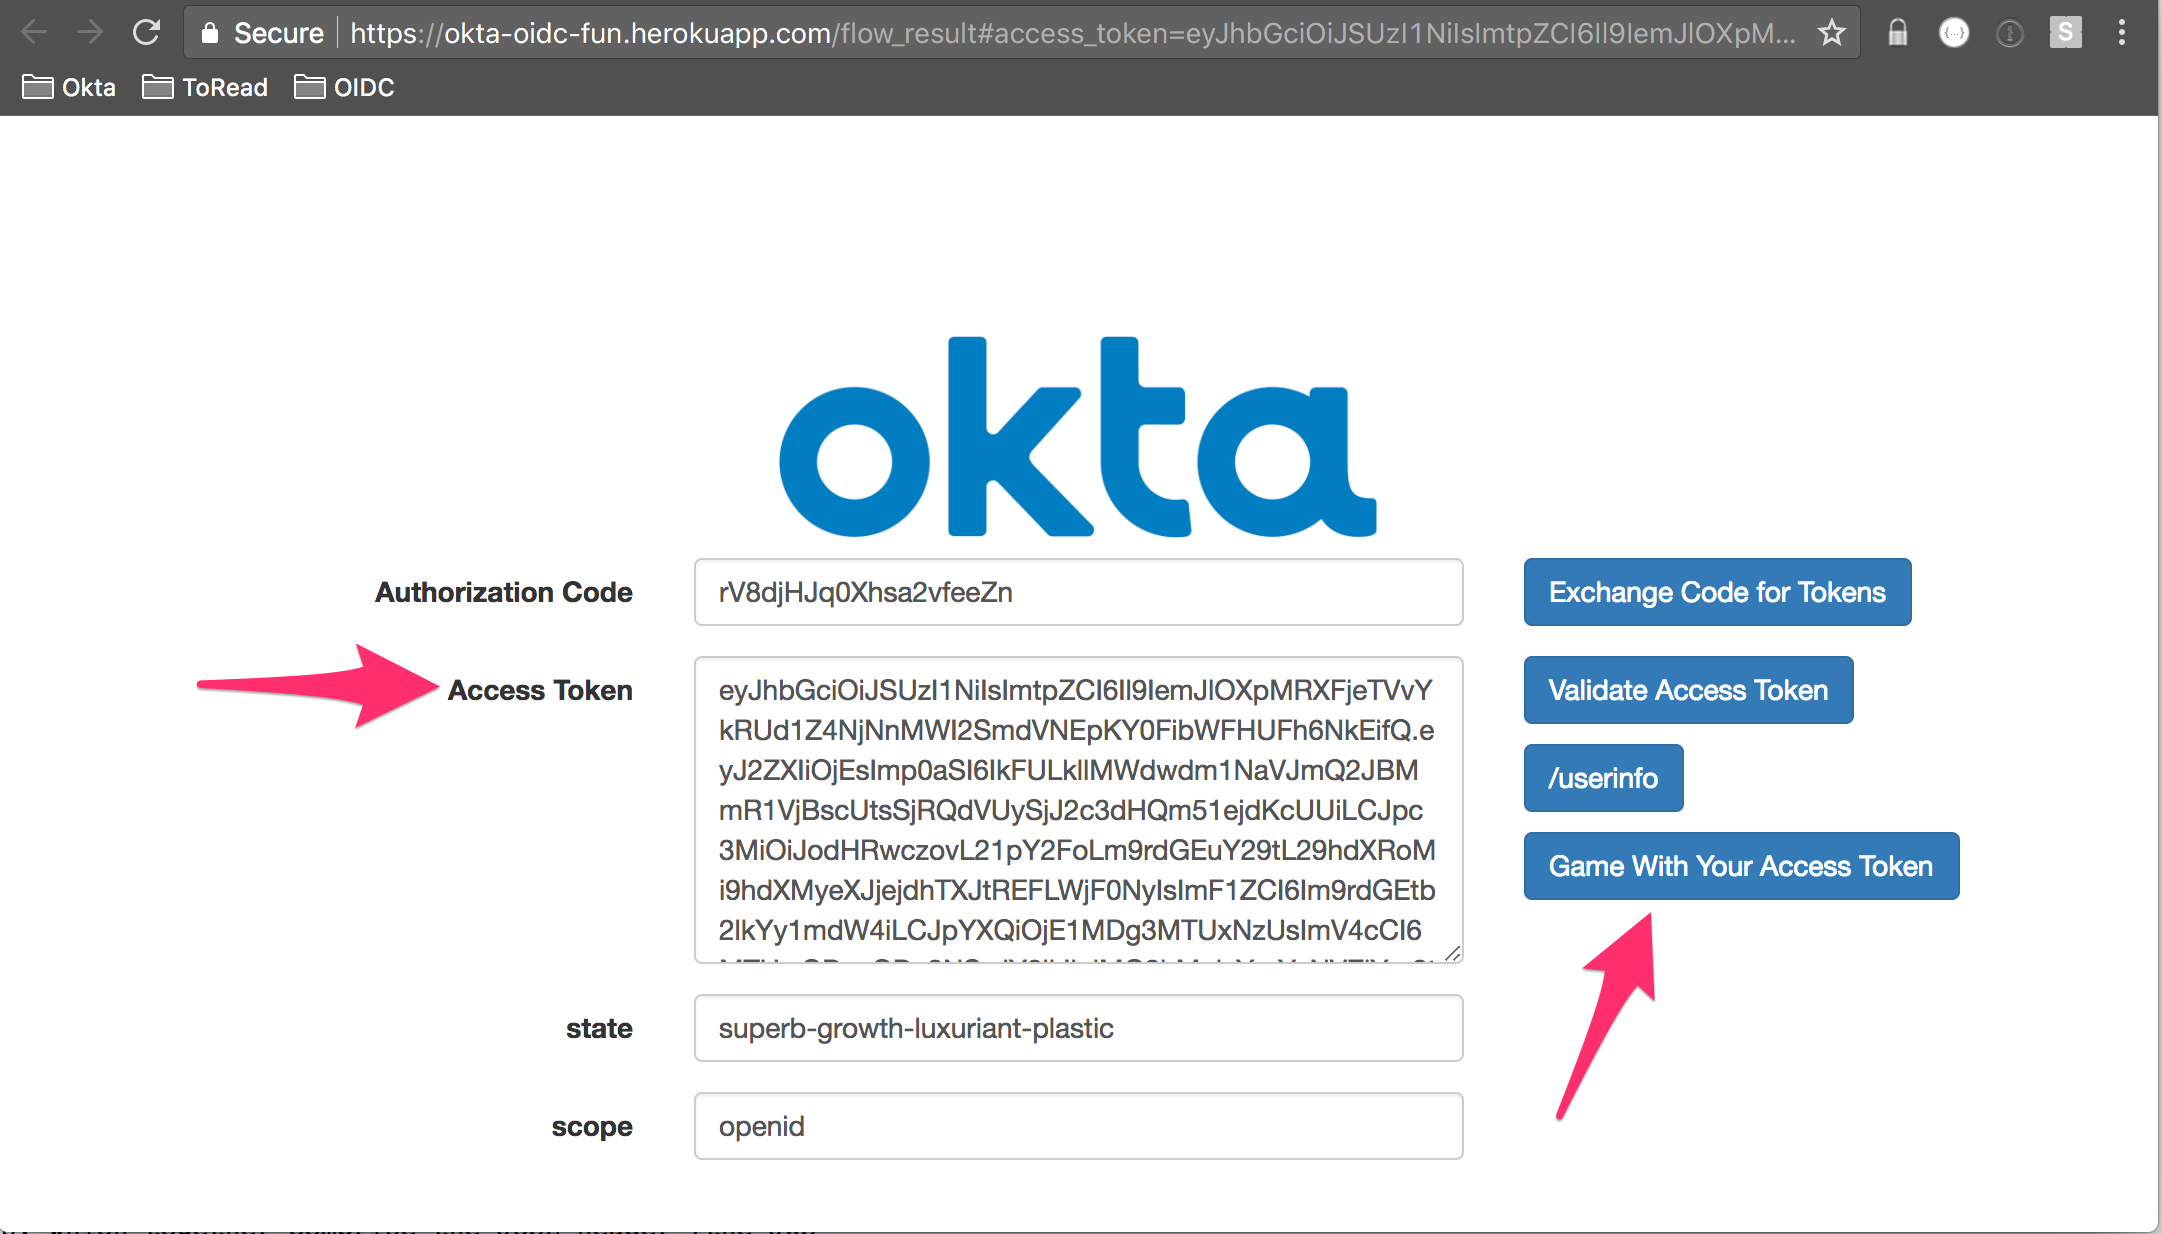
Navigate to: https://okta-oidc-fun.herokuapp.com. Click token. Then, click the link at the bottom of the page. (It starts with: https://micah.okta.com/oauth2/aus2yrcz7aMrmDAKZ1t7/v1/authorize.)
You should see an Access Token and a button that says: Game With Your Access Token. Click that. Now, you’ll be at the page where you can play Zork!
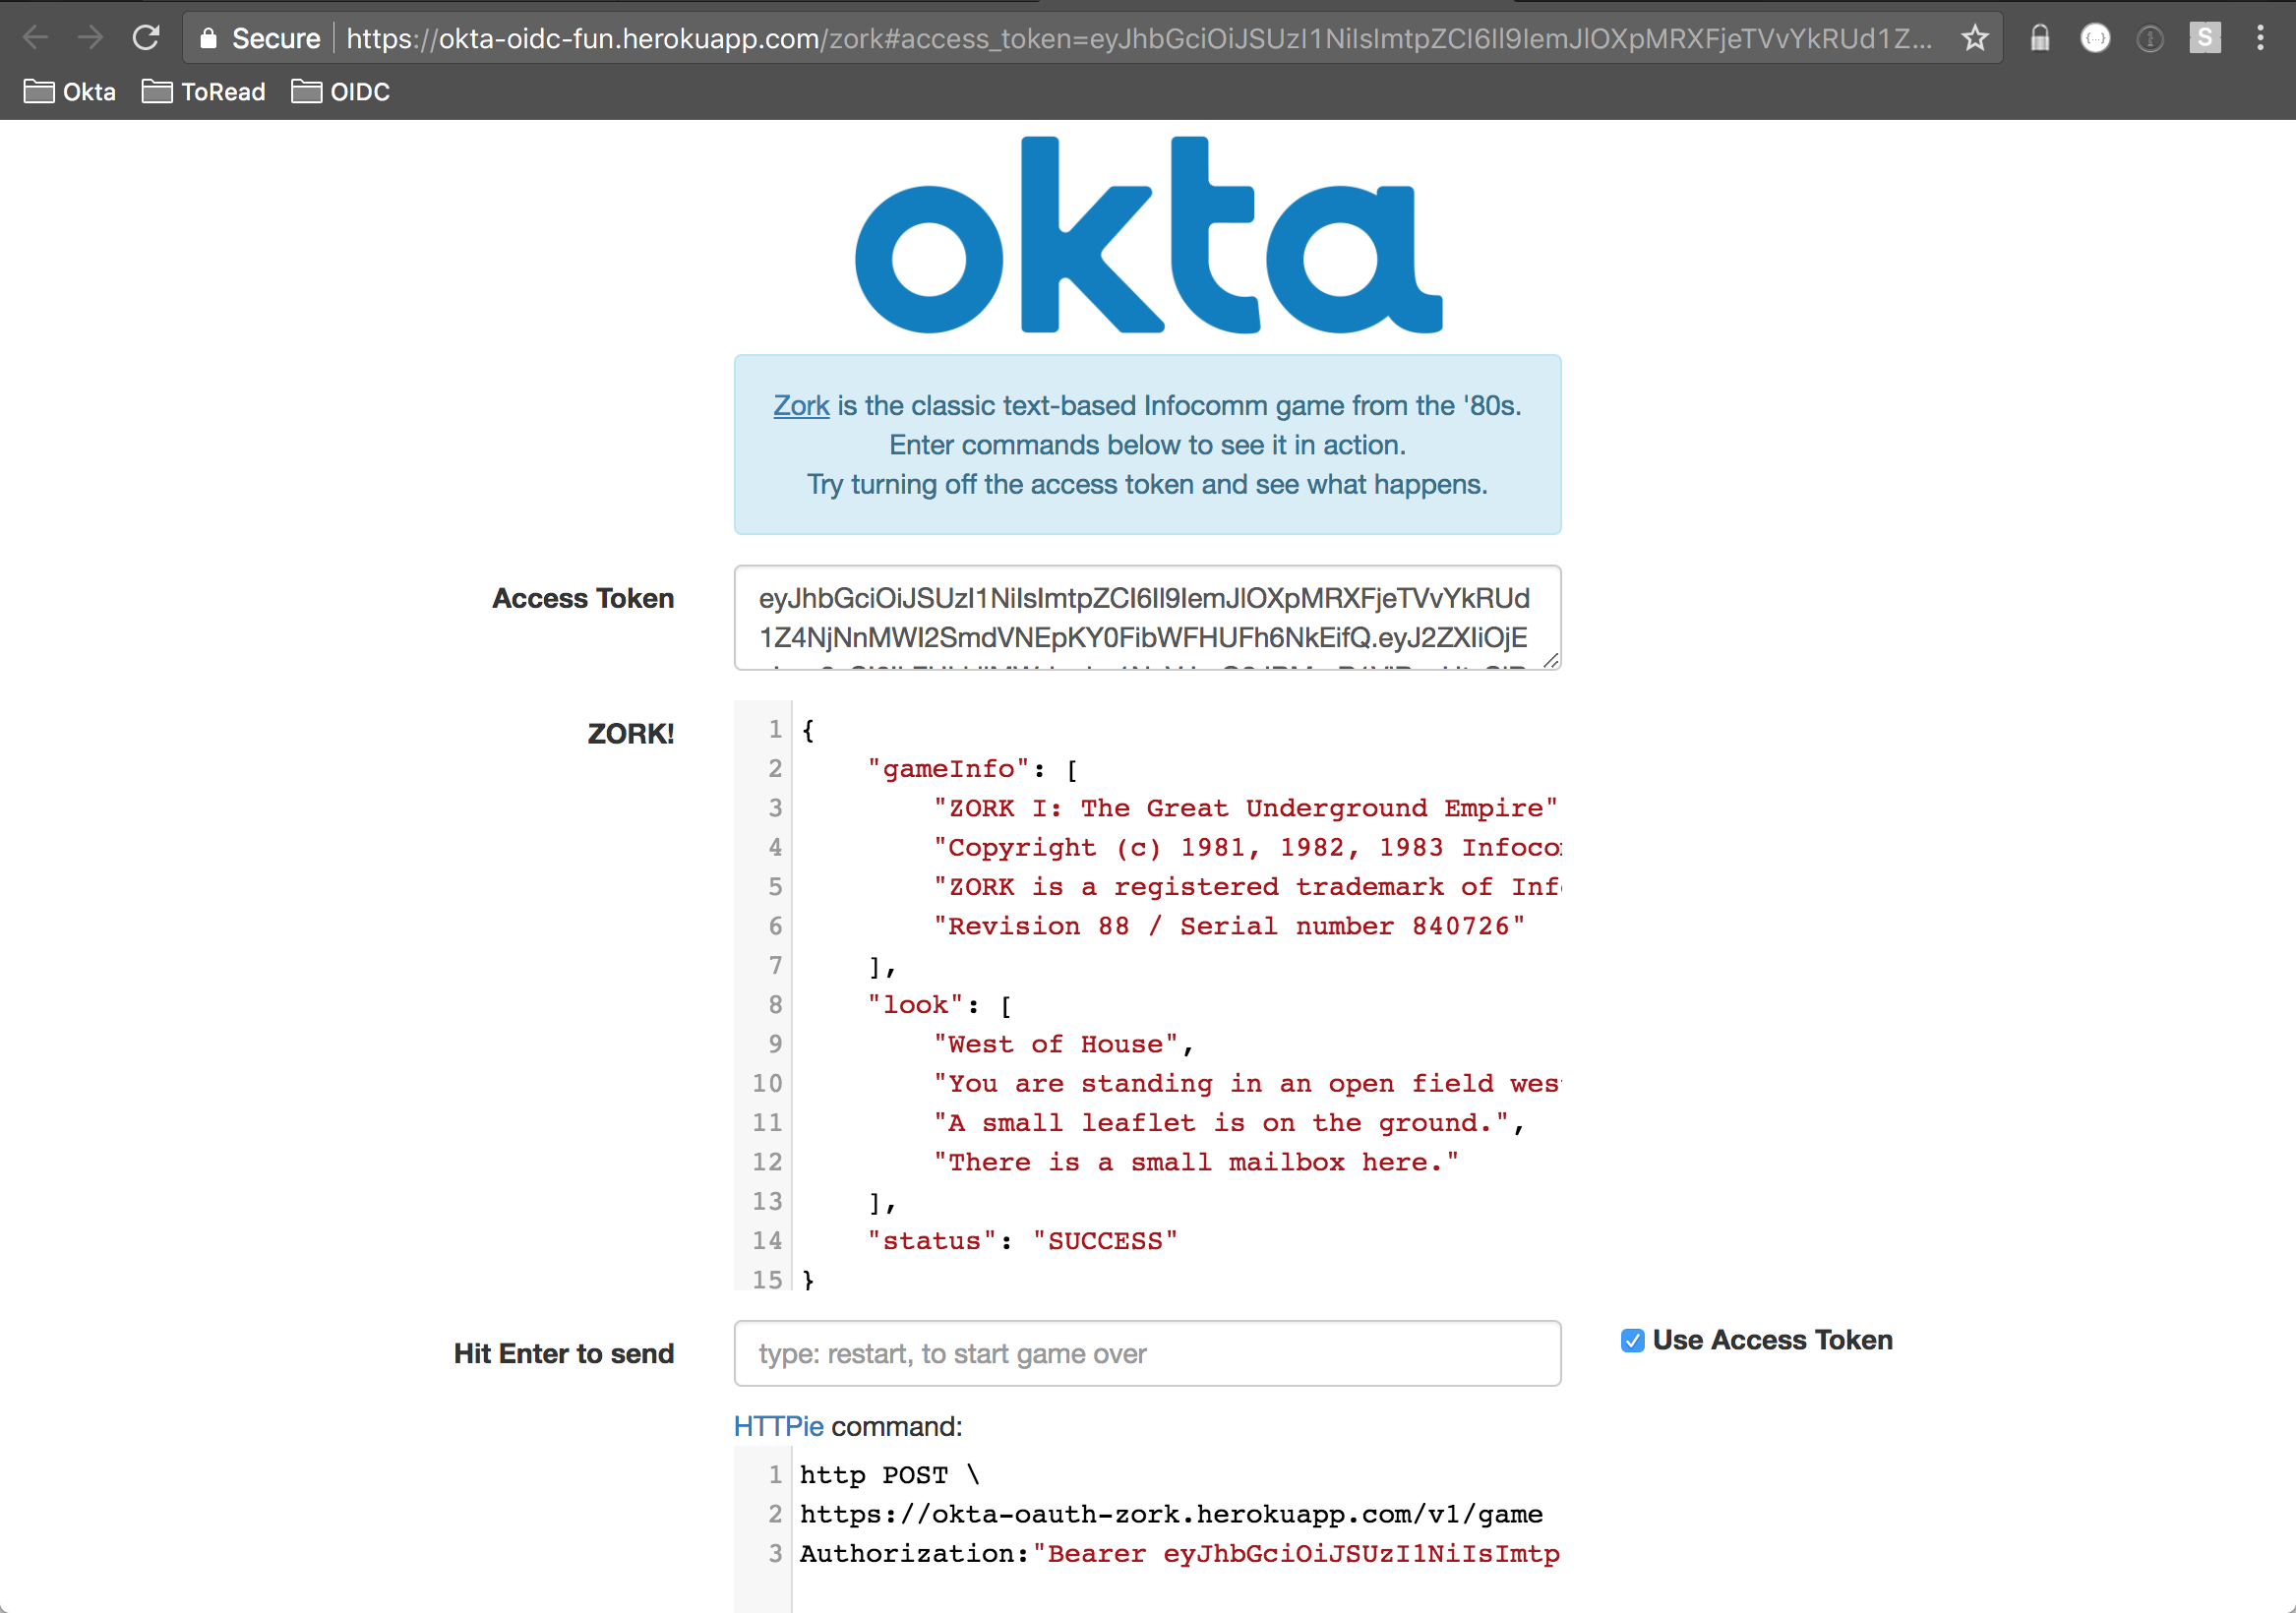
Enter a command in the text field and hit enter to send it. You should see a response from the game in JSON form above it. Try clicking Use Access Token and sending a command. You’ll get back a Unauthorized message.
Without the presence of the access token, the application can’t tell that you’re an authorized game player and rejects the request.
In the spirit of the game, you can choose your own adventure:
- Learn a little more about OAuth
- Deploy the application and user your own Okta Tenant
- Dive into the code
What the Heck is OAuth?
My colleague at Okta wrote a great in-depth post that defines what OAuth is and is not. Here, we’ll cover the important points.
OAuth is a standard that apps can use to provide client applications with “secure delegated access”. It works over HTTPS and authorizes devices, APIs, servers, and applications with access tokens rather than credentials.
An application obtains an access token through an interaction that usually involves authentication with an external provider. This is often referred to as federated identity. This token then represents you making it so that you don’t have to provide your username and password to the external provider on every request. Tokens used in this way are called bearer tokens. This is because all that’s needed to gain access to the application is to present the token. That’s why it’s important that applications safeguard tokens and don’t leak them accidentally.
Note, there are two version of OAuth: 1.0a and 2.0. Version 2.0 is the most commonly used nowadays. Anywhere throughout this post that you see OAuth, I’m talking about OAuth 2.0.
Once you establish trust with an external provider and that provider is issuing tokens, you can easily make the leap to single sign-on (SSO). For instance, you can have two applications backed by the same external provider for authentication. Both applications can make use of an access token from the external provider without the user having to reauthenticate.
There are a number of authorization flows used in OAuth. This post focuses on the implicit flow. The way the implicit flow works is:
- The user attempts to access a protected resource (like:
/v1/game) - The user is redirected to an external identity provider to authenticate (like Okta)
- Upon successful authentication, the user is redirected back to the application with an access token
- The application verifies the access token and if valid, allows the user access to the protected resource
This flow is what’s happening in the previous section. You might be saying to yourself, “But, wait - I didn’t have to login”. Well, that’s because in an effort to keep the example super simple, the application establishes a session in the background using a fixed username and password.
Here’s what’s happening behind the scenes as you navigate through the OIDC Playground above:
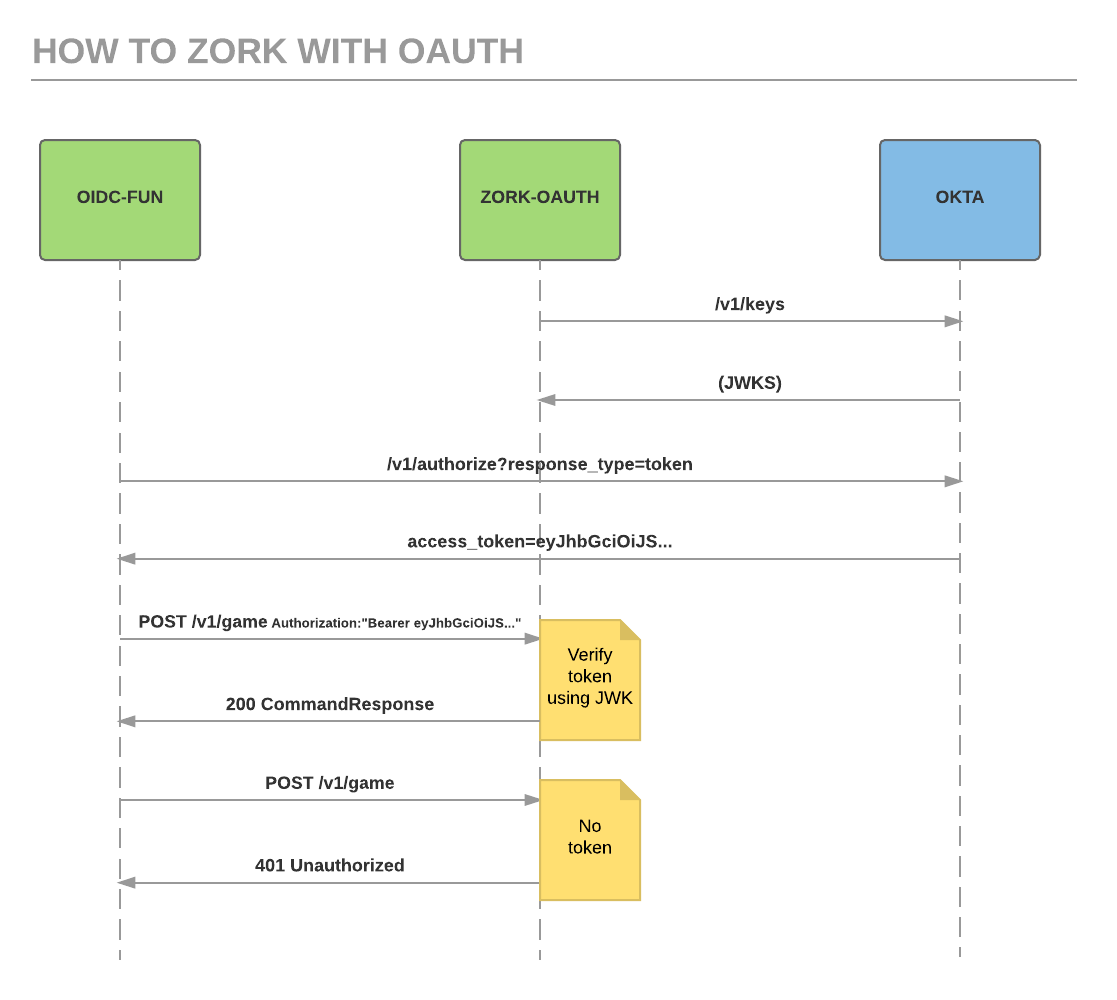
You may be wondering why the first column in this sequence diagram is labeled with OIDC. That stands for OpenID Connect. The truth is, the application running on Okta is an OIDC application. A full treatment of OIDC is outside the scope of this post. All you need to know for now is that OIDC is a superset of OAuth 2.0. That is, if it’s an OIDC app, OAuth is supported.
The /authorize... line kicks off the OAuth interaction. The user authenticates with Okta and, if successful, Okta redirects back with an access token.
The OIDC-FUN app then makes an ajax request to the ZORK-OAUTH app using the access token to represent the user’s identity. In this way, we are achieving SSO of a sort. The Zork app verifies the token and, if correct, extracts the user identity information and processes the command (if any) that was sent. It also uses the user identity information to save the game state back to Okta.
The ZORK-OAUTH app interacts with Okta at startup. Those are the top two lines. Based on your configuration, a JSON Web Key Set is retrieved. The JSON response is an array of available public keys configured in Okta. This enables verifying the cryptographically signed access token (in the form of a JWT) down the line. This is not explicitly part of the OAuth 2.0 specification, but it is part of the OIDC Discovery specification that Okta has implemented.
Let’s set up your very own Okta Developer Account and deploy the Zork application to it. You can see the OAuth implicit flow fully in action. Then, we’ll dig into the code.
Set Up Your Okta Developer Account
In this section, we’ll get everything set up in Okta so you can deploy the Okta Zork Auth app. Here’s a summary of the steps:
- Sign up for a free Okta developer account
- Add a web application that supports the OAuth implicit flow
- Update the Okta profile schema to support saving game state
- Create an API token for saving game state to a user profile
Navigate to https://developer.okta.com to set up your developer account. You’ll receive a confirmation email with a link. Follow the link to finish setup. You’ll then be at your Admin Console.
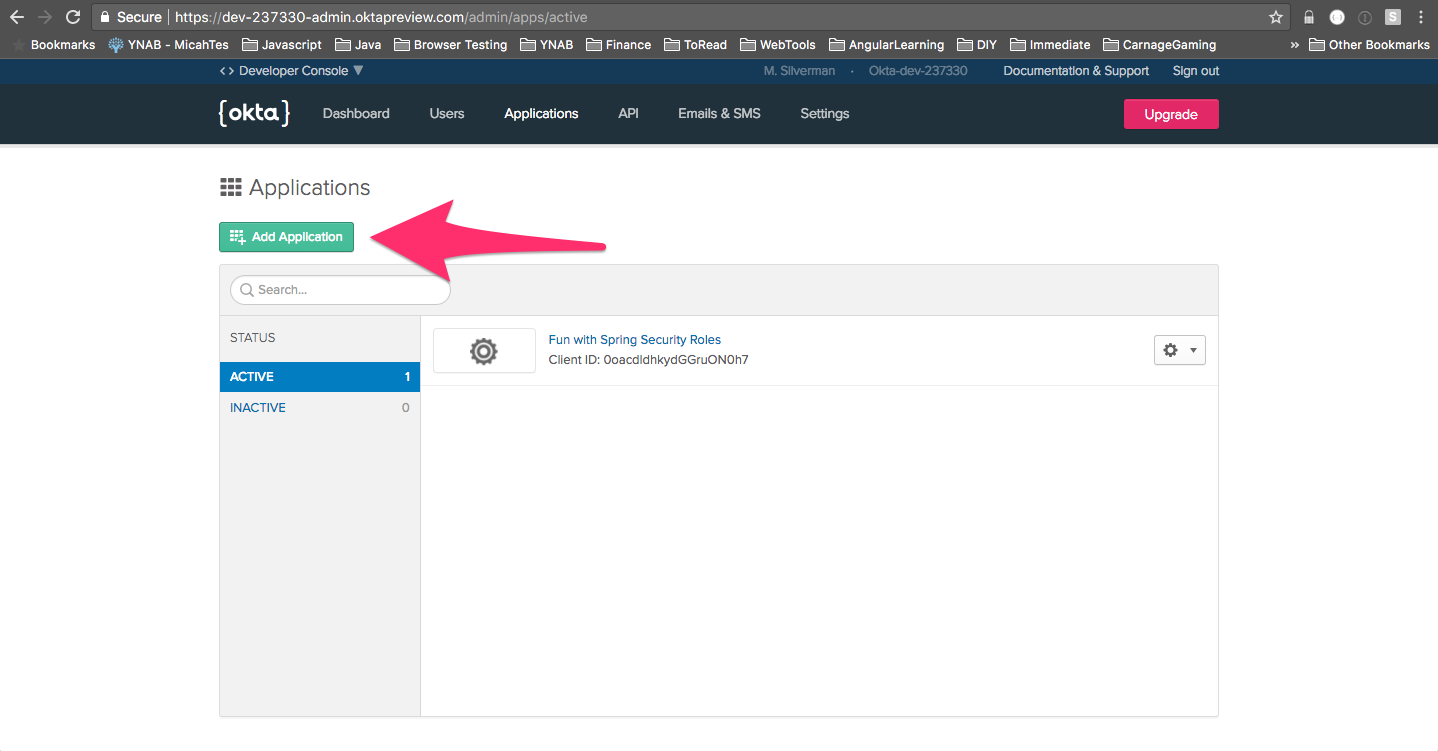
Click Applications along the top menu and click Add Application.
Choose Web and then click *Next.
Later, you’ll be deploying the Zork application to Heroku. Fill in the values for Base-URIs and Login redirect URIs that match your Heroku app name. That is, if you name your Heroku app: okta-zork-test, the URL will be: https://okta-zork-test.herokuapp.com
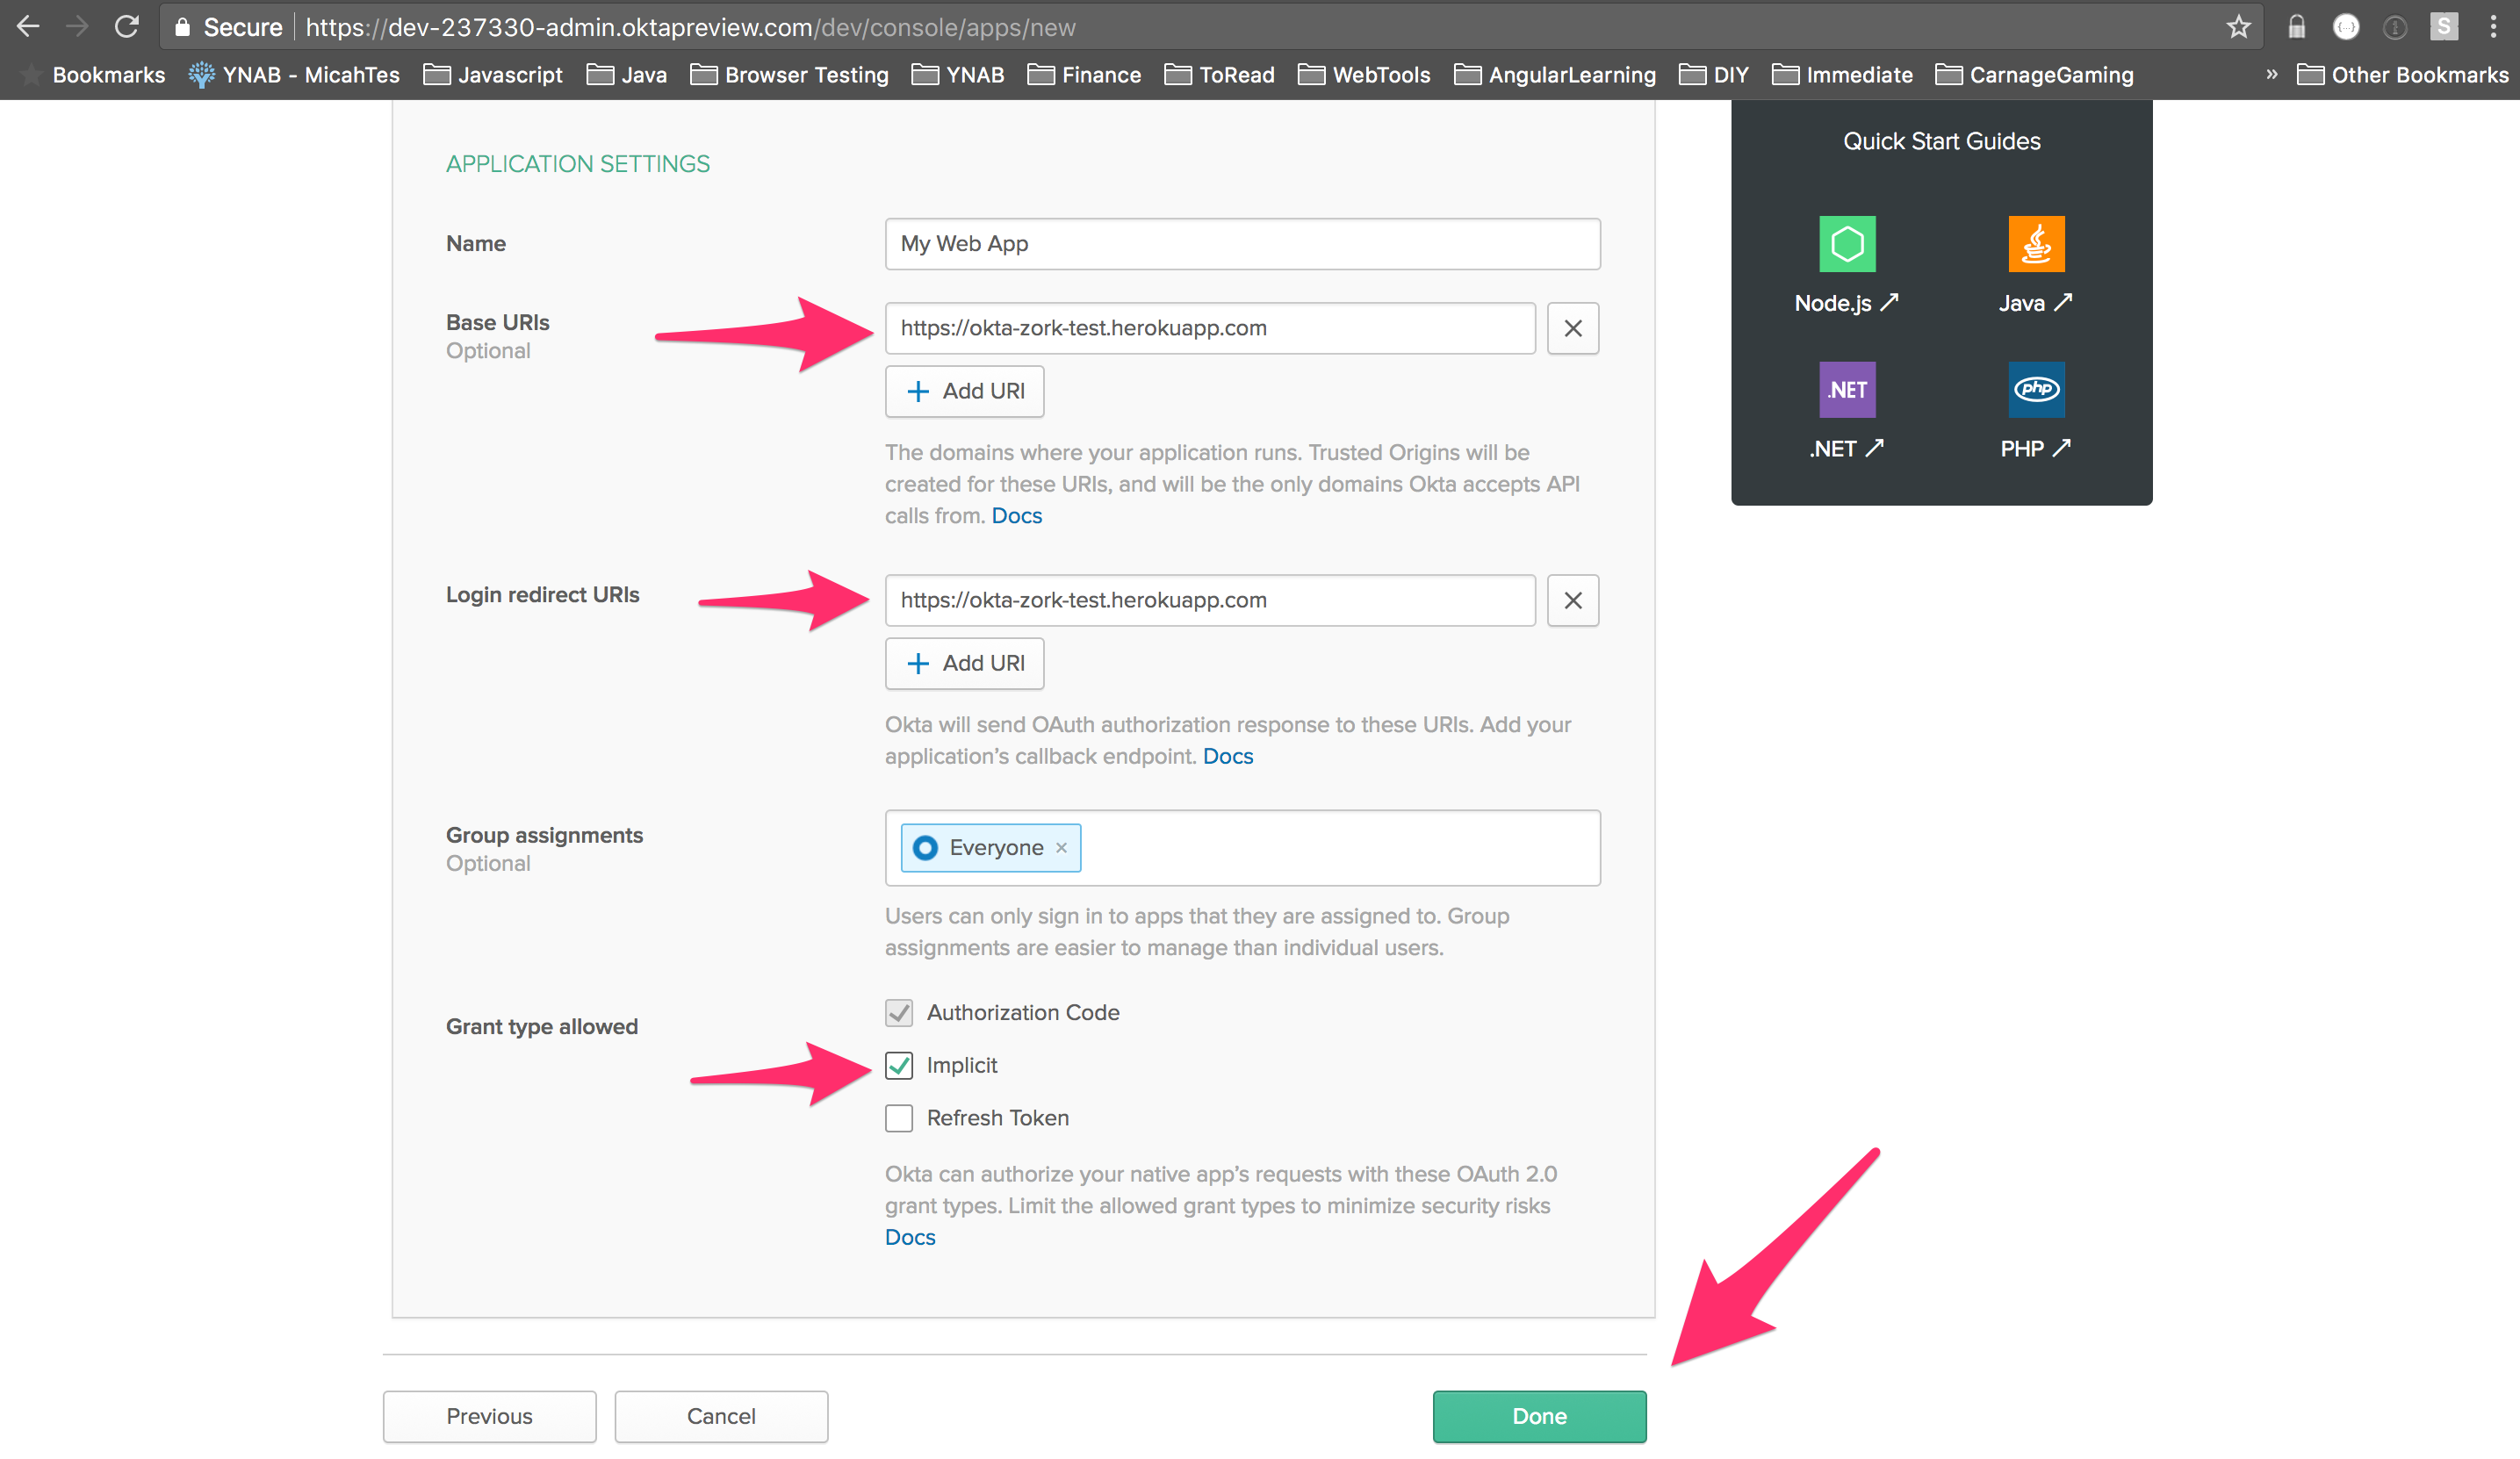
If you scroll to the bottom, you’ll see a Client ID. Save this value somewhere as we’ll be using it later to configure Heroku.
As you make your way through Zork, the application saves your game state. This makes it so that when you come back to the game, you can pick up where you left off. Rather than add another moving part to the application in the form of a database, I took advantage of Okta’s profile schema capability. In short, you can add any number of key/value pairs to the default user profile. In this case, I added zMachineData. It’s a string type field and the app will store your game state as a base64-encoded string. To add that profile schema attribute, do the following:
Select Users -> Profile Editor from the main menu of your Admin Console. Click Profile next to User.
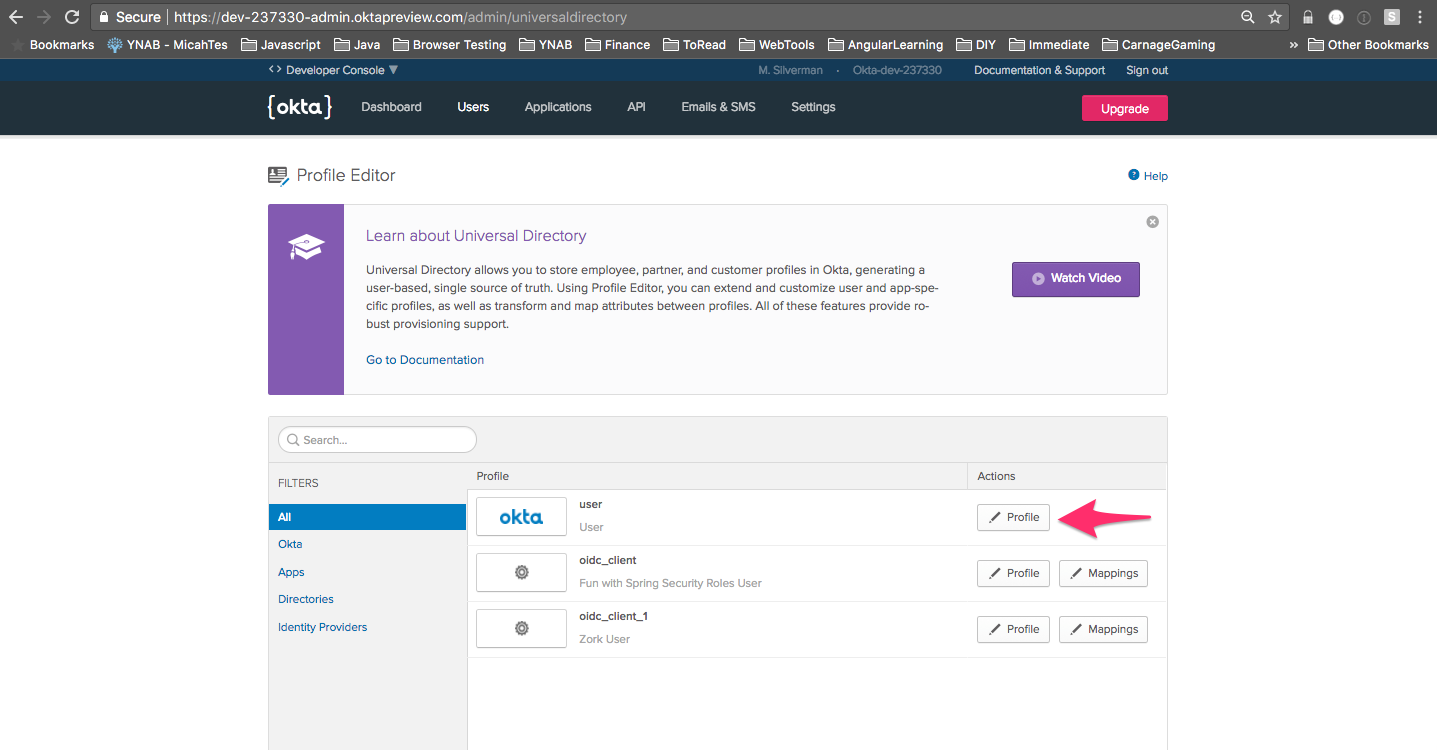
Click Add Attribute. Enter zMachineData for the Display name and Variable name fields. Click Save. That’s all there is to it! Now, every user in your tenant has a zMachineData attribute on their profile.
The last thing we need to do is create an API token. This enables the application to save the game state to the authenticated user’s profile.
Choose API -> Tokens from the main menu of your Admin Console. Click Create Token. Give it a name and click Create Token.
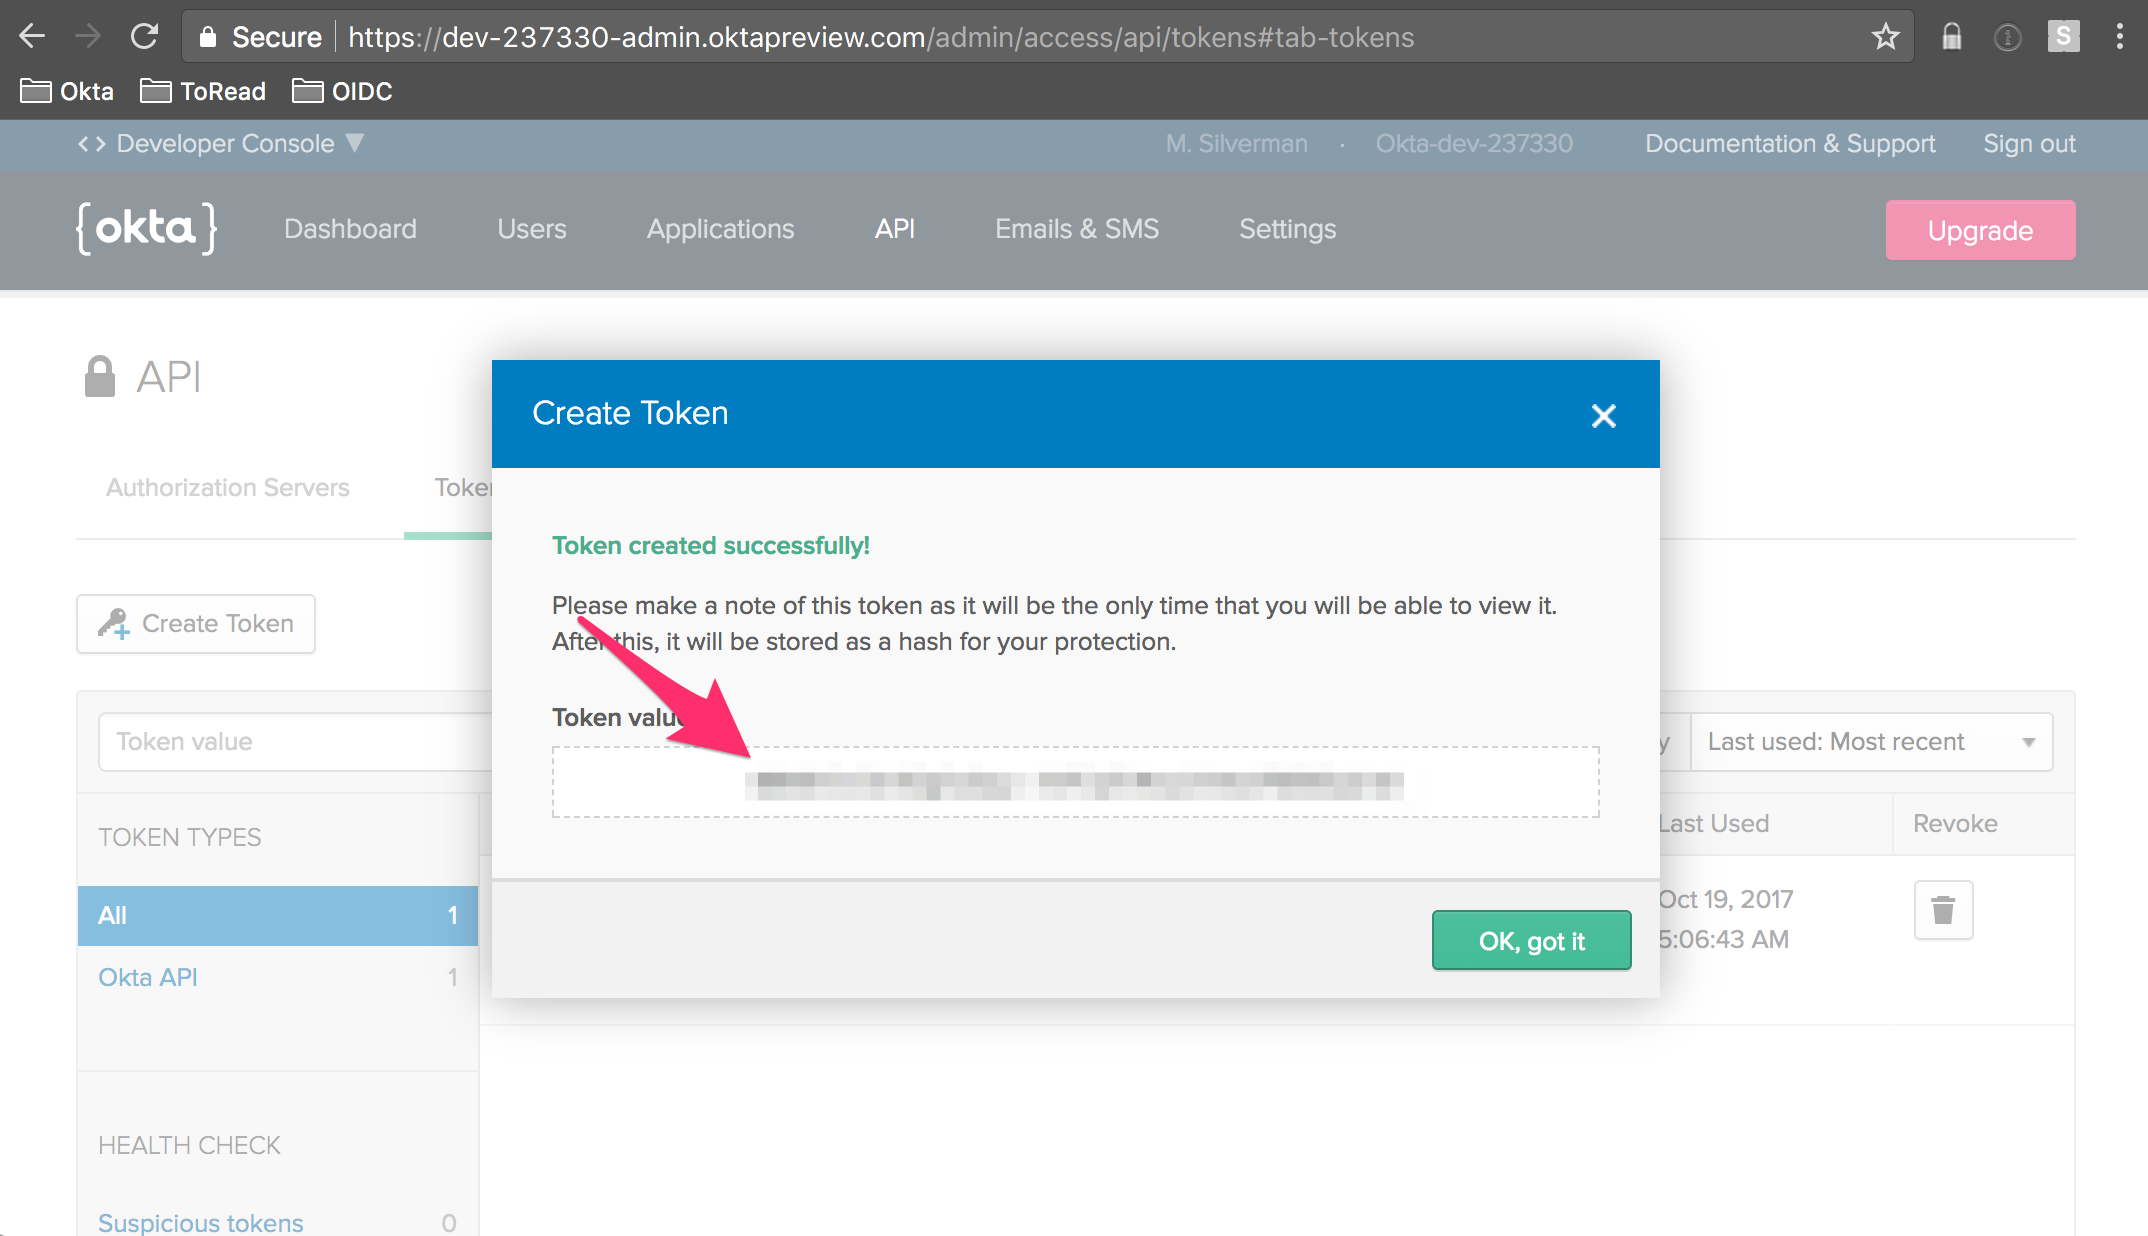
Save the token value somewhere. You’ll need it later when you deploy the app to Heroku. The token value is only ever showed once on this screen, so make sure you save it.
Now that you’ve got everything setup on the Okta, side. Let’s deploy the application to your own Heroku instance. After that, we’ll dig into the code.
Deploy Okta Zork OAuth to Heroku
Heroku makes it exceedingly easy to deploy Spring Boot applications. In fact, they even provide a handy deploy button where all you have to do is log in to Heroku, enter some configuration parameters, and go! If you haven’t already, go and create a Heroku account. It’s free.
Next, click this:

You’ll need some information to properly configure the app (you can leave the OKTA_AUDIENCE and OKTA_AUTH_SERVER_ID defaults as-is):
| Environment Variable | Example |
|---|---|
| App Name | The base name of what you set above, like: okta-zork-test |
| OKTA_ORG_URL | https://micah.okta.com |
| OKTA_API_TOKEN | saved from before |
| OKTA_CLIENT_ID | saved from before |
| OKTA_AUDIENCE | api://default |
| OKTA_AUTH_SERVER_ID | default |
Click Deploy App. Once it’s finished deploying, you should be able to browse to: http://
Spring Boot + Spring Security + Okta = Easy OAuth
The code for the Zork application is hosted on the Okta Developer GitHub.
The great thing is that this is just a vanilla Spring Boot with Spring Security app. It uses the Okta Spring Security starter, which hooks into the normal mechanisms of the Spring framework. The end result is that there’s is no additional code as relates to authentication. And, there’s only a few lines of Okta-specific code for saving game state. Let’s take a look.
The home page has a Zork It Up! link. Here’s a snippet from home.html
<a th:href="@{${userAuthorizationUri}(
    client_id=${clientId},
    response_type=token,
    scope=openid,
    redirect_uri=${redirectUri},
    nonce=${nonce},
    state=${state}
)}" class="btn btn-primary">Zork It Up!</a>
It’s using values pulled out of the model to substitute in for the Thymeleaf template. Thymeleaf has a handy format for specifying a url with query parameters:
<a th:href="@{URL(param1=value1, param2=value2, ...)}">...</a>
This ends up being rendered as:
<a href="URL?param1=value1¶m2=value2">...</a>
And, as you can see above, the URL can be a variable reference.
In the HomeController, these values are set home method:
@RequestMapping("/")
public String home(HttpServletRequest req, Model model) {
    model.addAttribute("clientId", clientId);
    model.addAttribute("userAuthorizationUri", issuer + "/v1/authorize");
    model.addAttribute("redirectUri", req.getRequestURL());
    model.addAttribute("nonce", UUID.randomUUID().toString());
    model.addAttribute("state", UUID.randomUUID().toString());

    return "home";
}
The rendered href for my deployed app is this (nonce and state are always random UUIDs for this example app):
https://micah.okta.com/oauth2/aus2yrcz7aMrmDAKZ1t7/v1/authorize?
client_id=0oa2yrbf35Vcbom491t7&response_type=token&scope=openid&
redirect_uri=https://okta-oauth-zork.herokuapp.com/&
nonce=e9fad6d6-202a-4f01-a740-8679c4092ec1&
state=d8c6d98f-d302-4afb-9624-b12500085a12
This is the “front door” to an OAuth implicit flow. The response_type field indicates that an access token will be returned. The redirect_uri field indicates where Okta will redirect back to upon successful authentication.
Note the scope field. It’s set to openid. In OIDC a scope field is required and at least openid must be present as a scope. For more information on OIDC, check out my three-part series on the Okta Blog.
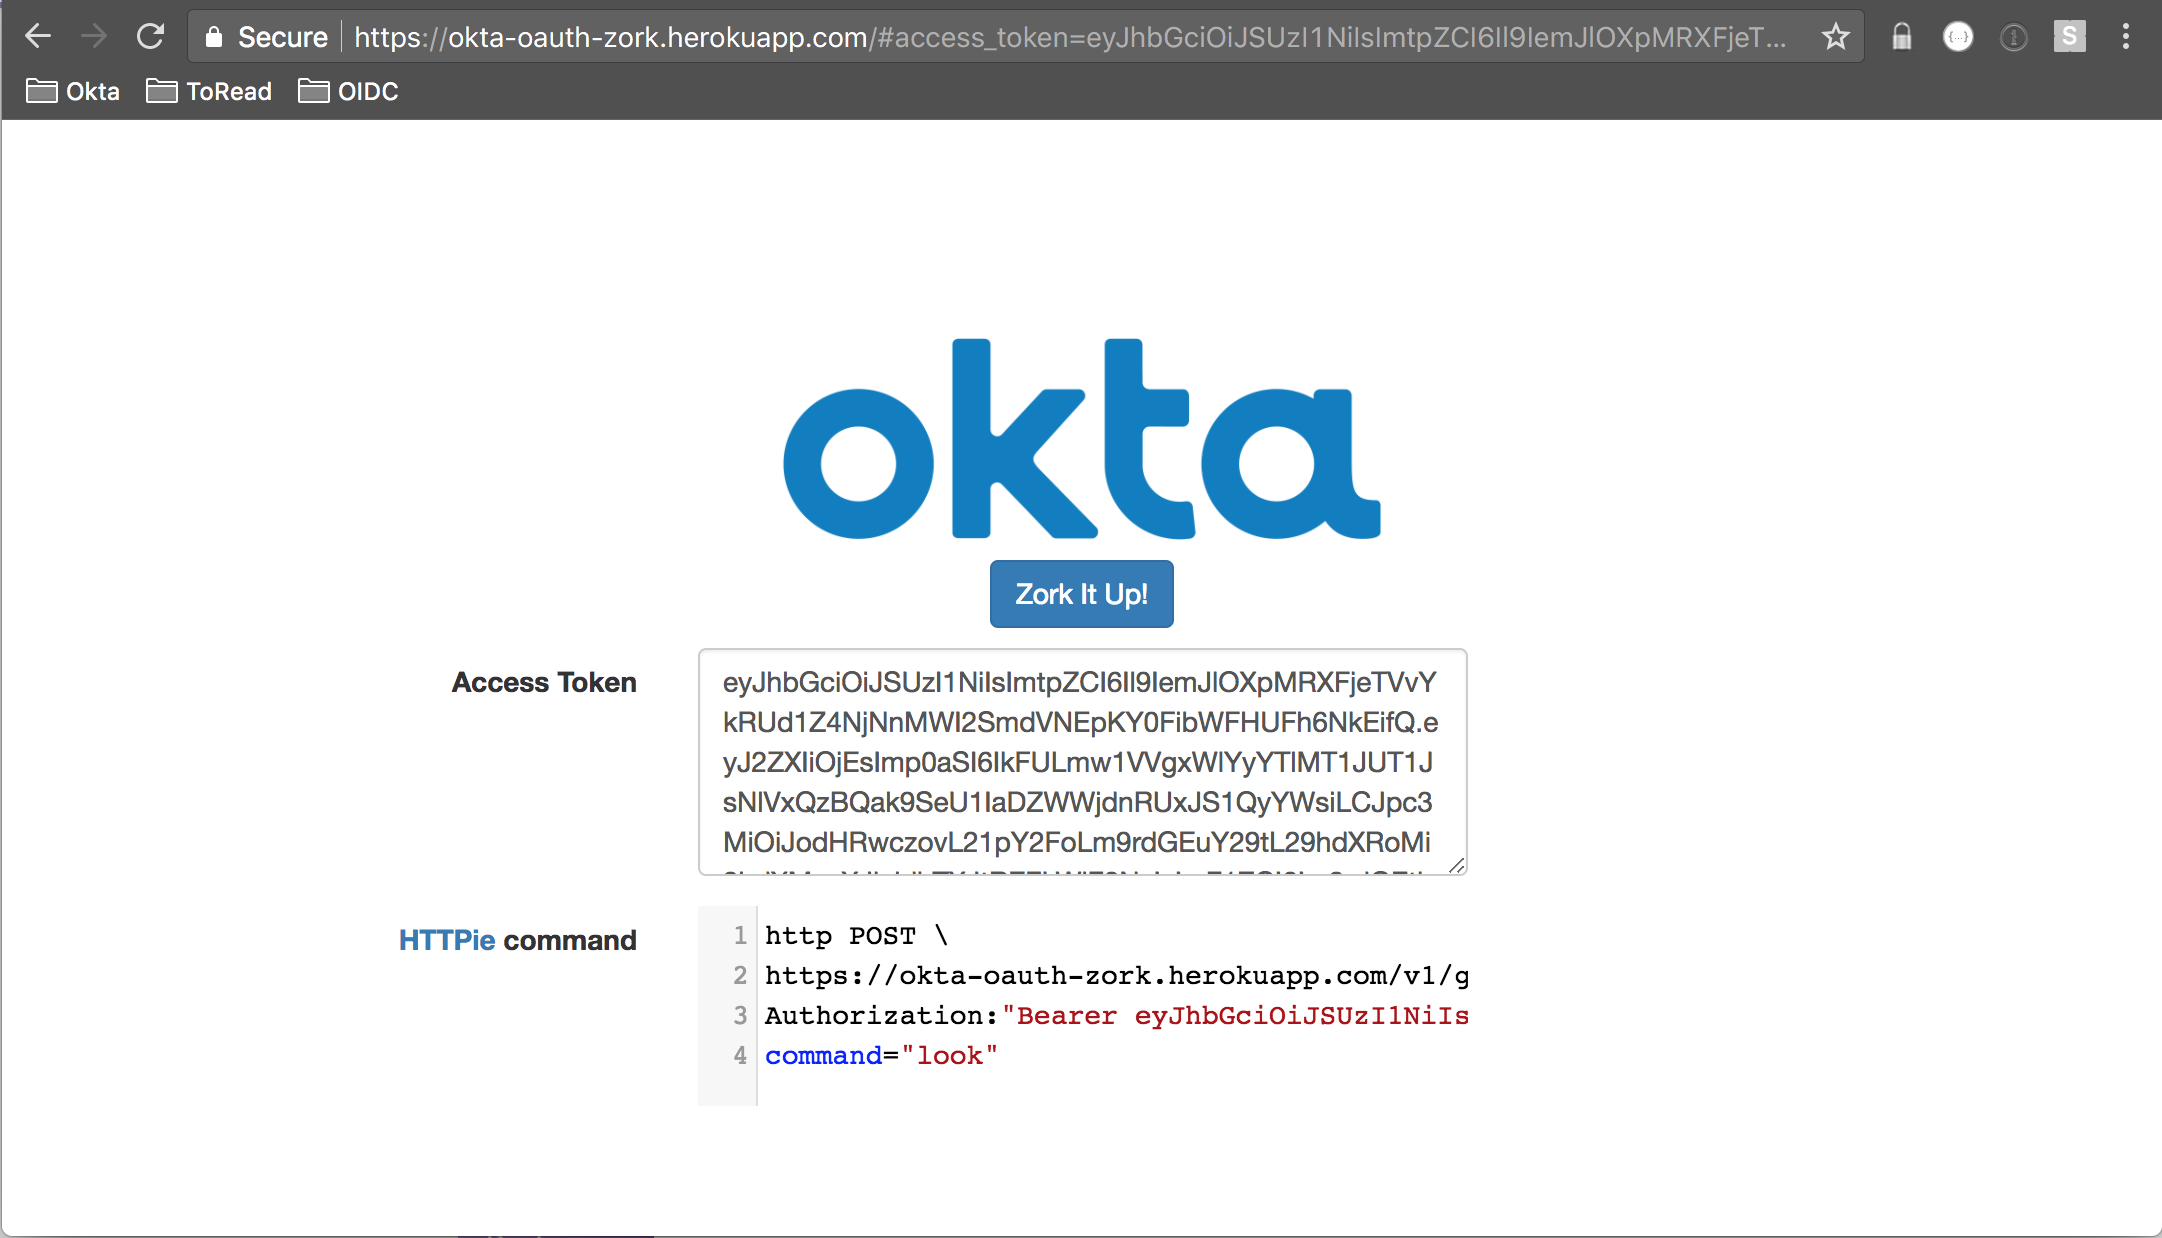
Assuming authentication is successful and Okta redirects back to your application, there’s some javascript that takes over to display the access token and a command using HTTPie to interact with the game.
var showToken = function (token) {
    $('#access_token_div').show();
    $('#access_token').val(token);

    $('#httpie_div').show();
    var httpieArea = document.getElementById('httpie');
    ...
    httpie.setSize(null, 100);

    var val = 'http POST \\\n';
    val += '[[${redirectUri}]]v1/game';
    val += ' \\\nAuthorization:"Bearer ' + token + '"';
    val += ' \\\ncommand="look"';
    httpie.setValue(val);
};
You should end up seeing a command like this:
http POST \
https://okta-oauth-zork.herokuapp.com/v1/game \
Authorization:"Bearer eyJhbGciOiJS..." \
command="look"
Give it a try. You’ll see output from the game that’s something like this:
{
    "gameInfo": [
        "ZORK I: The Great Underground Empire",
        "Copyright (c) 1981, 1982, 1983 Infocom, Inc. All rights reserved.",
        "ZORK is a registered trademark of Infocom, Inc.",
        "Revision 88 / Serial number 840726"
    ],
    "look": [
        "Kitchen",
        "You are in the kitchen of the white house. A table seems to have been used recently for the preparation of food. A passage leads to the west and a dark staircase can be seen leading upward. A dark chimney leads down and to the east is a small window which is open.",
        "On the table is an elongated brown sack, smelling of hot peppers.",
        "A bottle is sitting on the table.",
        "The glass bottle contains:",
        "  A quantity of water"
    ],
    "request": "look",
    "response": [
        "Kitchen",
        "You are in the kitchen of the white house. A table seems to have been used recently for the preparation of food. A passage leads to the west and a dark staircase can be seen leading upward. A dark chimney leads down and to the east is a small window which is open.",
        "On the table is an elongated brown sack, smelling of hot peppers.",
        "A bottle is sitting on the table.",
        "The glass bottle contains:",
        "  A quantity of water"
    ],
    "status": "SUCCESS"
}
Try submitting the same command without the token:
HTTP/1.1 401
...
{
    "error": "unauthorized",
    "error_description": "Full authentication is required to access this resource"
}
This is Spring Security doing its job. Let’s take a look at this code starting with the GameController:
@RequestMapping(value = VERSION + "/game", method = RequestMethod.POST)
public @ResponseBody CommandResponse command(
    @RequestBody(required = false) CommandRequest commandRequest,
    HttpServletRequest req,
    Principal principal
) throws IOException {
    Client client = Clients.builder().build();
    User user = client.getUser(principal.getName());
    String zMachineRequest = (commandRequest != null) ? commandRequest.getCommand() : null;
    ...

    String zMachineResponse = gameService.doZMachine(zMachineCommands, user);

    CommandResponse res = gameService.processZMachineResponse(zMachineRequest, zMachineResponse);

    if (zMachineRequest != null) {
        gameService.saveGameState(user);
    }
    ...

    return res;
}
When a user hits the /v1/game endpoint (as we did above), this method is entered. But – hold up there – the method expects an authenticated user in the form of Principal principal parameter to the method. What if the user isn’t authenticated? That’s where the beauty of Spring Security comes in. If there is no authenticated user, Spring Security will not allow this method to be entered and will instead set the 401 response with the error message we saw above.
There’s a Bean in OktaSpringBootOauthExampleApplication the controls this behavior:
@Bean
protected ResourceServerConfigurerAdapter resourceServerConfigurerAdapter() {

    return new ResourceServerConfigurerAdapter() {

        @Override
        public void configure(HttpSecurity http) throws Exception {
            http
                .authorizeRequests()
                .antMatchers("/", "/images/**", "/css/**", "/js/**", "/favicon.ico").permitAll()
                .antMatchers(HttpMethod.OPTIONS, VERSION + "/game").permitAll();
        }
    };
}
By default, all paths are locked down in Spring Security. Lines 10 and 11 define certain paths and certain request methods that are permitted without authentication. Everything else, requires an authenticated user.
The Okta Spring Security Integration makes it so that an Okta issued access token can be presented as a bearer token with the Authorization header and can be processed as an authenticated user.
The upshot of all this is that no Okta-specific auth code is required in the controller! That’s a real bonus.
These lines from GameController make use of the configured API Token to work with the Okta user and save the game state to the zMachineData profile attribute:
Client client = Clients.builder().build();
User user = client.getUser(principal.getName());
...
gameService.saveGameState(user);
This is Why We Build Framework Integrations
I initially built this example before the Okta Spring Security integration had been released. Here’s a list of dependencies that I had for the project at that point:
- spring-boot-starter-web
- spring-boot-starter-thymeleaf
- spring-boot-starter-security
- spring-security-oauth2
- jjwt
- fluent-hc
- guava
- okta-sdk-api
- okta-sdk-impl
- okta-sdk-httpclient
Even with the support of spring-security-oauth2, there was a lot of code I needed to implement myself including: retrieval of the discovery document, retrieval of the JWKS, parsing and validating the access token (JWT), hooking up the access token to Spring Security’s SecurityContext mechanism.
I did a major refactor of the code when the Okta Spring Security integration was released. Here’s a list of current dependencies for the project:
- spring-boot-starter-thymeleaf
- okta-spring-security-starter
- spring-security-oauth2
- guava
- okta-sdk-api
- okta-sdk-impl
- okta-sdk-httpclient
I was able to eliminate three dependencies. More importantly, I was able to dramatically reduce the codebase:
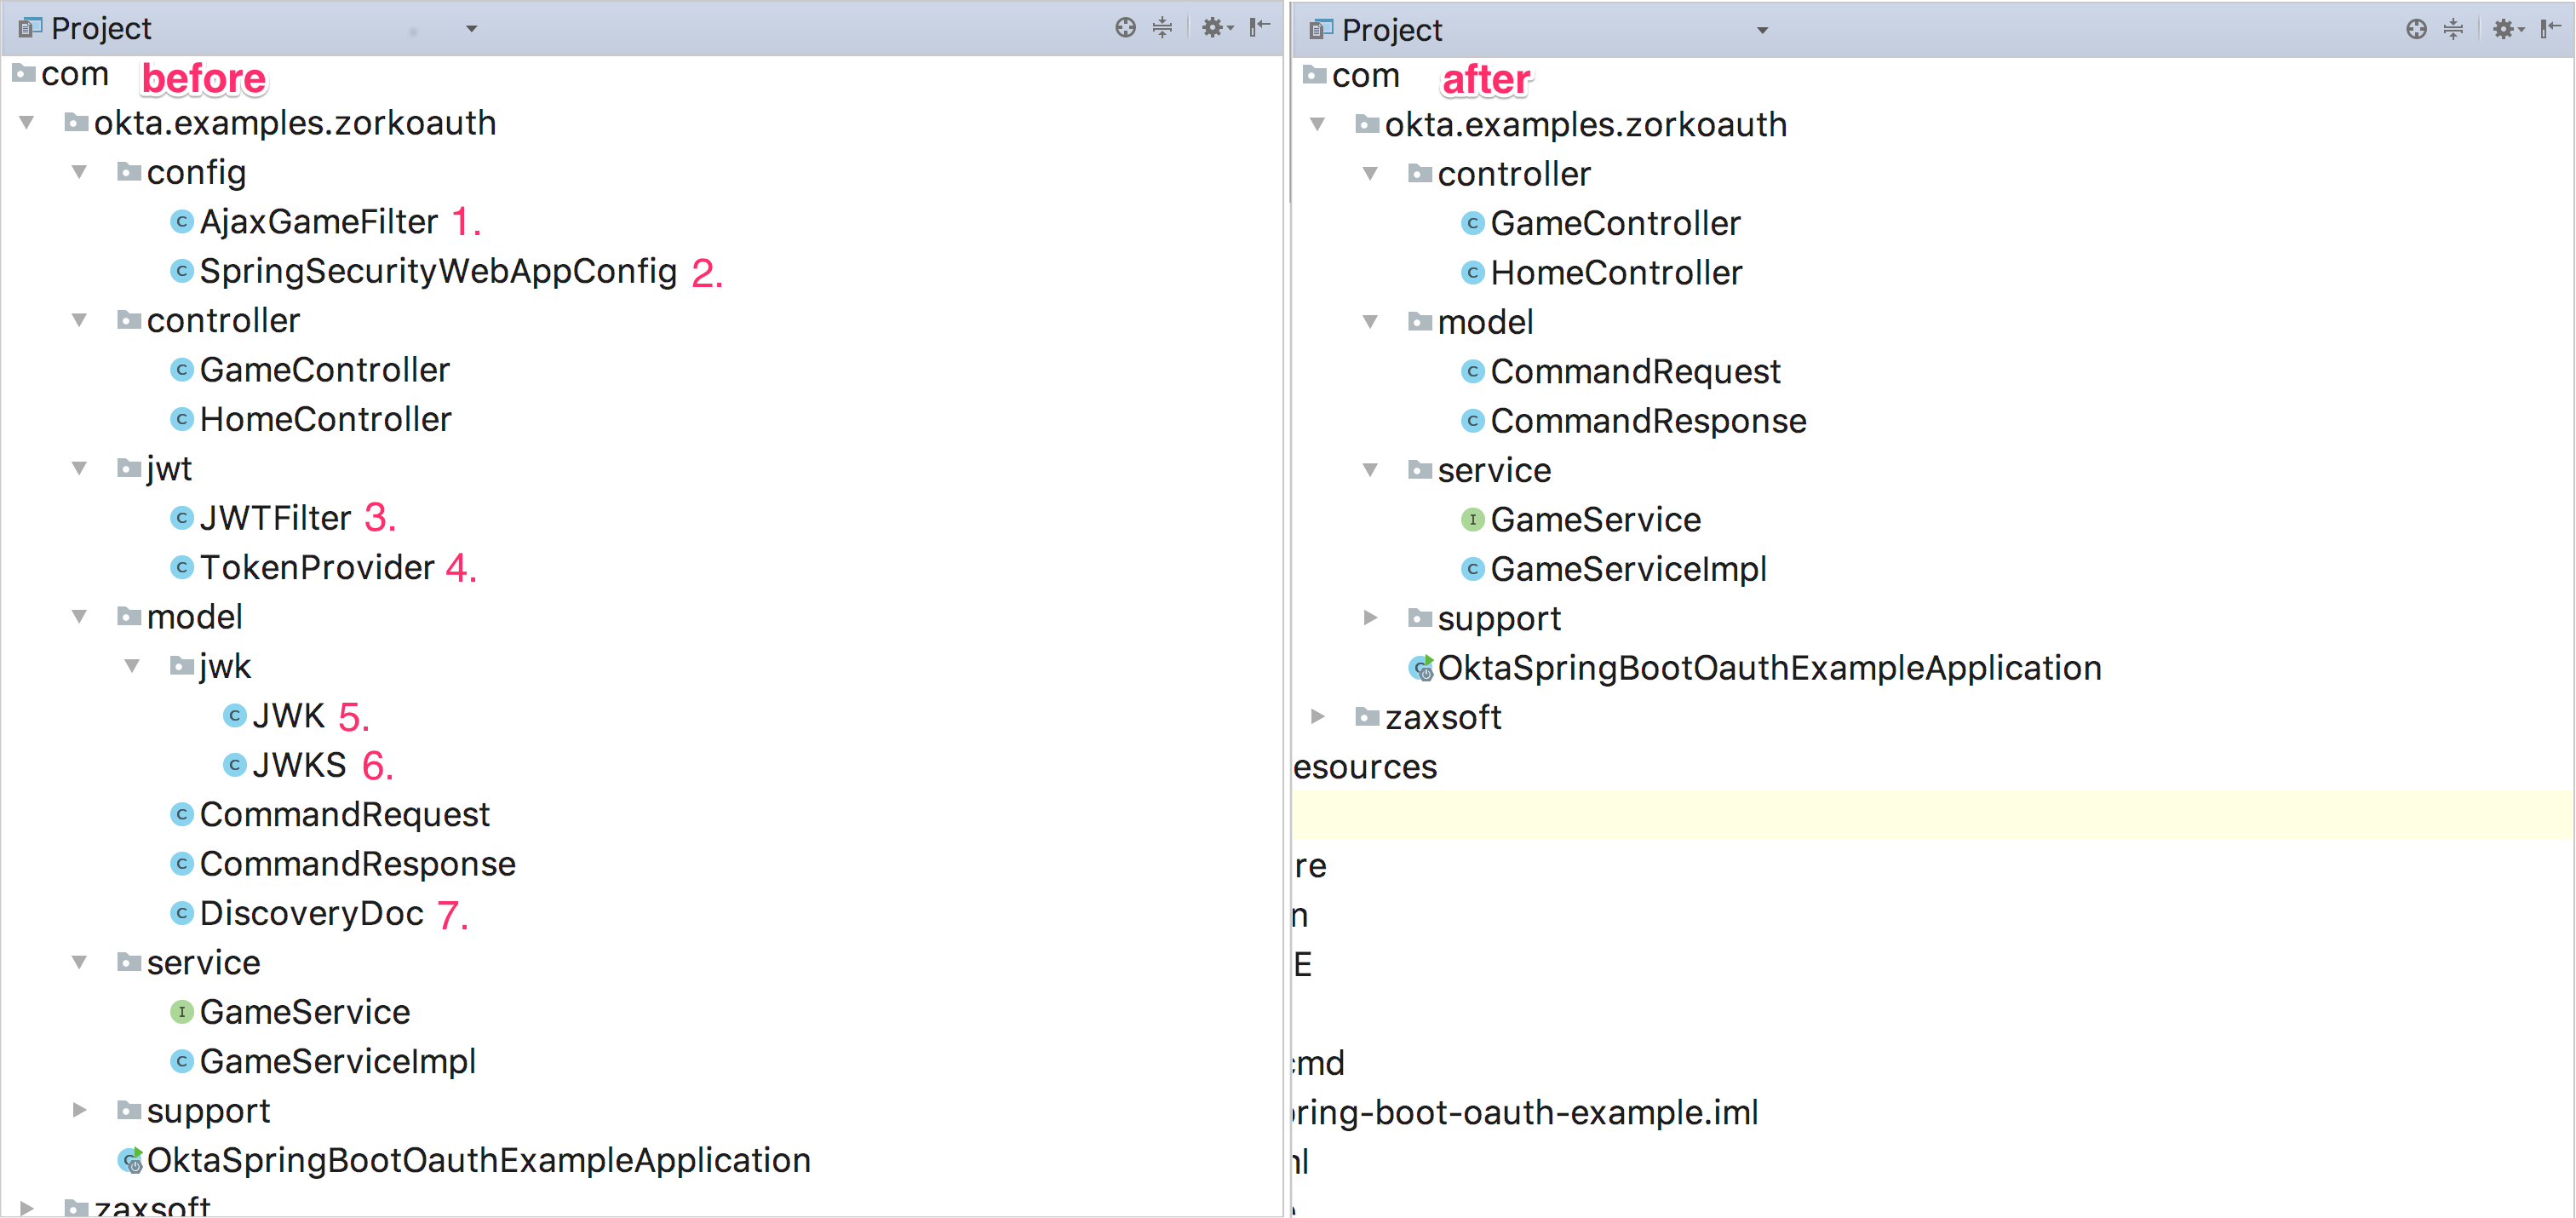
I was able to completely delete seven classes representing 570 lines of code. In the tree view on the right, the application is now focused only on the task at hand: the management of playing the game. The view on the left is littered with auth concerns not particularly germane to the application.
This is why we are working hard to build great framework integrations for using Okta. The less auth code you as a developer have to write, the more stable and focused your code will be.
Put the Canary and the Bauble in the Case
I hope that you’ve enjoyed learning a bit about OAuth by playing a classic text-based adventure game.
All the code, including the friendly purple deploy button can be found on the GitHub repo.
You can play the game without setting it up yourself by starting with the oidc playground.
Micah Silverman is a Senior Security H@X0R. With 25 years of Java Experience (yup, that's from the beginning), he's authored numerous articles, co-authored a Java EE book and spoken at many conferences. He's a maker, who's built full size MAME arcade cabinets and repaired old electronic games. He brings his love of all things Java and Developer Advocacy to you!
Okta Developer Blog Comment Policy
We welcome relevant and respectful comments. Off-topic comments may be removed.