Enable Your SAML Requesting App for Cross App Access




If you currently federate enterprise customers using Security Assertion Markup Language (SAML) and want to connect with third-party applications without migrating to OpenID Connect (OIDC), this Cross App Access (XAA) guide is for you.
The Identity Assertion Authorization Grant specification, the basis of XAA, was originally designed with OIDC in mind. To use it in SAML applications, you must accommodate specific security and uniqueness requirements. This guide details what you need to support and how to make resource requests to a third-party app using XAA.
Table of Contents
- How XAA in SAML works
- XAA implementation checklist for SAML-federated applications
- Making cross-application requests from your SAML app securely
- Configure your XAA SAML Requesting App in Okta
- Learn more about Cross App Access, SAML, and OAuth 2.0
How XAA in SAML works
When an agent (like one running in Claude) needs API access, it presents an Identity Assertion Authorization Grant (ID-JAG). The ID-JAG is a short-lived JSON Web Token (JWT) issued by the Identity Provider (IdP) for your app’s user. You exchange the ID-JAG token for an access token to the resource application you’re connecting with.
The sequence diagram shown below describes the SAML XAA flow and how your application fits in. You’ll handle the flow in two parts: where your application requests the ID-JAG from the IdP using a refresh token, and where your app requests the access token from the ID-JAG from the third-party resource app’s authorization server.

XAA implementation checklist for SAML-federated applications
Follow the guide in this section to support XAA in your SAML application when your app connects to a third-party resource application. The XAA flow places the burden of token validation onto the IdP and the resource app’s authorization server. The initial SSO step remains the same; however, you’ll add three requests before getting an access token to make the resource API call.
Once the user completes signing in, you’ll:
- Request an OAuth refresh token from Okta
- Request the ID-JAG token from Okta
- Request the OAuth access token from the third-party resource app’s OAuth authorization server
Request the refresh token
Your SAML application makes the initial SSO handshake and handles the SAMLResponse as usual. The ACS handler verifies the incoming payload and its digital signature, then extracts the underlying XML assertion. This assertion serves as the required credential for the subsequent exchange.
Immediately after validating the SAML response, in the same ACS request before redirecting the user onward, you’ll perform the first exchange. Base64-encode the assertion you extracted, then exchange it for a refresh token using Okta’s token endpoint. This exchange follows the OAuth 2.0 Token Exchange (RFC 8693) mechanism.
This step requires a credential in the request. Because you’re making a sensitive resource request, Okta requires a JWT signed with an asymmetric key pair as the credential – a private key JWT.
Follow the instructions in the Build a JWT for Client Authentication for your tech stack. The signed JWT becomes a client assertion in the request.
The refresh token HTTP request looks like this:
POST /oauth2/v1/token HTTP/1.1
Host: your-okta-domain.okta.com
Content-Type: application/x-www-form-urlencoded

grant_type=urn:ietf:params:oauth:grant-type:token-exchange&
subject_token=<base64url-encoded SAML assertion XML>&
subject_token_type=urn:ietf:params:oauth:token-type:saml2&
requested_token_type=urn:ietf:params:oauth:token-type:refresh_token&
scope=openid+offline_access&
client_id=<your_client_id>&
client_assertion_type=urn:ietf:params:oauth:client-assertion-type:jwt-bearer&
client_assertion=<your signed JWT>
The IdP (Okta) responds with the refresh token. The refresh token is opaque and long-lived. Persist the refresh token for the session; never persist or use the SAML assertion past this exchange.
Request the ID-JAG token
With the refresh token in hand, you have the credentials to request the ID-JAG token when your application needs resources from a third-party app. This exchange uses the same OAuth token exchange mechanism as the first step. You make the POST request to the same endpoint, Okta IdP, using the refresh token, and request the ID-JAG token type.
This request also requires a signed JWT as it’s requesting a sensitive resource.
The HTTP request looks like this:
POST /oauth2/v1/token HTTP/1.1
Host: your-okta-domain.okta.com
Content-Type: application/x-www-form-urlencoded

grant_type=urn:ietf:params:oauth:grant-type:token-exchange&
subject_token=<the refresh_token from prior step>&
subject_token_type=urn:ietf:params:oauth:token-type:refresh_token&
requested_token_type=urn:ietf:params:oauth:token-type:id-jag&
audience=<the resource app's authorization server issuer URI>&
resource=<the resource app's API base URL>&
scope=<the resource app's required scopes>&
client_id=<your_client_id>&
client_assertion_type=urn:ietf:params:oauth:client-assertion-type:jwt-bearer&
client_assertion=<your signed JWT>
The IdP responds with a short-lived, signed JSON Web Token (JWT), the ID-JAG, as the value in the access_token property within the payload.
Request the access token
Redeem the ID-JAG at the resource app’s authorization server’s token endpoint. The resource app’s authorization server handles the redemption request, not the IdP. This request uses the JWT Profile for OAuth 2.0 Client Authentication and Authorization Grants (RFC 7523). The ID-JAG is the assertion now, and you include the scopes required for the resource request. The scope matches the scopes requested in the ID-JAG request. The HTTP request looks something like:
POST /token HTTP/1.1
Host: the-resource-server.example.com
Content-Type: application/x-www-form-urlencoded
Authorization: Basic <base64(resource_as_client_id:resource_as_client_secret)>

grant_type=urn:ietf:params:oauth:grant-type:jwt-bearer&
assertion=<ID-JAG token>&
scope=todos.read
In the example HTTP request, the Authorization header uses the Basic scheme as a demo. Use the authorization scheme required by the resource application.
The response payload contains the access_token property, whose value is the access token. Use the access token to make the API resource request by using the value in the Authorization header. For example:
Authorization: Bearer <access_token>
Handle token expiration
ID-JAG tokens have a short timeline by design. When it expires, request a shiny new ID-JAG from the refresh token. Refresh tokens also have a lifespan. If the IdP rejects the refresh token due to expiration (you’ll see an invalid_grant error), then you need to obtain a new refresh token by having the user sign in via SSO again.
Making cross-application requests from your SAML app securely
With these steps complete, your SAML application is configured for Cross App Access. Agents can now authorize requests against your API while maintaining your existing production federation, eliminating the need for protocol migration.
You can now use Okta to make cross-application requests with your SAML app.
Configure your XAA SAML Requesting App in Okta
Let’s configure your SAML requester application in Okta. Before you begin, you’ll need:
- Values from your app (we’ll walk through the values needed below)
- An Okta Integrator Free Plan account. Sign up for a new account to test out the XAA feature
- xaa.dev for testing your requesting app
Cross App Access is an early access feature in Okta. New Integrator Free Plan account types include XAA support. If you have a paid Okta org plan and the following options are missing, contact your representative.
Sign in to your Integrator Free Plan org and open the Admin Console.
Create a custom SAML app integration representing your requesting app, using these values:
In General Settings:
- App name: “Requesting App”
In Configure SAML:
- Single sign-on URL: the ACS URL of your requester app, e.g., “https://requester-app-uri/saml/acs”
- Audience URI (SP Entity ID): the SP Entity of your requester, e.g., “https://requester-app-uri/saml/metadata”
- Name ID format: select EmailAddress
- Application username: select Email
- Update application username on: select Create and update
After creating the app, you’ll see more configuration options for your Okta SAML 2.0 requesting app. You’ll make changes in more than one tab.
Sign On configuration
On the Sign On tab, retrieve your SAML setup details: under View SAML setup instructions, copy the Identity Provider Single Sign-On URL and Identity Provider Issuer, and download the X.509 certificate as idp-cert.pem. You’ll need all three in your requesting app setup.
Assignments configuration
Assign your test user to the app on the Assignments tab.
Now that we have the requesting app registered, it’s time to create a custom SAML app integration representing the resource app, using these values:
In General Settings:
- App name: “Resource App for Testing”
In Configure SAML:
- Single sign-on URL: “https://idp.xaa.dev/saml-resource/acs”
- Audience URI (SP Entity ID): “https://idp.xaa.dev/saml-resource/metadata”
- Name ID format: select EmailAddress
- Application username: select Email
- Update application username on: select Create and update
⚠️ Note
Please note that we’re providing these for setup; they don’t constitute a working SSO connection to the resource app. Also, don’t assume the
NameIDis an email address; it is whatever the customer’s SSO emits. Your matching set must remain consistent across your deployment.
After creating the app, you’ll see more configuration options for your Okta SAML 2.0 app. You’ll make changes in the resource server tab.
Resource Server extra configuration
Enable Cross App Access (XAA) on the resource app integration from the Resource Server tab, and configure:
- Issuer URL: https://auth.resource.xaa.dev
Assignments configuration
Assign your test user to the app on the Assignments tab.
The next step is to set up xaa.dev for the resource app.
Go to Test your requesting app and use these values:
- IdP issuer URL: your Okta Integrator account ID (i.e., https://your-okta-domain.okta.com)
- Test user identifier: your email, e.g., name1234…@okta.com
- SAML IdP entityID: from the requesting app’s Sign On tab > SAML Setup > View SAML setup instructions, the Identity Provider Issuer value (i.e., http://www.okta.com/
)
After all values are entered, click Register.
Register and configure the AI Agent in Okta
With your Okta SAML 2.0 requesting app and the resource app configured, register a new AI Agent in Okta. The AI Agent configuration defines the relationship between the Okta SAML 2.0 requesting app you created and the resource application, which in this case is xaa.dev. You configure credentials, link your requesting app during registration, and connect the resource app as a Resource Connection.
In the Okta Admin Console, register the AI Agent and link your requesting app:
- Navigate to Directory > AI Agents
- Select Register AI Agent > Register Manually
- Under Profile, enter a Name, e.g., “Agent”, and an optional description, then press Next
- Under User access and authentication > Allow users to access this agent, select Select an existing app, then choose the Okta SAML requesting app you created earlier (e.g., “Requesting App”). This app acts as the requesting app for the XAA flow: your users sign in to the agentic app through it, and the agent then acts on their behalf. Press Next.
- Under owners: assign your test user as an individual owner
Select the AI Agent you just created to open its configuration. Configure the agent across the following tabs:
- On the Client registration tab, choose a client registration method:
- Select the Public/private key section
- In the Define where keys are managed section, choose Okta
- Under the Add and manage keys section, select Add public key, then Generate new key. Under PEM, copy the private key into the Private key (PKCS8 PEM or private JWK) field in your requesting app
- Copy the KEY ID and add it back to your requesting app
- In the Provide Client ID to AI agent builder or developer step, copy the Client ID, and add it back to your requesting app
- On the User access tab
- In the App used for access configuration, select Select an existing SAML app, then your SAML Application, e.g., “Requesting App”
- On the Resource connections tab, add a resource connection to the AI Agent. Use these values:
- Application instance: your resource app (e.g., “Resource App for Testing”)
- AI agent’s client ID registered in this app: the Client ID from xaa.dev (it should look similar to
byora...) - Scopes: Allow any scope
- Activate the AI Agent: activating the linked requesting app integration usually activates the AI Agent. If the agent’s status is STAGED, go to the Actions drop-down menu at the top and select Activate.
Once the AI Agent is active, the configuration is complete. All checkmarks on the agent configuration page must be green.
Test the SAML 2.0 app
At this stage, you are all set to run the requesting app and verify the complete XAA flow it is supposed to perform.
Validate the XAA connection end-to-end
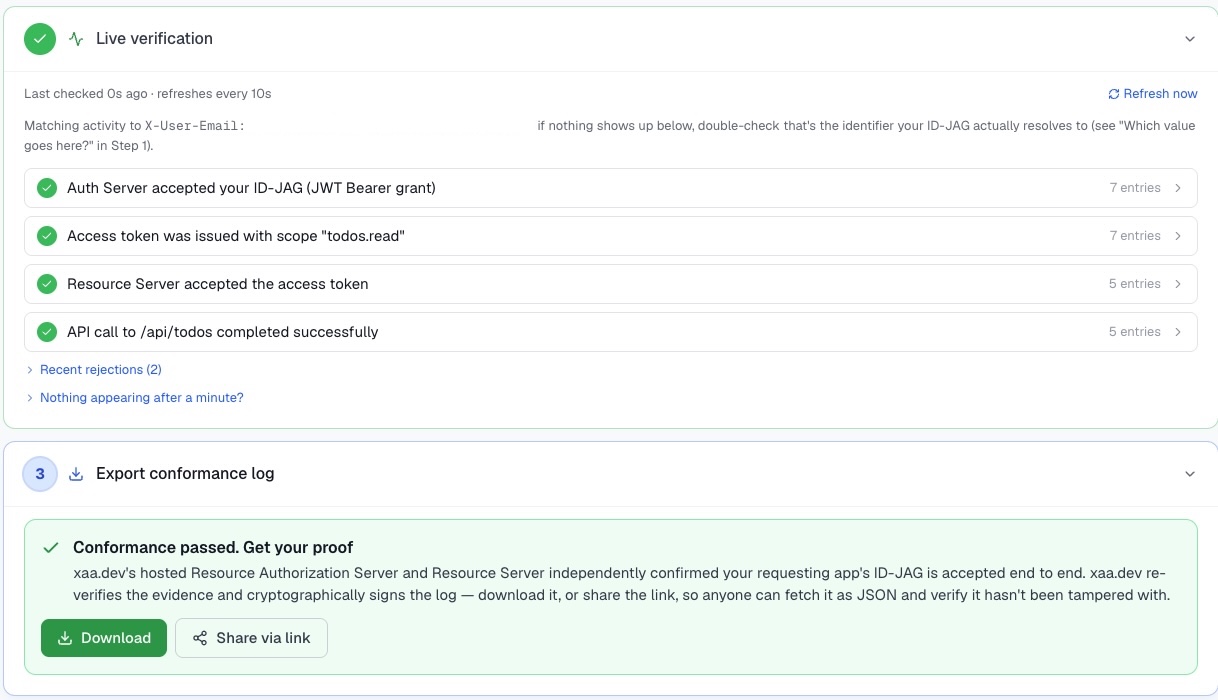
Once the flow is complete in the SAML 2.0 application, return to xaa.dev. In the Live verification tab, a green Conformance passed panel appears. This confirms all steps:
- Auth Server Accepted your ID-JAG
- Access token was issued
- Resource Server accepted your access token
- API call to the /api/todos/ was a success.
At this stage, the JSON conformance log will have the complete details of the XAA flow.
Learn more about Cross App Access, SAML, and OAuth 2.0
If this guide helped you implement Cross App Access with SAML, explore these resources:
- 📘 Cross App Access Documentation: Official guides for configuring and managing Cross App Access in production
- 🎙️ Developer Podcast on MCP and Cross App Access: Hear the backstory, use cases, and why this matters for developers
- 📋 How to Build and List Secure Cross App Access (XAA) Connections on Okta Integration Network (OIN)
Identity 101:
- What’s the Difference Between OAuth, OpenID Connect, and SAML?
- What are SAML, OAuth, and OIDC?
- Why You Should Migrate to OAuth 2.0 From Static API Tokens
- How to Get Going with the On-Demand SaaS Apps Workshops
Follow us on LinkedIn and X, and subscribe to our YouTube channel. Leave a comment below if you have any questions!
Alisa Duncan is a Senior Developer Advocate at Okta, a full-stack developer, and a community builder who loves the thrill of learning new things. She is a Google Developer Expert in Angular and organizes coding workshops and community events locally and internationally. Her background is primarily working on enterprise software platforms, and she is a fan of all things TypeScript and JavaScript.
Aasawari Sahasrabuddhe is a Senior Builder Advocate at Okta, a tech enthusiast, community builder, and educator. She specializes in bridging backend engineering with strategic community and content engagement. She is recognized as a MongoDB Champion with a strong foundation in Java, Spring Boot, and cloud-native technologies. She has a proven track record in technical writing and delivering hands-on workshops.
Semona has been with Okta for three years supporting developers as a Developer Support Engineer. She is excited to transition to a Dev Advocate role - advocating for Okta developer community needs. Outside of work, Semona is a foodie, loves kombucha, and is interested in board games and ultimate frisbee.
Akanksha has a developer background and experience building global developer communities. She has given talks on various technologies, hosted large-scale events and hackathons, advocated for developers, and fostered partnerships and open-source initiatives. Outside work, she loves dancing and traveling; you'll often find her capturing serene skies through her phone.
Okta Developer Blog Comment Policy
We welcome relevant and respectful comments. Off-topic comments may be removed.