Build a Flask App with Okta for Secure OIDC Login and Authorized API Calls

Python syntax and the flexibility of the Flask microframework make it a popular choice for quickly building web applications. While Flask provides the essentials to get you started, you’ll need to tackle two critical pieces yourself: secure user authentication and authorization for your backend services. After all, how do you securely sign users into your application? And once they’re signed in, how does your app fetch data from a backend service that only serves authorized requests?
This tutorial shows you how to solve both. You’ll build a Flask dashboard app that signs users in with Okta using OpenID Connect (OIDC). Once signed in, the app uses the resulting OAuth 2.0 access token to call a separate backend API that responds only to authorized requests. In this common pattern, a web app needs to fetch data from a protected backend service. You’ll use Authlib, an OIDC client library, to configure the Authorization Code flow with Proof Key for Code Exchange (PKCE) automatically. You’ll also learn how to add a custom scope to the access token and validate it on the backend to control what data the API returns.
Check out the complete source code on GitHub and get started without setting it up from scratch.
Table of Contents
- Build a Flask app with OIDC authentication
- Create an app integration in the Okta Admin Console
- Enable self-service user registration
- Add secure user login to a Flask application with Okta
- Call a protected API with OAuth scoped tokens
- Learn more about OAuth and OIDC
Build a Flask app with OIDC authentication
In this tutorial, you’ll build a simple dashboard application and learn how to:
- Securely sign users in to view their profile information using Okta as the OpenID Connect identity provider
- Use Authlib to configure the Authorization Code flow with PKCE automatically, following OAuth 2.1 security best practices
- Add a feature for new users to self-register for an account directly from the sign-in page
- Enable authenticated users to interact with a protected API using access tokens
Prerequisites
- Python 3.14 or later and pip installed
- An Okta Integrator Free Plan
Create an app integration in the Okta Admin Console
Before you begin, you’ll need an Okta Integrator Free Plan account. To get one, sign up for an Integrator account. Once you have an account, sign in to your Integrator account. Next, in the Admin Console:
- Go to Applications and Resources > Applications
- Click Create App Integration
- In the Sign in Method section, select OIDC - OpenID Connect
- Select Web Application as the application type, then click Next
-
Enter an app integration name
- Configure the redirect URIs:
- Sign-in redirect URIs:
http://localhost:5000/authorization-code/callback - Sign-out redirect URIs:
http://localhost:5000
- Sign-in redirect URIs:
- In the Assignments section, assign a group or keep the default Everyone group assigned for all
- Click Save
Where are my new app's credentials?
Creating an OIDC Web App manually in the Admin Console configures your Okta Org with the application settings.
After creating the app, you can find the configuration details on the app’s General tab:
- Client ID: Found in the Client Credentials section
- Client Secret: Click Show in the Client Credentials section to reveal
- Issuer: Found in the Issuer URI field for the authorization server that appears by selecting Security > API from the navigation pane.
You’ll need these values for your application configuration:
OKTA_OAUTH2_ISSUER="https://dev-133337.okta.com/oauth2/default"
OKTA_OAUTH2_CLIENT_ID="0oab8eb55Kb9jdMIr5d6"
OKTA_OAUTH2_CLIENT_SECRET="NEVER-SHOW-SECRETS"
Your Okta domain is the first part of your issuer, before /oauth2/default.
NOTE: You can also use the Okta CLI Client or Okta PowerShell Module to automate this process. See this guide for more information about setting up your app.
Enable self-service user registration
User registration is vital for any application, and Okta makes the process quick and hassle-free. See Self-Service Registration for an overview of how it works. Setting this up involves two main steps:
- Create a user profile policy – This policy defines the attributes a user must provide when self-registering. See the Okta documentation for detailed instructions.
- Assign your application to the policy – This step is required; without it, the self-service registration flow doesn’t activate for your app. See the product documentation for more details.
Add secure user login to a Flask application with Okta
Now that you’ve configured your app integration in Okta and noted the required Okta application details, it’s time to create your Flask application.
Create a basic Flask web application
First, you’ll create a project folder and a Python virtual environment, then install the necessary dependencies.
- Create a project folder named
flask-web-appand a subfolder calledvenv. -
Open a terminal window in the project folder and create a Python virtual environment
python -m venv venv -
Activate the virtual environment. Use the command that corresponds to your operating system.
# On macOS/Linux source venv/bin/activate # On Windows venv\Scripts\activate.bat -
With your environment active, install the required libraries:
pip install Authlib==1.6.1 Flask[async]==3.1.1 python-dotenv==1.1.1 requests==2.32.4 okta-jwt-verifier==0.3.0
Configure Flask environment variables
To keep sensitive credentials out of source control, you’ll store them in a .env file and load them into the application’s configuration. This practice prevents hard-coding secrets directly into your source code. Make sure to add .env to your .gitignore file to prevent accidentally committing your credentials to source control.
-
Create a file named
.envin the project root and add your Okta application’s configuration details. Replace the placeholders with your actual values.OKTA_CLIENT_ID={yourClientId} OKTA_CLIENT_SECRET={yourClientSecret} OKTA_BASE_URL=https://{yourOktaDomain} -
Create a
config.pyfile in the project root. This file reads the values from.envand constructs the OIDC metadata URL, which the application uses to fetch endpoints from Okta.import os OKTA_CLIENT_ID = os.getenv('OKTA_CLIENT_ID') OKTA_CLIENT_SECRET = os.getenv('OKTA_CLIENT_SECRET') OKTA_BASE_URL = os.getenv("OKTA_BASE_URL") OKTA_METADATA_URL = f"{OKTA_BASE_URL}/.well-known/openid-configuration"
Implement the OIDC authentication logic
Next, create the main application file, app.py, in your project’s root directory. This file holds the core logic for handling OIDC authentication. Paste the following code into it to configure the basic application.
from flask import Flask, render_template, url_for, redirect, session
from authlib.integrations.flask_client import OAuth
from dotenv import load_dotenv
import os
import requests

load_dotenv()

app = Flask(__name__)
app.secret_key = os.urandom(24)

app.config.from_object('config')

@app.route("/")
def index():
    return render_template('index.html')

if __name__ == "__main__":
    app.run(debug=True)
Initialize the Okta OIDC client
To set up the connection to Okta, add the following code to the bottom of your app.py file. This code initializes an OAuth object and registers the Okta application as a remote provider.
# Create a registry with an OAuth object
oauth = OAuth(app)

# Register a remote application
oauth.register(
    name='okta',
    client_id=app.config['OKTA_CLIENT_ID'],
    client_secret=app.config['OKTA_CLIENT_SECRET'],
    server_metadata_url=app.config['OKTA_METADATA_URL'],
    client_kwargs={
        'scope': 'openid profile email offline_access',
        'code_challenge_method': 'S256'
    }
)
The first parameter in the register() method (in this case, Okta) is the name of the remote application. You’ll later access the remote application with oauth.okta to handle all the OIDC-related functions.
The client_kwargs dictionary passes extra parameters to the authorization request. Because the code_challenge_method is present, the Authlib library automatically uses the PKCE flow, which enhances security.
Build Flask routes for OIDC authentication
The sign-in process begins when the user clicks the Login button, which redirects the browser to the Okta-hosted Sign-In page.
After the user signs in, Okta redirects the browser to the configured sign-in redirect URI with an authorization code. Authlib then exchanges that code for tokens and automatically calls Okta’s userinfo endpoint to retrieve the user’s profile. Similarly, after a user signs out, Okta redirects the browser to the sign-out redirect URI.
Let’s start by creating a simple HTML page that allows the user to log in. This page displays a sign-in button for signed-out users and a sign-out button for logged-in users, along with profile information.
-
Add the
/loginroute to yourapp.pyfile. This endpoint serves as the entry point for the authentication flow. It constructs the authorization redirect URI and sends the user’s browser to the Okta-hosted Sign-In page to begin the OIDC process.@app.route('/login') def login(): redirect_uri = url_for('authorization_code_callback', _external=True) return oauth.okta.authorize_redirect(redirect_uri) -
Next, implement the callback handler for the Redirect URI you configured in your Okta application (
http://localhost:5000/authorization-code/callback). This handler processes the authorization code returned by Okta. Callingauthorize_access_token()triggers Authlib to exchange the code for tokens and automatically call Okta’s userinfo endpoint. The callback then stores both the userinfo and the full token in Flask’s session for use across requests.@app.route('/authorization-code/callback') def authorization_code_callback(): token = oauth.okta.authorize_access_token() session['loggedInUser'] = token['userinfo'] session['token'] = token return redirect('/') -
Add the
/logoutroute. This endpoint clears the local user session, signing the user out of the Flask application. It then constructs a redirect URL to Okta’s logout_endpoint, which terminates the user’s session with Okta, ensuring a complete and secure sign-out.@app.route('/logout') def logout(): token = session.get('token') id_token_hint = None if token: id_token_hint = token.get('id_token') conf = oauth.okta.server_metadata logout_endpoint = conf.get('end_session_endpoint') session.pop('loggedInUser', None) session.pop('token', None) if logout_endpoint: logout_url = ( f'{logout_endpoint}?' f'id_token_hint={id_token_hint}&' f'post_logout_redirect_uri={url_for("index", _external=True)}' ) return redirect(logout_url) return redirect('/') -
Finally, update the root route (
/). This route now checks the session for a signed-in user and passes that information to the template.@app.route("/") def index(): loggedInUser = session.get('loggedInUser') return render_template('index.html', user=loggedInUser)
With the back-end routes in place, you can now create the HTML template files to provide a user interface for signing in, signing out, and displaying profile data.
Step 1: Create a templates directory in your project root. Inside it, create an index.html file. This page displays a Login button for signed-out users and, for signed-in users, profile information with a Logout button.
<!DOCTYPE html>
<html lang="en">
  <head>
    <meta charset="UTF-8" />
    <title>Home</title>
    <link rel="stylesheet" href="{{ url_for('static', filename='css/index.css') }}" />
  </head>
  <body>
    <div class="wrapper">
      <nav class="main-nav" role="navigation" aria-label="Primary navigation">
        <div class="nav-left">
          <a href="/">Flask Web App</a>
        </div>
        <div class="nav-right">
          {% if user %}
          <a href="/fetch-users">Fetch Users</a>
          <a href="/logout">Logout</a>
          {% else %}
          <a href="/login">Login</a>
          {% endif %}
        </div>
      </nav>

      <main class="container">
        {% if user %}
        <section aria-label="User welcome" class="user-info">
          <h1>Welcome, {{ user.name or user.preferred_username or 'User' }}!</h1>
          <p>You have successfully logged in. You can now fetch and view user details.</p>
          <p>Click the button below to load the list of users.</p>
          <button onclick="location.href='/fetch-users'">Fetch Users</button>
        </section>

        {% else %}
        <section aria-label="Login prompt" class="user-info">
          <h1>Welcome to the Flask Web App</h1>
          <p>If you are seeing this, you are not logged in yet.</p>
          <p>This app uses OpenID Connect (OIDC) for secure login. After logging in, you can access user-specific data.</p>
          <p>Click the login button below to get started.</p>
          <a href="/login" class="button-link">Login / Register</a>
        </section>
        {% endif %}
      </main>
    </div>
  </body>
</html>
Step 2: For styling, create a static/css directory in your project root. Inside it, create index.css and add the following code.
body,
html {
  height: 100%;
  margin: 0;
  padding: 0;
  font-family: "Segoe UI", Tahoma, Geneva, Verdana, sans-serif;
  line-height: 1.5;
  overflow-y: hidden;
}

nav.main-nav {
  position: fixed;
  top: 0;
  left: 0;
  right: 0;
  background-color: #2f2f2f;
  color: #f0f0f0;
  display: flex;
  justify-content: space-between;
  align-items: center;
  padding: 1rem 2rem;
  z-index: 1000;
}

nav.main-nav a {
  color: #f0f0f0;
  text-decoration: none;
  margin-left: 1.5rem;
  font-weight: 600;
}

nav.main-nav a:hover {
  color: #bfbfbf;
  text-decoration: underline;
}

.wrapper {
  display: flex;
  flex-direction: column;
  min-height: 100vh;
  max-width: 1000px;
  margin: 0 auto;
  padding: 5rem 2rem 0;
}

main.container {
  flex: 1 1 auto;
  padding: 2rem 0;
  display: flex;
  flex-direction: column;
}

section.user-info {
  background: transparent;
  padding: 1.5rem 0;
  margin-bottom: 2rem;
  color: #222222;
}

button,
a.button-link {
  background-color: #1a73e8;
  color: #fff;
  border: none;
  padding: 0.6rem 1.3rem;
  border-radius: 5px;
  cursor: pointer;
  font-size: 1rem;
  text-decoration: none;
  display: inline-block;
  margin-top: 1rem;
  font-weight: 600;
}

button:hover,
a.button-link:hover {
  background-color: #155ab6;
  color: #fff;
}
Run the Flask OAuth web app
You’re ready to test the sign-in and sign-out functionality.
- Start the application with the Flask server.
flask run
- Open a new terminal window and start the resource server.
flask --app resource-server.py run --port 5001
- Open a browser and go to http://localhost:5000.
- Click Login. The browser redirects you to the Okta Sign-In Widget.
- After you sign in, Okta redirects you back to your application, and the page displays the signed-in user’s details.
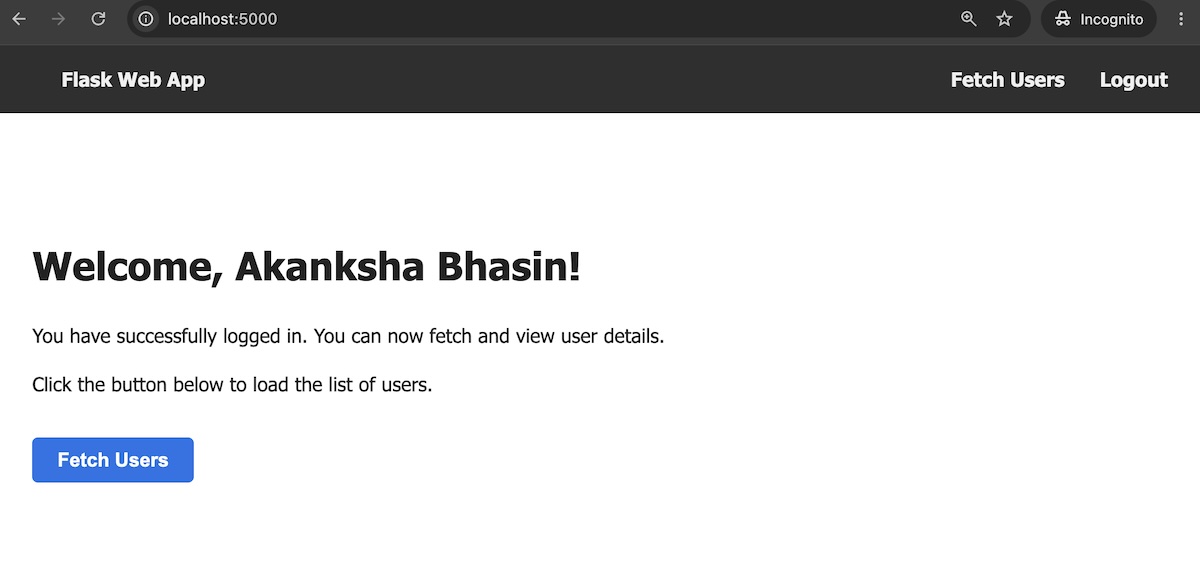
- Click Logout. The browser clears your session and returns you to the home page.
You’ve successfully added a secure authentication flow to your Flask app. Next, you’ll extend it to call a protected API using scoped tokens.
Call a protected API with OAuth scoped tokens
Using OAuth for API authorization is a modern security best practice. It allows you to use access tokens to interact with APIs to fetch and manage data securely. This section walks you through how to use a scoped access token to fetch data from your own resource server.
Every action on an endpoint that supports OAuth 2.0 requires a specific scope. In this example, your endpoint requires the specific scope api:read-users to return a list of sample users.
To include this scope in the tokens minted from Okta, follow these steps:
- In your Okta Admin Console, navigate to Security > API
- Select your Authorization Server and go to the Scopes tab
- Click the Add Scope button and enter
api:read-usersin the Name field - Optionally, enter the Description and the Display Phrase
- Click Create
Now, when your app requests this scope, Okta includes it in the tokens it issues.
Before creating the resource server, add an extra layer of security. You want your endpoint only to consume tokens intended for your server, preventing attackers from replaying or misusing tokens issued for other services.
To do this, restrict the aud claim that Okta returns in the access token to your resource server. To achieve this:
- In your Okta Admin Console, navigate to Security > API
- Select your Authorization Server. In the Settings tab, click Edit.
- Change the Audience field to http://localhost:5001 – this is where your resource server runs
Build a protected users API
For this demo app, you’ll create a minimal resource server with a single route called fetch-users that returns a list of sample users.
-
Start by modifying the
.envfile. Add the variable that stores the domain of your resource server (in this case, http://localhost:5001):OKTA_CLIENT_ID={yourClientId} OKTA_CLIENT_SECRET={yourClientSecret} OKTA_BASE_URL=https://{yourOktaDomain} RESOURCE_SERVER_BASE_URL=http://localhost:5001 -
Now, modify the
config.pyfile to include the resource server URL and the list of sample users. Replace the existing code with the following:import os OKTA_CLIENT_ID = os.getenv('OKTA_CLIENT_ID') OKTA_CLIENT_SECRET = os.getenv('OKTA_CLIENT_SECRET') OKTA_BASE_URL = os.getenv("OKTA_BASE_URL") OKTA_METADATA_URL = f"{OKTA_BASE_URL}/.well-known/openid-configuration" RESOURCE_SERVER_BASE_URL = os.getenv("RESOURCE_SERVER_BASE_URL") SAMPLE_USERS = [ { "id": 1, "name": "Alice Johnson", "firstName": "Alice", "lastName": "Johnson", "email": "alice.johnson@example.com" }, { "id": 2, "name": "Bob Smith", "firstName": "Bob", "lastName": "Smith", "email": "bob.smith@example.com" }, { "id": 3, "name": "Nina Patel", "firstName": "Nina", "lastName": "Patel", "email": "nina.patel@example.com" } ] -
Create a
resource-server.pyfile in the project directory and add the following code:from flask import Flask, request, jsonify from okta_jwt_verifier import BaseJWTVerifier app = Flask(__name__) app.config.from_object('config') ISSUER = app.config['OKTA_BASE_URL'] CLIENT_ID = app.config['OKTA_CLIENT_ID'] AUDIENCE = app.config['RESOURCE_SERVER_BASE_URL'] REQUIRED_SCOPES = {"api:read-users"} async def verify_token(): pass @app.get('/fetch-users') async def get_users(): is_valid, error_response = await verify_token() if not is_valid: return error_response return jsonify(app.config['SAMPLE_USERS']) if __name__ == "__main__": app.run(port=5001)The endpoint returns sample users if the token is valid. Next, you’ll add token validation.
-
Now write the logic for token validation. You’ll validate the token’s issuer, audience, and client ID against your authorization server URL, resource server domain, and client ID. You’ll also verify that the
api:read-usersscope is present in the token’sscpclaim.Start with the
verify_tokenfunction. First, check if the Authorization header is of type Bearer:auth_header = request.headers.get("Authorization") if not auth_header: return None, (jsonify({"error": "No token provided"}), 401) parts = auth_header.split() if parts[0].lower() != "bearer" or len(parts) != 2: return None, (jsonify({"error": "Authorization header must be Bearer token"}), 401)Next, use Okta’s package to verify that the audience, issuer, and client ID in the token match your configuration:
token = parts[1]

try:
    jwt_verifier = BaseJWTVerifier(issuer=ISSUER, client_id=CLIENT_ID, audience=AUDIENCE)
    await jwt_verifier.verify_access_token(token)

    return True, None
except Exception as e:
    print(f"Token verification failed: {e}")
    return None, (jsonify({"error": "Invalid or Expired Token"}), 401)
Now add scope validation. Extract the claims from the token and check that the custom scope
api:read-usersis present in thescpclaim. If the token doesn’t contain this scope, reject it and return an error. In the try block, before the return statement, add the following code:_, claims, _, _ = jwt_verifier.parse_token(token) token_scopes = set(claims.get("scp", [])) if not REQUIRED_SCOPES.issubset(token_scopes): return False, (jsonify({"error": "Insufficient Scope"}), 403) print("Token is Valid!")Once everything is done, your
verify_tokenfunction looks like this:async def verify_token(): auth_header = request.headers.get("Authorization") if not auth_header: return None, (jsonify({"error": "No token provided"}), 401) parts = auth_header.split() if parts[0].lower() != "bearer" or len(parts) != 2: return None, (jsonify({"error": "Authorization header must be Bearer token"}), 401) token = parts[1] try: jwt_verifier = BaseJWTVerifier(issuer=ISSUER, client_id=CLIENT_ID, audience=AUDIENCE) await jwt_verifier.verify_access_token(token) _, claims, _, _ = jwt_verifier.parse_token(token) token_scopes = set(claims.get("scp", [])) if not REQUIRED_SCOPES.issubset(token_scopes): return False, (jsonify({"error": "Insufficient Scope"}), 403) print("Token is Valid!") return True, None except Exception as e: print(f"Token verification failed: {e}") return False, (jsonify({"error": "Invalid or Expired Token"}), 401)
Extend the Flask app to interact with the resource server
With the Okta configuration complete, the next step is to update your Flask application to request this scope. This ensures that the access token issued to the user includes the necessary permission to call the protected endpoint.
-
In your
app.pyfile, find the oauth.register block and addapi:read-usersto the scope string within theclient_kwargsdictionary.oauth.register( # ... other parameters client_kwargs={ 'scope': 'openid profile email offline_access api:read-users', 'code_challenge_method': 'S256' } ) -
Add a new route,
/fetch-users, to yourapp.pyfile. This endpoint uses the stored access token from the user’s session to make a secure GET request to the protected endpoint in the resource server. If successful, it passes the returned list of users to the index.html template for display.@app.route('/fetch-users') def fetchUsers(): token = session.get('token') loggedInUser= session.get('loggedInUser') if not (token or loggedInUser): return redirect(url_for('login')) access_token = token.get('access_token') RESOURCE_SERVER_BASE_URL = app.config['RESOURCE_SERVER_BASE_URL'] headers = {"Authorization": f"Bearer {access_token}"} resp = requests.get(f"{RESOURCE_SERVER_BASE_URL}/fetch-users", headers=headers) if resp.ok: data = resp.json() return render_template('index.html', user=loggedInUser, userList=data) else: return f"API request failed: {resp.status_code} {resp.text}", resp.status_code -
Update the root route (
/) to initialize theuserListvariable in the template. This prevents errors when the page first loads before any data is fetched. Replace the existing index function with the following code.@app.route("/") def index(): loggedInUser = session.get('loggedInUser') return render_template('index.html', user=loggedInUser, userList=None)
Update the Flask UI to display protected data
Now, let’s modify the front end to add a button that triggers the API call and a table to display the returned user data.
Step 1: Open the templates/index.html file and replace its entire contents with the updated code below. This version adds a Fetch Users button for signed-in users and a table to display the user list when available.
<!DOCTYPE html>
<html lang="en">
  <head>
    <meta charset="UTF-8" />
    <title>Home</title>
    <link rel="stylesheet" href="{{ url_for('static', filename='css/index.css') }}" />
  </head>
  <body>
    <div class="wrapper">
      <nav class="main-nav" role="navigation" aria-label="Primary navigation">
        <div class="nav-left">
          <a href="/">Flask Web App</a>
        </div>
        <div class="nav-right">
          {% if user %}
          <a href="/fetch-users">Fetch Users</a>
          <a href="/logout">Logout</a>
          {% else %}
          <a href="/login">Login</a>
          {% endif %}
        </div>
      </nav>

      <main class="container">
        {% if user %}
        <section aria-label="User welcome" class="user-info">
          <h1>Welcome, {{ user.name or 'User' }}!</h1>
          <p>You have successfully logged in. You can now fetch and view user details.</p>
          <p>Click the button below to load the list of users.</p>
          <button onclick="location.href='/fetch-users'">Fetch Users</button>
        </section>

        {% if userList %}
        <section aria-label="Users table">
          <h2>Users List</h2>
          <div class="table-wrapper">
            <table>
              <thead>
                <tr>
                  <th>Email</th>
                  <th>First Name</th>
                  <th>Last Name</th>
                </tr>
              </thead>
            </table>
            <div class="table-body-scroll">
              <table>
                <tbody>
                  {% for user in userList %}
                  <tr>
                    <td>{{ user.email }}</td>
                    <td>{{ user.firstName }}</td>
                    <td>{{ user.lastName }}</td>
                  </tr>
                  {% endfor %}
                </tbody>
              </table>
            </div>
          </div>
        </section>
        {% endif %} {% else %}
        <section aria-label="Login prompt" class="user-info">
          <h1>Welcome to the Flask Web App</h1>
          <p>If you are seeing this, you are not logged in yet.</p>
          <p>This app uses OpenID Connect (OIDC) for secure login. After logging in, you can access user-specific data.</p>
          <p>Click the login button below to get started.</p>
          <a href="/login" class="button-link">Login / Register</a>
        </section>
        {% endif %}
      </main>
    </div>
  </body>
</html>
Step 2: To style the new user table, open static/css/index.css file and add the following CSS at the end of the file.
.table-body-scroll {
    max-height: 300px;
    overflow-y: auto;
    border-radius: 8px;
    border: 1px solid #d1d9e6;
    box-shadow: 0 0 6px rgba(0, 0, 0, 0.05);
  }

  table {
    border-collapse: collapse;
    width: 100%;
    background-color: #fff;
    color: #2c3e50;
    border-radius: 8px 8px 0 0;
    table-layout: fixed;
  }

  thead th {
    text-align: center;
    background-color: #e9f0fb;
    color: #1a3c72;
    font-weight: 700;
    padding: 0.75rem 1rem;
    border-bottom: 1px solid #d1d9e6;
    position: sticky;
    top: 0;
    z-index: 1;
  }

  td {
    text-align: center;
    padding: 0.75rem 1rem;
    border-bottom: 1px solid #e2e8f0;
    font-size: 1rem;
    word-wrap: break-word;
  }
Test the protected API integration
Ready to see it all work? Make sure both servers are running: the Flask app (flask run) and the resource server (flask --app resource-server.py run --port 5001). Open a browser, go to http://localhost:5000, sign in, and then click Fetch Users. A table appears, listing sample users returned from your resource server. If you see the user data, your integration is a success!
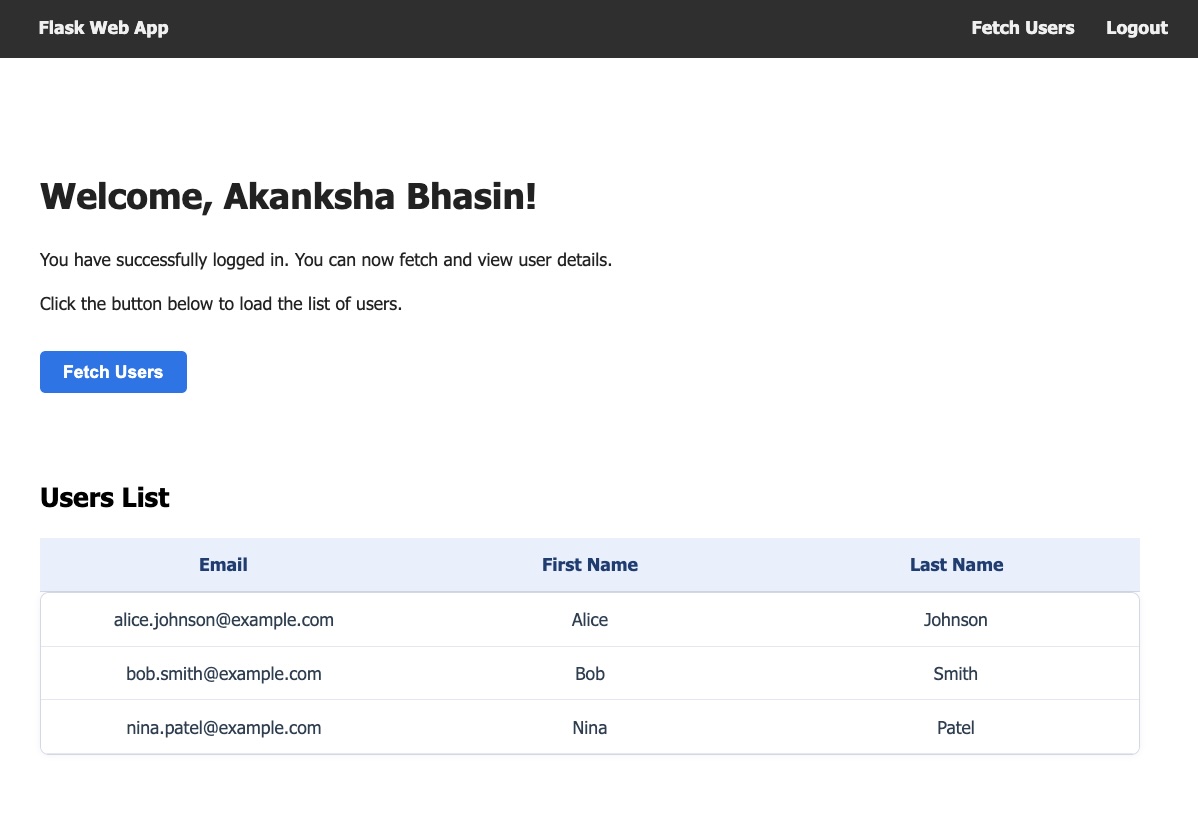
Your Flask application now has secure user authentication and can use an access token to interact with a protected API.
Learn more about OAuth and OIDC
If you’d like to learn more about the concepts covered in this tutorial, explore these official Okta resources:
- Sign users in to your web app
- Authorization Code flow with PKCE
- Validate Access Tokens
- Create an Authorization Server
- Secure a Node Express App with OAuth 2.0 and PKCE
Remember to follow us on LinkedIn, X, and subscribe to our YouTube channel for more exciting content. We also want to hear from you about the topics you’d like to see and any questions you may have. Leave us a comment below!
Akanksha has a developer background and experience building global developer communities. She has given talks on various technologies, hosted large-scale events and hackathons, advocated for developers, and fostered partnerships and open-source initiatives. Outside work, she loves dancing and traveling; you'll often find her capturing serene skies through her phone.
Okta Developer Blog Comment Policy
We welcome relevant and respectful comments. Off-topic comments may be removed.