How to Manage User Lifecycle with .NET and SCIM
Several challenges exist in provisioning users for a growing company across systems and applications. It can be time-consuming, error-prone, challenging to sync users across domains, and potentially a security risk to keep track of existing profiles. Fortunately, a protocol called SCIM (System for Cross-domain Identity Management) standardizes user information across systems, making it possible to sync users. Also, combined with a SCIM-compliant Identity Provider (IdP), it securely automates common user lifecycle operations. In this tutorial, I’ll walk you through building a .NET SCIM server with the CRUD (Create, Read, Update, Delete) Restful API endpoints outlined in the SCIM protocol. We’ll then test the server using Swagger User Interface before integrating it with Okta, a SCIM compliant IdP.
Note: In May 2025, the Okta Integrator Free Plan replaced Okta Developer Edition Accounts, and the Okta CLI was deprecated.
We preserved this post for reference, but the instructions no longer work exactly as written. Replace the Okta CLI commands by manually configuring Okta following the instructions in our Developer Documentation.
Use SCIM to manage users
SCIM is an HTTP-based protocol defining standard endpoints and schemas to overcome complexity when implementing user lifecycle management operations across different systems.
Components of a SCIM integration
There are two primary components for a SCIM integration. The first is the SCIM server, which is a server that has implemented the endpoints as described in the SCIM spec — for example, User endpoints, Group endpoints, Schemas endpoints, etc. The applications team typically develops these endpoints, which leaves the IdP to manage the user profiles. This blog will detail creating a sample SCIM server using .NET. The other component is the SCIM client, which makes SCIM-compliant HTTP calls to a SCIM server to exchange user profile information. Okta (the IdP), in our use case, will act as a SCIM client and call the .NET SCIM server we’ll build using this tutorial.
Build a .NET SCIM server
Prerequisites
Table of Contents
- Use SCIM to manage users
- Components of a SCIM integration
- Build a .NET SCIM server
- Create a .NET project
- Test the .NET project using Swagger UI
- Set up Okta as your identity provider (IdP) for authentication and authorization
- Create the database models using Entity Framework
- Create SCIM complaint request and response models
- Create the .NET SCIM server RESTful API endpoints
- Retrieve a user
- List all users
- Create a user
- Update a user
- Delete a user
- Secure your .NET SCIM server endpoints
- Bootstrap OAuth to Swagger UI
- Test requests to the .NET SCIM server locally using a tunnel
- Create a SCIM provisioning application in Okta
- Test common user lifecycle operations
- Keep experimenting with SCIM
Create a .NET project
Create a directory called okta-scim-server-dotnet. Navigate to the directory in your terminal, then run the following commands:
dotnet new webapi (Creates a new API project)
dotnet dev-certs https --trust (Trust the self-signed TLS certs)
Test the .NET project using Swagger UI
- Run the project using the command
dotnet watch --launch-profile https - At this point using the https://localhost:7094/swagger/index.html you will be able to see the Swagger UI. Typically, a browser tab will automatically open; if not, manually check for the URL to the Swagger UI under
Properties/launchSettings.jsonand copy/paste this URL onto the browser:
Note: You may get different ports so be sure to double-check the URLs in
Properties/launchSettings.json.
Set up Okta as your identity provider (IdP) for authentication and authorization
Before you begin, you’ll need a free Okta developer account. Install the Okta CLI and run okta register to sign up for a new account. If you already have an account, run okta login.
Then, run okta apps create. Select the default app name, or change it as you see fit.
Choose Single-Page App and press Enter.
Use http://localhost:7094/swagger/oauth2-redirect.html for the Redirect URI and set the Logout Redirect URI to http://localhost:7094.
What does the Okta CLI do?
The Okta CLI will create an OIDC Single-Page App in your Okta Org. It will add the redirect URIs you specified and grant access to the Everyone group. It will also add a trusted origin for http://localhost:7094. You will see output like the following when it’s finished:
Okta application configuration:
Issuer:    https://dev-133337.okta.com/oauth2/default
Client ID: 0oab8eb55Kb9jdMIr5d6
NOTE: You can also use the Okta Admin Console to create your app. See Create a Single-Page App for more information.
Take note of the Issuer and the Client ID. You’ll need those values for your authentication configuration coming up soon.
Create the database models using Entity Framework
This sample uses EntityFrameworkCore as the Object Relational Mapper (ORM) and Sqlite as the database. Let’s develop the database models!
Add the required dependencies by running the following commands
dotnet tool install --global dotnet-ef
dotnet add package Microsoft.EntityFrameworkCore.Tools
dotnet add package Microsoft.EntityFrameworkCore.Design
dotnet add package Microsoft.EntityFrameworkCore.Sqlite
Create a DataModels.cs file and add the required model classes for User and child object Email.
using System.ComponentModel.DataAnnotations.Schema;
using Microsoft.EntityFrameworkCore;

namespace okta_scim_server_dotnet;

public partial class User
{
    [DatabaseGenerated(DatabaseGeneratedOption.Identity)]
    public int Id { get; set; }
    public string? ExternalId { get; set; }

    public string UserName { get; set; }
    public string FirstName { get; set; }
    public string LastName { get; set; }
    public string? MiddleName { get; set; }
    public string DisplayName { get; set; }
    public bool Active { get; set; }

    public virtual ICollection<Email>? Emails { get; set; }
}

[PrimaryKey(nameof(Value), nameof(UserId))]
public class Email
{
    public string Type { get; set; }
    public string Value { get; set; }
    public bool Primary { get; set; }

    public int UserId { get; set; }
    public virtual User User { get; set; }
}
Add DB context for each entity framework in the DataModels.cs file, (i.e., to the two models we created above). We’ll also add some seed data using the method OnModelCreating, which will be useful for testing. In this sample, we will create support for the User resource type. However, if you want to expand on this, you can use similar concepts to maintain endpoints for other resource types, such as Group. Paste the following code just below the Email class:
public partial class ScimDbContext : DbContext
{
    public ScimDbContext(){}
    public ScimDbContext(DbContextOptions<ScimDbContext> options) : base(options) { }

    public virtual DbSet<User> Users { get; set; }
    public virtual DbSet<Email> Emails { get; set; }

    protected override void OnModelCreating(ModelBuilder modelBuilder)
    {
        modelBuilder.Entity<User>().HasIndex(u => u.UserName).IsUnique();
        modelBuilder.Entity<User>().HasData(new List<User> {
            new User { Id = 1, FirstName = "Micky", LastName = "Daldo", DisplayName = "Micky Daldo", UserName = "mdaldo@fake.domain", Active = true },
            new User { Id = 2, FirstName = "Dan", LastName = "Slem", DisplayName = "Dan Slem", UserName = "dslem@fake.domain", Active = true },
            new User { Id = 3, FirstName = "Sarika", LastName = "Mahesh", DisplayName = "Sarika Mahesh", UserName = "smahesh@fake.domain", Active = true }
        });
        modelBuilder.Entity<Email>().HasData(new List<Email> {
            new Email { Type = "work", Value="mdaldo@fake.domain", Primary = true, UserId = 1 },
            new Email { Type = "personal", Value="mdaldo@personal.domain", Primary = false, UserId = 1 },
            new Email { Type = "work", Value="dslem@fake.domain", Primary = true, UserId = 2 },
            new Email { Type = "work", Value="smahesh@fake.domain", Primary = true, UserId = 3 }
        });
        base.OnModelCreating(modelBuilder);
    }
}
The DataModels.cs file should look like this:
using System.ComponentModel.DataAnnotations.Schema;
using Microsoft.EntityFrameworkCore;

namespace okta_scim_server_dotnet;

public partial class User
{
    [DatabaseGenerated(DatabaseGeneratedOption.Identity)]
    public int Id { get; set; }
    public string? ExternalId { get; set; }

    public string UserName { get; set; }
    public string FirstName { get; set; }
    public string LastName { get; set; }
    public string? MiddleName { get; set; }
    public string DisplayName { get; set; }
    public bool Active { get; set; }

    public virtual ICollection<Email>? Emails { get; set; }
}

[PrimaryKey(nameof(Value), nameof(UserId))]
public class Email
{
    public string Type { get; set; }
    public string Value { get; set; }
    public bool Primary { get; set; }

    public int UserId { get; set; }
    public virtual User User { get; set; }
}

public partial class ScimDbContext : DbContext
{
    public ScimDbContext(){}
    public ScimDbContext(DbContextOptions<ScimDbContext> options) : base(options) { }

    public virtual DbSet<User> Users { get; set; }
    public virtual DbSet<Email> Emails { get; set; }

    protected override void OnModelCreating(ModelBuilder modelBuilder)
    {
        modelBuilder.Entity<User>().HasIndex(u => u.UserName).IsUnique();
        modelBuilder.Entity<User>().HasData(new List<User> {
            new User { Id = 1, FirstName = "Micky", LastName = "Daldo", DisplayName = "Micky Daldo", UserName = "mdaldo@fake.domain", Active = true },
            new User { Id = 2, FirstName = "Dan", LastName = "Slem", DisplayName = "Dan Slem", UserName = "dslem@fake.domain", Active = true },
            new User { Id = 3, FirstName = "Sarika", LastName = "Mahesh", DisplayName = "Sarika Mahesh", UserName = "smahesh@fake.domain", Active = true }
        });
        modelBuilder.Entity<Email>().HasData(new List<Email> {
            new Email { Type = "work", Value="mdaldo@fake.domain", Primary = true, UserId = 1 },
            new Email { Type = "personal", Value="mdaldo@personal.domain", Primary = false, UserId = 1 },
            new Email { Type = "work", Value="dslem@fake.domain", Primary = true, UserId = 2 },
            new Email { Type = "work", Value="smahesh@fake.domain", Primary = true, UserId = 3 }
        });
        base.OnModelCreating(modelBuilder);
    }
}
Add dbconfiguration in the Properties/appsettings.json file as a top-level property.
"ConnectionStrings": {
    "DefaultConnection": "Data Source=scim-dev.db;"
}
This command above creates a db file in the project folder named scim-db.dev. After adding this property, the JSON file should look like this:
{
  "ConnectionStrings": {
    "DefaultConnection": "Data Source=scim-dev.db;"
  },
  "Logging": {
    "LogLevel": {
      "Default": "Information",
      "Microsoft.AspNetCore": "Warning"
    }
  },
  "AllowedHosts": "*"
}
Now we can wire it all up in Program.cs for DI using AddDbContextPool middleware
- At the top of the file, add dependencies with
usingstatementsusing Microsoft.EntityFrameworkCore; using okta_scim_server_dotnet; - After
builder.Services.AddSwaggerGen();add the following code:builder.Services.AddDbContextPool<ScimDbContext>( options => options.UseSqlite(builder.Configuration.GetConnectionString("DefaultConnection")) );The
Program.csfile should now look like this:
  using Microsoft.EntityFrameworkCore;
  using okta_scim_server_dotnet;
var builder = WebApplication.CreateBuilder(args);
// Add services to the container.
// Learn more about configuring Swagger/OpenAPI at https://aka.ms/aspnetcore/swashbuckle
builder.Services.AddEndpointsApiExplorer();
builder.Services.AddSwaggerGen();
  builder.Services.AddDbContextPool<ScimDbContext>(
      options => options.UseSqlite(builder.Configuration.GetConnectionString("DefaultConnection"))
  );
var app = builder.Build();
// Configure the HTTP request pipeline.
if (app.Environment.IsDevelopment())
{
app.UseSwagger();
app.UseSwaggerUI();
}
app.UseHttpsRedirection();
var summaries = new[]
{
"Freezing", "Bracing", "Chilly", "Cool", "Mild", "Warm", "Balmy", "Hot", "Sweltering", "Scorching"
};
app.MapGet("/weatherforecast", () =>
{
var forecast = Enumerable.Range(1, 5).Select(index =>
new WeatherForecast
(
DateOnly.FromDateTime(DateTime.Now.AddDays(index)),
Random.Shared.Next(-20, 55),
summaries[Random.Shared.Next(summaries.Length)]
))
.ToArray();
return forecast;
})
.WithName("GetWeatherForecast")
.WithOpenApi();
app.Run();
record WeatherForecast(DateOnly Date, int TemperatureC, string? Summary)
{
public int TemperatureF => 32 + (int)(TemperatureC / 0.5556);
}
We can then migrate the coded database models and data into the actual database.
- Prepare db migration by running
dotnet ef migrations add InitialScimDb - Apply these changes to db by running
dotnet ef database update. This command would have created a file namedscim-dev.dbin your project folder. - Optional: Test db creation using the command line tool,
- You should have sqlite3 client installed. (I had this our of the box in Mac OS)
- Connect using
sqlite3 <<Path to sqlite file>>/scim-dev.db - List tables using
.tables - List users by running
select * from Users; - Then exit using
.exit
Create SCIM complaint request and response models
Having taken care of data models and database creation, let’s move on to creating SCIM-compliant models. Our requests and responses will be using these models to communicate with SCIM clients. Create a new file, ScimModels.cs, and add the following SCIM models:
ScimListResourceRequestis used when listing resources. It has pagination and filtering parameters.ScimListResourceResponse<T>is used when returning a list of resources. Since this is a generic model, it can therefore be used for multiple resource types.ScimErrorResponseis used when returning an error such as resource not found in standard SCIM format.ScimUser,ScimName, andScimEmailare user objects and child objects which are SCIM compliant.
namespace okta_scim_server_dotnet;

public class ScimListResourceRequest
{
    public string? filter { get; set; }
    public int? startIndex { get; set; }
    public int? count { get; set; }
    // TODO: Start with simple parsing on what Okta sends. Extend it to be generic to handle other operations
    public Dictionary<string, string> parsedFilter
    {
        get
        {
            Dictionary<string, string> parsedValue = new Dictionary<string, string>();
            if (!string.IsNullOrWhiteSpace(filter))
            {
                var filterTerms = filter.Split(" eq ");
                if (filterTerms.Length == 2)
                {
                    parsedValue.Add(filterTerms[0], filterTerms[1].Substring(1, filterTerms[1].Length - 2));
                }
            }
            return parsedValue;
        }
    }
    public int parsedStartIndex { get { return startIndex ?? 1; } }
    public int parsedCount { get { return count ?? 100; } }
}

public class ScimListResourceResponse<T>
{
    public IEnumerable<string> schemas = new[] { "urn:ietf:params:scim:api:messages:2.0:ListResponse" };
    public int totalResults { get; set; }
    public int startIndex { get; set; }
    public int itemsPerPage { get; set; }
    public IEnumerable<T> Resources { get; set; }
}

public class ScimErrorResponse
{
    public ScimErrorResponse(int status, string detail)
    {
        this.schemas = new[] { "urn:ietf:params:scim:api:messages:2.0:Error" };
        this.status = status;
        this.detail = detail;
    }
    public IEnumerable<string> schemas {get; private set;}
    public string? detail { get; set; }
    public int status { get; set; }
}
public class ScimUser
{
    public IEnumerable<string> schemas { get; set; }
    public string? id { get; set; }
    public string externalId { get; set; }
    public string userName { get; set; }
    public ScimName name { get; set; }
    public string displayName { get; set; }
    public IEnumerable<ScimEmail> emails { get; set; }
    public bool active { get; set; }
}

public class ScimName
{
    public string givenName { get; set; }
    public string familyName { get; set; }
    public string? middleName { get; set; }
}

public class ScimEmail
{
    public string value { get; set; }
    public string type { get; set; }
    public bool primary { get; set; }
}
We also need to create mappers between DB models and SCIM models to avoid many manual conversions. For this, we will use the AutoMapper package.
- Install dependencies by running the following commands:
dotnet add package AutoMapper dotnet add package Automapper.Extensions.Microsoft.DependencyInjection - Add Mappings to
ScimModels.cs:- At the top of the file, add the
usingstatementusing AutoMapper; - At the bottom, add the following code:
  public class UserProfile: Profile
  {
      public UserProfile()
      {
          CreateMap<ScimUser, User>()
              .ForMember(dest => dest.FirstName, act => act.MapFrom(src => src.name.givenName))
              .ForMember(dest => dest.LastName, act => act.MapFrom(src => src.name.familyName))
              .ForMember(dest => dest.MiddleName, act => act.MapFrom(src => src.name.middleName))
              .ReverseMap()
              .ForPath(dest => dest.id, act => act.MapFrom(src => src.Id))
              .ForPath(dest => dest.schemas, act => act.MapFrom(src => new[] { "urn:ietf:params:scim:schemas:core:2.0:User" }));

          CreateMap<ScimEmail, Email>().ReverseMap();
      }
  }
The
ScimModels.csfile should now look like this:
- At the top of the file, add the
using AutoMapper;

namespace okta_scim_server_dotnet;

public class ScimListResourceRequest
{
    public string? filter { get; set; }
    public int? startIndex { get; set; }
    public int? count { get; set; }
    // TODO: Starting with simple parsing on what okta sends. Extend it to be generic to handle other operations
    public Dictionary<string, string> parsedFilter
    {
        get
        {
            Dictionary<string, string> parsedValue = new Dictionary<string, string>();
            if (!string.IsNullOrWhiteSpace(filter))
            {
                var filterTerms = filter.Split(" eq ");
                if (filterTerms.Length == 2)
                {
                    parsedValue.Add(filterTerms[0], filterTerms[1].Substring(1, filterTerms[1].Length - 2));
                }
            }
            return parsedValue;
        }
    }
    public int parsedStartIndex { get { return startIndex ?? 1; } }
    public int parsedCount { get { return count ?? 100; } }
}

public class ScimListResourceResponse<T>
{
    public IEnumerable<string> schemas = new[] { "urn:ietf:params:scim:api:messages:2.0:ListResponse" };
    public int totalResults { get; set; }
    public int startIndex { get; set; }
    public int itemsPerPage { get; set; }
    public IEnumerable<T> Resources { get; set; }
}

public class ScimErrorResponse
{
    public ScimErrorResponse(int status, string detail)
    {
        this.schemas = new[] { "urn:ietf:params:scim:api:messages:2.0:Error" };
        this.status = status;
        this.detail = detail;
    }
    public IEnumerable<string> schemas {get; private set;}
    public string? detail { get; set; }
    public int status { get; set; }
}
public class ScimUser
{
    public IEnumerable<string> schemas { get; set; }
    public string? id { get; set; }
    public string externalId { get; set; }
    public string userName { get; set; }
    public ScimName name { get; set; }
    public string displayName { get; set; }
    public IEnumerable<ScimEmail> emails { get; set; }
    public bool active { get; set; }
}

public class ScimName
{
    public string givenName { get; set; }
    public string familyName { get; set; }
    public string? middleName { get; set; }
}

public class ScimEmail
{
    public string value { get; set; }
    public string type { get; set; }
    public bool primary { get; set; }
}
public class UserProfile: Profile
{
    public UserProfile()
    {
        CreateMap<ScimUser, User>()
            .ForMember(dest => dest.FirstName, act => act.MapFrom(src => src.name.givenName))
            .ForMember(dest => dest.LastName, act => act.MapFrom(src => src.name.familyName))
            .ForMember(dest => dest.MiddleName, act => act.MapFrom(src => src.name.middleName))
            .ReverseMap()
            .ForPath(dest => dest.id, act => act.MapFrom(src => src.Id))
            .ForPath(dest => dest.schemas, act => act.MapFrom(src => new[] { "urn:ietf:params:scim:schemas:core:2.0:User" }));

        CreateMap<ScimEmail, Email>().ReverseMap();
    }
}
- To wire up the SCIM models and the mappers we have created,
AddAutoMappermiddleware inProgram.cs- At the top of the file, add the
usingstatementsusing AutoMapper; - After
builder.Services.AddDbContextPool<ScimDbContext>(...);add the following codebuilder.Services.AddAutoMapper(typeof(Program).Assembly);
- At the top of the file, add the
The Program.cs file should now look like this:
using Microsoft.EntityFrameworkCore;
using okta_scim_server_dotnet;
using AutoMapper;

var builder = WebApplication.CreateBuilder(args);

// Add services to the container.
// Learn more about configuring Swagger/OpenAPI at https://aka.ms/aspnetcore/swashbuckle
builder.Services.AddEndpointsApiExplorer();
builder.Services.AddSwaggerGen();

builder.Services.AddDbContextPool<ScimDbContext>(
    options => options.UseSqlite(builder.Configuration.GetConnectionString("DefaultConnection"))
);

builder.Services.AddAutoMapper(typeof(Program).Assembly);

var app = builder.Build();

// Configure the HTTP request pipeline.
if (app.Environment.IsDevelopment())
{
    app.UseSwagger();
    app.UseSwaggerUI();
}

app.UseHttpsRedirection();

var summaries = new[]
{
    "Freezing", "Bracing", "Chilly", "Cool", "Mild", "Warm", "Balmy", "Hot", "Sweltering", "Scorching"
};

app.MapGet("/weatherforecast", () =>
{
    var forecast =  Enumerable.Range(1, 5).Select(index =>
        new WeatherForecast
        (
            DateOnly.FromDateTime(DateTime.Now.AddDays(index)),
            Random.Shared.Next(-20, 55),
            summaries[Random.Shared.Next(summaries.Length)]
        ))
        .ToArray();
    return forecast;
})
.WithName("GetWeatherForecast")
.WithOpenApi();

app.Run();

record WeatherForecast(DateOnly Date, int TemperatureC, string? Summary)
{
    public int TemperatureF => 32 + (int)(TemperatureC / 0.5556);
}
Create the .NET SCIM server RESTful API endpoints
Since we have created the necessary data and SCIM models. We can move on to creating the endpoints for user lifecycle management. First, let’s set up dependencies, some basic global configuration, and clean up unnecessary code.
- Install dependencies by running
dotnet add package Newtonsoft.Json - At the top of the
Program.csfile, addusingstatementsusing System.Text.Json.Serialization; using System.Text.Json; using System.Net; using Microsoft.AspNetCore.Mvc; - Add the following code after
var builder = WebApplication.CreateBuilder(args);to respond cleanly and overcome parsing limitationsbuilder.Services.ConfigureHttpJsonOptions(options => { options.SerializerOptions.ReferenceHandler = ReferenceHandler.IgnoreCycles; options.SerializerOptions.DefaultIgnoreCondition = JsonIgnoreCondition.WhenWritingNull; }); - Remove WeatherForecast related sample code
The Program.cs file should now look like this:
using Microsoft.EntityFrameworkCore;
using okta_scim_server_dotnet;
using AutoMapper;
  using System.Text.Json.Serialization;
  using System.Text.Json;
  using System.Net;
  using Microsoft.AspNetCore.Mvc;
var builder = WebApplication.CreateBuilder(args);
  builder.Services.ConfigureHttpJsonOptions(options => {
      options.SerializerOptions.ReferenceHandler = ReferenceHandler.IgnoreCycles;
      options.SerializerOptions.DefaultIgnoreCondition = JsonIgnoreCondition.WhenWritingNull;
  });
// Add services to the container.
// Learn more about configuring Swagger/OpenAPI at https://aka.ms/aspnetcore/swashbuckle
builder.Services.AddEndpointsApiExplorer();
builder.Services.AddSwaggerGen();
builder.Services.AddDbContextPool<ScimDbContext>(
options => options.UseSqlite(builder.Configuration.GetConnectionString("DefaultConnection"))
);
builder.Services.AddAutoMapper(typeof(Program).Assembly);
var app = builder.Build();
// Configure the HTTP request pipeline.
if (app.Environment.IsDevelopment())
{
app.UseSwagger();
app.UseSwaggerUI();
}
app.UseHttpsRedirection();
app.Run();
Retrieve a user
We are using minimal APIs for creating endpoints. For retrieving a user, let’s create the route that expects the user’s id in the path and responds with a single ScimUser object if found and a ScimErrorResponse if the user doesn’t exist. Add the following code before app.Run(); in the Program.cs file:
var scimPrefix = "/scim/v2";
var userRoute = $"{scimPrefix}/users";
var notFoundResponse = new ScimErrorResponse((int)HttpStatusCode.NotFound, "Resource Not Found");
app.MapGet(userRoute + "/{id}", async Task<IResult> (int id, ScimDbContext db, IMapper mapper) => {
    ScimUser? user = await db.Users.Where(u => u.Id == id).Include(u => u.Emails).Select(u => mapper.Map<ScimUser>(u)).FirstOrDefaultAsync();
    if(user is null)
    {
        return Results.NotFound(notFoundResponse);
    }
    return Results.Ok(user);
})
.WithName("GetUser")
.WithOpenApi();
The Program.cs file should now look like this:
//..........Omitted for brevity..........

builder.Services.AddAutoMapper(typeof(Program).Assembly);

var app = builder.Build();

// Configure the HTTP request pipeline.
if (app.Environment.IsDevelopment())
{
    app.UseSwagger();
    app.UseSwaggerUI();
}

app.UseHttpsRedirection();

var scimPrefix = "/scim/v2";
var userRoute = $"{scimPrefix}/users";
var notFoundResponse = new ScimErrorResponse((int)HttpStatusCode.NotFound, "Resource Not Found");
app.MapGet(userRoute + "/{id}", async Task<IResult> (int id, ScimDbContext db, IMapper mapper) => {
    ScimUser? user = await db.Users.Where(u => u.Id == id).Include(u => u.Emails).Select(u => mapper.Map<ScimUser>(u)).FirstOrDefaultAsync();
    if(user is null)
    {
        return Results.NotFound(notFoundResponse);
    }
    return Results.Ok(user);
})
.WithName("GetUser")
.WithOpenApi();

app.Run();
Some variables are declared outside of this method for reuse.
Run the project using the steps mentioned in the testing section. To expand it, click on the GET /scim/v2/users/{id} endpoint. Click Try it out and enter 3 as the id value in the description box, then click the Execute button. You should receive the following as a response based on the seeding data with status code 200:
{
  "schemas": [
    "urn:ietf:params:scim:schemas:core:2.0:User"
  ],
  "id": "3",
  "userName": "smahesh@fake.domain",
  "name": {
    "givenName": "Sarika",
    "familyName": "Mahesh"
  },
  "displayName": "Sarika Mahesh",
  "emails": [
    {
      "value": "smahesh@fake.domain",
      "type": "work",
      "primary": true
    }
  ],
  "active": true
}
Now change id to 100 and try again. You should receive the following as a response with status code 404:
{
  "schemas": [
    "urn:ietf:params:scim:api:messages:2.0:Error"
  ],
  "detail": "Resource Not Found",
  "status": 404
}
We’ve completed our testing for the GET user endpoint. Let’s add other endpoints!
List all users
For listing users, add the following code to the Program.cs file below the previously added section. This method expects ScimListResourceRequest attributes in the query and responds with 200 status and ScimListResourceResponse<ScimUser> user in body. Okta will use pagination to retrieve large sets of users:
app.MapGet(userRoute, async ([AsParameters] ScimListResourceRequest request, ScimDbContext db, IMapper mapper) => {
    string filterUsername = request.parsedFilter.Where(f => f.Key.ToLower() == "username").Select(f => f.Value).SingleOrDefault();
    // filter and paginate results based on input
    var users = await db.Users.Where(u => string.IsNullOrWhiteSpace(filterUsername) || u.UserName == filterUsername).OrderByDescending(u => u.Id).Include(u => u.Emails).ToListAsync();
    return new ScimListResourceResponse<ScimUser>
    {
        totalResults = users.Count,
        startIndex = request.parsedStartIndex,
        itemsPerPage = request.parsedCount,
        Resources = users.Skip(request.parsedStartIndex - 1).Take(request.parsedCount).Select(u => mapper.Map<ScimUser>(u))
    };
})
.WithName("ListUsers")
.WithOpenApi();
The Program.cs file should now look like this:
//..........Omitted for brevity..........

var scimPrefix = "/scim/v2";
var userRoute = $"{scimPrefix}/users";
var notFoundResponse = new ScimErrorResponse((int)HttpStatusCode.NotFound, "Resource Not Found");
app.MapGet(userRoute + "/{id}", async Task<IResult> (int id, ScimDbContext db, IMapper mapper) => {
    ScimUser? user = await db.Users.Where(u => u.Id == id).Include(u => u.Emails).Select(u => mapper.Map<ScimUser>(u)).FirstOrDefaultAsync();
    if(user is null)
    {
        return Results.NotFound(notFoundResponse);
    }
    return Results.Ok(user);
})
.WithName("GetUser")
.WithOpenApi();

app.MapGet(userRoute, async ([AsParameters] ScimListResourceRequest request, ScimDbContext db, IMapper mapper) => {
    string filterUsername = request.parsedFilter.Where(f => f.Key.ToLower() == "username").Select(f => f.Value).SingleOrDefault();
    // filter and paginate results based on input
    var users = await db.Users.Where(u => string.IsNullOrWhiteSpace(filterUsername) || u.UserName == filterUsername).OrderByDescending(u => u.Id).Include(u => u.Emails).ToListAsync();
    return new ScimListResourceResponse<ScimUser>
    {
        totalResults = users.Count,
        startIndex = request.parsedStartIndex,
        itemsPerPage = request.parsedCount,
        Resources = users.Skip(request.parsedStartIndex - 1).Take(request.parsedCount).Select(u => mapper.Map<ScimUser>(u))
    };
})
.WithName("ListUsers")
.WithOpenApi();

app.Run();
To test this, you’ll need to rebuild the .NET SCIM server every time you add a new endpoint. To do this, enter Ctrl+R on your terminal, where you have your .NET SCIM server running. Once the server has been refreshed, click on the GET /scim/v2/users endpoint and the Try it out button. Then click the Execute button to run the request without any parameters. The code has some defaults and will return the first 100 users. You can expect a response with 200 status and body similar to the following:
{
  "totalResults": 4,
  "startIndex": 1,
  "itemsPerPage": 100,
  "resources": [
    {
      "schemas": [
        "urn:ietf:params:scim:schemas:core:2.0:User"
      ],
      "id": "4",
      "userName": "fakeguy@fake.domain",
      "name": {
        "givenName": "Fake",
        "familyName": "Guy"
      },
      "displayName": "Fake Guy",
      "emails": [],
      "active": true
    },
    ... //Removed for brevity
  ]
}
You can explore by adding different numerical values in startIndex, count, and also some valid filter parameter such as userName eq "fakeguy@fake.domain"
Create a user
To create a user, add the following code to the Program.cs file below the previously added section. This method expects a ScimUser object in the request body:
app.MapPost(userRoute, async Task<IResult> (ScimUser scimUser, ScimDbContext db, IMapper mapper) => {
    var user = mapper.Map<User>(scimUser);
    db.Users.Add(user);
    await db.SaveChangesAsync();
    return Results.Created($"users/{user.Id}", mapper.Map<ScimUser>(user));
})
.WithName("CreateUser")
.WithOpenApi();
The Program.cs file should now look like this:
//..........Omitted for brevity..........

app.MapGet(userRoute, async ([AsParameters] ScimListResourceRequest request, ScimDbContext db, IMapper mapper) => {
    string filterUsername = request.parsedFilter.Where(f => f.Key.ToLower() == "username").Select(f => f.Value).SingleOrDefault();
    // filter and paginate results based on input
    var users = await db.Users.Where(u => string.IsNullOrWhiteSpace(filterUsername) || u.UserName == filterUsername).OrderByDescending(u => u.Id).Include(u => u.Emails).ToListAsync();
    return new ScimListResourceResponse<ScimUser>
    {
        totalResults = users.Count,
        startIndex = request.parsedStartIndex,
        itemsPerPage = request.parsedCount,
        Resources = users.Skip(request.parsedStartIndex - 1).Take(request.parsedCount).Select(u => mapper.Map<ScimUser>(u))
    };
})
.WithName("ListUsers")
.WithOpenApi();

app.MapPost(userRoute, async Task<IResult> (ScimUser scimUser, ScimDbContext db, IMapper mapper) => {
    var user = mapper.Map<User>(scimUser);
    db.Users.Add(user);
    await db.SaveChangesAsync();
    return Results.Created($"users/{user.Id}", mapper.Map<ScimUser>(user));
})
.WithName("CreateUser")
.WithOpenApi();

app.Run();
To test this, you’ll need to rebuild the .NET SCIM server everytime you add a new endpoint, to do this enter Ctrl+R on your terminal where you have your .NET SCIM server running. Click on the POST/scim/v2/users endpoint and the Try it out button, then enter the following JSON payload as the request body in Swagger UI before clicking the Execute button:
{
  "schemas": [
    "urn:ietf:params:scim:schemas:core:2.0:User"
  ],
  "userName": "fakeguy@fake.domain",
  "name": {
    "givenName": "Fake",
    "familyName": "Guy"
  },
  "displayName": "Fake Guy",
  "active": true
}
The expected response will be something like below with 201 status
{
  "schemas": [
    "urn:ietf:params:scim:schemas:core:2.0:User"
  ],
  "id": "4",
  "userName": "fakeguy@fake.domain",
  "name": {
    "givenName": "Fake",
    "familyName": "Guy"
  },
  "displayName": "Fake Guy",
  "emails": [],
  "active": true
}
Update a user
To update a user, add the following code to the Program.cs file below the previously added section. We’ll a PUT operation, but you can also develop a PATCH request. This operation expects the user’s id in the path and the ScimUser object in the body, which can return either a 200 or 404 response:
app.MapPut(userRoute + "/{id}", async Task<IResult> (int id,ScimUser scimUser, ScimDbContext db, IMapper mapper) => {
    var existingUser = await db.Users.Where(u => u.Id == id).Include(u => u.Emails).FirstOrDefaultAsync();
    if (existingUser is null) { return Results.NotFound(notFoundResponse); }
    db.Entry(existingUser).CurrentValues.SetValues(mapper.Map<User>(scimUser));
    foreach (var email in existingUser.Emails.ToList())
    {
        if(!scimUser.emails.Any(u => u.value == email.Value)) { db.Emails.Remove(email); }
    }
    foreach (var email in scimUser.emails)
    {
        var existingEmail = existingUser.Emails.Where(e => e.Value == email.value).SingleOrDefault();
        if(existingEmail is not null)
        {
            db.Entry(existingEmail).CurrentValues.SetValues(email);
        } else
        {
            existingUser.Emails.Add(mapper.Map<Email>(email));
        }
    }
    await db.SaveChangesAsync();
    return Results.Ok(mapper.Map<ScimUser>(existingUser));
})
.WithName("UpdateUser")
.WithOpenApi();
The Program.cs file should now look like this:
//..........Omitted for brevity..........

app.MapPost(userRoute, async Task<IResult> (ScimUser scimUser, ScimDbContext db, IMapper mapper) => {
    var user = mapper.Map<User>(scimUser);
    db.Users.Add(user);
    await db.SaveChangesAsync();
    return Results.Created($"users/{user.Id}", mapper.Map<ScimUser>(user));
})
.WithName("CreateUser")
.WithOpenApi();

app.MapPut(userRoute + "/{id}", async Task<IResult> (int id,ScimUser scimUser, ScimDbContext db, IMapper mapper) => {
    var existingUser = await db.Users.Where(u => u.Id == id).Include(u => u.Emails).FirstOrDefaultAsync();
    if (existingUser is null) { return Results.NotFound(notFoundResponse); }
    db.Entry(existingUser).CurrentValues.SetValues(mapper.Map<User>(scimUser));
    foreach (var email in existingUser.Emails.ToList())
    {
        if(!scimUser.emails.Any(u => u.value == email.Value)) { db.Emails.Remove(email); }
    }
    foreach (var email in scimUser.emails)
    {
        var existingEmail = existingUser.Emails.Where(e => e.Value == email.value).SingleOrDefault();
        if(existingEmail is not null)
        {
            db.Entry(existingEmail).CurrentValues.SetValues(email);
        } else
        {
            existingUser.Emails.Add(mapper.Map<Email>(email));
        }
    }
    await db.SaveChangesAsync();
    return Results.Ok(mapper.Map<ScimUser>(existingUser));
})
.WithName("UpdateUser")
.WithOpenApi();

app.Run();
To test this, again, you’ll need to rebuild the .NET SCIM server, so enter Ctrl+R on the terminal where you have your .NET SCIM server running. Let’s update Fake Guy’s profile to include his middle initial R. To do this, click on the PUT/scim/v2/users/{id} endpoint and the Try it out button, then enter 4 as the id value and the following JSON payload as the request body in the Swagger UI before clicking the Execute button:
{
  "schemas": [
    "urn:ietf:params:scim:schemas:core:2.0:User"
  ],
  "id": "4",
  "userName": "fakeguy@fake.domain",
  "name": {
    "givenName": "Fake",
    "familyName": "Guy",
    "middleName": "R"
  },
  "displayName": "Fake Guy",
  "emails": [],
  "active": true
}
The expected response will be something like below with 200 status.
{
  "schemas": [
    "urn:ietf:params:scim:schemas:core:2.0:User"
  ],
  "id": "4",
  "userName": "fakeguy@fake.domain",
  "name": {
    "givenName": "Fake",
    "familyName": "Guy",
    "middleName": "R"
  },
  "displayName": "Fake Guy",
  "emails": [],
  "active": true
}
Feel free to test it with an invalid user id to get a 404 response.
Delete a user
Add the following code to the Program.cs file below the previously added section for deleting user. This endpoint is not a true delete endpoint but rather a soft-delete that uses the PATCH operation by setting the property active: false. This operation expects the user’s id in the path and the JsonPatchDocument object in the body which can return either a 200 or 404 response.
app.MapPatch(userRoute + "/{id}", async Task<IResult> (int id, [FromBody] JsonDocument patchJson, ScimDbContext db, IMapper mapper) => {
    var existingUser = await db.Users.Where(u => u.Id == id).Include(u => u.Emails).FirstOrDefaultAsync();
    if (existingUser is null) { return Results.NotFound(notFoundResponse); }

    foreach(JsonElement operation in patchJson.RootElement.GetProperty("Operations").EnumerateArray()) {
        // Handling only active property for simplicity
        if (operation.GetProperty("op").GetString() == "replace" && operation.GetProperty("value").TryGetProperty("active", out var temp)) {
            existingUser.Active = operation.GetProperty("value").GetProperty("active").GetBoolean();
            await db.SaveChangesAsync();
        }
    }
    return Results.Ok(mapper.Map<ScimUser>(existingUser));
})
.WithName("UpdateUserPartial")
.WithOpenApi();
The Program.cs file should now look like this:
//..........Omitted for brevity..........

app.MapPut(userRoute + "/{id}", async Task<IResult> (int id,ScimUser scimUser, ScimDbContext db, IMapper mapper) => {
    var existingUser = await db.Users.Where(u => u.Id == id).Include(u => u.Emails).FirstOrDefaultAsync();
    if (existingUser is null) { return Results.NotFound(notFoundResponse); }
    db.Entry(existingUser).CurrentValues.SetValues(mapper.Map<User>(scimUser));
    foreach (var email in existingUser.Emails.ToList())
    {
        if(!scimUser.emails.Any(u => u.value == email.Value)) { db.Emails.Remove(email); }
    }
    foreach (var email in scimUser.emails)
    {
        var existingEmail = existingUser.Emails.Where(e => e.Value == email.value).SingleOrDefault();
        if(existingEmail is not null)
        {
            db.Entry(existingEmail).CurrentValues.SetValues(email);
        } else
        {
            existingUser.Emails.Add(mapper.Map<Email>(email));
        }
    }
    await db.SaveChangesAsync();
    return Results.Ok(mapper.Map<ScimUser>(existingUser));
})
.WithName("UpdateUser")
.WithOpenApi();

app.MapPatch(userRoute + "/{id}", async Task<IResult> (int id, [FromBody] JsonDocument patchJson, ScimDbContext db, IMapper mapper) => {
    var existingUser = await db.Users.Where(u => u.Id == id).Include(u => u.Emails).FirstOrDefaultAsync();
    if (existingUser is null) { return Results.NotFound(notFoundResponse); }

    foreach(JsonElement operation in patchJson.RootElement.GetProperty("Operations").EnumerateArray()) {
        // Handling only active property for simplicity
        if (operation.GetProperty("op").GetString() == "replace" && operation.GetProperty("value").TryGetProperty("active", out var temp)) {
            existingUser.Active = operation.GetProperty("value").GetProperty("active").GetBoolean();
            await db.SaveChangesAsync();
        }
    }
    return Results.Ok(mapper.Map<ScimUser>(existingUser));
})
.WithName("UpdateUserPartial")
.WithOpenApi();

app.Run();
To test this, again you’ll need to rebuild the SCIM server so enter Ctrl+R on your terminal where you have your SCIM server running. Let’s deactivate Fake Guy’s profile. To do this, click on the PATCH/scim/v2/users/{id} endpoint and the Try it out button, then enter 4 as the id value and the following JSON payload in the Swagger UI before clicking the Execute button:
{
    "schemas": [
        "urn:ietf:params:scim:api:messages:2.0:PatchOp"
    ],
    "Operations": [
        {
            "op": "replace",
            "value": {
                "active": false
            }
        }
    ]
}
The expected response will be something like below with 200 status.
{
  "schemas": [
    "urn:ietf:params:scim:schemas:core:2.0:User"
  ],
  "id": "4",
  "userName": "fakeguy@fake.domain",
  "name": {
    "givenName": "Fake",
    "familyName": "Guy",
    "middleName": "R"
  },
  "displayName": "Fake Guy",
  "emails": [],
  "active": false
}
Feel free to test it out with an invalid user id to get a 404 response.
Secure your .NET SCIM server endpoints
Now that endpoints are created and tested. It is time to secure it before integration with Okta. Okta recommends at least one of three ways to secure your server. For this sample, we will use oAuth using the Okta.AspNetCore package.
- Install dependency by running
dotnet add package Okta.AspNetCore - Add okta configuration in
Properties/appsettings.jsonfile as a top-level property"Okta": { "OktaDomain": "https://${yourOktaDomain}.com", "AuthorizationServerId": "${authorizationServerId}" },The
Properties/appsettings.jsonfile should now look like this:
{
  "Okta": {
      "OktaDomain": "https://${yourOktaDomain}.com",
      "AuthorizationServerId": "${authorizationServerId}"
  },
"ConnectionStrings": {
"DefaultConnection": "Data Source=scim-dev.db;"
},
"Logging": {
"LogLevel": {
"Default": "Information",
"Microsoft.AspNetCore": "Warning"
}
},
"AllowedHosts": "*"
}
If you’ve created an application through the Okta CLI (from the Setup Okta steps), then set your Authorization Server Id to the default template Authorization Server like this:
{
"AuthorizationServerId": "default"
}
Another place to find the Authorization Server Id is in your Okta Dashboard under Security > API > Authorization Servers > Name of the Authorization Server, e.g., “default.”
- Make the following changes in
Program.csto implement authentication usingAddOktaWebApimiddleware.- At the top of the file, add the
usingstatement:using Okta.AspNetCore; - Add the following code after
builder.Services.AddAutoMapper(...);:builder.Services .AddAuthentication(options => { options.DefaultAuthenticateScheme = OktaDefaults.ApiAuthenticationScheme; options.DefaultChallengeScheme = OktaDefaults.ApiAuthenticationScheme; options.DefaultSignInScheme = OktaDefaults.ApiAuthenticationScheme; }) .AddOktaWebApi(new OktaWebApiOptions { OktaDomain = builder.Configuration["okta:OktaDomain"], AuthorizationServerId = builder.Configuration["okta:AuthorizationServerId"] }); builder.Services.AddAuthorization(); - Add the following code before
app.UseHttpsRedirection();:app.UseAuthentication(); app.UseAuthorization();The
Program.csfile should now look like this:
- At the top of the file, add the
using Microsoft.EntityFrameworkCore;
using okta_scim_server_dotnet;
using AutoMapper;
using System.Text.Json.Serialization;
using System.Text.Json;
using System.Net;
using Microsoft.AspNetCore.Mvc;
using Okta.AspNetCore;
var builder = WebApplication.CreateBuilder(args);
builder.Services.ConfigureHttpJsonOptions(options => {
options.SerializerOptions.ReferenceHandler = ReferenceHandler.IgnoreCycles;
options.SerializerOptions.DefaultIgnoreCondition = JsonIgnoreCondition.WhenWritingNull;
});
// Add services to the container.
// Learn more about configuring Swagger/OpenAPI at https://aka.ms/aspnetcore/swashbuckle
builder.Services.AddEndpointsApiExplorer();
builder.Services.AddSwaggerGen();
builder.Services.AddDbContextPool<ScimDbContext>(
options => options.UseSqlite(builder.Configuration.GetConnectionString("DefaultConnection"))
);
builder.Services.AddAutoMapper(typeof(Program).Assembly);
  builder.Services
      .AddAuthentication(options =>
      {
          options.DefaultAuthenticateScheme = OktaDefaults.ApiAuthenticationScheme;
          options.DefaultChallengeScheme = OktaDefaults.ApiAuthenticationScheme;
          options.DefaultSignInScheme = OktaDefaults.ApiAuthenticationScheme;
      })
      .AddOktaWebApi(new OktaWebApiOptions
      {
          OktaDomain = builder.Configuration["okta:OktaDomain"],
          AuthorizationServerId = builder.Configuration["okta:AuthorizationServerId"]
      });
  builder.Services.AddAuthorization();
var app = builder.Build();
// Configure the HTTP request pipeline.
if (app.Environment.IsDevelopment())
{
app.UseSwagger();
app.UseSwaggerUI();
}
app.UseHttpsRedirection();
  app.UseAuthentication();
  app.UseAuthorization();
//..........Omitted for brevity..........
app.Run();
- Next let’s wire up this authentication requirement to all endpoints we developed. Simply add
RequireAuthorization()to all routes. Here is an example for the POST endpoint (whereRequireAuthorization()was added to the end of the code),app.MapPost(userRoute, async Task<IResult> (ScimUser scimUser, ScimDbContext db, IMapper mapper) => { var user = mapper.Map<User>(scimUser); db.Users.Add(user); await db.SaveChangesAsync(); return Results.Created($"users/{user.Id}", mapper.Map<ScimUser>(user)); }) .WithName("CreateUser") .WithOpenApi() .RequireAuthorization();Bootstrap OAuth to Swagger UI
Update
Oktasection inProperties/appsettings.jsonwith the Client ID from earlier section."Okta": { "OktaDomain": "https://${yourOktaDomain}.com", "AuthorizationServerId": "${authorizationServerId}", "SwaggerClientId": "${clientId}" }
Note: If you use the template authorization server called default as mentioned here, then set the AuthorizationServerId to the value “default”. As shown below.
The Properties/appsettings.json file should now look like this:
{
"Okta": {
"OktaDomain": "https://${yourOktaDomain}.com",
"AuthorizationServerId": "default",
"SwaggerClientId": "${clientId}"
},
"ConnectionStrings": {
"DefaultConnection": "Data Source=scim-dev.db;"
},
"Logging": {
"LogLevel": {
"Default": "Information",
"Microsoft.AspNetCore": "Warning"
}
},
"AllowedHosts": "*"
}
- In
Program.csand at the top of the file, addusing Microsoft.OpenApi.Models; - Update
builder.Services.AddSwaggerGen();tobuilder.Services.AddSwaggerGen(c => { c.AddSecurityDefinition("oauth2", new OpenApiSecurityScheme { Type = SecuritySchemeType.OAuth2, Flows = new OpenApiOAuthFlows { AuthorizationCode = new OpenApiOAuthFlow { AuthorizationUrl = new Uri($"{builder.Configuration["okta:OktaDomain"]}/oauth2/{builder.Configuration["okta:AuthorizationServerId"]}/v1/authorize"), TokenUrl = new Uri($"{builder.Configuration["okta:OktaDomain"]}/oauth2/{builder.Configuration["okta:AuthorizationServerId"]}/v1/token"), Scopes = new Dictionary<string, string>{{ "openid", "openid" }, { "profile", "profile" }} } } }); c.AddSecurityRequirement(new OpenApiSecurityRequirement { { new OpenApiSecurityScheme { Reference = new OpenApiReference { Type = ReferenceType.SecurityScheme, Id = "oauth2" }, In = ParameterLocation.Header }, new List<string>() } }); }); - Update
app.UseSwaggerUI();toapp.UseSwaggerUI(c => { c.OAuthClientId(builder.Configuration["okta:SwaggerClientId"]); c.OAuthUsePkce(); });
The Program.cs file should now look like this:
using Microsoft.EntityFrameworkCore;
using okta_scim_server_dotnet;
using AutoMapper;
using System.Text.Json.Serialization;
using System.Text.Json;
using System.Net;
using Microsoft.AspNetCore.Mvc;
using Okta.AspNetCore;
using Microsoft.OpenApi.Models;
var builder = WebApplication.CreateBuilder(args);
builder.Services.ConfigureHttpJsonOptions(options => {
options.SerializerOptions.ReferenceHandler = ReferenceHandler.IgnoreCycles;
options.SerializerOptions.DefaultIgnoreCondition = JsonIgnoreCondition.WhenWritingNull;
});
// Add services to the container.
// Learn more about configuring Swagger/OpenAPI at https://aka.ms/aspnetcore/swashbuckle
builder.Services.AddEndpointsApiExplorer();
builder.Services.AddSwaggerGen(c =>
{
c.AddSecurityDefinition("oauth2", new OpenApiSecurityScheme
{
Type = SecuritySchemeType.OAuth2,
Flows = new OpenApiOAuthFlows
{
AuthorizationCode = new OpenApiOAuthFlow
{
AuthorizationUrl = new Uri($"{builder.Configuration["okta:OktaDomain"]}/oauth2/{builder.Configuration["okta:AuthorizationServerId"]}/v1/authorize"),
TokenUrl = new Uri($"{builder.Configuration["okta:OktaDomain"]}/oauth2/{builder.Configuration["okta:AuthorizationServerId"]}/v1/token"),
Scopes = new Dictionary<string, string> {{ "openid", "openid" }, { "profile", "profile" }}
}
}
});
c.AddSecurityRequirement(new OpenApiSecurityRequirement
{
{
new OpenApiSecurityScheme
{
Reference = new OpenApiReference { Type = ReferenceType.SecurityScheme, Id = "oauth2" },
In = ParameterLocation.Header
},
new List<string>()
}
});
});
builder.Services.AddDbContextPool<ScimDbContext>(
options => options.UseSqlite(builder.Configuration.GetConnectionString("DefaultConnection"))
);
builder.Services.AddAutoMapper(typeof(Program).Assembly);
builder.Services
.AddAuthentication(options =>
{
options.DefaultAuthenticateScheme = OktaDefaults.ApiAuthenticationScheme;
options.DefaultChallengeScheme = OktaDefaults.ApiAuthenticationScheme;
options.DefaultSignInScheme = OktaDefaults.ApiAuthenticationScheme;
})
.AddOktaWebApi(new OktaWebApiOptions
{
OktaDomain = builder.Configuration["okta:OktaDomain"],
AuthorizationServerId = builder.Configuration["okta:AuthorizationServerId"]
});
builder.Services.AddAuthorization();
var app = builder.Build();
// Configure the HTTP request pipeline.
if (app.Environment.IsDevelopment())
{
app.UseSwagger();
app.UseSwaggerUI(c =>
{
c.OAuthClientId(builder.Configuration["okta:SwaggerClientId"]);
c.OAuthUsePkce();
});
}
app.UseHttpsRedirection();
app.UseAuthentication();
app.UseAuthorization();
var scimPrefix = "/scim/v2";
var userRoute = $"{scimPrefix}/users";
var notFoundResponse = new ScimErrorResponse((int)HttpStatusCode.NotFound, "Resource Not Found");
app.MapGet(userRoute + "/{id}", async Task<IResult> (int id, ScimDbContext db, IMapper mapper) => {
ScimUser? user = await db.Users.Where(u => u.Id == id).Include(u => u.Emails).Select(u => mapper.Map<ScimUser>(u)).FirstOrDefaultAsync();
if(user is null)
{
return Results.NotFound(notFoundResponse);
}
return Results.Ok(user);
})
.WithName("GetUser")
.WithOpenApi();
app.MapGet(userRoute, async ([AsParameters] ScimListResourceRequest request, ScimDbContext db, IMapper mapper) => {
string filterUsername = request.parsedFilter.Where(f => f.Key.ToLower() == "username").Select(f => f.Value).SingleOrDefault();
// filter and paginate results based on input
var users = await db.Users.Where(u => string.IsNullOrWhiteSpace(filterUsername) || u.UserName == filterUsername).OrderByDescending(u => u.Id).Include(u => u.Emails).ToListAsync();
return new ScimListResourceResponse<ScimUser>
{
totalResults = users.Count,
startIndex = request.parsedStartIndex,
itemsPerPage = request.parsedCount,
Resources = users.Skip(request.parsedStartIndex - 1).Take(request.parsedCount).Select(u => mapper.Map<ScimUser>(u))
};
})
.WithName("ListUsers")
.WithOpenApi()
.RequireAuthorization();
  app.MapPost(userRoute, async Task<IResult> (ScimUser scimUser, ScimDbContext db, IMapper mapper) => {
      var user = mapper.Map<User>(scimUser);
      db.Users.Add(user);
      await db.SaveChangesAsync();
      return Results.Created($"users/{user.Id}", mapper.Map<ScimUser>(user));
  })
  .WithName("CreateUser")
  .WithOpenApi()
  .RequireAuthorization();
app.MapPut(userRoute + "/{id}", async Task<IResult> (int id,ScimUser scimUser, ScimDbContext db, IMapper mapper) => {
var existingUser = await db.Users.Where(u => u.Id == id).Include(u => u.Emails).FirstOrDefaultAsync();
if (existingUser is null) { return Results.NotFound(notFoundResponse); }
db.Entry(existingUser).CurrentValues.SetValues(mapper.Map<User>(scimUser));
foreach (var email in existingUser.Emails.ToList())
{
if(!scimUser.emails.Any(u => u.value == email.Value)) { db.Emails.Remove(email); }
}
foreach (var email in scimUser.emails)
{
var existingEmail = existingUser.Emails.Where(e => e.Value == email.value).SingleOrDefault();
if(existingEmail is not null)
{
db.Entry(existingEmail).CurrentValues.SetValues(email);
} else
{
existingUser.Emails.Add(mapper.Map<Email>(email));
}
}
await db.SaveChangesAsync();
return Results.Ok(mapper.Map<ScimUser>(existingUser));
})
.WithName("UpdateUser")
.WithOpenApi()
.RequireAuthorization();
app.MapPatch(userRoute + "/{id}", async Task<IResult> (int id, [FromBody] JsonDocument patchJson, ScimDbContext db, IMapper mapper) => {
var existingUser = await db.Users.Where(u => u.Id == id).Include(u => u.Emails).FirstOrDefaultAsync();
if (existingUser is null) { return Results.NotFound(notFoundResponse); }
foreach(JsonElement operation in patchJson.RootElement.GetProperty("Operations").EnumerateArray()) {
// Handling only active property for simplicity
if (operation.GetProperty("op").GetString() == "replace" && operation.GetProperty("value").TryGetProperty("active", out var temp)) {
existingUser.Active = operation.GetProperty("value").GetProperty("active").GetBoolean();
await db.SaveChangesAsync();
}
}
return Results.Ok(mapper.Map<ScimUser>(existingUser));
})
.WithName("UpdateUserPartial")
.WithOpenApi()
.RequireAuthorization();
app.Run();
- At this point, our OAuth implementation can now can be tested on our CRUD endpoints. However, this needs an additional step. The Swagger UI should now have an
Authorizebutton. Click on this button, then click on theselect alloption underScopesbefore clicking on theAuthorizebutton again. If you do not authenticate, you will get401responses from any of the endpoints we’ve protected.
Test requests to the .NET SCIM server locally using a tunnel
Okta will need to make requests to your server; therefore, you will need to expose your .NET SCIM server to the internet. One way to give your app a public URL or IP would be to host it on a cloud instance with DNS that you control. For development purposes, you can use ngrok or Localtunnel to provide a public address to the app running on your computer. In this project, we will be using ngrok. Feel free to use any other tunneling tool such as localtunnel.
After setting up an account with ngrok:
- Use the tunnel on a separate terminal from where you are running your .NET SCIM server.
- Run
ngrok http <<port>>(you can get this port from Properties/launchSettings.json). - Note down the domain listed in the console (this is the scim server domain).
- Open the web interface hosted on http://localhost:4040 to inspect the network traffic between Okta and the SCIM server.
Create a SCIM provisioning application in Okta
Log in to your Okta Integrator Free Plan account that you created previously.
In this step, you will create an app integration in Okta. Although there are several ways to create apps, we will demonstrate the workflow you would use if you decide to publish your SCIM integration to customers on the Okta Integration Network. Don’t worry, we won’t submit the sample app to the integration network!
Log in to your Okta Integrator Free Plan account. Ensure you’re in the Admin Console — when you’re in the Admin Console, the URL will be “dev-youraccountid-admin.okta.com”. In the sidebar, select Applications > Applications, and press the Browse App Catalog button.
Enter “SCIM 2.0 Test App” in the search box. Select the “SCIM 2.0 Test App (OAuth Bearer Token)”, and press the + Add Integration button to confirm creating an integration using “SCIM 2.0 Test App (Bearer Token)”.
You’ll then see configuration options. Leave the options under the General Settings tab and navigate to the Sign-On Options tab. Give the app a helpful name in the Application label field. For example, you can keep the default or change it to “.NET SCIM Server”. Leave the Automatically log in when a user lands on login page checked, and click Next.
Keep the default settings in the Sign-On Options dialog, as our app doesn’t use these. Click the Done button at the bottom of the page.
In the Provisioning tab of the application, press the Configure API Integration button and check the Enable API Integration checkbox. Provide the Base URL, which is the ngrok localtunnel URL with /scim/v2 appended to the end. The OAuth Bearer Token is can be retrieved from the test you did above either from UI or curl. Press Save to save the settings.
For example, below is a highlighted sample base URL from ngrok:

When you save these settings or use the Test API Credentials button, Okta will make a GET /Users request with the OAuth token you provided to verify a connection with your .NET SCIM server.
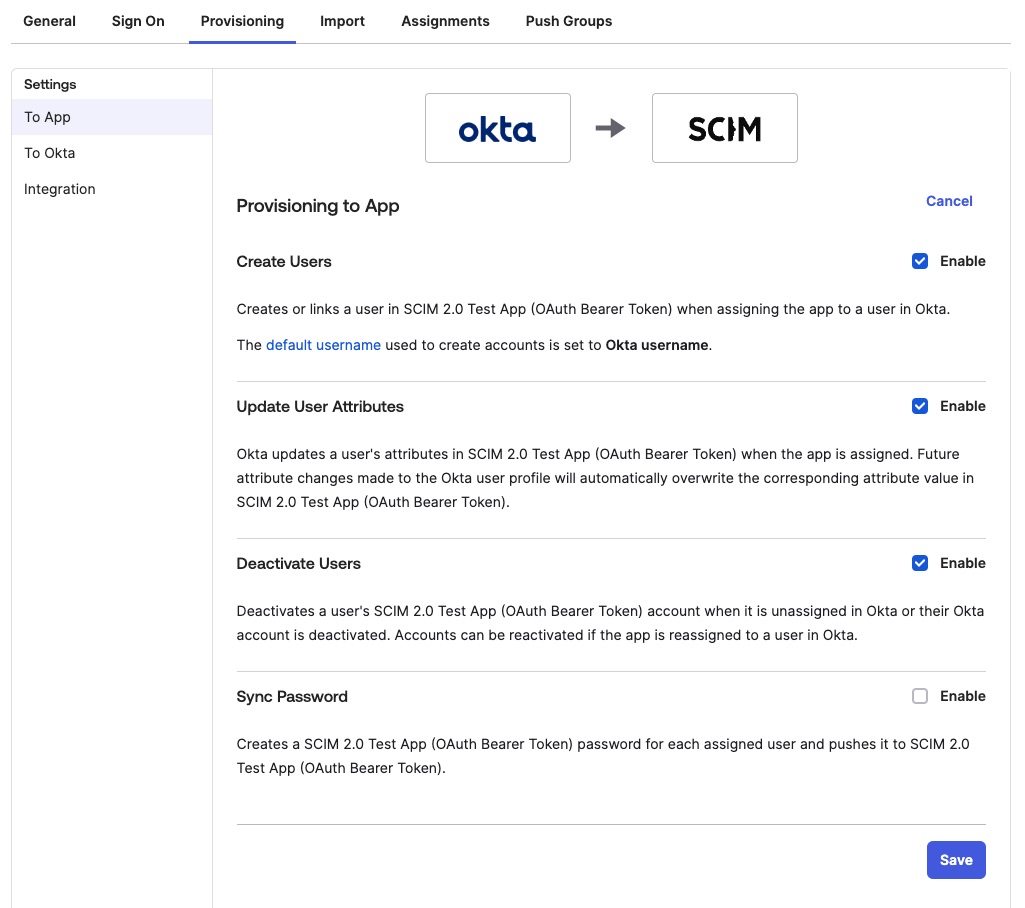
Finally, under the Provisioning tab, click the To App heading in the left sidebar.In the Provisioning To App settings, press the Edit button. Enable Create Users, Update User Attributes, and Deactivate Users. Leave the Sync Passwords setting unchecked for now. Press Save. Remain on this screen for the next steps.
Test common user lifecycle operations
We are now ready to test common user lifecycle requests between Okta and your .NET SCIM server.
Import users from the .NET SCIM server
As you know, we have existing users in our .NET SCIM server. Let’s sync them over to Okta so that we have visibility of all users. We can also designate Okta as the source of truth for info about users assigned to this app or organization.
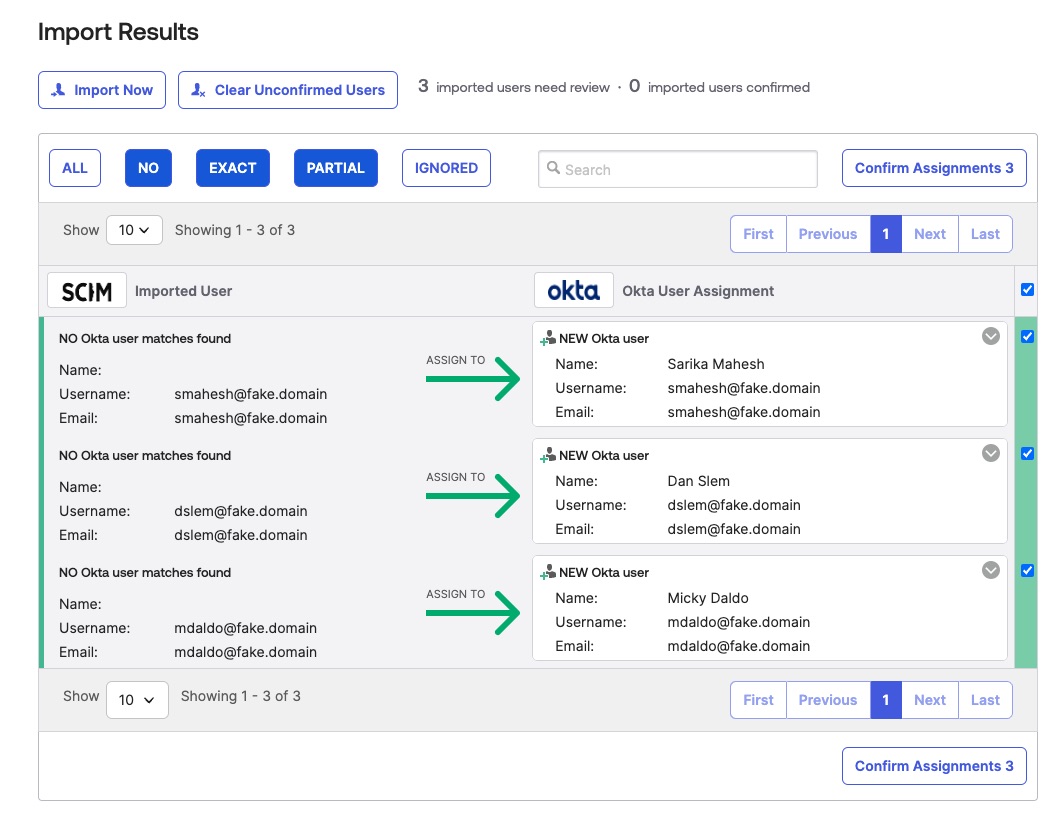
In the Import tab of the SCIM Test App in Okta, click the Import Now button. You’ll see a dialog confirming Okta scanned your users and found new users. You’ll then have a screen to confirm assignments. When the import succeeds, Okta will request to get all users and confirm those already not recorded. In the list of users to import, check the boxes by those you want to sync to Okta and click Confirm Assignments. Then go to the Assignments tab and watch as the imported users appear.
Sync users from Okta to the .NET SCIM server
To sync a user who exists in Okta but not our app, we’ll first need to create a user in Okta. From within the Okta Admin Console sidebar, navigate to Directory > People. Press the Add Person button and add a person with the default User type of “User” with a First name of “Tom”, Last name of “Anderson”, Username of “tom.anderson@fake.domain”, and press Save.
You can now go back to your SCIM Application. Navigate to Applications > Applications in the sidebar. Find your SCIM app and press on the list item to edit it. In the Assignments tab, click the Assign button and select Assign to People in the dropdown menu. Click the Assign button next to “Tom Anderson” in the user list, and press Save and Go Back to accept the default values. Press the Done button to save your changes. On the Swagger UI, double-check that Tom is in the downstream server by making a GET /scim/v2/users request to list all current users.
Deprovision a user
Let’s say Tom’s contract with the company ends, and you must deprovision him from the application.
In the Assignments tab of the Okta SCIM application, find “Tom Anderson” and press the X button next to Tom’s entry to unassign them from the app. This unassignment triggers Okta to send a PATCH request to your .NET SCIM server, setting the unassigned user’s active attribute to false which indicates that a user’s account is deactivated.
We can confirm that Tom’s active attribute is now false in the Swagger UI by making a request to the GET /scim/v2/users endpoint filtering for Tom’s email “tom.anderson@fake.domain”.
Reprovision a user
Let’s say Tom gets hired full-time with the company and needs access to the application again.
To reactivate Tom’s account, we will repeat the steps for assigning his Okta account to the application. Reactivating Tom causes Okta to send a PATCH request to your SCIM server, setting their active attribute to true.
Again, we can confirm that Tom’s account is now active through the Swagger UI by making a request to the GET Users endpoint filtering for Tom’s email “tom.anderson@fake.domain”.
Change a user’s info in Okta
Let’s look at one more scenario. Let’s say not only has Tom returned, but he also changed his name! Worry not, as our SCIM connection will automatically propagate this profile update. Let’s change Tom’s name to Leo and watch how Okta sends the new name to the .NET SCIM server.
In the Okta Admin Console sidebar, navigate to Directory > People, and click on Tom’s name in the user list to edit their settings. In the Profile tab, click Edit in the Attributes pane. Change the firstName field to “Leo”, and update their login and email to leo.anderson@fake.domain. Use the Save button at the bottom of the page to save your changes. Again, on the Swagger UI, double-check Tom’s updated name by making a GET /scim/v2/users request to list all current users.
Troubleshooting: If you experience import issues with Okta, double-check that your previous SCIM base URL isn’t cached under the Provisioning > Integration tab. If it’s cached, requests won’t be made to your .NET SCIM server.
Keep experimenting with SCIM
This tutorial provides the fundamental steps to create your .NET SCIM server to manage user lifecycle with an identity provider such as Okta. You can get the complete sample code for this project from the GitHub repository. Now, you can extend resources supported by adding groups. Or update the SCIM model to add more attributes you may need.
You can go even further and create an application that authenticates users using the same identity provider to provide Single Sign On to users already provisioned through your .NET SCIM server.
- Enterprise-Ready Workshop: Manage users with SCIM
- Enterprise-Ready Workshop: Authenticate with OpenID Connect
You can further manage your users and groups using Terraform or Workflows:
- Enterprise Maturity Workshop: Terraform
- Enterprise Ready Workshop: Automate with no-code Okta Workflows
Excited to learn more about creating secure .NET apps? Follow us on Twitter and subscribe to our YouTube channel. If you have any questions or you want to share what tutorial you’d like to see next, please comment below!
Ram Gandhi is a Developer Support Solutions Architect at Okta, a full-stack developer, DevOps expert, and a problem solver who is excited by learning new things. He has over 13 years of experience developing software applications across various industries and securing them using industry best practices. He loves to work in cross-platform development and Kubernetes.
Okta Developer Blog Comment Policy
We welcome relevant and respectful comments. Off-topic comments may be removed.