How to Add Authentication to .NET MAUI Apps

Have you ever been inspired by a colleague’s work and decided to explore a new tool or technology? That’s what happened to me when my colleague, Andrea Chiarelli, wrote a blog post “Add Authentication to .NET MAUI Apps with Auth0.” As someone who is always looking for ways to improve my skills and stay up-to-date with the latest trends in technology, I was intrigued by his post and decided to try MAUI, but this time using Okta for user authentication.
In this tutorial, I’ll walk you through the steps of integrating Okta into a MAUI application, including a few troubleshooting tips for issues I encountered. Hopefully, my experience will inspire and help others who want to make their MAUI applications more secure with Okta.
Prerequisites
If you are getting started with .NET MAUI Apps, you can find all the requirements in the installation guide. For this sample application, I used the following setup:
- Windows 11 OS build 22000.1696
- Visual Studio 2022 Version 17.4.5
- .NET 7
- Okta CLI
Okta has Authentication and User Management APIs that reduce development time with instant-on, scalable user infrastructure.
Table of Contents
- Create a new .NET MAUI Application
- Add authentication to your MAUI application
- Keep experimenting with MAUI, .NET, OAuth, and OIDC
Note: In May 2025, the Okta Integrator Free Plan replaced Okta Developer Edition Accounts, and the Okta CLI was deprecated.
We preserved this post for reference, but the instructions no longer work exactly as written. Replace the Okta CLI commands by manually configuring Okta following the instructions in our Developer Documentation.
Create a new .NET MAUI Application
I will use Visual Studio 2022 for this article, but you can use the .NET CLI or any IDE of your choice.
To create a new .NET MAUI project, follow these steps:
- Open Visual Studio and click the “Create a new project” button.
- In the “Create a new project” dialog box, search for “MAUI” in the search box, and select “.NET MAUI App” as the project template.
- Click on the “Next” button and enter “OktaMauiSampleApp” as the project name and select a location for your project in the “Configure your new project” window.
- Select the target framework and click the “Create” button to create your project.
- Restore your project’s dependencies and build your solution to ensure everything is in place.
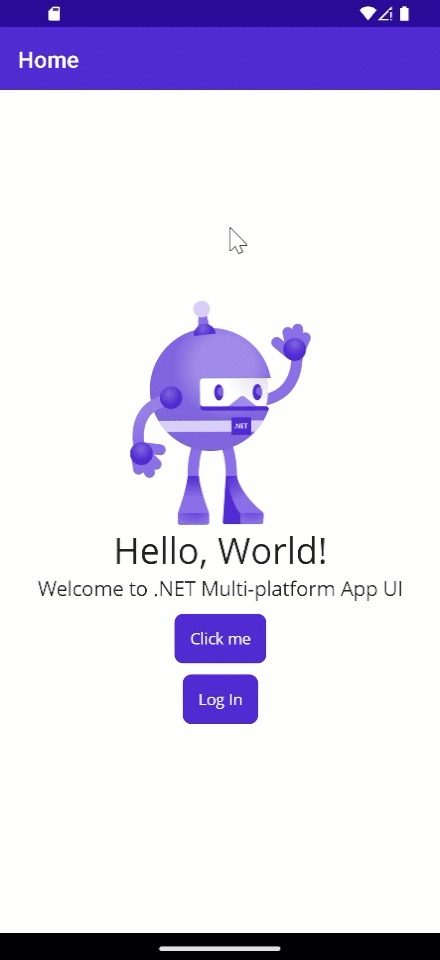
- Select the desired target platform in the Debug Target drop-down and launch your application. You will see a screen like the following:

That’s it! You have successfully created a .NET MAUI application using Visual Studio 2022. Now, it’s time to improve the security of your application by integrating Okta to enable authentication.
Troubleshooting: If you face the error “Local source of NuGet packages doesn’t exist”, try creating a new NuGet config by running the following command:
dotnet new nugetconfigand rebuild your solution.
Troubleshooting: If you face the error: “NETSDK1112: The runtime pack for Microsoft.NETCore.App.Runtime.win-x64 was not downloaded”, try running a NuGet restore specifying your runtime
dotnet restore --runtime win-x64
Add authentication to your MAUI application
Before you begin, you’ll need a free Okta developer account. Install the Okta CLI and run okta register to sign up for a new account. If you already have an account, run okta login.
Then, run okta apps create. Select the default app name, or change it as you see fit.
Choose Native and press Enter.
Use myapp://callback for the Redirect URI and the Logout Redirect URI
.
What does the Okta CLI do?
The Okta CLI will create an OIDC Native App in your Okta Org. It will add the redirect URIs you specified and grant access to the Everyone group. You will see output like the following when it’s finished:
Okta application configuration:
Issuer:    https://dev-133337.okta.com/oauth2/default
Client ID: 0oab8eb55Kb9jdMIr5d6
NOTE: You can also use the Okta Admin Console to create your app. See Create a Native App for more information.
You’ll need the application’s configuration values from the Okta CLI output to set up authentication in your MAUI application. You can run the following command in the Okta CLI to show your application’s configuration:
okta apps config --app=<YOUR_APP_ID>
Now, it’s time to get back to code. You’ll need to build the logic to add authentication to your MAUI application, so this is what you’ll need to implement:
- OktaClient: The client you’ll use to sign users in and out
- OktaClientConfiguration: This class will represent the Okta configuration
- WebBrowserAuthenticator: An implementation of
IdentityModel.OidcClient.Browser.IBrowser, which contains the logic to interact with the browser during the sign-in/out process. - Configure DI for the Okta Client.
- Update the UI to support Sign-In and Sign-Out
- Add platform-specific changes to handle authentication
Let’s get started!
Create the OpenID Connect (OIDC) client
For this project, we will use the IdentityModel.OidcClient dependency, so let’s right-click on “Project > Manage NuGet Packages” and search and install IdentityModel.OidcClient.
Create an OktaClient class with the following content. To organize things, I put this file in an Okta folder:
using IdentityModel.OidcClient;
using IdentityModel.Client;

namespace OktaMauiSampleApp.Okta
{
    public class OktaClient
    {
        private readonly OidcClient _oidcClient;
        private readonly OidcClientOptions _oidcClientOptions;

        /// <summary>
        /// Gets the OktaClient's Configuration
        /// </summary>
        public OktaClientConfiguration Configuration { get; private set; }

        /// <summary>
        /// Initializes a new instance of the <see cref="OktaClient"/> class.
        /// </summary>
        /// <param name="configuration">The OktaClient configuration.</param>

        public OktaClient(OktaClientConfiguration configuration)
        {
            Configuration = configuration;
            _oidcClientOptions = BuildOidcClient(configuration);
            _oidcClient = new OidcClient(_oidcClientOptions);
        }


        /// <summary>
        /// Starts the authorization flow.
        /// </summary>
        /// <param name="cancellationToken">A cancellation token that can be used to cancel the request.</param>
        /// <returns>The login result.</returns>
        public async Task<LoginResult> LoginAsync(CancellationToken cancellationToken = default)
        {
            await EnsureProviderInformationAsync(cancellationToken);
            return await _oidcClient.LoginAsync(cancellationToken: cancellationToken).ConfigureAwait(false);
        }


        /// <summary>
        /// Ends the user's Okta session in the browser.
        /// </summary>
        /// <param name="idToken">The id token.</param>
        /// <param name="cancellationToken">A cancellation token to cancel the request.</param>
        /// <returns>The logout result.</returns>
        public async Task<LogoutResult> LogoutAsync(string idToken, CancellationToken cancellationToken = default)
        {
            if (string.IsNullOrEmpty(idToken))
            {
                throw new ArgumentNullException(nameof(idToken));
            }

            await EnsureProviderInformationAsync(cancellationToken);

            var logoutRequest = new LogoutRequest()
            {
                IdTokenHint = idToken,
            };

            return await _oidcClient.LogoutAsync(logoutRequest, cancellationToken).ConfigureAwait(false);
        }


        /// <summary>
        /// Build a new <c>OidcClientOptions</c> instance based on user's configuration.
        /// </summary>
        /// <param name="configuration">The <see cref="OktaClientConfiguration"/> configuration.</param>
        /// <returns>A new instance of <c>OidcClientOptions</c>.</returns>
        private static OidcClientOptions BuildOidcClient(OktaClientConfiguration configuration)
        {
            var scopeString = string.Join(" ", configuration.Scope?.ToArray());

            return new OidcClientOptions
            {
                Authority = configuration.OktaDomain,
                ClientId = configuration.ClientId,
                Scope = scopeString,
                RedirectUri = configuration.RedirectUri,
                PostLogoutRedirectUri = string.IsNullOrEmpty(configuration.PostLogoutRedirectUri) ? configuration.RedirectUri : configuration.PostLogoutRedirectUri,
                Browser = configuration.Browser,
                RefreshDiscoveryDocumentForLogin = false,
            };
        }

        /// <summary>
        /// Retrieves and sets the Provider Information taking into account Okta's multiple authorization servers
        /// </summary>
        /// <param name="cancellationToken"></param>
        /// <returns></returns>
        /// <exception cref="InvalidOperationException"></exception>
        private async Task EnsureProviderInformationAsync(CancellationToken cancellationToken = default)
        {
            var oktaOrgAuthorizationServer =
                Configuration.OktaDomain.Split("/oauth2")?.FirstOrDefault() ?? Configuration.OktaDomain;

            using (var httpClient = new HttpClient())
            {
                var discoveryDocumentResponse = await httpClient.GetDiscoveryDocumentAsync(
                    new DiscoveryDocumentRequest
                    {
                        Address = Configuration.OktaDomain,
                        Policy =
                        {
                            // Okta Org AS must be included to avoid https://stackoverflow.com/questions/56459997/endpoint-belongs-to-different-authority
                            AdditionalEndpointBaseAddresses = new List<string> { oktaOrgAuthorizationServer }
                        }

                    }, cancellationToken).ConfigureAwait(false);

                if (discoveryDocumentResponse.IsError)
                {
                    throw new InvalidOperationException("Error loading discovery document: " +
                                                        discoveryDocumentResponse.Error, discoveryDocumentResponse.Exception);
                }

                _oidcClient.Options.ProviderInformation = new ProviderInformation
                {
                    IssuerName = discoveryDocumentResponse.Issuer,
                    KeySet = discoveryDocumentResponse.KeySet,
                    AuthorizeEndpoint = discoveryDocumentResponse.AuthorizeEndpoint,
                    TokenEndpoint = discoveryDocumentResponse.TokenEndpoint,
                    EndSessionEndpoint = discoveryDocumentResponse.EndSessionEndpoint,
                    UserInfoEndpoint = discoveryDocumentResponse.UserInfoEndpoint,
                    TokenEndPointAuthenticationMethods =
                        discoveryDocumentResponse.TokenEndpointAuthenticationMethodsSupported,

                };
            }
        }
    }
}
Before jumping into the OktaClientConfiguration creation, I’d like to explain a few differences between this implementation and the Auth0 client described in Add Authentication to .NET MAUI Apps with Auth0 blog post from Auth0 by Okta.
Okta provides two different types of authorization servers, the “Org Authorization Server” (Org AS) and the “Custom Authorization Server” (Custom AS). Suppose you try to use a Custom AS with IdentityModel. In that case, you will face the following error: “Error loading discovery document: Endpoint belongs to different authority: https://xxxxxxxxx.com/oauth2/v1/clients”. This is because during discovery, IdentityModel validates that all endpoints belong to the same authorization server, and with Okta, the client registration occurs at the Org level, not the authorization server level.
In Okta, applications are global to the Org and can be used for multiple authorization servers; that’s why you cannot register a client for only one Authorization Server and, ultimately, why the path in metadata is not specific to the Authorization Server that the discovery request was for.
To avoid the issue mentioned above, we must implement our discovery logic and tell IdentityModel that endpoints can belong to two different authorization servers. The method EnsureProviderInformationAsync contains the custom discovery logic, and we need to make sure to call this method before the actual Login and Logout.
Also, for logout, Okta needs the ID Token, so you need to store the login’s response in your application which contains the ID Token, among other essential properties.
Now, let’s jump into the OktaClientConfiguration implementation.
Create the Okta Client Configuration
In the Okta folder, create a class called OktaClientConfiguration, and copy and paste the following content:
using IBrowser = IdentityModel.OidcClient.Browser.IBrowser;

namespace OktaMauiSampleApp.Okta
{
    public class OktaClientConfiguration
    {
        public string ClientId { get; set; }

        public string RedirectUri { get; set; }

        public string PostLogoutRedirectUri { get; set; }

        public IList<string> Scope { get; set; } = new string[] { "openid", "profile" };

        public string OktaDomain { get; set; }

        public IBrowser Browser { get; set; }

    }
}
This class is straightforward and contains all the properties to configure the underlying OIDC client.
Manage the authentication process
In the Okta folder, create a class called WebBrowserAuthenticator and copy and paste the following content:
using IdentityModel.Client;
using IdentityModel.OidcClient.Browser;

namespace OktaMauiSampleApp.Okta
{
    public class WebBrowserAuthenticator : IdentityModel.OidcClient.Browser.IBrowser
    {
        public async Task<BrowserResult> InvokeAsync(BrowserOptions options, CancellationToken cancellationToken = default)
        {
            try
            {
                WebAuthenticatorResult result = await WebAuthenticator.Default.AuthenticateAsync(
                    new Uri(options.StartUrl),
                    new Uri(options.EndUrl));

                var url = new RequestUrl(options.EndUrl)
                    .Create(new Parameters(result.Properties));

                return new BrowserResult
                {
                    Response = url,
                    ResultType = BrowserResultType.Success
                };
            }
            catch (TaskCanceledException)
            {
                return new BrowserResult
                {
                    ResultType = BrowserResultType.UserCancel,
                    ErrorDescription = "Login canceled by the user."
                };
            }
        }
    }
}
The WebBrowserAuthenticator class implements the IdentityModel IBrowser interface to manage the authentication process. As mentioned above, this class is assigned the important task of launching the system browser that displays the Okta Login page to the user.
Configure dependency injection for the Okta client
Open the MauiProgram.cs file and add the highlighted content. The MauiProgram class should look like the following:
using Microsoft.Extensions.Logging;
using OktaMauiSampleApp.Okta;
using OktaClientConfiguration = OktaMauiSampleApp.Okta.OktaClientConfiguration;

namespace OktaMauiSampleApp;

public static class MauiProgram
{
    public static MauiApp CreateMauiApp()
    {
        var builder = MauiApp.CreateBuilder();
        builder
            .UseMauiApp<App>()
            .ConfigureFonts(fonts =>
            {
                fonts.AddFont("OpenSans-Regular.ttf", "OpenSansRegular");
                fonts.AddFont("OpenSans-Semibold.ttf", "OpenSansSemibold");
            });

#if DEBUG
        builder.Logging.AddDebug();
#endif

        // 👇 new code
        builder.Services.AddSingleton<MainPage>();

        var oktaClientConfiguration = new Okta.OktaClientConfiguration()
        {
            // Use "https://{yourOktaDomain}/oauth2/default" for the "default" authorization server, or
            // "https://{yourOktaDomain}/oauth2/<MyCustomAuthorizationServerId>"

            OktaDomain = "https://{yourOktaDomain}/oauth2/default"
            ClientId = "foo",
            RedirectUri = "myapp://callback",
            Browser = new WebBrowserAuthenticator()
        };

        builder.Services.AddSingleton(new OktaClient(oktaClientConfiguration));
        // 👆 new code
        return builder.Build();
    }
}
Update the MAUI application to support sign in and signout
Now, it’s time to update the UI to display the sign in and sign out buttons, plus the user’s claims once they’re authenticated. Open the MainPage.xaml file and replace the content with the following:
<?xml version="1.0" encoding="utf-8" ?>
<ContentPage
    xmlns="http://schemas.microsoft.com/dotnet/2021/maui"
    xmlns:x="http://schemas.microsoft.com/winfx/2009/xaml"
    x:Class="OktaMauiSampleApp.MainPage">
    <ScrollView>
        <VerticalStackLayout
            Spacing="25"
            Padding="30,0"
            VerticalOptions="Center">
            <StackLayout x:Name="LoginView">
                <Image
                    Source="dotnet_bot.png"
                    SemanticProperties.Description="Cute dot net bot waving hi to you!"
                    HeightRequest="200"
                    HorizontalOptions="Center" />

                <Label
                    Text="Hello, World!"
                    SemanticProperties.HeadingLevel="Level1"
                    FontSize="32"
                    HorizontalOptions="Center" />

                <Label
                    Text="Welcome to .NET Multi-platform App UI"
                    SemanticProperties.HeadingLevel="Level2"
                    SemanticProperties.Description="Welcome to dot net Multi-platform App UI"
                    FontSize="18"
                    HorizontalOptions="Center" />

                <Button
                    x:Name="CounterBtn"
                    Text="Click me"
                    SemanticProperties.Hint="Counts the number of times you click"
                    Clicked="OnCounterClicked"
                    HorizontalOptions="Center"
                    Margin="10"/>

                <Button
                    x:Name="LoginBtn"
                    Text="Log In"
                    SemanticProperties.Hint="Click to log in"
                    Clicked="OnLoginClicked"
                    HorizontalOptions="Center" />
            </StackLayout>

            <StackLayout
                x:Name="HomeView"
                IsVisible="false">

                <Label
                    x:Name="HelloLbl"
                    Text="Hello, World!"
                    SemanticProperties.HeadingLevel="Level5"
                    FontSize="25"
                    HorizontalOptions="Center" />

                <Button
                    x:Name="LogoutBtn"
                    Text="Log Out"
                    SemanticProperties.Hint="Click to log out"
                    Clicked="OnLogoutClicked"
                    HorizontalOptions="Center"
                    Margin="0,30"/>

                <ListView x:Name="UserInfoLvw">
                    <ListView.HeaderTemplate>
                        <DataTemplate>
                            <Grid HeightRequest="50">
                                <Label LineBreakMode="NoWrap"
                                       Margin="10,0,0,0" Text="Claims" FontAttributes="Bold"
                                       FontSize="18" TextColor="Black" HorizontalOptions="Center"
                                       VerticalOptions="Center"/>
                            </Grid>
                        </DataTemplate>
                    </ListView.HeaderTemplate>
                </ListView>

            </StackLayout>
        </VerticalStackLayout>
    </ScrollView>
</ContentPage>
Now, open the MainPage.xaml.cs and replace the content with the following:
using IdentityModel.OidcClient;
using IdentityModel.OidcClient.Results;
using OktaMauiSampleApp.Okta;

namespace OktaMauiSampleApp;

public partial class MainPage : ContentPage
{
    int count = 0;
    private OktaClient _oktaClient;
    private LoginResult _authenticationData;

    public MainPage(OktaClient oktaClient)
    {
        InitializeComponent();
        _oktaClient = oktaClient;
    }

    private void OnCounterClicked(object sender, EventArgs e)
    {
        count++;

        if (count == 1)
            CounterBtn.Text = $"Clicked {count} time";
        else
            CounterBtn.Text = $"Clicked {count} times";

        SemanticScreenReader.Announce(CounterBtn.Text);
    }

    public async void OnLoginClicked(object sender, EventArgs e)
    {
        var loginResult = await _oktaClient.LoginAsync();

        if (!loginResult.IsError)
        {
            _authenticationData = loginResult;
            LoginView.IsVisible = false;
            HomeView.IsVisible = true;

            UserInfoLvw.ItemsSource = loginResult.User.Claims;
            HelloLbl.Text = $"Hello, {loginResult.User.Claims.FirstOrDefault(x => x.Type == "name")?.Value}";
        }
        else
        {
            await DisplayAlert("Error", loginResult.ErrorDescription, "OK");
        }
    }

    public async void OnLogoutClicked(object sender, EventArgs e)
    {
        var logoutResult = await _oktaClient.LogoutAsync(_authenticationData.IdentityToken);

        if (!logoutResult.IsError)
        {
            _authenticationData = null;
            LoginView.IsVisible = true;
            HomeView.IsVisible = false;
        }
        else
        {
            await DisplayAlert("Error", logoutResult.ErrorDescription, "OK");
        }
    }
}
The UI logic is very minimal. We have a StackLayout called HomeView that will be displayed once the user is authenticated. This component has a “Log Out” button and a ListView where we show the user’s claims. Once the user logs out, the HomeView component is hidden, and the “Log In” button is displayed again.
That’s all here! It’s time to make the platform-specific updates and try our MAUI application.
Add platform-specific changes to handle authentication
For this tutorial, I’ll focus on Android, but you can easily refer to “Add Authentication to .NET MAUI Apps with Auth0” to add the code to support iOS.
In the Platforms/Android folder, create a new file called WebAuthenticationCallbackActivity and copy and paste the following content:
using System;
using System.Collections.Generic;
using System.Linq;
using System.Text;
using System.Threading.Tasks;
using Android.App;
using Android.Content.PM;

namespace OktaMauiSampleApp
{
    [Activity(NoHistory = true, LaunchMode = LaunchMode.SingleTop, Exported = true)]
    [IntentFilter(new[] { Android.Content.Intent.ActionView },
        Categories = new[] {
            Android.Content.Intent.CategoryDefault,
            Android.Content.Intent.CategoryBrowsable
        },
        DataScheme = CALLBACK_SCHEME)]
    public class WebAuthenticationCallbackActivity : Microsoft.Maui.Authentication.WebAuthenticatorCallbackActivity
    {
        const string CALLBACK_SCHEME = "myapp";
    }
}
This class contains the intent filter that accepts myapp as the scheme for the callback URI.
Finally, open the AndroidManifest.xml file located in the same folder and add the content highlighted below to make the intent visible. Your AndroidManifest.xml should look like the following:
<?xml version="1.0" encoding="utf-8"?>
<manifest xmlns:android="http://schemas.android.com/apk/res/android">
    <application android:allowBackup="true" android:icon="@mipmap/appicon" android:roundIcon="@mipmap/appicon_round" android:supportsRtl="true"></application>
    <uses-permission android:name="android.permission.ACCESS_NETWORK_STATE" />
    <uses-permission android:name="android.permission.INTERNET" />

    <!-- 👇 new code -->
    <queries>
        <intent>
            <action android:name="android.support.customtabs.action.CustomTabsService" />
        </intent>
    </queries>
  <!-- 👆 new code -->

</manifest>
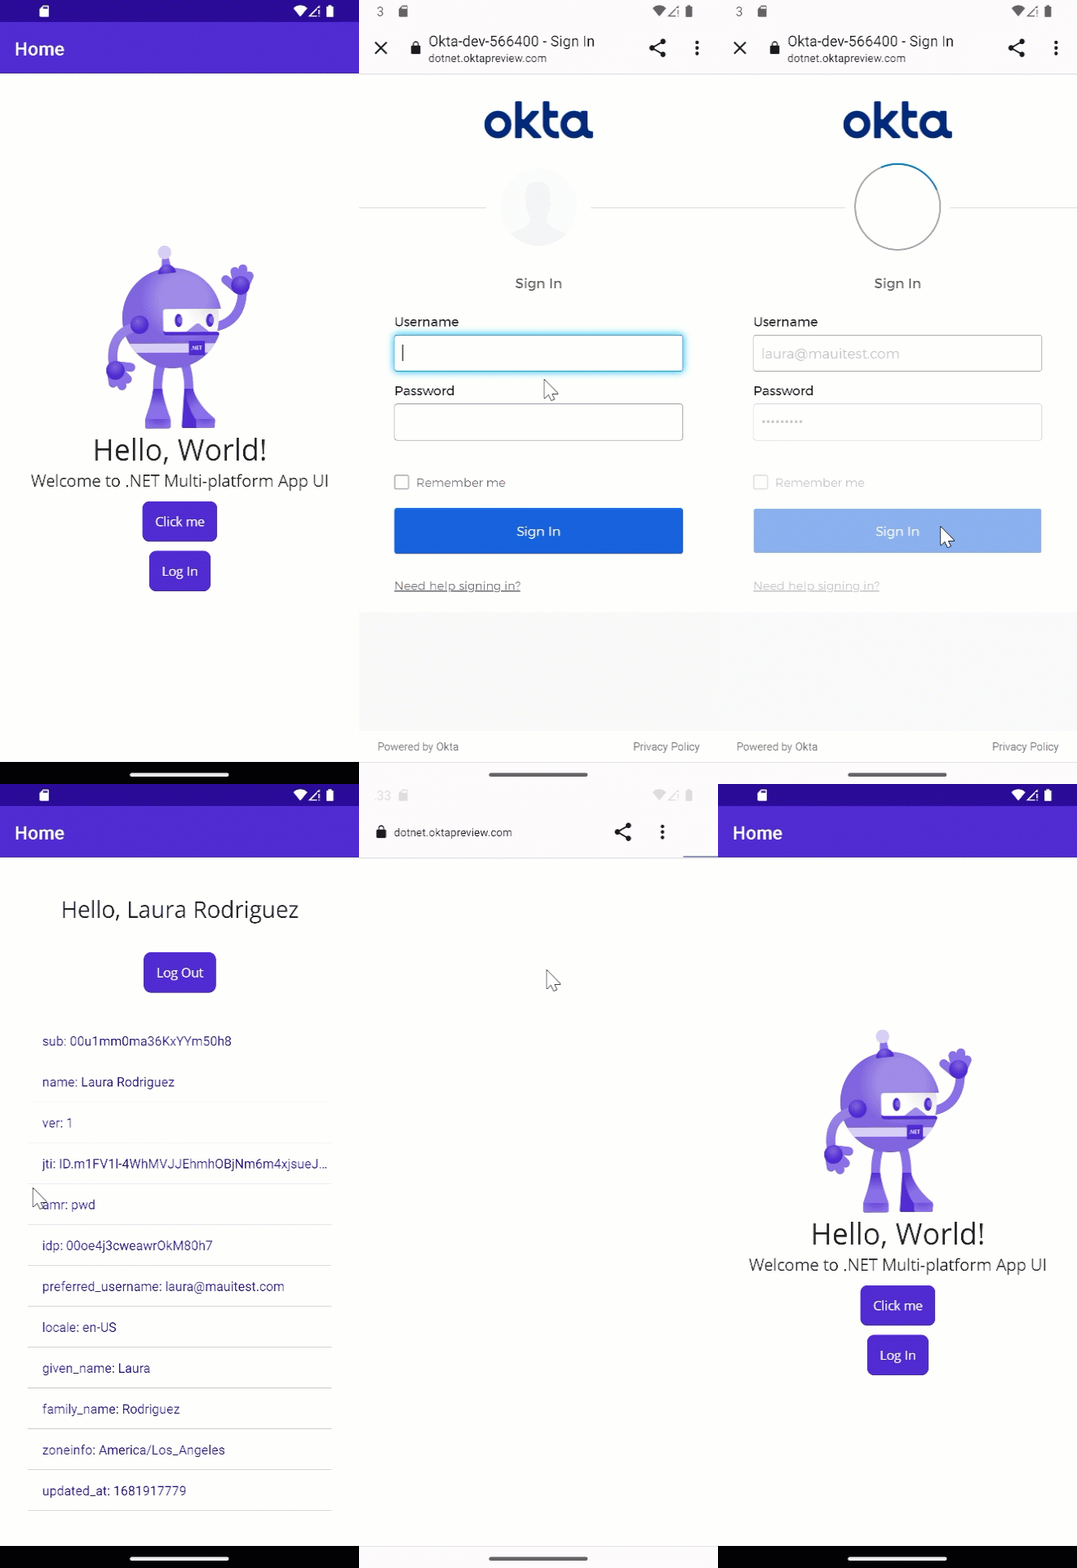
Woohoo! It’s time to test the Android version application. It should look like this:

Keep experimenting with MAUI, .NET, OAuth, and OIDC
This tutorial provides you with the fundamental steps to create your Okta client and add authentication with Okta to your MAUI applications. You can go further and try authentication on other platforms as well! I’d love to know what platform you’re using; let me know in the comments below.
You can get the complete sample code for this MAUI authentication project from GitHub.
If you enjoyed this tutorial, you might also like these:
- Secure Your .NET 6 Web API
- Using Azure Cognitive Services in a .NET App
- Comparison of Dependency Injection in .NET
- Managing Multiple .NET Microservices with API Federation
Excited to learn more about creating secure .NET and MAUI apps? Follow us on Twitter and subscribe to our YouTube channel. If you have any questions or you want to share what tutorial you’d like to see next, please comment below!
Okta Developer Blog Comment Policy
We welcome relevant and respectful comments. Off-topic comments may be removed.