Managing Multiple .NET Microservices with API Federation

For large enterprise companies, boundaries around each team are crucial for maintaining systems that are owned by software engineers. This is accomplished by allowing individual teams to own their systems and expose them via APIs.
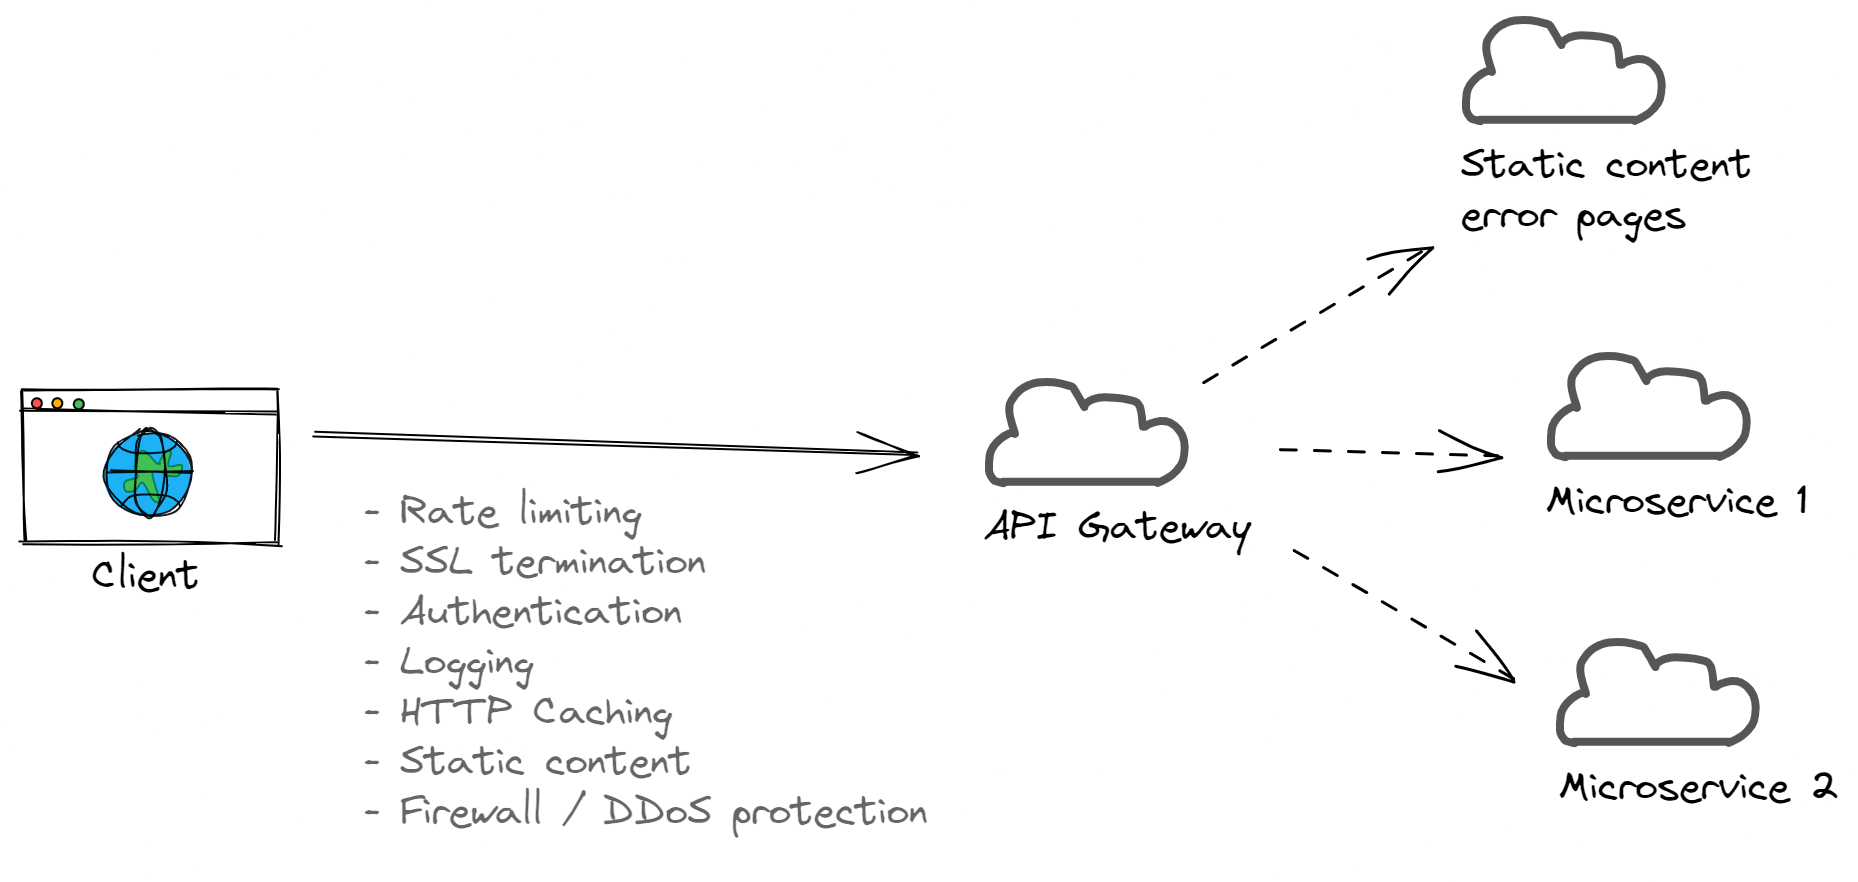
You also need to keep certain types of cross-cutting concerns centralized, like select security controls, logging, and routing. If you don’t, every API across different teams has to implement common controls like rate-limiting, logging, and authentication. This can lead to maintainability and consistency issues.
However, the API Federation pattern keeps cross-cutting concerns located in one centralized lightweight API gateway. For example, by having a centralized place where rate-limiting is processed, and HTTP headers are returned for your company’s APIs, each API is kept consistent from the perspective of your clients.
The gateway also short-circuits requests that otherwise might use unnecessary resources. Protecting internal APIs and microservices from DDoS detection can be added in one place, which safeguards backend services.
In this article, you’ll learn how to build .NET microservices that are federated via another .NET API gateway. You’ll see how using an API gateway can protect internal services from the outside world by allowing the gateway to handle authentication using Okta’s authentication services. These are easily integrated into our .NET microservice.
What Is API federation?
APIs are foundational to modern software development. They enable distributed systems to communicate with each other in a way that allows different teams to build their own systems autonomously.
Larger organizations need to be able to keep cross-cutting and security concerns at a higher-level abstraction so that individual API teams don’t need to worry about them.
API federation addresses this need by centralizing cross-cutting and security concerns into a gateway. All incoming API traffic can have security controls applied such as DDoS protection, SSL termination, and rate-limiting, and will proxy those requests to internal services.
In this article, you’ll be using the federated identity approach. This enables authentication and authorization to be handled by one team or system (i.e., API gateway) so that other internal teams and APIs don’t have to worry about cross-cutting concerns.
Other architectural patterns like Backends For Frontends use this same approach of placing API gateways in front of other internal microservices for similar reasons.
Before you begin
To proceed through this tutorial, you’ll need the following tools installed:
- Docker Desktop
- Visual Studio 2022 for Windows
- The latest version of the .NET SDK (This should be installed by Visual Studio.)
- Postman Desktop App
- A free Okta Developer account
Build .NET microservices
Let’s start building the foundation of your .NET projects and solutions.
First, navigate to an empty folder where you will start building your .NET solution and projects. Create a folder named /src and navigate to /src in a terminal.
Next, you’ll create two internal microservices and the API gateway. To do this, execute the following commands:
dotnet new webapi -o Service1 --no-https -f net6.0dotnet new webapi -o Service2 --no-https -f net6.0dotnet new webapi -o ServiceGateway --no-https -f net6.0
In order to build and link all the .NET projects together, you’ll need to create a new solution by running dotnet new sln.
To add all the projects to the new solution, run:
dotnet sln src.sln add Service1/Service1.csprojdotnet sln src.sln add Service2/Service2.csprojdotnet sln src.sln add ServiceGateway/ServiceGateway.csproj
To get the projects ready for the next steps, remove the Controllers folder and the WeatherController.cs file from all three projects.
Create a proxy gateway
The API gateway is a lightweight service that executes cross-cutting concern logic and then forwards the original request to the appropriate internal microservice API.
In your IDE, create a new file C# class named ProxyExtensions in the root of the ServiceGateway project. This file will have a couple of extension methods to perform the logic needed to proxy HTTP requests to other microservices. Extension methods in C# are a great way to create reusable methods that are tucked away in their own file.
Replace its contents with the following:
namespace ServiceGateway
{
  public static class ProxyExtensions
  {
    private static readonly int StreamCopyBufferSize = 81920;

    public static HttpRequestMessage CreateProxyHttpRequest(this HttpContext context, Uri uri)
    {
      var request = context.Request;

      var requestMessage = new HttpRequestMessage();
      var requestMethod = request.Method;
      if (!HttpMethods.IsGet(requestMethod) &&
          !HttpMethods.IsHead(requestMethod) &&
          !HttpMethods.IsDelete(requestMethod) &&
          !HttpMethods.IsTrace(requestMethod))
      {
        var streamContent = new StreamContent(request.Body);
        requestMessage.Content = streamContent;
      }

      // Copy the request headers
      foreach (var header in request.Headers)
      {
        if (!requestMessage.Headers.TryAddWithoutValidation(header.Key, header.Value.ToArray()) && requestMessage.Content != null)
        {
          requestMessage.Content?.Headers.TryAddWithoutValidation(header.Key, header.Value.ToArray());
        }
      }

      requestMessage.Headers.Host = uri.Authority;
      requestMessage.RequestUri = uri;
      requestMessage.Method = new HttpMethod(request.Method);

      return requestMessage;
    }

    public static async Task CopyProxyHttpResponse(this HttpContext context, HttpResponseMessage responseMessage)
    {
      if (responseMessage == null)
      {
        throw new ArgumentNullException(nameof(responseMessage));
      }

      var response = context.Response;

      response.StatusCode = (int)responseMessage.StatusCode;
      foreach (var header in responseMessage.Headers)
      {
        response.Headers[header.Key] = header.Value.ToArray();
      }

      foreach (var header in responseMessage.Content.Headers)
      {
        response.Headers[header.Key] = header.Value.ToArray();
      }

      // SendAsync removes chunking from the response. This removes the header, so it doesn't expect a chunked response.
      response.Headers.Remove("transfer-encoding");

      using var responseStream = await responseMessage.Content.ReadAsStreamAsync();
      await responseStream.CopyToAsync(response.Body, StreamCopyBufferSize, context.RequestAborted);
    }
  }
}
These two methods allow your gateway to forward/proxy requests and responses to the original client transparently. This code can be found in the AspLabs GitHub repository.
NOTE: a hand-built .NET-base API gateway could be beneficial when you need full control of how your gateway behaves (i.e., if you’re building a really complex internal API gateway), don’t want dependencies on third-party services, or as a proof-of-concept. In production scenarios, you may want to use a product like Azure API Management or Amazon API Gateway instead of a hand-built .NET application API gateway. These tools come with common cross-cutting tooling like routing, rate-limiting, static content caching, HTTP caching, SSL termination, etc., so you don’t have to code them by hand. Often, you can leverage infrastructure-as-code tools like Terraform to keep your API gateway easy to maintain and scalable.
Next, replace the ServiceGateway/Program.cs file with the following (you’ll add more to this file later.):
using ServiceGateway;

var builder = WebApplication.CreateBuilder(args);

builder.Services.AddHttpClient();

var app = builder.Build();

// Expose the gateway via port "4300"
app.Urls.Clear();
app.Urls.Add("http://localhost:4300");

app.UseRouting();

// We're routing clients to internal microservices, which many times
// will have different public and internal URLs. Gateways can help to
// keep routing centralized as a cross-cutting and customer-focused concern.
app.MapGet("/warehouse", async context =>
{
    var client = app.Services.GetService<IHttpClientFactory>().CreateClient();

    var message = context.CreateProxyHttpRequest(new Uri("http://localhost:4301/inventory"));
    var response = await client.SendAsync(message);
    await context.CopyProxyHttpResponse(response);
});

app.MapGet("/sales/sku/{sku:required}", async context =>
{
    var sku = context.Request.RouteValues["sku"];
    var client = app.Services.GetService<IHttpClientFactory>().CreateClient();
    var message = context.CreateProxyHttpRequest(new Uri($"http://localhost:4302/sku/{sku}"));
    var response = await client.SendAsync(message);
    await context.CopyProxyHttpResponse(response);
});

app.Run();
Your gateway service will now accept two routes, and proxy the requests to the appropriate internal microservice.
You’ll also need to configure these two services. Replace Service1/Program.cs with the following:
using Microsoft.AspNetCore.Builder;

var builder = WebApplication.CreateBuilder(args);

var app = builder.Build();

app.Urls.Clear();
app.Urls.Add("http://localhost:4301");

app.UseRouting();

app.MapGet("/inventory", () => "Total inventory is 721 items");

app.Run();
Then, replace Service2/Program.cs with:
using Microsoft.AspNetCore.Builder;

var builder = WebApplication.CreateBuilder(args);

var app = builder.Build();

app.Urls.Clear();
app.Urls.Add("http://localhost:4302");

app.UseRouting();

app.MapGet("/sku/{sku:required}", (string sku) => $"You're looking at SKU {sku}!");

app.Run();
Both of these files make the services listen to traffic on a custom port so that all three microservices can run on your machine at the same time. These services return static content so that you can focus on the orchestration of the gateway and microservices.
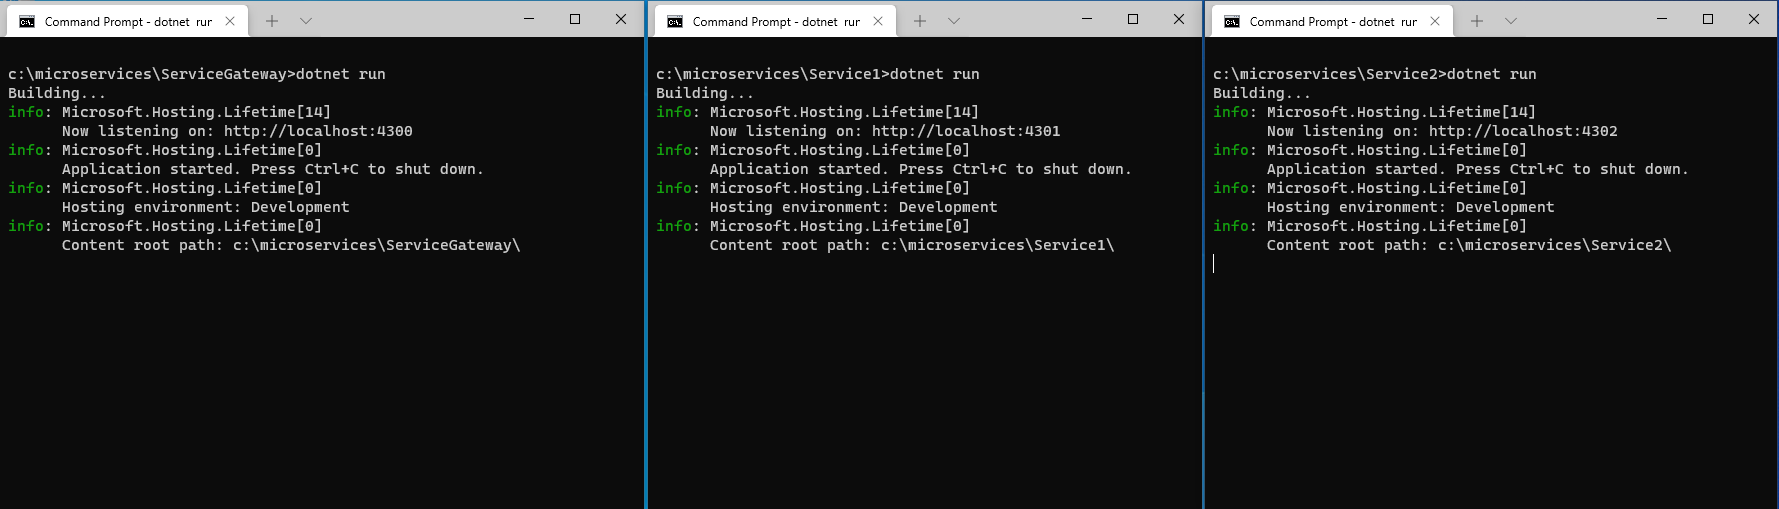
Now, it’s time to try to run it. Open up three separate terminals (any terminal should work). Navigate to the root directory for each of the .NET projects you created and execute dotnet run.
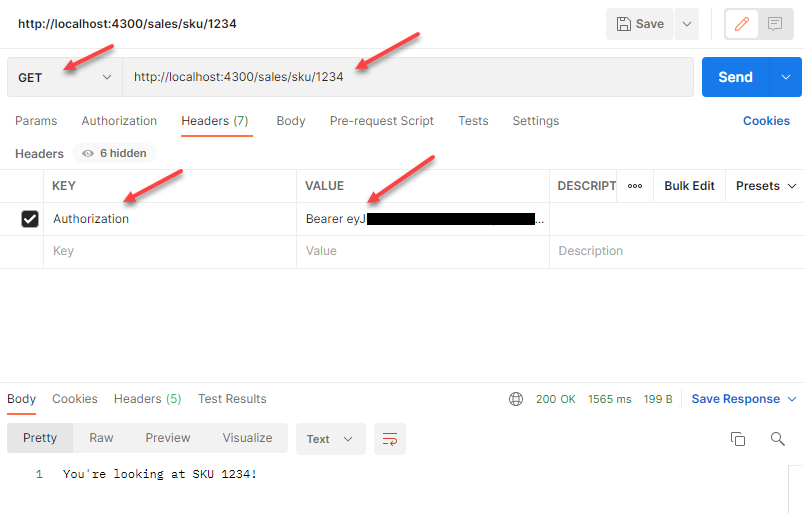
To test the API gateway, run the following request in Postman:
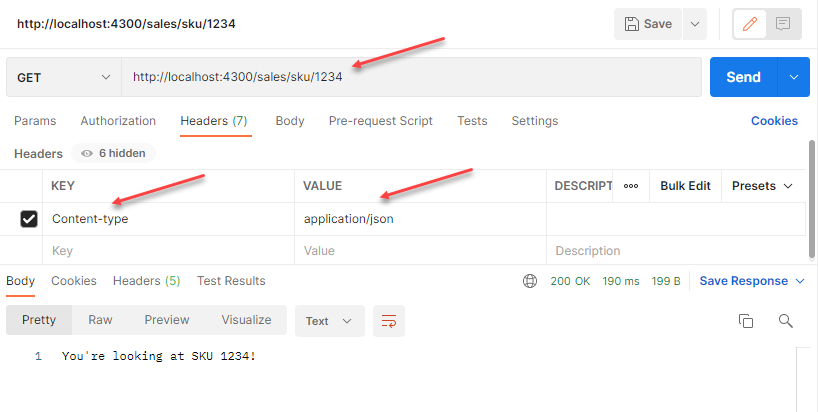
You should see some HTTP headers and the HTTP body “You’re looking at SKU 1234!”
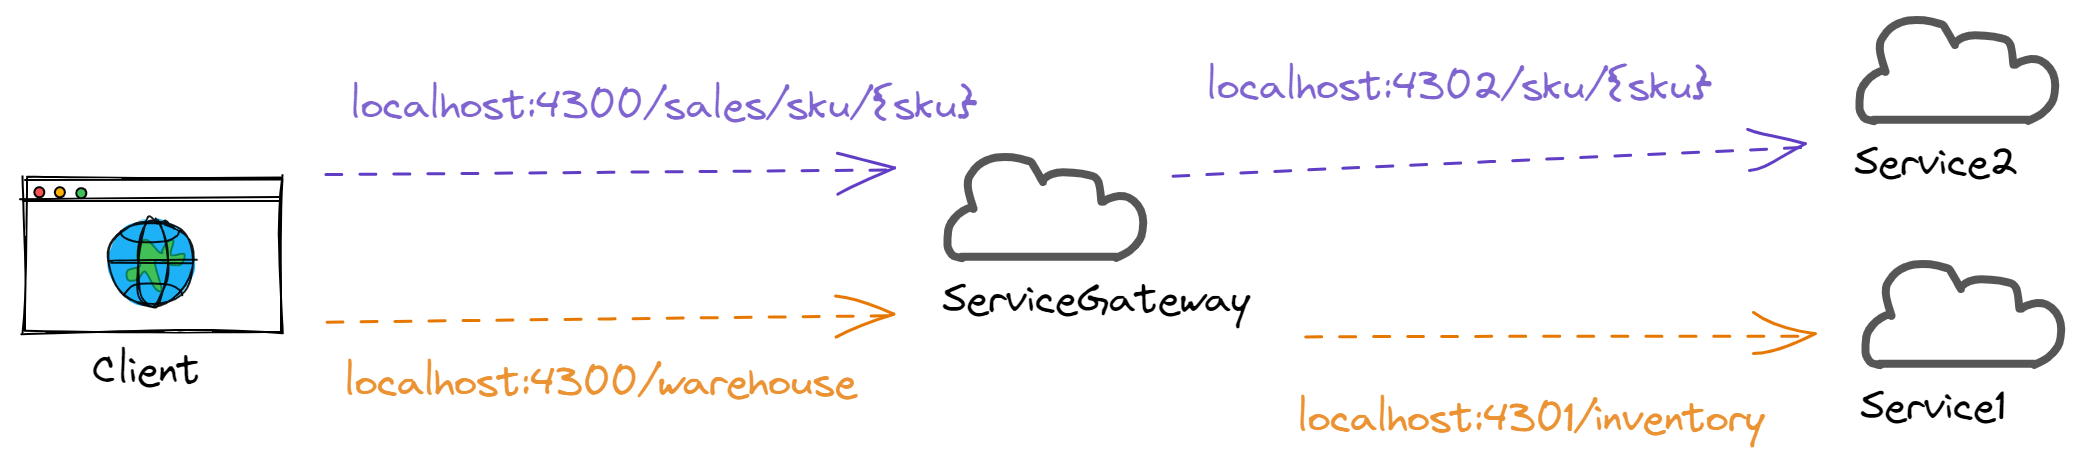
Here’s what the current topology looks like:
Add Okta auth to your API gateway
In the next steps, you’ll add authentication to your API gateway. By placing authentication in the gateway, any internal microservices or APIs can trust that requests coming from the gateway have already been authenticated.
Here, you’ll be using the API gateway to proxy requests for API access tokens to Okta behind the scenes.

In these next steps, you’ll be utilizing your Okta account.
Once signed into Okta, you’ll be at the home page/dashboard. Navigate to Applications on the left-hand menu, and click the Create App Integration button. Choose API Services, and create a name for your app.
Take note of your Okta domain,
client_id, andclient_secretfor later.
You’ll need to create a dummy security scope for your API integration. On the left-hand menu again, click on Security > API. In the list of authorization servers, click the Edit button for the default server. Then, click on the Scopes tab and the Add Scope button. Make sure the Default Scope checkbox is selected, and choose any name for your scope.
Copy the Okta domain that’s displayed and add it to your ServiceGateway/appsettings.json file:
  "Okta": {
    "Domain": "https://dev-1234.okta.com"
  }
Next, navigate to the ServiceGateway project folder in a terminal and run dotnet add package Okta.AspNetCore. This will install the Okta .NET library that will help your gateway to authenticate incoming requests.
Finally, copy the following code and replace ServiceGateway/Program.cs with it:
using Okta.AspNetCore;
using ServiceGateway;

var builder = WebApplication.CreateBuilder(args);

builder.Services.AddHttpClient();

// Configure authentication middleware
AddAuthMiddleware(builder);

var app = builder.Build();

app.Urls.Clear();
app.Urls.Add("http://localhost:4300");

// Federated Logging
app.Use(async (context, next) =>
{
    Console.WriteLine($"Request for \"{context.Request.Path}\"");
    await next();
});

// Federated Rate-Limiting
app.Use(async (context, next) =>
{
    context.Response.Headers.Add("X-Rate-Limit-Limit", "infinite");
    await next();
});

app.UseRouting();
app.UseAuthentication();
app.UseAuthorization();

// Using Okta to generate tokens by forwarding the request.
// To your clients, if you strip out Okta specific response headers,
// they would have no idea that Okta is being used as the identity
// provider!
app.MapPost("/token", async context =>
{
    var client = app.Services.GetService<IHttpClientFactory>().CreateClient();

    var message = context.CreateProxyHttpRequest(new Uri($"{builder.Configuration["Okta:Domain"]}/oauth2/default/v1/token"));
    var response = await client.SendAsync(message);
    await context.CopyProxyHttpResponse(response);
});


app.MapGet("/warehouse", async context =>
{
    var client = app.Services.GetService<IHttpClientFactory>().CreateClient();

    var message = context.CreateProxyHttpRequest(new Uri("http://localhost:4301/inventory"));
    var response = await client.SendAsync(message);
    await context.CopyProxyHttpResponse(response);
});

app.MapGet("/sales/sku/{sku:required}", async context =>
{
    var sku = context.Request.RouteValues["sku"];
    var client = app.Services.GetService<IHttpClientFactory>().CreateClient();
    var message = context.CreateProxyHttpRequest(new Uri($"http://localhost:4302/sku/{sku}"));
    var response = await client.SendAsync(message);
    await context.CopyProxyHttpResponse(response);
}).RequireAuthorization();

app.Run();

void AddAuthMiddleware(WebApplicationBuilder builder)
{
    // This method is all it takes to use Okta to automatically test incoming
    // bearer tokens for authentication!
    builder.Services.AddAuthentication(options =>
    {
        options.DefaultAuthenticateScheme = OktaDefaults.ApiAuthenticationScheme;
        options.DefaultChallengeScheme = OktaDefaults.ApiAuthenticationScheme;
        options.DefaultSignInScheme = OktaDefaults.ApiAuthenticationScheme;
    })
    .AddOktaWebApi(new OktaWebApiOptions()
    {
        OktaDomain = builder.Configuration["Okta:Domain"],
    });

    builder.Services.AddAuthorization();
}
Again, open up three separate terminals and navigate to the root directory for each of the .NET projects you created. Run all three services by executing dotnet run in each terminal.
You’ll have to provide a bearer token to the gateway service in order to access /sales/sku/<sku> but /warehouse will not require any authentication.
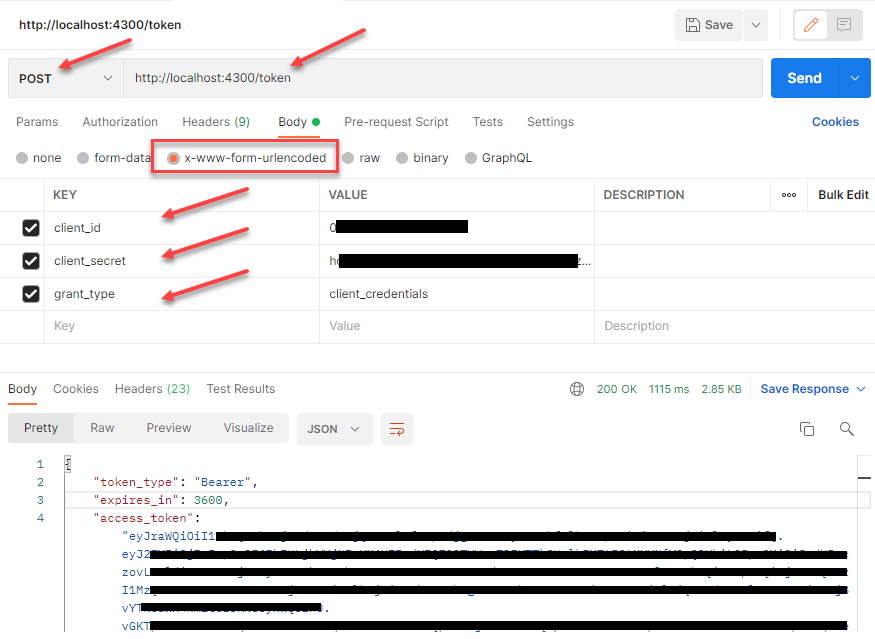
To get an access token to access /sales/sku/<sku>, you’ll need to execute the following request in Postman by using your own client_id and client_secret values:

You should have a response with the access_token displayed. Copy the token and then issue the following request using Postman to replace the bearer token with your access token:

If implemented correctly, you should see a successful response!
Use Docker to run the solution
In Visual Studio, right-click each project and click on Add > Docker Support. Then, choose Linux as the target OS. This will add a Dockerfile to each project that will be configured to build and run the .NET application with sensible defaults.
Right-click the ServiceGateway project and choose Add > Container orchestration support. Choose Docker Compose and then Linux as the target OS. This step will add a docker-compose.yml file.

Replace the docker-compose.yml file with the following:
version: '3.4'

services:
  servicegateway:
    image: ${DOCKER_REGISTRY-}servicegateway
    build:
      context: .
      dockerfile: ServiceGateway/Dockerfile
    ports:
      - "4300:80"
  service1:
    image: ${DOCKER_REGISTRY-}service1
    build:
      context: .
      dockerfile: Service1/Dockerfile
    ports:
      - "4301:80"
  service2:
    image: ${DOCKER_REGISTRY-}service2
    build:
      context: .
      dockerfile: Service2/Dockerfile
    ports:
      - "4302:80"
This will configure each project to become exposed at the ports you used earlier, except now Docker is responsible for exposing the proper ports.
In the Program.cs file for the three .NET projects you created, remove the Urls code that looks like:
app.Urls.Clear();
app.Urls.Add("http://localhost:<port>");
In the ServiceGateway project’s Program.cs file, replace the two URLs for the internal microservice routes with http://host.docker.internal:<port> instead of http://localhost:<port>.
For example, the code for the external /warehouse route will now become the internal URL of http://host.docker.internal:4301/inventory.
At the top of Visual Studio 2022, there will be a new launch profile available called “Docker Compose.”
Use the same Postman request as earlier to fetch your token:
Then, using that token, you can make requests to the /sales/sku/<sku> path:
Now you can run all your microservices and the API gateway and test them.
What you learned about API federation in .NET
In this tutorial, you built the skeleton of the API gateway and two .NET microservices, which were all exposed on specific ports.
You also learned how to use Okta’s Client Credentials API token endpoint to retrieve a server-to-server access token by using your API gateway as a proxy. With Okta’s Okta.AspNetCore library, you then enabled your API gateway to process and validate incoming access tokens.
In the end, you had the entire suite of services running in one click by using Docker Compose.
You can check out the completed project at this Github repository.
Learn more about managing multiple services with API federation
Check out these posts for more information about managing multiple microservices with API federation:
If you need help figuring out what kind of authentication flow to use, you can refer to Okta’s guide.
If you have any questions about this post, please add a comment below. For more interesting content, follow @oktadev on Twitter, connect with us on LinkedIn, and subscribe to our YouTube channel.
James is a Microsoft MVP with a background building web and mobile applications in fintech and insurance industries. He's the author of "Refactoring TypeScript" and creator of open-source tools for .NET called Coravel. He lives in Canada, just ten minutes from the highest tides in the world.
Okta Developer Blog Comment Policy
We welcome relevant and respectful comments. Off-topic comments may be removed.