How Authentication and Authorization Work for SPAs
Adding authentication to public clients such as Single Page Applications (SPA) and JavaScript applications can be a source of confusion. Identity Providers like Okta try to help you via multiple support systems. Still, it can feel like a lot of work. Especially since you’re responsible for way more than authentication alone in the applications you work on!
As part of authentication, your client application makes multiple calls to an authorization server, and you get back several strings, which are tokens. Let’s demystify what’s going on behind the scenes and closely examine what those tokens are and how you use them within your client application.
Table of Contents
- Authentication and Authorization using OAuth 2.0 + OpenID Connect (OIDC)
- OAuth 2.0 + OIDC for JavaScript clients and SPA
- Auth tokens in OAuth 2.0 + OIDC
- Create an OAuth 2.0 + OIDC Compliant Authorization server
- View the well-known endpoint for OIDC Discovery
- Debug the authorization code and token requests
- Add authentication to your SPA
- Use auth tokens in SPAs
- Learn more about OAuth, OIDC, tokens, and authentication best practices
There’s a companion video for this post if you want to check out how to run a SPA sample application, look at browser storage, and inspect network calls.
Note: In May 2025, the Okta Integrator Free Plan replaced Okta Developer Edition Accounts, and the Okta CLI was deprecated.
We preserved this post for reference, but the instructions no longer work exactly as written. Replace the Okta CLI commands by manually configuring Okta following the instructions in our Developer Documentation.
Authentication and Authorization using OAuth 2.0 + OpenID Connect (OIDC)
OAuth 2.0 with OIDC is the best practice for adding authentication and authorization to your software applications. Authentication verifies the identity of who you claim to be, and authorization verifies you have access to data you want to see or actions you want to perform. It is lightweight with less effort to set up and use than Security Assertion Markup Language (SAML), an alternate authentication and authorization mechanism that pre-existing systems may use. For newer systems, you’ll want to use OAuth 2.0 + OIDC.
OAuth 2.0 handles authorization to resources, such as when your front-end application gets data from a backend API by making an HTTP request. OAuth 2.0 standards have the flexibility to support authorization across your entire application system through different flows and grant types. For example, different OAuth 2.0 flows support JavaScript-based front-end applications, for your APIs and back-end services to communicate, and even for IOT devices in your home automation system. OpenID Connect (OIDC) is an identity layer on OAuth 2.0 that provides standardized identity information.
OAuth 2.0 + OIDC for JavaScript clients and SPA
SPAs and other JavaScript front-ends are public clients, which means they can’t maintain secret information for authorization, unlike a confidential client. A confidential client (such as a traditional server-rendered web app) can keep super secret information such as a Client Secret for authorization. In both application types, we should use a flow called Authorization Code and an extension to the flow called Proof Key for Code Exchange (PKCE).
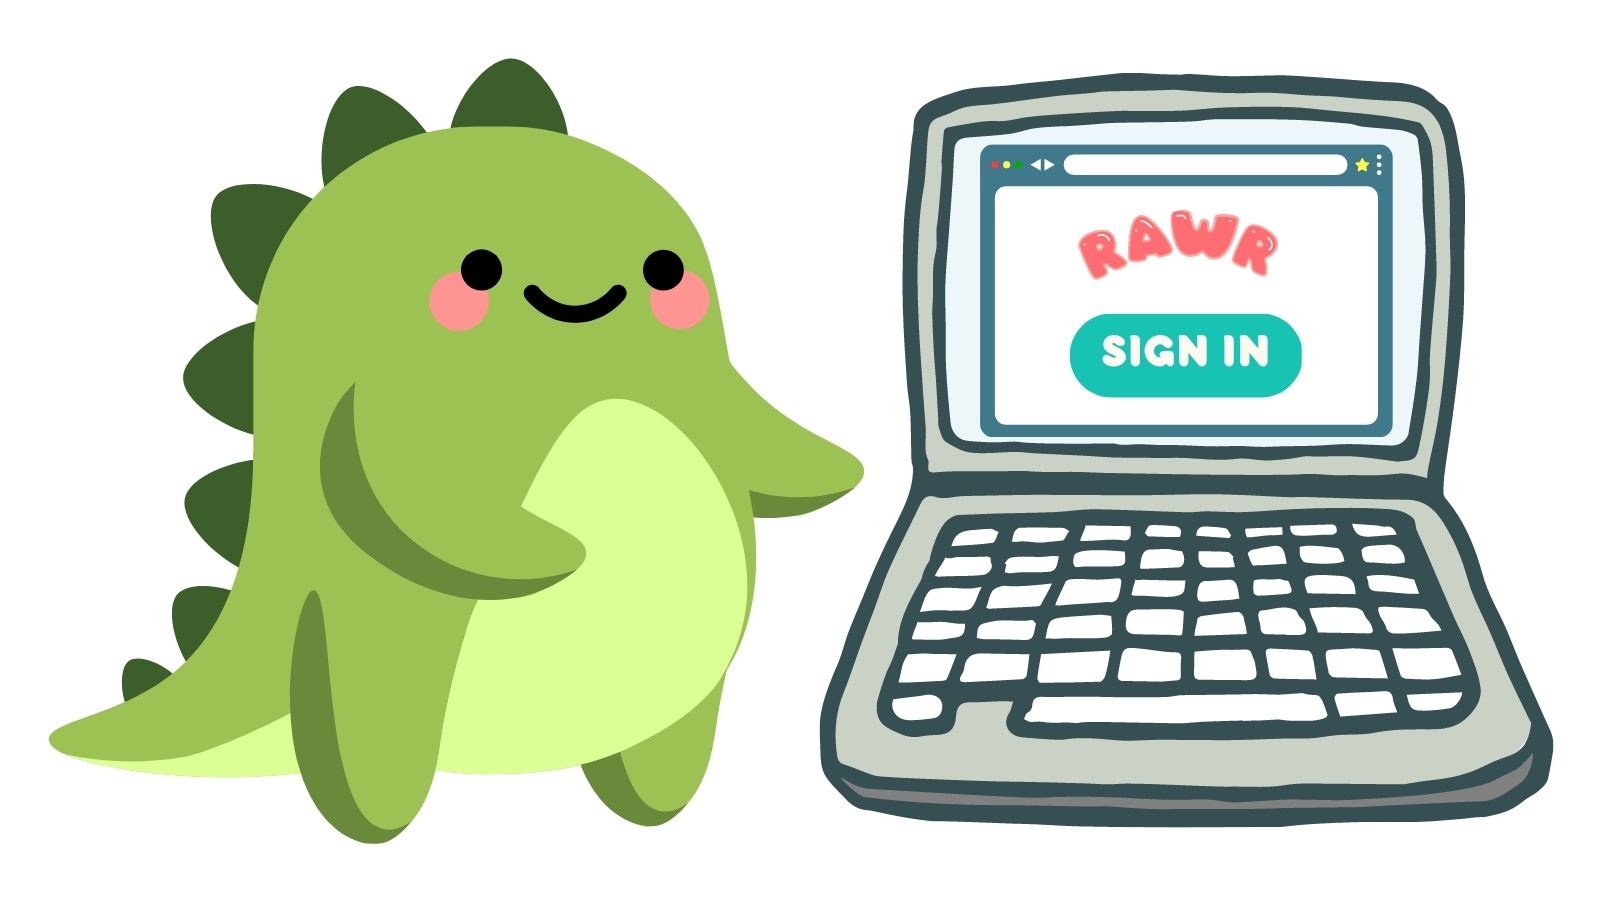
Let’s see how this flow works step-by-step following what happens when a cute dinosaur named Sunny prepares to sign in to the “Rawr” app.
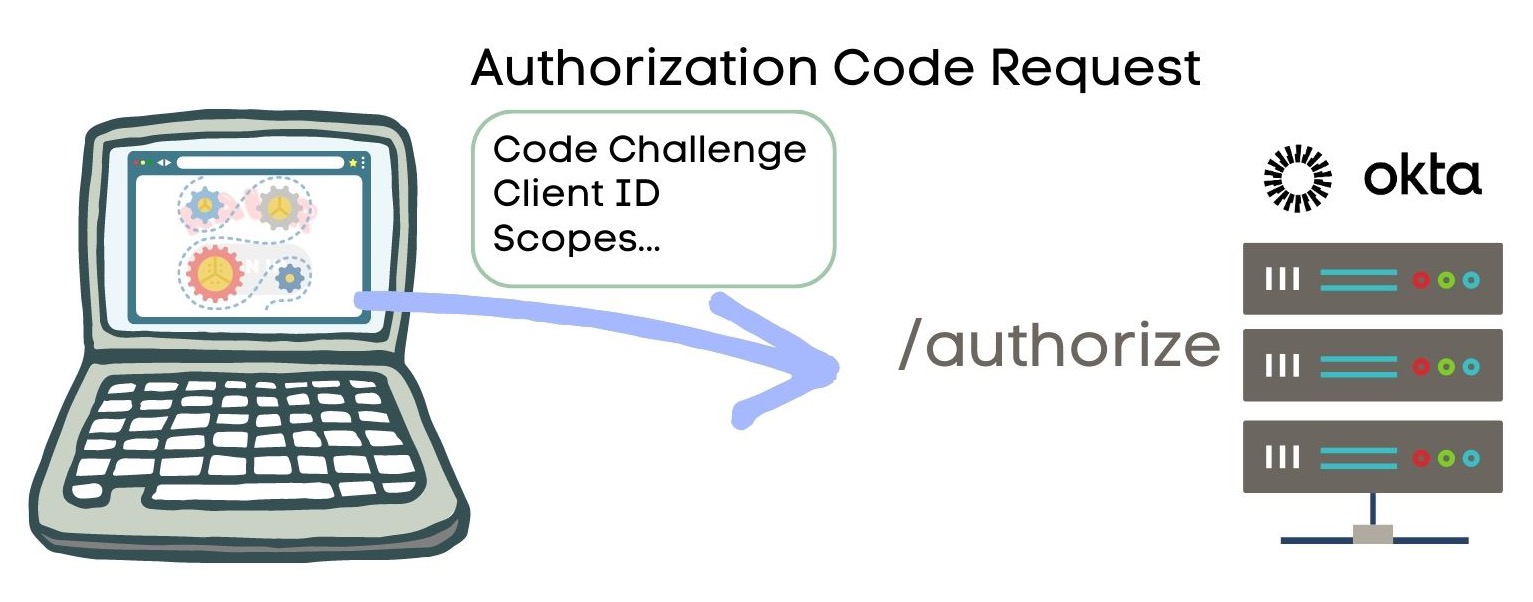
The client application starts the process and generates a random, long string — the code verifier. Then it creates a code challenge from the code verifier. This step is part of the PKCE extension.
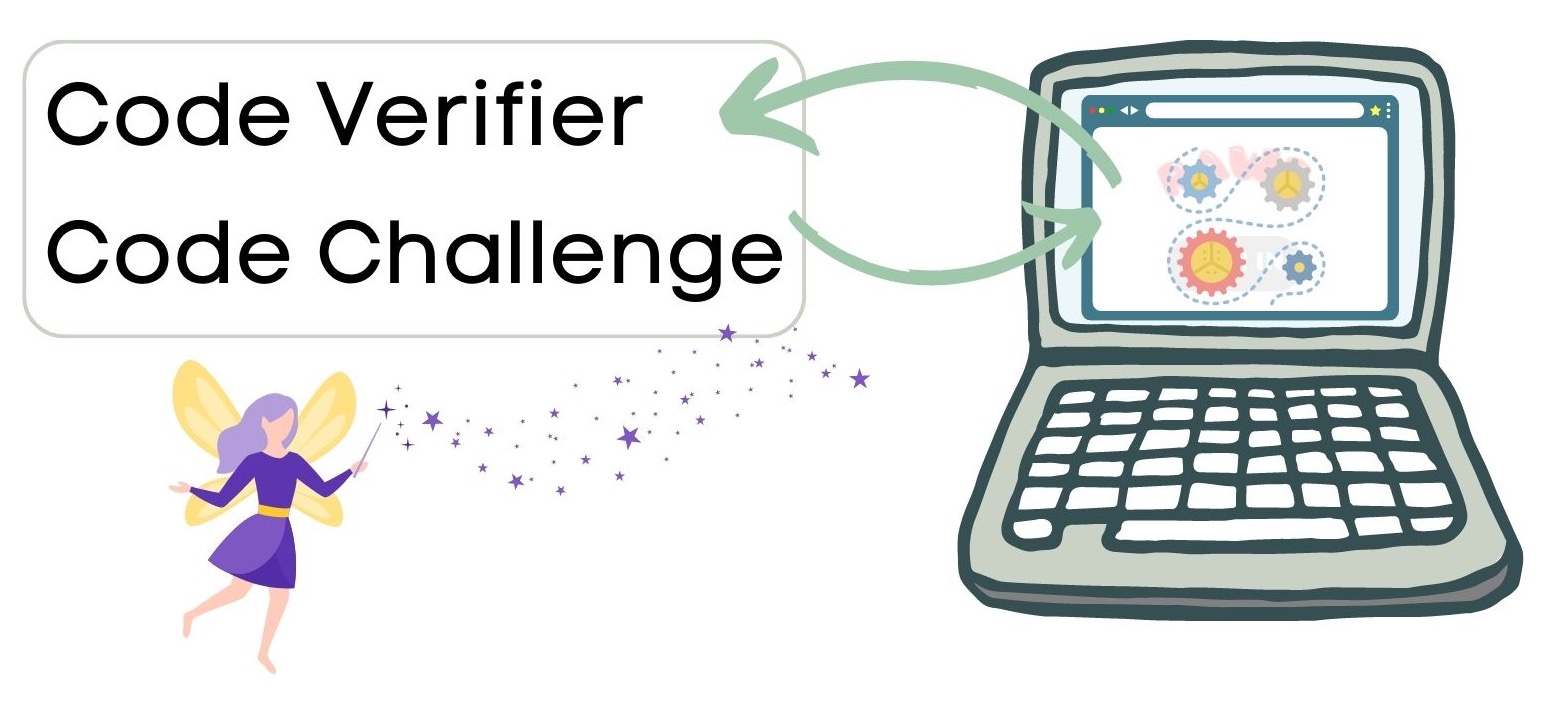
The client application holds on to the code verifier. It then makes an authorization code request to your authorization server, in this case, represented by Okta. The authorization code request includes the code challenge along with some critical pieces of information, such as
- Client ID
- Scopes, including at least the following:
openidrequired for specifying the app uses OIDC in verifying the user’s identityprofilefor accessing the user’s profile information, such as their nameoffline_accessto request a Refresh Token as part of this call
- Redirect URI for the callback location within the client application when sign-in is complete
- A random alphanumeric string for preventing Cross-Site Request Forgery (CSRF)
The authorization server redirects the user, Sunny, to a web page it hosts to sign in and provide authorization consent.
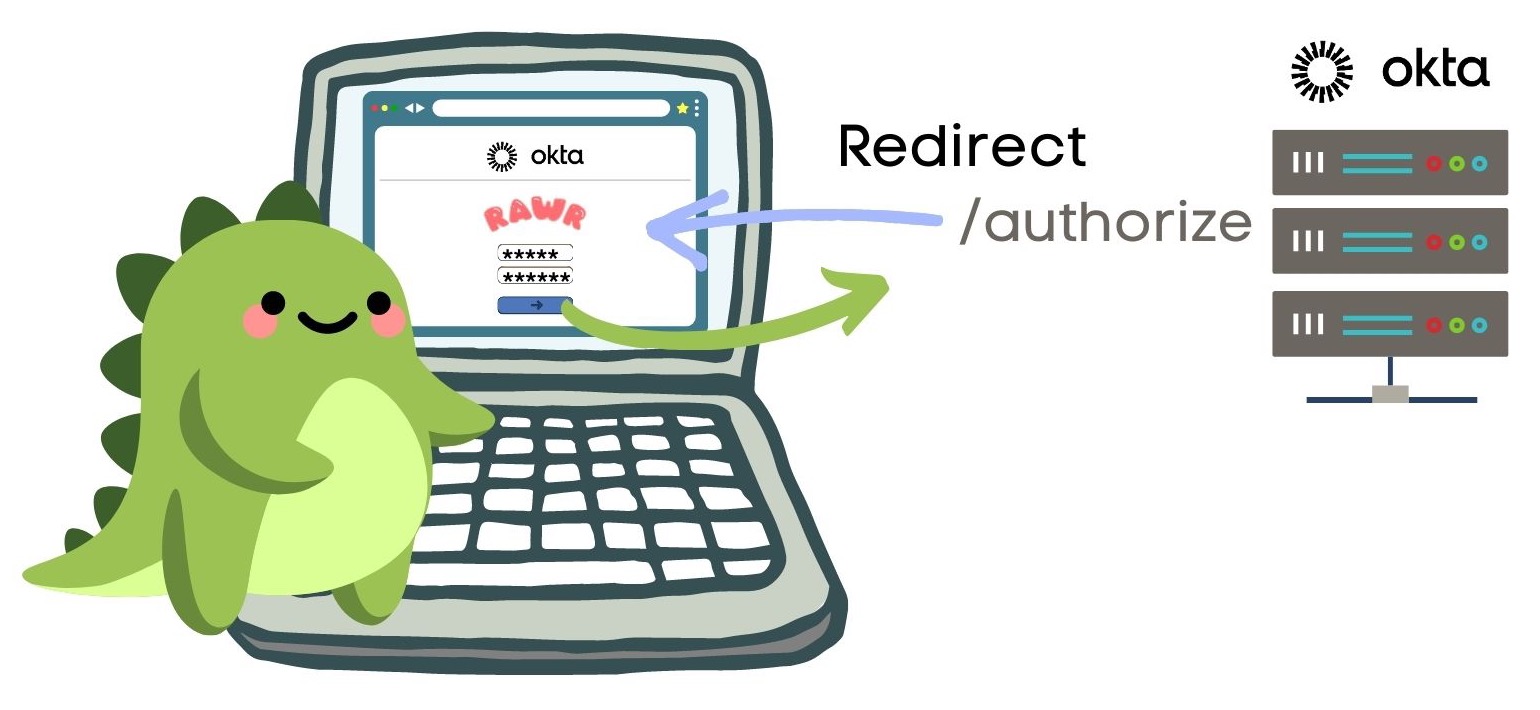
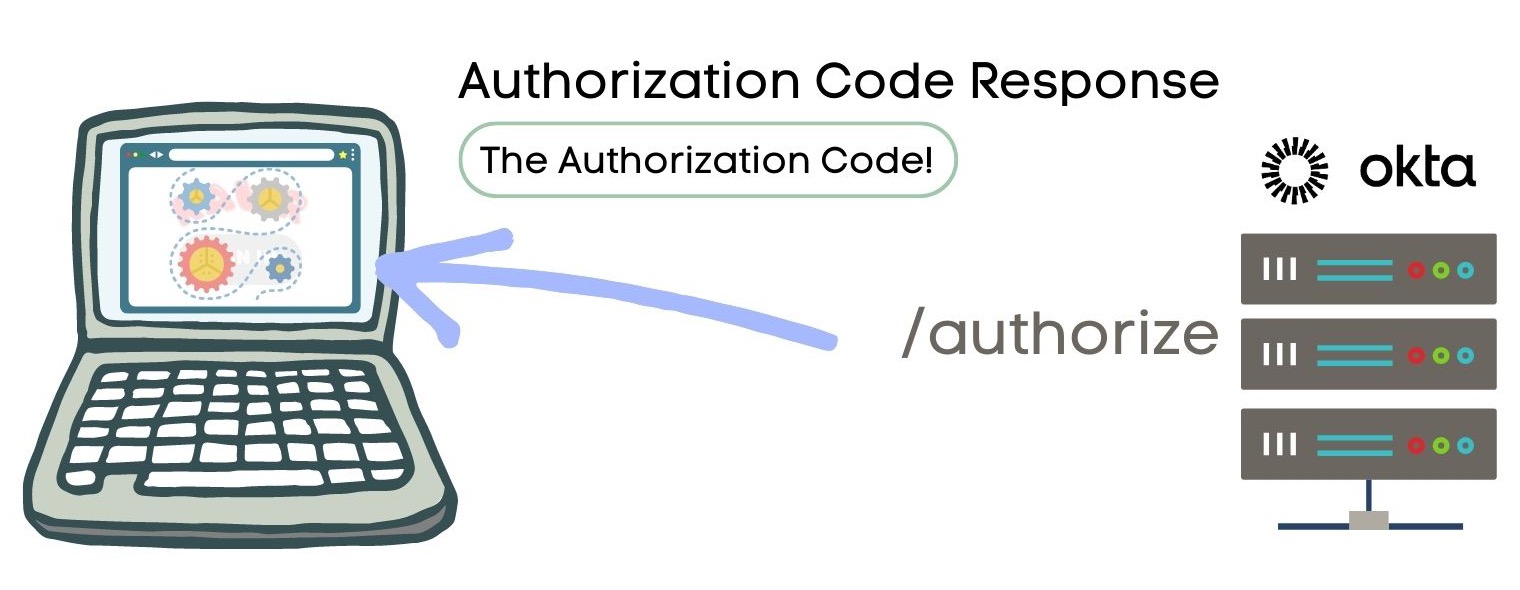
Yay! Sign-in success! The authorization server returns an authorization code to the client application.
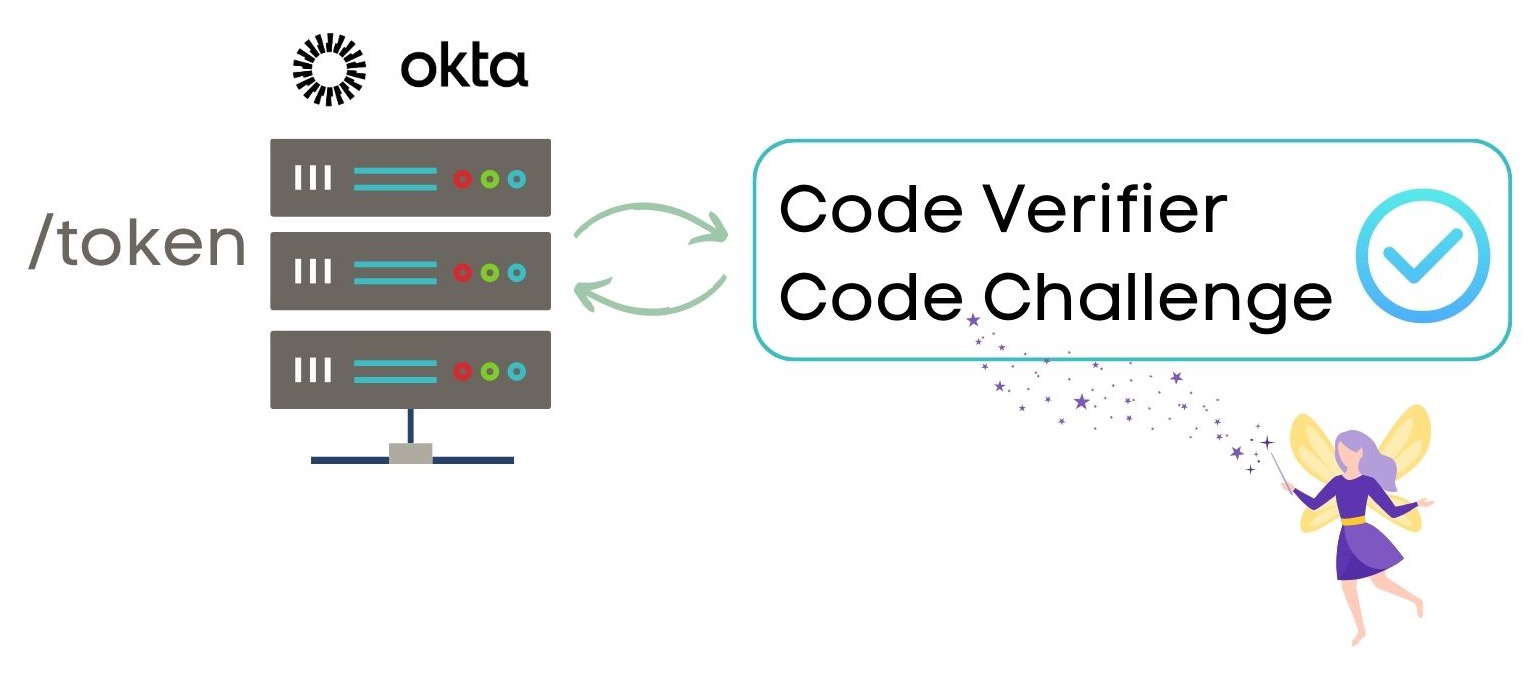
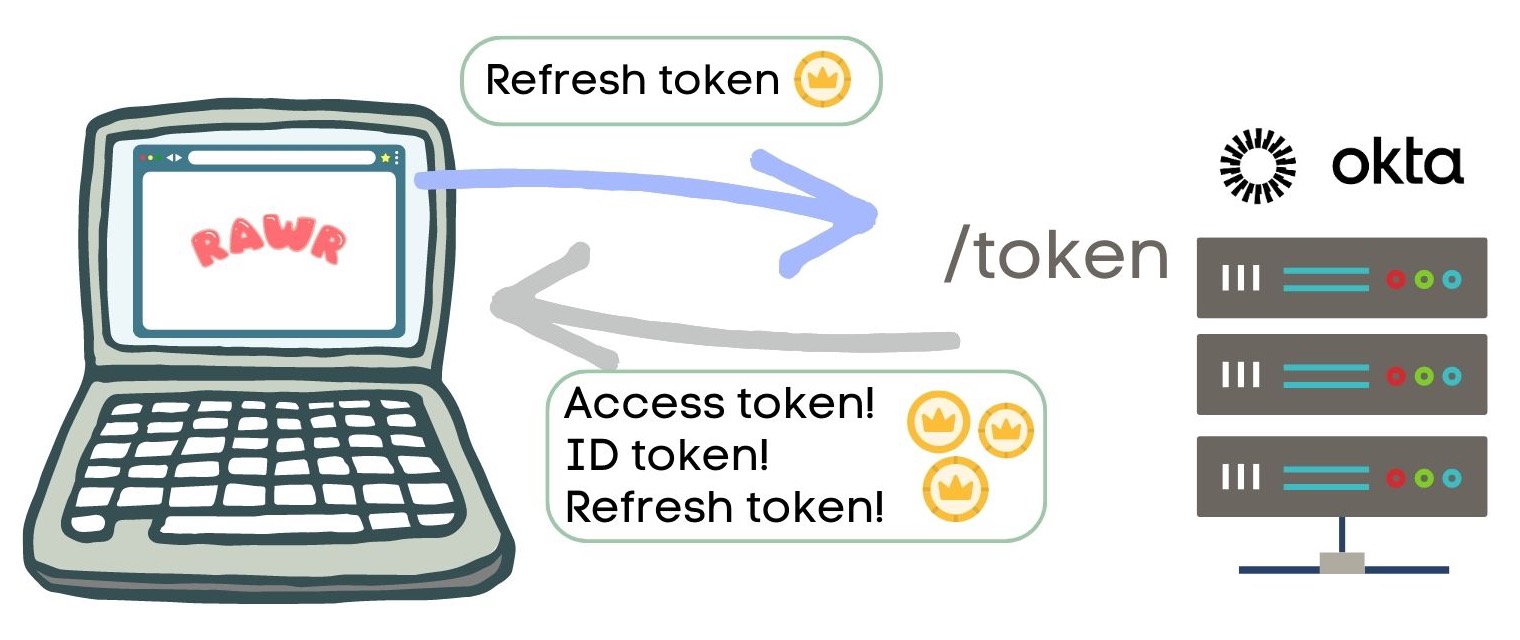
Now that there’s an authorization code, the client application makes a request to the token endpoint of the authorization server and sends the authorization code and the code verifier.
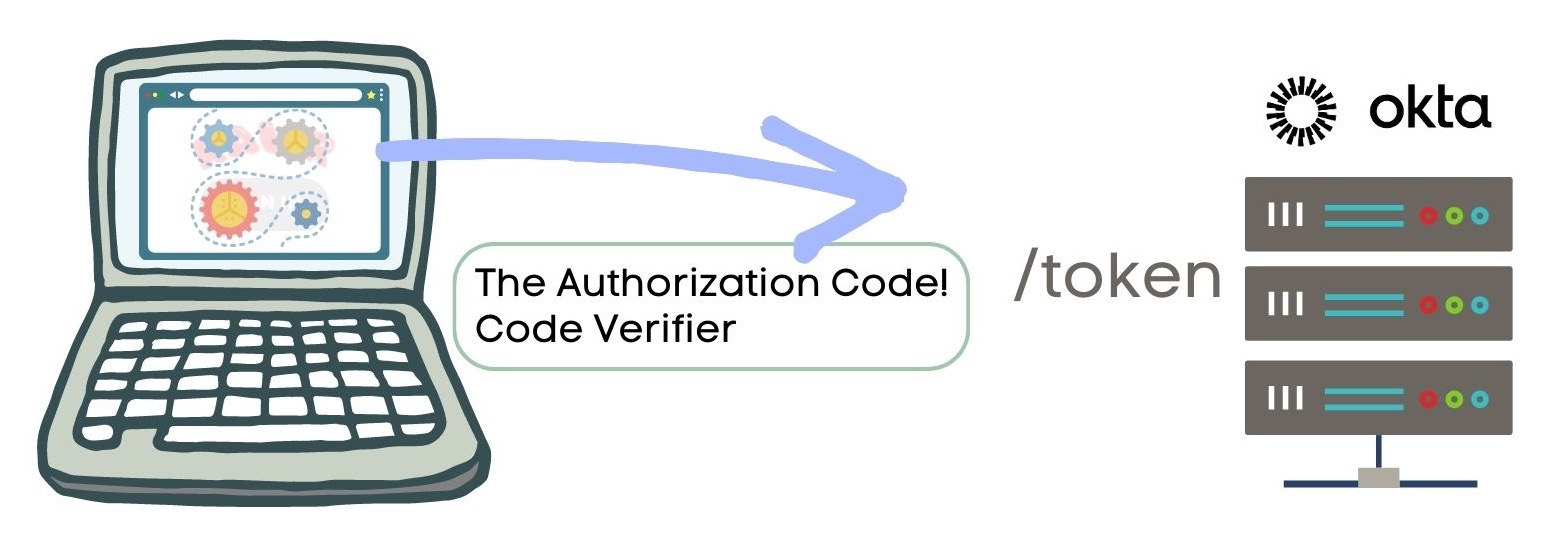
To process the token endpoint request the authorization server ensures the authorization code is still valid and that the code verifier matches the code challenge sent in the authorization request. This step is part of the PKCE extension.
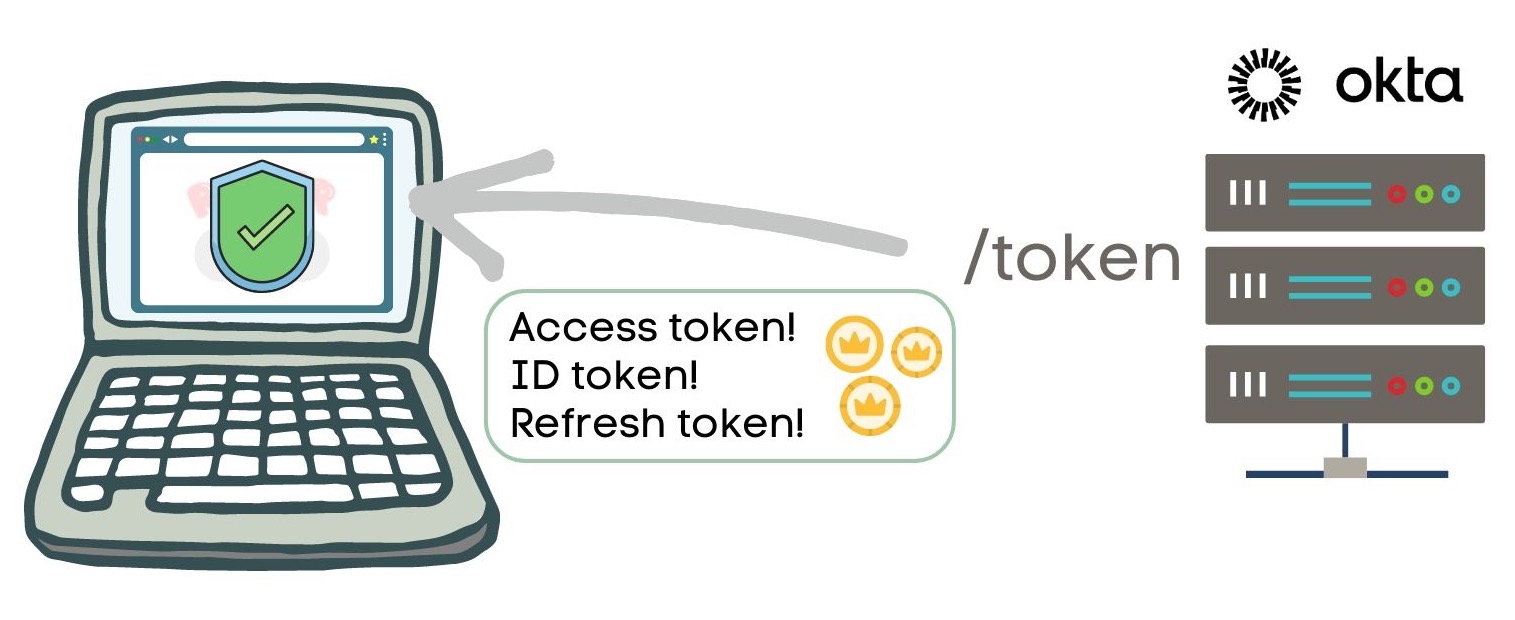
Yay! Success! The authorization server returns three tokens:
- Access token
- ID token
- Refresh token
Now that Sunny successfully signed in, they can continue their rawring lessons!

Now that you have these three tokens let’s better understand what each one is for.
Auth tokens in OAuth 2.0 + OIDC
These three tokens provide crucial information about your identity, access to resources, and the ability to stay authenticated securely.
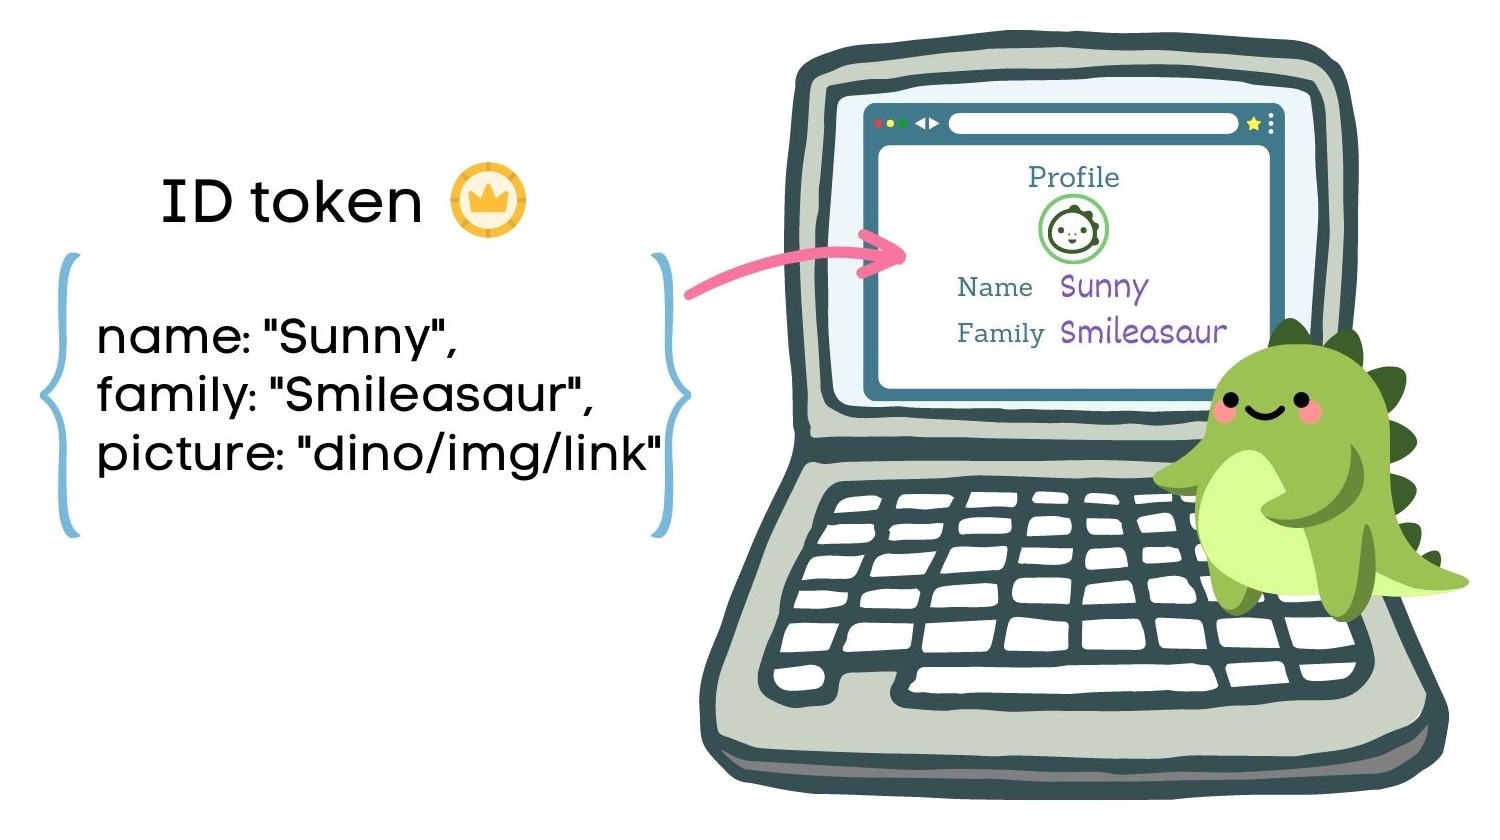
ID token
The ID token is about the user, so information about Sunny in this case. This authentication token is returned from the OpenID Connect layer. It contains standardized identity information such as email, name, and issuing party, called claims. The ID token may include extra claims for information critical to Sunny’s identity, such as their dinosaur family, which is a Smileasaur of course.
Access token
The access token is a key that grants access to data or to perform an action. This authorization token is returned from the OAuth layer. The token has metadata about the token itself, such as the issuing party, information about requested scopes made in the original request, and the expiration time. Access tokens are intentionally short-lived for public clients and are a safety mechanism since it guards access to resources, and it’s dangerous if it falls into the wrong hands!
Refresh token
The Refresh token allows us to exchange it for new, shiny tokens. This optional offline_access scope we added in the original authorization code request allows the access token to be short-lived but does not require Sunny to authenticate to get a new token repeatedly. Refresh tokens can be longer-lived than access tokens, but for public clients, the lifetime of Refresh tokens should also be short. We want to make sure bad actors can’t get a hold of a Refresh token to gain access to an access token! For public clients like SPA, it’s a best practice also to use Refresh Token rotation, which improves security by rotating refresh tokens after each use.
While each step of this OAuth flow to get the tokens is critical to ensure a secure authentication and authorization process, let’s inspect the two requests in more detail.
Create an OAuth 2.0 + OIDC Compliant Authorization server
We’ll start by setting up an authorization server in Okta and use the OpenID Connect Debugger tool to inspect the Network requests. This authorization server is OAuth 2.0 and OIDC compliant so we can use it within applications that conform to those specs.
Before you begin, you’ll need a free Okta developer account. Install the Okta CLI and run okta register to sign up for a new account. If you already have an account, run okta login.
Then, run okta apps create. Select the default app name, or change it as you see fit.
Choose Single-Page App and press Enter.
Use https://oidcdebugger.com/debug for the Redirect URI and accept the default Logout Redirect URI of https://oidcdebugger.com/debug.
What does the Okta CLI do?
The Okta CLI will create an OIDC Single-Page App in your Okta Org. It will add the redirect URIs you specified and grant access to the Everyone group. It will also add a trusted origin for https://oidcdebugger.com/debug. You will see output like the following when it’s finished:
Okta application configuration:
Issuer:    https://dev-133337.okta.com/oauth2/default
Client ID: 0oab8eb55Kb9jdMIr5d6
NOTE: You can also use the Okta Admin Console to create your app. See Create a Single-Page App for more information.
Make a note of the Issuer and Client ID. In the upcoming steps, you’ll need those values to configure Okta in your SPA client.
View the well-known endpoint for OIDC Discovery
Authorization servers have standard, public endpoints for discovery by clients. Let’s take a peek at the OIDC discovery document.
The OpenID Connect specification requires a standardized mechanism for client discovery. You can find it at {Issuer}/.well-known/openid-configuration. Open up a browser tab to the OIDC discovery endpoint. It is also JSON formatted data that looks something like this:
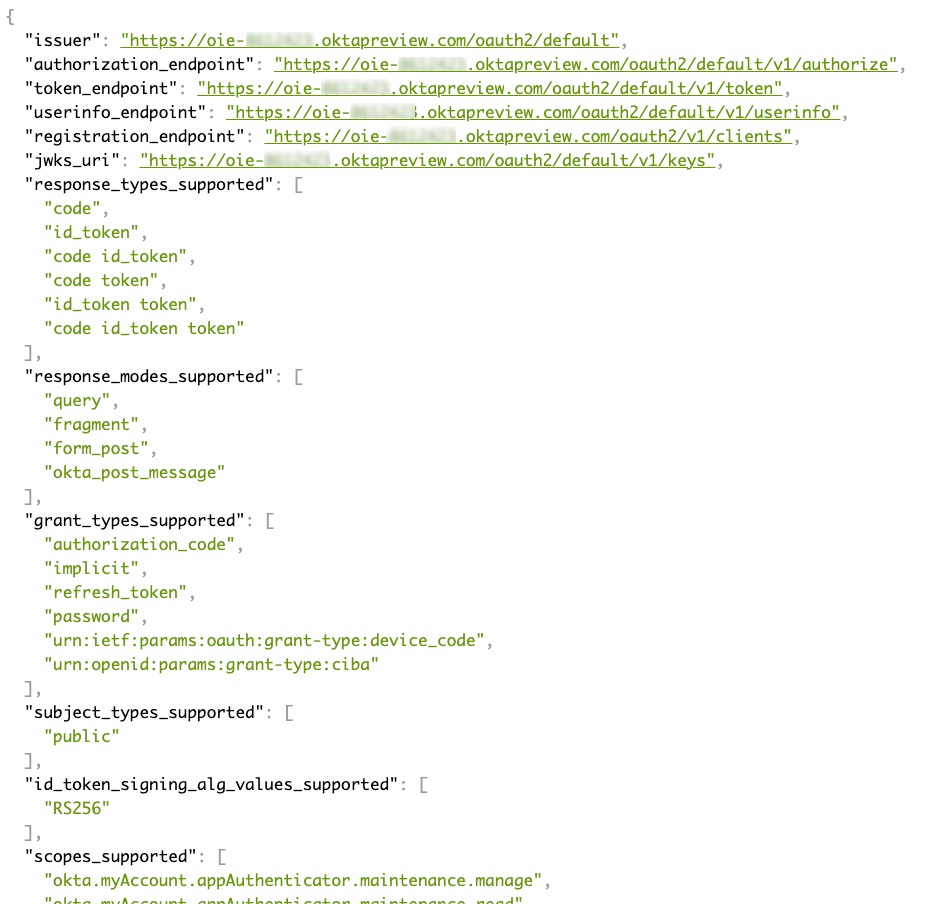
In the discovery response, we have the endpoints for the authorization and token requests which we’ll use in the following steps. We also have a user info endpoint to query for user information and endpoints to validate the ID token. If you find the property for claims_supported, you’ll see the claims cover various identifying information about the user.
Debug the authorization code and token requests
We can see this OAuth flow using the OpenID Connect Debugger tool. Open the site on a browser with good developer debugging capabilities. You’ll see something like this:

Some fields are pre-populated, which is helpful. Add the other key information needed:
- Authorize URI (required) - the authorize endpoint from the discovery doc
- Client ID (required) - the Client ID value from Okta CLI
- Scope (required) -
openidis already added for us. Addprofileandoffline_accesswith spaces in between. The form field should look likeopenid profile offline_access. - Response type (required) - select “Use PKCE?” to unlock a few new fields, but everything is auto-populated. The debugger discovers the token endpoint automatically for us. 😎
Open debugging tools in your browser to watch for redirection and network requests. You’ll want to make sure you’re preserving logs between page refreshes.
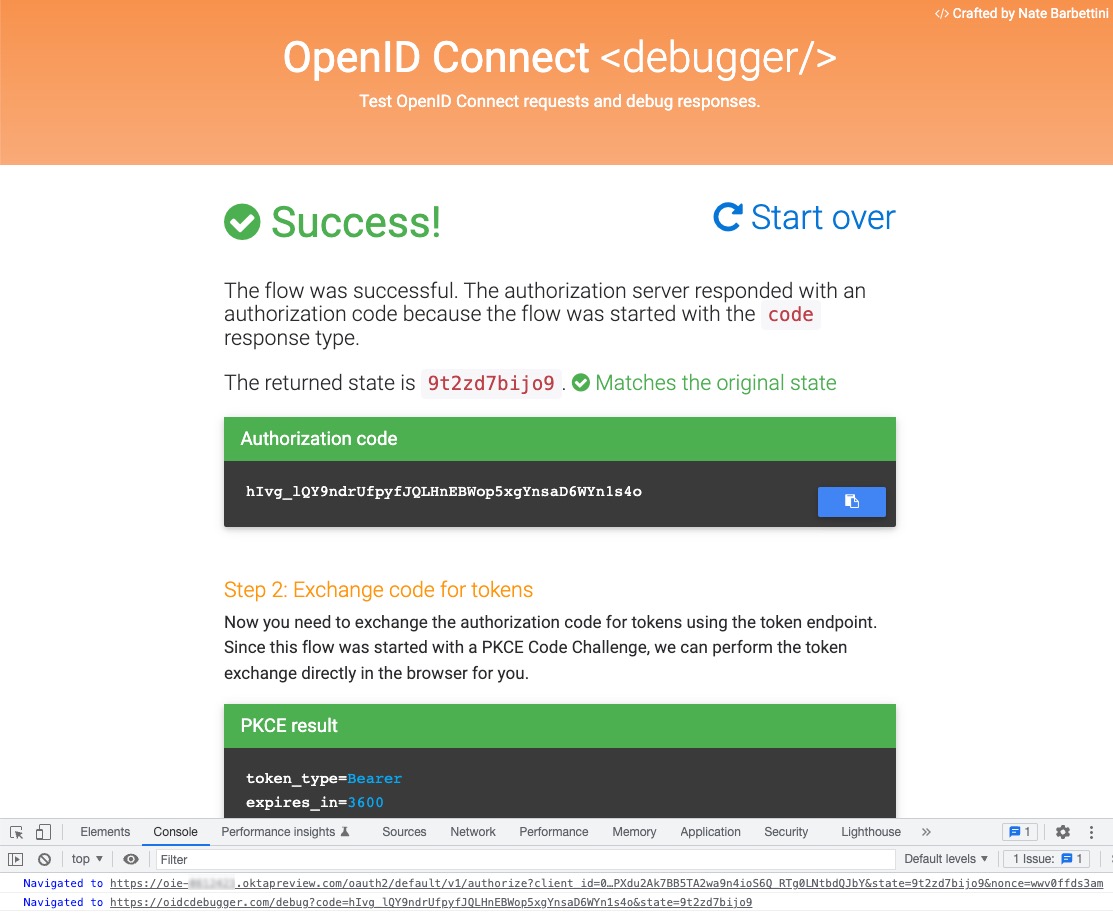
At the bottom of the page, you’ll see how the authorization code request is formed. Press Send Request to start the flow.
First, you’ll authenticate using Okta if you still need to sign in by redirecting to an Okta-hosted sign-in page. Redirecting to the Identity Provider’s hosted sign-in page is the best practice for security, so it’s also a common practice you’ll see across Identity Providers. Completing sign-in redirects you back to the OIDC debugger with a success message. You’ll see the authorization code automatically exchanged for tokens.
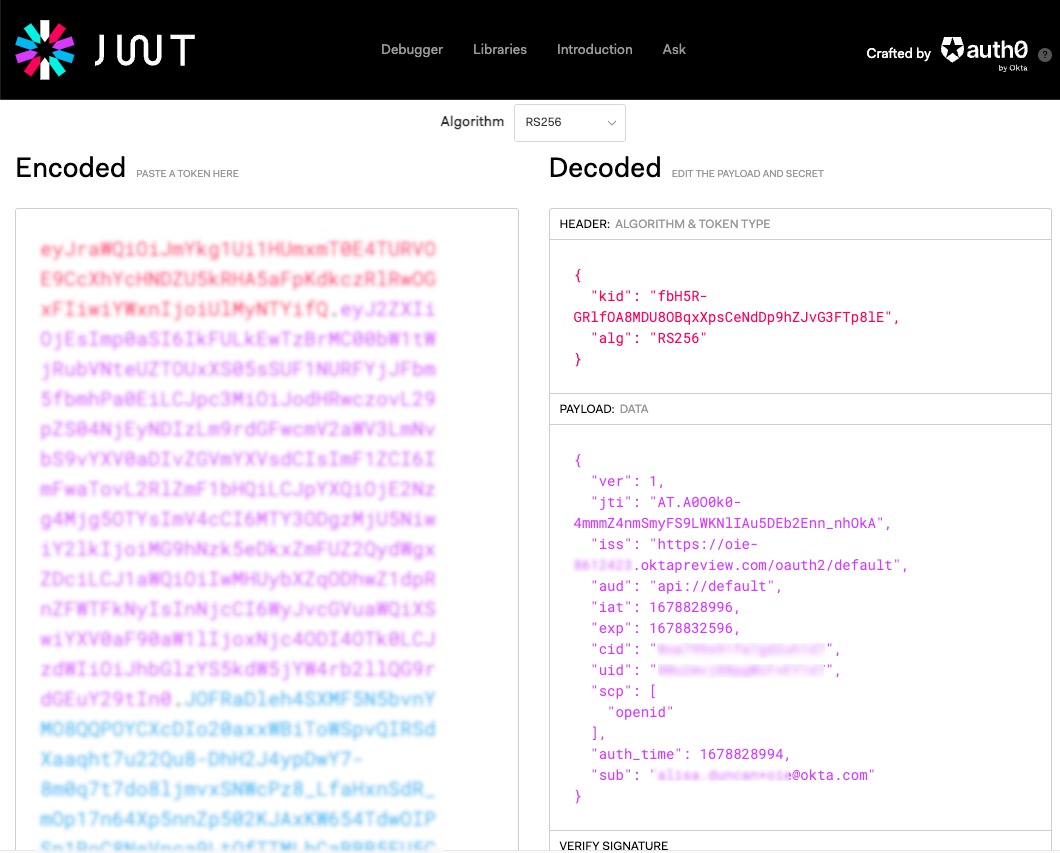
The token format for ID tokens is JSON Web Token (JWT). The access token from Okta is also a JWT. JWT is an open standard (RFC 7519) that allows systems to exchange information in JSON format securely. They are compact and safe from modifications, but our tokens contain public information. Don’t worry! They are secure, just not confidential.
You can copy the access token or ID token value from the response and read the contents using a JWT debugger.
So this is cool, but what do we do with the tokens in our SPA? Let’s bring these concepts into our front-end application.
Add authentication to your SPA
First, we need an Okta OIDC application supporting our SPA’s redirect URI. We could edit the existing OIDC debugger application we created previously, or we can use a handy Okta CLI command to set everything up for us and to scaffold out a sample application in our preferred framework.
Use the following command in the terminal to get going quickly. There’s a separate command for each Angular, React, and Vue.
Angular
okta start angular
React
okta start react
Vue
okta start vue
Follow the instructions in the terminal to start the application. You should be able to sign in and sign out. Additionally, you can watch network requests for the calls it makes.
We don’t have a refresh token by default. You can enable that in the Okta Admin Console. Navigate to the Okta Developer site and sign in to your Okta organization. In the Admin Console, navigate to Applications > Applications and select the Okta application for the SPA you created. Edit the settings to enable Refresh Token. It automatically adds Refresh Token Rotation. Save your changes.
If you still need to, open the SPA code in your favorite IDE. Depending on your framework, navigate to the config.js or app.config.ts file. You’ll see the OIDC config and property for scopes where you will add offline_access. Your OIDC config looks something like this:
{
    clientId: CLIENT_ID,
    issuer: ISSUER,
    redirectUri: window.location.origin + '/login/callback',
    scopes: ['openid', 'profile', 'email', 'offline_access']
}
Now try rerunning the SPA. If you inspect the network request, you’ll see the refresh token too. You can see the tokens by looking at the contents of your local storage too.
Use auth tokens in SPAs
Now that we have these tokens in our SPA, what do we do with them? Let a trusted OIDC library, such as the Okta SDKs, handle all the token requests and refresh them for us. Behind the scenes, the OIDC library is hard at work exchanging tokens.
We’re primarily interested in the contents of the ID token and using the access token.
How to use the access token
The access token gives us access to resources. That means we use access tokens in outgoing API requests that our application needs, like for Sunny to get their next rawring lesson.
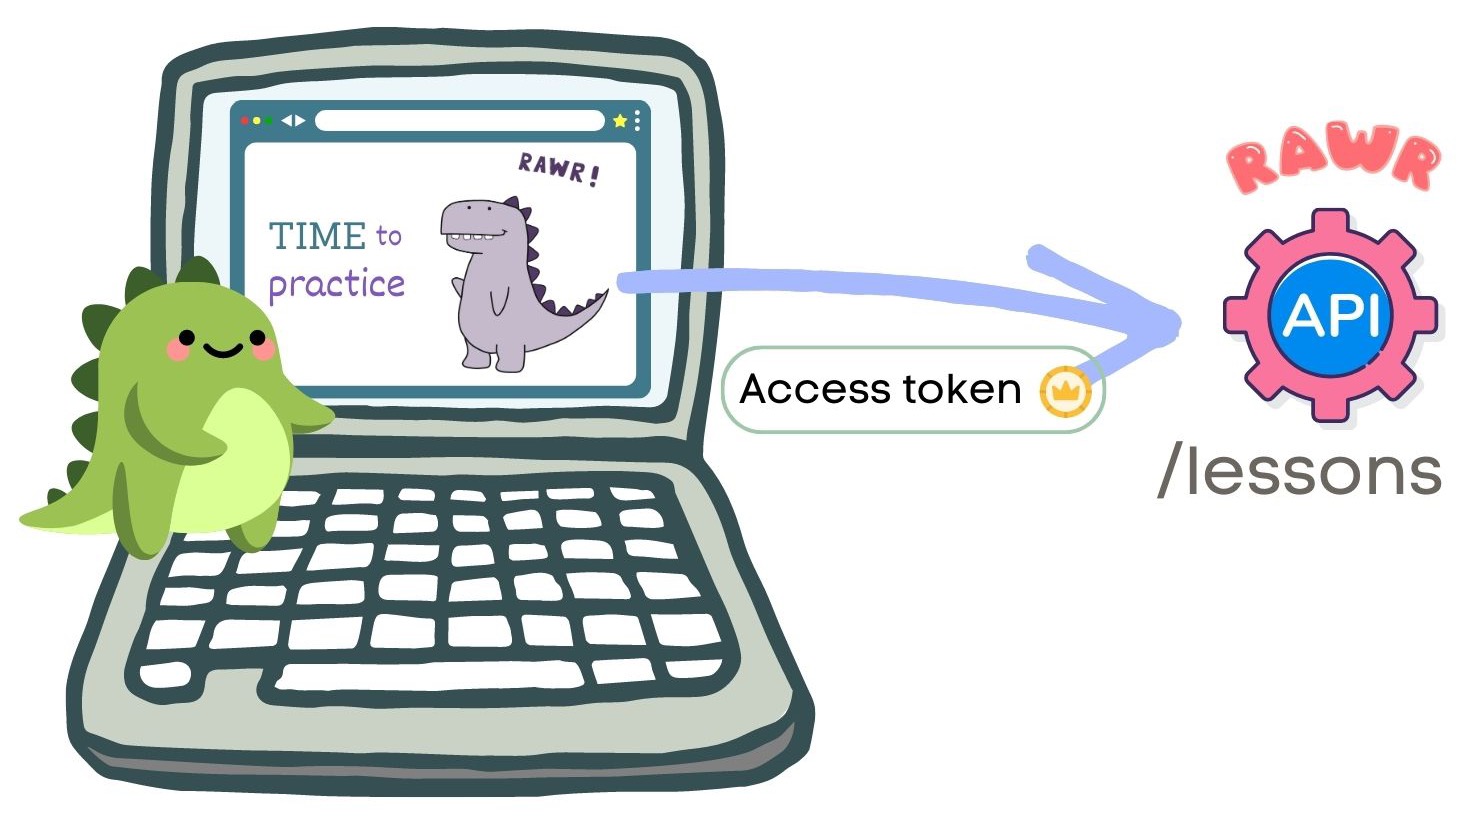
You’ll send the access token as a Bearer token in the HTTP call’s Authorization header. So in the case of Sunny, the outgoing HTTP call looks like this.
GET /lessons
Authorization: Bearer access_token_value
You’ll want to ensure you’re not adding the access token to calls outside your system by maintaining an allowlist of origins that should include the token.
A great way to manage adding the Authorization header and the logic to verify the call matches the allowlist of origins is using an interceptor. Interceptors sit between your application and outgoing (or incoming) HTTP requests. Angular includes the concept of interceptors within the framework, and if you use Axios in Vue or React apps, you can configure interceptors there.
You can see access tokens in action within the SPA you previously created. If you navigate to Messages in the application, it will make a call to a resource server and add the access token to the Authorization header. If you want to see the messages request succeed, you’ll need to run the resource server in Okta’s samples-nodejs-express-4 repo.
How to use the ID token
Since the ID token contains user identity information, you can use it to start populating your user store and for supporting identifiers you need immediately, such as their name.
In the SPA you previously created, you can see all your claims if you navigate to Profile.
The Okta SDK automatically decodes the ID token so that we can use the claims without decoding the payload ourselves. But before we jump right into using the claims, the Okta SDK first validates the token signature, which helps ensure the token’s integrity and that it hasn’t been altered. Let’s take a quick peek under the covers at what happens during this validation process.
Since this token is a JWT, we can rely on standard validation for JWTs for the validity of the token itself. Next, it will validate some claims in the payload, including:
iss- the issuer, which should match the original request. In the OIDC Debugger tool, we passed this in as the “Authorize URI”aud- the audience, which should match the client ID of your Okta applicationnonce- an arbitrary one-time value that should match the original request. In the OIDC Debugger tool, it was pre-populated for us.expandiat- the expiry time and issued at times, respectively. Only non-expired tokens with an expected issue time here, please!
Once you have the access token, you can also make a request to the OIDC Discovery document’s User Info endpoint, which may contain more information about the user than what is available in your ID token. You may also need to add any user information and user settings from API calls within your system into your user store since the SPAs we write have complex user information.
Learn more about OAuth, OIDC, tokens, and authentication best practices
Hopefully, this gives insight into how authentication and authorization with OAuth 2.0 + OpenID Connect work for public clients like SPAs and how each token fits into the landscape.
If you liked this post, you might want to check out the following:
- The Identity of OAuth Public Clients
- Is the OAuth 2.0 Implicit Flow Dead?
- The Things to Keep in Mind about Auth
Remember to follow us on Twitter and subscribe to our YouTube channel for more exciting content. We also want to hear about what tutorials you want to see. Leave us a comment below.
Changelog:
- Apr 26, 2023: Embedded a link to a companion YouTube video.
Alisa Duncan is a Senior Developer Advocate at Okta, a full-stack developer, and a community builder who loves the thrill of learning new things. She is a Google Developer Expert in Angular and organizes coding workshops and community events locally and internationally. Her background is primarily working on enterprise software platforms, and she is a fan of all things TypeScript and JavaScript.
Okta Developer Blog Comment Policy
We welcome relevant and respectful comments. Off-topic comments may be removed.