Native SSO: Desktop and Mobile Apps Single Sign-On
When you hear SSO (Single Sign-On), you probably immediately think of web apps, and how you only need to sign into one web app first, then all other web apps give you seamless access. Unfortunately, for desktop and mobile applications (often referred to as “native apps”), the seamless web SSO experience (also referred to as native SSO) has not caught on. This is partly due to the lack of an industry standard or best practice on how to accomplish native SSO.
Although there is no standard yet, there’s been growing demand for a solution, due to the continued expansion of native apps, both desktop and mobile. In 2020, a report from RiskIQ counted 8.9 million mobile apps. There are also a large number of internal native apps available to employees within an enterprise.
In comparison with desktop or web apps, it’s even more critical to enable SSO for mobile apps, due to the smaller keyboard and screen on a mobile device, which makes password input more painful. To date, complex proprietary solutions have not proven interoperable with the variety of native applications an enterprise installs on employee devices. Thus, there is still a dire need for an industry-standard solution.
Fortunately, this problem is widely recognized, and an OIDC draft spec Native SSO for Mobile Apps has been released to address the issue using a token-exchange approach. Okta recently added support for this draft spec. In this article, we describe the solution and compare it to an existing approach. We also share an example app to demonstrate how you can use the token-exchange solution to build SSO for your apps, not only within the same device, but also across devices. Specifically, the example demonstrates how you can single-sign-on with Okta to a mobile app on one device (such as your iPhone), then have access to all your apps on another desktop device (such as your Mac).
Note: In May 2025, the Okta Integrator Free Plan replaced Okta Developer Edition Accounts, and the Okta CLI was deprecated.
We preserved this post for reference, but the instructions no longer work exactly as written. Replace the Okta CLI commands by manually configuring Okta following the instructions in our Developer Documentation.
Sharing web sessions with native apps
Before we describe the token-exchange solution, let’s explore how to build a native SSO solution based on web SSO. If we could share web login sessions with native apps, we could leverage the advance in browser SSO technology. Web session sharing has become more restrictive due to the continued increase in privacy restrictions on mobile devices. Apple leads the charge on adding more privacy restrictions, but Android is quickly following suit.
Apple introduced SFSafariViewController in iOS 9, which enables an embedded web browser experience inside a mobile app. But Apple quickly changed its behavior. In iOS 11, SFSafariViewController no longer shares any browser cookies with the standalone Safari browser on the same device, making it impossible to share SSO sessions between a mobile app and a web app.
Apple introduced ASWebAuthenticationSession in iOS 12 to add the ability to share browser cookies, but it is restrictive:
It can only be used in an OIDC-style login flow, and only shares persistent cookies, not session cookies.
The Okta developer guide on web session sharing illustrates how two mobile apps on the same device can share a web login session. At a high level, it involves these steps:
- Enable persistent cookies. Okta login session is stored in a session cookie by default, but only persistent cookies can be shared in iOS.
- Login App 1 through the embedded browser. The login session is saved in a persistent cookie.
- Login App 2 through the embedded browser. Since the login session is still in the persistent cookie, the user is not prompted for login.
Native SSO based on token exchange
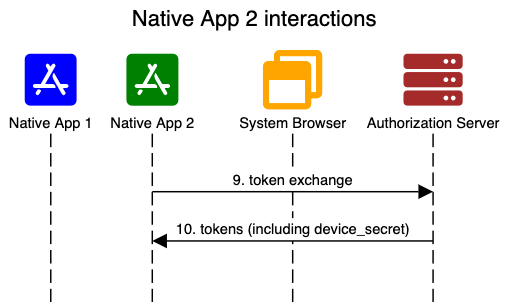
Okta’s native SSO solution is based on token exchange, and it builds on an OIDC draft spec Native SSO for Mobile Apps. The following diagrams, taken from the spec, illustrate the flow to enable native SSO.
Sign-in to the first application is similar to a normal OIDC sign in, using a system browser. The only difference is that we request the device_sso scope, and in return, we receive a device_secret along with the returned tokens.
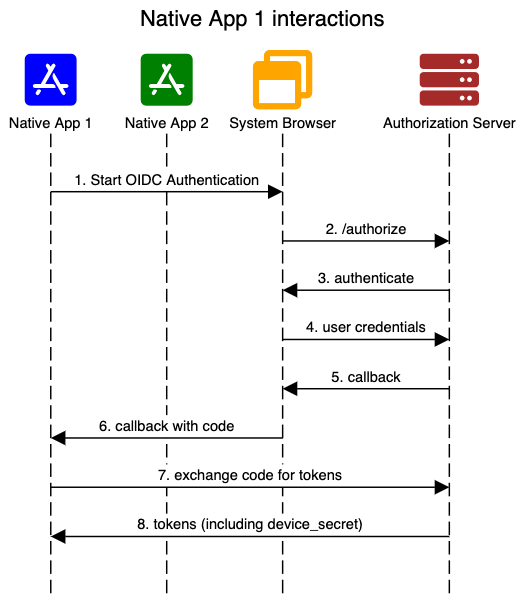
When Native App 2 requests login, it can simply take the ID token and device secret returned for App 1, and call the token endpoint to exchange for tokens for App 2. The returned tokens for App 2 have their own refresh lifecycle.
Our Native SSO Guide goes into more detail on how to enable native SSO, and demonstrates the interaction through curl commands.
How is it different
The token-exchange-based native SSO solution is simpler and better than sharing web SSO in at least several regards:
- Out-of-the-box config: Sharing web SSO requires you to use an API to configure all users to use a persistent cookie for session management. (The default is to use a session cookie.) A login session will persist even after you close the browser, which may be a surprise for some users. In contrast, native SSO is one of the supported grant types that can be easily enabled in the Okta admin console.
- Single LogOut: It is not possible to single logout all applications with the web SSO sharing solution. If you want to log out from all apps, you have to log out from each app one by one. In contrast, in native SSO, one can simply revoke
device_secret, then all apps automatically sign out. - Multiple devices: Sharing web SSO can only work on the same device. In contrast, native SSO can work across devices, as long as
device_secretcan be safely shared. In fact, the remaining portion of this blog demonstrates how to implement native SSO across multiple Apple devices.
Single sign-on across multiple Apple devices
Many of us own multiple devices such as iPhone, MacBook, iPad. It would be great to single sign-on to apps across all the devices we own. In this section, we demonstrate how to sign into a mobile app on an iOS device and a desktop app on a MacBook by leveraging iCloud keychain.
Note that this demo generalizes the device_secret concept described in the draft spec to beyond a single device. While it allows you to single sign-on across multiple devices, you do lose the ability to revoke access on an individual device. (You can only revoke all devices.) Also, you lose the assurance that the device_secret can identify a single device.
We first need to create two OIDC apps in your Okta admin console, one for the iOS mobile app, another for the Mac desktop app. See our Native SSO Guide for full instruction.
Next, let us start an Xcode project, and add two targets: one for an iOS app (nativesso), another for a Mac app (nativessomac). The full source code can be found in the Native SSO sample app repo.
Store device secret in iCloud Keychain
The key to enabling native SSO is to be able to securely share device_secret across multiple devices. We can use iCloud Keychain. We will show how to use Apple’s keychain interface functions to save and restore the device secret.
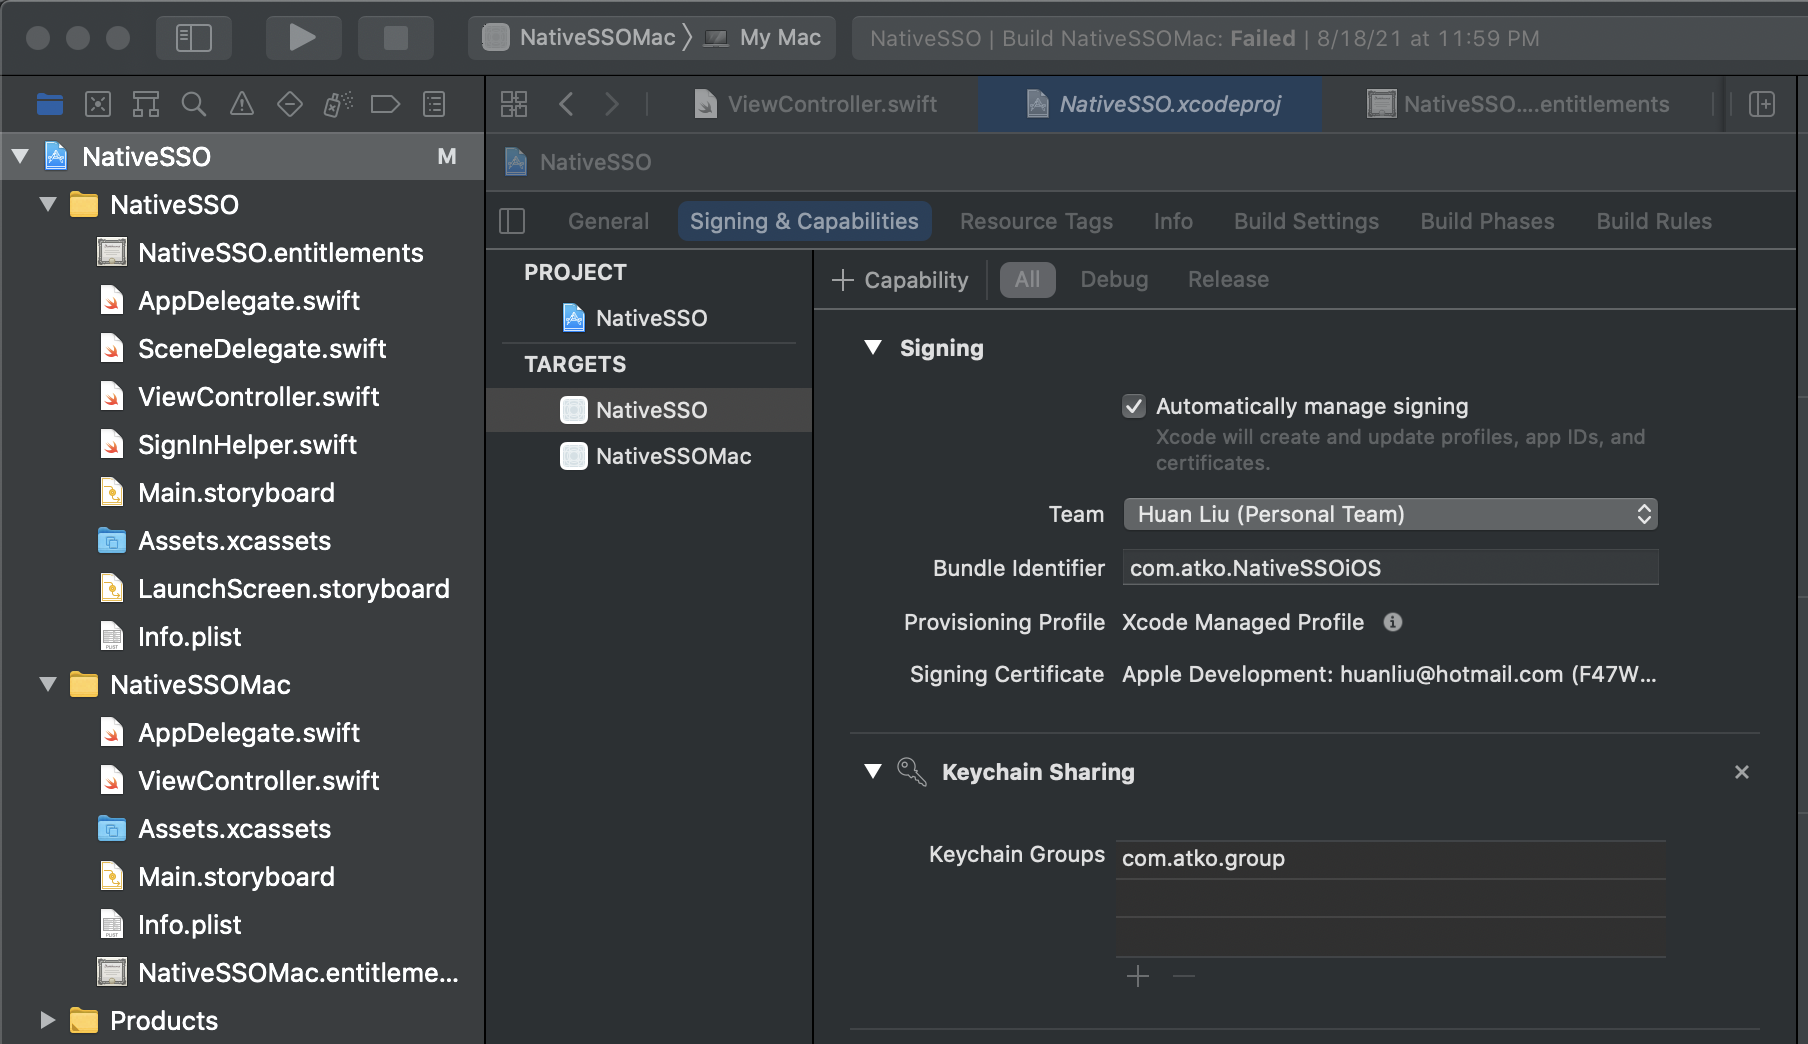
By default, a keychain item is only stored per app. No other apps can access the keychain items your app saves. However, the keychain has a concept called the keychain access group. You can enable multiple apps to share the same keychain access group, then all of these apps can read and write from the same Keychain Access Group. A Keychain Access Group is tied to a developer account, so only your apps (if enabled) can access the group. No other apps from other developers can access your group, so it is secure.
First, let us add the keychain access group. Click the target, select Signing & Capabilities, click + to add a Keychain Sharing capability. Then input a unique group name, such as com.atko.group, in the box. This will update the entitlement file. Repeat this step for other targets or apps that you want to share the device secret with.
To save a device secret and ID token in the keychain, we invoke the following function:
static func addDeviceSecret(idToken: String, deviceSecret: String) {
    let attributes: [String: Any] = [
        (kSecClass as String): kSecClassGenericPassword,     // only Password items can use iCloud keychain
        (kSecAttrSynchronizable as String): kCFBooleanTrue!, // allow iCloud
        (kSecAttrLabel as String): keychainTag,              // tag to make it easy to search
        (kSecAttrAccessGroup as String): keychainGroup,      // multiple apps can share through this group
        (kSecAttrAccount as String): idToken,
        (kSecValueData as String): deviceSecret.data(using: .utf8)!
    ]
    // Let's add the item to the Keychain! 😄
    let status = SecItemAdd(attributes as CFDictionary, nil)
}
We first set the attributes:
kSecClassis set tokSecClassGenericPasswordbecause iCloud keychain only supports password items, not certificates.kSecAttrSynchronizableflag indicates that we want to use iCloud keychain.- We add a
kSecAttrLabelto facilitate a later query to find this key. kSecAttrAccessGroupis set to the same keychain access group enabled in the entitlement, for examplecom.atko.group.- We reuse fields designed for saving passwords: save ID token in
kSecAttrAccountfield, and device secret inkSecValueData.
After the attributes are set, it is a simple call to Apple’s API SecItemAdd to save the credentials.
We can find the previously saved device secret through a query to the iCloud keychain through the following function.
static func queryForDeviceSecret() -> (idToken: String?, deviceSecret: String?) {
    let query: [String: Any] = [
        (kSecClass as String): kSecClassGenericPassword,     // only Password items can use iCloud keychain
        (kSecAttrSynchronizable as String): kCFBooleanTrue!, // allow iCloud
        (kSecAttrLabel as String): keychainTag,              // tag to make it easy to search
        (kSecAttrAccessGroup as String): keychainGroup,      // multiple apps can share through this group
        (kSecMatchLimit as String): kSecMatchLimitOne,       // should only have one key
        (kSecReturnAttributes as String): true,
        (kSecReturnData as String): true]
    var item: CFTypeRef?

    // should succeed
    let status = SecItemCopyMatching(query as CFDictionary, &item)

    if let existingItem = item as? [String: Any],
        let idToken = existingItem[kSecAttrAccount as String] as? String,
        let deviceSecretData = existingItem[kSecValueData as String] as? Data {
        let deviceSecret = String(data: deviceSecretData, encoding: .utf8)
        return (idToken, deviceSecret)
    }
    return (nil, nil)
}
The query is set using the same set of parameters as used in the SecItemAdd call, then it is a simple call to the Apple’s API SecItemCopyMatching.
Exchange device secret for new tokens
Okta OIDC iOS library is a wrapper around the AppAuth library. For token exchange, we will use AppAuth’s built-in functions.
We first have to construct a configuration for AppAuth.
let configuration = OIDServiceConfiguration.init(
    authorizationEndpoint: URL(string: authorizeUrl)!,
    tokenEndpoint: URL(string: tokenUrl)!
)
The authorizeUrl should be set to your AS (Authorization Server)’s “authorize” URL, for instance: https://dev-133337.okta.com/oauth2/default/v1/authorize. The tokenEndpoint should be the token url, like this: https://dev-133337.okta.com/oauth2/default/v1/token.
Then we construct a token exchange request. Note that we specify the new grant type urn:ietf:params:oauth:grant-type:token-exchange, and also add in the special parameters in the additionalParameters field. Specifically, actor_token should be set to the device token, and subject_token should be set to the ID token you obtained earlier when a different app signed in.
let request = OIDTokenRequest(
                configuration: configuration,
                grantType: "urn:ietf:params:oauth:grant-type:token-exchange",
                authorizationCode: nil,
                redirectURL: nil,
                clientID: oktaOidc.configuration.clientId,
                clientSecret: nil,
                scope: "openid offline_access",
                refreshToken: nil,
                codeVerifier: nil,
                additionalParameters: [
                   "actor_token" : deviceSecret!,
                   "actor_token_type" : "urn:x-oath:params:oauth:token-type:device-secret",
                   "subject_token" : idToken!,
                   "subject_token_type" : "urn:ietf:params:oauth:token-type:id_token",
                   "audience" : "api://default"])
Lastly, we perform token exchange to get a new accessToken, refreshToken for the new app.
// perform token exchange
OIDAuthorizationService.perform(request) { tokenResponse, error in
    if error != nil {
        // handle errors
    }
// Signed in, persist tokens,
}
End-to-end login flow
Now that we have the building blocks of save-and-query device secret, and token exchange, let’s tie them together to enable login on a device. Essentially, it follows these steps:
- Look up
deviceSecretfrom iCloud keychain.let (idToken, deviceSecret) = queryForDeviceSecret() - If
deviceSecretexists, attempts token exchange, as outlined in the previous section. - If the token exchange succeeds, the user is already logged in. We then save login state locally so that the app does not need to do a login check on the next startup. This is leveraging Okta OIDC library’s built-in capability to persist login state locally.
stateManager!.writeToSecureStorage() - If no
deviceSecret, or token exchange fails, invoke the OIDC login flow. First construct a configuration for Okta’s OIDC library:let configuration = try OktaOidcConfig(with: [ "issuer": "https://dev-133337.okta.com/oauth2/default", "clientId": "0oa826j5pHmPRt2n00w6", "scopes": "device_sso openid offline_access", "redirectUri": "nativesso:/callback", "logoutRedirectUri": "nativesso:/logout" ])Then invoke the OIDC flow. On an iOS device:
oktaOidc.signInWithBrowser(from: self, callback: SignInHelper.oktaOidcCallback)On a Mac:
oktaOidc.signInWithBrowser(redirectServerConfiguration: nil, callback: SignInHelper.oktaOidcCallback) - If the sign-in is successful, we save the login state locally, the same as in step three. In addition, we save the device secret in the iCloud keychain, so that other apps can perform native SSO login.
  removeDeviceSecret()
  addDeviceSecret(idToken: stateManager!.idToken!,
               deviceSecret: stateManager!.authState.lastTokenResponse!.additionalParameters!["device_secret"]! as! String)
Note that the Okta SDK currently does not understand the device secret field, so we are parsing for the field directly from the last token request response.
By now, you should be able to launch both the iPhone app and the Mac app. The first one will prompt you for login, but the second one will be able to log you in without any prompt.
Okta’s Native SSO is available now
Okta’s native SSO feature is now in GA (general availability). You can turn it on in your org, and start experimenting. Beyond the demo use case we showed above, we envision it will open up many more scenarios. Give it a try, and drop a comment below to directly reach the development team. We would love to hear your feedback and feature requests.
Want to stay up to date on the latest articles, videos, and events from the Okta DevRel team? Follow our social channels: @oktadev on Twitter, Okta for Developers on LinkedIn, Twitch, and YouTube.”
Huan Liu is a Director of Engineering and Sphere Head for CIAM (Customer Identity Access Management) Products. His team is responsible for both the end-to-end CIAM experiences and the underlying federation protocols. Prior to Okta, Huan was an Engineering Manager and Head of the Terragraph program at Facebook. He was also the co-lead of the Maveric program, which brings Facebook's ML expertise to 5G networks. Huan holds a Ph.D. degree in Electrical Engineering from Stanford University.
Okta Developer Blog Comment Policy
We welcome relevant and respectful comments. Off-topic comments may be removed.