Update App Secrets with Jenkins CI and .NET Core

Note: In May 2025, the Okta Integrator Free Plan replaced Okta Developer Edition Accounts, and the Okta CLI was deprecated.
We preserved this post for reference, but the instructions no longer work exactly as written. Replace the Okta CLI commands by manually configuring Okta following the instructions in our Developer Documentation.
Introduction
Jenkins is a free and open-source application that makes it easy to create CI/CD pipelines in almost any language or environment. Jenkins features a vast number of plugs to help create a CI/CD environment that is tailored to your technologies.
In this application, you will create a .NET5 MVC web application and check it into a git repository. You will secure this application with Okta. Finally, you will set up a Jenkins project to fetch the code from your git repository, publish the project, apply configuration values, and run the application. Combining these three technologies you’ll see how quick and easy it is to set up a modern CI/CD environment for a web application that is properly secured with a great single sign-on provider.
What you’ll need
- Your favorite IDE. I will be using Visual Studio but Visual Studio Code is another great option
- A git repository
- .NET 5
- Jenkins
- A Web Browser to Access Jenkins
- An Okta Developer Account
- The Okta CLI tool
Create your Okta Application
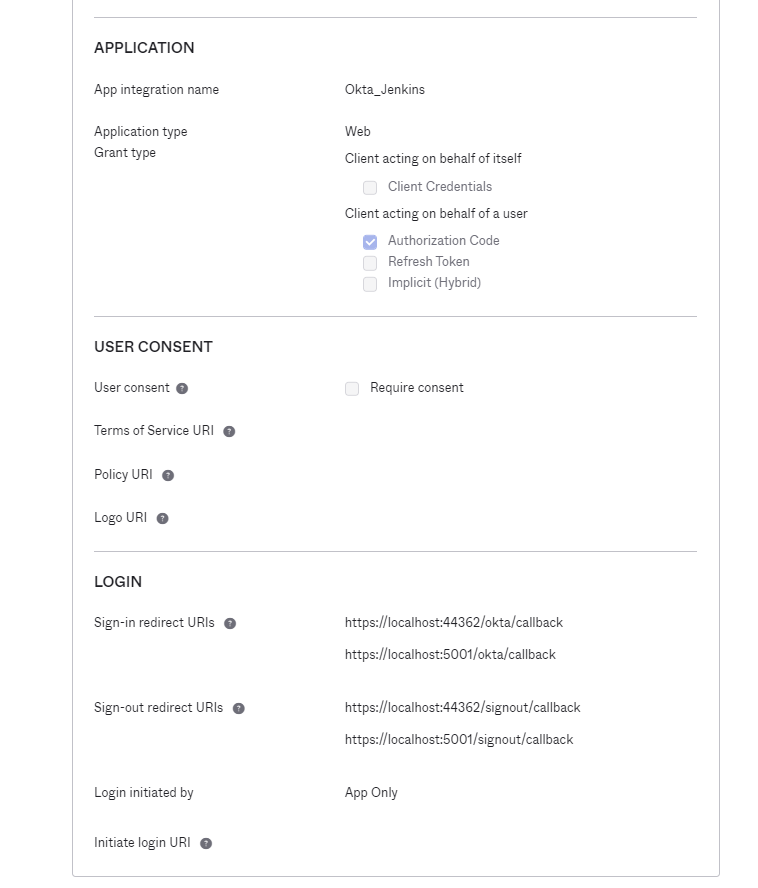
The first thing you want to do is create your Okta application. To do this you can use the new Okta CLI tool. Download the Okta CLI tool if you haven’t already and run okta login to log into your account. Next run okta apps create and follow the prompts you receive. First, select web as your application type. Next, for your Redirect URI type in your web application’s development location and append /okta/callback to it. For Post Logout RedirectURI use your same base domain and append /signout/callback as this is the route Okta will use by default. If you have multiple authorization services the CLI tool will prompt you to select one. For this project you can select default however in a production environment you should create a custom server. After a moment the CLI tool will return your ClientId. Be sure to note this as you will need it in your application.
Next, navigate to your Okta admin portal. The first thing you want to do is note your Client Secret. Next, press Edit under the General Settings tab and scroll down to the Login subsection. Add a value under Sign-in redirect URIs with the same path as before but use https://locahost:5001 instead of your development domain. This URI will be used when you publish and run your application with Jenkins. Similarly, under Sign-out redirect URIs add a value with the same route as your development route but using https://localhost:5001.
Create your .NET Application
Open Visual Studio and select Create a New Project. Use the template for ASP.NET Core Web App(Model-View-Controller). Give your application a meaningful name click Create. Visual Studio will scaffold your application. Once it is complete you can begin making the necessary changes.
First, install the Okta.AspNetCore package from nuget using the command:
Install-Package Okta.AspNetCore -Version 3.5.0
Next, modify your Startup.cs file with the code below.
using Microsoft.AspNetCore.Builder;
using Microsoft.AspNetCore.Hosting;
using Microsoft.AspNetCore.HttpsPolicy;
using Microsoft.Extensions.Configuration;
using Microsoft.Extensions.DependencyInjection;
using Microsoft.Extensions.Hosting;
using System;
using System.Collections.Generic;
using System.Linq;
using System.Threading.Tasks;

using Microsoft.AspNetCore.Authentication.Cookies;
using Okta.AspNetCore;

namespace Okta_Jenkins
{
    public class Startup
    {
        public Startup(IConfiguration configuration)
        {
            Configuration = configuration;
        }

        public IConfiguration Configuration { get; }

        // This method gets called by the runtime. Use this method to add services to the container.
        public void ConfigureServices(IServiceCollection services)
        {
            services.AddAuthentication(options =>
            {
                options.DefaultAuthenticateScheme = CookieAuthenticationDefaults.AuthenticationScheme;
                options.DefaultSignInScheme = CookieAuthenticationDefaults.AuthenticationScheme;
                options.DefaultChallengeScheme = OktaDefaults.MvcAuthenticationScheme;
            })
            .AddCookie()
            .AddOktaMvc(new OktaMvcOptions
            {
                // Replace these values with your Okta configuration
                OktaDomain = Configuration.GetValue<string>("Okta:Domain"),
                ClientId = Configuration.GetValue<string>("Okta:ClientId"),
                ClientSecret = Configuration.GetValue<string>("Okta:ClientSecret"),
                CallbackPath = Configuration.GetValue<string>("Okta:CallbackPath")
            });

            services.AddControllersWithViews();
        }

        // This method gets called by the runtime. Use this method to configure the HTTP request pipeline.
        public void Configure(IApplicationBuilder app, IWebHostEnvironment env)
        {
            if (env.IsDevelopment())
            {
                app.UseDeveloperExceptionPage();
            }
            else
            {
                app.UseExceptionHandler("/Home/Error");
                // The default HSTS value is 30 days. You may want to change this
                // for production scenarios, see https://aka.ms/aspnetcore-hsts.
                app.UseHsts();
            }
            app.UseHttpsRedirection();
            app.UseStaticFiles();

            app.UseRouting();

            app.UseAuthentication();
            app.UseAuthorization();

            app.UseEndpoints(endpoints =>
            {
                endpoints.MapControllerRoute(
                    name: "default",
                    pattern: "{controller=Home}/{action=Index}/{id?}");
            });
        }
    }
}
In your new Startup.cs file you are configuring the application to use authentication. In addition, you are also configuring your application to use the Okta.AspNetCore library you added a moment ago.
Next, add a new controller called AccountController.cs. This will handle your login and logout methods.
using Microsoft.AspNetCore.Mvc;

using Microsoft.AspNetCore.Authentication.Cookies;
using Okta.AspNetCore;

namespace Okta_Jenkins.Controllers
{
    public class AccountController : Controller
    {
        public IActionResult Login()
        {
            if (!HttpContext.User.Identity.IsAuthenticated)
            {
                return Challenge(OktaDefaults.MvcAuthenticationScheme);
            }

            return RedirectToAction("Index", "Home");
        }

        [HttpPost]
        public IActionResult Logout()
        {
            return new SignOutResult(new[]
            {
                OktaDefaults.MvcAuthenticationScheme,
                CookieAuthenticationDefaults.AuthenticationScheme
            });
        }
    }
}
Next, replace the code in your HomeController with the following.
using Microsoft.AspNetCore.Mvc;
using Microsoft.Extensions.Logging;
using Okta_Jenkins.Models;
using System;
using System.Collections.Generic;
using System.Diagnostics;
using System.Linq;
using System.Threading.Tasks;

namespace Okta_Jenkins.Controllers
{
    public class HomeController : Controller
    {
        private readonly ILogger<HomeController> _logger;

        public HomeController(ILogger<HomeController> logger)
        {
            _logger = logger;
        }

        public IActionResult Index()
        {
            if(User.Identity.IsAuthenticated)
            {
                return RedirectToAction("Index", "Profile");
            }

            return View();
        }
    }
}
Your new HomeController will now check for authenticated users before dropping them on the home page. If the user is authenticated, you will redirect them to their profile page. To do that you will need to add ProfileController.cs to your controllers.
using Microsoft.AspNetCore.Mvc;
using Microsoft.Extensions.Logging;
using Microsoft.AspNetCore.Authorization;

namespace Okta_Jenkins.Controllers
{
    public class ProfileController : Controller
    {
        private readonly ILogger<ProfileController> _logger;

        public ProfileController(ILogger<ProfileController> logger)
        {
            _logger = logger;
        }

        [Authorize]
        public IActionResult Index()
        {
            return View();
        }
    }
}
The Index method here has the Authorize attribute. This will prevent unauthenticated users from accessing the page. They will be redirected back to the home page where they will need to log in.
Next, you will want to work on your views. Open _Layout.cshtml and replace the code with the code below.
<!DOCTYPE html>
<html lang="en">
<head>
<meta charset="utf-8" />
<meta name="viewport" content="width=device-width, initial-scale=1.0" />
<title>@ViewData["Title"] - Okta with Jenkins</title>
<link rel="stylesheet" href="~/lib/bootstrap/dist/css/bootstrap.min.css" />
<link rel="stylesheet" href="~/css/site.css" />
</head>
<body>
<header>
<nav class="navbar navbar-expand-sm navbar-toggleable-sm navbar-light bg-white border-bottom box-shadow mb-3">
<div class="container">
<a class="navbar-brand" asp-area="" asp-controller="Home" asp-action="Index">Home</a>
<button class="navbar-toggler" type="button" data-toggle="collapse" data-target=".navbar-collapse" aria-controls="navbarSupportedContent"
aria-expanded="false" aria-label="Toggle navigation">
<span class="navbar-toggler-icon"></span>
</button>
<div class="navbar-collapse collapse d-sm-inline-flex justify-content-between">
<ul class="navbar-nav justify-content-end flex-grow-1">
<li class="nav-item">
@if (User.Identity.IsAuthenticated)
{
<form asp-action="Logout" asp-controller="Account" asp-method="POST">
<input type="submit" value="Logout" class="btn btn-secondary" />
</form>
}
else
{
<a class="btn btn-primary" asp-action="Login" asp-controller="Account">Login</a>
}
</li>
</ul>
</div>
</div>
</nav>
</header>
<div class="container">
<main role="main" class="pb-3">
@RenderBody()
</main>
</div>
<footer class="border-top footer text-muted">
<div class="container">
© 2021 - Okta_Jenkins - <a asp-area="" asp-controller="Home" asp-action="Privacy">Privacy</a>
</div>
</footer>
<script src="~/lib/jquery/dist/jquery.min.js"></script>
<script src="~/lib/bootstrap/dist/js/bootstrap.bundle.min.js"></script>
<script src="~/js/site.js" asp-append-version="true"></script>
@await RenderSectionAsync("Scripts", required: false)
</body>
</html>
The only difference here is that you have added a Login button for unauthenticated users and a logout button for authenticated ones.
Next, open Home/Index.cshtml and replace the razor code with this.
@{
    ViewData["Title"] = "Home Page";
}

<div class="text-center">
    <h1 class="display-4">Welcome</h1>
    <p>This is a brief tutorial on using <a href="https://www.jenkins.io/" target="_blank" rel="nofollow">Jenkins CI/CD</a> with <a href="https://dotnet.microsoft.com/download/dotnet/5.0" target="_blank" rel="nofollow">.Net 5</a>, Secured with <a href="https://www.okta.com/" target="_blank" rel="nofollow">Okta</a></p>
    <p>Written by <a href="https://profile.fishbowlllc.com/" target="_blank" rel="nofollow">Nik Fisher</a></p>
</div>
Finally, create a new view for Profile/Index.cshtml and add the following code to it.
<div class="jumbotron">
    Welcome to your Profile
</div>
The last thing you will need to do is add your application settings. By default you should have a file called appsettings.json and one called appsettings.Development.json. If you don’t, create one and add the following code to appsettings.Development.json.
{
  "Logging": {
    "LogLevel": {
      "Default": "Information",
      "Microsoft": "Warning",
      "Microsoft.Hosting.Lifetime": "Information"
    }
  },
  "Okta": {
    "Domain": "{yourOktaDomain}",
    "ClientId": "{yourClientId}",
    "ClientSecret": "{yourClientSecret}",
    "CallbackPath": "/okta/callback"
  }
}
This file should be listed in your .gitignore file because it contains sensitive information. You should never check client secrets or any other sensitive data into your git repository. Next, add the following configuration to appsettings.json.
{
  "Logging": {
    "LogLevel": {
      "Default": "Information",
      "Microsoft": "Warning",
      "Microsoft.Hosting.Lifetime": "Information"
    }
  },
  "Okta": {
    "Domain": "",
    "ClientId": "",
    "ClientSecret": "",
    "CallbackPath": "/okta/callback"
  }
}
You will notice that this is the same structure as appsettings.development.json but without the sensitive values. When you create your Jenkins project, you will pull this file and publish it then you will override the settings in this file with environment variables.
Create your Jenkins Project
The first thing you’ll need to do is installing Jenkins. You can do that here on their site; Just make sure you get the appropriate version for your operating system.
Once Jenkins is installed on your machine you will be present with a screen for the first time login. Follow the instructions to get your admin password and log in. Jenkins will then offer to install recommended plugins. If this is your first time you can use that option. More advanced users may want to install the plugins they want manually. Note, you will need at least the Git plugin.
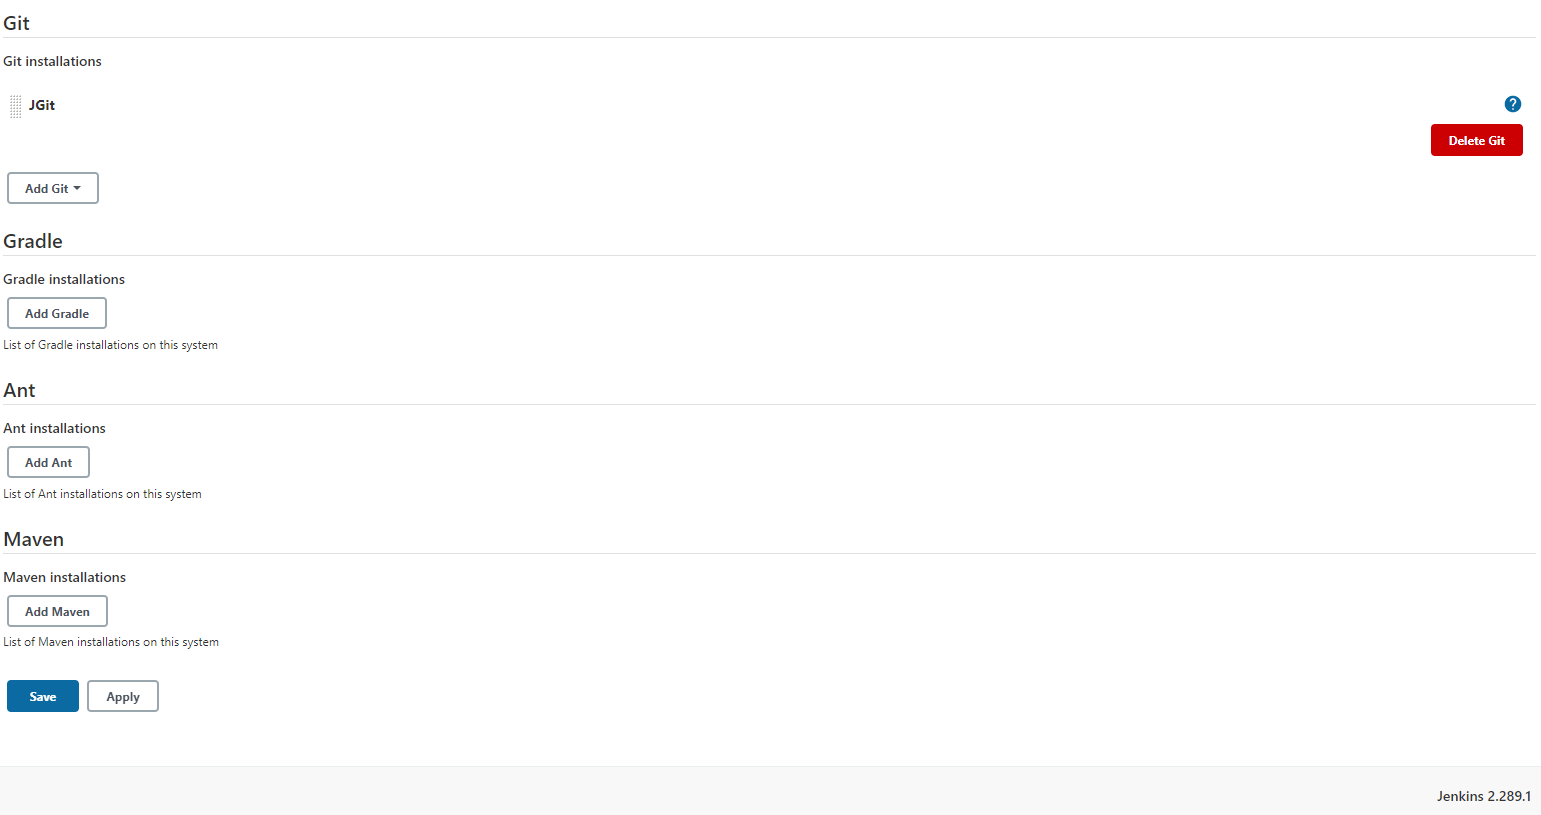
After that is complete you can begin to set up your project. However, if you are working on a windows machine you will want to change your Git to JGit. First, click on Manage Jenkins then click on Global Configuration Tool. Delete the default Git that was added there and click on Add Git. Select JGit then hit Save at the bottom of the page.
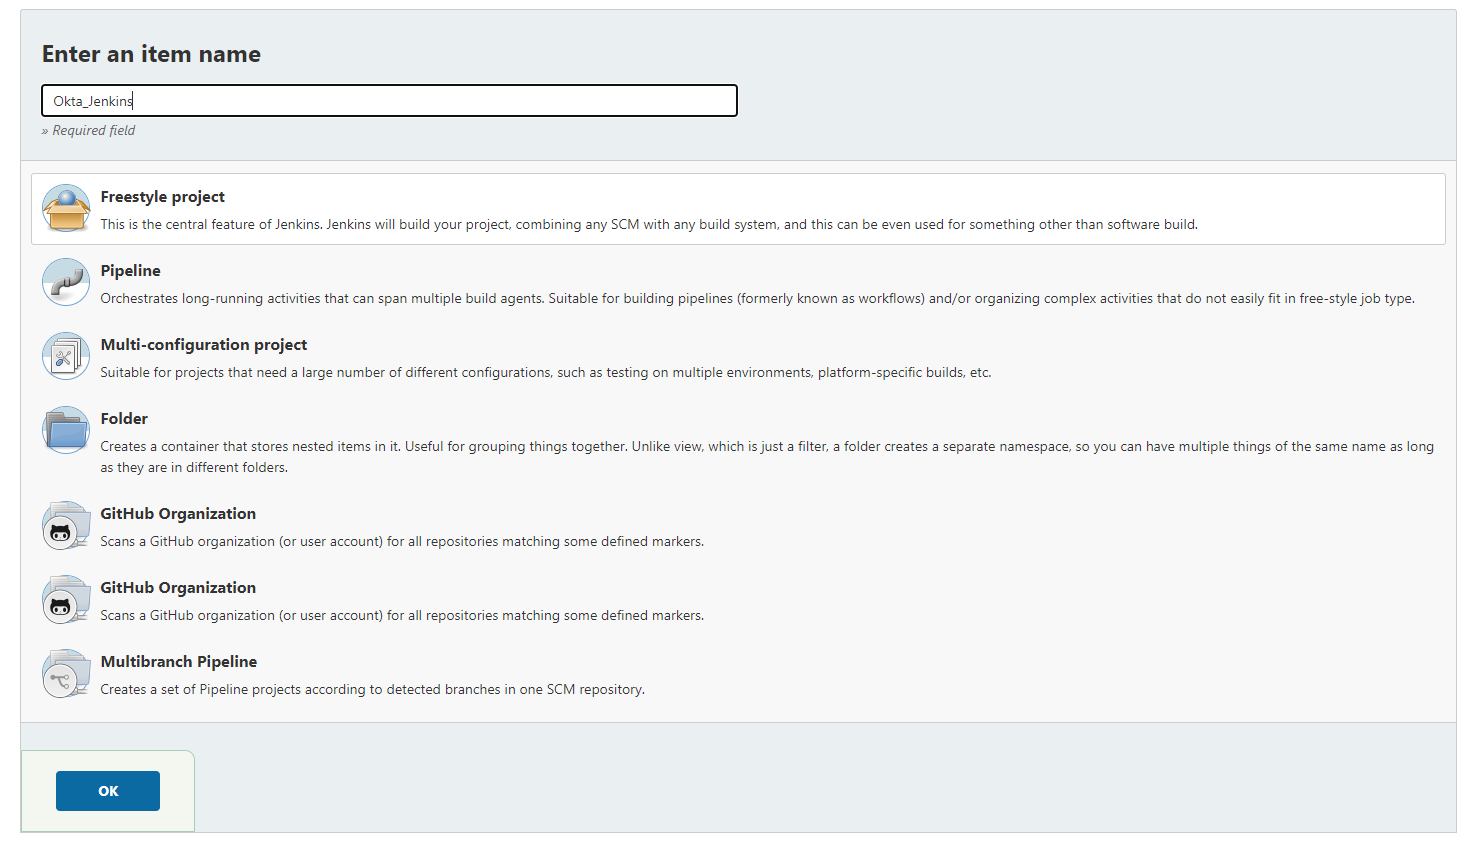
Navigate back to Dashboard and click on Create a Job. Select Freestyle Project and give your project a meaningful name. I called mine Okta_Jenkins. Click Ok and you will be brought to your project page. Navigate to Source Code Management and select Git. Enter the path for your project from your git repository. Add your credentials using the Jenkins Credentials Provider. Specify which branch your want to build.
Finally, under the Build section add a new task with the Execute Windows batch command option. Add the following lines of code.
dotnet publish
cd Okta_Jenkins\bin\Debug\net5.0\publish
set Okta:Domain={yourOktaDomain}
set Okta:ClientId={yourClientId}
set Okta:ClientSecret={yourClientSecret}
set Okta:CallbackPath=/okta/callback
dotnet Okta_Jenkins.dll
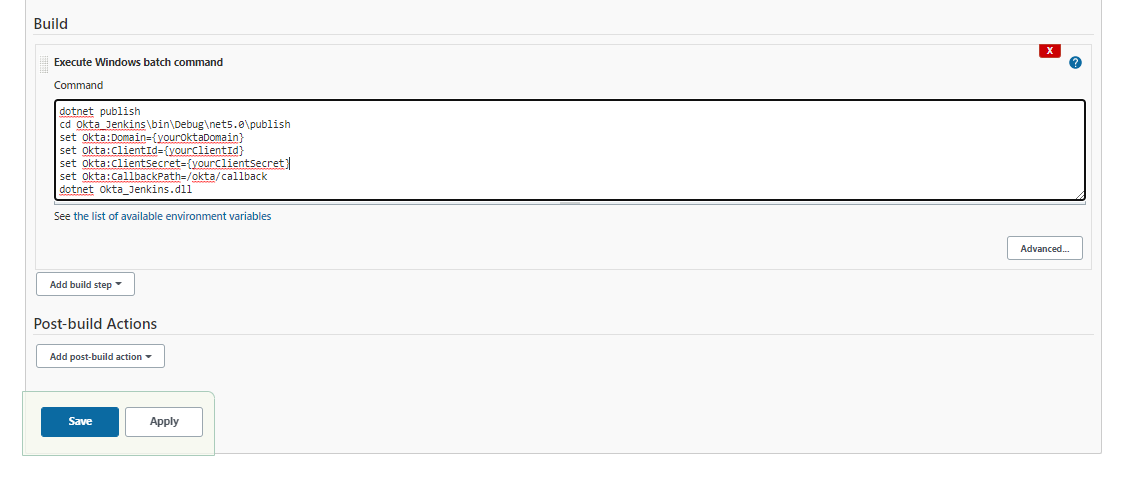
The first line of code here will publish your application. Next, you want to switch your working directory to the publish directory. Next, you need to set your environment variables. There are a few different ways you can do this but the idea is that your appsettings.json in your git repository will not be populated with your sensitive values. Therefore you will need to set them on your server. The environment variables will override any values in the appsettings file.
Finally, you want to run your application by calling dotnet with the dll.
Navigate back to your project dashboard and click Build Now. After a moment you should be able to click on the build on the left pane. In there click Console Output and you should see a message telling you that the application is now running on http://localhost:5000 and https://localhost:5001. Open your browser and navigate to either URL and you should see your application running.
Conclusions
By combining .NET5 and Okta you can quickly and easily build a secure web application on the latest framework from Microsoft. By adding Jenkins you have now created a modern and powerful CI/CD pipeline that can set up multiple environments in a flash, run automated testing, and publish your project.
You can find all the code from this tutorial on GitHub, in the okta-jenkins-ci-app-secrets-dotnet repository.
Okta Developer Blog Comment Policy
We welcome relevant and respectful comments. Off-topic comments may be removed.