Developers Guide to GPG and YubiKey

Setting up a new YubiKey as a second factor is easy—your browser walks you through the entire process. However, setting up a YubiKey to sign your Git commits and Secure Shell (SSH) authentication is a very different experience. In this post, I’ll walk through configuring a YubiKey and highlight some of the things I’ve learned along the way.
| I’ve used GPG for years, but it didn’t really "click" for me until I sat down and wrote this post. |
Prerequisites
-
GnuPG - Install the
gnupgpackage with Yum, Apt, Brew, etc.
- Why Use a YubiKey?
- What Is OpenPGP?
- Set Up and Configure a GPG Key
- Back Up Your GPG Keys
- Enable Your GPG Key for SSH
- Test Your GPG Keys with GitHub
- Use a Graphical Pin Entry Program
- Sign Git Commits
- Setting Up a YubiKey
- Move Your GPG Keys to a YubiKey
- Use Your GPG Key on Multiple Computers
- Learn More About Secure Coding Practices
Why Use a YubiKey?
A YubiKey is a hardware-based authentication device that can securely store secret keys. Once a private key is written to your YubiKey, it cannot be recovered. Keeping secrets off your computer is more secure than storing them on your computer’s hard drive—another application could read your SSH keys from the ~/.ssh folder.
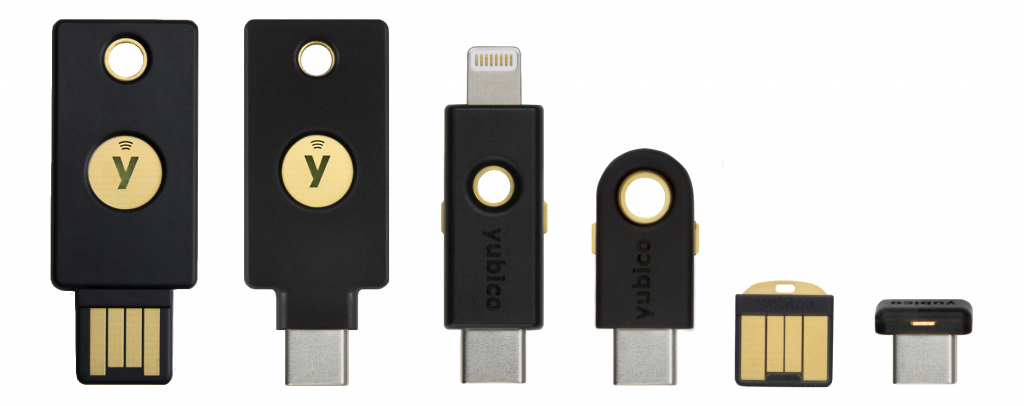
Each type of YubiKey supports a variety of different "interfaces," each with different use cases. Many people associate a YubiKey with generating long one-time passwords (OTP) that look like this:
cccjgjgkhcbbirdrfdnlnghhfgrtnnlgedjlftrbdeutHowever, generating one-time passwords is just a small slice of what you can do with a YubiKey. In this post, I’ll be talking about the OpenPGP interface and how you can use it for authentication.
| If you don’t own a YubiKey, you can still follow along and skip the YubiKey parts. |
What Is OpenPGP?
OpenPGP is a specification (RFC-4880), which describes a protocol for using public-key cryptography for encryption, signing, and key exchange, based on the original Phil Zimmermann work of Pretty Good Privacy (PGP).
There is often confusion between PGP and Gnu Privacy Guard (GnuPG or GPG), probably because of the inverted acronym. Sometimes these terms are used interchangeably, but GPG is an implementation of the OpenPGP specification (and arguably the most popular one).
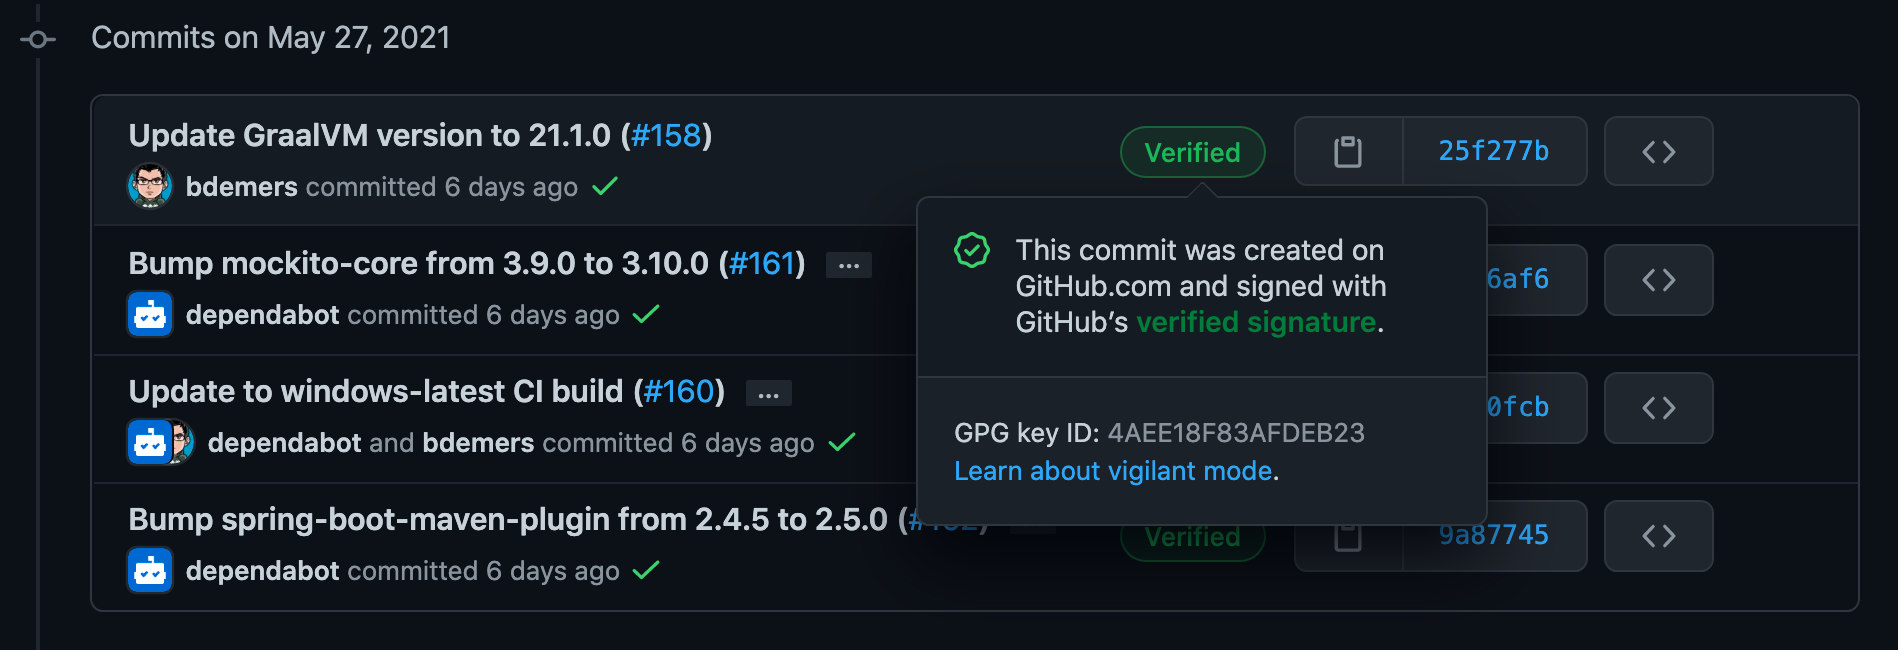
You may have seen "Verified" badges on GitHub commits that use OpenPGP to confirm an author’s identity.
Set Up and Configure a GPG Key
First, you need to generate a GPG key. You could do this directly on a YubiKey. However, you can NOT back up the keys once they are on the device. So instead, I’ll generate a GPG key on my computer, and once I have everything working, I’ll permanently move it to my YubiKey.
Start by generating a new key using gpg. If you already have a key, you can skip this first step:
gpg --full-generate-keyPlease select what kind of key you want:
(1) RSA and RSA
(2) DSA and Elgamal
(3) DSA (sign only)
(4) RSA (sign only)
(9) ECC (sign and encrypt) *default*
(10) ECC (sign only)
(14) Existing key from card
Your selection? 1 (1)
RSA keys may be between 1024 and 4096 bits long.
What keysize do you want? (3072) 4096 (2)
Requested keysize is 4096 bits
Please specify how long the key should be valid.
0 = key does not expire
<n> = key expires in n days
<n>w = key expires in n weeks
<n>m = key expires in n months
<n>y = key expires in n years
Key is valid for? (0) 2y (3)
Key expires at Sat Jun 3 15:08:09 2023 EDT
Is this correct? (y/N) y (4)
GnuPG needs to construct a user ID to identify your key.
Real name: Brian Demers (5)
Email address: Brian.Demers@okta.com (6)
Comment: bdemers test key (7)
You selected this USER-ID:
"Brian Demers (bdemers test key) <Brian.Demers@okta.com>"
Change (N)ame, (C)omment, (E)mail or (O)kay/(Q)uit? o (8)| 1 | Create an RSA key. |
| 2 | Set the key size to 4096. |
| 3 | Expire in 2 years, you can extend the expiration later. |
| 4 | Enter your name. |
| 5 | Enter your email address. |
| 6 | Enter an optional comment. |
| 7 | You will be prompted for a secret passphrase. |
| 8 | Press `o' to save and exit. |
Now you have a key! You can view your secret keys at any time by running:
gpg --list-secret-keys---------------------------------
sec rsa4096 2021-06-03 [SC] [expires: 2023-06-03]
4C40E4AD3A157D172ECB27C9B2EAA49E11DE8CBD (1)
uid [ultimate] Brian Demers (bdemers test key) <Brian.Demers@okta.com>
ssb rsa4096 2021-06-03 [E] [expires: 2023-06-03]| 1 | make a note of the Key ID; you will need this for a few different steps below. |
Add an authentication sub-key for use with SSH for authentication—more on that below.
gpg --quick-add-key {your-key-id} rsa4096 auth 2yIf you list the secret keys again, you can see the new key and capability:
gpg --list-secret-keys---------------------------------
sec rsa4096 2021-06-03 [SC] [expires: 2023-06-03] (1)
4C40E4AD3A157D172ECB27C9B2EAA49E11DE8CBD
uid [ultimate] Brian Demers (bdemers test key) <Brian.Demers@okta.com>
ssb rsa4096 2021-06-03 [E] [expires: 2023-06-03] (2)
ssb rsa4096 2021-06-03 [A] [expires: 2023-06-03] (3)| 1 | The primary key, has the capabilities of signing [S] and certification [C]. |
| 2 | The encryption [E] subkey. |
| 3 | The new authentication [A] subkey. |
Now that you have your newly minted key, back them up!
Back Up Your GPG Keys
Backups of your GPG keys should be stored offline. You are going through the process of securely storing your keys on a YubiKey, don’t leave your backup hanging around on disk.
| Pick a backup strategy that works for you, anything from storing the keys on a USB stick in a lock box, to a printed paper key, or you could go all out. |
Run the following commands to export the keys and trust store.
gpg --armor --export > public-keys.asc (1)
gpg --armor --export-secret-keys > private-keys.asc (2)
gpg --export-ownertrust > ownertrust.asc (3)

# Create a revocation certificate, in case you need lose your key
gpg --armor --gen-revoke {your-key-id} > revocation.asc (4)
# Select 1 for "Key has been compromised"| 1 | Export all public keys. |
| 2 | Export all private keys. |
| 3 | Export the trust store. |
| 4 | Create a revocation certificate as well. Take a look at the GnuPG docs to learn more about key revocation. |
The --armor argument outputs the key in a PEM format.
|
If you ever need to restore your keys from this backup, you can run:
# restore public keys
gpg --import public-keys.asc
# restore private keys
gpg --import private-keys.asc
# restore trust store
gpg --import-ownertrust ownertrust.asc
Enable Your GPG Key for SSH
There are a few moving parts needed to expose your new GPG key in a way that your SSH client will use them. Initially, this part confused me the most and left me jumping between blog posts and various Stack Overflow questions (many of which were out of date).
Working backward from the SSH client:
- The SSH client reads the SSH_AUTH_SOCK environment variable; it contains the location of a Unix socket managed by an agent.
- A gpg-agent running in the background controls this socket and allows your GPG key to be used for authentication.
gpg-agent can replace the need for ssh-agent.
|
Enable SSH support using standard sockets by updating the ~/.gnupg/gpg-agent.conf file:
echo "enable-ssh-support" >> ~/.gnupg/gpg-agent.conf
echo "use-standard-socket" >> ~/.gnupg/gpg-agent.conf
Next, you will need to find the "keygrip" for the authentication key; this is different from the key id, run:
gpg --list-secret-keys --with-keygrip---------------------------------
sec rsa4096 2021-06-03 [SC] [expires: 2023-06-03]
4C40E4AD3A157D172ECB27C9B2EAA49E11DE8CBD (1)
Keygrip = 78BCD171C2DD44E5D6054F0EC98B8C5D2A37D076
uid [ultimate] Brian Demers (bdemers test key) <Brian.Demers@okta.com>
ssb rsa4096 2021-06-03 [E] [expires: 2023-06-03]
Keygrip = 48B8049057AE142926CADB23A816DFF57DC85098
ssb rsa4096 2021-06-03 [A] [expires: 2023-06-03]
Keygrip = 28E05AC1DCFCB0C23EFD89A86C627B0959758813 (2)| 1 | Don’t confuse the Key ID with the "keygrip" |
| 2 | The "keygrip" for the authentication [A] key. |
Update ~/.gnupg/sshcontrol with the authentication "keygrip"; this allows the gpg-agent to use this key with SSH.
echo {keygrip} >> ~/.gnupg/sshcontrolConfigure your shell environment to use gpg-agent:
# configure SSH to use GPG
echo 'export SSH_AUTH_SOCK=$(gpgconf --list-dirs agent-ssh-socket)' >> ~/.zshrc

# start gpg-agent, if it isn't started already
echo 'gpgconf --launch gpg-agent' >> ~/.zshrc
echo 'gpg-connect-agent /bye' >> ~/.zshrc
# the docs say to use: gpg-connect-agent /bye

# Set an environment variable to tell GPG the current terminal.
echo 'export GPG_TTY=$(tty)' >> ~/.zshrc
The gpg-agent is started automatically the first time it is used. However, to make sure it is running and available for SSH, it needs to be run when your shell starts.
|
Open a new terminal session and run ssh-add -L; if everything is working correctly, your public key in SSH format will be output to your console:
ssh-rsa AAAAB3NzaC1yc2EAAAADAQABAAACAQC66/kO8H70GENVLxdD6ZBaRKzj5iDmhUpjFw1WzQmFe+O/dW8FpIXtuZX7QxtV+fqCaK6zbMPfKcUTfogRPdUtzzy/1Ik5WOAfJRF/woL6rMpId0klLalAJ4etOq2X3izBY8RhdiBGPOBPWl9bVTMcvrxIJqcO61FUC0vfwcXX/0GnQ+CnnA2c3CoeZAJbVFWSjo3imii26DdcfL3S0++6yN1y8EFr6BXh7S50Wog/c3CjgyM9t8Hiew/6XpB4deHWEPKkjn/TquRrg1xoFlCkz8w4NJ+jjkhhn8zZ0pcL9fk6VlkzkGiA1ADaEYj+ji0yKvenjrMiiM2FxHEcnTyXsAJkw/3iSxkQ2CpnWjg+BMZnV0inCH9KGvgQcZ3NF6hLuCi1wWP9TA1pVIcLVsDXJrwAnKYyrngWF1O2eI60x2I6ySQUJd1bExYWt2M50V5SynqKWUiYcRecLrO3/wPKzdUsYSNgCcwRSE4pXabAzTsre/WOp7MPQZ9tqWp1tPjyg+wn5UeQ21j0Fm3pZ4EWhBDQmPjm6y9tLv0kzoR8gmqa1KfSqwWyCl3FrNkT1wixxjQL1DVhVy3Kqoy5HA/z30hhkd5BSaqqouykirS/fmFE+k5pwZ/TVwf7BlC1AFNH0AzlCqoWt8s7wFsMUKsVkhZmYaHU52EIvn5rwPcUQQ== (none)
If you don’t see any output, try restarting the agent with the following command: gpg-connect-agent reloadagent /bye
|
Test Your GPG Keys with GitHub
Now that I have GPG configured on my computer, the next thing is to make sure everything is working correctly.
Log in to GitHub and go the Settings → SSH and GPG page. Copy the output from ssh-add -L and add a new SSH key.
On the same page add your GPG key, copy the value from gpg --armor --export {your-key-id}.
On macOS, you can pipe the output directly to your clipboard using pbcopy, for example, ssh-add -L | pbcopy.
|
Once you have your key configured, you can open an SSH connection to GitHub:
ssh git@github.comThe session will close immediately but will print a message:
Hi bdemers! You've successfully authenticated, but GitHub does not provide shell access.
Connection to github.com closed.
Woot! Everything is working!
Use a Graphical Pin Entry Program
If you would rather use a graphical application to enter your passphrase, you can install an alternative "pinentry" program. For example, on macOS:
# install a GUI pin entry program
brew install pinentry-mac

# configure gpg-agent to use this pinentry application
echo "pinentry-program $(which pinentry-mac)" >>  ~/.gnupg/gpg-agent.conf

# Restart gpg-agent
gpg-connect-agent reloadagent /bye
Sign Git Commits
Signing your commits is the only way to prove you are the author. Without a signature, someone could easily impersonate you by setting the name and email on a commit to match your information.
Configure Git to sign commits and tags automatically takes a few global properties; you want that "Verified" label on GitHub, don’t you 😉:
git config --global commit.gpgsign true
git config --global tag.gpgSign true
git config --global user.signingkey {your-key-id}
Your next commit will be signed, and you can double-check this by running git log --show-signature:
commit 85e0174d961f44666d8ffc7000e81df22eea13c6
gpg: Signature made Tue Jun  8 12:19:14 2021 EDT
gpg:                using RSA key 4C40E4AD3A157D172ECB27C9B2EAA49E11DE8CBD
gpg: Good signature from "Brian Demers (bdemers test key) <Brian.Demers@okta.com>" [ultimate]
Author: Brian Demers <Brian.Demers@okta.com>
Date:   Tue Jun 8 12:19:13 2021 -0400

    Testing commit signing
Setting Up a YubiKey
You didn’t need a YubiKey to complete any of the above GPG setup. Without one, though, I don’t think I’d go through setting up GPG + SSH authentication. Using standard SSH keys will offer the same level of security with less complexity. As I mentioned above, the goal was to move keys off my computer, and into the secure storage of the YubiKey.
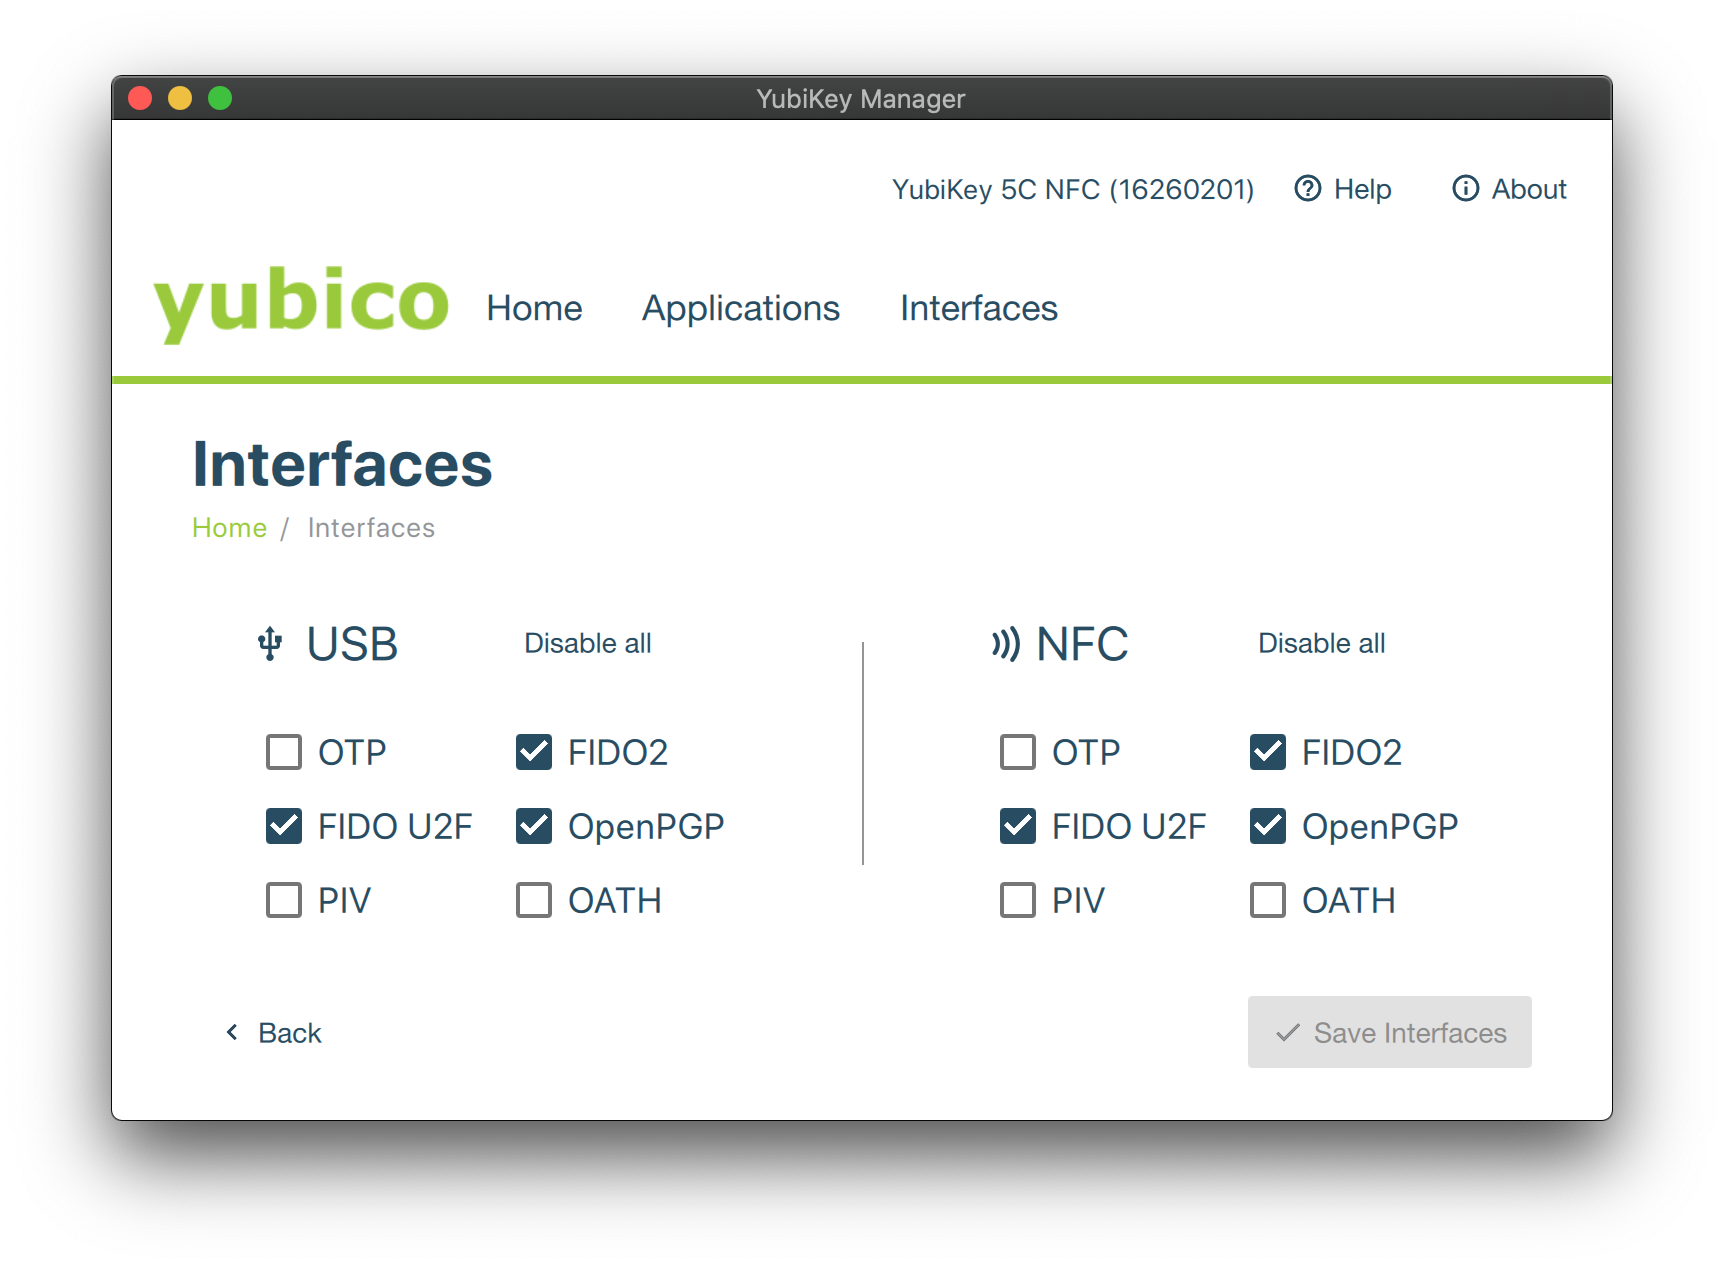
One of the first things I do when I get a new YubiKey is to disable the keyboard functions. Unfortunately, I found myself accidentally touching the device, only to have it spew out a long set of characters; this is an excellent feature if you use it, but if you don’t, it can easily be disabled.
Open up the YubiKey Manager Application, select the Interfaces tab, and disable "OTP," "PIV," and "OATH" interfaces, and press the Save Interfaces button; the result will look something like this:
Open up a terminal and run gpg --card-status, to display information about your device.
| GPG refers to devices as "smartcards", so any time you see the term "card" it refers to your YubiKey. |
Reader ...........: Yubico YubiKey OTP FIDO CCID
Application ID ...: D2760001240103040006162602010000
Application type .: OpenPGP
Version ..........: 3.4
Manufacturer .....: Yubico
Serial number ....: 16260201
Name of cardholder: [not set]
Language prefs ...: [not set]
Salutation .......:
URL of public key : [not set]
Login data .......: [not set]
Signature PIN ....: not forced
Key attributes ...: rsa2048 rsa2048 rsa2048
Max. PIN lengths .: 127 127 127
PIN retry counter : 3 0 3
Signature counter : 0
KDF setting ......: off
Signature key ....: [none]
Encryption key....: [none]
Authentication key: [none]
General key info..: [none]
If you see an "Operation not supported by device" error message, make sure you have a recent version of GPG installed and try again. I’m using version 2.2.27 in this post.
To configure the device with your settings, run:
gpg --card-editThis command will open an interactive session; type admin to enable setting properties on the devices.
Run the following commands to update the card.
gpg/card> admin (1)
Admin commands are allowed

gpg/card> passwd (2)
gpg: OpenPGP card no. D2760001240103040006162602010000 detected

1 - change PIN
2 - unblock PIN
3 - change Admin PIN
4 - set the Reset Code
Q - quit

Your selection? 1 (3)
PIN changed.

1 - change PIN
2 - unblock PIN
3 - change Admin PIN
4 - set the Reset Code
Q - quit

Your selection? 3 (4)
PIN changed.

1 - change PIN
2 - unblock PIN
3 - change Admin PIN
4 - set the Reset Code
Q - quit

Your selection? q

gpg/card> name (5)
Cardholder's surname: Demers
Cardholder's given name: Brian

gpg/card> lang (6)
Language preferences: en

gpg/card> login (7)
Login data (account name): bdemers

gpg/card> url (8)
URL to retrieve public key: https://github.com/bdemers.gpg

gpg/card> quit (9)| 1 | The admin command enables additional commands. |
| 2 | Enter the passwd to enter the password/pin sub-menu. |
| 3 | The default PIN is 123456. |
| 4 | The default Admin PIN is 12345678. |
| 5 | Set your name, last name, then first name. |
| 6 | The two-letter shortcode for your primary language. |
| 7 | Your preferred login name. |
| 8 | The URL of where your public key is stored, GitHub serves them at https://github.com/<username>.gpg. |
| 9 | Exit the program. |
If you run gpg --card-status again you will updated information stored on your card:
Name of cardholder: Brian Demers
Language prefs ...: en
URL of public key : https://github.com/bdemers.gpg
Login data .......: bdemers
Move Your GPG Keys to a YubiKey
| Make sure you back up your keys before moving them; this is your last chance! |
Each key will need to be individual, the signature, encryption, and authentication keys. Edit the key by running:
gpg --edit-key {your-key-id}Follow along with the prompts:
gpg> keytocard (1)
Really move the primary key? (y/N) y
Please select where to store the key:
   (1) Signature key
   (3) Authentication key
Your selection? 1

...

gpg> key 1 (2)

sec  rsa4096/B2EAA49E11DE8CBD
     created: 2021-06-03  expires: 2023-06-03  usage: SC
     trust: ultimate      validity: ultimate
ssb* rsa4096/E45F9D38B846EC9E (3)
     created: 2021-06-03  expires: 2023-06-03  usage: E
ssb  rsa4096/D81BDB63BB563819
     created: 2021-06-03  expires: 2023-06-03  usage: A
[ultimate] (1). Brian Demers (bdemers test key) <Brian.Demers@okta.com>

gpg> keytocard (4)
Please select where to store the key:
   (2) Encryption key
Your selection? 2

...
gpg> key 1 (5)
...

gpg> key 2 (6)

...

gpg> keytocard (7)
Please select where to store the key:
   (2) Authentciation key
Your selection? 3 (8)

...

gpg> q (9)
Save changes? (y/N) y| 1 | Move the primary key to the smartcard. |
| 2 | Switch to key 1, the encryption key. |
| 3 | The selected key is marked with a *. If you do not see a selected key that means the primary key 0 has been selected. |
| 4 | Run keytocard again. |
| 5 | Deselect key 1. |
| 6 | Repeat the process for key 2 the authentication key. |
| 7 | You know the drill keytocard |
| 8 | All done! Exit and save changes. |
After moving your keys to smartcard like a YubiKey, running the gpg --list-secret-keys command will show a greater-than symbol > next to the sec and ssb listings:
|
---------------------------------
sec>  rsa4096 2021-06-03 [SC] [expires: 2023-06-03]
      4C40E4AD3A157D172ECB27C9B2EAA49E11DE8CBD
      Card serial no. = 0006 16260201
uid           [ultimate] Brian Demers (bdemers test key) <Brian.Demers@okta.com>
ssb>  rsa4096 2021-06-03 [E] [expires: 2023-06-03]
ssb>  rsa4096 2021-06-03 [A] [expires: 2023-06-03]
The smart card does NOT store your public key, run the fetch sub command to make sure GPG can fetch your key from the GitHub URL specified above:
gpg --edit-cardgpg/card> fetch
gpg: requesting key from 'https://github.com/bdemers.gpg'
gpg: key B2EAA49E11DE8CBD: duplicated subkeys detected - merged
gpg: key B2EAA49E11DE8CBD: public key "Brian Demers (bdemers test key) <Brian.Demers@okta.com>" imported
gpg: Total number processed: 1
gpg: imported: 1Use Your GPG Key on Multiple Computers
One of the great things about storing your GPG keys on a YubiKey is that you can easily bring the keys to a different device. Since the keys are stored on the smartcard, you simply need to "link" the device’s keys:
gpg --card-editgpg/card> fetch
gpg: requesting key from 'https://github.com/bdemers.gpg'
gpg: key B2EAA49E11DE8CBD: duplicated subkeys detected - merged
gpg: key B2EAA49E11DE8CBD: public key "Brian Demers (bdemers test key) <Brian.Demers@okta.com>" imported
gpg: Total number processed: 1
gpg: imported: 1
gpg/card> quitFinally, you can confirm the keys have been linked by running gpg --list-secret-keys and look to see if the sec entry is marked with a >.
---------------------------------
sec>  rsa4096 2021-06-03 [SC] [expires: 2023-06-03]
      4C40E4AD3A157D172ECB27C9B2EAA49E11DE8CBD
      Card serial no. = 0006 16260201
uid           [ultimate] Brian Demers (bdemers test key) <Brian.Demers@okta.com>
ssb>  rsa4096 2021-06-03 [E] [expires: 2023-06-03]
ssb>  rsa4096 2021-06-03 [A] [expires: 2023-06-03]
The last thing to do is update the trust store on the new computer:
gpg --edit-key...
gpg> trust (1)
...
Please decide how far you trust this user to correctly verify other users' keys
(by looking at passports, checking fingerprints from different sources, etc.)
1 = I don't know or won't say
2 = I do NOT trust
3 = I trust marginally
4 = I trust fully
5 = I trust ultimately
m = back to the main menu
Your decision? 5 (2)
Do you really want to set this key to ultimate trust? (y/N) y
gpg> q (3)| 1 | Run the trust subcommand. |
| 2 | Select 5 ultimately trust; ONLY do this for your key. |
| 3 | Finished! Press q to exit. |
Your smartcard is now set up on multiple computers!
Learn More About Secure Coding Practices
In this post, I showed you how to set up the OpenPGP interface of a YubiKey and configure it to be used for SSH authentication. There is a lot more you can do with GPG, like encrypt files, publish your keys, and build your web of trust.
If you want to learn more about secure coding practices, check out these other posts!
If you have questions, please leave a comment below. If you liked this tutorial, follow @oktadev on Twitter, follow us on LinkedIn, or subscribe to our YouTube channel.
Brian Demers is a Developer Advocate at Okta and a PMC member for the Apache Shiro project. He spends much of his day contributing to OSS projects in the form of writing code, tutorials, blogs, and answering questions. Along with typical software development, Brian also has a passion for fast builds and automation. Away from the keyboard, Brian is a beekeeper and can likely be found playing board games. You can find him on Twitter at @briandemers.
Okta Developer Blog Comment Policy
We welcome relevant and respectful comments. Off-topic comments may be removed.