Super Simple GraphQL Tutorial with C#

In today’s connected world, APIs are becoming an essential part of software and hardware companies. APIs allow companies to expose their services to third-party developers and integrate with other services. As more and more APIs are built and exposed to the internet, it is essential to secure them from unauthorized access. In this tutorial, you will learn how to build an ASP.NET Core 3.1 Web API using GraphQL and secure it with Okta.
ASP.NET Core is an open-source framework for building web apps and web APIs. It is cross-platform, runs on .NET Core, and can be hosted on-premise or cloud-based.
To continue you will need:
- A basic knowledge of C#
- Visual Studio 2019 or Visual Studio Code
- .NET Core 3.1 SDK
- An Okta Developer Account (free forever, to handle your OAuth needs)
Note: In May 2025, the Okta Integrator Free Plan replaced Okta Developer Edition Accounts, and the Okta CLI was deprecated.
We preserved this post for reference, but the instructions no longer work exactly as written. Replace the Okta CLI commands by manually configuring Okta following the instructions in our Developer Documentation.
Benefits of GraphQL
GraphQL is an open-source technology developed by Facebook that allows API developers to create a type system for the data—allowing clients to write queries against these types—and a server-side runtime for executing these queries. GraphQL allows you to query exactly the fields you need, so you can avoid fetching extra data that you don’t need. It also is strongly typed so it validates all your queries before running them. GraphQL isn’t tied to any specific web framework or database engine and can be used with any technology that supports it.
Create an ASP.NET Core API with GraphQL
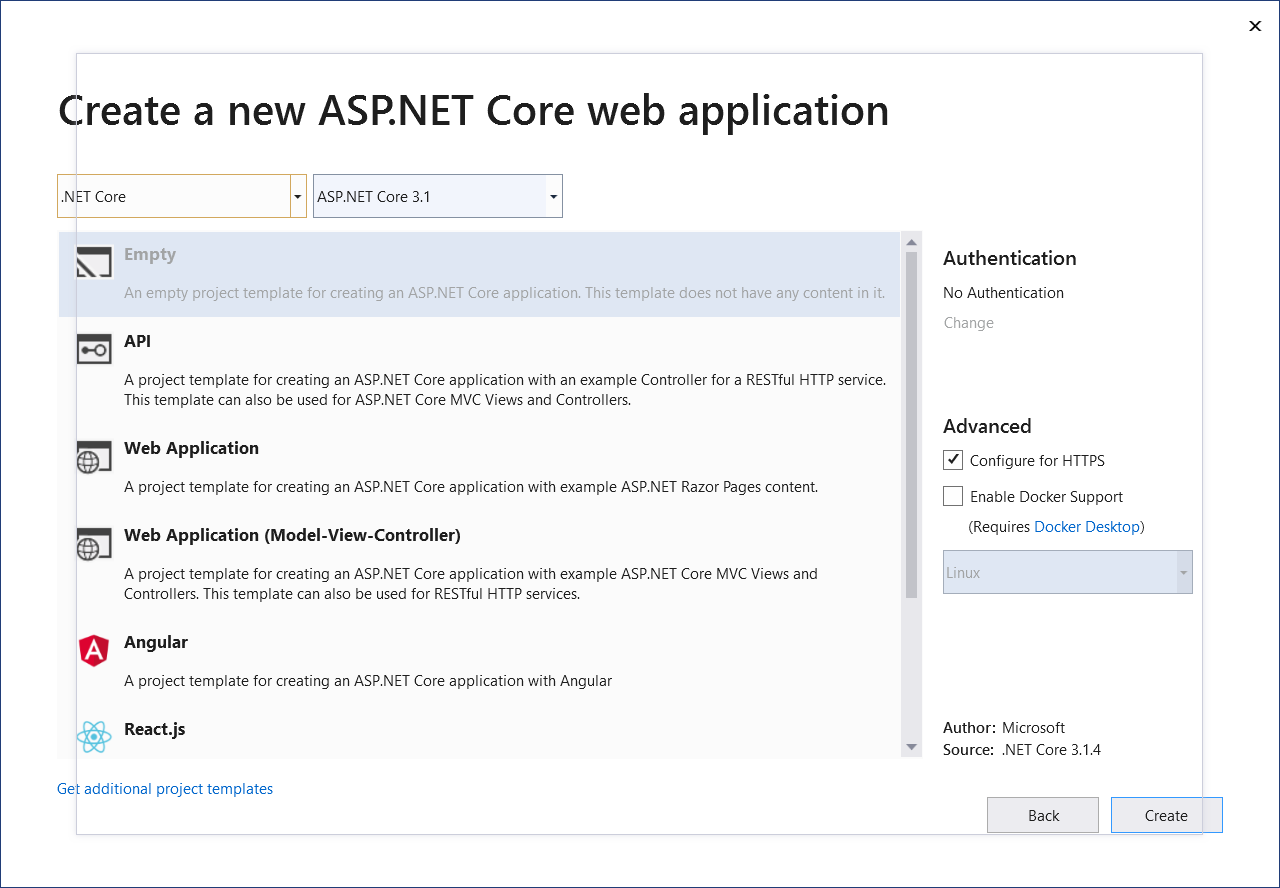
Let’s build an API for time tracking. Fire up Visual Studio and create a new project by clicking File>New Project select ASP.NET Core Web Application, and click Next. Name the app TimeGraphServer and click Create. On the next window, select Empty and click OK.
Alternatively, you can create the project by running the following command in the terminal:
dotnet new web
Create Data Model and Set Up Database
For the demo of this article, I’ll use an in-memory database provider for Entity Framework Core. I’ll install the latest version of Microsoft.EntityFrameworkCore.InMemory NuGet package (3.1.7 as of publish date of this post). You can also install it from NuGet Package Manager or by running the following command:
dotnet add package Microsoft.EntityFrameworkCore.InMemory --version 3.1.7
In the TimeGraphServer project create a folder called Models and add Project.cs and TimeLog.cs classes:
public class Project
{
  public int Id { get; set; }
  public string Name { get; set; }
  public string CreatedBy { get; set; }
}
public class TimeLog
{
  public int Id { get; set; }
  public DateTime From { get; set; }
  public DateTime To { get; set; }

  public string User { get; set; }

  public int ProjectId { get; set; }
  public Project Project { get; set; }
}
Next, you will need to set up a database context for Entity Framework Core. Create another folder called Database and add TimeGraphContext class:
public class TimeGraphContext : DbContext
{
  public TimeGraphContext(DbContextOptions<TimeGraphContext> options) : base(options)
  {
  }

  public DbSet<Project> Projects { get; set; }
  public DbSet<TimeLog> TimeLogs { get; set; }
}
Now that we have the TimeGraphContext, let’s add it to the available services. Open the Startup.cs file and paste the following in ConfigureServices method:
services.AddDbContext<TimeGraphContext>(context =>
{
  context.UseInMemoryDatabase("TimeGraphServer");
});
You have now configured Entity Framework Core to use an in-memory database called TimeGraphServer. The in-memory database is mainly used for tests, but it will be enough for the purposes of this tutorial.
Now let’s populate the database with some dummy data. In the TimeGraphContext class, override the OnModelCreating method and replace it with the following:
protected override void OnModelCreating(ModelBuilder modelBuilder)
{
  modelBuilder.Entity<Project>().HasData(new Project
  {
      CreatedBy = "Giorgi",
      Id = 1,
      Name = "Migrate to TLS 1.2"
  }, new Project
  {
      CreatedBy = "Giorgi",
      Id = 2,
      Name = "Move Blog to Hugo"
  });

  modelBuilder.Entity<TimeLog>().HasData(new TimeLog
  {
      Id = 1,
      From = new DateTime(2020, 7, 24, 12, 0, 0),
      To = new DateTime(2020, 7, 24, 14, 0, 0),
      ProjectId = 1,
      User = "Giorgi"
  }, new TimeLog
  {
      Id = 2,
      From = new DateTime(2020, 7, 24, 16, 0, 0),
      To = new DateTime(2020, 7, 24, 18, 0, 0),
      ProjectId = 1,
      User = "Giorgi"
  }, new TimeLog
  {
      Id = 3,
      From = new DateTime(2020, 7, 24, 20, 0, 0),
      To = new DateTime(2020, 7, 24, 22, 0, 0),
      ProjectId = 2,
      User = "Giorgi"
  });
}
To force Entity Framework Core to create the database containing the seed data, add Database.EnsureCreated(); to the constructor of the TimeGraphContext class.
Our database set up is now complete so you are now ready to add GraphQL support to the project.
Configure GraphQL in Your API
To add GraphQL support I will use the HotChocolate library. HotChocolate is a set of libraries that provide GraphQL implementation for .NET Core and .NET Classic.
First, install the following packages:
dotnet add package HotChocolate.AspNetCore
dotnet add package HotChocolate.AspNetCore.Playground
Next, go to the Startup class and replace the Configure method with this:
if (env.IsDevelopment())
{
  app.UseDeveloperExceptionPage();
  app.UsePlayground(new PlaygroundOptions
  {
      QueryPath = "/api",
      Path = "/playground"
  });
}

app.UseGraphQL("/api");
This will configure GraphQL server to be available at the /api endpoint and, when running in development mode, we will have a nice simple GraphQL ide available at /playground which we will see in action in a minute.
Next, I will expose our types to GraphQL for querying.
Add Queries to GraphQL
For each type that you want to expose through GraphQL, you need to create a corresponding GraphQL type. Add a folder called GraphQL to the project and create GraphQLTypes.cs like this:
public class ProjectType : ObjectType<Project>
{
}

public class TimeLogType : ObjectType<TimeLog>
{
}
Next, add Query.cs and paste the following:
public class Query
{
  private readonly TimeGraphContext dbContext;

  public Query(TimeGraphContext dbContext)
  {
      this.dbContext = dbContext;
  }

  public IQueryable<Project> Projects => dbContext.Projects;
  public IQueryable<TimeLog> TimeLogs => dbContext.TimeLogs;
}
The Query class is the root type that the GraphQL server will expose—it will allow clients to query Project and TimeLog entities. Go to the ConfigureServices method in the Startup class and add the following:
services.AddGraphQL(provider => SchemaBuilder.New().AddServices(provider)
    .AddType<ProjectType>()
    .AddType<TimeLogType>()
    .AddQueryType<Query>()
    .Create());
This will add the Query type as a root query type and register a GraphQL schema with the dependency injection container.
This completes the definition of our GraphQL queries so let’s run the project now and see what our GraphQL API looks like!
Execute Queries from GraphQL Playground
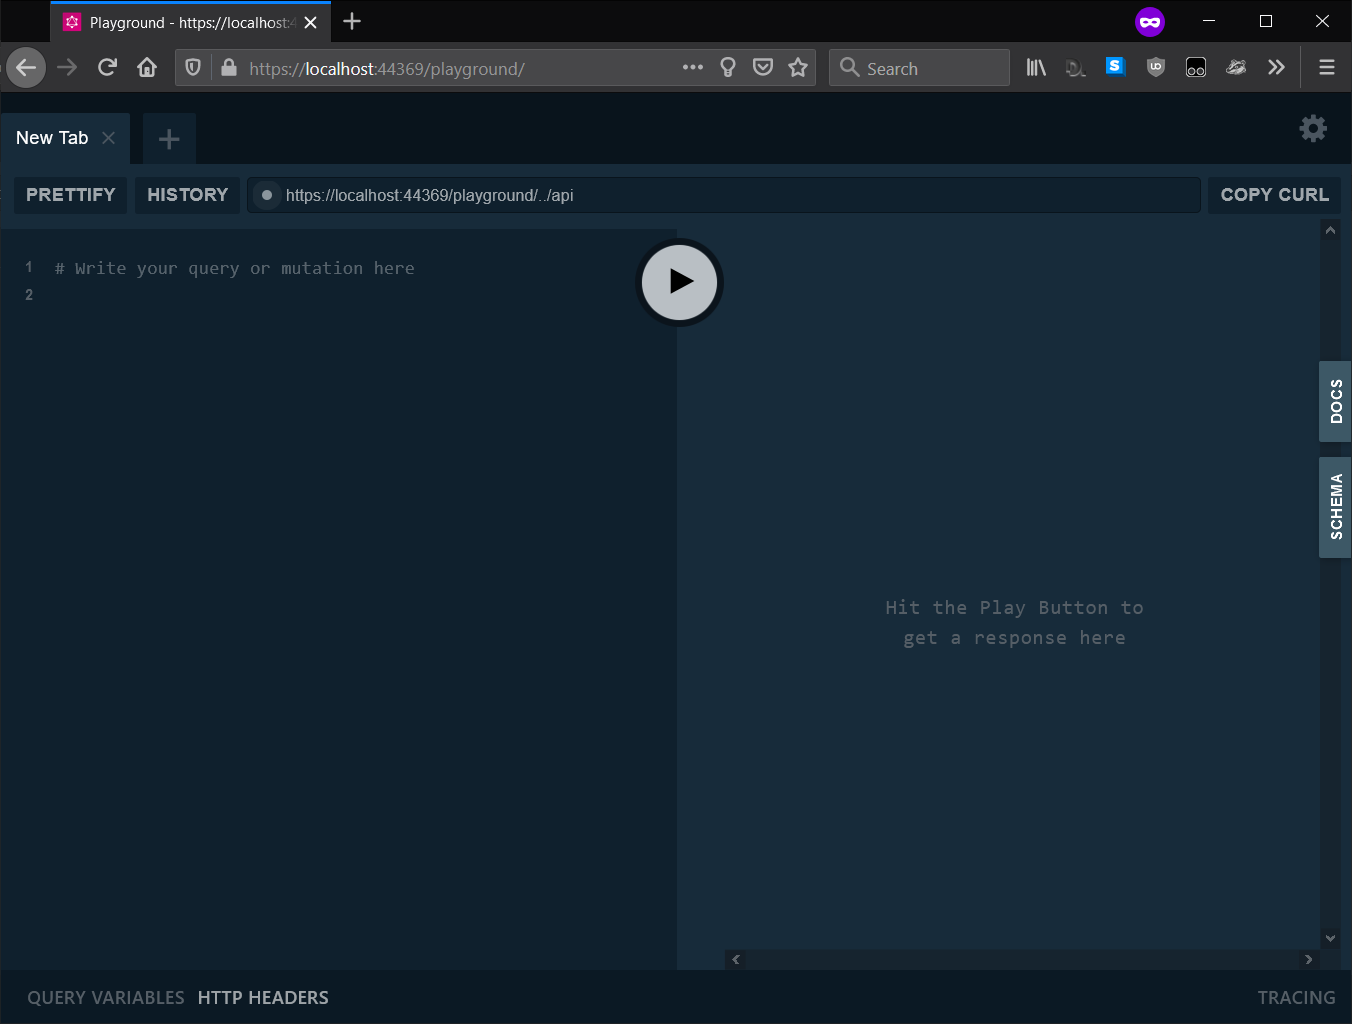
Hit the F5 button and you will see GraphQL playground which looks like this:
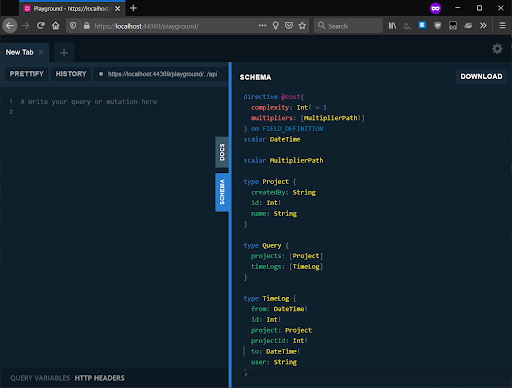
If you click the Schema button at the right of the screen you will see the raw contents of our GraphQL API schema:
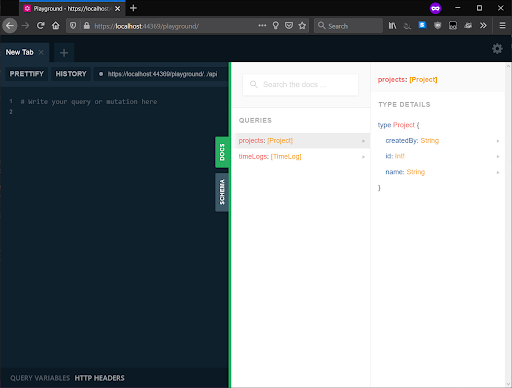
Click the Docs button and you will see a human-readable version of the schema:
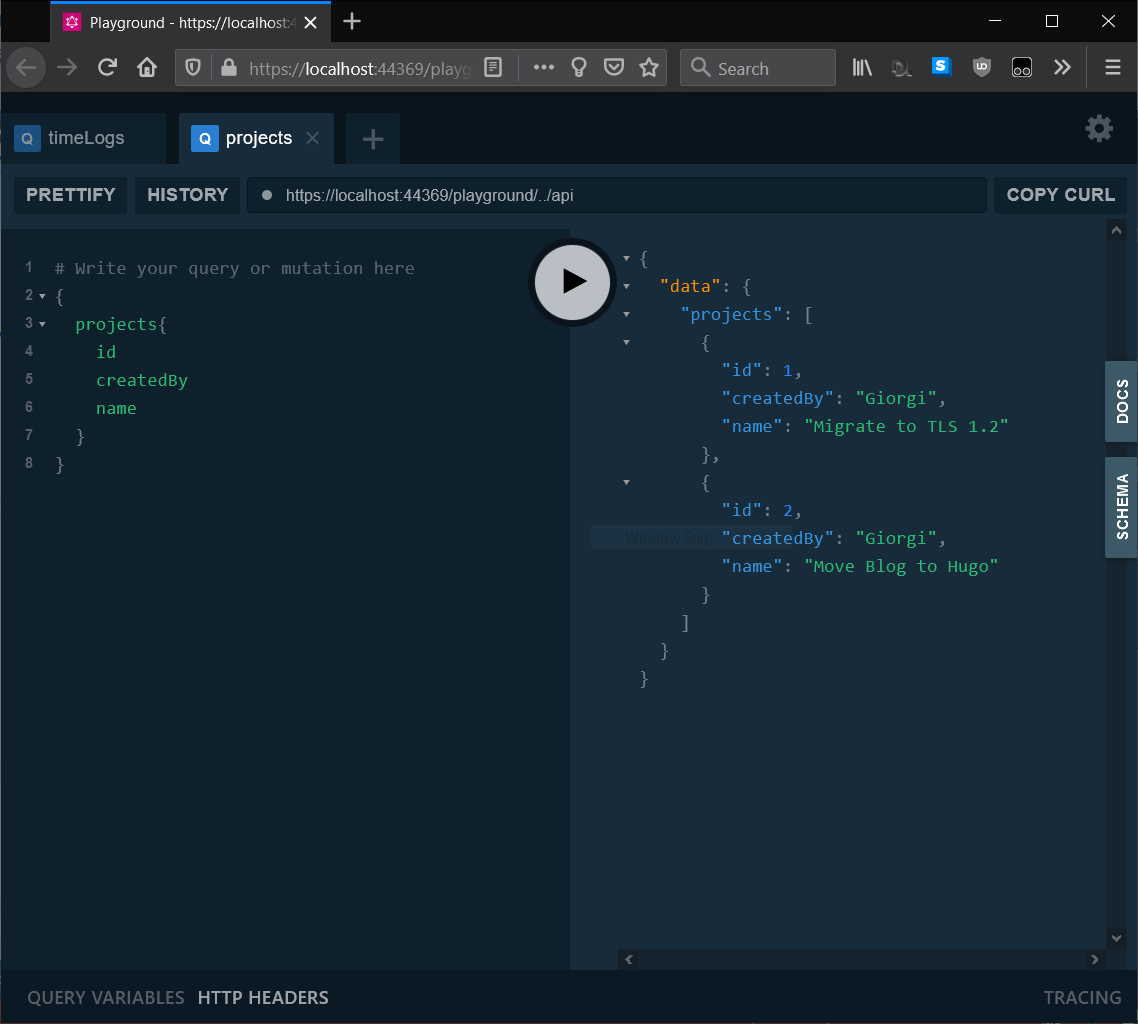
Now, paste the following query in the left panel and click the Play button:
{
  projects{
      id
      createdBy
      name
  }
}
Our GraphQL API will execute the query, and you will see the results in the right panel:
Next, it’s time to secure the API!
Secure GraphQL API with Okta
In this tutorial, I will use Okta to easily secure the API, so that I don’t have to roll my own identity provider and deal with all the tricky details. Okta supports user authentication, multi-factor authentication, social authentication, as well as all OpenID connect flows out of the box—so it can take care of all the scenarios you might ever need.
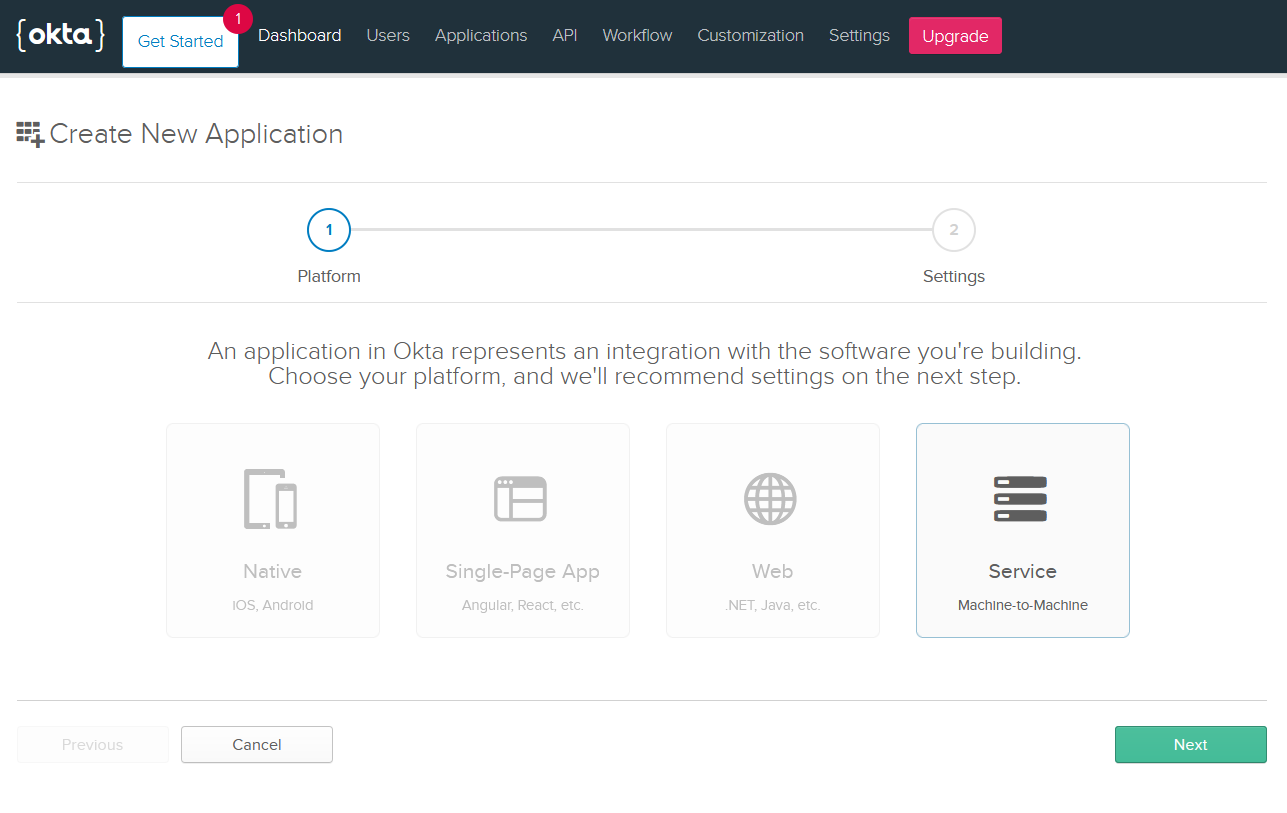
To get started, log in to your Okta Developer Account—via the URL emailed to you after signing up—to access your org’s portal dashboard. Once you log in, make sure to note your Org URL from the upper right corner of the screen:

Now, create a new application. Click Applications in the top menu and then Add Application. Select Native and click Service.
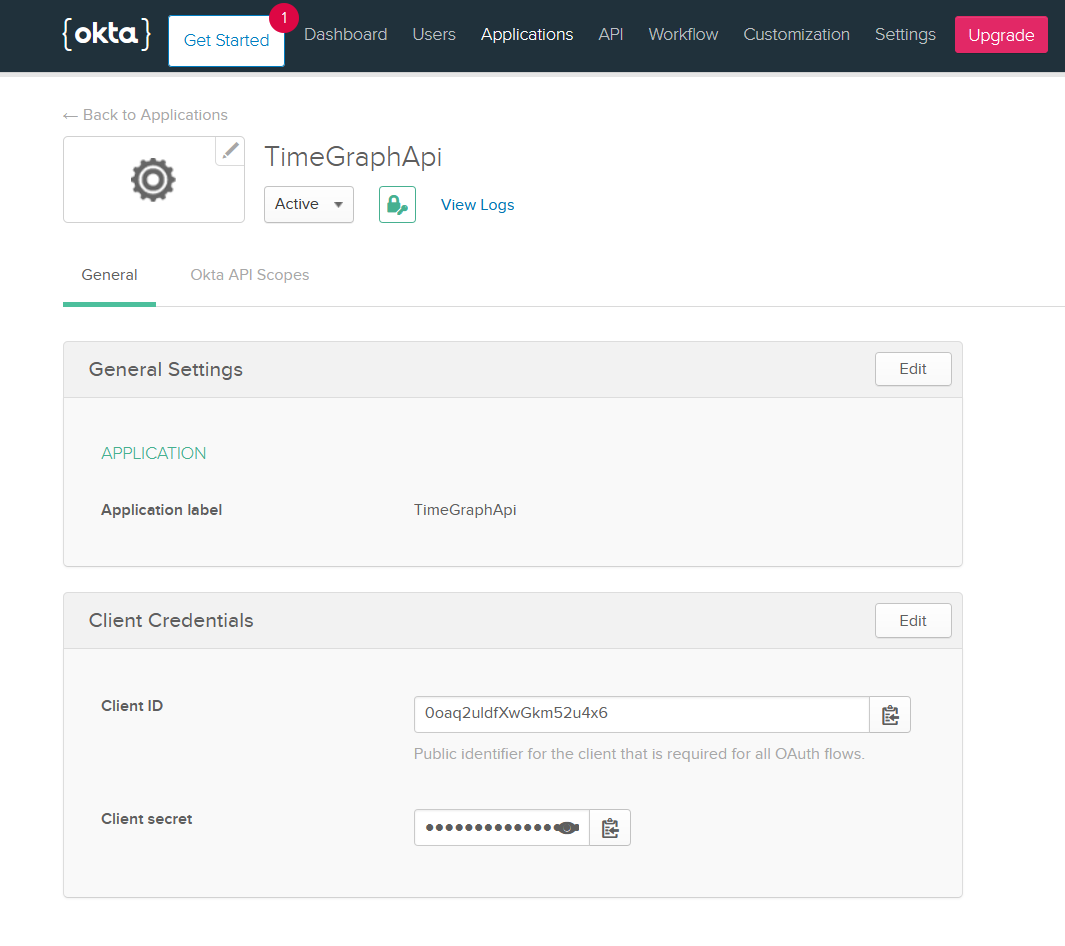
Enter a name (I will use TimeGraphClient), and click Done. On the next screen, you will see Client Id and Client Secret of the application. You will need these to call the API, so take note of them.
Next, go back to Visual Studio and add Okta.AspNetCore and HotChocolate.AspNetCore.Authorization NuGet packages:
dotnet add package Okta.AspNetCore
dotnet add package HotChocolate.AspNetCore.Authorization
Configure Okta middleware
Go the Startup class and add this using statement:
using Okta.AspNetCore;
Next, add the following code in the ConfigureServices method and add your Okta configuration:
services.AddAuthentication(options =>
{
  options.DefaultAuthenticateScheme = OktaDefaults.ApiAuthenticationScheme;
  options.DefaultChallengeScheme = OktaDefaults.ApiAuthenticationScheme;
  options.DefaultSignInScheme = OktaDefaults.ApiAuthenticationScheme;
})
.AddOktaWebApi(new OktaWebApiOptions()
{
  OktaDomain = "https://${yourOktaDomain}"
});
Then, in the Configure method, add this line above the UseGraphQL line:
app.UseAuthentication();
Add Authorization to HotChocolate
Now that you have configured authentication for the service, you need to secure the actual GraphQL objects. In this tutorial, I will allow unauthorized users to query Projects but require authentication for TimeLogs.
To achieve this override, Configure method in TimeLogType class:
  protected override void Configure(IObjectTypeDescriptor<TimeLog> descriptor)
  {
      descriptor.Authorize();
  }
Finally, go to the ConfigureServices method and register authorize directive in the AddGraphQL method:
services.AddGraphQL(provider => SchemaBuilder.New().AddServices(provider)
    .AddType<ProjectType>()
    .AddType<TimeLogType>()
    .AddAuthorizeDirectiveType()
    .AddQueryType<Query>()
    .Create());
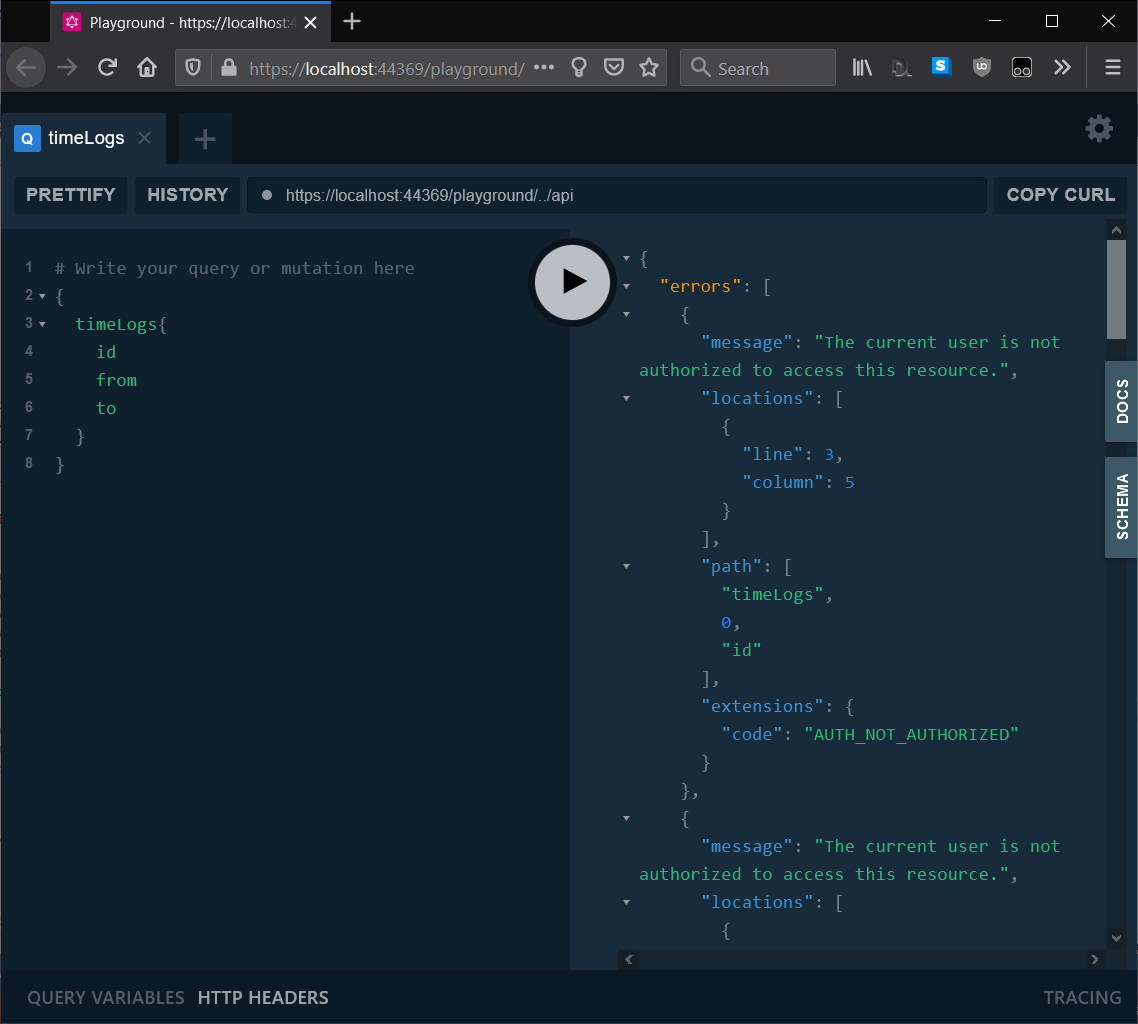
Test Your Secure GraphQL API
If you run the project again and execute the same query as above, you will get the same results as the previous time. But, if you run the query for all the TimeLog entries, you will get The current user is not authorized to access this resource error:
{
  timeLogs{
      id
      from
      to
  }
}
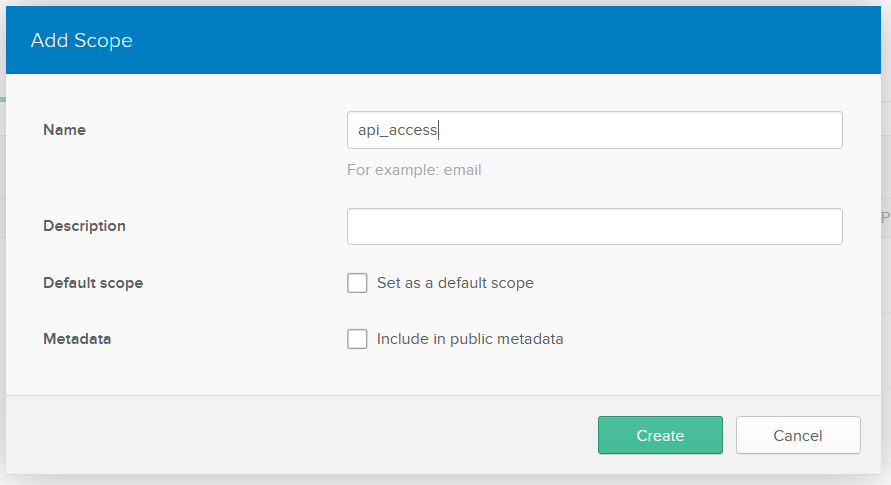
To access the protected items, you need to make a call to your authenticator so that you receive a token. In your Okta developer console, go to API and click Authorization Servers. Note the Issuer URI as you will need it to make the request to get a token. Finally, click on the name of the server, click on the Scopes tab, and add a new scope called api_access.
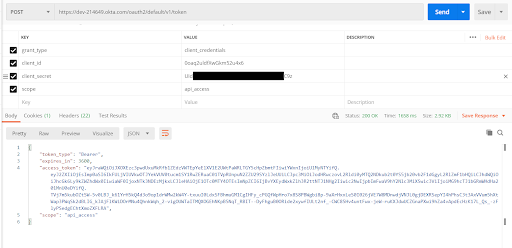
You are now ready to request a token from your authorization server. To make the request I will use Postman but you are free to use any other REST client that you prefer. The token endpoint is located at /v1/token, so I will make a request to https://${yourOktaDomain}/oauth2/default/v1/token URL. You will also need to pass the client_id and client_secret parameters of your client application. Issue the request and you will get an access_token back from your authorization server:
Now that you have access_token, go back to the playground, click on the HTTP HEADERS panel and pass your token in Authorization header like this:
{
  "Authorization":"Bearer <your token here>"
}
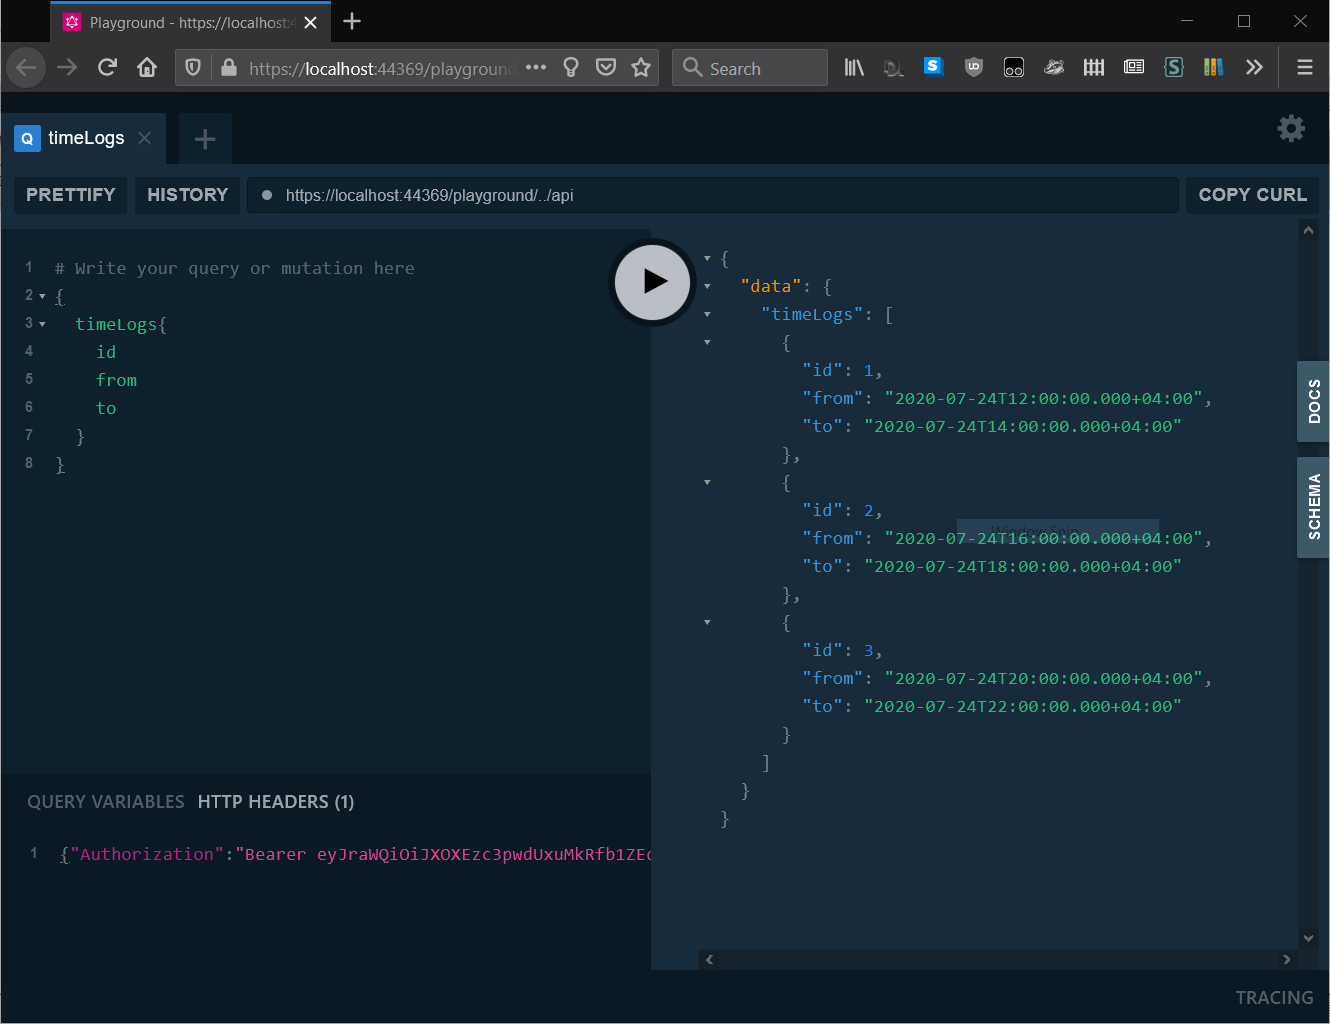
Click the Play button and this time you will get the list of TimeLog entries:
Now you have a secure GraphQL API!
Learn More About GraphQL, ASP.NET Core, and Okta
I hope the tutorial was interesting to you and that you enjoyed it. You can get the full source code of the project from GitHub. For more GraphQL, ASP.NET Core and Okta articles check out these posts:
- Build a GraphQL API with ASP.NET Core
- Build Awesome APIs with Entity Framework Core
- Token Authentication in ASP.NET Core 2.0 - A Complete Guide
Make sure to follow us on Twitter and subscribe to our YouTube Channel so that you never miss any awesome content!
Okta Developer Blog Comment Policy
We welcome relevant and respectful comments. Off-topic comments may be removed.