Node Microservices: From Zero to Hero

Node is one of the premier frameworks for microservice architecture today. The microservice pattern allows developers to compartmentalize individual components of a larger application infrastructure. Because each component runs independently, you can upgrade or modify components without impacting the larger application. Each component exposes an interface to external consumers who are blind to any internal logic the service does.
One of the challenges of working in a microservice environment is the process of one service finding another to call it. Each service runs as an application and has an address that the calling service must find before it can call any functions on its interface.
Seneca is a microservice toolkit that helps alleviate this headache by providing the foundations of a microservice application. Seneca markets itself as a toolkit for Node that leaves you free to worry about the business logic in your application.
In this tutorial, you will use Node and Seneca to build an application to view menus from various restaurants in your area. The user may select any number of items from any of the menus and add them to their cart. Once the user confirms the order, the app sends individual orders to each restaurant.
You will use Okta to provide authentication for your users.
Scaffold the Node Microservices Project
First, create a new directory for your application.
mkdir restaurant-application
cd restaurant-application
Next, create folders for your services and the code for the back end of the application. Seneca refers to the code behind the services as plugins.
mkdir lib
mkdir services
You will need a folder for any public files such as views, javascript, or CSS that the app will deliver to the client.
mkdir public
mkdir public/js
mkdir public/views
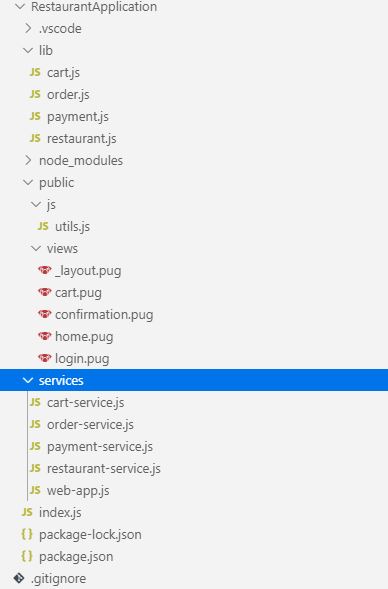
Now that you set up your directory structure, you can add the files you will need to run the application.
In the lib folder, add the following 4 files; cart.js, order.js, payment.js, restaurant.js. Next, in the services folder, add the corresponding services for each of the 4 files you just created; cart-service.js, order-service.js, payment-service.js, restaurant-service.js. In addition to these four, you will also need to add web-app.js to the services folder to handle the external communication from the users. In your root directory, add the index.js file, which will handle the startup for your application.
For this application, you will use pugjs to render your views. In the public/views folder, add your _layout.pug view from which your app will extend all other views. Next add views for cart.pug, confirmation.pug, home.pug, and login.pug. You will also need a javascript file for the client to use in the public\js folder. For simplicity, call this file utils.js.
Next, run the command npm init to go through the npm setup wizard. This wizard will prompt you for the application name, license, and other information. If you wish to use the default values, use npm init -y. When you open your code editor, your file system should look like this:
Install the Node Microservices Dependencies
With your application initialized for Node, you can now add the dependencies you will need for the project. Install these packages from the Node Package Manager. From the terminal, issue the commands below to install the packages.
First, add the Okta OIDC middleware and the Nodejs SDK. These packages make interfacing with Okta as easy as possible. You will use the Okta Node SDK as well as the OIDC middleware.
npm install @okta/oidc-middleware@2.0.0
npm install @okta/okta-sdk-nodejs@3.1.0
Next, add the express and express-session packages to the project. Express is a web framework for Node that provides a feature-rich experience for creating mobile or web applications. Express-Session will help handle your session parameters.
npm install express@4.11.2
npm install express-session@1.17.0
Install Pug to render your views. You may choose a different view engine, but Pug is very simple and easy to use.
npm install pug@2.0.4
Body parser handles extracting the data from forms or JSON.
npm install body-parser@1.11.0
To keep your secrets out of your code and repository, you’ll use dotenv which reads values from a .env file as if they were environment variables.
npm install dotenv@8.2.0
And of course, you will need Seneca to manage the communication between your services. You will also use Seneca-Web to include middleware for Seneca on your web application level and the seneca-web-adapter-express to interface Seneca with express. Seneca provides adapters for other frameworks such as Hapi, but you will not need those for this project.
npm install seneca@3.17.0
npm install seneca-web@2.2.1
npm install seneca-web-adapter-express@1.2.0
Create Your Node Microservices
Setting up the services is the easiest part of the job. This is where most of the magic happens. First, add the following to cart-service.js:
require('seneca')()
  .use('../lib/cart')
  .listen(10202)
That’s it. You create an instance of Seneca, tell it which file(s) to use, and tell it what port to listen on. It may seem like magic, but that’s because it is.
The file lib/cart is called a plugin in Seneca parlance. I will go over what the cart plugin looks like later.
Next, create the other three services to perform the same action. Each service will use a designated plugin and listen on a different port.
First, set up the order service. It will listen on port 10204.
require('seneca')()
  .use('../lib/order')
  .listen(10204)
Next, add the code for the payment service, which listens on port 10203.
require('seneca')()
  .use('../lib/payment')
  .listen(10203)
Finally, you can add the code for the restaurant service to listen on port 10201.
require('seneca')()
  .use('../lib/restaurant')
  .listen(10201)
You will come back to the web-app service when it’s time to write the web application. For now, take a look at the payment plugin to see how Seneca works. Add the following code to the lib/payment.js file:
module.exports = function (options) {
    var seneca = this
    var plugin = 'payment'

    seneca.add({ role: plugin, cmd: 'pay' }, pay)

    function pay(args, done) {
        //TODO integrate with your credit card vendor
        done(null, { success: true });
    }

    return { name: plugin };
}
Here you are exporting a very simple plugin that exposes one method billCard to external consumers. In this tutorial, you have not integrated with any kind of payment service. In your application, you will need to integrate with your payment provider.
Explore How Seneca Helps with Microservices
When building microservices with Seneca, there are several ways you can set them up. Let me take a moment to show you a couple of ways you could handle calls to the payment service.
The first thing you would need to do is add the pay() function to Seneca. To do so, you would use the add method with a JSON object called a “pattern”. A pattern contains some parameters that Seneca will use to try to match the request with a given action. In your very simple bill card, you only have pay(). The following two sets of JSON would both result in hitting the pay function.
{
    role: 'payment',
    cmd: 'pay',
    creditCardNumber: '0000-0000-0000-1234',
    creditCard: true
}
and
{
    role: 'payment',
    cmd: 'pay',
    paypalAccountId: 'xyz123',
    paypal: true
}
In your pay() function, you would need to check if creditCard were true, and, if so, check if paypal were also true. If both were false, perhaps your application would reject it. If both were populated, the application wouldn’t know what to do.
Seneca’s patterns handle this for you. You can extend your pay pattern to look for both. Take a look at the code below. While you don’t need this level of sophistication for the app you are creating currently, it is helpful to keep this idea in mind as your work through the project. Below you will see how you might handle splitting PayPal and credit card logic later.
seneca.add({ role: plugin, cmd: 'pay' }, reject)
seneca.add({ role: plugin, cmd: 'pay', paypal: true }, payByPaypal)
seneca.add({ role: plugin, cmd: 'pay', creditCard: true }, payByCreditCard)
In the above instance, if paypal and creditCard were both set to true, creditCard would win since they share the same number of properties that match and creditCard comes before paypal alphabetically. This is an important concept in Seneca: patterns are unique and Seneca has a rigid system for breaking ties.
With this logic, under pay, you don’t have to reject the payment but rather you could add branching and tie into the payByPaypal and payByCreditCard functions.
Why would you do that?
Imagine you want to extend your existing simple pay() method at a later date to explicitly require consumers to choose credit cards or PayPal. You send out a reminder to users of the service that starting on January 1st, you will no longer accept the request without a flag for PayPal or credit card. On January 1st, none of your users bothered updating and now everyone is receiving the rejection message. You can simply change how the default pay pattern is handled by replacing reject with your pay() method that contains the branching.
Finally, a done() function would be passed in as a call back that determines what the application should do when the pattern is matched. So far in your application, you are just returning success: true to the consumer which is fine for testing. But you will need to integrate with your payment vendor or pay for all this food yourself.
Build the Restaurant Microservice
Next up, we have the restaurant microservice. The restaurant-service uses therestaurant plugin, of course. Here you have three exposed functions. The get() will return a restaurant and its menu. menu() will return the menu of a given restaurant. Finally, the item() function packages up and returns a menu item for a consumer.
The code for lib/restaurant.js is as follows:
module.exports = function(options) {
    var seneca = this;
    var plugin = 'restaurant';

    seneca.add({ role: plugin, cmd: 'get' }, get);
    seneca.add({ role: plugin, cmd: 'menu' }, menu);
    seneca.add({ role: plugin, cmd: 'item' }, item);

    function get(args, done) {
      if (args.id) {
        return done(null, getResturant(args.id));
      } else {
        return done(null, restaurants);
      }
    }

    function item(args, done) {
      var restaurantId = args.restaurantId;
      var itemId = args.itemId;

      var restaurant = getResturant(restaurantId);
      var desc = restaurant.menu.filter(function(obj, idx) {
        return obj.itemId == itemId;
      })[0];

      var value = {
        item: desc,
        restaurant: restaurant
      };

      return done(null, value);
    }

    function menu(args, done) {
      var menu = getResturant(args.id).menu;
      return done(null, menu);
    }

    function getResturant(id) {
      return restaurants.filter(function(r, idx) {
        return r.id === id;
      })[0];
    }

    return { name: plugin };
  };
You are following the convention of using cmd to perform the operation and role to denote what service that operation belongs to. But there is nothing special about role or cmd. They could easily have been you and i. What you need to remember is when you call your service from somewhere else that you match that same pattern.
The remaining services, cart and order, work in much the same fashion. Cart exposes functionality for add and remove, which add and remove items from a given cart; clear, which removes all items from a cart; and get, which, of course, gets a cart.
Here is the code for the lib/cart.js file:
module.exports = function (options) {
    var seneca = this;
    var plugin = 'cart';

    seneca.add({ role: plugin, cmd: 'get' }, get);
    seneca.add({ role: plugin, cmd: 'add' }, add);
    seneca.add({ role: plugin, cmd: 'remove' }, remove);
    seneca.add({ role: plugin, cmd: 'clear' }, clear);

    function get(args, done) {
      return done(null, getCart(args.userId));
    }

    function add(args, done) {
      var cart = getCart(args.userId);

      if (!cart) {
        cart = createCart(args.userId);
      }

      cart.items.push({
        itemId: args.itemId,
        restaurantId: args.restaurantId,
        restaurantName: args.restaurantName,
        itemName: args.itemName,
        itemPrice: args.itemPrice
      });

      cart.total += +args.itemPrice;
      cart.total.toFixed(2);

      return done(null, cart);
    }

    function remove(args, done) {
      var cart = getCart(args.userId);

      var item = cart.items.filter(function (obj, idx) {
        return (
          obj.itemId == args.itemId && obj.restaurantId == args.restaurantId
        );
      })[0];

      var idx = cart.items.indexOf(item);

      if (item) cart.items.splice(idx, 1);
      cart.total -= item.itemPrice;

      return done(null, cart);
    }

    function clear(args, done) {
      var cart = getCart(args.userId);

      if (!cart) {
        cart = createCart(args.userId);
      }

      cart.items = [];
      cart.total = 0.00;

      done(null, cart);
    }

    function getCart(userId) {
      var cart = carts.filter(function (obj, idx) {
        return obj.userId === userId;
      })[0];

      if (!cart) cart = createCart(userId);

      return cart;
    }

    function createCart(userId) {
      var cart = {
        userId: userId,
        total: 0.0,
        items: []
      };

      carts.push(cart);

      return cart;
    }

    return { name: plugin };
  };


  var carts = []
The order plugin exposes a placeOrder() method, which takes a cart object and packages it into an array or order. You will need to complete the sendOrder function to integrate into the restaurants you are doing business with.
The code for the lib/order.js file is:
module.exports = function(options) {
  var seneca = this;
  var plugin = 'order';

  seneca.add({ role: plugin, cmd: 'placeOrder' }, placeOrder);

  function placeOrder(args, done) {
    var orders = packageOrders(args.cart);

    for (var i = 0; i < orders.length; i++) {
      sendOrder(orders[i]);
    }

    done(null, { success: true, orders: orders });
  }

  function packageOrders(cart) {
    orders = [];

    for (var i = 0; i < cart.items.length; i++) {
      var item = cart.items[i];
      var order = orders.filter(function(obj, idx) {
        obj.restaurantId == item.restaurantId;
      })[0];

      if (!order) {
        order = {
          restaurantId: item.restaurantId,
          items: [item]
        };

        orders.push(order);
      } else {
        order.items.push(item);
      }
    }

    return orders;
  }

  function sendOrder(order) {
    //TODO integrate into your restaurants
    return true;
  }

  return { name: plugin };
};
Build Your Node Web Application
Now you can begin to set up the web application in the web-app file. First, let’s make sure you have all your includes.
var Express = require('express')
var session = require("express-session");

var Seneca = require('seneca')
var Web = require("seneca-web");
var seneca = Seneca();

var ExpressOIDC = require("@okta/oidc-middleware").ExpressOIDC;

var path = require("path");
var bodyparser = require('body-parser');
As you saw earlier, you will need Express and Express Session, Seneca, the Okta Middleware, and a couple of utilities in path and body-parser.
Set up Seneca for Your Microservices
First, tell Seneca to use the Express adapter. Below your require() statements, add:
var senecaWebConfig = {
  context: Express(),
  adapter: require('seneca-web-adapter-express'),
  options: { parseBody: false, includeRequest: true, includeResponse: true }
}

seneca.use(Web, senecaWebConfig)
  .client({ port: '10201', pin: 'role:restaurant' })
  .client({ port: '10202', pin: 'role:cart' })
  .client({ port: '10203', pin: 'role:payment' })
  .client({ port: '10204', pin: 'role:order' })
Here you will also tell Seneca where the other microservices are located. In your instance, all the services are running on the same IP and therefore you only need to identify the port. If that changes, you can locate the microservice by domain or IP if necessary.
Set Up Express
Add the following to your web-app.js file to set up Express.
seneca.ready(() => {
  const app = seneca.export('web/context')();

  app.use(Express.static('public'));
  app.use(bodyparser.json());
  app.use(bodyparser.urlencoded());

  app.set('views', path.join(__dirname, '../public/views'));
  app.set('view engine', 'pug');
});
Typically you would use Express directly, but since you want to leverage the Seneca middleware you will need to use the instance of Express you assigned to Seneca. The rest of this should look fairly straightforward. You are telling Express where the static files are—in this case, the public folder—and that you are using both json and urlencoded for post methods. You are also telling Pug where to find the views.
Set Up Okta
The next thing you want to do is set up Okta to handle the authentication. Okta is an extremely powerful single sign-on provider.
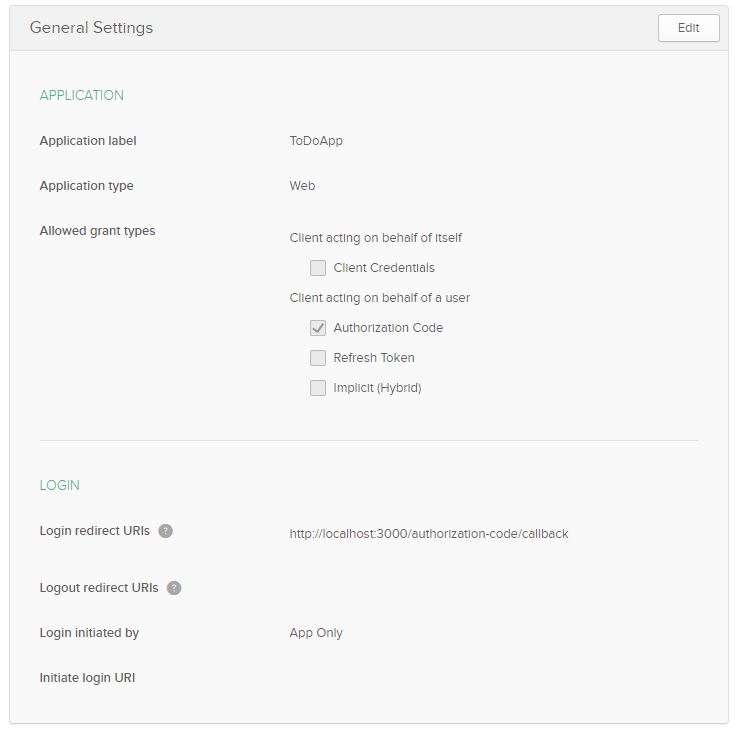
If you don’t have an Okta account, you will need to sign up first. Then log in and navigate to the Applications area of the site. Click on Add Application and follow the wizard. The wizard will prompt you to select an application type. For this project, choose Web.
Next, the wizard will bring you to the Create New Application - Settings page. Give your application a name you will remember. For this example, you can use “Restaurant Application”. Ensure your base domain for Login redirect URIs is the same as your Node application. In your example, you are set to listen to localhost:3000, but if your environment dictates you use a different port, you’ll need to use that. You can leave the rest of the settings set to their defaults. Click Done and proceed to the application screen.
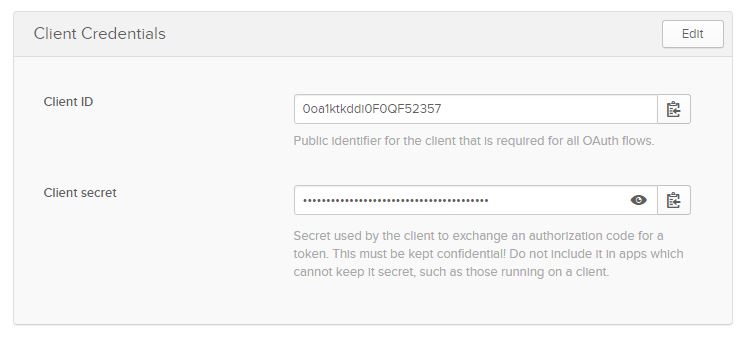
To connect your application to Okta, you will need a few pieces of information. First, make sure you grab the Client ID and Client secret from the General tab of your application’s page. The secret will be obfuscated but there is an “eye” icon that will allow you to see it and a clipboard icon that will allow you to copy it to your clipboard.
With this information, you can now return to the application and connect to Okta. Open your web-app.js file and add the following code.
const oktaSettings = {
  clientId: process.env.OKTA_CLIENTID,
  clientSecret: process.env.OKTA_CLIENTSECRET,
  url: process.env.OKTA_URL_BASE,
  appBaseUrl: process.env.OKTA_APP_BASE_URL
};

const oidc = new ExpressOIDC({
  issuer: oktaSettings.url + '/oauth2/default',
  client_id: oktaSettings.clientId,
  client_secret: oktaSettings.clientSecret,
  appBaseUrl: oktaSettings.appBaseUrl,
  scope: 'openid profile',
  routes: {
    login: {
      path: '/users/login'
    },
    callback: {
      path: '/authorization-code/callback',
      defaultRedirect: '/'
    }
  }
});

app.use(
  session({
    secret:
      "ladhnsfolnjaerovklnoisag093q4jgpijbfimdposjg5904mbgomcpasjdg'pomp;m",
    resave: true,
    saveUninitialized: false
  })
);

app.use(oidc.router);
For the session secret, you can use any long and sufficiently random string. The login route will be the URL that users will be given to log in to. Here you are using users/login, which seems as natural as any route. When a user navigates to users/login Okta will step in and display the hosted login page to them.
You are using the scopes openid and profile. OpenID will provide the basic authentication details, and the profile will supply fields like the username. You will use the Okta username to identify the user with their cart later on. You can learn more about scopes in Okta’s documentation.
To keep your Okta credentials out of the code, add a file at the root of the project called .env that will store these values for you. The contents will be:
OKTA_CLIENTID={yourClientId}
OKTA_CLIENTSECRET={yourClientSecret}
OKTA_URL_BASE={yourOktaDomain}
OKTA_APP_BASE_URL=http://localhost:3000
Replace the placeholder values in curly braces with your values from Okta. At the very top of your web-app.js file (before all other require() statements), add:
require('dotenv').config();
This will ensure the Node application reads the values from the .env file as environment variables when the application starts up.
Set Up Your Node Application’s Routes
The final thing you need to do is set up your routes and start the web application. In the web-app.js file, add the following:
app.get('/', ensureAuthenticated, function (request, response) {
  var cart;
  var restaurants;
  var user = request.userContext.userinfo;
  var username = request.userContext.userinfo.preferred_username;

  seneca.act('role:restaurant', { cmd: 'get', userId: username }, function (err, msg){
    restaurants = msg;
    }).act('role:cart', { cmd: 'get', userId: username }, function (err, msg) {
      cart = msg;
    }).ready(function () {
      return response.render('home', {
        user: user,
        restaurants: restaurants,
        cart: cart
      });
    })
  });

  app.get('/login', function (request, response) {
    return response.render('login')
  })

  app.get("/users/logout", (request, response, next) => {
    request.logout();
    response.redirect("/");
  });

  app.get('/cart', ensureAuthenticated, function (request, response) {
    var username = request.userContext.userinfo.preferred_username;
    var user = request.userContext.userinfo;

    seneca.act('role:cart', { cmd: 'get', userId: username }, function (err, msg) {
      return response.render('cart', {
        user: user,
        cart: msg
      });
    });
  })

  app.post('/cart', ensureAuthenticated, function (request, response) {

    var username = request.userContext.userinfo.preferred_username;
    var restaurantId = request.body.restaurantId;
    var itemId = request.body.itemId;
    var val;

    seneca.act('role:restaurant', { cmd: 'item', itemId: itemId, restaurantId: restaurantId }, function (err, msg) { val = msg; })
      .ready(function () {
        seneca.act('role:cart',
          {
            cmd: 'add',
            userId: username,
            restaurantName: val.restaurant.name,
            itemName: val.item.name,
            itemPrice: val.item.price,
            itemId: val.item.itemId,
            restaurantId: val.item.restaurantId
          }, function (err, msg) {
            return response.send(msg).statusCode(200)
          });
      })
  });

  app.delete('/cart', ensureAuthenticated, function (request, response) {
    var username = request.userContext.userinfo.preferred_username;
    var restaurantId = request.body.restaurantId;
    var itemId = request.body.itemId;

    seneca.act('role:cart', { cmd: 'remove', userId: username, restaurantId: restaurantId, itemId: itemId }, function (err, msg) {
      return response.send(msg).statusCode(200)
    });
  });

  app.post('/order', ensureAuthenticated, function (request, response) {
    var username = request.userContext.userinfo.preferred_username;
    var total;
    var result;

    seneca.act('role:cart', { cmd: 'get', userId: username }, function (err, msg) {
      total = msg.total
    });

    seneca.act('role: payment', { cmd: 'pay', total: total }, function (err, msg) {
      result = msg;
    }).ready(function () {
      if (result.success) {
        seneca.act('role: cart', { cmd: 'clear', userId: username }, function () {
          return response.redirect('/confirmation').send(302);
        })
      }
      else {
        return response.send('Card Declined').send(200);
      }
    })
  })

  app.get('/confirmation', ensureAuthenticated, function (request, response) {
    var username = request.userContext.userinfo.preferred_username;
    var user = request.userContext.userinfo;

    seneca.act('role:cart', { cmd: 'get', userId: username }, function (err, msg) {
      return response.render('confirmation', {
        user: user,
        cart: msg
      });
    });
  });

  app.listen(3000);
The calls here perform each of the tasks that could be requested by the client. There are a few important notes about these calls that you should keep in mind.
First, each page should be provided with a user model if the user is logged in. The userContext in the request Express provides can obtain the user.
Secondly, this is where you begin to really use Seneca. To communicate between your services, you call seneca.act() and provide the pattern to be matched. There is no need to know where the service is living, as you have already defined that in the service files themselves.
An important note here is that Seneca allows you to chain the act() method. It will not process each of those in a series; therefore you can’t predict when you will receive results back. If you need to wait for a call to finish before moving onto the next, you can use ready() to do something after the act() is complete.
Finally, you will be using the ensureAuthenticated() function as a route handler in your calls. This will check that Okta authenticated the user before allowing them to proceed to the intended page. If the Okta hasn’t authenticated the user, the program will redirect to your login page. You can add the following code to your web-app.js file to help with this.
function ensureAuthenticated(request, response, next) {
  if (!request.userContext) {
    return response.status(401).redirect('../login');
  }

  next();
}
Now you’re ready to test out your microservices.
Start the Node Microservices for Debugging
Next, you’re going to move on to the client-side work. First, spawn each process to ensure all your services are running. Open your index.js file and add the following code to it.
var fs = require('fs')
var spawn = require('child_process').spawn

var services = ['web-app', 'restaurant-service', 'cart-service', 'payment-service', 'order-service']

services.forEach(function (service) {
  var proc = spawn('node', ['./services/' + service + '.js'])

  proc.stdout.pipe(process.stdout)
  proc.stderr.pipe(process.stderr)
})
Build the Node Client Application
You will use the Pug view engine for your pages. Typically, you will start with the layout page or pages. In this application, you only have one layout page. I named mine _layout so it appears at the top of my views folder, but you can call it whatever you would like.
block variables

doctype html
html(lang='en')
  head
    meta(charset='utf-8')
    meta(name='viewport' content='width=device-width, initial-scale=1, shrink-to-fit=no')
    script(src="https://code.jquery.com/jquery-3.4.1.min.js" integrity="sha256-CSXorXvZcTkaix6Yvo6HppcZGetbYMGWSFlBw8HfCJo=" crossorigin="anonymous")
    script(src="https://stackpath.bootstrapcdn.com/bootstrap/4.3.1/js/bootstrap.min.js" integrity="sha384-JjSmVgyd0p3pXB1rRibZUAYoIIy6OrQ6VrjIEaFf/nJGzIxFDsf4x0xIM+B07jRM" crossorigin="anonymous")
    script(src="https://stackpath.bootstrapcdn.com/bootstrap/4.3.1/js/bootstrap.bundle.min.js" integrity="sha384-xrRywqdh3PHs8keKZN+8zzc5TX0GRTLCcmivcbNJWm2rs5C8PRhcEn3czEjhAO9o" crossorigin="anonymous")
    link(href="https://stackpath.bootstrapcdn.com/bootstrap/4.3.1/css/bootstrap.min.css" rel="stylesheet" integrity="sha384-ggOyR0iXCbMQv3Xipma34MD+dH/1fQ784/j6cY/iJTQUOhcWr7x9JvoRxT2MZw1T" crossorigin="anonymous")
    link(href="https://use.fontawesome.com/releases/v5.7.0/css/all.css" rel="stylesheet" integrity="sha384-lZN37f5QGtY3VHgisS14W3ExzMWZxybE1SJSEsQp9S+oqd12jhcu+A56Ebc1zFSJ" crossorigin="anonymous")
    title #{title}
  body
    div.d-flex.flex-column.flex-md-row.align-items-center.p-3.px-md-4.mb-3.bg-white.border-bottom.box-shadow
      h5.my-0.mr-md-auto Yum Yum Eats
      nav.my-2.my-md-0.mr-md-3
        if user == undefined
          a.p-2.text-dark(href="/users/login") Log In
        else
          a.p-2.text-dark(href="/users/logout") Logout
          a.p4.btn.btn-primary(href="/cart")
            span.fas.fa-shopping-cart.mr-3
            span.badge.badge-light(id='cart-button') #{cart.items.length}
    .container
      block content

    footer.pt-4.my-md-5.pt-md-5.border-top
      div.row.text-center
        div.col-8.col-md Built with #[a(href='https://expressjs.com/') Express.js], login powered by #[a(href='https://developer.okta.com/') Okta].
The layout page provides all the common logic on each of the pages. Your header and footer sections are on this page as well as any scripts that will be used on all of your pages. Here you have brought in bootstrap from the CDN and font-awesome for icons.
The code includes branching in the layout page to check for the user in the model. This signals to the view whether it should show the login or logout buttons.
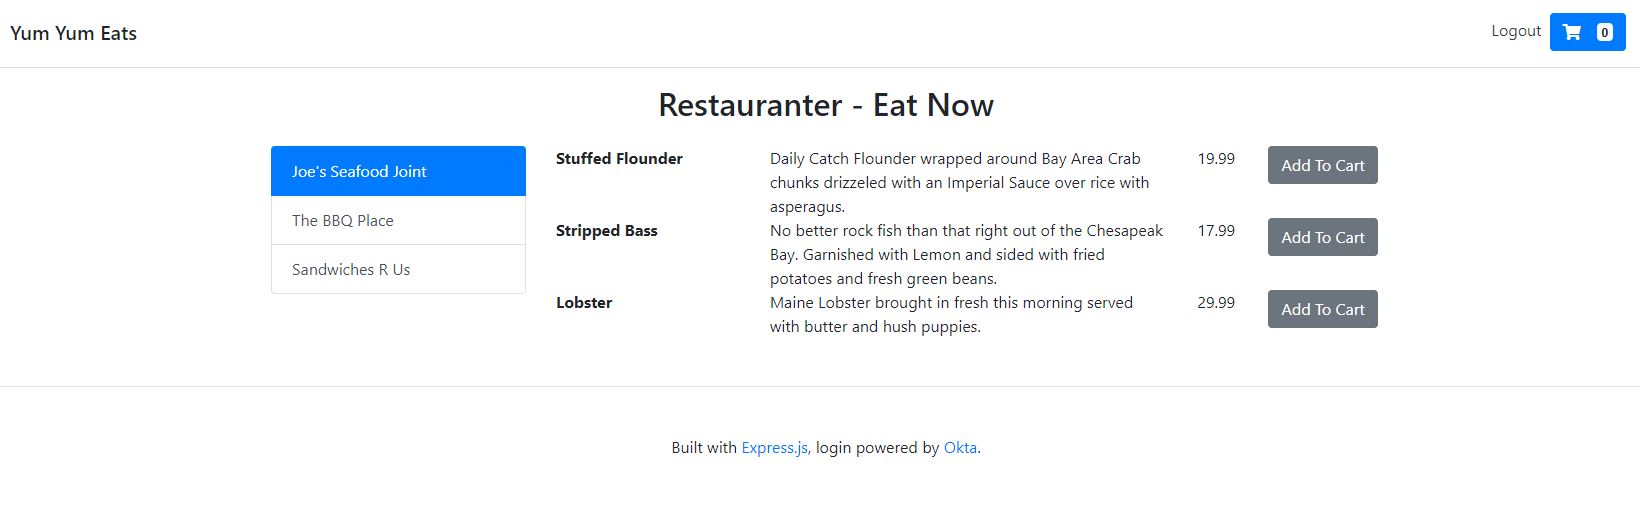
Next, set up the home.pug page. This page will act as the main display for the restaurants and menus.
extends _layout

block variables
  - var title = 'Restauranter - Eat Now'

block content
  h2.text-center #{title}

  .row
    .col-lg-3
      div(role="tablist" id="list-tab").list-group.restaurants
        each restaurant, i in restaurants
          - href = '#r' + restaurant.id
          - controls = 'r' + restaurant.id
          - id = 'list-' + restaurant.id + '-list'
          a.list-group-item.list-group-item-action(data-toggle='list', href=href, role='tab' aria-controls=controls, id=id) #{restaurant.name}
    .col-lg-9
      .tab-content(id='nav-tabContent')
        each restaurant, i in restaurants
          - id = 'r' + restaurant.id
          - labeledBy = 'list-' + restaurant.id + '-list'
          .tab-pane.fade(id=id, role='tabpanel' aria-labelledby=labeledBy)
            .row
              each item, j in restaurant.menu
                .col-lg-2
                  span #{item.name}
                .col-lg-6
                  span #{item.description}
                .col-lg-2
                  span #{item.price}
                .col-lg-2
                  - func = 'addToCart(' + item.restaurantId + ',' + item.itemId + ')';
                  button(onClick = func) Add To Cart
  script(src="..\\js\\utils.js")
The home page is where you get a chance to see some of the strength of Pug. The home page extends the _layout page and delivers the content unique to home in the block content section. Back on the _layout page, there is a block content section that dictates where the content will render. Here, your content is just a few tabs with your restaurants. When a user clicks the tab, the app displays a menu with an Add To Cart button.
This code also adds a script to the body of this page. You don’t need this script on every page, so you will only include it on pages that rely on it. All the necessary client-side javascript is in the utils.js file in the public\js folder. Add this as its content:
function updateCart(cart) {
  var count = cart.items.length;
  $('#cart-button').text(count);
}

function removeFromCart(restaurantId, itemId, rowNumber) {
  var data = {
    restaurantId: restaurantId,
    itemId: itemId
  };

  $.ajax({
    type: 'DELETE',
    url: 'cart',
    data: data,
    success: function(cart) {
      if(cart.items.length == 0)
      {
        window.location.href  = 'cart';
      }
      updateCart(cart);
      $('#row-' + rowNumber).remove();
      $('#total-price').text('Total Price $ ' + cart.total);
    }
  });
}

function addToCart(restaurantId, itemId) {
  var data = {
    restaurantId: restaurantId,
    itemId: itemId
  };

  $.ajax({
    type: 'POST',
    url: 'cart',
    data: data,
    success: function(cart) {
      updateCart(cart);
    }
  });
}
The utils javascript provides logic for adding and removing items from the cart and updating the view based on the updated cart.
Once the user has added the items to their cart, they will need to review the order and check out. This all happens in your views/cart.pug view.
extends _layout

block variables
    - var title = 'Restauranter - Eat Now'

block content
    h2.p-2 Cart
    if cart.items.length == 0
        p Your cart is empty. Please check out our
            a(href="/") menus.
    else
        table.table.table-striped
            thead
                tr
                    th Restaurant
                    th Item
                    th Price
                    th Remove
            tbody
            each item, i in cart.items
                - c = 'row-' + i;
                tr(id=c)
                    td #{ item.restaurantName }
                    td #{ item.itemName }
                    td #{ item.itemPrice }
                    td
                        - removeFunc = 'removeFromCart(' + item.restaurantId + ',' + item.itemId + ',' + i + ')'
                        a.fa.fa-trash-alt(href="#", onClick = removeFunc)
            tfoot
                tr
                    td(colspan="3")
                        span.float-right(id='total-price') Total Price $ #{cart.total.toFixed(2)}
                    td
                        form(action="order", method="post")
                            button.btn.btn-primary Order
    script(src="..\\js\\utils.js")
Once again, you are extending the _layout page. The content itself is a table with the items the user added with a final opportunity to remove an item from the cart.
The program shows the views/confirmation.pug page after the user submits their order and it succeeds. The page displays a thank-you message to the user.
extends _layout

block variables
    - var title = 'Restauranter - Eat Now'

block content
    h2 Thank You for ordering!
Finally, you can complete your login page. One of the best things about Okta is that you don’t need to implement a lot of login logic. You’ll recall that you set routes/login in your Okta setup to users/login. This presents the users/login link to your user, and when they click it, they will be piped into the Okta login logic.
extends _layout

block variables
  - var title = 'Login'

block content
    p Hey there, in order to access this page, please
      a(href="/users/login") Login here.
The last thing you will need is base data for your application to use. In a real application, you might get this from a data store of some sort. For demonstration purposes, you’ll just create data in memory. At the bottom of your restaurant.js file, add:
var restaurants = [
  {
    id: '1',
    name: "Joe's Seafood Joint",
    menu: [
      {
        restaurantId: 1,
        itemId: 1,
        name: 'Stuffed Flounder',
        price: '19.99',
        description:
          'Daily Catch Flounder wrapped around Bay Area Crab chunks drizzled with an Imperial Sauce over rice with asparagus.'
      },
      {
        restaurantId: 1,
        itemId: 2,
        name: 'Striped Bass',
        price: '17.99',
        description:
          'No better rockfish than that right out of the Chesapeake Bay.  Garnished with Lemon and sided with fried potatoes and fresh green beans.'
      },
      {
        restaurantId: 1,
        itemId: 3,
        name: 'Lobster',
        price: '29.99',
        description:
          'Maine Lobster brought in fresh this morning served with butter and hush puppies.'
      }
    ]
  },
  {
    id: '2',
    name: 'The BBQ Place',
    menu: [
      {
        restaurantId: 2,
        itemId: 1,
        name: 'Pulled Pork',
        price: '12.99',
        description:
          'Slow cooked pork shoulder with our famous vinegar barbeque sauce served with hush puppies and carrots.'
      },
      {
        restaurantId: 2,
        itemId: 2,
        name: 'Smokey Smoked Brisket',
        price: '17.99',
        description:
          'Smoked for 2 whole days in our custom built smoker on premise.  Juicy and tender brisket served with fries and coleslaw.'
      },
      {
        restaurantId: 2,
        itemId: 3,
        name: 'Half Rack of Ribs',
        price: '29.99',
        description:
          'Slathered in barbeque sauce and served with french fries and coleslaw.'
      }
    ]
  },
  {
    id: '3',
    name: 'Sandwiches R Us',
    menu: [
      {
        restaurantId: 3,
        itemId: 1,
        name: 'Tuna Wrap',
        price: '12.99',
        description:
          'Fresh caught Hatteras yellowfin tuna wrapped in a wheat tortilla.  Comes with chips or fries and a fried pickle.'
      },
      {
        restaurantId: 3,
        itemId: 2,
        name: 'BLT',
        price: '10.99',
        description:
          'The classic BLT made with real local bacon from my buddys farm'
      },
      {
        restaurantId: 3,
        itemId: 3,
        name: 'Pigs in a Blanket',
        price: '12.99',
        description:
          'Two mini pancakes as bread, bacon, sausage, and eggs.  Drizzled in syrup and slathered in butter.'
      }
    ]
  }
];
At this point, your application is ready to go. You can start it by running debug in your IDE or by using the command node index.js. Since your user won’t be authenticated, the first page he or she will see is the request to log in. The user can do so using their Okta account. Afterward, the app will take them the menu page.
Learn More about Node and Microservices
By leveraging the powerful tools of Okta and Seneca, you put together an application to handle a complete food ordering process built on a microservice architecture with full authentication in no time at all. If you would like to learn more, check out some of my favorite tutorials below.
- Painless Node.js Authentication
- Build A Simple Web App with Node and Postgres
- Use TypeScript to Build a Node API with Express
Make sure you follow us on Twitter, Facebook, and YouTube for more great content. If you have any questions or comments, let us know in the comments below.
Okta Developer Blog Comment Policy
We welcome relevant and respectful comments. Off-topic comments may be removed.