Build A Simple Web App with Node and Postgres

Node.js boasts high performance and scalability for web, mobile, or desktop applications. It is one of the fastest-growing and best-supported javascript frameworks available today, and its microservice patterns has made it a hit for modern enterprise applications. PostgreSQL has also risen in popularity, to compete with MySql. The two technologies partner well as a foundation for modern, microservices-based applications.
In this post, we will build a small application that keeps track of a To-Do List and the status of tasks, all built on Node and Postgres.
To connect the two you will use an ORM (Object-Relational Mapper) called Sequelize, available via the Node Package Manager, npmjs. Sequelize fits beautifully over Postgres, MSSql, MySql, and MariaDB with no need to rewrite code. This tutorial will also use Express.js, because it makes working with Node so simple. You’ll need a proper IDE for Node development, and we use Visual Studio Code in this example, because it’s free, lightweight, and extensible.
Finally, to power authentication, you will use Okta , and its Okta OIDC Middleware and the Node.js SDK.
Note: In May 2025, the Okta Integrator Free Plan replaced Okta Developer Edition Accounts, and the Okta CLI was deprecated.
We preserved this post for reference, but the instructions no longer work exactly as written. Replace the Okta CLI commands by manually configuring Okta following the instructions in our Developer Documentation.
Set Up PostgreSQL
Postgres is incredibly simple to set up. First, you will need to download the distribution that matches your server’s operating system. I installed version 12 on Windows 10 - 64bit. Follow the instructions in the installer, and you’re just about ready to go.
Next, you will need to set up a Postgres database. To do so, you will use the SQL Shell that comes with Postgres. You can review the full documentation here, but, I will just show you how to create a new database.
As part of your installation, Postgres will install SQL Shell your workstation. Open SQL Shell and it will prompt you for the server, database, username, and password. Hopefully, you remember these from when you installed the database.
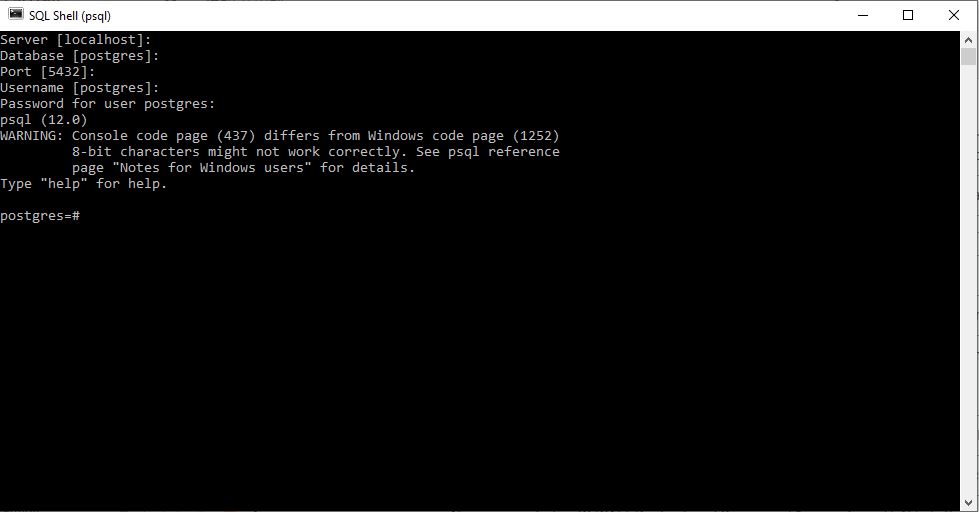
Log in and create your first database:
CREATE DATABASE TODOLIST;
Note: In Postgres syntax, the semicolon is a must. If you do not put a semicolon in Sql Shell, it will wait until it sees one to complete the command. Typically, your next command will return a syntax error when you do add the semicolon.
You can verify that your database was created by using the \list command. Switch to your new TODOLIST database using \TODOLIST.
From here, you will create a table named Item that holds most of your application data:.
CREATE TABLE Item ( id serial primary key, title varchar(100), description text, isComplete boolean);
If you have any experience with SQL, this syntax should look very familiar. It starts by calling the Create Table function and naming your table Item, followed by the table’s structure in parenthesis. By convention, you will name the first column id to provide a primary key for the table. In Postgres, the serial type is used to denote an auto incrementing integer that is not null. Title is a varchar, or a string, with a maximum limit of 100 characters. Description is marked as a text field and therefore has no limit on the number of characters used, but is more difficult to search. IsComplete is a boolean value that indicates if the Item is completed by the user.
Now you have a database set up and ready to accept your items from your web server.
Create Your Node Application
Now, create a directory for your node application. You can do that with the following commands:
mkdir todolist
cd todolist
Use npm init to go through a wizard that will prompt up for various configuration details, including the entry point, author, name, and test scripts. Skip these questions and use the default fields by using npm init -y.
Now that Node has been initialized on your directory you can start framing out your project structure.
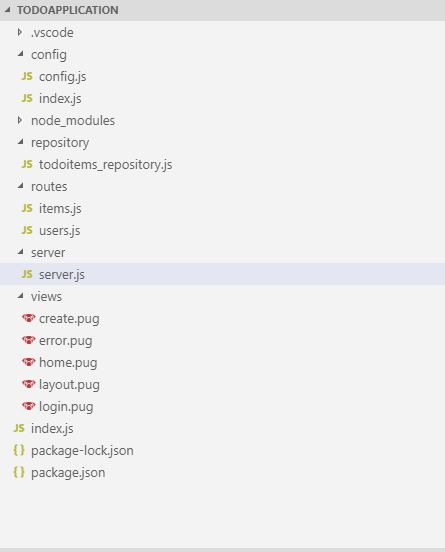
First, create folders for config, repository, routes, server, and views.
In the config folder, you will create a general configuration file named config.js and a specific one for index.js that will serve as your entry point.
In the repository folder, create a file named todoitems_repository.js. This will serve as the access layer to your Postgres database.
For routes you will have two routes; items.js and users.js. items.js will contain the routing logic for your list and creation of new items. users.js will contain the routes you need to present the user with a login page. Note, you won’t need login functionality, as that will be handled by the Okta middleware.
In the Server folder, create a server.js file to contain your server logic that register middleware, instantiate your routes, and handle any unhandled errors for your server.
Finally, add 5 views: create.pug, error.pug, home.pug, layout.pug, and login.pug. The layout.pug file provides a template for each page and provides common page functionalities like headers and footers. The home.pug file will be your dashboard page that displays the list of incomplete items to the user. The file create.pug provides your user a place to create a new item. The login.pug file gives unauthenticated users a landing page and provides a link to your Okta login page, and the error.pug file displays a generic error page if your server encountered an unexpected hiccup.
Register Your Node Dependencies
For this project, you’ll use a handful of dependencies from the Node Package Manager via the following terminal commands.
First, you need to add express.js and to help handle session parameters, you will also want to get Express Session:
npm install express@4.14.0
npm install express-session@1.17.0
For your ORM, Sequelize is one of the easiest and most powerful options available on Node. In addition to Sequelize, you will also need the pg package, which handles Postgres:
npm install sequelize@5.19.3
npm install pg@7.12.1
Of course, to make it even easier to interface with Okta, add our OIDC middleware, as well as the Okta Node SDK:
npm install @okta/oidc-middleware@2.0.0
npm install @okta/okta-sdk-nodejs@2.0.1
To render your views, add the Pug view engine:
npm install pug@2.0.4
Finally, two utility packages, http-status and body-parser provide properties for HTTP Status Codes and convert the form data or JSON to javascript objects.
npm install body-parser@1.19.0
npm install http-status@0.2.5
Connect the Node Application to the Postgres Database
Let’s now connect your application to your database. In todoitems_repository.js, start a new instance of Sequelize. First, create a function called initSequelize and add your initialization logic there:
var sequelize = new Sequelize(config.database, config.user, config.password, {
  host: config.server,
  dialect: 'postgres',
  define: {
    freezeTableName: true,
    timestamps: false
  }
});
You’ll notice you set freezeTableName to true. This offers greater control over how Sequelize names the models in your code. The dialect property tells Sequelize that it is using Postgres.
Next, define your Item model from the database in your Node application. At the top of your todoitems_repository.js file, under the sequelize declaration, create a ToDoItem class that extends a Sequelize.Model:
class ToDoItem extends Sequelize.Model {}
Back in your initSequelize function, add the full model definition for ToDoItem:
ToDoItem.init(
  {
    id: {
      type: Sequelize.INTEGER,
      allowNull: false,
      primaryKey: true,
      autoIncrement: true
    },
    title: {
      type: Sequelize.STRING,
      allowNull: false
    },
    description: {
      type: Sequelize.STRING,
      allowNull: false
    },
    iscomplete: {
      type: Sequelize.BOOLEAN,
      allowNull: false
    }
  },
  {
    sequelize,
    tableName: 'Item'
  }
);
Once you have Sequelize set up, you can implement a repository function to utilize Sequelize to perform database operations. he javascript Object.create method will declare the exposed functions:
const repository = function(config) {
  var sequelize = initSequelize(config);
  Object.create({
    disconnect,
    createToDoItem,
    getAllIncompleteToDoItems,
    markAsComplete
  });
};
Of course, you can’t use these functions unless they are defined, so let’s modify the repository function to implement these methods using Sequelize. It should look like this:
const repository = function(config) {
  var sequelize = initSequelize(config);

  const disconnect = function() {
    sequelize.close();
  };

  const createToDoItem = function(title, description) {
    return ToDoItem.create({
      title: title,
      description: description,
      iscomplete: false
    });
  };

  const markAsComplete = function(id) {
    return ToDoItem.update(
      {
        iscomplete: true
      },
      {
        where: {
          id: id
        }
      }
    );
  };

  const getAllIncompleteToDoItems = function() {
    return ToDoItem.findAll({
      where: {
        iscomplete: false
      }
    });
  };

  return Object.create({
    disconnect,
    createToDoItem,
    getAllIncompleteToDoItems,
    markAsComplete
  });
};
The function above provides you with common methods that modify your ToDoItems, such as update, create, delete, and findAll. Sequelize functions take objects that can carry information for your where select options, your update options, and your where clauses.
Importantly, this function will not return a list of ToDoItems, as it might appear. Sequelize is promise-based, and therefore this function will return a promise. IYou will need to allow the promise to resolve in your service layer to retrieve your true list of ToDoItems.
Set up Routes
In your two routes files (users.js, items.js) you will set up the actions the client can take against the server.
You start with the simpler users route and set up two separate actions, one for logging out and one for serving your login page to an unauthenticated user. Because Okta handles the login process for us, you don’t need to worry about that part.
app.get(basepath + '/logout', (request, response, next) => {
  request.logout();
  response.redirect('/');
});

app.get(basepath + '/index', (request, response, next) => {
  if (!request.userContext) {
    return response.render('login');
  } else {
    return response.redirect('/');
  }
});
This simply checks if the user is already logged in. If they are not, it shows the user the login page. Otherwise, it allows the user to move on to the home page.
The home page and server calls to manage your items will be controlled by the items routes. Below you can see the routes set up for the calls you will need.
app.get(basepath, ensureAuthenticated, function(request, response) {
  repo
    .getAllIncompleteToDoItems()
    .then(items => {
      response.render('home', {
        user: request.userContext.userinfo,
        items: items
      });
    })
    .catch(err => {
      response.render('error');
    });
});

app.get(basepath + '/create', ensureAuthenticated, function(request, response) {
  response.render('create');
});

app.post(basepath + '/items/create', ensureAuthenticated, function(
  request,
  response
) {
  repo
    .createToDoItem(request.body.title, request.body.description)
    .then(data => {
      response.redirect('/');
    })
    .catch(err => {
      response.render('error');
    });
});

app.post(basepath + '/items/complete', ensureAuthenticated, function(
  request,
  response
) {
  repo
    .markAsComplete(request.body.id)
    .then(data => {
      response.redirect('/');
    })
    .catch(err => {
      response.render('error');
    });
});

function ensureAuthenticated(request, response, next) {
  if (!request.userContext) {
    return response.status(401).redirect('../users/index');
  }

  next();
}
This registers two routes for the two pages that items will serve; create and home, and set up two post methods. One creates any new items a user inputs, while the other lets the user mark an item as complete.
As I mentioned before, Sequelize is promise-based. When you call getAllIncompleteItems, it returns a promise. By calling then on the promise, it is allowed to resolve and hook into the result (a list of items) in the callback function. In this case, part of the model that home.pug uses to render the content supplies the items.
Also,the ensureAuthenticated() function is passed in as a route handler and evaluated before the request is handled. ensureAuthenticated() asks if the user is authenticated, like your login page (but backward). If they are not, it redirect them back to the login page from your users route with a standard 401 status.
Build the Node Server
Next, register your middleware and take care of any error handling in a server.js file away from your entry point.
Register Pug as your view engine and set up body-parser to look for form data coming from the client:
app.set('view engine', 'pug');
app.use(bodyParser.urlencoded({ extended: false }));
body-parser also has built-in functionality for JSON if you want to post from javascript on the client, but it’s not necessary for this simple project.
Next, register routes in the application. To do this, inject the application into the route managers and any objects you need. For example, the items route will need access to your repository, while the users routes do not.
items(app, options);
users(app, null);
Finally, you can start your server:
const server = app.listen(options.port, function() {
  resolve(server);
});
Notice you injected the options from your entry point, which you will see shortly.
Your start function in the server.js file should look like below:
const start = function(options) {
  return new Promise(function(resolve, reject) {
    process.on('unhandledRejection', (reason, p) => {
      console.log('Unhandled Rejection at: Promise', p, 'reason:', reason);
    });

    if (!options.port) {
      reject(new Error('no port specified'));
    }

    if (!options.repo) {
      reject(new Error('no repo'));
    }

    const app = express();

    app.set('views', path.join(__dirname, '../views'));
    app.set('view engine', 'pug');

    app.use(bodyParser.urlencoded({ extended: false }));

    app.use(function(error, request, response, next) {
      reject(new Error('something went wrong' + error));
      response.status(500).send('something went wrong');
    });

    const oidc = new ExpressOIDC({
      issuer: options.okta.url + '/oauth2/default',
      client_id: options.okta.clientId,
      client_secret: options.okta.clientSecret,
      appBaseUrl: options.okta.appBaseUrl,
      scope: 'openid profile',
      routes: {
        login: {
          path: '/users/login'
        },
        callback: {
          path: '/authorization-code/callback',
          defaultRedirect: '/'
        }
      }
    });

    app.use(
      session({
        secret: '{some really long random string}',
        resave: true,
        saveUninitialized: false
      })
    );

    app.use(oidc.router);

    items(app, options);
    users(app, null);

    const server = app.listen(options.port, function() {
      resolve(server);
    });
  });
};
Set Up Okta for Single Sign On Management
If you don’t have an Okta account, sign up for a free-forever developer account.
Log into your account and head to the Applications area of the site. Click on Add Application and follow the wizard. Select Web for the application type. Make sure to reconcile the base domain that Okta and your Node application use. Okta defaults to localhost:8080, while your Node app listens to port 3000 (more on this later). In your Okta Application, change the login redirect to localhost:3000. Then click Done.
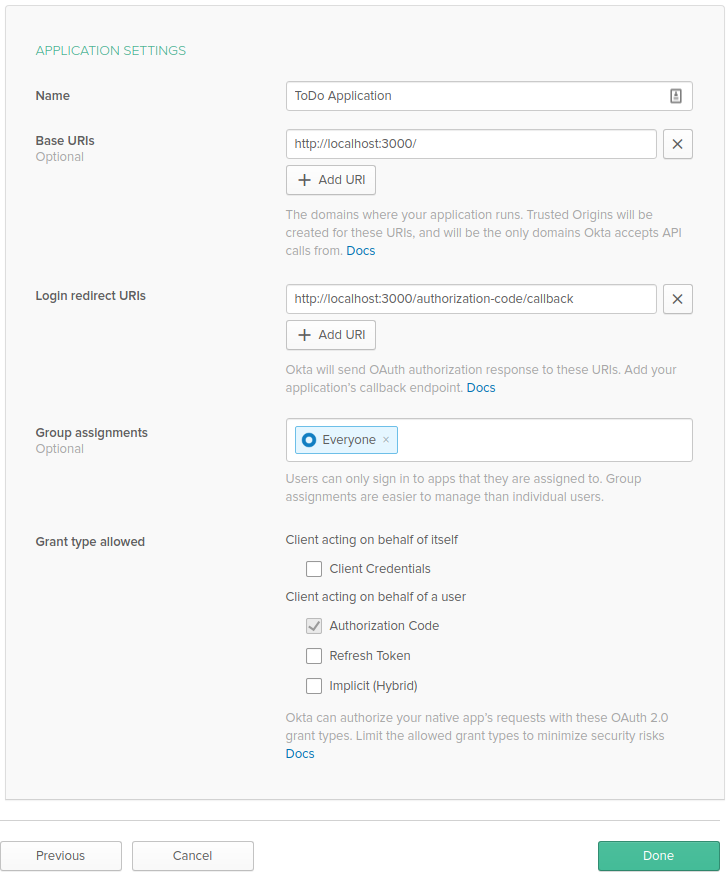
One you’re set up, Okta will provide you with a few key pieces of information to properly interface with the platform; client ID and client secret will be at the bottom of the application’s General tab. The URL base that will power your login screen will be located at the top of your Okta dashboard. Make sure to copy these down!
Next, in the Okta menu, use the API menu item at the top of the page and choose Tokens and create a new token.
Now, include client ID, client secret, the URL base and your API token in your config.js file.
const oktaSettings = {
  clientId: process.env.OKTA_CLIENTID || { yourClientId },
  clientSecret: process.env.OKTA_CLIENTSECRET || { yourClientSecret },
  url: process.env.OKTA_URL_BASE || https://{ yourOktaDomain },
  apiToken: process.env.OKTA_API_TOKEN || { yourApiToken },
  appBaseUrl: process.env.OKTA_APP_BASE_URL || 'http://localhost:3000'
};
Export these to index.js and inject them into your server.js file for use when registering the OIDC middleware:
const oidc = new ExpressOIDC({
  issuer: options.okta.url + "/oauth2/default",
  client_id: options.okta.clientId,
  client_secret: options.okta.clientSecret,
  appBaseUrl: options.okta.appBaseUrl,
  scope: 'openid profile',
  routes: {
    login: {
      path: "/users/login"
    },
    callback: {
      path: "/authorization-code/callback",
      defaultRedirect: "/"
    }
  }
});

app.use(session({
  secret: { some very long, random string },
  resave: true,
  saveUninitialized: false
}));
By registering the OIDC, you also tell Okta to that /users/login is your login page. Note, the callback needs to be the same as the one set up in your application in the Okta Admin Site.
You will use openid and profile for the scope in this example. openid provides the bare authentication details while the profile provides user information. You can read more about scopes in Okta’s documentation.
Configuration Recap
At this point, review your configuration settings and ensure you are ready to set up your entry point. To start, you want to set up your index.js in the config folder.
const { dbSettings, serverSettings, oktaSettings } = require('./config');

module.exports = Object.assign(
  {},
  { dbSettings, serverSettings, oktaSettings }
);
The file is fairly simple; it just imports configuration settings from the generic config file. config/index.js serves to provide configuration for index.js. In larger applications, many separate configurations for different components can easily repackaged here for the consumer.
In your application, all the configurations are stored in one file, config/config.js:
const serverSettings = {
  port: process.env.PORT || 3000
};

const dbSettings = {
  database: process.env.DB || 'todolist',
  user: process.env.DB_USER || 'postgres',
  password: process.env.DB_PASS || 'your password',
  server: process.env.DB_SERVER || 'localhost'
};

const oktaSettings = {
  clientId: process.env.OKTA_CLIENTID || 'yourClientId',
  clientSecret: process.env.OKTA_CLIENTSECRET || 'yourClientSecret',
  url: process.env.OKTA_URL_BASE || 'yourOktaDomain',
  apiToken: process.env.OKTA_API_TOKEN || 'yourApiToken',
  appBaseUrl: process.env.OKTA_APP_BASE_URL || 'http://localhost:3000'
};

module.exports = Object.assign(
  {},
  { dbSettings, serverSettings, oktaSettings }
);
To make it easier to find and access your settings in index.js, your configuration settings are organized into logical objects: the Okta settings have their own object, as do the database and server settings. The database settings should match the values you input when setting up Postgres. The Okta settings will come from your Okta account. Notice the environment variables: when you deploy your application, you will be given the opportunity to set these (you can also do so in Visual Studio). However, if those variables aren’t set, your application will use the default values given.
Set Up the Node Application’s Entry Point
Node looks for an entry point in your application to start up. In this case, it’s the index.js file. Here is where your server will start and inject any necessary configurations. At its heart, it is a very simple operation:
repository.connect(dbConfig)
  .then(repo => {
    console.log('Repository Connected. Starting Server');
    rep = repo;

    return server.start({
      port: config.serverSettings.port,
      repo: repo,
      okta: config.oktaSettings
    })
  })
  .then(app => {
    console.log(`Server Started Successfully, running on port:${config.serverSettings.port}.`);
    app.on('close', function () {
      rep.disconnect();
    })
  })
})
All this does is connect your repository, and if that is successful, starts the server, registers your routes and middleware and listens on the selected port for incoming requests.
Starting the server, creates the opportunity to pass arguments for injection. This server passes the repo you just connected to and settings from the configuration file,including the correct port and your Okta settings.
An event called boot.ready connects to the repository and informs your application it is ready to start. To make this possible, wrap your connect function in an event handled for boot.ready using Node’s EventEmitter class. At the end of your index.js file, add the boot.ready event that kicks off the whole process. boot.error handles errors, prevents the server from starting and logs the error.
mediator.on('boot.ready', function(dbConfig) {
  let rep;

  repository
    .connect(dbConfig)
    .then(repo => {
      console.log('Repository Connected.  Starting Server');
      rep = repo;

      return server.start({
        port: config.serverSettings.port,
        repo: repo,
        okta: config.oktaSettings
      });
    })
    .then(app => {
      console.log(
        `Server Started Successfully, running on port: ${config.serverSettings.port}.`
      );
      app.on('close', function() {
        rep.disconnect();
      });
    });
});

mediator.on('db.error', function(error) {
  console.log(error);
});

mediator.emit('boot.ready', config.dbSettings);
Create the Node Application Views
The Pug view Engine creates your application’s views, and pages are built with bootstrap, because its nice and simple and easy for a developer to understand. Pug creates a layout page that can be extended by your children pages. For your layout page, the real challenge is ensuring that the user sees the correct display depending on if they are logged in or not.
div.d-flex.flex-column.flex-md-row.align-items-center.p-3.px-md-4.mb-3.bg-white.border-bottom.box-shadow
  h5.my-0.mr-md-auto To Do List
  nav.my-2.my-md-0.mr-md-3
  if user == undefined
    a.p-2.text-dark(href="/users/login") Log In
  else
    a.p-2.text-dark(href="/") Item List
    a.p-2.text-dark(href="/create") Create Item
    a.p-2.text-dark(href="/users/logout") Logout
.container
  block content
This will require your model to pass a user. If that user is null, the application will treat the user as unauthenticated and present him or her with a login option. Otherwise, it presents the user with the links for creating an item.
The block content keyword provides a space to render content, and comes from your child pages, as you can see on your home page:To embed a child page in layout.pug, in home.pug, create another block content heading that will be represented as a content block in layout.pug.
extends layout

block variables
- var title = 'To Do List - Home'

block content
h2.text-center #{title}

table.table.table-striped
  thead.thead-light
    tr
      th Title
      th Description
      th Is Complete
  tbody
    each item, i in items
      tr
      td #{item.title}
      td #{item.description}
      td
        form(action="items/complete", method="post")
          input(type="hidden", name="id", value=item.id)
          button.btn.btn-secondary(onClick='this.submit') Mark As Complete
The standard h2 tag gives the page a title, and a new table displays the items. Find the items part of your model in the pug file use and the each command to create a new tr row and any cells necessary for the user. There is a title, description, and form that posts back to the items/complete route you registered earlier. Items/complete will set the isComplete boolean on the item to true and remove it from this view.
The view that creates an item uses the same layout. The create.pug view needs only a couple text boxes, one for description and one for title, as well as a way to actually post the data back to the server.
extends layout

block variables
  - var title = 'Create To Do Item'

block content
  div.card
    h5.card-header Create To Do Item
    div.card-body
      form(action="items/create", method="post")
        div.form-group
          label(for="Title") Title
          input#title.form-control(type="text", name="title")
        div.form-group
          label(for="description") Description
          textarea#description.form-control(name="description", cols="30", rows="10")
        div.form-group
          button.btn.btn-primary Save
If your user isn’t logged in, however, they shouldn’t be able to see these two pages. In your routes, the ensureAuthenticated() middleware displays login.pug page to unauthenticated users. Now your application must provide a way for the user to login.
extends layout

block variables
  - var title = 'Login'

block content

  p Hey there, in order to access this page, please
    a(href="/users/login") Login here.
You defined /users/login as the login page to be managed by Okta when you created the application in the Okta dashboardClicking the link directs users to the login page provided by Okta, which handles all the authentication Of course, you could have just as easily written ensureAuthenticated() to reroute to users/login but working with pug is fun.
Finally, errors happen. Even the best developers and servers see occasional errors, and you want to make sure your user sees an appropriate error page, not one provided by the browser or a data dump of the stack.
Your application uses a very simple error page.
extends layout

block variables
  - var title = 'Oops that is an error'

block content
  p.warning We hit a little snag.  Sorry
The error page just informs the user that an error has occurred and they shouldn’t necessarily panic. However, you may want to create multiple error pages for errors of different types, or display an error code and an email for support if you wish.
You can navigate back to your home page and see the fruits of your labor. The to-do list now correctly calls the server and requests the full list of to-do items. Of course, the server doesn’t have any yet, so click New Item and add a thing to do. Then click on the checkbox to see your new item marked as complete. You can verify this by checking the database directly via SQL shell.
You can download the code for this tutorial directly from the GitHub repository.
Learn More About Node and Postgres
If you want to learn more about PostgreSQL, Node or Visual Studio, check out our other blog posts.
- MySQL vs PostgreSQL – Choose the Right Database for Your Project
- Build a Simple REST API with Node and OAuth 2.0
- Build a REST API with Node and Postgres
- Top 10 Visual Studio Code Extensions for Node.js
As always, you can ask questions in the comments section below. Don’t forget to follow us on Facebook and subscribe to our YoutTube channel so you never miss any killer content!
Okta Developer Blog Comment Policy
We welcome relevant and respectful comments. Off-topic comments may be removed.