C# WebSockets Tutorial: Build a Multiplayer Game

It might seem obvious, but HTTP is a transfer protocol for hypertext. It was designed — in 1989 — to allow clients to request and receive hypertext documents from a server. While the protocol is undoubtedly a revolutionary technology, modern web applications have evolved far beyond simply responding to client requests. Today, web applications push more processing onto a client that must accommodate multiple Javascript frameworks and libraries. There is a real need for a communications protocol that goes beyond the request/response model of HTTP and instead provides full-duplex communication between client and server. Today, the Websocket protocol is the defacto choice for interactive client applications. In this post, you’ll learn how to use it to build a simple multiplayer game. If anybody asks why you’re playing video games with your co-workers, you can legitimately claim it’s for research purposes!
To walk through this post, you’ll need:
Note: In May 2025, the Okta Integrator Free Plan replaced Okta Developer Edition Accounts, and the Okta CLI was deprecated.
We preserved this post for reference, but the instructions no longer work exactly as written. Replace the Okta CLI commands by manually configuring Okta following the instructions in our Developer Documentation.
How the WebSocket Protocol Works
By design, WebSocket runs on the same servers that support standard HTTP. To make that possible, WebSocket sessions begin with an HTTP request for a WebSocket session. For example: http://localhost:5000/game. The web server then responds with an HTTP 101 status code (switching protocols), and a two-way channel is set up between the client and the server on ws://localhost:5000/game. This TCP channel can then be used for communications by code on either the client or the server-side.
Significantly, the WebSocket protocol is only useful when an application has been built to leverage it. Usually, that requires an app to run JavaScript in a web browser and some code on the server. This approach is very different from HTTP, where a generic browser can navigate and download HTML and other content by merely requesting the resource from the server.
Get to Know C# WebSockets
The WebSocket protocol operates at a relatively low level. As mentioned, it’s only useful when you build an application designed for it. From a client perspective, all modern HTML5-compliant browsers support the WebSocket class. JavaScript like this creates a connection that send messages:
var connection = new WebSocket('ws://localhost:5000/game');
connection.onopee= function()
{
  connection.send("Message to send to the server")
}
It’s also pretty straightforward to get started in ASP.Net Core. Enable support for the WebSocket protocol in your Startup.cs file by extending your Configure method to include the middleware:
public void Configure(IApplicationBuilder app, IWebHostEnvironment env)
{
  ...
  app.UseWebSockets();
}
Then you can add a handler for the path that will receive your WebSocket connection requests by adding:
app.Use(async (context, next) =>
{
  if (context.Request.Path == "/game")
  {
    if (context.WebSockets.IsWebSocketRequest)
    {
      WebSocket webSocket = await context.WebSockets.AcceptWebSocketAsync();
      await MyWebSocketHandler(context, webSocket);
    }
    else
    {
      context.Response.StatusCode = 400;
    }
  }
  else
  {
    await next();
  }
});
Your handler might look something like this:
private async Task MyWebSocketHander(HttpContext context, WebSocket webSocket)
{
  var buffer = new byte[1024 * 4];
  WebSocketReceiveResult result = await webSocket.ReceiveAsync(new ArraySegment<byte>(buffer), CancellationToken.None);
  while (!result.CloseStatus.HasValue)
  {
    await webSocket.SendAsync(new ArraySegment<byte>(buffer, 0, result.Count), result.MessageType, result.EndOfMessage, CancellationToken.None);

    result = await webSocket.ReceiveAsync(new ArraySegment<byte>(buffer), CancellationToken.None);
  }
  await webSocket.CloseAsync(result.CloseStatus.Value, result.CloseStatusDescription, CancellationToken.None);
}
This handler is pretty simple; it receives message bytes from the buffer and sends them back out to any connected client. As you can see, this code is low-level. If only there were a framework to make it a bit less cumbersome!
Use WebSockets in C# with SignalR
There are WebSockets frameworks for most programming languages and runtime environments, and ASP.Net Core is no exception. SignalR is Microsoft’s WebSockets framework for both .Net Standard and .Net Core. With SignalR, you don’t need to write low-level code like the snippet above. Instead, you can write code that’ll be very familiar if you’ve used MVC or WebAPI programming in ASP.Net Core.
public class MyHub : Hub
{
  public async Task Echo(string message)
  {
    await Clients.All.Message(message);
  }
}
Build a Multiplayer Game with WebSockets
To keep this post short and focused on WebSockets, start by cloning the sample project repo:
git clone https://github.com/oktadeveloper/okta-websocket-csharp-example.git
The sample project uses the React framework to provide the client-side elements and ASP.Net core as the server-side. Let’s jump in and look at how everything’s been hooked up.
Add SignalR support
In Startup.cs, add the SignalR service by adding the following line to your ‘ConfigureServices’ method right before the AddControllersWithViews() call.
services.AddSignalR();
In the Configure method of Startup.cs, extend the call to app.UseEndpoints to add your SignalR endpoint. For the sample application, you should add an additional Hub endpoint:
app.UseEndpoints(endpoints =>
{
  endpoints.MapControllerRoute(
    name: "default",
    pattern: "{controller}/{action=Index}/{id?}");
  endpoints.MapHub<GameHub>("game");
});
A Hub is essentially a two-way controller. Whereas controllers in MVC and WebAPI programming receive messages from the client and act upon them, a Hub can also send messages to the Client from other parts of your application.
Add a WebSocket Hub
A Hub is just a class derived from the Hub base class, in the same way as an API Controller is a class derived from the ControllerBase class. In the Hubs folder you’ll find GameHub.cs that contains the following class:
public class GameHub : Hub<IGameClient>
{
}
Hubs relay messages from your server application to connected clients, but the actual implementation of this message is very generic. The framework serializes method parameters and details of the message type and sends the bytes to the client. Rather than writing this boilerplate code, you can derive your Hub class from the generic Hub<T> base class, and then pass an interface that includes the messages you want to send to clients.
With this approach you can call a method defined on the interface when your server-side code needs to send a message, and the base class will take care of the rest. As well as being more convenient, this technique ensures messages are strongly-typed.
The IGameClient interface looks like this:
public interface IGameClient
{
  Task RenderBoard(string[][] board);
  Task Color(string color);
  Task Turn(string player);
  Task RollCall(Player player1, Player player2);
  Task Concede();
  Task Victory(string player, string[][] board);
}
Each one of these methods triggers an event in client-side code. If you examine the JavaScript file at ClientApp/src/components/Connect4.js you’ll see:
this.state.hubConnection.on('renderBoard', board => {
  this.setState({ board: board })
});

this.state.hubConnection.on('color', color => {
    this.setState({ color: color })
});

this.state.hubConnection.on('turn', player => {
  if (player === this.state.color) {
    this.setState({ message: "You're up. What's your move?", yourTurn: true, showButtons: false })
  } else {
    this.setState({ message: player + ' is thinking...', yourTurn: false, showButtons: false })
  }
});

this.state.hubConnection.on('rollcall', (player1, player2) => {
  this.setState({ player1: player1, player2: player2, })
});

this.state.hubConnection.on('concede', () => {
  this.setState({ message: 'Your opponent conceded. You win', yourTurn: false, showButtons: true })
  this.state.hubConnection.stop()
});

this.state.hubConnection.on('victory', (player, board) => {
  let newState = { yourTurn: false }
  if (player === this.state.color) {
    newState['message'] = 'You win!'
  } else {
    newState['message'] = 'You lose!'
  }
  newState["board"] = board;
  newState["showButtons"] = true;
  this.setState(newState)
  this.state.hubConnection.stop()
});
Note: the message names have been switched from Pascal case to Camel case as per the conventions for C# and JavaScript, respectively. The SignalR framework takes care of this automatically.
Determine Which Client is Sending Messages to the WebSocket
One of the ramifications of two-way communication is that it allows multiple, open communication channels at any given time between various clients and the webserver. The real value in WebSocket communication is in the ability to send messages from the server to a specific client or group of clients, rather than all connected clients. If you examine the code in GameHub.cs, you’ll see two overridden methods:
public override async Task OnConnectedAsync()
{
  //Find a game or create a new one
  var game = _repository.Games.FirstOrDefault(g => !g.InProgress);
  if (game is null)
  {
    game = new Game();
    game.Id = Guid.NewGuid().ToString();
    game.Player1.ConnectionId = Context.ConnectionId;
    _repository.Games.Add(game);
  }
  else
  {
    game.Player2.ConnectionId = Context.ConnectionId;
    game.InProgress = true;
  }

  await Groups.AddToGroupAsync(Context.ConnectionId, game.Id);
  await base.OnConnectedAsync();

  if (game.InProgress)
  {
    CoinToss(game);
    await Clients.Group(game.Id.ToString()).RenderBoard(game.Board);
  }
}

public override async Task OnDisconnectedAsync(Exception exception)
{
  //If game is complete delete it
  var game = _repository.Games.FirstOrDefault(g => g.Player1.ConnectionId == Context.ConnectionId || g.Player2.ConnectionId == Context.ConnectionId);
  if (!(game is null))
  {
    await Groups.RemoveFromGroupAsync(Context.ConnectionId, game.Id);
    await Clients.Group(game.Id).Concede();
    _repository.Games.Remove(game);
  }

  await base.OnDisconnectedAsync(exception);
}
Hub objects contain a Context property that represents the client on the other end of the communication channel. Whenever the client sends data to the Hub, the web server creates the appropriate Hub object, and the SignalR framework automatically sets the Context property.
Before a client can communicate with a Hub, it must create a session. As part of this session’s initialization process, the SignalR framework calls the OnConnectedAsync() method of the corresponding Hub controller. Each client session has a unique ConnectionId property value, and the server uses this value to send messages to specific connected clients. Furthermore, ConnectionId can be added to Groups to allow the server to send messages to particular groups of connected clients.
In this sample, the code creates a group for each game and adds the ConnectionId for both players. This approach means that many games can be in progress at any given time, and the server can determine which clients should receive which messages.
Both the OnConnectedAsync() method that is called when a client connects and the OnDisconnectedAsync() method are used when a client disconnects. This method allows for any cleanup that may be necessary. In the sample code, it’s used to forfeit the game.
Client Libraries for WebSocket communications
The sample code uses a Client-side library, as well as server-side SignalR libraries. If you examine, ClientApp/src/package.json, you’ll notice the inclusion of:
"@aspnet/signalr": "1.1.4",
This NPM package provides the HubConnectionBuilder class used in ClientApp/src/components/Connect4.js:
const hubConnection = new HubConnectionBuilder().withUrl("/game").configureLogging(LogLevel.Information).build();
The resulting hubConnection object can be used throughout Client-side code to receive events from the Server-side hub or to send messages to it.
Call Methods on the Server with WebSocket
So far, you’ve seen how Server-side code communicates with Clients by serializing method calls picked up in the client-side code as events. But what about the other way round? What if the client needs to send a message to the server?
The @aspnet/signalr package provides a HubConnection class to expose an invoke() method. You can use this method to invoke any public method on the server-side Hub controller.
For example (from Connect4.js):
this.state.hubConnection.invoke('updateuser', user.email, user.name);
results in this code being called (from GameHub.cs):
public async Task UpdateUser(string email, string name)
{
  var game = _repository.Games.FirstOrDefault(g => g.HasPlayer(Context.ConnectionId));
  if (game != null)
  {
    var player = game.GetPlayer(Context.ConnectionId);
    player.Email = email;
    player.Name = name;
    await Clients.Group(game.Id).RollCall(game.Player1, game.Player2);
  }
}
The first parameter is the method name. Again, the SignalR framework switches this from Camel case to Pascal case. The framework deserializes and passes additional parameters as arguments to the method. This approach is similar to the way query string arguments might be given to an API Controller method in HTTP-based communication.
Add Players and Play the Game
To see all this WebSocket goodness in action, try out the sample project. Since the application is a multi-player game, a straightforward way to authenticate and identify individual players is to use Okta.
If you don’t already have one, sign up for a forever-free developer account.
Log in to your developer console, navigate to Applications, then click Add Application. Select Single-Page App, then click Next.
The sample project is set up to run on port 5000so you should add: http://localhost:5000 as the Base URI. Your settings should look like:
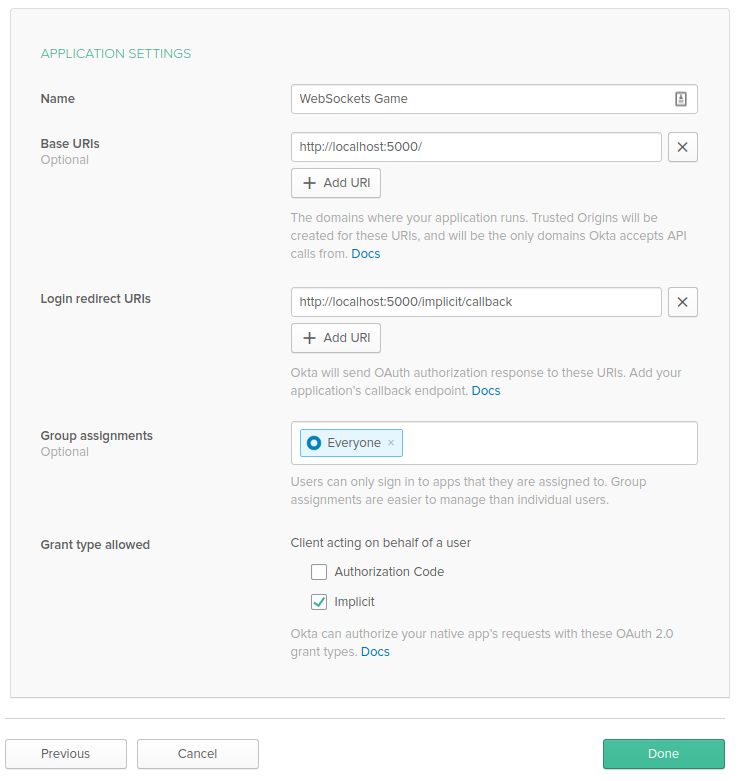
Once you click Done to save your Okta application, make a note of the Client ID and Organization URL. You can find the Org URL on the upper right corner of the Okta Dashboard home page.
Since we’re using React to build the Client-side elements, include the Okta React package in package.json:
"dependencies": {
  "babel-eslint": "10.0.1",
  "bootstrap": "^4.1.3",
  "jquery": "^3.4.1",
  "merge": "^1.2.1",
  "oidc-client": "^1.9.0",
  "@aspnet/signalr": "1.1.4",
  "@okta/okta-react": "1.2.3",
  "react": "^16.0.0",
  "react-dom": "^16.0.0",
  "react-router-bootstrap": "^0.24.4",
  "react-router-dom": "^4.2.2",
  "react-scripts": "^3.0.1",
  "react-gravatar": "2.6.3",
  "reactstrap": "^6.3.0",
  "rimraf": "^2.6.2"
},
The final step is to update the react-router component with the authentication information. In ClientApp/src/App.js, update the code to:
export default class App extends Component {
  static displayName = App.name;

  render() {
    return (
      <Security
        issuer={`https://{yourOktaDomain}/oauth2/default`}
        client_id='{yourClientId}'
        redirect_uri={`${window.location.origin}/implicit/callback`}
      >
        <Layout>
          <Route exact path='/' component={Leaderboard} />
          <SecureRoute path='/connect4' component={Connect4} />
          <Route path="/implicit/callback" component={ImplicitCallback} />
        </Layout>
      </Security>
    );
  }
}
This code creates a React router component that handles the authentication callback from Okta and also requires authentication to connect to the ‘/connect4’ path.
If you’ve configured everything correctly, you can run the project in Visual Studio by pressing F5 or selecting Start Debugging from the Debug menu.
Point your browser at http://localhost:5000 and enjoy! To put it through its paces, deploy it to a web server, and challenge your colleagues. Remember, it’s all in the name of research.
Learn More about Websockets, .NET and React
In this post, you’ve learned about the WebSocket protocol and how it can be easily used in ASP.NET Core by hooking up the SignalR Framework. To find out more about the other areas covered by the sample app see:
- Simple User Authentication in React
- Build a Secure App with ASP.Net Core and React
- Build a REST API with ASP.NET Core 2.2
For more informative tutorials, please follow @oktadev on Twitter and subscribe to our YouTube channel.
Okta Developer Blog Comment Policy
We welcome relevant and respectful comments. Off-topic comments may be removed.