Symfony 4.3 + Vue.js: PHP Apps Made Simple
Today’s Web users are a lot more sophisticated than just a few years ago. They expect applications to be fast, secure, and work equally well on their desktops and phones. Meeting these expectations requires a great deal of work so you can provide a reliable backend and a fully dynamic frontend, while keeping the whole system secure and scalable.
However, with the right set of tools, you can get started quickly and become productive in no time at all. In this article, I’ll show you how to build a single-page application using Symfony 4.3 at the backend and Vue.js at the frontend, without spending hours configuring your environment or build tools.
Symfony is a great framework, consisting of a large set of reusable, loosely coupled components written in PHP. PHP still runs over 80% of the Web we know, and it only gets better with each new version of the language.
Vue.js is one of the hottest JavaScript frameworks in the past two years because of its small size, gentle learning curve, fantastic performance, and flexibility. It also integrates out of the box with some of the most popular backend frameworks like Laravel and Rails.
If you want to follow this tutorial, you’ll need a PHP 7 and Node/npm/yarn development environment. You’ll also need a free Okta account.
Note: In May 2025, the Okta Integrator Free Plan replaced Okta Developer Edition Accounts, and the Okta CLI was deprecated.
We preserved this post for reference, but the instructions no longer work exactly as written. Replace the Okta CLI commands by manually configuring Okta following the instructions in our Developer Documentation.
Single Page App with Symphony and Vue
In this tutorial, you’ll build a simple application that allows you to keep track of the count of various items (e.g. the number of times someone says a certain line in a TV show, as you watch it):
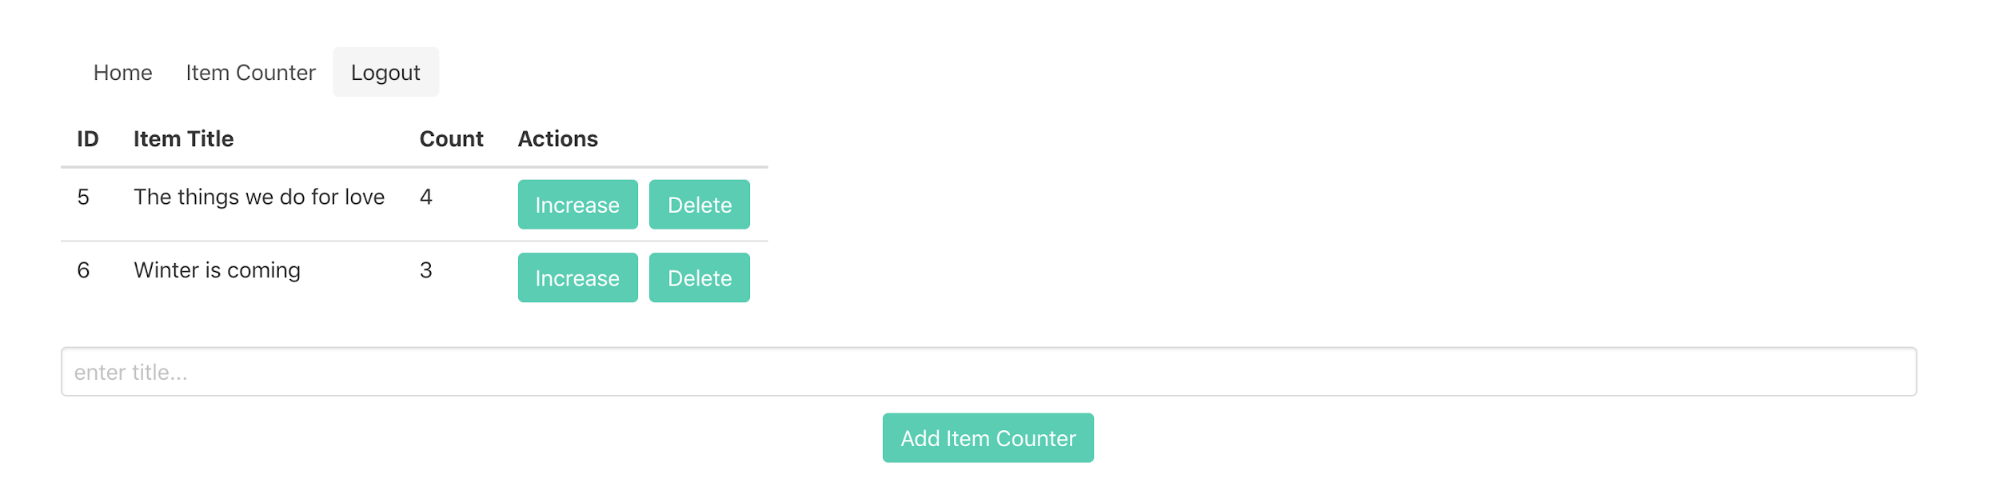
The application allows you to add new items, increase the count of an item, and delete an item.
You will develop a single-page application on the frontend (using Vue 2.6) with an API backend in Symfony 4.3, and the application will use Okta for user authentication/authorization.
The frontend code is completely separated from the backend, and each part can be deployed individually.
Initial Okta Setup
Before you dive into the application code, set up your Okta account. Okta is an API service that allows you to create, edit, and securely store user accounts and user account data. You can then connect these accounts with multiple applications and implement a single sign-on authentication. Register for a forever-free developer account here.
Once you’re signed up, log in and visit the Okta dashboard. Be sure to take note of the Org URL setting at the top-right portion of the dashboard, you’ll need this URL later when configuring your application.
Step-by-step instructions for setting up your application:
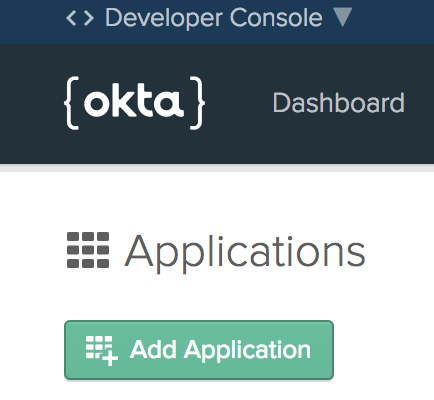
- Go to the Applications menu item and click the Add Application button:
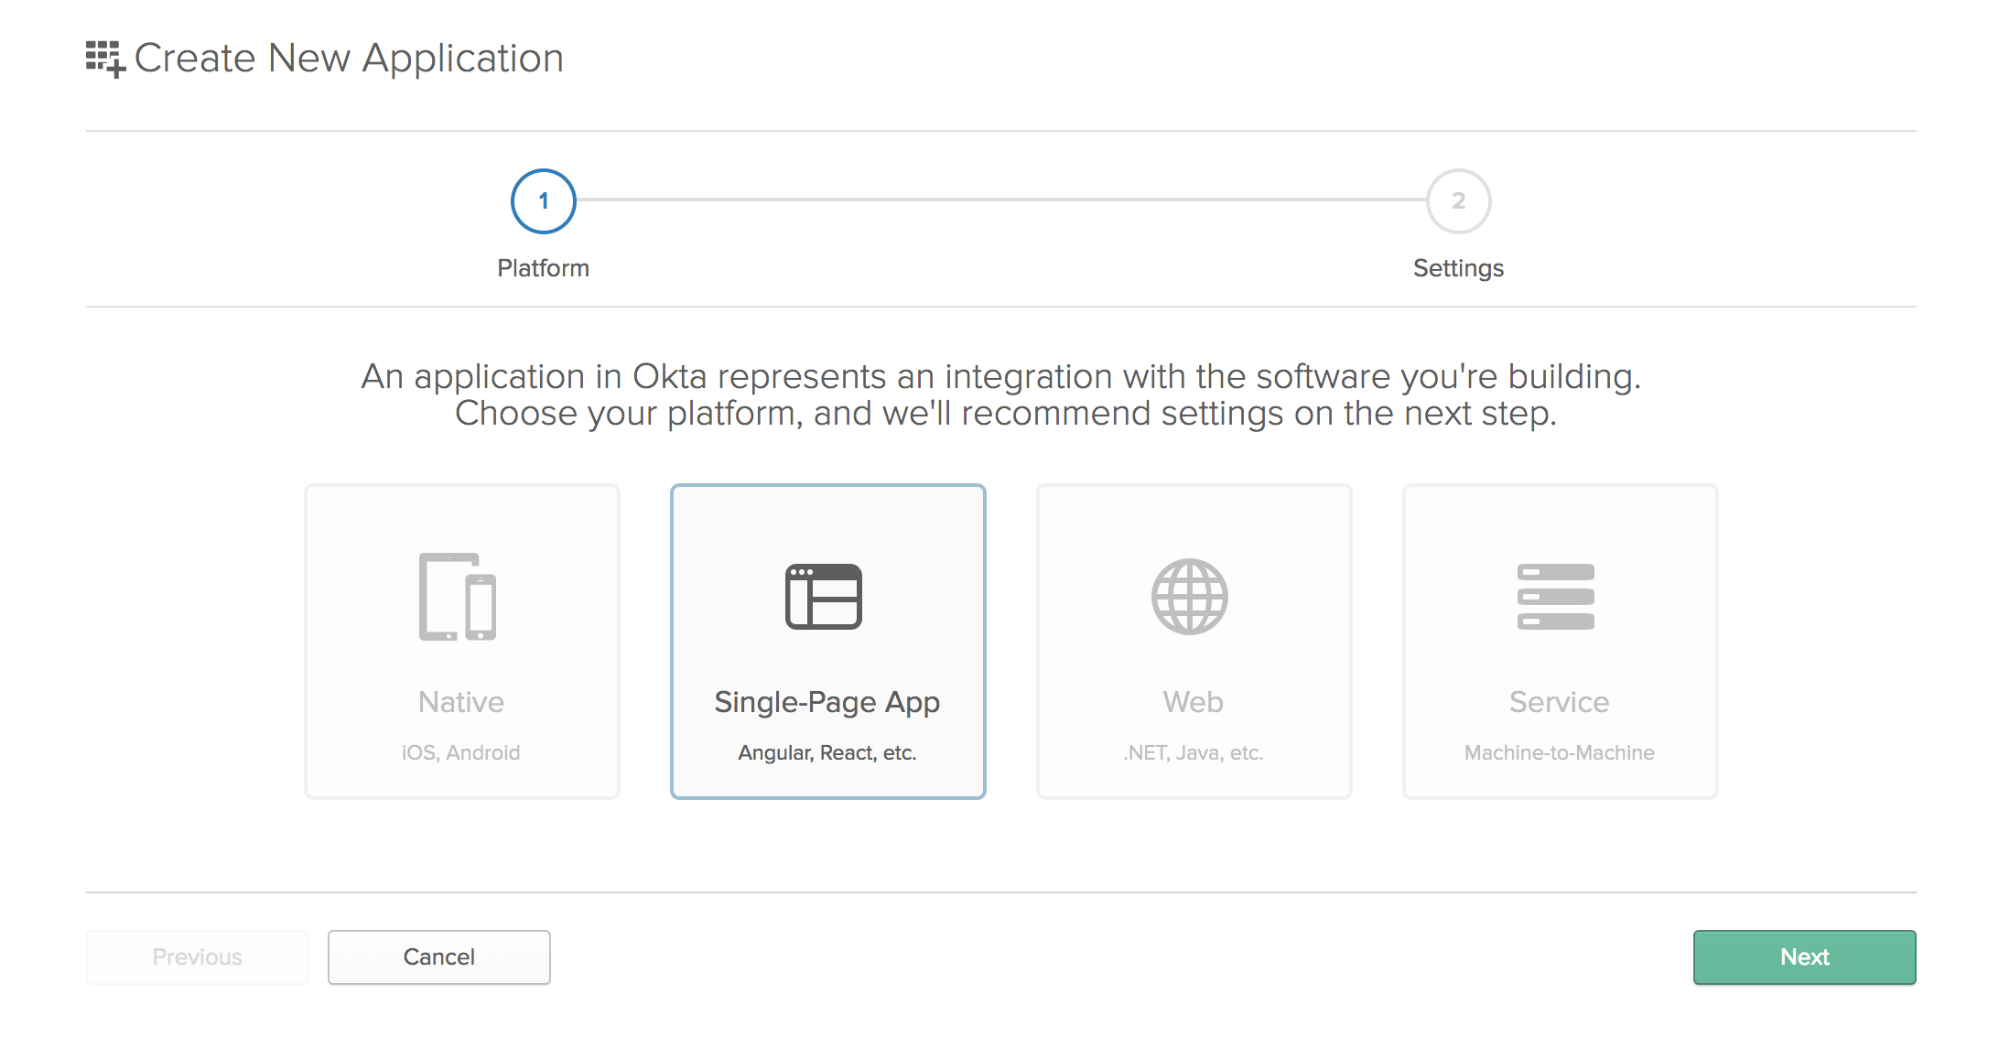
- Select Single Page Application and click Next.
-
Set a descriptive application name and enter
http://localhost:8080/callbackas the Login redirect URI to match the route we’ll be creating in our app. Under Grant Type Allowed choose Authorization Code and disable Implicit, then click Done. -
Finally, copy down the value of the Client ID variable. This value will be used in the OpenID Connect flow later on.
Create a MySQL Database
You can also create a new MySQL database and grant privileges to a new database user before starting the new project so it’s easier to configure the project when following this guide.
mysql -uroot -p
CREATE DATABASE item_counter CHARACTER SET utf8mb4 COLLATE utf8mb4_unicode_ci;
GRANT ALL on item_counter.* to item_counter@127.0.0.1 identified by 'item_counter';
quit
Symfony 4 Initial Setup and New Project
Symfony 4 is based upon a new philosophy and method for building Web applications called Symfony Flex. It allows you to start with some basic dependencies and a greatly simplified directory structure. You can then grow your application using automated bundle management and introduce just the modules you need, when you need them.
Create a new Symfony 4 project (using the /skeleton version) and run the server:
composer create-project symfony/skeleton item-counter-server
cd item-counter-server
php -S 127.0.0.1:8000 -t public
http://localhost:8000/ now shows the default Symfony 4 page.
The current version of Symfony at the time of writing this article is 4.3.1. The Symfony version in composer.json should be pinned to 4.3.* like this:
composer.json
...
        "symfony/console": "4.3.*",
        "symfony/dotenv": "4.3.*",
        "symfony/flex": "^1.1",
        "symfony/framework-bundle": "4.3.*",
        "symfony/yaml": "4.3.*"
...
If it’s not, change the version numbers as shown above and run composer update.
In November 2018, Symfony introduced some serious changes to the way .env files are handled. Basically, the .env.dist file does not exist anymore and you need to create a .env.local file to override any default values/put your local secrets (this file is git-ignored by default).
Create and edit your .env.local file:
DATABASE_URL=mysql://item_counter:item_counter@127.0.0.1:3306/item_counter
OKTA_CLIENT_ID=<ENTER YOUR OKTA CLIENT ID>
OKTA_ISSUER=<ENTER YOUR OKTA ISSUER URL>
Create a Base API in Symfony 4
Symfony 4 includes a basic but robust MVC framework. In this project, you will use SensioFrameworkExtraBundle which includes the core MVC framework as well as a few additional features such as “annotations”, which enable you to define even more concise controllers and even describe database attributes in your models.
First, add SensioFrameworkExtraBundle which includes annotated routes so you can define API routes within the controllers, as well as the Doctrine ORM (the default database ORM used in Symfony):
composer require sensio/framework-extra-bundle
Then create a test controller and route in src/Controller/ItemCounterController.php:
<?php
namespace App\Controller;

use Symfony\Component\HttpFoundation\JsonResponse;
use Symfony\Component\Routing\Annotation\Route;

class ItemCounterController
{
    /**
    * @Route("/items", methods="GET")
    */
    public function itemsAction()
    {
        return new JsonResponse([
                'title' => 'Winter is coming!',
                'count' => 0
        ]);
    }
}
Load http://localhost:8000/items in the browser and you should see a JSON response with a status code of 200:
{
    "title": "Winter is coming!",
    "count": 0
}
The respond() method will return a JSON response with the default status code of 200. You can use other methods like respondUnauthorized() to return a 401 Unauthorized response with an appropriate error message. This is the appropriate status code to return when someone makes a request without being logged in. To implement this, create an API controller with methods to get and set your status code and make the ItemCounterController extend from it:
src/Controller/ApiController.php
<?php
namespace App\Controller;

use Symfony\Component\HttpFoundation\JsonResponse;

class ApiController
{
    /**
     * @var integer HTTP status code - 200 (OK) by default
     */
    protected $statusCode = 200;

    /**
     * Gets the value of statusCode.

     * @return integer
     */
    public function getStatusCode()
    {
        return $this->statusCode;
    }

    /**
     * Sets the value of statusCode.

     * @param integer $statusCode the status code

     * @return self
     */
    protected function setStatusCode($statusCode)
    {
        $this->statusCode = $statusCode;

        return $this;
    }

    /**
     * Returns a JSON response

     * @param array $data
     * @param array $headers

     * @return Symfony\Component\HttpFoundation\JsonResponse
     */
    public function respond($data, $headers = [])
    {
        return new JsonResponse($data, $this->getStatusCode(), $headers);
    }

    /**
     * Sets an error message and returns a JSON response

     * @param string $errors

     * @return Symfony\Component\HttpFoundation\JsonResponse
     */
    public function respondWithErrors($errors, $headers = [])
    {
        $data = [
            'errors' => $errors,
        ];

        return new JsonResponse($data, $this->getStatusCode(), $headers);
    }

    /**
     * Returns a 401 Unauthorized http response

     * @param string $message

     * @return Symfony\Component\HttpFoundation\JsonResponse
     */
    public function respondUnauthorized($message = 'Not authorized!')
    {
        return $this->setStatusCode(401)->respondWithErrors($message);
    }

}
src/Controller/ItemCounterController.php:
<?php
namespace App\Controller;

use Symfony\Component\HttpFoundation\JsonResponse;
use Symfony\Component\Routing\Annotation\Route;

class ItemCounterController extends ApiController
{
    /**
    * @Route("/items", methods="GET")
    */
    public function itemsAction()
    {
        return $this->respond([
                'title' => 'Winter is coming!',
                'count' => 0
        ]);
    }
}
Implement the API Features
Your application needs some database persistence and the following API endpoints:
- List all items:
GET /items - Create a new item:
POST /items - Increase the counter of an item:
POST /items/{id}/count - Delete an item:
DELETE /items/{id}
The data will be stored in a very simple database with just one entity (items) and the following columns: id, title, count.
Pull up the ORM pack and maker-bundle - you will use them to auto-generate some code for the database entity and migrations:
composer require symfony/orm-pack
composer require symfony/maker-bundle --dev
$ php bin/console make:entity
 Class name of the entity to create or update (e.g. TinyElephant):
 > ItemCounter

 Entity generated! Now let's add some fields!
 You can always add more fields later manually or by re-running this command.

 New property name (press <return> to stop adding fields):
 > title

 Field type (enter ? to see all types) [string]:

 Field length [255]:

 Can this field be null in the database (nullable) (yes/no) [no]:

 updated: src/Entity/ItemCounter.php

 Add another property? Enter the property name (or press <return> to stop adding fields):
 > count

 Field type (enter ? to see all types) [string]:
 > integer

 Can this field be null in the database (nullable) (yes/no) [no]:

 updated: src/Entity/ItemCounter.php

 Add another property? Enter the property name (or press <return> to stop adding fields):

Success!
Next: When you're ready, create a migration with make:migration

$ php bin/console make:migration
$ php bin/console doctrine:migrations:migrate
The steps above created the entity and migration, and migrated the database schema. Verify this with a MySQL client before proceeding with the API endpoints below.
The API endpoints will be very basic and crude. In a real project, you would, of course, need proper validation, pagination, etc., but this solution is good enough for your demo.
Add API transformers for an individual item and an item collection to the ItemCounterRepository.php file:
public function transform(ItemCounter $item)
{
    return [
            'id'    => (int) $item->getId(),
            'title' => (string) $item->getTitle(),
            'count' => (int) $item->getCount()
    ];
}

public function transformAll()
{
    $items = $this->findAll();
    $itemsArray = [];

    foreach ($items as $item) {
        $itemsArray[] = $this->transform($item);
    }

    return $itemsArray;
}
Add the following methods to the ApiController.php file:
/**
 * Returns a 422 Unprocessable Entity
 * @param string $message
 * @return Symfony\Component\HttpFoundation\JsonResponse
 */
public function respondValidationError($message = 'Validation errors')
{
    return $this->setStatusCode(422)->respondWithErrors($message);
}

/**
 * Returns a 404 Not Found
 * @param string $message
 * @return Symfony\Component\HttpFoundation\JsonResponse
 */
public function respondNotFound($message = 'Not found!')
{
    return $this->setStatusCode(404)->respondWithErrors($message);
}

/**
 * Returns a 201 Created
 * @param array $data
 * @return Symfony\Component\HttpFoundation\JsonResponse
 */
public function respondCreated($data = [])
{
    return $this->setStatusCode(201)->respond($data);
}

// this method allows us to accept JSON payloads in POST requests
// since Symfony 4 doesn't handle that automatically:
protected function transformJsonBody(\Symfony\Component\HttpFoundation\Request $request)
{
    $data = json_decode($request->getContent(), true);

    if (json_last_error() !== JSON_ERROR_NONE) {
        return null;
    }

    if ($data === null) {
        return $request;
    }

    $request->request->replace($data);

    return $request;
}
Here’s the full API controller in ItemCounterController.php:
<?php
namespace App\Controller;

use App\Entity\ItemCounter;
use App\Repository\ItemCounterRepository;
use Doctrine\ORM\EntityManagerInterface;
use Symfony\Component\HttpFoundation\Request;
use Symfony\Component\Routing\Annotation\Route;
use Sensio\Bundle\FrameworkExtraBundle\Configuration\Method;

class ItemCounterController extends ApiController
{
    /**
    * @Route("/items", methods="GET")
    */
    public function index(ItemCounterRepository $itemCounterRepository)
    {
        $items = $itemCounterRepository->transformAll();

        return $this->respond($items);
    }

    /**
    * @Route("/items", methods="POST")
    */
    public function create(Request $request, ItemCounterRepository $itemCounterRepository, EntityManagerInterface $em)
    {
        $request = $this->transformJsonBody($request);

        if (! $request) {
            return $this->respondValidationError('Please provide a valid request!');
        }

        // validate the title
        if (! $request->get('title')) {
            return $this->respondValidationError('Please provide a title!');
        }

        // persist the new item counter
        $itemCounter = new ItemCounter;
        $itemCounter->setTitle($request->get('title'));
        $itemCounter->setCount(0);
        $em->persist($itemCounter);
        $em->flush();

        return $this->respondCreated($itemCounterRepository->transform($itemCounter));
    }

    /**
    * @Route("/items/{id}/count", methods="POST")
    */
    public function increaseCount($id, EntityManagerInterface $em, ItemCounterRepository $itemCounterRepository)
    {
        $itemCounter = $itemCounterRepository->find($id);

        if (! $itemCounter) {
            return $this->respondNotFound();
        }

        $itemCounter->setCount($itemCounter->getCount() + 1);
        $em->persist($itemCounter);
        $em->flush();

        return $this->respond(
            $itemCounterRepository->transform($itemCounter)
        );
    }

    /**
    * @Route("/items/{id}", methods="DELETE")
    */
    public function delete($id, EntityManagerInterface $em, ItemCounterRepository $itemCounterRepository)
    {
        $itemCounter = $itemCounterRepository->find($id);

        if (! $itemCounter) {
            return $this->respondNotFound();
        }

        $em->remove($itemCounter);
        $em->flush();

        return $this->respond([]);
    }
}
Add a CORS bundle to make the API available to the client app:
composer require nelmio/cors-bundle
Test all API endpoints in Postman or a similar tool before proceeding. Note: when creating a new item, send the POST /items payload as a JSON object (this is what Vue does).
Vue Initial Setup and New Project with Routing
It’s time to move on to the frontend.
Install the latest version of the Vue CLI, create a new project and pull up the Vue Router, Axios and Okta dependencies (so you can perform HTTP requests to the API, and use Okta authorization for the protected routes):
npm i -g @vue/cli
vue create item-counter-client
(select the default settings)
cd item-counter-client
yarn add --save vue-router axios @okta/okta-vue
yarn run serve
Loading http://localhost:8080/ should show the default VueJS app.
The version of Vue at the time of writing this article is 2.6.10. Pin the version to 2.6 in package.json:
  "dependencies": {
    ...
    "vue": "2.6.*",
    ...
  },
Stop the server and run it again to make sure everything’s OK after the Vue version definition update:
yarn
yarn run serve
Remove the default content first so you will have a nice blank page:
Delete src/components/HelloWorld.vue and src/App.vue.
Modify src/main.js:
src/main.js
import Vue from 'vue'
import VueRouter from 'vue-router'

Vue.config.productionTip = false

Vue.use(VueRouter)

import Dashboard from './components/Dashboard.vue'

const routes = [
  { path: '/', component: Dashboard },
]

const router = new VueRouter({
  mode: 'history',
  routes
})

new Vue({
  router,
  render: h => h(Dashboard)
}).$mount('#app')
Create a new file components/Dashboard.vue:
components/Dashboard.vue
<template>
    <h1>This is the dashboard</h1>
</template>

<script>
</script>
It doesn’t look very nice with the default browser font. To improve it, load the Bulma CSS framework from a CDN:
public/index.html
...
<link rel="stylesheet" type="text/css" href="https://cdnjs.cloudflare.com/ajax/libs/bulma/0.7.1/css/bulma.min.css">
Add the menu and routing, and implement a protected ‘Item Counter’ route that requires authentication, and of course, substitute your own Okta domain and Client ID inside the Auth component configuration object.:
main.js
import Vue from 'vue'
import VueRouter from 'vue-router'

Vue.config.productionTip = false
Vue.use(VueRouter)

import Dashboard from './components/Dashboard.vue'
import Auth from '@okta/okta-vue'

Vue.use(Auth, {
  issuer: 'https://{YOUR_OKTA_DOMAIN}/oauth2/default',
  client_id: '{YOUR_CLIENT_ID}',
  redirect_uri: 'http://localhost:8080/callback',
  scope: 'openid profile email'
})

const routes = [
  { path: '/callback', component: Auth.handleCallback() },
  { path: '/', component: Dashboard},
]

const router = new VueRouter({
  mode: 'history',
  routes
})

new Vue({
  router,
  render: h => h(Dashboard)
}).$mount('#app')
Add a menu with am Item Counter link (only if authenticated) and Login/Logout buttons to the Dashboard:
components/ItemCounter.vue
<template>
    <h1>This is the item counter</h1>
</template>

<script>
</script>
main.js
...
import ItemCounter from './components/ItemCounter.vue'

const routes = [
  { path: '/implicit/callback', component: Auth.handleCallback() },
  { path: '/counter', component: ItemCounter }
]
...
components/Dashboard.vue
<template>
    <div style="text-align:center">
        <section class="section">
            <div class="container">
                <nav class="navbar" role="navigation" aria-label="main navigation">
                    <div class="navbar-menu">
                        <div class="navbar-item">
                            <router-link to="/" class="navbar-item">Home</router-link>
                            <router-link v-if='authenticated' to="/counter" class="navbar-item">Item Counter</router-link>
                            <a class="button is-light" v-if='authenticated' v-on:click='logout' id='logout-button'> Logout </a>
                            <a class="button is-light" v-else v-on:click='login' id='login-button'> Login </a>
                        </div>
                    </div>
                </nav>
                <router-view></router-view>
            </div>
        </section>
    </div>
</template>

<script>
export default {

    data: function () {
        return {
            authenticated: false
        }
    },

    created () {
        this.isAuthenticated()
    },

    watch: {
        // Everytime the route changes, check for auth status
        '$route': 'isAuthenticated'
    },

    methods: {
        async isAuthenticated () {
            this.authenticated = await this.$auth.isAuthenticated()
        },

        login () {
            this.$auth.loginRedirect('/')
        },

        async logout () {
            await this.$auth.logout()
            await this.isAuthenticated()

            // Navigate back to home
            this.$router.push({ path: '/' })
        }
    }
}
</script>
The frontend app now contains a navbar with placeholder pages for Home, Item Counter (only available when logged in), and the Login or Logout button (depending on the login state). The Login/Logout actions work through Okta.
Add Okta Authentication to Your Backend API
The application will use the Okta JWT Verifier for PHP library to handle Okta authentication at the backend. It has a dependency on firebase/php-jwt so pull up these packages into the backend project:
composer require firebase/php-jwt okta/jwt-verifier guzzlehttp/psr7
Modify the API Controller by adding a method to perform the authorization and return 401 Unauthorized if it fails.
src/Controller/ApiController.php
...
    /**
     * Attempt authorization using jwt-verifier
     * @return bool
     */
    public function isAuthorized(): bool
    {
        if (! isset($_SERVER['HTTP_AUTHORIZATION'])) {
            return false;
        }

        $authType = null;
        $authData = null;

        // Extract the auth type and the data from the Authorization header.
        @list($authType, $authData) = explode(" ", $_SERVER['HTTP_AUTHORIZATION'], 2);

        // If the Authorization Header is not a bearer type, return a 401.
        if ($authType != 'Bearer') {
            return false;
        }

        // Attempt authorization with the provided token
        try {

            // Setup the JWT Verifier
            $jwtVerifier = (new \Okta\JwtVerifier\JwtVerifierBuilder())
                            ->setAudience('api://default')
                            ->setClientId($_ENV['OKTA_CLIENT_ID'])
                            ->setIssuer($_ENV['OKTA_ISSUER'])
                            ->build();

            // Verify the JWT from the Authorization Header.
            $jwt = $jwtVerifier->verify($authData);
        } catch (\Exception $e) {

            // We encountered an error, return a 401.
            return false;
        }

        return true;
    }
...
Next, secure the controller methods that require authentication. A production application would use Symfony’s security firewall, and you would extract the authorization method into a custom provider, or use ‘before’ filters to perform the token authentication. For the demo though, you will simply add a check to each ItemCounterController method that requires authorization:
if (! $this->isAuthorized()) {
    return $this->respondUnauthorized();
}
This isn’t very DRY (obviously). Test the API endpoints again with Postman: you should get a 401 unauthorized response unless you add the authentication header Authorization with a valid Bearer $token value (you can use the access token from the frontend application’s local storage).
List Item Counters in Vue
Create a new src/config.js file and define the base API URL there:
src/config.js
export const API_BASE_URL = 'http://localhost:8000';
Modify your ItemCounter.vue component:
<template>
    <div>
        <div v-if="isLoading">Loading items...</div>
        <div v-else>
        <table class="table">
            <thead>
                <tr>
                    <th>ID</th>
                    <th>Item Title</th>
                    <th>Count</th>
                </tr>
            </thead>
            <tbody>
                <template v-for="item in items">
                    <tr v-bind:key="item.id">
                        <td>{{ item.id }}</td>
                        <td>{{ item.title }}</td>
                        <td>{{ item.count }}</td>
                    </tr>
                </template>
            </tbody>
        </table>
        <a class="button is-primary">Add Item Counter</a>
        </div>
    </div>
</template>

<script>
import axios from 'axios'
import { API_BASE_URL } from '../config'

export default {
    data() {
        return {
            isLoading: true,
            items: {}
        }
    },
    async created () {
        axios.defaults.headers.common['Authorization'] = `Bearer ${await this.$auth.getAccessToken()}`
        try {
            const response = await axios.get(API_BASE_URL + '/items')
            this.items = response.data
            this.isLoading = false
        } catch (e) {
            // handle the authentication error here
        }
    }
}
</script>
Click Item Counter in the menu to show the list of item counters. You need to be logged in to be able to access the menu and see the item counters.
Create a Form in Vue to Add New Item Counters
Replace the button to add item counter in the ItemCounter.vue component with:
<item-counter-form @completed="addItemCounter"></item-counter-form>
Then update the <script> section of the component like this:
<script>
import axios from 'axios'
import ItemCounterForm from './ItemCounterForm.vue'
import { API_BASE_URL } from '../config'

export default {
    components: {
        ItemCounterForm
    },
    data() {
        return {
            items: {},
            isLoading: true,
            countUpdatingTable: []
        }
    },
    async created () {
        axios.defaults.headers.common['Authorization'] = `Bearer ${await this.$auth.getAccessToken()}`
        try {
            const response = await axios.get(API_BASE_URL + '/items')
            this.items = response.data
            this.isLoading = false
        } catch (e) {
            // handle the authentication error here
        }
    },
    methods: {
        addItemCounter(item) {
            this.items.push(item)
        }
    }
}
</script>
Create components/ItemCounterForm.vue:
<template>
    <form @submit.prevent="onSubmit">
        <span class="help is-danger" v-text="errors"></span>

        <div class="field">
            <div class="control">
                <input class="input" type="title" placeholder="enter title..." v-model="title" @keydown="errors = ''">
            </div>
        </div>

        <button class="button is-primary" v-bind:class="{ 'is-loading' : isLoading }">Add Item Counter</button>
    </form>
</template>

<script>
import axios from 'axios'
import { API_BASE_URL } from '../config'

export default {
    data() {
        return {
            title: '',
            errors: '',
            isLoading: false
        }
    },
    methods: {
        onSubmit() {
            this.isLoading = true
            this.postItemCounter()
        },
        async postItemCounter() {
            axios.defaults.headers.common['Authorization'] = `Bearer ${await this.$auth.getAccessToken()}`
            axios.post(API_BASE_URL + '/items', this.$data)
                .then(response => {
                    this.title = ''
                    this.isLoading = false
                    this.$emit('completed', response.data)
                })
                .catch(error => {
                    // handle authentication and validation errors here
                    this.errors = error.response.data.errors
                    this.isLoading = false
                })
        }
    }
}
</script>
Reload the app to see a form with a Title field and a button Add Item Counter which creates new items to keep count of.
Implement Buttons to Increase Count and Delete Item Counters
The last part of the frontend application is to add buttons to increase the count of an item or delete an item counter.
Edit the ItemCounter.vue component like this (full version):
<template>
<div>
<div v-if="isLoading">Loading item counters...</div>
<div v-else>
<table class="table">
<thead>
<tr>
<th>ID</th>
<th>Item Title</th>
<th>Count</th>
<th>Actions</th>
</tr>
</thead>
<tbody>
<template v-for="item in items">
<tr v-bind:key="item.id">
<td>{{ item.id }}</td>
<td>{{ item.title }}</td>
<td>{{ item.count }}</td>
<td>
<button class="button is-primary" v-bind:class="{ 'is-loading' : isCountUpdating(item.id) }" @click="increaseCount(item)">Increase</button>
<button class="button is-primary" v-bind:class="{ 'is-loading' : isDeleting(item.id) }" @click="deleteItemCounter(item.id)">Delete</button>
</td>
</tr>
</template>
</tbody>
</table>
<item-counter-form @completed="addItemCounter"></item-counter-form>
</div>
</div>
</template>
<script>
import axios from 'axios'
import Vue from 'vue'
import ItemCounterForm from './ItemCounterForm.vue'
import { API_BASE_URL } from '../config'
export default {
components: {
ItemCounterForm
},
data() {
return {
items: {},
isLoading: true,
countUpdatingTable: []
}
},
async created () {
axios.defaults.headers.common['Authorization'] = `Bearer ${await this.$auth.getAccessToken()}`
try {
const response = await axios.get(API_BASE_URL + '/items')
this.items = response.data
this.isLoading = false
} catch (e) {
// handle the authentication error here
}
},
methods: {
addItemCounter(item) {
this.items.push(item)
},
isCountUpdating(id) {
return this.countUpdatingTable[id]
},
async increaseCount(item) {
axios.defaults.headers.common['Authorization'] = `Bearer ${await this.$auth.getAccessToken()}`
Vue.set(this.countUpdatingTable, item.id, true)
axios.post(API_BASE_URL + '/items/' + item.id + '/count')
.then(response => {
item.count = response.data.count
this.countUpdatingTable[item.id] = false
})
.catch(() => {
// handle authentication and validation errors here
this.countUpdatingTable[item.id] = false
})
},
isDeleting(id) {
let index = this.items.findIndex(item => item.id === id)
return this.items[index].isDeleting
},
async deleteItemCounter(id) {
let index = this.items.findIndex(item => item.id === id)
Vue.set(this.items[index], 'isDeleting', true)
await axios.delete(API_BASE_URL + '/items/' + id)
this.items.splice(index, 1)
}
}
}
</script>
The demo application should be fully functional now – you can add item counters, increase the count, and delete item counters.
As an exercise, try to improve the code by extracting the common API boilerplate code (retrieving the access token, sending the Authorization header, sending a request and receiving a response) into a service class.
You can find the full code here: https://github.com/oktadeveloper/okta-php-symfony-vue-crud-example-2019
Learn More About Symfony, Vue, and Okta
- Our Vue Samples and Quickstarts
- The Lazy Developer’s Guide to Authentication with Vue.js
- Build a Basic CRUD App with Laravel and Vue
Like what you learned today? Follow us on Twitter, like us on Facebook, check us out on LinkedIn, and subscribe to our YouTube channel for more awesome content!
Okta Developer Blog Comment Policy
We welcome relevant and respectful comments. Off-topic comments may be removed.