Build a Basic CRUD App with Laravel and Vue

Laravel is one of the most popular web frameworks today because of its elegance, simplicity, and readability. It also boasts one of the largest and most active developer communities. The Laravel community has produced a ton of valuable educational resources, including this one! In this tutorial, you’ll build a trivia game as two separate projects: a Laravel API and a Vue frontend (using vue-cli). This approach offers some important benefits:
- It allows you to separate your backend and frontend and deploy them independently, using different strategies and schedules for testing and deployment
- You can deploy your frontend as a static application to a CDN and achieve virtually unlimited scaling for a fraction of the cost of hosting it together with the backend
- This structure allows developers to work on just the API or just the frontend without needing access to the source code of the other part of the system (this is still possible to achieve if the projects are integrated, but it’s a bit of a headache to set up) making it an ideal architecture for large teams
Before you start, you’ll need to set up a development environment with PHP 7 and Node.js 8+/npm. You will also need an Okta developer account so you can add user registration, user login, and all the other user related functionalities.
FUN FACT: Did you know that Vue owes much of its current popularity to Laravel? Vue comes pre-packaged with Laravel (along with Laravel Mix, an excellent build tool based on webpack) and allows developers to start building complex single-page applications without worrying about transpilers, code packaging, source maps, or any other ‘dirty’ aspects of modern frontend development.
Note: In May 2025, the Okta Integrator Free Plan replaced Okta Developer Edition Accounts, and the Okta CLI was deprecated.
We preserved this post for reference, but the instructions no longer work exactly as written. Replace the Okta CLI commands by manually configuring Okta following the instructions in our Developer Documentation.
Create an OpenID Connect App
Before we get into the code, let’s set up our Okta account so it’s ready when we need it. Okta is an API service that allows you to create, edit, and securely store user accounts and user account data, and connect them with one or more applications.
Before you begin, you’ll need a free Okta developer account. Install the Okta CLI and run okta register to sign up for a new account. If you already have an account, run okta login.
Then, run okta apps create. Select the default app name, or change it as you see fit.
Choose Single-Page App and press Enter.
Use http://localhost:8080/callback for the Redirect URI and accept the default Logout Redirect URI of http://localhost:8080.
What does the Okta CLI do?
The Okta CLI will create an OIDC Single-Page App in your Okta Org. It will add the redirect URIs you specified and grant access to the Everyone group. It will also add a trusted origin for http://localhost:8080. You will see output like the following when it’s finished:
Okta application configuration:
Issuer:    https://dev-133337.okta.com/oauth2/default
Client ID: 0oab8eb55Kb9jdMIr5d6
NOTE: You can also use the Okta Admin Console to create your app. See Create a Vue App for more information.
Build Your Laravel and Vue CRUD Application
Now it’s time to dig in and build a fun trivia game application! This app will be integrated with a free API for trivia quiz questions and will allow us to set up a list of players, load questions, and mark the players’ answers as right or wrong.
Here’s what your completed application will look like:
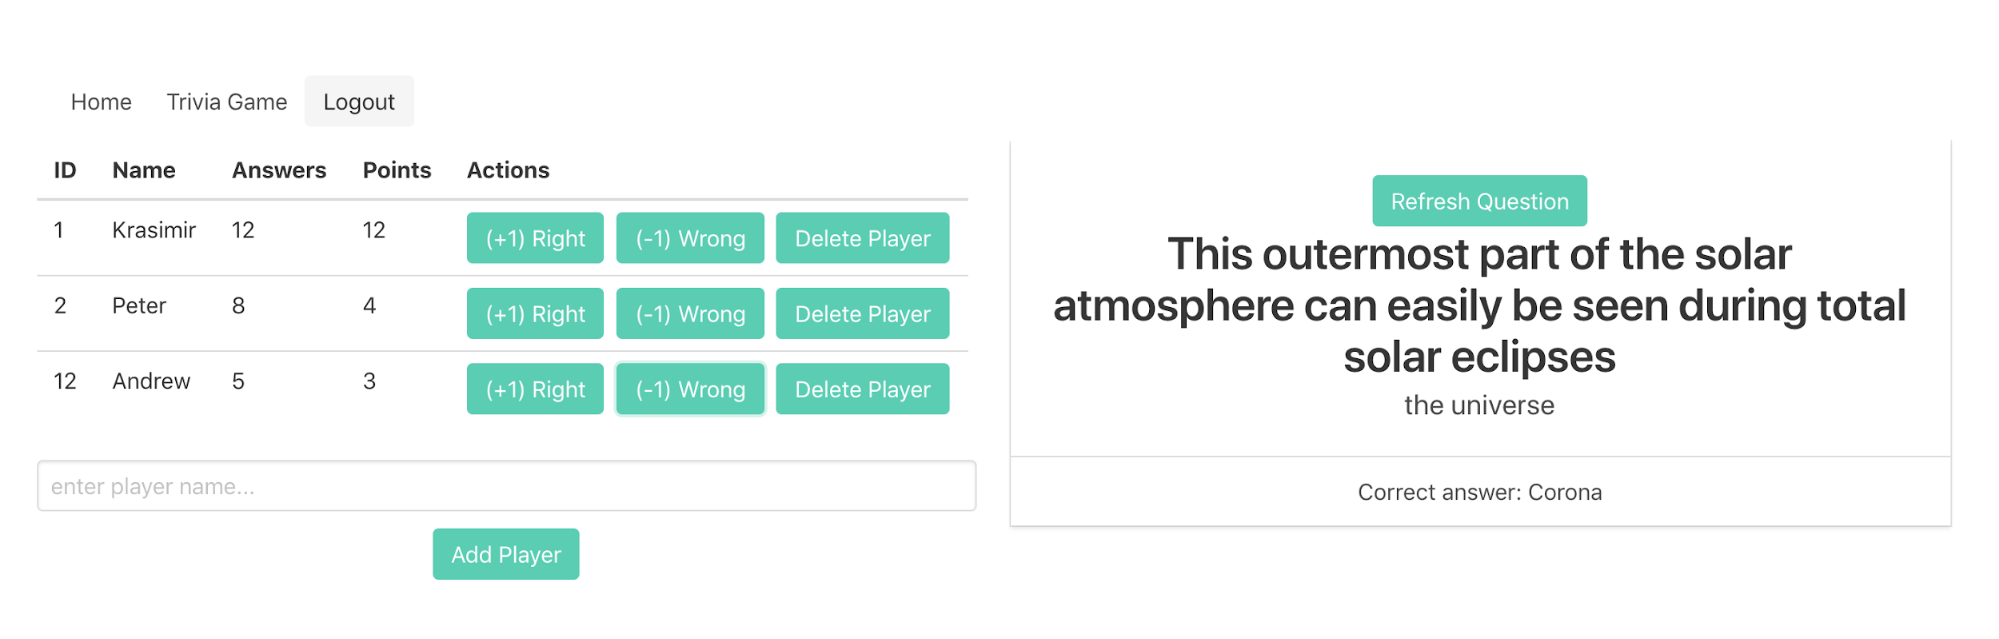
You can create your own rules, but here’s the general gist of the game:
- The game host reads questions to the players and marks their answers
- The host cannot be a player
- The players can attempt to answer the current question or pass
- If the answer is correct, the player gets +1 points. If the answer is wrong, the player gets -1 points.
- When the question is answered correctly or everyone has passed, the host can hit the Refresh Question button to load the next question.
Install Laravel and Configure the Application
Once the laravel command is installed globally via composer, you’ll use it to create a new Laravel project, and start the development PHP server from its directory:
composer create-project laravel/laravel="5.6.*" trivia-web-service
cd trivia-web-service
php artisan serve
Next, you’ll set up a new MySQL database and user for your app (there’s nothing set in stone about MySQL, you can use a different database engine if you prefer):
mysql -uroot -p
CREATE DATABASE trivia CHARACTER SET utf8mb4 COLLATE utf8mb4_unicode_ci;
CREATE USER 'trivia'@'localhost' identified by 'trivia';
GRANT ALL on trivia.* to 'trivia'@'localhost';
quit
You now need to insert the database configuration variables into the .env file in your main project directory:
.env
DB_DATABASE=trivia
DB_USERNAME=trivia
DB_PASSWORD=trivia
Create a Simple Laravel API
Now that your database is configured, let’s build the API. Your Laravel API will be quite simple, it will contain just one entity (a Player). Let’s create a migration and a database model for it:
php artisan make:model Player -m
Model created successfully.
Created Migration: 2018_10_08_094351_create_players_table
Put the code that creates the database table in the up() method of the migration:
database/migrations/2018_10_08_094351_create_players_table.php
public function up()
{
    Schema::create('players', function (Blueprint $table) {
        $table->increments('id');
        $table->string('name');
        $table->integer('answers')->default(0);
        $table->integer('points')->default(0);
        $table->timestamps();
    });
}
Next, run the migration to apply it to your database:
php artisan migrate
At this point, you may notice that you already have a model class, app/Player.php, but it’s empty. You need to tell Laravel which fields can be mass-assigned when creating or updating records. You’ll do this via the $fillable attribute of the model class:
app/Player.php
...

class Player extends Model
{
    protected $fillable = ['name', 'answers', 'points'];
}
Laravel 5.6 introduced the concept of API resources which greatly simplified the way REST APIs are created in Laravel. The API resource classes take care of the transformation of our data to a JSON representation. You’ll need two resources for the API: a Player (dealing with an individual player), and a PlayerCollection (dealing with a collection of players).
php artisan make:resource Player
php artisan make:resource PlayerCollection
The transformation is defined in the toArray() function of the resource class:
app/Http/Resources/Player.php
public function toArray($request)
{
    return [
        'id'         => $this->id,
        'name'       => $this->name,
        'answers'    => (int) $this->answers,
        'points'     => (int) $this->points,
        'created_at' => $this->created_at,
        'updated_at' => $this->updated_at,
    ];
}
app/Http/Resources/PlayerCollection.php
public function toArray($request)
{
    return [
        'data' => $this->collection
    ];
}
With that out of the way, you can now create the routes and controller for the REST API.
php artisan make:controller PlayerController
routes/api.php
Route::get('/players', 'PlayerController@index');
Route::get('/players/{id}', 'PlayerController@show');
Route::post('/players', 'PlayerController@store');
Route::post('/players/{id}/answers', 'PlayerController@answer');
Route::delete('/players/{id}', 'PlayerController@delete');
Route::delete('/players/{id}/answers', 'PlayerController@resetAnswers');
app/Http/Controllers/PlayerController.php
...
use App\Player;
use App\Http\Resources\Player as PlayerResource;
use App\Http\Resources\PlayerCollection;
...

class PlayerController extends Controller
{
    public function index()
    {
        return new PlayerCollection(Player::all());
    }

    public function show($id)
    {
        return new PlayerResource(Player::findOrFail($id));
    }

    public function store(Request $request)
    {
        $request->validate([
            'name' => 'required|max:255',
        ]);

        $player = Player::create($request->all());

        return (new PlayerResource($player))
                ->response()
                ->setStatusCode(201);
    }

    public function answer($id, Request $request)
    {
        $request->merge(['correct' => (bool) json_decode($request->get('correct'))]);
        $request->validate([
            'correct' => 'required|boolean'
        ]);

        $player = Player::findOrFail($id);
        $player->answers++;
        $player->points = ($request->get('correct')
                           ? $player->points + 1
                           : $player->points - 1);
        $player->save();

        return new PlayerResource($player);
    }

    public function delete($id)
    {
        $player = Player::findOrFail($id);
        $player->delete();

        return response()->json(null, 204);
    }

    public function resetAnswers($id)
    {
        $player = Player::findOrFail($id);
        $player->answers = 0;
        $player->points = 0;

        return new PlayerResource($player);
    }
}
You have to enable CORS so you can access your API from the frontend application:
composer require fruitcake/laravel-cors
app/Http/Kernel.php
protected $middlewareGroups = [
    'web' => [
        ...
        \Fruitcake\Cors\HandleCors::class,
    ],

    'api' => [
        ...
        \Fruitcake\Cors\HandleCors::class,
    ],
];
Your API allows you to retrieve all players or a specific player, add/delete players, mark answers as right/wrong, and reset a player’s score. There’s also a validation of the requests and the code generates JSON responses with the appropriate HTTP status codes with small amount of code.
To test the API, just add some dummy data to the database (use the Faker library to automate this process). After that, you can access these URLs and inspect the responses:
http://127.0.0.1:8000/api/playershttp://127.0.0.1:8000/api/players/1
Testing the POST/PUT/DELETE requests is a bit more involved and requires an external tool (for example, cURL or Postman). You also need to make sure that the following headers are sent with each request:
Accept: "application/json"
This header tells Laravel to return any validation errors in JSON format.
Install Vue and Set up the Frontend Application
You will install vue-cli and create a new Vue.js project using the default configuration. You’ll also add Vue Router, Axios, and the Okta authentication+authorization library to the project:
npm install -g @vue/cli
vue create trivia-web-client-vue
cd trivia-web-client-vue
yarn add --save vue-router axios @okta/okta-vue@3.1.0
npm install --save @okta/okta-auth-js@4.8.0 @okta/okta-vue vue-router axios
yarn serve
Loading http://localhost:8080/ now shows the default VueJS app.
Create a Menu with Routing in the Vue Frontend
Remove the default content first so you will have a nice blank page: Delete src/components/HelloWorld.vue and src/App.vue, and modify src/main.js:
main.js
import Vue from 'vue'
import VueRouter from 'vue-router'

Vue.config.productionTip = false
Vue.use(VueRouter)

import Dashboard from './components/Dashboard.vue';

const routes = [
  { path: '/', component: Dashboard },
]

const router = new VueRouter({
  mode: 'history',
  routes
})

new Vue({
  router,
  render: h => h(Dashboard)
}).$mount('#app')
Create a new file components/Dashboard.vue:
components/Dashboard.vue
<template>
    <h1>This is the dashboard</h1>
</template>

<script>
</script>
It doesn’t look very nice with the default browser font. Let’s improve it by loading the Bulma CSS framework from a CDN:
public/index.html
...
<link rel="stylesheet" type="text/css" href="https://cdnjs.cloudflare.com/ajax/libs/bulma/0.7.1/css/bulma.min.css">
Add Authentication to the Vue Frontend
Great! Now you can add your menu and routing, and implement a protected ‘Trivia Game’ route that requires authentication:
main.js
import Vue from 'vue'
import VueRouter from 'vue-router'
import Dashboard from './components/Dashboard.vue'
import { OktaAuth } from '@okta/okta-auth-js'
import OktaVue, { LoginCallback } from '@okta/okta-vue'

const oktaAuth = new OktaAuth({
  issuer: 'https://{yourOktaDomain}/oauth2/default',
  clientId: '{yourClientId}',
  redirectUri: window.location.origin + '/callback',
  scopes: ['openid', 'profile', 'email']
})
Vue.use(OktaVue, { oktaAuth })

Vue.config.productionTip = false
Vue.use(VueRouter)

const routes = [
  { path: '/callback', component: LoginCallback },
  { path: '/', component: Dashboard },
]

const router = new VueRouter({
  mode: 'history',
  routes
})

new Vue({
  router,
  render: h => h(Dashboard)
}).$mount('#app')
Don’t forget to substitute your own Okta domain and Client ID! You also need to add a menu with a ‘Trivia Game’ link (only if authenticated) and Login/Logout buttons to the Dashboard.
main.js
...
import TriviaGame from './components/TriviaGame.vue'

const routes = [
  { path: '/callback', component: LoginCallback },
  { path: '/trivia', component: TriviaGame }
]
...
components/TriviaGame.vue
<template>
    <h1>This is the trivia game</h1>
</template>

<script>
</script>
components/Dashboard.vue
<template>
    <div style="text-align:center">
        <section class="section">
            <div class="container">
                <nav class="navbar" role="navigation" aria-label="main navigation">
                    <div class="navbar-menu">
                        <div class="navbar-item">
                            <router-link to="/" class="navbar-item">Home</router-link>
                            <router-link v-if='authState.isAuthenticated' to="/trivia" class="navbar-item">Trivia Game</router-link>
                            <a class="button is-light" v-if='authState.isAuthenticated' v-on:click='logout' id='logout-button'> Logout </a>
                            <a class="button is-light" v-else v-on:click='login' id='login-button'> Login </a>
                        </div>
                    </div>
                </nav>
                <router-view></router-view>
            </div>
        </section>
    </div>
</template>

<script>
export default {
    methods: {
        async login () {
            await this.$auth.signInWithRedirect()
        },

        async logout () {
            await this.$auth.signOut()
        }
    }
}
</script>
The app now contains a navbar with placeholder pages for Home, Trivia Game (only available when logged in), and the Login or Logout button (depending on the login state). The Login/Logout actions work through Okta. You can now proceed with the implementation of the Trivia Game and connecting the backend API.
Get the List of Players from the Laravel API
Next up you’ll be adding a new Vue component to load the list of players from the Laravel API.
You’ll create a new src/config.js file and define our base API url there:
src/config.js
export const API_BASE_URL = 'http://localhost:8000/api';
You can now modify your TriviaGame.vue component:
components/TriviaGame.vue
<template>
    <div>
        <div v-if="isLoading">Loading players...</div>
        <div v-else>
        <table class="table">
            <thead>
                <tr>
                    <th>ID</th>
                    <th>Name</th>
                    <th>Answers</th>
                    <th>Points</th>
                    <th>Actions</th>
                </tr>
            </thead>
            <tbody>
                <template v-for="player in players">
                    <tr v-bind:key="player.id">
                        <td>{{ player.id }}</td>
                        <td>{{ player.name }}</td>
                        <td>{{ player.answers }}</td>
                        <td>{{ player.points }}</td>
                        <td>Action buttons</td>
                    </tr>
                </template>
            </tbody>
        </table>
        <a class="button is-primary">Add Player</a>
        </div>
    </div>
</template>

<script>
import axios from 'axios'
import { API_BASE_URL } from '../config'

export default {
    data() {
        return {
            isLoading: true,
            players: {}
        }
    },
    async created () {
        axios.defaults.headers.common['Authorization'] = `Bearer ${this.$auth.getAccessToken()}`
        try {
            const response = await axios.get(API_BASE_URL + '/players')
            this.players = response.data.data
            this.isLoading = false
        } catch (e) {
            // handle the authentication error here
        }
    }
}
</script>
Add Authentication to the Laravel API
You need to secure your backend API so it only allows requests that include a valid Okta token. You will install the Okta JWT Verifier package and add a custom middleware for API authentication:
composer require okta/jwt-verifier:"^0.2" spomky-labs/jose:"^7.1" guzzlehttp/psr7:"^1.4"
php artisan make:middleware AuthenticateWithOkta
app/Http/Middleware/AuthenticateWithOkta.php
<?php
namespace App\Http\Middleware;

use Closure;

class AuthenticateWithOkta
{
    /**
     * Handle an incoming request.
     *
     * @param  \Illuminate\Http\Request  $request
     * @param  \Closure  $next
     * @return mixed
     */
    public function handle($request, Closure $next)
    {
        if ($this->isAuthorized($request)) {
            return $next($request);
        } else {
            return response('Unauthorized.', 401);
        }
    }

    public function isAuthorized($request)
    {
        if (! $request->header('Authorization')) {
            return false;
        }

        $authType = null;
        $authData = null;

        // Extract the auth type and the data from the Authorization header.
        @list($authType, $authData) = explode(" ", $request->header('Authorization'), 2);

        // If the Authorization Header is not a bearer type, return a 401.
        if ($authType != 'Bearer') {
            return false;
        }

        // Attempt authorization with the provided token
        try {

            // Setup the JWT Verifier
            $jwtVerifier = (new \Okta\JwtVerifier\JwtVerifierBuilder())
                            ->setAdaptor(new \Okta\JwtVerifier\Adaptors\SpomkyLabsJose())
                            ->setAudience('api://default')
                            ->setClientId('{yourClientId}')
                            ->setIssuer('{yourIssuerUrl}')
                            ->build();

            // Verify the JWT from the Authorization Header.
            $jwt = $jwtVerifier->verify($authData);
        } catch (\Exception $e) {

            // You encountered an error, return a 401.
            return false;
        }

        return true;
    }

}
Of course, you need to replace the client ID and issuer URL with your own! It’s also preferable to extract these variables into the .env file. They are not secrets and they are visible in the frontend application so it’s not a security concern to keep them in the repo, but it’s not convenient if you have multiple environments.
app/Http/Kernel.php
    protected $middlewareGroups = [
        'web' => [
			...
        ],

        'api' => [
            ...
			\App\Http\Middleware\AuthenticateWithOkta::class,
        ],
    ];
If you did everything correctly, http://localhost:8000/api/players should now show you an ‘Unauthorized.’ message but loading the list of players in the Vue frontend should work fine (when you are logged in).
Create a New Player Component in Vue
Next, replace the ‘Add Player’ button placeholder with a form to add a new player.
components/TriviaGame.vue
Replace:
<a class="button is-primary">Add Player</a>
with:
<player-form @completed="addPlayer"></player-form>
Add to the
import PlayerForm from './PlayerForm.vue'

export default {
    components: {
        PlayerForm
    },
...
    methods: {
        addPlayer(player) {
            this.players.push(player)
        }
    }
Create a new component PlayerForm.vue:
components/PlayerForm.vue
<template>
    <form @submit.prevent="onSubmit">
        <span class="help is-danger" v-text="errors"></span>

        <div class="field">
            <div class="control">
                <input class="input" type="name" placeholder="enter player name..." v-model="name" @keydown="errors = ''">
            </div>
        </div>

        <button class="button is-primary" v-bind:class="{ 'is-loading' : isLoading }">Add Player</button>
    </form>
</template>

<script>
import axios from 'axios'
import { API_BASE_URL } from '../config'

export default {
    data() {
        return {
            name: '',
            errors: '',
            isLoading: false
        }
    },
    methods: {
        onSubmit() {
            this.isLoading = true
            this.postPlayer()
        },
        async postPlayer() {
            axios.defaults.headers.common['Authorization'] = `Bearer ${this.$auth.getAccessToken()}`
            axios.post(API_BASE_URL + '/players', this.$data)
                .then(response => {
                    this.name = ''
                    this.isLoading = false
                    this.$emit('completed', response.data.data)
                })
                .catch(error => {
                    // handle authentication and validation errors here
                    this.errors = error.response.data.errors
                    this.isLoading = false
                })
        }
    }
}
</script>
It’s now possible to add more players to our trivia game.
Add a ‘Delete Player’ Button to the Vue Application
Next you’ll replace the ‘Action Buttons’ placeholder with a button that actually deletes the player.
components/TriviaGame.vue
Replace
<td>Action buttons</td>
with:
<td>
<button class="button is-primary" v-bind:class="{ 'is-loading' : isDeleting(player.id) }" @click="deletePlayer(player.id)">Delete Player</button>
</td>

Modify the <script> section:

...
import Vue from 'vue'
...

export default {
    ...
    methods: {
        ...
        isDeleting(id) {
            let index = this.players.findIndex(player => player.id === id)
            return this.players[index].isDeleting
        },
        async deletePlayer(id) {
            let index = this.players.findIndex(player => player.id === id)
            Vue.set(this.players[index], 'isDeleting', true)
            await axios.delete(API_BASE_URL + '/players/' + id)
            this.players.splice(index, 1)
        }
    }
}
Connect a Trivia Question Service to Vue
In order to save time, you’ll use a public API for retrieving trivia questions instead of building out a question database from scratch. The service provides a URL that returns a different trivia question every time it’s requested. Define the URL in the config.js file and you’ll get an initial question when the Trivia Game page is loaded. Then you’ll modify the Trivia Game component to include a card with the question and answer:
src/config.js
...
export const TRIVIA_ENDPOINT = 'http://jservice.io/api/random?count=1';
components/TriviaGame.vue (pasting the full contents of the file)
<template>
    <div class="columns">
        <div class="column" v-if="isLoading">Loading players...</div>
        <div class="column" v-else>
        <table class="table">
            <thead>
                <tr>
                    <th>ID</th>
                    <th>Name</th>
                    <th>Answers</th>
                    <th>Points</th>
                    <th>Actions</th>
                </tr>
            </thead>
            <tbody>
                <template v-for="player in players">
                    <tr v-bind:key="player.id">
                        <td></td>
                        <td></td>
                        <td></td>
                        <td></td>
                        <td>
                        <button class="button is-primary" v-bind:class="{ 'is-loading' : isDeleting(player.id) }" @click="deletePlayer(player.id)">Delete Player</button>
                        </td>
                    </tr>
                </template>
            </tbody>
        </table>
        <player-form @completed="addPlayer"></player-form>
        </div>
        <div class="column">
            <div class="card" v-if="question">
                <div class="card-content">
                    <button class="button is-primary" @click="getQuestion()">Refresh Question</button>
                    <p class="title">

                    </p>
                    <p class="subtitle">

                    </p>
                </div>
                <footer class="card-footer">
                    <p class="card-footer-item">
                        <span>Correct answer: </span>
                    </p>
                </footer>
            </div>
        </div>
    </div>
</template>

<script>
import axios from 'axios'
import { API_BASE_URL, TRIVIA_ENDPOINT } from '../config'
import PlayerForm from './PlayerForm.vue'
import Vue from 'vue'

export default {
    components: {
        PlayerForm
    },
    data() {
        return {
            isLoading: true,
            question: null,
            players: {}
        }
    },
    async created () {
        this.getQuestion()
        axios.defaults.headers.common['Authorization'] = `Bearer ${this.$auth.getAccessToken()}`
        try {
            const response = await axios.get(API_BASE_URL + '/players')
            this.players = response.data.data
            this.isLoading = false
        } catch (e) {
            // handle the authentication error here
        }
    },
    methods: {
        async getQuestion() {
            delete axios.defaults.headers.common.Authorization
            this.doGetQuestion()
            axios.defaults.headers.common['Authorization'] = `Bearer ${this.$auth.getAccessToken()}`
        },
        async doGetQuestion() {
            try {
                const response = await axios.get(TRIVIA_ENDPOINT, {
                    headers: {
                        'Content-Type': 'application/x-www-form-urlencoded'
                    }
                })
                this.question = response.data[0]
            } catch (e) {
                // handle errors here
            }
        },
        addPlayer(player) {
            this.players.push(player)
        },
        isDeleting(id) {
            let index = this.players.findIndex(player => player.id === id)
            return this.players[index].isDeleting
        },
        async deletePlayer(id) {
            let index = this.players.findIndex(player => player.id === id)
            Vue.set(this.players[index], 'isDeleting', true)
            await axios.delete(API_BASE_URL + '/players/' + id)
            this.players.splice(index, 1)
        }
    }
}
</script>
Add Buttons in Vue to Indicate Right and Wrong Answers
Now, let’s add two more buttons next to the Delete Player button and implement the handlers:
components/TriviaGame.vue
...
<td>
<button class="button is-primary" v-bind:class="{ 'is-loading' : isCountUpdating(player.id) }" @click="answer(player.id, true)">(+1) Right</button>
<button class="button is-primary" v-bind:class="{ 'is-loading' : isCountUpdating(player.id) }" @click="answer(player.id, false)">(-1) Wrong</button>
<button class="button is-primary" v-bind:class="{ 'is-loading' : isDeleting(player.id) }" @click="deletePlayer(player.id)">Delete Player</button>
</td>
...
methods: {
...
isCountUpdating(id) {
let index = this.players.findIndex(player => player.id === id)
return this.players[index].isCountUpdating
},
async answer(id, isCorrectAnswer) {
let data = {
correct: isCorrectAnswer
}
let index = this.players.findIndex(player => player.id === id)
Vue.set(this.players[index], 'isCountUpdating', true)
const response = await axios.post(API_BASE_URL + '/players/' + id + '/answers', data)
this.players[index].answers = response.data.data.answers
this.players[index].points = response.data.data.points
this.players[index].isCountUpdating = false
}
}
The game is complete now! You now have a basic Laravel API that returns trivia questions to authenticated requests, and a Vue front-end that can log users in and make authenticated requests to the Laravel API.
This is a great start, but there is of course room for improvement. You can improve the code by extracting the common API boilerplate code (retrieving the access token, sending the Authorization header, sending a request and receiving a response) into a service class.
You can find the full code here: https://github.com/oktadeveloper/okta-php-laravel-vue-crud-example
Learn More About Laravel, Vue, and Okta
If you would like to dig deeper into the topics covered in this article, the following resources are a great starting point:
- Our Vue/PHP Quickstart Guide
- Build a Basic CRUD App with Laravel and Angular
- Build a Basic CRUD App with Laravel and React
If you find any issues, please add a comment below, and we’ll do our best to help. If you liked this tutorial, you shouldfollow us on Twitter. We also have a YouTube channel where we publish screencasts and other videos.
Changelog:
- Apr 15, 2021: Updated to use Okta Vue 3.1.0 and the Okta CLI for OIDC app creation. Updated Laravel CORS library from barryvdh to fruitcake. See changes in okta-blog#679. Changes to the example app can be viewed in okta-php-laravel-vue-crud-example#20.
Okta Developer Blog Comment Policy
We welcome relevant and respectful comments. Off-topic comments may be removed.