Tutorial: Build a Basic CRUD App with Laravel and Angular
Laravel is a popular PHP framework for Web application development and it’s a pretty good choice if you’re starting a new project today for multiple reasons:
Laravel is a well-architectured framework that’s easy to pick up and write elegant code, but it’s powerful as well. It contains many advanced features out-of-the-box: Eloquent ORM, support for unit/feature/browser tests, job queues, and many more. There’s an abundance of great learning resources and it boasts one of the largest communities on the net, so it’s easy to find developers who are familiar with it.
Laravel includes a decent templating engine if you’re going old school (by generating HTML on the server side) and it also comes out of the box with a great frontend build tool (the webpack-based Laravel Mix) and Vue.js for building single-page applications. Because of this, the combination of Laravel + Vue.js has turned into the de-facto standard. However, Laravel might be choosing Vue.js but it doesn’t mean you are limited to it!
One of the best ‘hidden’ features of Laravel is that it’s very easy to use it to create a REST-ful API that can drive a frontend built in your preferred framework. Of course, you can also go with the light-weight version of Laravel, Lumen, if you need a high-performance API with minimum overhead and bootstrapping time of less than 40 ms, but for most purposes, the full-featured Laravel will do just fine. Today, I’m going to show you how easy it is to set up a Laravel API that is consumed by an Angular 6 application. We’ll use Okta for user authentication and authorization in our app, which will allow us to implement security the right way without any hassle.
Before you start, you’ll need to set up a development environment with PHP 7 and Node.js 8+/npm. You will also need an Okta developer account.
Note: In May 2025, the Okta Integrator Free Plan replaced Okta Developer Edition Accounts, and the Okta CLI was deprecated.
We preserved this post for reference, but the instructions no longer work exactly as written. Replace the Okta CLI commands by manually configuring Okta following the instructions in our Developer Documentation.
Why Use Okta for Authentication?
Well, we might be biased, but we think Okta makes identity management easier, more secure, and more scalable than what you’re used to. Okta is an API service that allows you to create, edit, and securely store user accounts and user account data, and connect them with one or more applications. Our API enables you to:
- Authenticate and authorize your users
- Store data about your users
- Perform password-based and social login
- Secure your application with multi-factor authentication
- And much more! Check out our product documentation for more information
Register for a forever-free developer account, and when you’re done, come back to learn more about building a secure CRUD app with Laravel and Angular.
Angular and Laravel CRUD Application
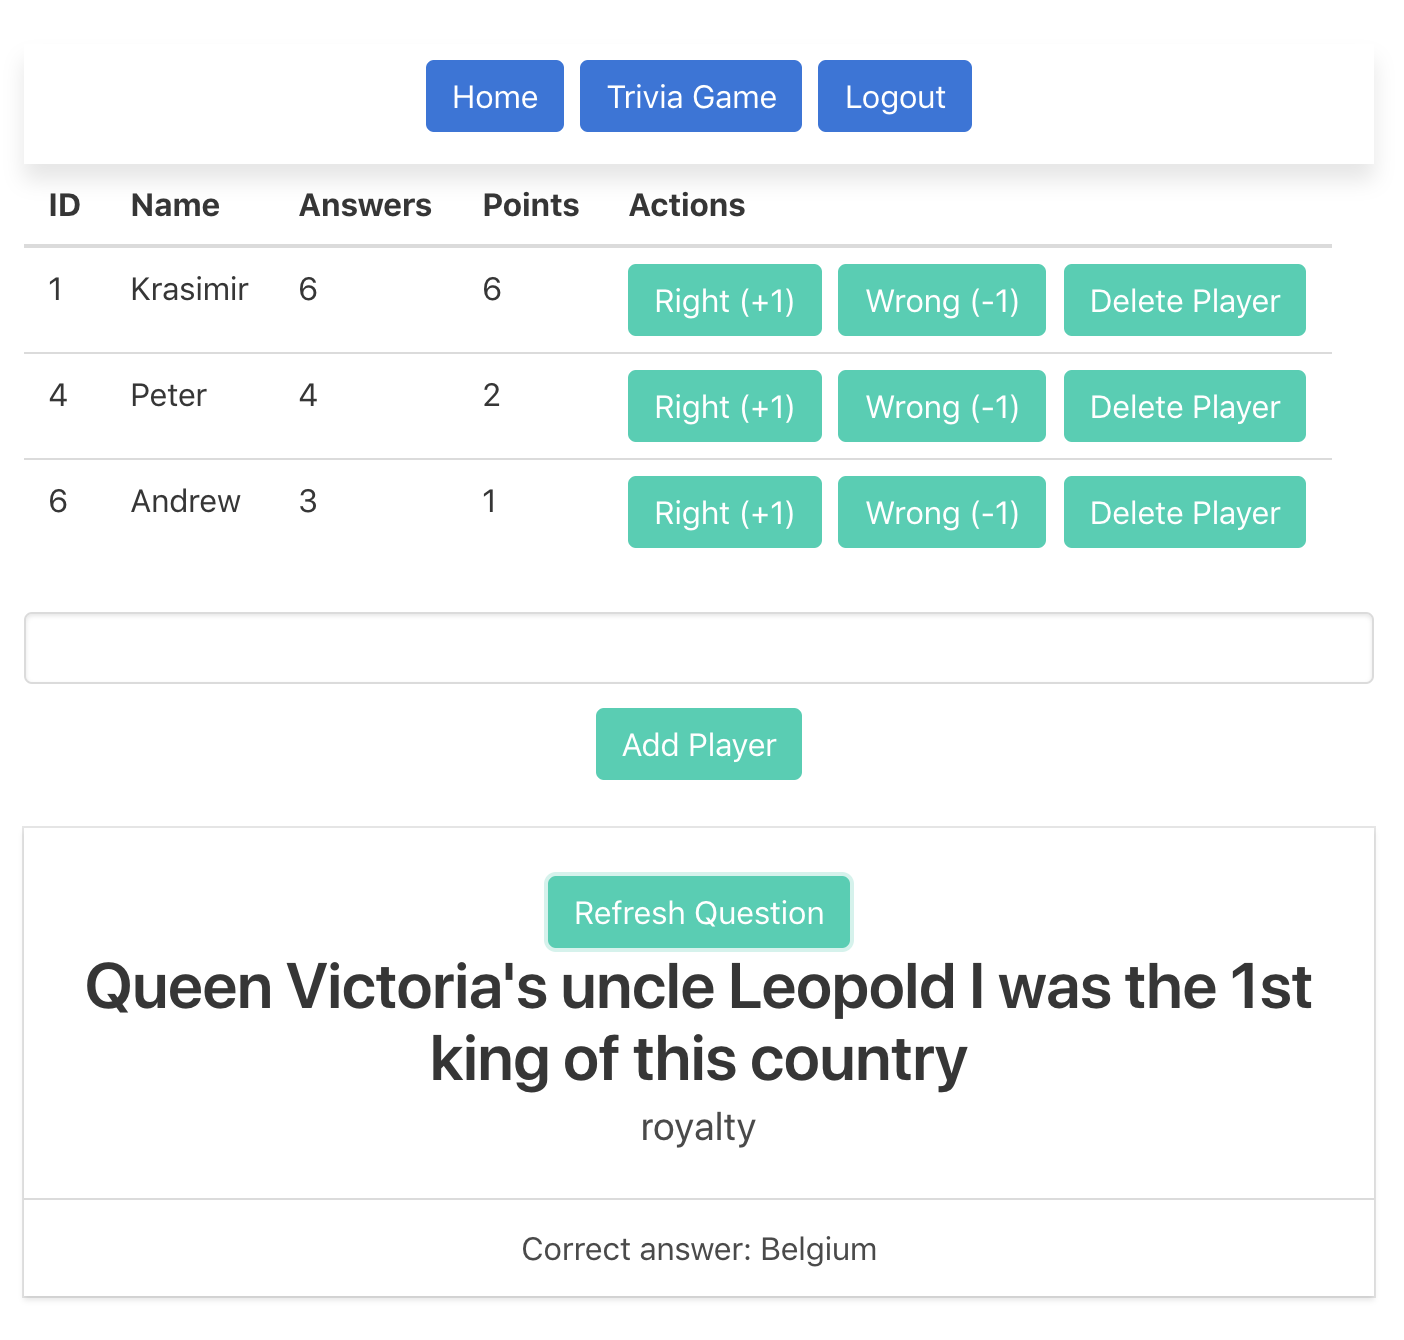
Today we’ll build a simple trivia game interface that will allow you to run trivia games for your friends. Here’s what the finished app will look like:
Here’s one possible way to run the game as the host:
- Set up the list of players
- Read the question to the players
- Players can attempt to answer (one by one) in which case you can mark each answer as Right (+1 point) or Wrong (-1 point), or they can skip the question
- Hit ‘Refresh Question’ to proceed with the next question, once someone gets the right answer (or they all give up)
You can, of course, make up your own rules as well.
Create a Free Okta Developer Account
Let’s set up our Okta account so it’s ready when we need it.
Before you proceed, you need to log into your Okta account (or create a new one for free) and set up a new OIDC app. You’ll mostly use the default settings. Make sure to take note of your Okta domain and the Client ID generated for the app.
Here are the step-by-step instructions:
Go to the Applications menu item and click the ‘Add Application’ button:

Select ‘Single Page Application’ and click ‘Next’.
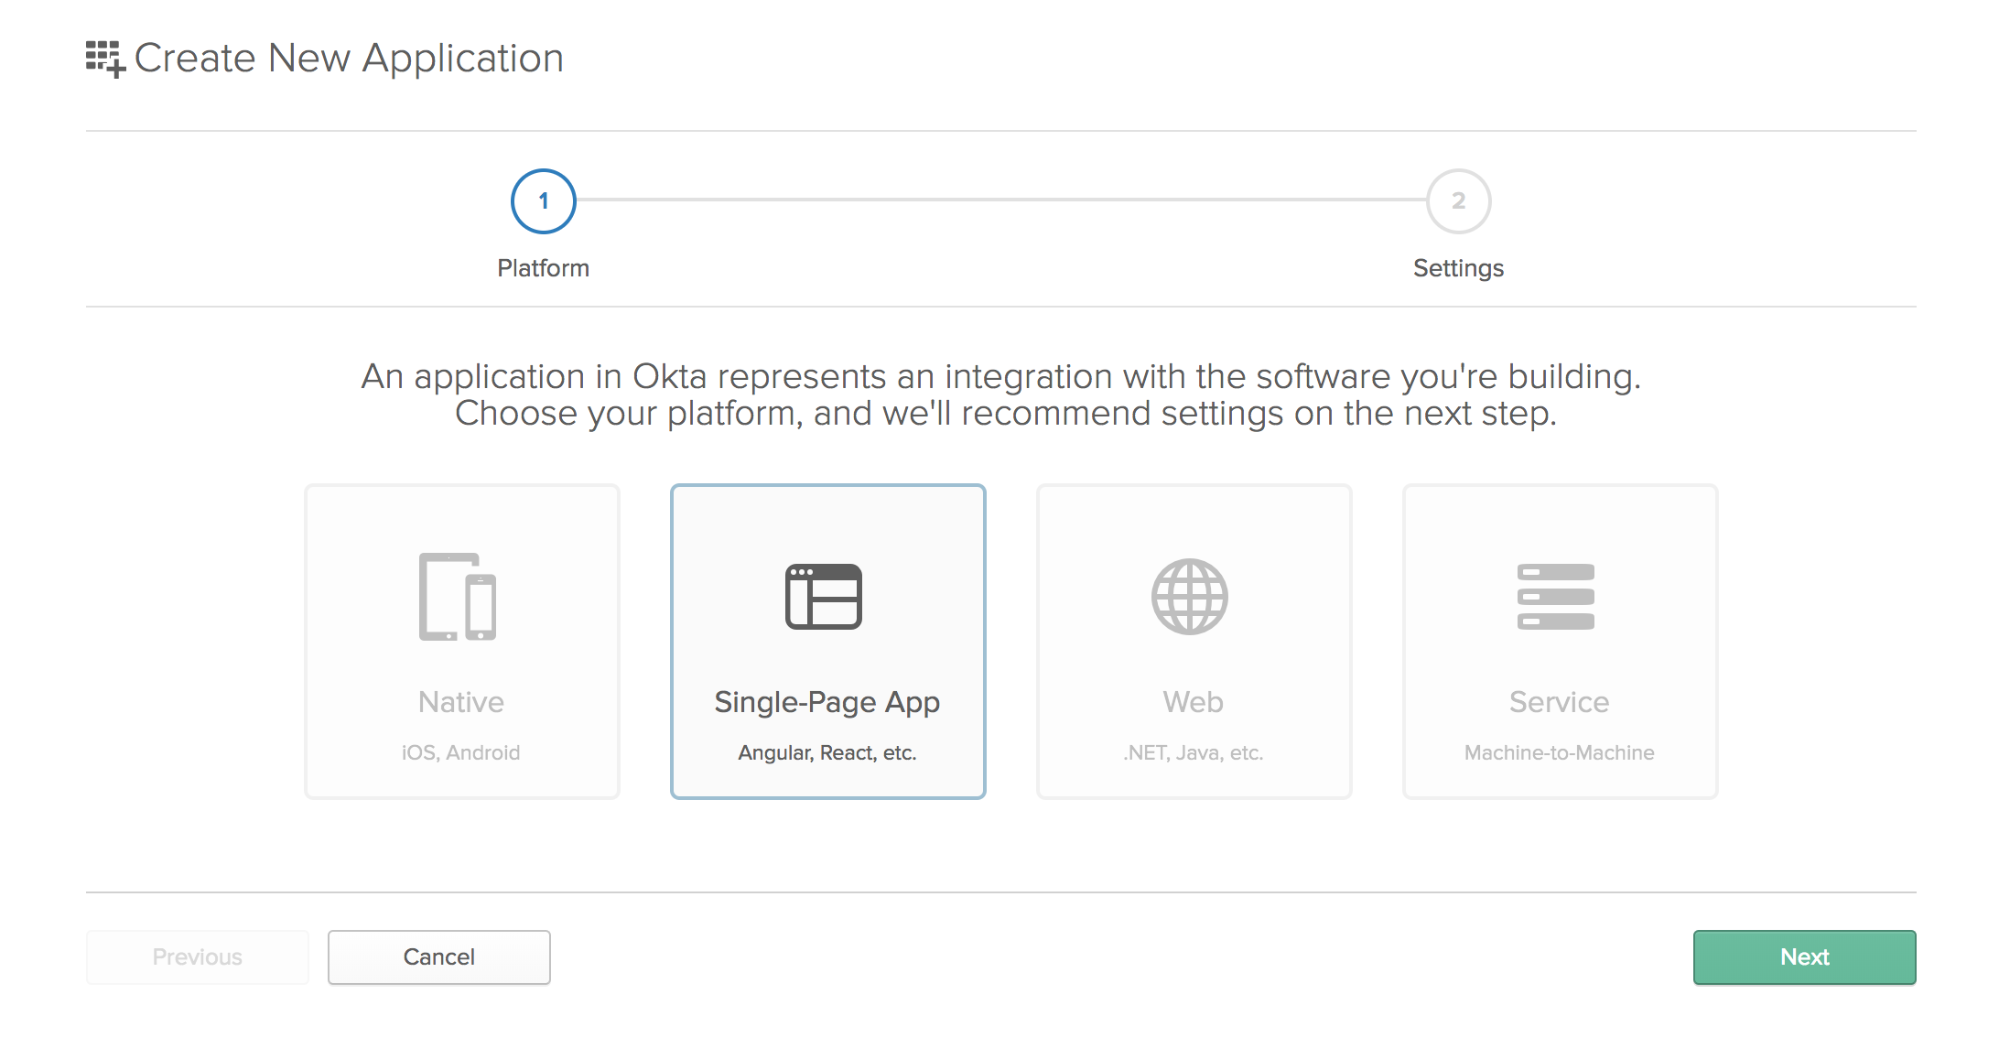
Set a descriptive application name, add http://localhost:3000/login as a Login redirect URI, and click Done. You can leave the rest of the settings as they are.
Install and Configure the Laravel Application
We will follow the installation instructions from the official Laravel documentation (https://laravel.com/docs/5.7/installation)
First, let’s install the ‘laravel’ command globally on our system through composer. Then we’ll create a new Laravel project, navigate to it and start the development PHP server:
composer global require laravel/installer
laravel new trivia-web-service
cd trivia-web-service
php artisan serve
Next, we’ll create a MySQL database and user for our app (you are free to use a different database engine if you prefer):
mysql -uroot -p
CREATE DATABASE trivia CHARACTER SET utf8mb4 COLLATE utf8mb4_unicode_ci;
CREATE USER 'trivia'@'localhost' identified by 'trivia';
GRANT ALL on trivia.* to 'trivia'@'localhost';
quit
Now let’s edit our .env file and enter our database credentials:
.env
DB_DATABASE=trivia
DB_USERNAME=trivia
DB_PASSWORD=trivia
Create a Backend API with Laravel
We’ll start by creating a model and a migration for our Player entity.
php artisan make:model Player -m
Model created successfully.
Created Migration: 2018_10_08_094351_create_players_table
The -m option is short for –migration and it tells Artisan to create one for our model.
Edit the migration file and update the up() method:
database/migrations/2018_10_08_094351_create_players_table.php
public function up()
{
    Schema::create('players', function (Blueprint $table) {
        $table->increments('id');
        $table->string('name');
        $table->integer('answers')->default(0);
        $table->integer('points')->default(0);
        $table->timestamps();
    });
}
Then run the migration to create the table:
php artisan migrate
Edit the model file and add a $fillable attribute to the class so we can define which fields we can mass-assign in create() and update() operations on the model:
app/Player.php
class Player extends Model
{
    protected $fillable = ['name', 'answers', 'points'];
}
Now we’ll create two API resources: Player (dealing with an individual player) and PlayerCollection (dealing with a collection of players).
php artisan make:resource Player
php artisan make:resource PlayerCollection
Modify the transformation functions toArray() of the resources:
app/Http/Resources/Player.php
public function toArray($request)
{
    return [
        'id'         => $this->id,
        'name'       => $this->name,
        'answers'    => (int) $this->answers,
        'points'     => (int) $this->points,
        'created_at' => $this->created_at,
        'updated_at' => $this->updated_at,
    ];
}
app/Http/Resources/PlayerCollection.php
public function toArray($request)
{
    return [
        'data' => $this->collection
    ];
}
We can now create the routes and controller for our REST API.
php artisan make:controller PlayerController
routes/api.php
Route::get('/players', 'PlayerController@index');
Route::get('/players/{id}', 'PlayerController@show');
Route::post('/players', 'PlayerController@store');
Route::post('/players/{id}/answers', 'PlayerController@answer');
Route::delete('/players/{id}', 'PlayerController@delete');
Route::delete('/players/{id}/answers', 'PlayerController@resetAnswers');
app/Http/Controllers/PlayerController.php
...
use App\Player;
use App\Http\Resources\Player as PlayerResource;
use App\Http\Resources\PlayerCollection;
...

class PlayerController extends Controller
{
    public function index()
    {
        return new PlayerCollection(Player::all());
    }

    public function show($id)
    {
        return new PlayerResource(Player::findOrFail($id));
    }

    public function store(Request $request)
    {
        $request->validate([
            'name' => 'required|max:255',
        ]);

        $player = Player::create($request->all());

        return (new PlayerResource($player))
                ->response()
                ->setStatusCode(201);
    }

    public function answer($id, Request $request)
    {
        $request->merge(['correct' => (bool) json_decode($request->get('correct'))]);
        $request->validate([
            'correct' => 'required|boolean'
        ]);

        $player = Player::findOrFail($id);
        $player->answers++;
        $player->points = ($request->get('correct')
                           ? $player->points + 1
                           : $player->points - 1);
        $player->save();

        return new PlayerResource($player);
    }

    public function delete($id)
    {
        $player = Player::findOrFail($id);
        $player->delete();

        return response()->json(null, 204);
    }

    public function resetAnswers($id)
    {
        $player = Player::findOrFail($id);
        $player->answers = 0;
        $player->points = 0;

        return new PlayerResource($player);
    }
}
The API allows us to get the list of all players or an individual player’s data, add/delete players, mark correct/incorrect answers by a player and reset the answers and points data of a player. There’s validation of the requests and the code generates JSON responses with the appropriate status codes - not bad at all for such a small amount of code.
To test the get methods, add some dummy data to the database (you can, of course, use the Laravel factories with the Faker library to generate data) and then access these URLs:
- http://127.0.0.1:8000/api/players
- http://127.0.0.1:8000/api/players/1
If you want to test the post/put/delete requests (for example with Postman), make sure to set the following header for each request:
Accept: "application/json"
so the validation errors will be returned as JSON.
Install Angular and Create the Frontend Application
We will follow the official Angular documentation (https://angular.io/guide/quickstart) and install the Angular CLI globally, then we’ll create a new project and start the server.
sudo npm install -g @angular/cli@^6.1
ng new trivia-web-client-angular
cd trivia-web-client-angular
ng --version
Angular CLI: 6.1.5
Angular: 6.1.9
ng serve
Navigating to http://127.0.0.1:4200/ now opens the default Angular application.
Next, we’ll add the Bulma framework (because everyone else is using Bootstrap, but we like to mix things up a bit, right):
npm install --save bulma
Add to .angular.json:
"styles": [
  ...,
  "node_modules/bulma/css/bulma.min.css"
]
Run the server again because changes to angular.json are not picked up automatically:
ng serve
Customize the Main Layout in Angular
Replace the default HTML layout:
src/app/app.component.html
<div style="text-align:center">
    <section class="section">
        <div class="container">
            <nav class="navbar" role="navigation" aria-label="main navigation">
                <div class="navbar-menu is-active buttons">
                    <button class="button is-link">Home</button>
                    <button class="button is-link">Trivia Game</button>
                </div>
            </nav>
        </div>
    </section>
</div>
Let’s create our two main components:
ng generate component Home
ng generate component TriviaGame
Adding routing:
src/app/app.module.ts
import { Routes, RouterModule } from '@angular/router';

const routes: Routes = [
    { path: '', component: HomeComponent, pathMatch: 'full' },
    { path: 'trivia', component: TriviaGameComponent },
    { path: '**', redirectTo: '', pathMatch: 'full' }
];
In the imports section:
imports: [
    BrowserModule,
    RouterModule.forRoot(routes)
],
Adding routing links and the router outlet (Replace the <nav class="navbar"> section):
src/app/app.component.html
<nav class="navbar" role="navigation" aria-label="main navigation">
    <div class="navbar-menu is-active buttons">
        <button class="button is-link" [routerLink]="['']">Home</button>
        <button class="button is-link" [routerLink]="['/trivia']">Trivia Game</button>
    </div>
</nav>
<router-outlet></router-outlet>
Add Authentication with Okta
We need to install the Okta Angular package first:
npm install @okta/okta-angular rxjs-compat@6 --save
src/app/app.module.ts
import { OktaAuthModule, OktaCallbackComponent } from '@okta/okta-angular';

const oktaConfig = {
  issuer: '{YourIssuerURL}',
  redirectUri: 'http://localhost:4200/implicit/callback',
  clientId: '{yourClientId}'
};
Don’t forget to replace your URL and Client ID!
src/app/app.module.ts
imports: [
    BrowserModule,
    RouterModule.forRoot(routes),
    OktaAuthModule.initAuth(oktaConfig)
],
Update the routes as well:
const routes: Routes = [
    { path: '', component: HomeComponent, pathMatch: 'full' },
    { path: 'trivia', component: TriviaGameComponent },
    { path: 'implicit/callback', component: OktaCallbackComponent },
    { path: '**', redirectTo: '', pathMatch: 'full' },
];
Add the authentication code:
src/app/app.component.ts
import { Component } from '@angular/core';
import { OktaAuthService } from '@okta/okta-angular';

@Component({
  selector: 'app-root',
  templateUrl: './app.component.html',
  styleUrls: ['./app.component.css']
})

export class AppComponent {

    isAuthenticated: boolean;

    constructor(public oktaAuth: OktaAuthService) {
        this.oktaAuth.$authenticationState.subscribe(
            (isAuthenticated: boolean) => (this.isAuthenticated = isAuthenticated)
        );
    }

    async ngOnInit() {
        this.isAuthenticated = await this.oktaAuth.isAuthenticated();
    }

    login() {
        this.oktaAuth.loginRedirect('/');
    }

    logout() {
        this.oktaAuth.logout('/');
    }
}
Modify the links in the navbar:
src/app/app.component.html
<button class="button is-link" *ngIf="isAuthenticated" [routerLink]="['/trivia']">Trivia Game</button>
<button class="button is-link" *ngIf="!isAuthenticated" (click)="login()"> Login </button>
<button class="button is-link" *ngIf="isAuthenticated" (click)="logout()"> Logout </button>
src/app/app.module.ts
import { HttpModule } from '@angular/http';
...
imports: [
    BrowserModule,
    HttpModule,
    RouterModule.forRoot(routes),
    OktaAuthModule.initAuth(oktaConfig)
],
Create a Service in Angular
We’ll use the CLI tool to create the service:
ng generate service player
src/app/player.service.ts
import { Injectable } from '@angular/core';
import { OktaAuthService } from '@okta/okta-angular';
import { Http, Headers, RequestOptions } from '@angular/http';
import { Observable } from 'rxjs';

export interface Player {
    id: Number,
    name: String,
    answers: Number,
  points: number
}

const API_URL: string = 'http://localhost:8000';

@Injectable({
  providedIn: 'root'
})
export class PlayerService {

    private accessToken;
    private headers;

    constructor(private oktaAuth: OktaAuthService, private http: Http) {
        this.init();
    }

    async init() {
        this.accessToken = await this.oktaAuth.getAccessToken();
        this.headers = new Headers({
            Authorization: 'Bearer ' + this.accessToken
        });
    }

    getPlayers(): Observable<Player[]> {
        return this.http.get(API_URL + '/players',
            new RequestOptions({ headers: this.headers })
        )
        .map(res => res.json().data);
    }
}
Now we can add the code for fetching the Players data to the OnInit lifecycle hook of the TriviaGameComponent:
src/app/trivia-game/trivia-game.component.ts
import { Component, OnInit } from '@angular/core';
import { Player, PlayerService } from '../player.service';
import 'rxjs/Rx';

@Component({
  selector: 'app-trivia-game',
  templateUrl: './trivia-game.component.html',
  styleUrls: ['./trivia-game.component.css']
})
export class TriviaGameComponent implements OnInit {

  players: Player[];
  errorMessage: string;

  constructor(private playerService: PlayerService) { }

    ngOnInit() {
        this.getPlayers();
    }

    getPlayers() {
        this.playerService
            .getPlayers()
            .subscribe(
                players => this.players = players,
                error => this.errorMessage = <any>error
            );
    }
}
We’ll get a CORS error now so let’s enable CORS for our API (switch back to our backend API directory for the next commands):
composer require barryvdh/laravel-cors
app/Http/Kernel.php
protected $middlewareGroups = [
    'web' => [
    ...
    \Barryvdh\Cors\HandleCors::class,
    ],

    'api' => [
        ...
    \Barryvdh\Cors\HandleCors::class,
    ],
];
Display List of Players in Angular
src/app/trivia-game/trivia-game.component.html
<div>
    <span class="help is-info" *ngIf="isLoading">Loading...</span>
    <span class="help is-error" *ngIf="errorMessage">{{ errorMessage }}</span>
    <table class="table" *ngIf="!isLoading && !errorMessage">
        <thead>
            <tr>
                <th>ID</th>
                <th>Name</th>
                <th>Answers</th>
                <th>Points</th>
                <th>Actions</th>
            </tr>
        </thead>
        <tbody>
            <tr *ngFor="let player of players">
                <td>{{ player.id }}</td>
                <td>{{ player.name }}</td>
                <td>{{ player.answers }}</td>
                <td>{{ player.points }}</td>
                <td>
                    <button class="button is-primary">Delete Player</button>
                </td>
            </tr>
        </tbody>
    </table>
</div>
We’ll also modify our TriviaGameComponent class to include the isLoading property (initialized to true and set to false after the list of players is retrieved from the server), and our Player model and service to include an isUpdating flag for every player (initialized to false):
src/app/trivia-game/trivia-game.component.ts
...
import { OktaAuthService } from '@okta/okta-angular';
import { Player, PlayerService } from '../player.service';
...

export class TriviaGameComponent implements OnInit {

    players: Player[];
    errorMessage: string;
    isLoading: boolean = true;

    constructor(private playerService: PlayerService,
                private oktaAuth: OktaAuthService) { }

    async ngOnInit() {
        await this.oktaAuth.getAccessToken();
        this.getPlayers();
    }

    getPlayers() {
        this.playerService
            .getPlayers()
            .subscribe(
                players => {
                    this.players = players
                    this.isLoading = false
                },
                error => {
                    this.errorMessage = <any>error
                    this.isLoading = false
                }
            );
    }
src/app/player.service.ts
export interface Player {
  ...
    isUpdating: boolean,
}
...

    getPlayers(): Observable<Player[]> {
        return this.http.get(API_URL + '/api/players',
            new RequestOptions({ headers: this.headers })
        )
        .map(res => {
          let modifiedResult = res.json().data
                modifiedResult = modifiedResult.map(function(player) {
            player.isUpdating = false;
            return player;
          });
          return modifiedResult;
        });
    }
src/app/trivia-game/trivia-game.component.ts
findPlayer(id): Player {
    return this.players.find(player => player.id === id);
}

isUpdating(id): boolean {
    return this.findPlayer(id).isUpdating;
}
Secure the Backend API with Okta
We need to secure our backend API so it authenticates the Okta token and only allows authorized requests. Let’s install the packages we need to be able to verify tokens and create a custom middleware:
composer require okta/jwt-verifier spomky-labs/jose guzzlehttp/psr7
php artisan make:middleware AuthenticateWithOkta
app/Http/Middleware/AuthenticateWithOkta.php
<?php
namespace App\Http\Middleware;

use Closure;

class AuthenticateWithOkta
{
    /**
     * Handle an incoming request.
     *
     * @param  \Illuminate\Http\Request  $request
     * @param  \Closure  $next
     * @return mixed
     */
    public function handle($request, Closure $next)
    {
        if ($this->isAuthorized($request)) {
            return $next($request);
        } else {
            return response('Unauthorized.', 401);
        }
    }

    public function isAuthorized($request)
    {
        if (! $request->header('Authorization')) {
            return false;
        }

        $authType = null;
        $authData = null;

        // Extract the auth type and the data from the Authorization header.
        @list($authType, $authData) = explode(" ", $request->header('Authorization'), 2);

        // If the Authorization Header is not a bearer type, return a 401.
        if ($authType != 'Bearer') {
            return false;
        }

        // Attempt authorization with the provided token
        try {

            // Setup the JWT Verifier
            $jwtVerifier = (new \Okta\JwtVerifier\JwtVerifierBuilder())
                            ->setAdaptor(new \Okta\JwtVerifier\Adaptors\SpomkyLabsJose())
                            ->setAudience('api://default')
                            ->setClientId('{YOUR_CLIENT_ID}')
                            ->setIssuer('{YOUR_ISSUER_URL}')
                            ->build();

            // Verify the JWT from the Authorization Header.
            $jwt = $jwtVerifier->verify($authData);
        } catch (\Exception $e) {

            // We encountered an error, return a 401.
            return false;
        }

        return true;
    }

}
app/Http/Kernel.php
    protected $middlewareGroups = [
        'web' => [
      ...
        ],

        'api' => [
            ...
      \App\Http\Middleware\AuthenticateWithOkta::class,
        ],
    ];
Do not forget to put your own client ID and issuer URL! It also won’t hurt to extract these variables into the .env file.
Create a New Player Form in Angular
We’ll create a new component (PlayerForm) and display it below the list of players.
ng generate component PlayerForm
src/app/trivia-game/trivia-game.component.html
...
<app-player-form (playerAdded)="appendPlayer($event)"></app-player-form>
src/app/player.service.ts
...
addPlayer(player): Observable<Player> {
    return this.http.post(API_URL + '/api/players', player,
        new RequestOptions({ headers: this.headers })
    ).map(res => res.json().data);
}
src/app/player-form/player-form.component.html
<span class="help is-danger">{{ errors }}</span>
<div class="field">
    <div class="control">
        <input class="input" #playerName (keydown)="errors = ''">
    </div>
</div>
<button type="button" class="button is-primary" [class.is-loading]="isLoading" (click)="addPlayer(playerName.value)">Add Player</button>
src/app/player-form/player-form.component.ts
import { Component, OnInit, EventEmitter, Output  } from '@angular/core';
import { Player, PlayerService } from '../player.service';
import 'rxjs/Rx';

@Component({
    selector: 'app-player-form',
    templateUrl: './player-form.component.html',
    styleUrls: ['./player-form.component.css']
})

export class PlayerFormComponent implements OnInit {

    errors: string = '';
    isLoading: boolean = false;

    constructor(private playerService: PlayerService) { }

    @Output()
    playerAdded: EventEmitter<Player> = new EventEmitter<Player>();

    ngOnInit() {
    }

    addPlayer(name) {
        this.isLoading = true;
        this.playerService
            .addPlayer({
                name: name
            })
            .subscribe(
                player => {
                    this.isLoading = false;
                    player.isUpdating = false;
                    this.playerAdded.emit(player);
                },
                error => {
                    this.errors = error.json().errors;
                    this.isLoading = false;
                }
            );
    }
}
src/app/trivia-game/trivia-game.component.ts
...
appendPlayer(player: Player) {
    this.players.push(player);
}
Add Angular Functionality to Delete Player
We’ll add a button on each player row in the list:
src/app/trivia-game/trivia-game.component.html
...
<button class="button is-primary" [class.is-loading]="isUpdating(player.id)" (click)="deletePlayer(player.id)">Delete Player</button>
...
src/app/player.service.ts
...
deletePlayer(id): Observable<Player> {
    return this.http.delete(API_URL + '/api/players/' + id,
        new RequestOptions({ headers: this.headers })
    );
}
...
src/app/trivia-game/trivia-game.component.ts
...
deletePlayer(id) {
    let player = this.findPlayer(id)
    player.isUpdating = true
    this.playerService
        .deletePlayer(id)
        .subscribe(
            response => {
                let index = this.players.findIndex(player => player.id === id)
                this.players.splice(index, 1)
                player.isUpdating = false
            },
            error => {
                this.errorMessage = <any>error
                player.isUpdating = false
            }
        );
}
...
Build Trivia Service in Angular
We’ll create a new Trivia service and link it to a public API for trivia questions.
ng generate service trivia
src/app/trivia.service.ts
import { Injectable } from '@angular/core';
import { Http } from '@angular/http';

const TRIVIA_ENDPOINT: string = 'http://localhost:8000/question';

@Injectable({
    providedIn: 'root'
})
export class TriviaService {

    constructor(private http: Http) { }

    getQuestion() {
        return this.http.get(TRIVIA_ENDPOINT)
        .map(res => res.json()[0]);
    }
}
Modify the trivia game component html to include a card with the question and answer, and buttons to indicate correct and wrong answer for each player:
src/app/trivia-game/trivia-game.component.html
<div class="columns">
<div class="column">
<span class="help is-info" *ngIf="isLoading">Loading...</span>
<span class="help is-error" *ngIf="errorMessage">{{ errorMessage }}</span>
<table class="table" *ngIf="!isLoading && !errorMessage">
<thead>
<tr>
<th>ID</th>
<th>Name</th>
<th>Answers</th>
<th>Points</th>
<th>Actions</th>
</tr>
</thead>
<tbody>
<tr *ngFor="let player of players">
<td>{{ player.id }}</td>
<td>{{ player.name }}</td>
<td>{{ player.answers }}</td>
<td>{{ player.points }}</td>
<td>
<button class="button is-primary" [class.is-loading]="isUpdating(player.id)" (click)="rightAnswer(player.id)">Right (+1)</button>
<button class="button is-primary" [class.is-loading]="isUpdating(player.id)" (click)="wrongAnswer(player.id)">Wrong (-1)</button>
<button class="button is-primary" [class.is-loading]="isUpdating(player.id)" (click)="deletePlayer(player.id)">Delete Player</button>
</td>
</tr>
</tbody>
</table>
<app-player-form (playerAdded)="appendPlayer($event)"></app-player-form>
</div>
<div class="column">
<div class="card" *ngIf="question?.question">
<div class="card-content">
<button class="button is-primary" (click)="getQuestion()">Refresh Question</button>
<p class="title">
{{ question.question }}
</p>
<p class="subtitle">
{{ question.category.title }}
</p>
</div>
<footer class="card-footer">
<p class="card-footer-item">
<span>
Correct answer: {{ question.answer }}
</span>
</p>
</footer>
</div>
</div>
</div>
src/app/trivia-game/trivia-game.component.ts
...
import { TriviaService } from '../trivia.service';
...
export class TriviaGameComponent implements OnInit {
    ...
    question: any;
    ...
    constructor(private playerService: PlayerService,
            private triviaService: TriviaService,
            private oktaAuth: OktaAuthService) { }

    async ngOnInit() {
        await this.oktaAuth.getAccessToken();
        this.getPlayers();
        this.getQuestion();
    }
    ...
    getQuestion() {
        this.triviaService
            .getQuestion()
            .subscribe(
                question => this.question = question,
                error => this.errorMessage = <any>error
            );
    }
...
We’ll add a quick unauthenticated endpoint to our API to return a random trivia question. In reality, you’d probably want to connect a real trivia database to your app, but this will do for this quick demo.
In the server project, add the following route:
routes/web.php
Route::get('/question', function(Request $request) {
    return response()->json(json_decode(file_get_contents('http://jservice.io/api/random?count=1')));
});
Add Buttons to Mark Answers Right and Wrong
src/app/player.service.ts
...
    answer(id, data): Observable<Player> {
        return this.http.post(API_URL + '/api/players/' + id + '/answers', data,
            new RequestOptions({ headers: this.headers })
        ).map(res => res.json().data);
    }
...
src/app/trivia-game/trivia-game.component.ts
...
    rightAnswer(id) {
        let data = {
            correct: true
        }
        this.answer(id, data)
    }

    wrongAnswer(id) {
        let data = {
            correct: false
        }
        this.answer(id, data)
    }

    answer(id, data) {
        let player = this.findPlayer(id)
        player.isUpdating = true
        this.playerService
            .answer(id, data)
            .subscribe(
                response => {
                    player.answers = response.answers
                    player.points = response.points
                    player.isUpdating = false
                },
                error => {
                    this.errorMessage = <any>error
                    player.isUpdating = false
                }
            );
    }
...
That’s it! You’re ready to play a trivia game.
Hopefully this article was helpful for you and you now realize how easy it is to add authentication to Laravel APIs and Angular applications.
You can find the source code for the complete application at https://github.com/oktadeveloper/okta-php-trivia-angular.
If you want to read more about Okta, Angular, or Laravel, check out the Okta Dev Blog.
Here are some great articles to check out first:
As always, we’d love to hear from you. Hit us up with questions or feedback in the comments, or on Twitter @oktadev!
Okta Developer Blog Comment Policy
We welcome relevant and respectful comments. Off-topic comments may be removed.