The History (and Future) of Asynchronous JavaScript

Everyone knows that JavaScript is eating the world. The problem is, there are lots of developers responsible for building software with JavaScript without a particularly deep knowledge of the language. It is easy to learn the basics and be productive, but newer programmers have a tendency to misuse some of JavaScript. Asynchronous JavaScript is particularly misunderstood. In this post, I will show you the most common ways to make asynchronous JavaScript calls and when to use each one. There are a lot of idiosyncrasies when using JavaScript in the browser, so for the purposes of this post, I will be discussing JavaScript on the server using Node.
DISCLAIMER: The examples that follow are all contrived examples to illustrate a concept. There are (most likely) more appropriate ways to do the things I am doing. They are only to demonstrate the concept.
What is Asynchronous JavaScript?
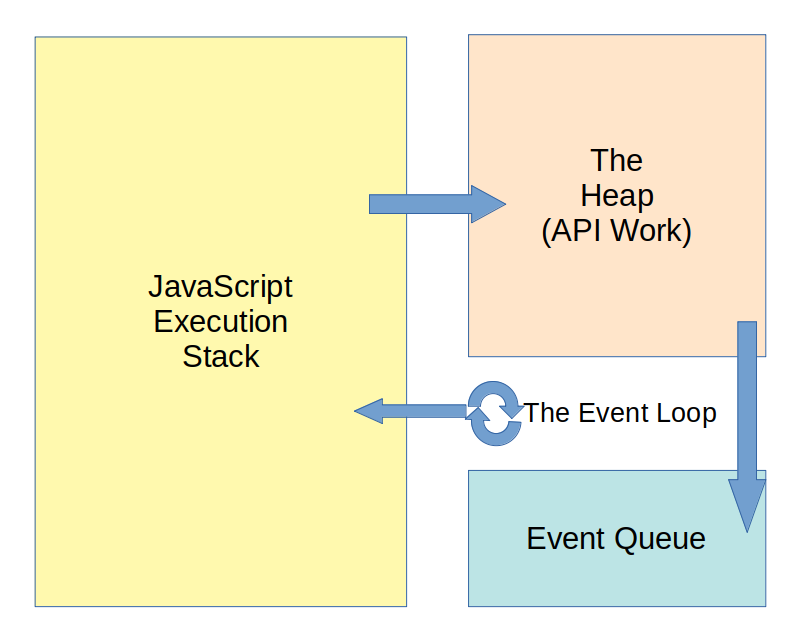
It’s important to first understand what asynchronous JavaScript is, and why you would want to make asynchronous calls. Asynchronous calls refer to calls that are moved off of JavaScript’s execution stack and do some work elsewhere. These are calls to an API. In Node’s case, they are calls to a C++ API in Node. Once the work is done, there is a function put in the event queue. Then when JavaScript’s execution stack is empty, the event loop pulls the function from the queue and pushes it onto the execution stack.
Simple Asynchronous JavaScript
The simplest example of asynchronous JavaScript is the setTimeout() function:
setTimeout(function callAfterTimeout(){
  console.log('At least five seconds have passed.');
}, 5000);
The setTimeout() function takes a function to call when the timeout has elapsed, and a number of milliseconds to wait before calling that function. When you make a call to setTimeout() it is a call to a C++ API. This gets moved off of the execution stack and when the timeout completes, the callback gets pushed into the queue. Once the execution stack is empty, the event loop will pull the callback from the queue and add it to the execution stack. All asynchronous code works in this same basic manner.
Callbacks (The Old Way)
The setTimeout() function’s first parameter is a function to call when the timeout finishes. This is a simple example of a callback. The function passed is known as a “callback” function and the work being done asynchronously is the timer.
Of all the techniques for writing asynchronous JavaScript, callbacks were the first. They were a part of every JavaScript developer’s life even when they didn’t realize it. Node itself was pretty much built on callbacks, and Express (Node’s most popular web server engine) uses callbacks for just about everything.
With most of the uses of callbacks, it’s most common to have the callback function as the last parameter. That is the case making database requests to MongoDB.
const MongoClient = require('mongodb').MongoClient;

MongoClient.connect('mongodb://localhost:27017', (err, db) => {
  if (err) throw err;
  console.log("Connected to MongoDB!");
  db.close();
});
This also shows another common pattern for callbacks, and that is the first parameter of the callback function is an error result. This allows the callback to check for an error result first and go ahead and throw or handle the error before trying to read a result it probably doesn’t have.
These are all just conventions that the industry has standardized on. There’s nothing enforcing these conventions, and not all libraries follow the conventions which can be a problem.
Another drawback to callbacks is a phenomenon known as “Callback Hell” or “The Arrow of Death/Despair”. This happens when you want to do a sequence of asynchronous things with the result of a previous asynchronous call.
someAsyncThing(params, (err, res) => {
  if (err) throw err;
  doSomethingAsyncWithResult(res, (err2, res2) => {
    if (err2) throw err2;
    someAsyncWithThatResult(res2, (err3, res3) => {
      if (err3) throw err3;
      anotherCallWithResult(res3, (err4, res4) => {
        if (err4) throw err4;
        return res4;
      });
    });
  });
});
You can see how this can quickly get out of hand. Even if it only went two callbacks deep, it can make the code hard to read and hard to reason about.
Promises (The Newer Way)
Promises were introduced to fix a lot of the problems with using callbacks to do asynchronous operations. A promise is just that: a promise to let the calling code know when the asynchronous call has finished.
doSomethingAsync(params)
  .then((result) => {
    console.log(result);
  })
  .catch((err) => {
    console.error(err);
  });
In this case, a promise is returned immediately from the doSomethingAsync() function. The promise acts as a sort of proxy that lets the execution context know when it is complete. If the promise completes successfully it is said to “resolve” and the then function is called with the result of the promise. If there is an error during execution the promise is “rejected” and the catch is called.
It is important to remember that the then and catch also return a promise. That means they can be chained.
doSomethingAsync(params)
  .then((result) => {
    console.log(result, 'Promise 1');
    return someNewResult;
  })
  .then((result) => {
    console.log(result, 'Promise 2');
  })
  .catch((err) => {
    console.error(err);
  });
This helps alleviate the “Callback Hell” by chaining the promise resolutions and making the code more readable and easier to reason about. It ends up reading like a sentence: “Do this, then do that that, then do the other”.
You can create your own promises as well. It is an easy way to take a library that uses callbacks and get it to return promises instead.
const MongoClient = require('mongodb').MongoClient;
const database;

function connectToMongo(url){
  return new Promise((resolve, reject) => {
    MongoClient.connect(url, (err, db) => {
      if (err) reject(err);
      resolve(db);
    });
  });
}

connectToMongo('mongodb://localhost:27017')
  .then((db) => {
    database = db;
    return db.queryTheDatabase();
  })
  .then((res) => {
    doSometingWithResults(res);
    database.close();
  })
  .catch((err) => {
    console.error(err);
  });
Here I have wrapped the MongoClient.connect() function to return a promise while the callback is being processed. Once the callback is called, it either resolves or rejects the promise. When I call the connectToMongo() function, I immediately get that promise back. Then I can chain then() function calls onto the promise. Each then returns a promise, and in the first then() the promise resolves with the database query results. If there is an error and the promise is rejected, I handle it here with the catch() function.
For those not used to promises, this can still be a bit difficult to reason about. Mostly because you have to understand what will be in the promise results when chaining your resolutions. You see I had to put the database connection into a variable and handle it later, rather than trying to pass it along the chain.
Async/Await (The Newest Way)
The async keyword in JavaScript adds a whole new level of cool to promises: the await keyword! This can make your code much more readable because the await keyword lets the code end up reading like traditional synchronous JavaScript. How cool is that?
const value = await someAsyncFunction();
console.log(value);
There are some important things to note about the async and await keywords. First, this code is NOT running synchronously. The await keyword is just “syntactic sugar” that makes an invisible then() function around the console.log(value) that is using the value from the awaited statement. Second, to use the await keyword, you must be inside a function marked with the async keyword.
const MongoClient = require('mongodb').MongoClient;

function connectToMongo(url){
  return new Promise((resolve, reject) => {
    MongoClient.connect(url, (err, db) => {
      if (err) reject(err);
      resolve(db);
    });
  });
}

async function getAllUsers(){
  try{
    const db = await connectToMongo('mongodb://localhost:27017');
    const users = await db.collection.Users.find({});
    db.close();
    return users;
  }catch(err){
    console.error(err);
    return err.message;
  }
}
In this case, the users and db are invisibly wrapped in then() functions to handle the resolution of the promises. The try/catch block wraps the entire promise to handle promise rejection. Now, THIS reads really well. It’s easy to follow and it is basically doing the same thing as if it were standard promises and chained in then() and catch() functions.
The only real problem with this approach is remembering to add the async keyword. If you’re like me, your linter will let you know!
Learn More About JavaScript and Application Security
Want to learn more about asynchronous JavaScript, or just JavaScript in general? Check out some of the useful resources.
- Learn JavaScript in 2019
- Add Authentication to Your Vanilla JavaScript App in 20 Minutes
- Build a Video Chat Service with JavaScript, WebRTC, and Okta
- WebAuthn: A Developer’s Guide to What’s on the Horizon
- webauthn.me
As usual, if you have any comments, questions, or suggestions leave a comment below. Don’t forget to follow us on Twitter, Facebook, and LinkedIn and watch our kick-ass videos on YouTube.
Okta Developer Blog Comment Policy
We welcome relevant and respectful comments. Off-topic comments may be removed.