The Lazy Developer's Guide to Authentication with Vue.js
Heads up... this blog post is old!
For an updated version of this blog post, see Vue Login and Access Control the Easy Way.

I’ll happily admit that like many of you, I’m a lazy developer. I tend to look for solutions someone else has already built before I try to build them myself. In the “old days” of the early 2000s, I used to spend a lot more time coding solutions myself. But today many solutions to coding problems are just a keyword search away. In that spirit, I approached this tutorial using keywords – looking for existing solutions first, then fitting my favorite solution on top of it. I think you’ll like the results!
When I started writing this article, I wanted to show you how to add authentication to a Vue.js app. I started learning Vue.js back in April while authoring my Front End Development for Back End Developers presentation. I bought a pro subscription to Egghead.io and watched Build Vue.js Apps with the Vue-CLI and Nuxt.js by @johnlindquist.
Note: In May 2025, the Okta Integrator Free Plan replaced Okta Developer Edition Accounts, and the Okta CLI was deprecated.
We preserved this post for reference, but the instructions no longer work exactly as written. Replace the Okta CLI commands by manually configuring Okta following the instructions in our Developer Documentation.
Vue CLI + PWA!
Every web app that has mobile users should add PWA support so the app loads faster and works offline. Vue.js has excellent PWA support. You might recognize me as a fan of PWAs if you’ve read my Ultimate Guide to Progressive Web Applications.
I installed Vue CLI and went to work.
npm install -g vue-cli@2.9.6
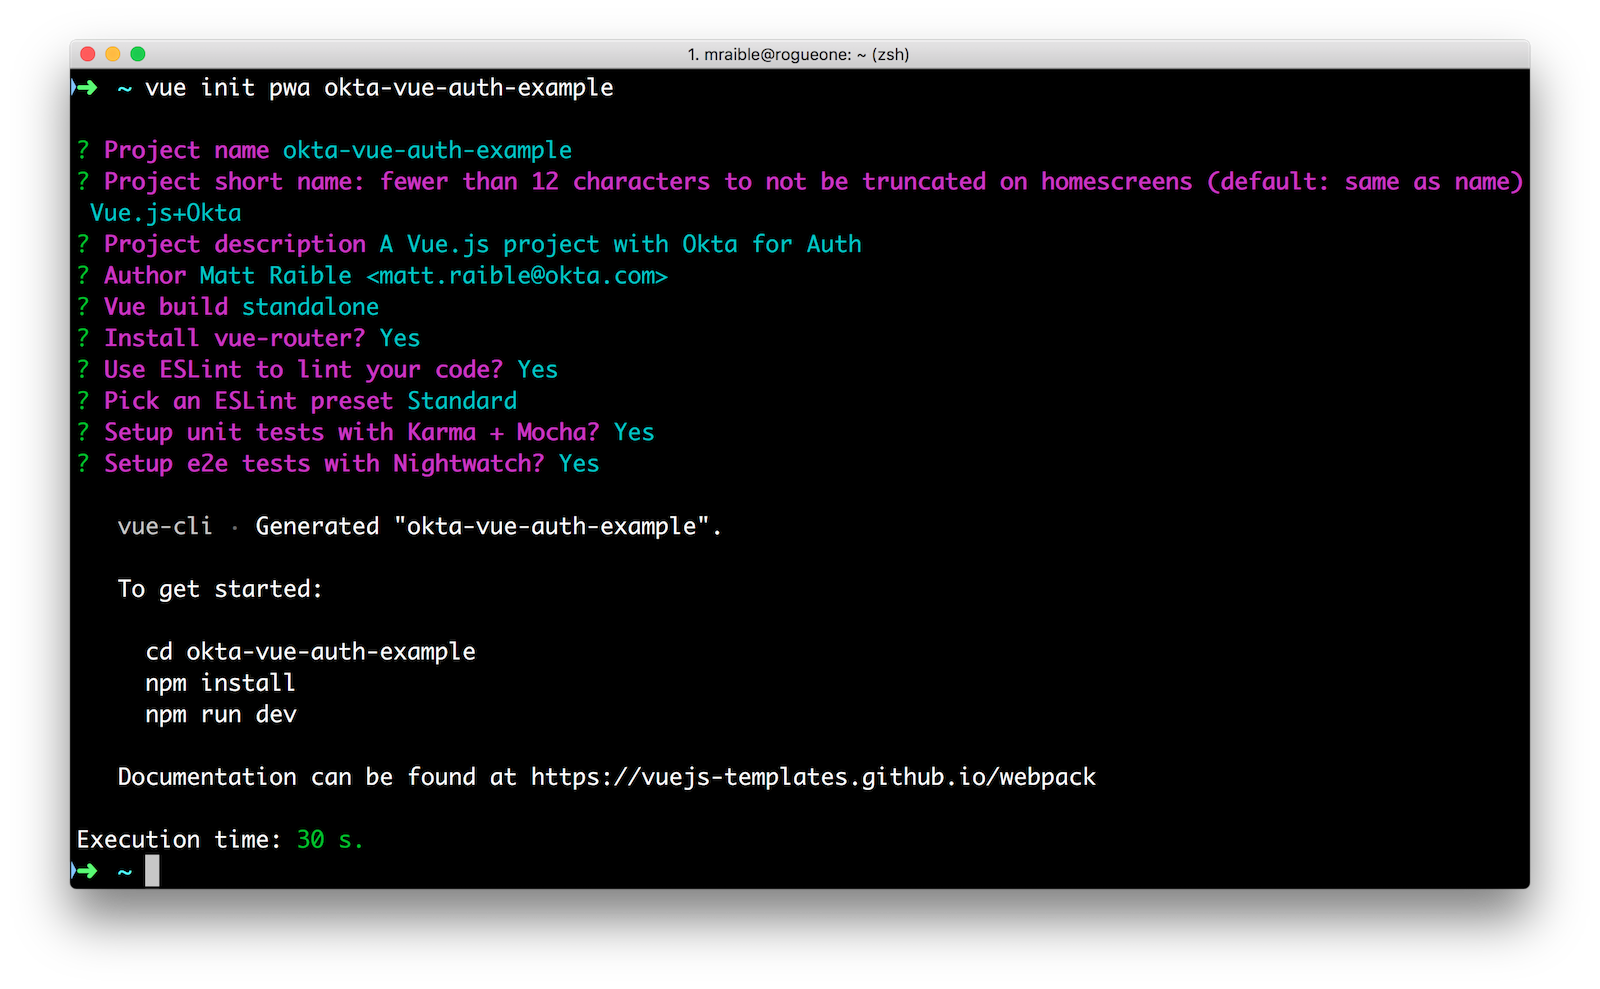
vue init pwa okta-vue-auth-example
cd okta-vue-auth-example
npm i
I opened the project in IntelliJ IDEA (disclaimer: my fave IDE) and was surprised to find the ESLint rules prefer ending your lines without a semicolon. The semicolon debate in JavaScript rages on!
I installed the Vue plugin for IntelliJ so *.vue files rendered with their proper syntax highlighting.
I googled a bit more and found the auth-flow example from vue-router. I started by copying some files from the auth-flow project into my project. I created a page that anyone can see (/about) and another (/dashboard) that only authenticated users can see.
Add Auth Flow Example
If you’d like to follow along, create the project using vue init as I did above, then create src/components/About.vue with the following HTML.
<template>
  <div>
    <h2>About</h2>
  </div>
</template>
Create src/components/Dashboard.vue. This page will only be viewable to authenticated folks.
<template>
  <div>
    <h2>Dashboard</h2>
    <p>Yay you made it!</p>
  </div>
</template>
Copy the Login.vue from auth-flow to src/components/Login.vue.
<template>
  <div>
    <h2>Login</h2>
    <p v-if="$route.query.redirect">
      You need to login first.
    </p>
    <form @submit.prevent="login">
      <label><input v-model="email" placeholder="email"></label>
      <label><input v-model="pass" placeholder="password" type="password"></label> (hint: password1)<br>
      <button type="submit">login</button>
      <p v-if="error" class="error">Bad login information</p>
    </form>
  </div>
</template>

<script>
  import auth from '../auth'
  export default {
    data () {
      return {
        email: 'joe@example.com',
        pass: '',
        error: false
      }
    },
    methods: {
      login () {
        auth.login(this.email, this.pass, loggedIn => {
          if (!loggedIn) {
            this.error = true
          } else {
            this.$router.replace(this.$route.query.redirect || '/')
          }
        })
      }
    }
  }
</script>

<style>
  .error {
    color: red;
  }
</style>
This component depends on auth.js, which fakes authentication. Create src/auth.js and paste in the fake auth implementation (for now).
/* globals localStorage */

export default {
  login (email, pass, cb) {
    cb = arguments[arguments.length - 1]
    if (localStorage.token) {
      if (cb) cb(true)
      this.onChange(true)
      return
    }
    pretendRequest(email, pass, (res) => {
      if (res.authenticated) {
        localStorage.token = res.token
        if (cb) cb(true)
        this.onChange(true)
      } else {
        if (cb) cb(false)
        this.onChange(false)
      }
    })
  },

  getToken () {
    return localStorage.token
  },

  logout (cb) {
    delete localStorage.token
    if (cb) cb()
    this.onChange(false)
  },

  loggedIn () {
    return !!localStorage.token
  },

  onChange () {}
}

function pretendRequest (email, pass, cb) {
  setTimeout(() => {
    if (email === 'joe@example.com' && pass === 'password1') {
      cb({
        authenticated: true,
        token: Math.random().toString(36).substring(7)
      })
    } else {
      cb({ authenticated: false })
    }
  }, 0)
}
Copy App.vue (or the code below) from auth-flow to src/App.vue:
<template>
  <div id="app">
    <h1>Auth Flow</h1>
    <ul>
      <li>
        <router-link v-if="loggedIn" to="/logout">Log out</router-link>
        <router-link v-if="!loggedIn" to="/login">Log in</router-link>
      </li>
      <li>
        <router-link to="/about">About</router-link>
      </li>
      <li>
        <router-link to="/dashboard">Dashboard</router-link>
        (authenticated)
      </li>
    </ul>
    <template v-if="$route.matched.length">
      <router-view></router-view>
    </template>
    <template v-else>
      <p>You are logged {{ loggedIn ? 'in' : 'out' }}</p>
    </template>
  </div>
</template>

<script>
import auth from './auth'
export default {
  data () {
    return {
      loggedIn: auth.loggedIn()
    }
  },
  created () {
    auth.onChange = loggedIn => {
      this.loggedIn = loggedIn
    }
  }
}
</script>
Add the following HTML/CSS to the bottom of src/App.vue to give it the same styling that the auth-flow project has.
<style>
  html, body {
    font-family: -apple-system, BlinkMacSystemFont, "Segoe UI", Roboto, Helvetica, Arial, sans-serif, "Apple Color Emoji", "Segoe UI Emoji", "Segoe UI Symbol";
    color: #2c3e50;
  }

  #app {
    padding: 0 20px;
  }

  ul {
    line-height: 1.5em;
    padding-left: 1.5em;
  }

  a {
    color: #7f8c8d;
    text-decoration: none;
  }

  a:hover {
    color: #4fc08d;
  }
</style>
Replace src/router/index.js with the following code. This sets up routing for the application, protects the dashboard, and looks intuitive doing it!
import Vue from 'vue'
import Router from 'vue-router'
import auth from '@/auth'
import About from '@/components/About.vue'
import Dashboard from '@/components/Dashboard.vue'
import Login from '@/components/Login.vue'

Vue.use(Router)

export default new Router({
  mode: 'history',
  base: __dirname,
  routes: [
    { path: '/about', component: About },
    { path: '/dashboard', component: Dashboard, beforeEnter: requireAuth },
    { path: '/login', component: Login },
    { path: '/logout',
      beforeEnter (to, from, next) {
        auth.logout()
        next('/')
      }
    }
  ]
})

function requireAuth (to, from, next) {
  if (!auth.loggedIn()) {
    next({
      path: '/login',
      query: { redirect: to.fullPath }
    })
  } else {
    next()
  }
}
After making these changes, run npm start. You’ll likely see the following error:
ERROR  Failed to compile with 1 errors

error  in ./src/auth.js

  ✘  https://google.com/#q=standard%2Fno-callback-literal  Unexpected literal in error position of callback
  src/auth.js:7:15
        if (cb) cb(true)
The easiest way to fix this is to update .eslintrc.js to allow callback literals.
'rules': {
  ...
  // allow callback literals
  'standard/no-callback-literal': 0
}
Thanks to nikivancic for this tip in the comments!
After making this change, you should be able to run npm start and authenticate with the hard coded values from auth.js.
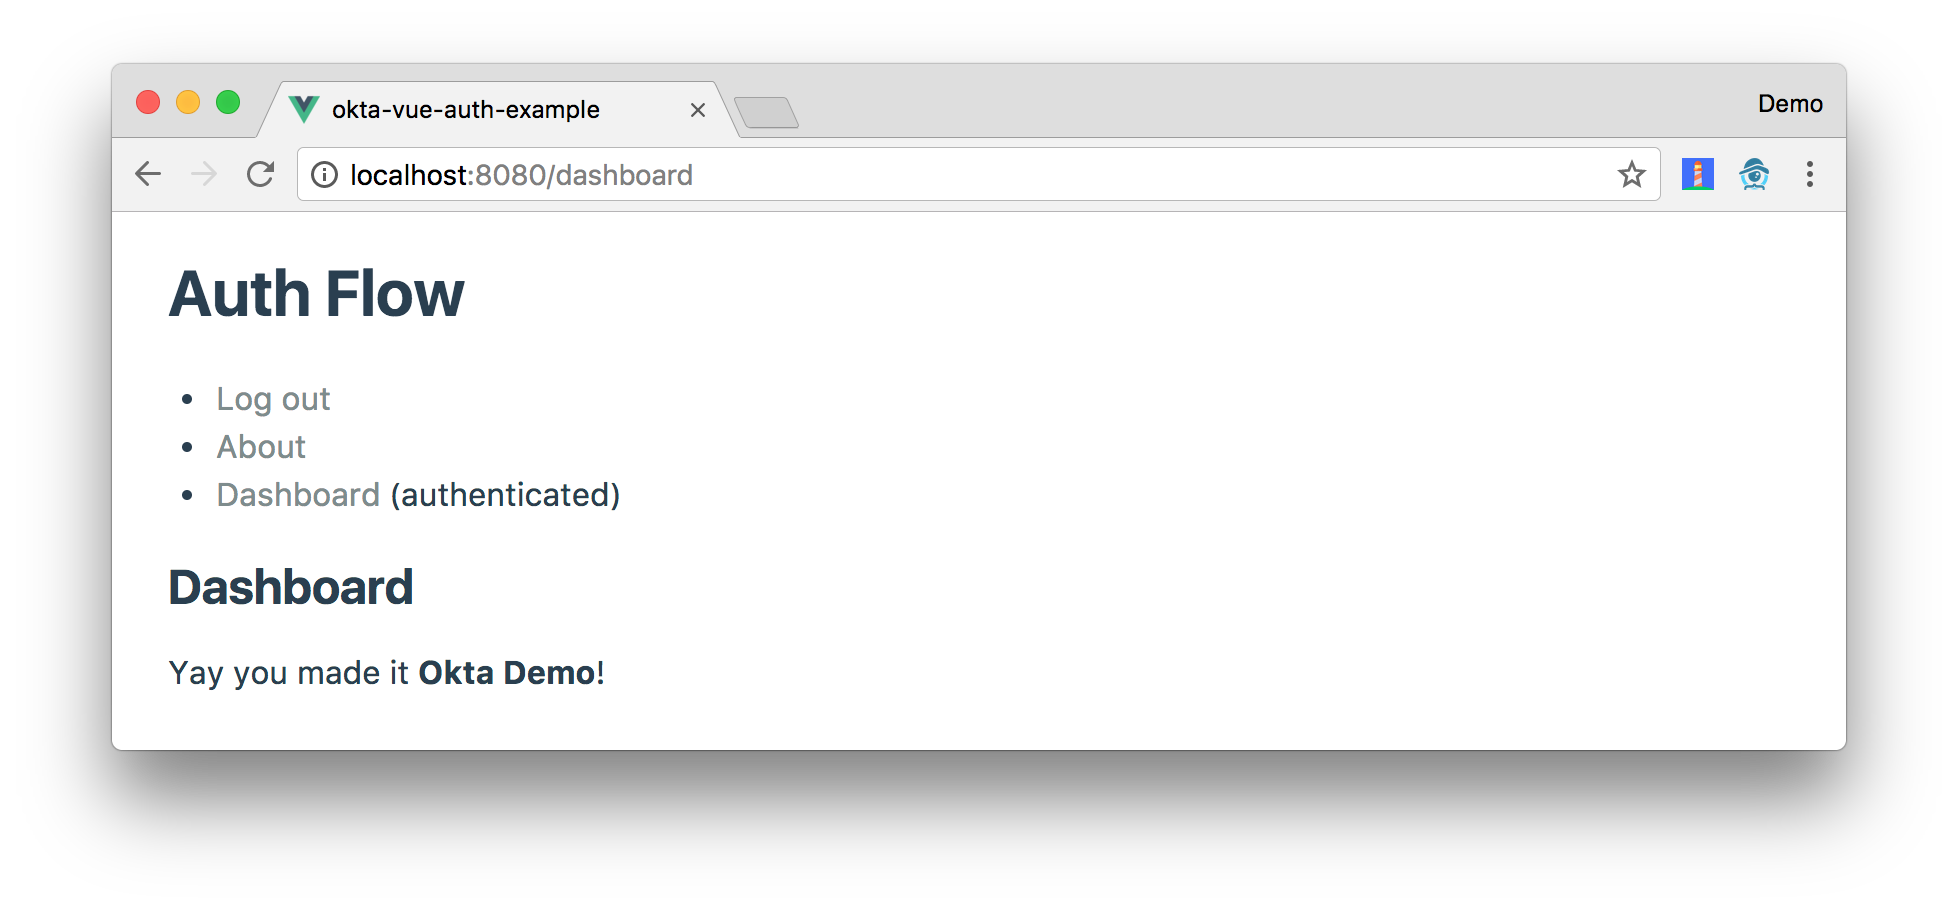
If you open your browser to http://localhost:8080, you should see a screen that resembles the one below.
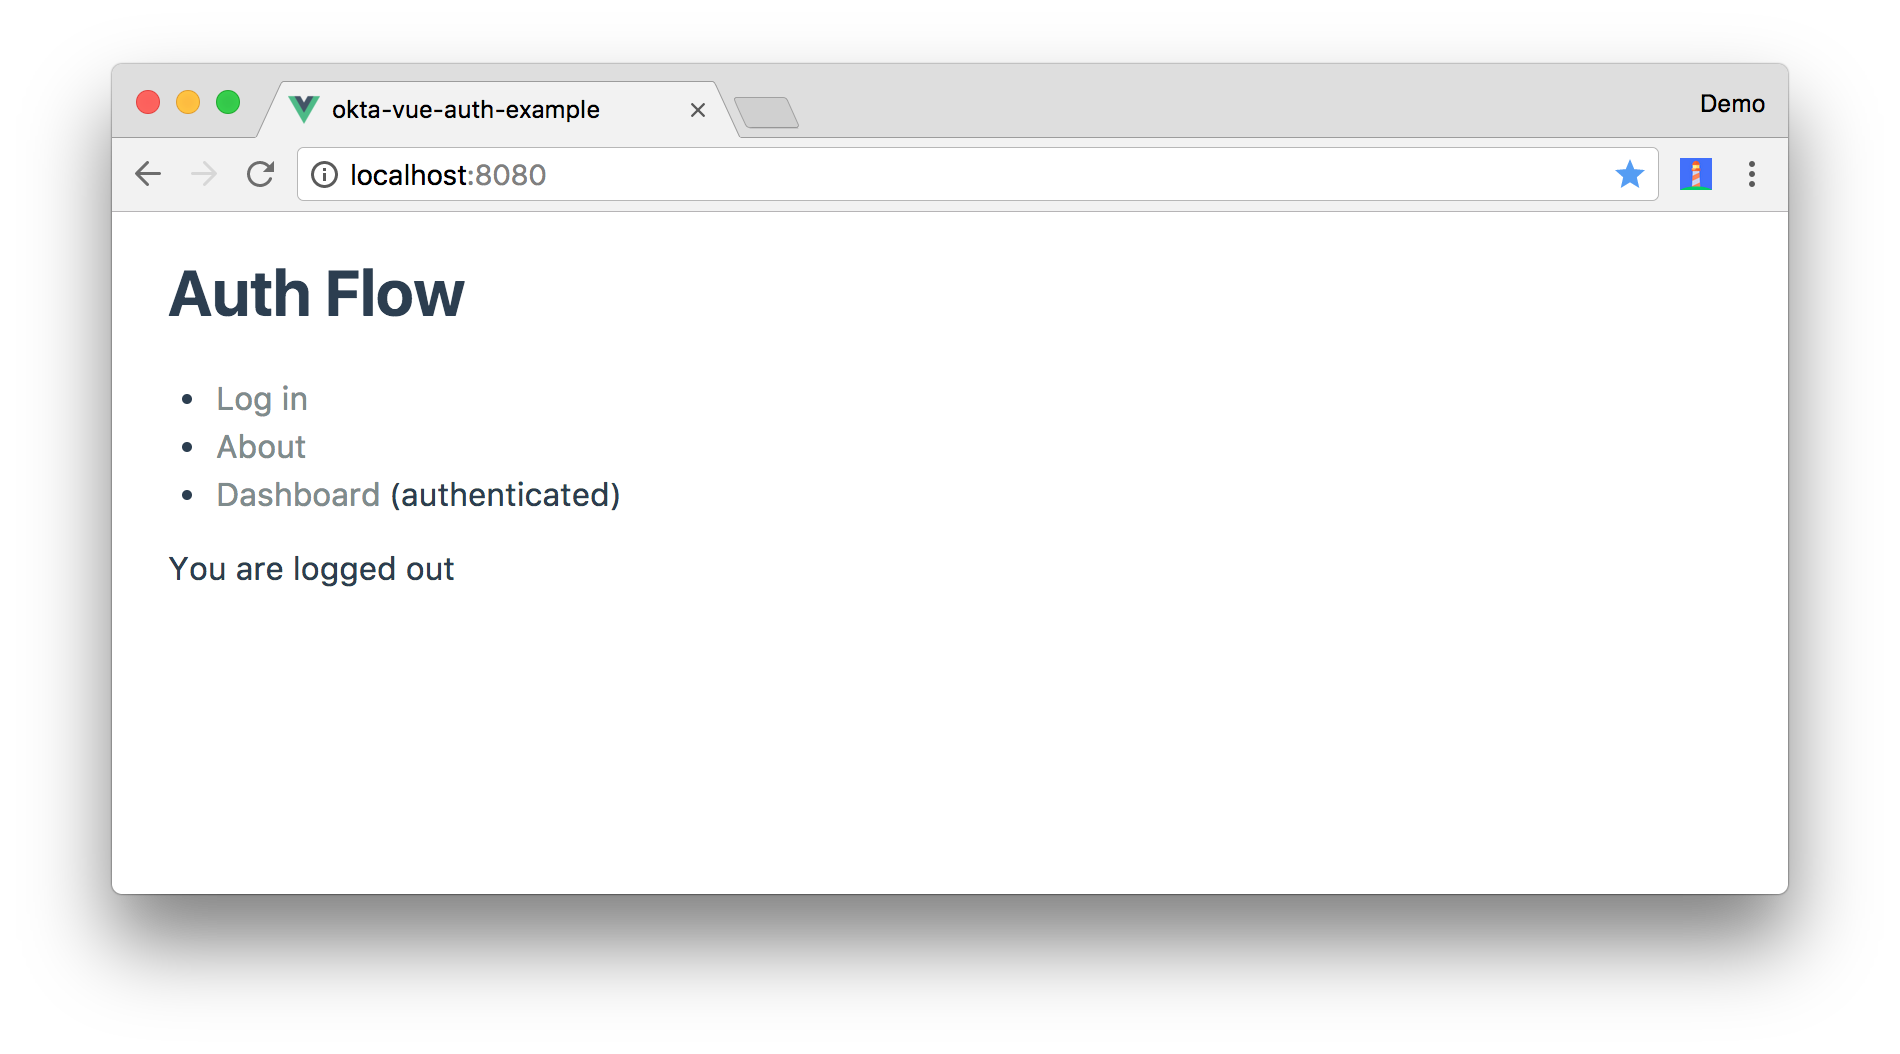
Click on the Dashboard link, and you’ll be prompted to log in.
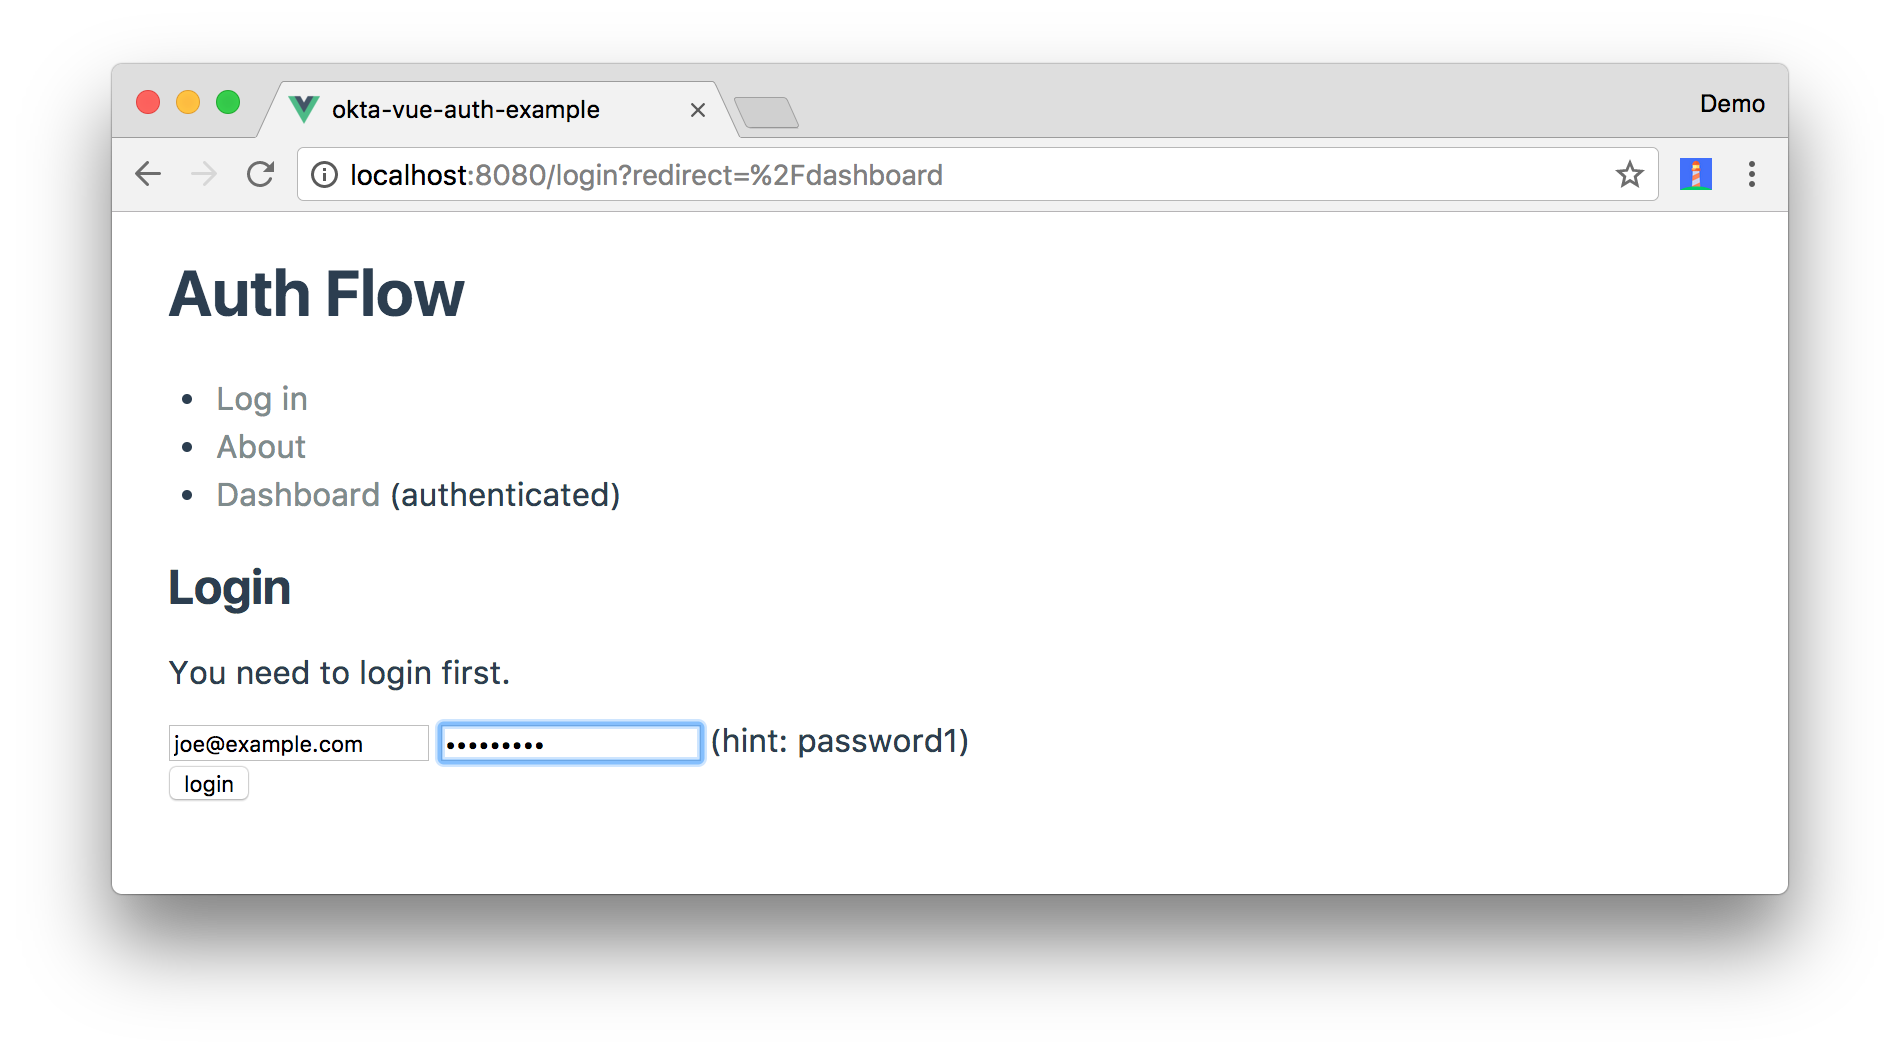
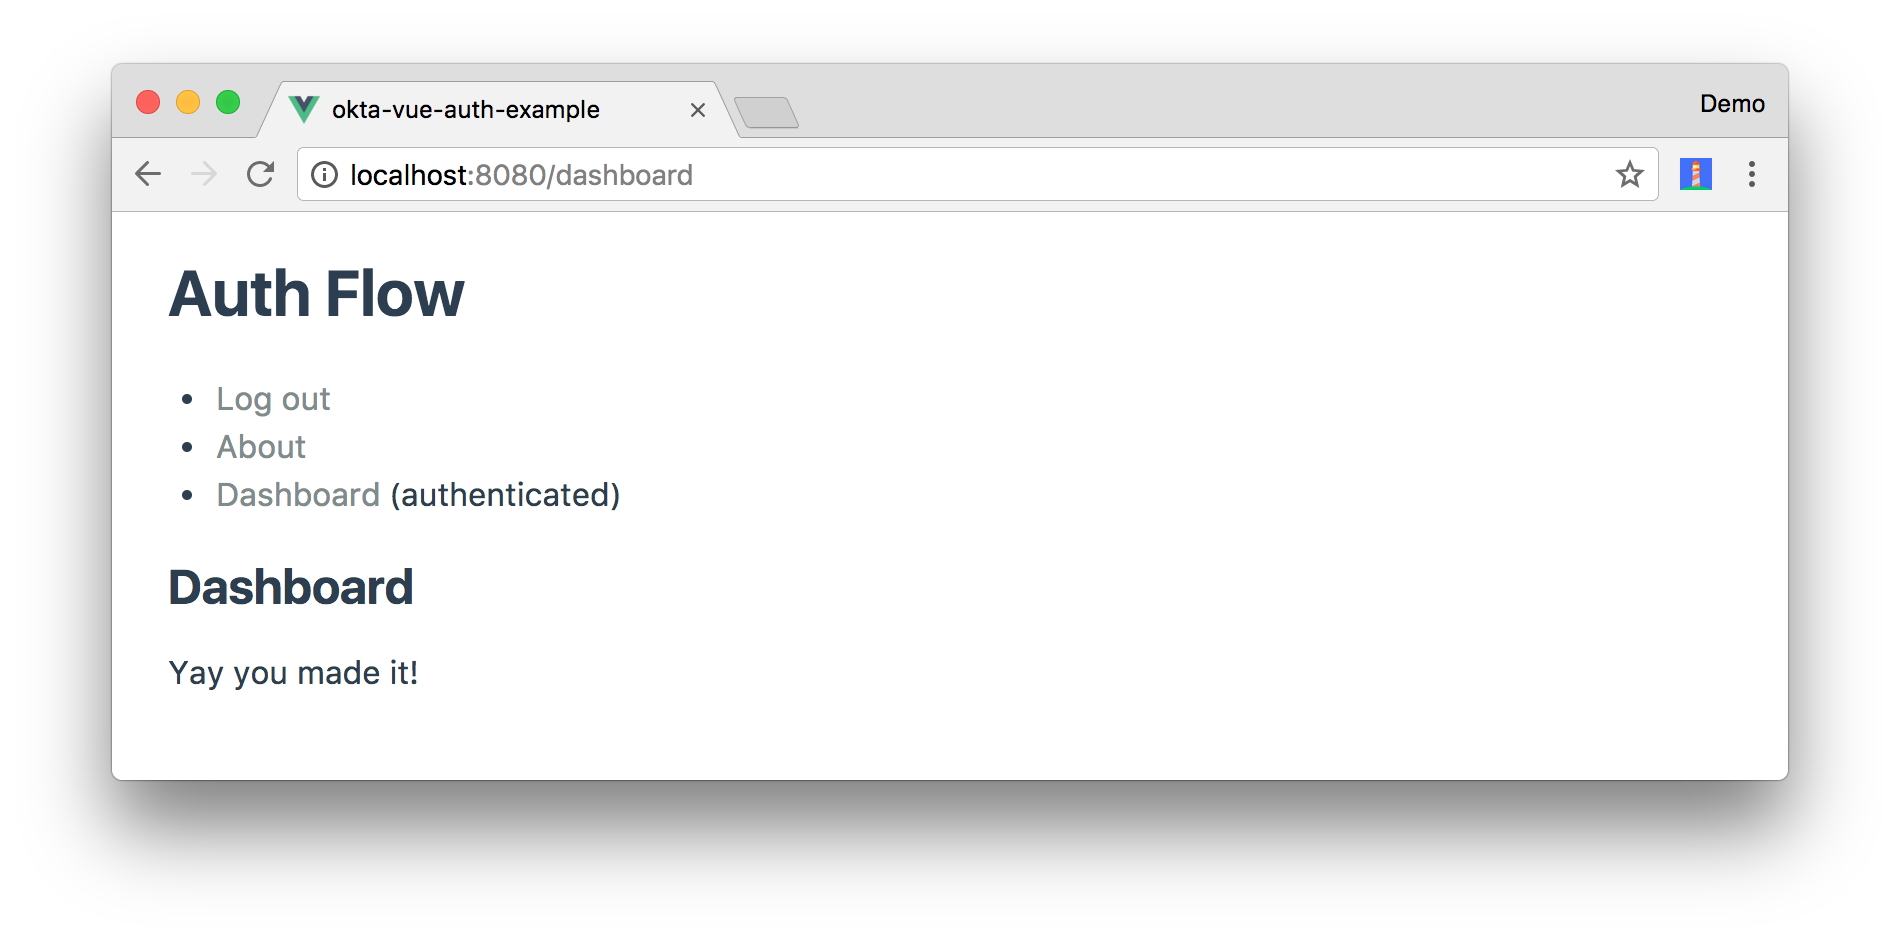
Entering joe@example/password1 will get you to the next step.
If you open Chrome Developer Tools, you’ll see a message that recommends installing Vue Devtools extension for a better development experience.
Add Okta for Authentication
To replace the fake, hard-coded authentication in src/auth.js, start by installing the Okta Auth SDK
npm install @okta/okta-auth-js@2.0.1
And while you’re at it, run npm audit fix --force to fix vulnerable dependencies.
Replace the code in auth.js with the following code that uses the Auth SDK to log in and save a session token as the token. If you don’t have an Okta Developer account, create one. Then replace {yourOktaDomain} in the code below with your Okta domain, which you can find on the Dashboard page in the Developer Console.
/* globals localStorage */
const OktaAuth = require('@okta/okta-auth-js')
const authClient = new OktaAuth({url: 'https://{yourOktaDomain}', issuer: 'default'})

export default {
  login (email, pass, cb) {
    cb = arguments[arguments.length - 1]
    if (localStorage.token) {
      if (cb) cb(true)
      this.onChange(true)
      return
    }
    return authClient.signIn({
      username: email,
      password: pass
    }).then(response => {
      if (response.status === 'SUCCESS') {
        localStorage.token = response.token
        if (cb) cb(true)
        this.onChange(true)
      }
    }).fail(err => {
      console.error(err.message)
      if (cb) cb(false)
      this.onChange(false)
    })
  },

  getToken () {
    return localStorage.token
  },

  logout (cb) {
    delete localStorage.token
    delete localStorage.idToken
    if (cb) cb()
    this.onChange(false)
    return authClient.signOut()
  },

  loggedIn () {
    return !!localStorage.token
  },

  onChange () {
  }
}
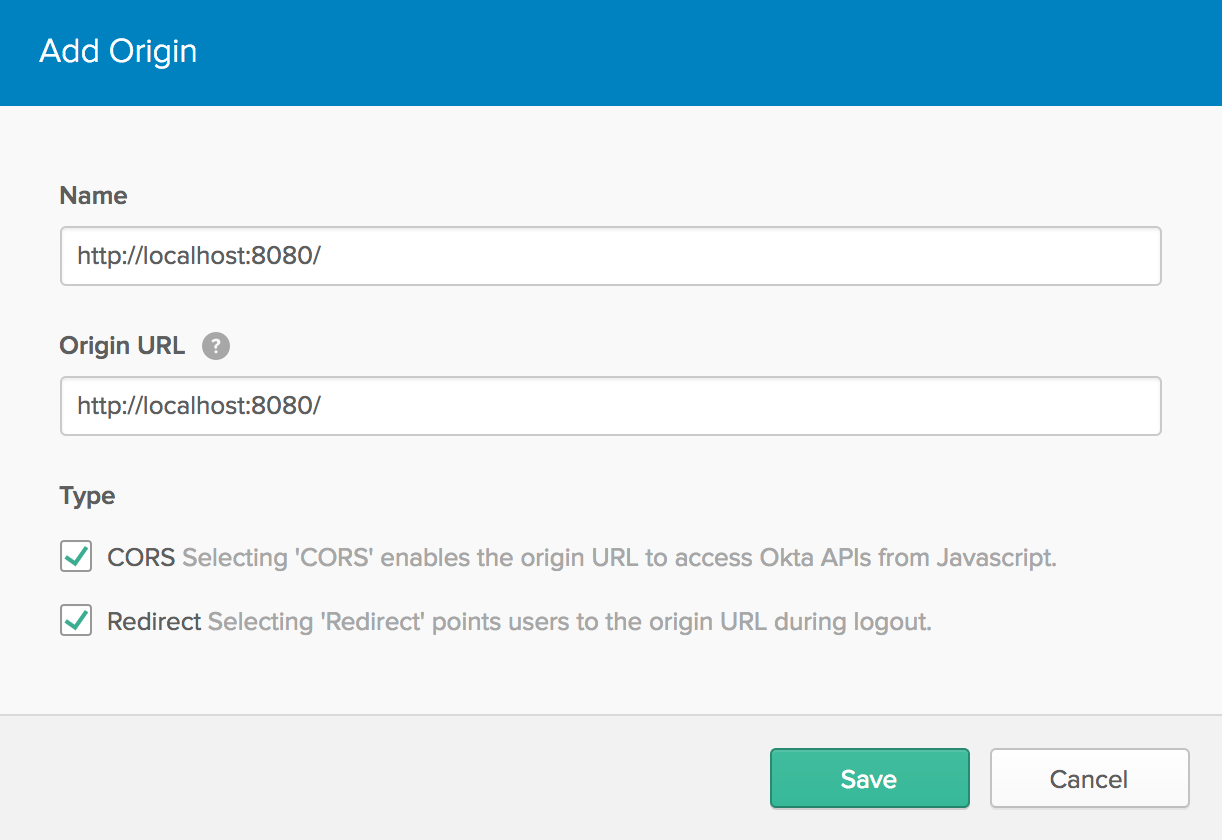
To make it possible to talk to Okta from http://localhost:8080, you’ll need to add it as a trusted origin. You can do this by signing in to your Okta dashboard and navigating to API > Trusted Origins. Add http://localhost:8080 and select the CORS and Redirect checkboxes.
After making this change, everything should work the same as before, but you’ll have to use Okta credentials to login.
Improve Security
You can improve the security of your application by turning off autocomplete in src/components/Login.vue, adding focus to the email field, and initializing its default value to being empty. Replace your current Login.vue with the following.
<template>
  <div>
    <h2>Login</h2>
    <p v-if="$route.query.redirect">
      You need to login first.
    </p>
    <form @submit.prevent="login" autocomplete="off">
      <label><input v-model="email" placeholder="email" v-focus></label>
      <label><input v-model="pass" placeholder="password" type="password"></label><br>
      <button type="submit">login</button>
      <p v-if="error" class="error">Bad login information</p>
    </form>
  </div>
</template>

<script>
  import auth from '../auth'
  export default {
    data () {
      return {
        email: '',
        pass: '',
        error: false
      }
    },
    methods: {
      login () {
        auth.login(this.email, this.pass, loggedIn => {
          if (!loggedIn) {
            this.error = true
          } else {
            this.$router.replace(this.$route.query.redirect || '/')
          }
        })
      }
    }
  }
</script>

<style>
  .error {
    color: red;
  }
</style>
To make the v-focus directive on the email field work, add the following to src/main.js (before new Vue({...})).
Vue.directive('focus', {
  // When the bound element is inserted into the DOM...
  inserted: function (el) {
    // Focus the element
    el.focus()
  }
})
Display User Information
Authenticating your users against cloud APIs is cool, but you know what’s even cooler!? Fetching access tokens and showing your users that you know who they are! To do this, you can use the Okta Auth SDK’s OpenID Connect (OIDC) features. Instead of storing the session token in localStorage, you can fetch an access token too. This can be useful when calling APIs that act as resource servers.
You can see how to create a resource server using Spring Boot and Okta in Build a Secure Notes Application with Kotlin, TypeScript, and Okta.
The Okta Auth SDK supports exchanging your session token for an access token. Replace the success callback on authClient.signIn() (in src/auth.js) with the following.
return authClient.signIn({
  username: email,
  password: pass
}).then(response => {
  if (response.status === 'SUCCESS') {
    return authClient.token.getWithoutPrompt({
      clientId: `{clientId}`,
      responseType: ['id_token', 'token'],
      scopes: ['openid', 'email', 'profile'],
      sessionToken: response.sessionToken,
      redirectUri: window.location.origin
    }).then(tokens => {
      localStorage.token = tokens[1].accessToken
      localStorage.idToken = tokens[0].idToken
      if (cb) cb(true)
      this.onChange(true)
    })
  }
You’ll need to create an OIDC App in Okta to get a {clientId}. To do this, log in to your Okta Developer account and navigate to Applications > Add Application. Click SPA and click the Next button. Give the app a name you’ll remember, and specify http://localhost:8080 as a Base URI and Login Redirect URI.
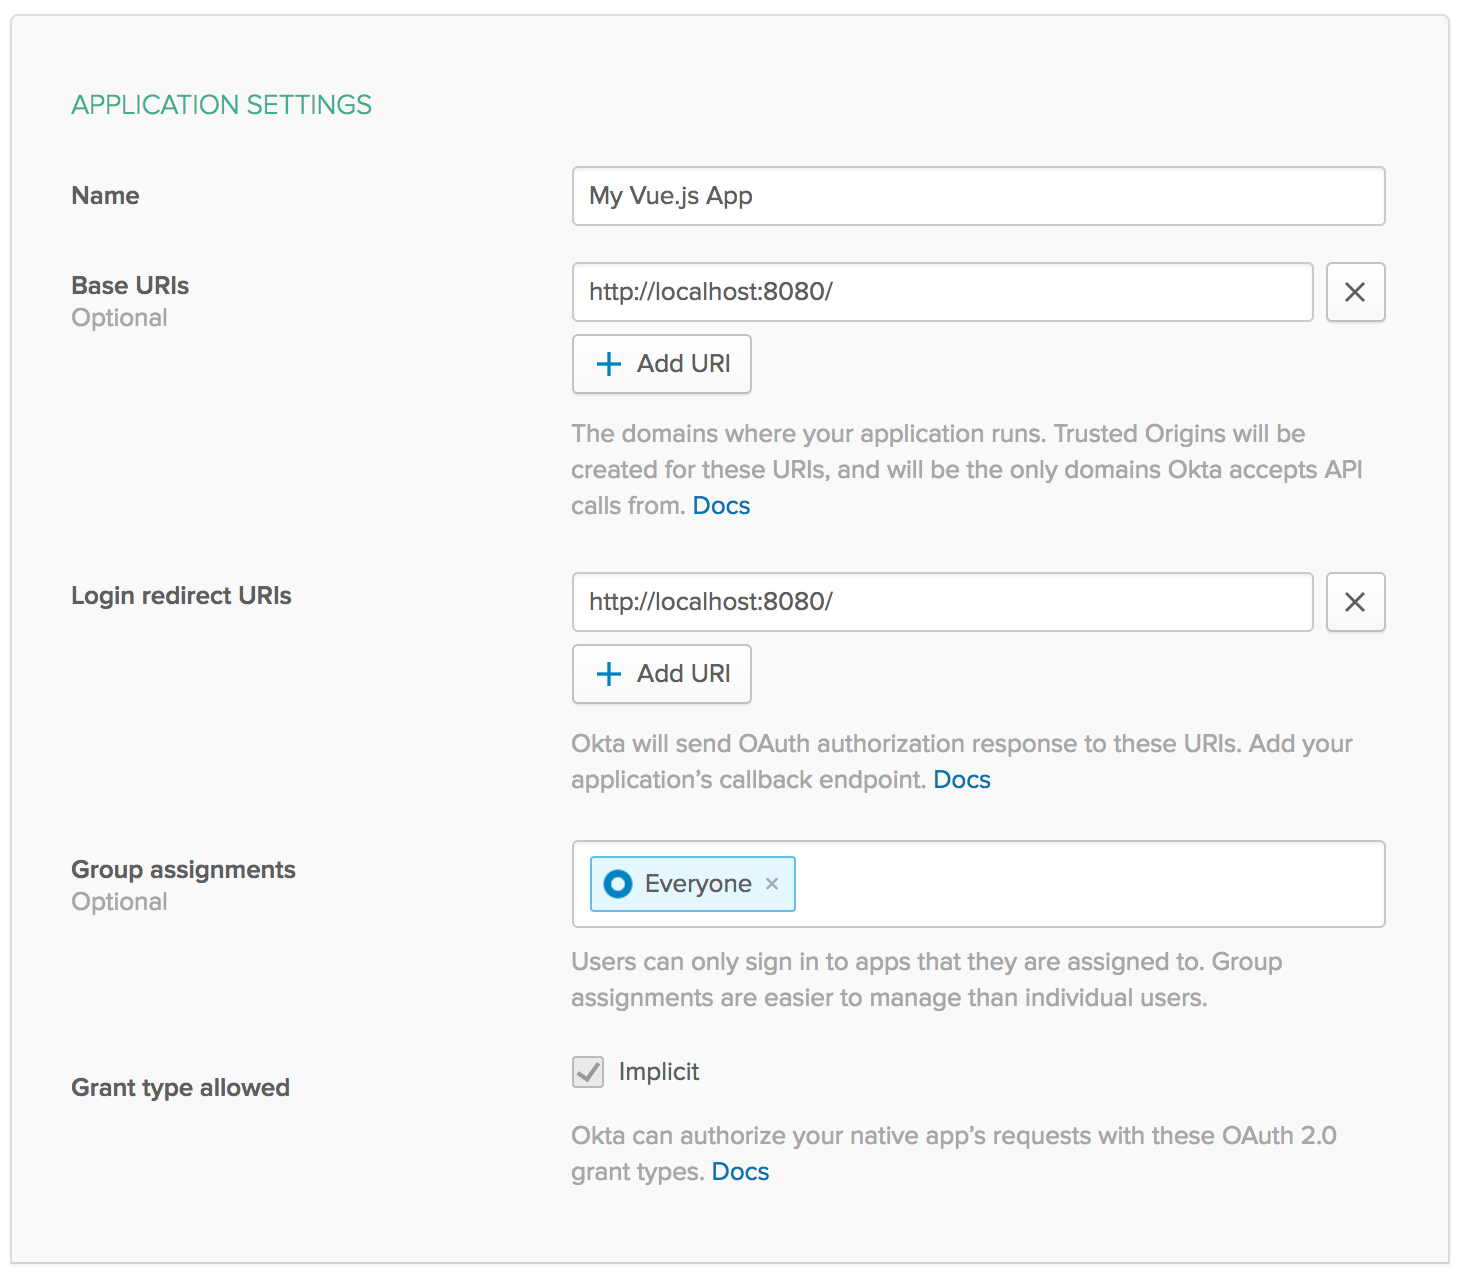
Click Done and you’ll be shown a screen with this information as well as a Client ID at the bottom. Copy the Client ID into src/auth.js.
You’ll notice the new callback saves the access token as token in localStorage. It also saves the idToken so it can parse the JWT and retrieve the user’s name. You have to add profile to the list of scopes (['openid', 'email'] is the default) to get the authenticated user’s name.
Once you have the idToken, you can fetch the user’s name from it. Even better, you can use the JWT Inspector Chrome plugin to view JWT values and print them to the JavaScript console.
To see this in action, add the following two methods to src/auth.js to get a person’s name from a decoded JWT. Thanks to Stack Overflow for the decoding JWTs in JavaScript code.
getName () {
  const claims = this.parseJwt(localStorage.idToken)
  console.jwt(localStorage.idToken)
  return claims['name']
 },

parseJwt (token) {
  const base64Url = token.split('.')[1]
  const base64 = base64Url.replace('-', '+').replace('_', '/')
  return JSON.parse(window.atob(base64))
},
WARNING: The code above uses console.jwt(). This only works when you have JWT Inspector installed. Remove or comment this line out when you’re done debugging your code.
Now the ID token will provide you with the user’s name, and you can show it on the dashboard! Modify src/components/Dashboard.vue to have the following code.
<template>
  <div>
    <h2>Dashboard</h2>
    <p>Yay you made it <b>{{name}}</b>!</p>
  </div>
</template>
<script>
  import auth from '../auth'
  export default {
    data () {
      return {
        name: auth.getName()
      }
    }
  }
</script>
If your project is not running, start it with npm start and navigate to http://localhost:8080. Rejoice if it works!
Auditing Your Progressive Web App
You can use Lighthouse to audit your application and see if it has all the elements needed for a PWA. To do this, you have to build your project and then run a web server from the dist directory. For example:
npm run build
cd dist
python -m SimpleHTTPServer 8080
If you run Lighthouse on your app at http://localhost:8080, you should see similar results to the screenshot below.
Because I like to see what the max possible score is, I deployed this app to Pivotal’s Cloud Foundry. I created a deploy.sh script that deploys using cf push.
For this to work, you will have to update Okta to add your cfapps.io URL as a Login Redirect URI (in your OIDC app) and as a Trusted Origin (API > Trusted Origins).
npm run build
cd dist
touch Staticfile
echo 'pushstate: enabled' > Staticfile
cf push vue-auth-pwa --no-start
cf set-env vue-auth-pwa FORCE_HTTPS true
cf start vue-auth-pwa
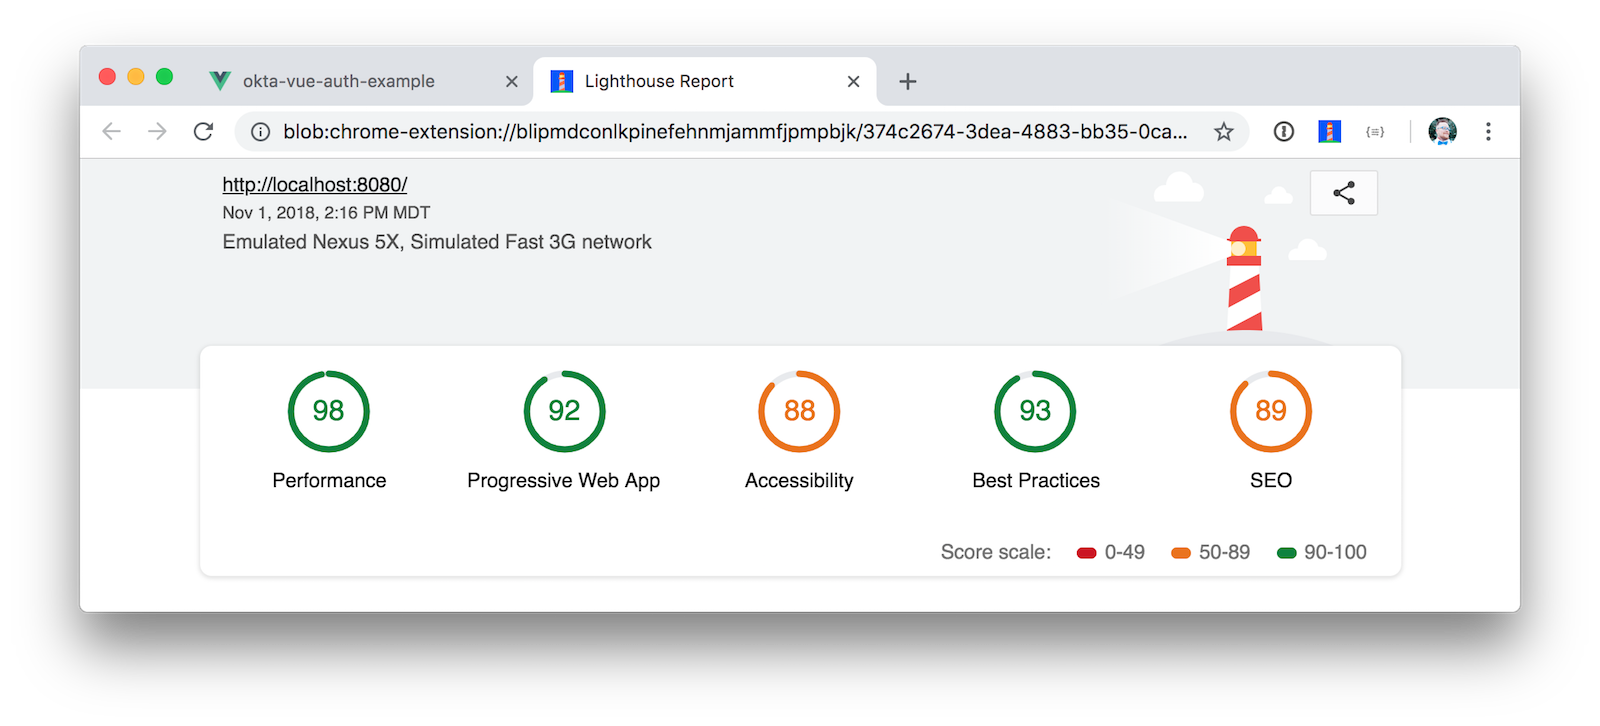
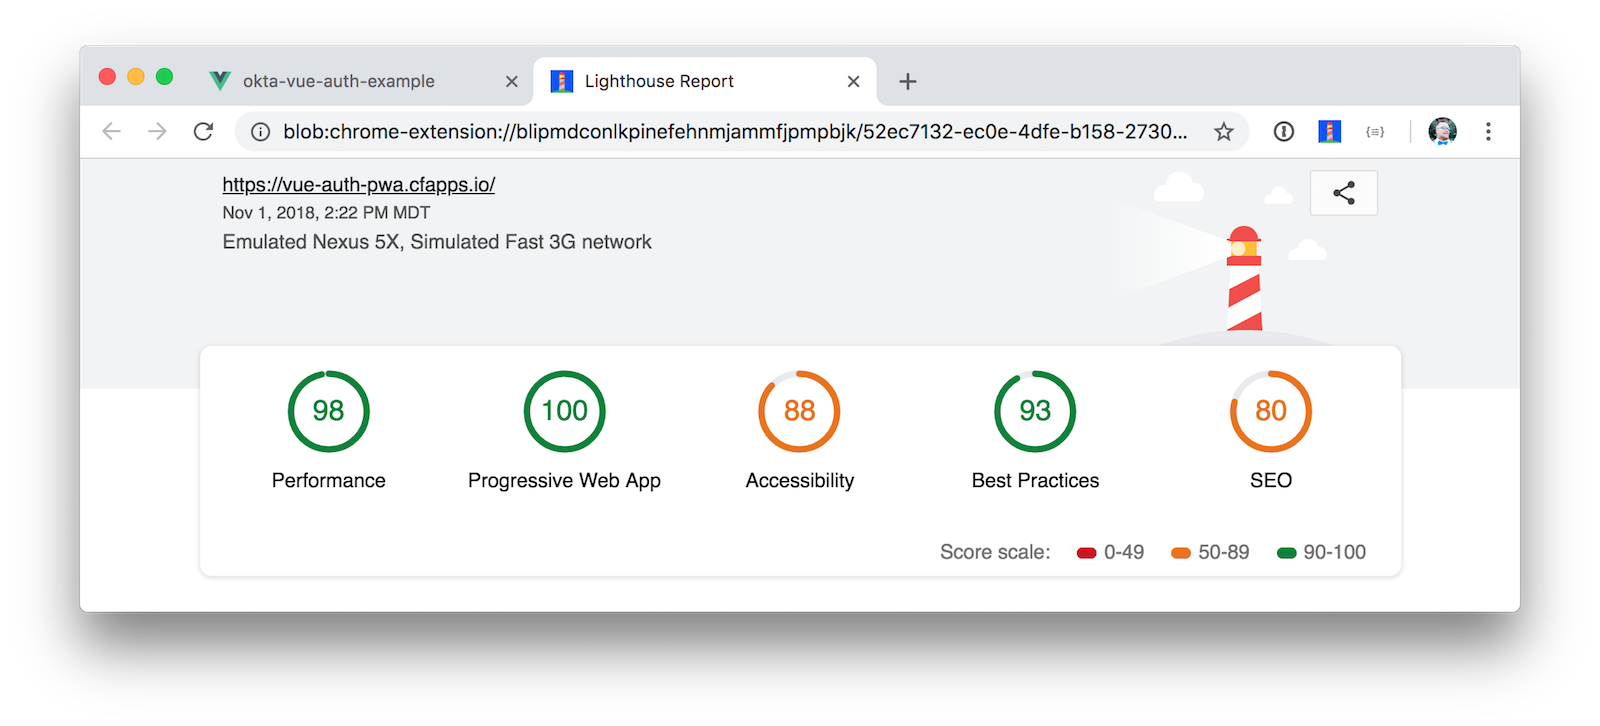
Running Lighthouse on my Cloud Foundry app yields some pretty good numbers across the board!
In Closing
I hope you’ve enjoyed this tour of authentication for the incredibly popular Vue.js. Kudos to Evan You for creating it and making it light and fast (perfect for PWAs!).
If you’re intrigued by Vue.js, follow @vuejs and @nuxt_js on Twitter. Stay up-to-date with our Okta Auth adventures by following @OktaDev or subscribing to our YouTube channel.
You can see the code this lazy developer created for this article on GitHub. You can also check out some other articles we have on PWAs and Vue.
Changelog:
- Nov 1, 2018: Updated to use Vue CLI 2.9.6, Vue 2.5.2, and Vue Okta Auth SDK 2.1. You can see the example app changes in okta-vue-auth-example#4; changes to this post can be viewed in okta.github.io#2453.
Matt Raible is a well-known figure in the Java community and has been building web applications for most of his adult life. For over 20 years, he has helped developers learn and adopt open source frameworks and use them effectively. He's a web developer, Java Champion, and Developer Advocate at Okta. Matt has been a speaker at many conferences worldwide, including Devnexus, Devoxx Belgium, Devoxx France, Jfokus, and JavaOne. He is the author of The Angular Mini-Book, The JHipster Mini-Book, Spring Live, and contributed to Pro JSP. He is a frequent contributor to open source and a member of the JHipster development team. You can find him online @mraible and raibledesigns.com.
Okta Developer Blog Comment Policy
We welcome relevant and respectful comments. Off-topic comments may be removed.