Build a Secure Notes Application with Kotlin, TypeScript, and Okta
I love my job as a developer advocate at Okta. I get to learn a lot, write interesting blog posts and create example apps with cool technologies like Kotlin, TypeScript, Spring Boot, and Angular, which I’m about to demo. When it comes to writing Hello World apps with authentication, I can whip one out in a few minutes. That isn’t because I’m a particularly good programmer, it’s because the languages, frameworks, tools, and platforms available to developers are impressive.
In this tutorial, I’ll show you how to write a note-taking application in Kotlin and TypeScript - two of the fastest growing languages of 2017. You’ll use two popular frameworks, Spring Boot and Angular, to make development super fast. Along the way, I’ll show you a few tips and tricks from my favorite development IDE, IntelliJ IDEA. Finally, we’ll leverage Angular CLI and start.spring.io to generate application skeletons.
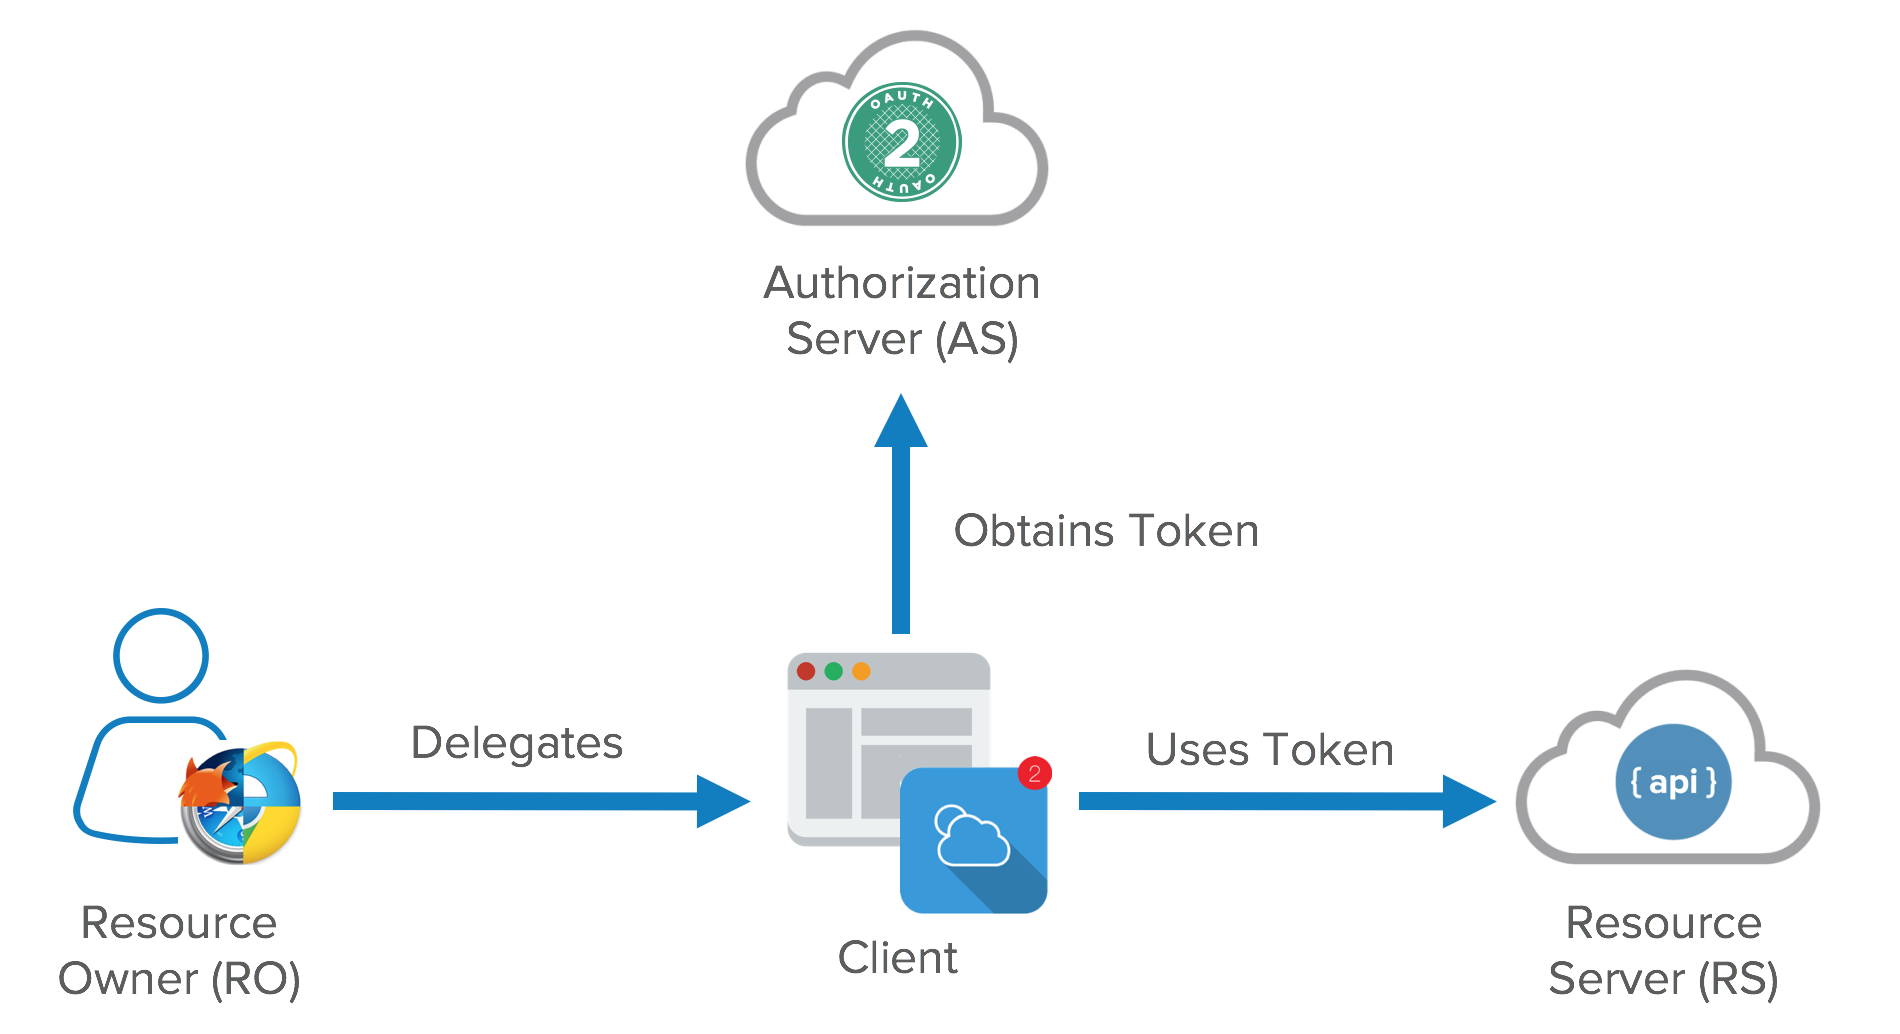
As with any good example app, you’ll want to deploy it securely, so I’ll show you how to do that using Okta’s Identity APIs and our new Spring Boot starter. The Okta Spring Boot starter allows you to make your API into a resource server that can read and validate access tokens sent to it. The diagram below shows how a resource server fits into an OAuth architecture.
Phew! That’s a lot of buzzwords for one article. Don’t worry, I’ve confirmed it’s possible to develop this app in even less time than it takes to deploy and secure it. And developing is fun, so let’s get started!
Note: In May 2025, the Okta Integrator Free Plan replaced Okta Developer Edition Accounts, and the Okta CLI was deprecated.
We preserved this post for reference, but the instructions no longer work exactly as written. Replace the Okta CLI commands by manually configuring Okta following the instructions in our Developer Documentation.
Build a Notes API with Kotlin and Spring Boot
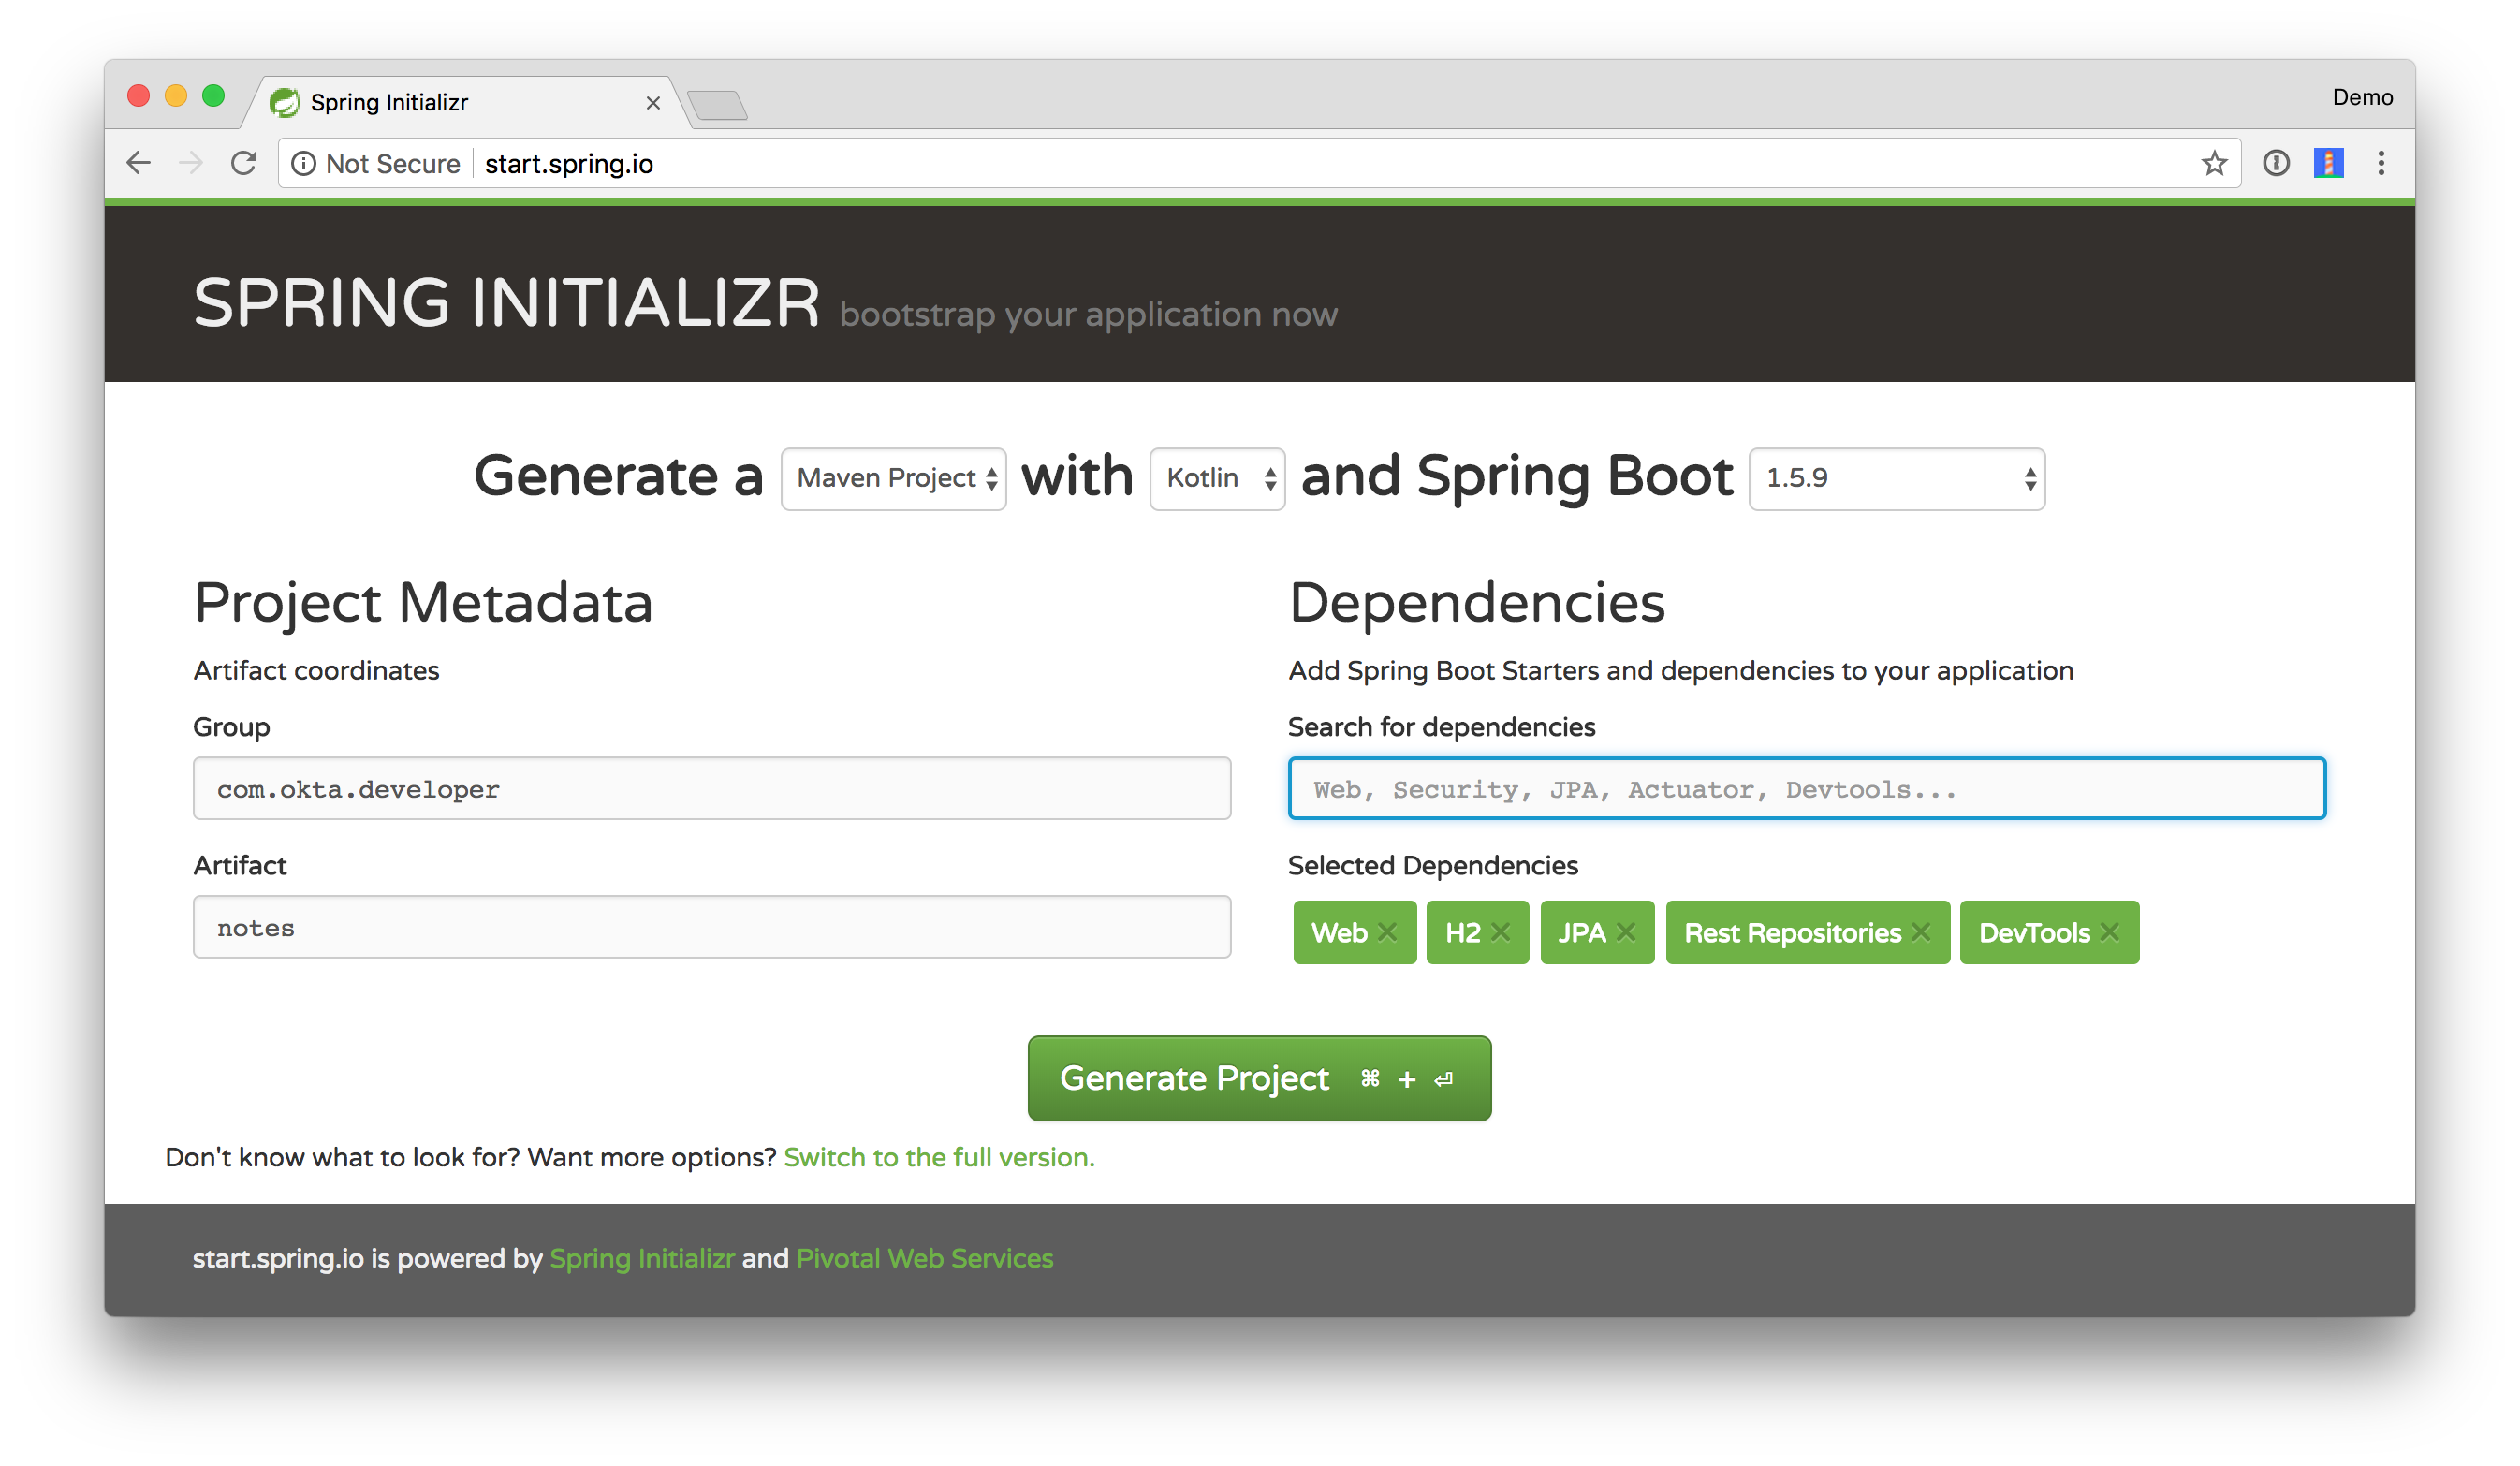
Start building the API for your application by navigating your favorite browser to start.spring.io. Select Kotlin as your language, and choose Web, H2, JPA, Rest Repositories, and DevTools. You’ll notice in the screenshot below that I changed the group and artifact names too. Please use these same names, so your package and class names match this tutorial.
Click Generate Project and expand the zip file after downloading. If you don’t have IntelliJ IDEA installed, now’s a good time to try it out. It’s a great IDE for Java, Kotlin, Groovy, TypeScript, JavaScript, HTML, and Sass/CSS. One of its killer features is the ability to copy/paste Java code into a Kotlin class and have it auto-converted to Kotlin on-the-fly!
You can also turn on automatic-compilation-on-save and reap the benefits of Spring Boot’s DevTools that restart your app when files change.
- Go to Preferences > Build, Execution, Deployment > Compiler and enable “Build project automatically”
- Open the Action window:
- Linux: CTRL+SHIFT+A
- Mac: SHIFT+COMMAND+A
- Windows: CTRL+ALT+SHIFT+/
- Enter Registry… and enable
compiler.automake.allow.when.app.running
Start by creating a new Note entity in src/main/kotlin/com/okta/developer/notes/NotesApplication.kt.
@SpringBootApplication
class NotesApplication

fun main(args: Array<String>) {
    SpringApplication.run(NotesApplication::class.java, *args)
}

@Entity
data class Note(@Id @GeneratedValue var id: Long? = null,
                var text: String? = null, var user: String? = null)
Kotlin’s data classes are built to hold data. By adding the data keyword, your class will get equals(), hashCode(), toString(), and a copy() function. The Type? = null syntax means the arguments are nullable when creating a new instance of the class.
Create a NotesRepository for persisting the data in your notes. Add the following lines of code just below your Note entity.
@RepositoryRestResource
interface NotesRepository : JpaRepository<Note, Long>
The extends syntax differs from Java and is a lot more concise (a colon instead of extends).
Create a DataInitializer bean that populates the database with some default data on startup.
@Component
class DataInitializer(val repository: NotesRepository) : ApplicationRunner {

    @Throws(Exception::class)
    override fun run(args: ApplicationArguments) {
        listOf("Note 1", "Note 2", "Note 3").forEach {
            repository.save(Note(text = it, user = "user"))
        }
        repository.findAll().forEach { println(it) }
    }
}
This example shows constructor injection, but Kotlin also supports field injection with @Autowired.
Start the app in your IDE using its Spring Boot tooling, or from the command line using mvnw spring-boot:run. If you’re on a Mac or Linux, you might need to use ./mvnw spring-boot:run.
You should see the following printed to your console on startup.
Note(id=1, text=Note 1, user=user)
Note(id=2, text=Note 2, user=user)
Note(id=3, text=Note 3, user=user)
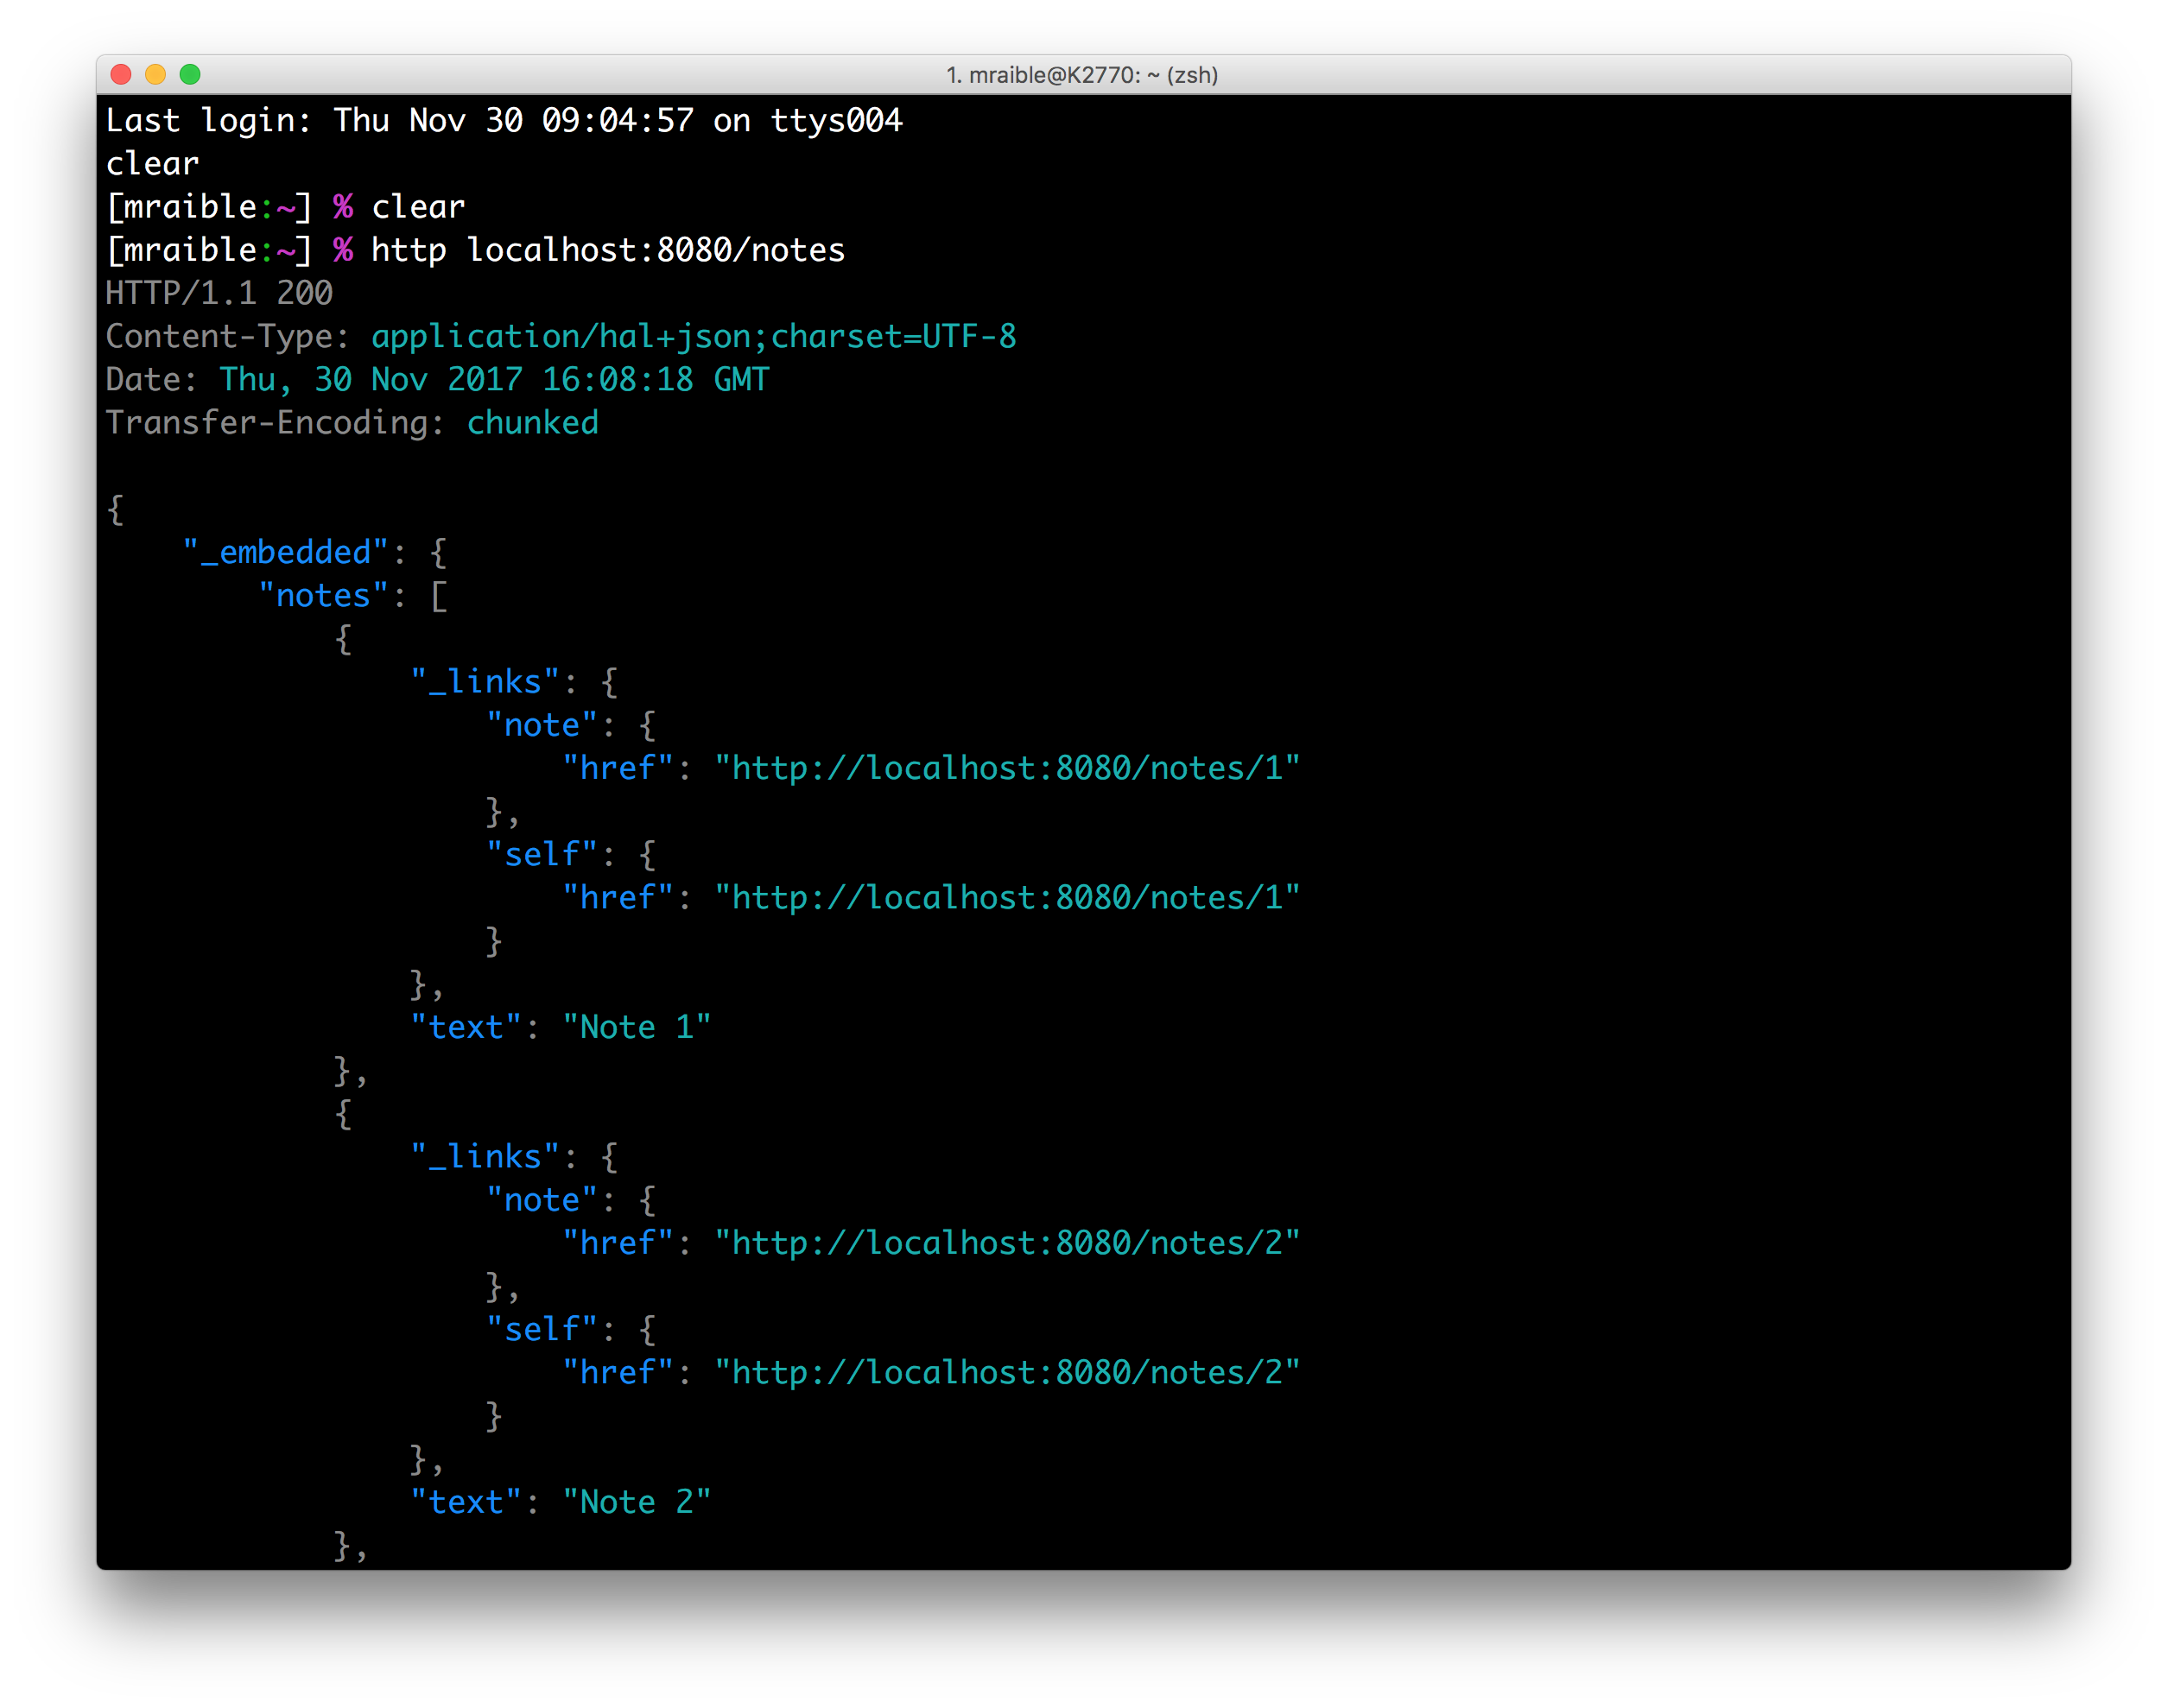
I recommend installing HTTPie, a command-line HTTP client that is much easier to use than curl. Use HTTPie to query the /notes endpoint provided by Spring Data REST’s @RepositoryRestResource.
http localhost:8080/notes
The result will look like the following screenshot.
Create a HomeController (in the same NotesApplication.kt file) and use it to filter notes by the currently logged-in user.
import java.security.Principal

@RestController
class HomeController(val repository: NotesRepository) {

    @GetMapping("/")
    fun home(principal: Principal): List<Note> {
        println("Fetching notes for user: ${principal.name}")
        val notes = repository.findAllByUser(principal.name)
        if (notes.isEmpty()) {
            return listOf()
        } else {
            return notes
        }
    }
}
The findAllByUser() method doesn’t exist on NotesRepository, so you’ll need to add it. Thanks to Spring Data JPA, all you need to do is add the method definition to the interface, and it will handle generating the finder method in the implementation.
interface NotesRepository : JpaRepository<Note, Long> {
    fun findAllByUser(name: String): List<Note>
}
If you try to access this new endpoint, you’ll get an error that the Principal parameter is not defined.
$ http localhost:8080
HTTP/1.1 500
Connection: close
Content-Type: application/json;charset=UTF-8
Date: Thu, 30 Nov 2017 17:04:01 GMT
Transfer-Encoding: chunked
{
    "error": "Internal Server Error",
    "exception": "java.lang.IllegalArgumentException",
    "message": "Parameter specified as non-null is null: method com.okta.developer.notes.HomeController.home, parameter principal",
    "path": "/",
    "status": 500,
    "timestamp": 1512061441679
}
Spring MVC throws a 500 error because it has no knowledge of a logged-in user. Add the Spring Security starter to your pom.xml to enable security in your application.
<dependency>
    <groupId>org.springframework.boot</groupId>
    <artifactId>spring-boot-starter-security</artifactId>
</dependency>
Restart the Maven process to download this new dependency and add it to the classpath.
If you navigate to http://localhost:8080 in your browser, you will see a basic authentication dialog. The command line will yield similar results.
{
    "error": "Unauthorized",
    "message": "Full authentication is required to access this resource",
    "path": "/",
    "status": 401,
    "timestamp": 1512061542911
}
The Spring Security starter creates a default user with username “user” and a password that changes every time you start the application. You can find this password in your terminal, similar to the one below.
Using default security password: 103c55b4-2760-4830-9bca-a06a87d384f9
Change the user’s password so it’s the same every time by adding the following to src/main/resources/application.properties.
security.user.password=kotlin is fun!
After the change, verify that this HTTPie command works.
$ http --auth user:'kotlin is fun!' localhost:8080
HTTP/1.1 200
Cache-Control: no-cache, no-store, max-age=0, must-revalidate
Content-Type: application/json;charset=UTF-8
Date: Thu, 30 Nov 2017 18:41:46 GMT
Expires: 0
Pragma: no-cache
Strict-Transport-Security: max-age=31536000 ; includeSubDomains
Transfer-Encoding: chunked
X-Content-Type-Options: nosniff
X-Frame-Options: DENY
X-XSS-Protection: 1; mode=block
[
    {
        "id": 1,
        "text": "Note 1"
    },
    {
        "id": 2,
        "text": "Note 2"
    },
    {
        "id": 3,
        "text": "Note 3"
    }
]
The reason you don’t see the user property in the JSON above is because I added a @JsonIgnore annotation to the Note class.
import com.fasterxml.jackson.annotation.JsonIgnore

@Entity
data class Note(@Id @GeneratedValue var id: Long? = null,
                var text: String? = null,
                @JsonIgnore var user: String? = null)
To automatically add the username to a note when it’s created, add a RepositoryEventHandler that is invoked before creating the record.
@Component
@RepositoryEventHandler(Note::class)
class AddUserToNote {

    @HandleBeforeCreate
    fun handleCreate(note: Note) {
        val username: String =  SecurityContextHolder.getContext().getAuthentication().name
        println("Creating note: $note with user: $username")
        note.user = username
    }
}
After adding the handler, saving your files, and waiting for your API to restart, you’ll be able to run the following commands with wild success.
http --auth user:'kotlin is fun!' POST localhost:8080/notes text='Note 4'
http --auth user:'kotlin is fun!' PUT localhost:8080/notes/4 text='Remember the Milk!'
http --auth user:'kotlin is fun!' DELETE localhost:8080/notes/4
Your API works and is locked down, but you still only have one user. Rather than spending time setting up database tables and encrypting passwords, you can use Okta’s APIs to manage, authenticate, and authorize your users securely. To get started with Okta, sign up for a free-forever developer account.
The Okta Spring Boot Starter
Okta provides a Spring Boot starter that integrates with Spring Security and its OAuth 2.0 support. Replace the Spring Security starter with the Okta Spring Security starter.
<dependency>
      <groupId>com.okta.spring</groupId>
      <artifactId>okta-spring-security-starter</artifactId>
      <version>0.1.0</version>
</dependency>
You’ll also need to upgrade the OAuth library used by Spring Security to the latest version.
<dependencyManagement>
    <dependencies>
        <dependency>
            <groupId>org.springframework.security.oauth</groupId>
            <artifactId>spring-security-oauth2</artifactId>
            <version>2.2.0.RELEASE</version>
        </dependency>
    </dependencies>
</dependencyManagement>
After modifying your pom.xml, configure it with your Okta settings.
Get Your Authorization Server Settings
Log in to your Okta account and navigate to API > Authorization Servers in the top menu. There should be a “default” server listed with an audience and issuer URI specified.
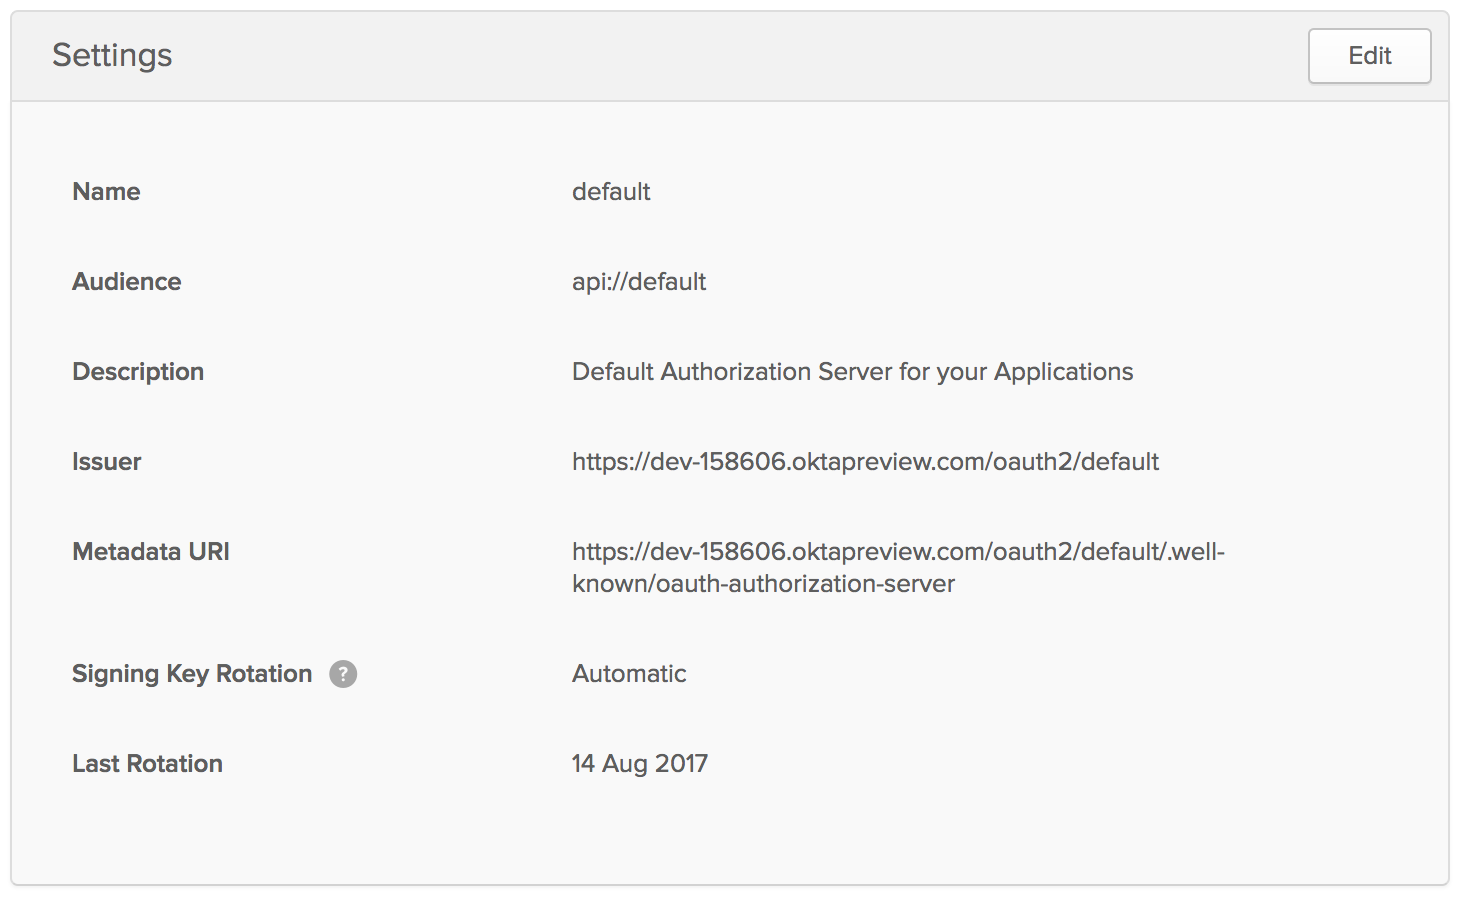
Copy and paste the Issuer URL and audience values into application.properties:
okta.oauth.issuer={issuer}
okta.oauth.audience={audience}
The Okta Spring Security starter expects you to have a custom claim called groups. Define a custom claim with these values:
- Name:
groups - Value Type:
Groups - Filter:
Regex-.*
Add an OpenID Connect Application
Navigate to Applications and click on Add Application. Select Single Page App (SPA) and click Next. Give the application a name (e.g. “My OIDC App”) and specify http://localhost:4200 as a Login redirect URI. Your upcoming Angular client will use this value. Click Done and admire your handiwork!
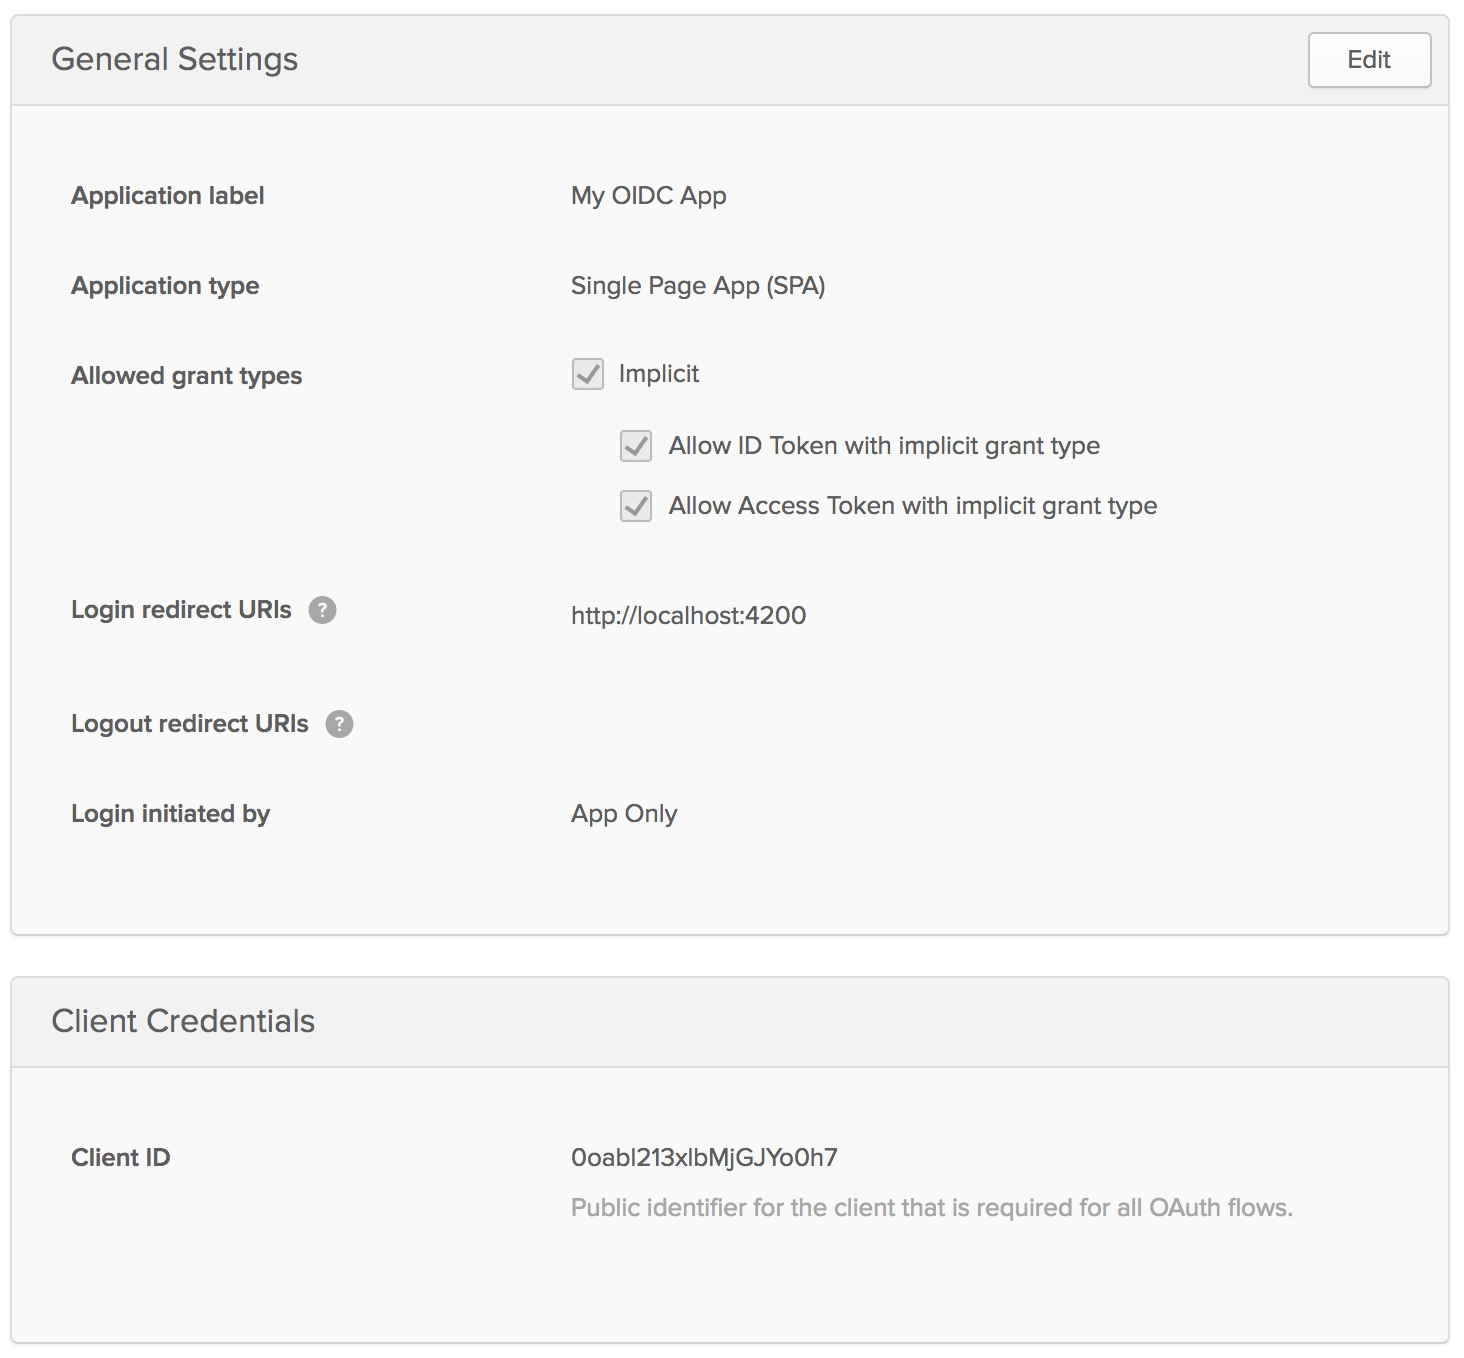
Copy the Client ID value into application.properties.
okta.oauth.clientId={client-id}
Before you start building the Angular client, add a CORS filter to NotesApplication so cross-origin requests can succeed.
class NotesApplication {

    @Bean
    fun simpleCorsFilter(): FilterRegistrationBean {
        val source = UrlBasedCorsConfigurationSource()
        val config = CorsConfiguration()
        config.allowCredentials = true
        config.allowedOrigins = listOf("http://localhost:4200")
        config.allowedMethods = listOf("*");
        config.allowedHeaders = listOf("*")
        source.registerCorsConfiguration("/**", config)
        val bean = FilterRegistrationBean(CorsFilter(source))
        bean.order = Ordered.HIGHEST_PRECEDENCE
        return bean
    }
}

fun main(args: Array<String>) {
    SpringApplication.run(NotesApplication::class.java, *args)
}
...
You can see the final version of this file on GitHub.
I hope you’ve enjoyed this quick tour of Kotlin and saw how its concise syntax can be a lot of fun. In May 2017, Kotlin was announced as an officially supported language on Android, giving the language quite a bit of attention. You can learn more about Kotlin on kotlinlang.org.
Build an Angular UI with TypeScript and Angular CLI
Angular CLI is a convenient way to create Angular applications. It generates a project skeleton, installs all the dependencies, and configures Webpack to compile TypeScript and optimize for production.
Install Angular CLI using Facebook’s Yarn.
yarn add global @angular/cli@1.5.5
Or using npm (npm install -g @angular/cli@1.5.5).
Then create a new project using its ng command.
ng new client
It takes a minute or two to install all the dependencies. After it finishes, cd into the client directory. You can run ng serve to view the app, or ng test to run unit tests. If you want to verify that the end-to-end tests pass, run ng e2e.
Create a service and component using the generate (alias: g) command. You can use s as an alias for service and c as an alias for component.
ng g service note
ng g component note-list
ng g c note-detail
ng g c login
The service files are generated in client/src/app by default, but I like to move them into a shared/{service} directory.
mkdir -p src/app/shared/note
mv src/app/note.service.* src/app/shared/note
At this point, I’d recommend opening your Angular client in IntelliJ IDEA. It has excellent TypeScript support and will auto-import classes for you, just like it does for Java and Kotlin.
Add the NoteService to the providers list in client/src/app/app.module.ts. Notice that Angular CLI has already added the generated components to the declarations list.
@NgModule({
  declarations: [
    AppComponent,
    NoteListComponent,
    NoteDetailComponent,
    LoginComponent
  ],
  imports: [
    BrowserModule
  ],
  providers: [NoteService],
  bootstrap: [AppComponent]
})
export class AppModule {
}
Modify client/src/app/shared/note/note.service.ts to have a getAll() method that talks to the API.
import { Injectable } from '@angular/core';
import { HttpClient } from '@angular/common/http';
import { Observable } from 'rxjs/Observable';

@Injectable()
export class NoteService {
  public API = 'http://localhost:8080';
  public NOTE_API = this.API + '/notes';

  constructor(private http: HttpClient) {
  }

  getAll(): Observable<any> {
    return this.http.get(this.API);
  }
}
TIP: If you’re using IntelliJ IDEA, I recommend you install the Angular 2 TypeScript Live Templates. They drastically reduce the amount of code you have to write with several code-generation shortcuts.
In client/src/app/notes-list/note-list.component.ts, add a dependency on NoteService and get all the user’s notes when the component loads.
import { NoteService } from '../shared/note/note.service';

export class NoteListComponent implements OnInit {
  notes: Array<any>;

  constructor(private noteService: NoteService) {
  }

  ngOnInit() {
    this.noteService.getAll().subscribe(data => {
      this.notes = data;
    }, error => console.error(error));
  }
}
Replace the HTML in client/src/app/note-list/note-list.component.html with a few lines to render the notes list.
<h2>Notes List</h2>
<div *ngFor="let note of notes">
  {{note.text}}
</div>
If you try to make things work at this point, you won’t be able to access your API because it expects you to send an access token in an Authorization header.
Install the Okta Sign-In Widget to authenticate using the “My OIDC” app you already created and get an access token.
yarn add @okta/okta-signin-widget
Create an OktaAuthService that can be used to render the Sign-In Widget and handle authentication. The following TypeScript code should be in client/src/app/shared/okta/okta.service.ts. Be sure to replace {yourOktaDomain} and {client-id} with values appropriate for your Okta organization and application.
import { Injectable } from '@angular/core';
import * as OktaSignIn from '@okta/okta-signin-widget/dist/js/okta-sign-in.min.js'
import { ReplaySubject } from 'rxjs/ReplaySubject';
import { Observable } from 'rxjs/Observable';
import { Router } from '@angular/router';

@Injectable()
export class OktaAuthService {

  signIn = new OktaSignIn({
    baseUrl: 'https://{yourOktaDomain}',
    clientId: '{client-id}',
    redirectUri: 'http://localhost:4200',
    authParams: {
      issuer: 'default',
      responseType: ['id_token', 'token'],
      scopes: ['openid', 'email', 'profile']
    }
  });

  private userSource: ReplaySubject<any>;
  public user$: Observable<any>;

  constructor(private router: Router) {
    this.userSource = new ReplaySubject<any>(1);
    this.user$ = this.userSource.asObservable();
  }

  isAuthenticated() {
    // Checks if there is a current accessToken in the TokenManger.
    return !!this.signIn.tokenManager.get('accessToken');
  }

  login(next?: string) {
    if (next) {
      this.router.navigate(['login', {next: next}]);
    } else {
      this.router.navigate(['login']);
    }
  }

  showLogin() {
    // Launches the widget and stores the tokens
    try {
      this.signIn.renderEl({el: '#okta-signin-container'}, response => {
        if (response.status === 'SUCCESS') {
          response.forEach(token => {
            if (token.idToken) {
              this.signIn.tokenManager.add('idToken', token);
            }
            if (token.accessToken) {
              this.signIn.tokenManager.add('accessToken', token);
            }
          });
          this.userSource.next(this.idTokenAsUser);
          this.signIn.hide();
        } else {
          console.error(response);
        }
      });
    } catch (exception)  {
      // An instance of the widget has already been rendered. Call remove() first.
    }
  }

  get idTokenAsUser() {
    const token = this.signIn.tokenManager.get('idToken');
    return {
      name: token.claims.name,
      email: token.claims.email,
      username: token.claims.preferred_username
    };
  }

  async logout() {
    // Terminates the session with Okta and removes current tokens.
    this.signIn.tokenManager.clear();
    await this.signIn.signOut();
    this.signIn.remove();
    this.userSource.next(undefined);
    this.login();
  }
}
NOTE: I realize this is quite a bit of code to render a sign-in form. The good news is you can simplify things by using the Okta Angular SDK.
Create an OktaAuthGuard in client/src/app/shared/okta/okta.guard.ts. You’ll use this to guard routes so they can’t be activated if the user isn’t authenticated.
import { Injectable } from '@angular/core';
import { ActivatedRouteSnapshot, CanActivate, RouterStateSnapshot } from '@angular/router';
import { OktaAuthService } from './okta.service';

@Injectable()
export class OktaAuthGuard implements CanActivate {
  signIn;
  authenticated;

  constructor(private oktaService: OktaAuthService) {
    this.signIn = oktaService;
  }

  canActivate(route: ActivatedRouteSnapshot, state: RouterStateSnapshot) {
    this.authenticated = this.oktaService.isAuthenticated();
    if (this.authenticated) {
      return true;
    }
    this.signIn.login();
    return false;
  }
}
Create an OktaAuthInterceptor in client/src/app/shared/okta.interceptor.ts to automatically add an Authorization header to HTTP requests.
import { Injectable } from '@angular/core';
import {
  HttpRequest,
  HttpHandler,
  HttpEvent,
  HttpInterceptor, HttpErrorResponse, HttpResponse
} from '@angular/common/http';
import { Observable } from 'rxjs/Observable';
import { OktaAuthService } from './okta.service';
import 'rxjs/add/operator/do';

@Injectable()
export class OktaAuthInterceptor implements HttpInterceptor {

  constructor(private oktaService: OktaAuthService) {
  }

  intercept(request: HttpRequest<any>, next: HttpHandler): Observable<HttpEvent<any>> {

    if (this.oktaService.isAuthenticated()) {
      const accessToken = this.oktaService.signIn.tokenManager.get('accessToken');
      request = request.clone({
        setHeaders: {
          Authorization: `${accessToken.tokenType} ${accessToken.accessToken}`
        }
      });
    }

    return next.handle(request).do((event: HttpEvent<any>) => {
      if (event instanceof HttpResponse) {
        return event;
      } else if (event instanceof HttpErrorResponse) {
        if (event.status === 401) {
          this.oktaService.login();
        }
      }
    });
  }
}
In client/src/app/app.module.ts, define the routes for the application, with canActivate guards for the note-related routes.
const appRoutes: Routes = [
  {path: 'login', component: LoginComponent},
  {path: 'notes', component: NoteListComponent, canActivate: [OktaAuthGuard]},
  {path: 'notes/:id', component: NoteDetailComponent, canActivate: [OktaAuthGuard]},
  {path: '', redirectTo: '/notes', pathMatch: 'full'}
];
Import HttpClientModule and RouterModule, configure OktaAuthService and OktaAuthGard as providers, and define OktaAuthInterceptor as an HTTP interceptor.
@NgModule({
  declarations: [
    AppComponent,
    NoteListComponent,
    NoteDetailComponent,
    LoginComponent
  ],
  imports: [
    BrowserModule,
    HttpClientModule,
    RouterModule.forRoot(appRoutes)
  ],
  providers: [NoteService, OktaAuthService, OktaAuthGuard, {
    provide: HTTP_INTERCEPTORS,
    useClass: OktaAuthInterceptor,
    multi: true
  }],
  bootstrap: [AppComponent]
})
export class AppModule {
}
Modify LoginComponent (in client/src/app/login/login.component.ts) to show the homepage if the user is logged-in, or the sign-in widget if not.
export class LoginComponent implements OnInit {

  constructor(private oktaService: OktaAuthService,
              private router: Router) {
  }

  ngOnInit() {
    if (this.oktaService.isAuthenticated()) {
      this.router.navigate(['/']);
    } else {
      this.oktaService.showLogin();
    }

    // user authentication listener
    this.oktaService.user$.subscribe(user => {
      this.router.navigate(['/']);
    });
  }
}
In the same directory, update login.component.html to have a div for the sign-in widget to render in.
<div id="okta-signin-container"></div>
Modify client/src/app/app.component.html to show the user’s name and add a <router-outlet> for rendering all the routes.
<h1>{{title}}</h1>

<div *ngIf="user">
  Welcome {{user?.name}}!
  <button (click)="oktaService.logout()">Logout</button>
</div>

<router-outlet [hidden]="!user"></router-outlet>
Then update client/src/app/app.component.ts so it has a reference to user and oktaService. Notice that this class populates the user variable if the user is already authenticated (for example, they refreshed their browser) or if they sign in with the widget. The this.oktaService.user$ is an Observable that can be subscribed to for changes in the user.
export class AppComponent implements OnInit {
  title = 'My Notes';
  user;

  constructor(public oktaService: OktaAuthService) {
  }

  ngOnInit() {
    if (this.oktaService.isAuthenticated()) {
      this.user = this.oktaService.idTokenAsUser;
    }

    this.oktaService.user$.subscribe(user => {
      this.user = user;
    });
  }
}
To make the Okta Sign-In Widget look good, add its default CSS files to client/src/styles.
@import '~@okta/okta-signin-widget/dist/css/okta-sign-in.min.css';
@import '~@okta/okta-signin-widget/dist/css/okta-theme.css';
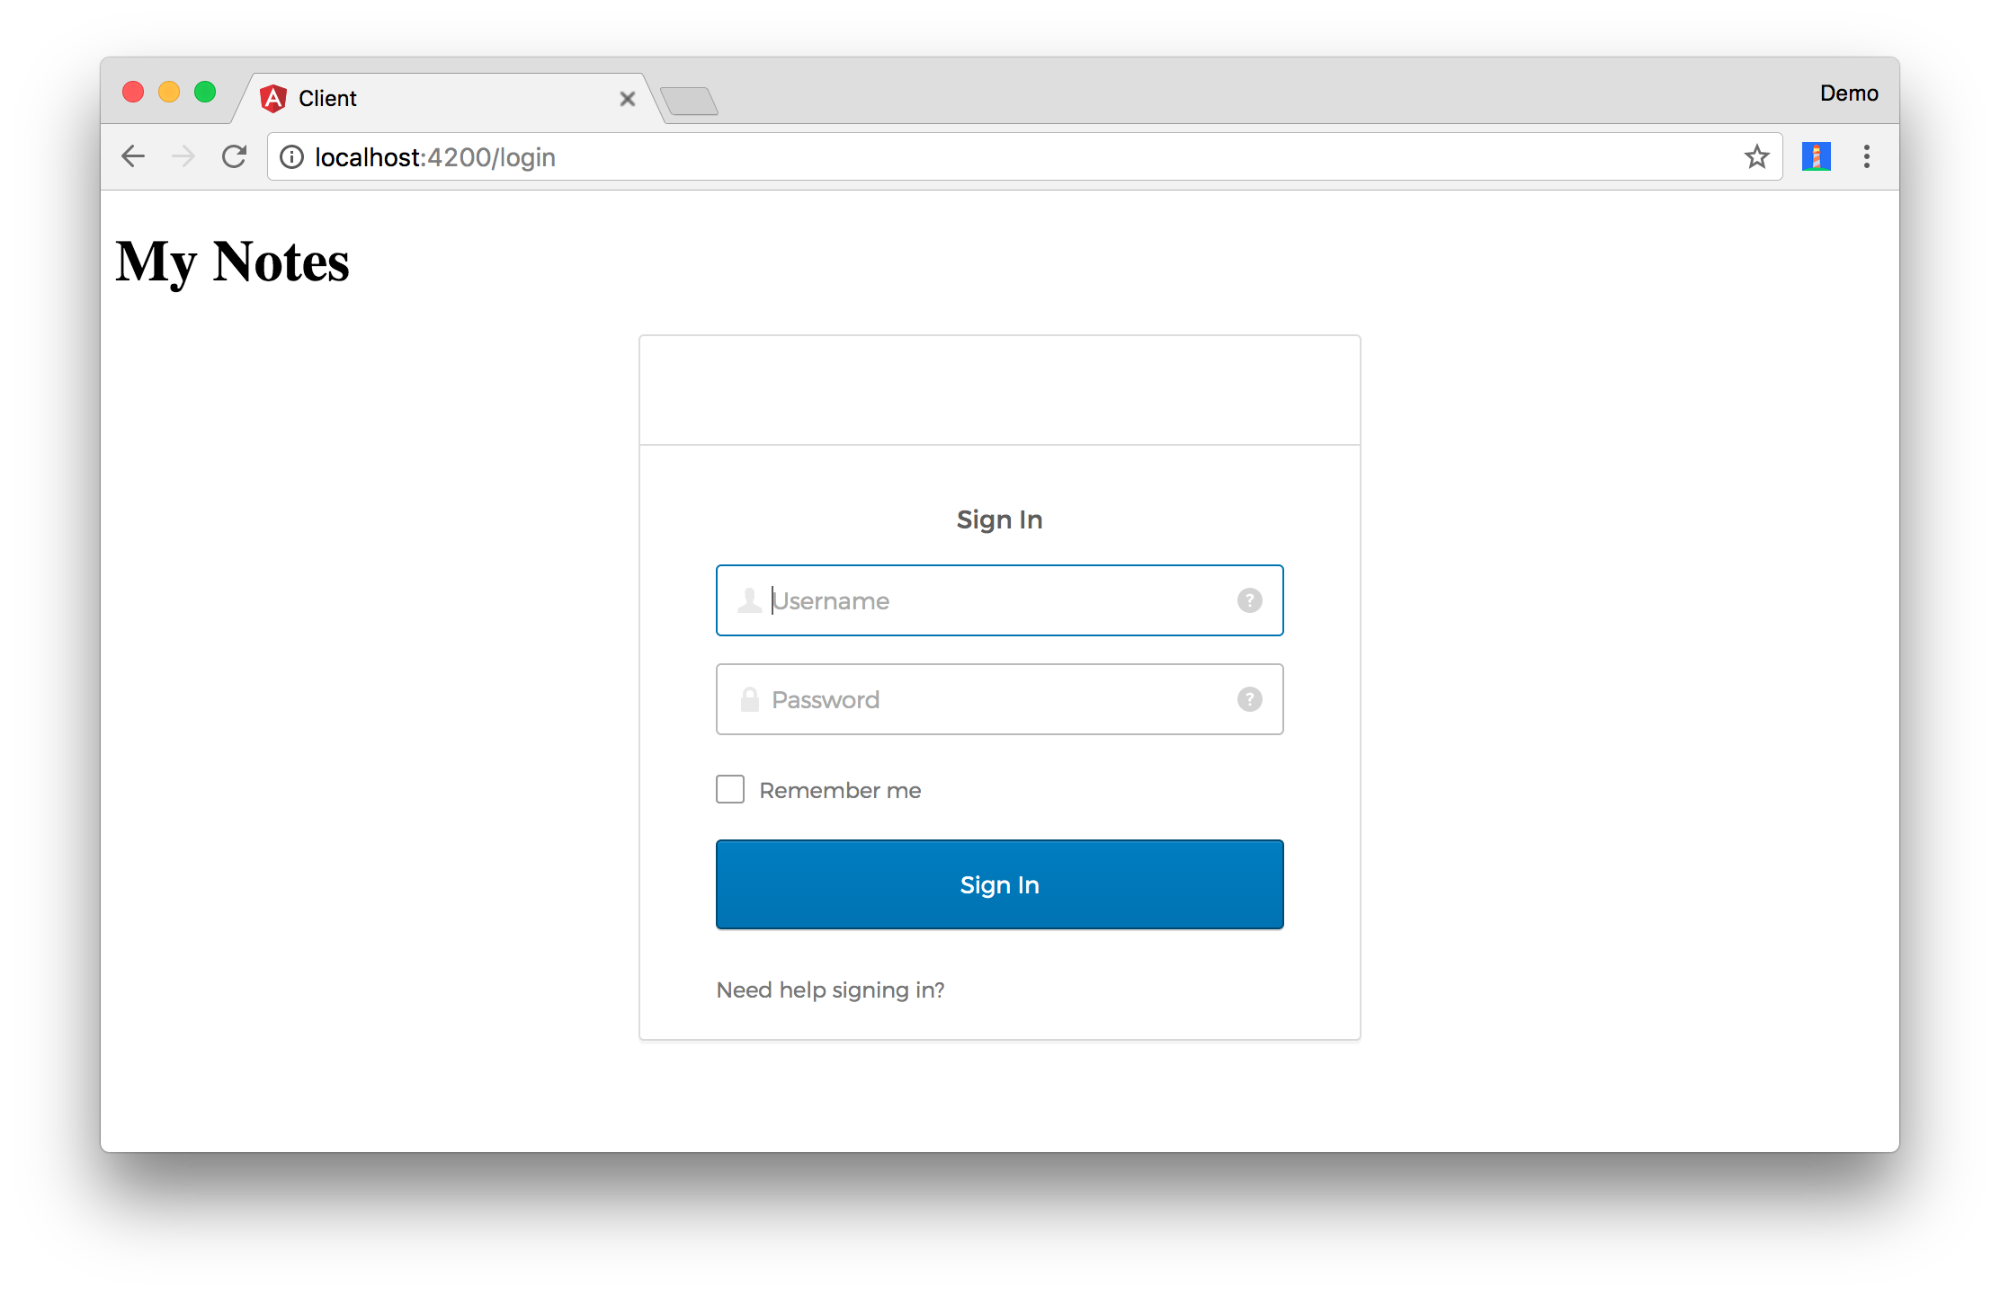
After making all these changes, you should be able to fire up http://localhost:4200 (using ng serve) and see a sign in form.
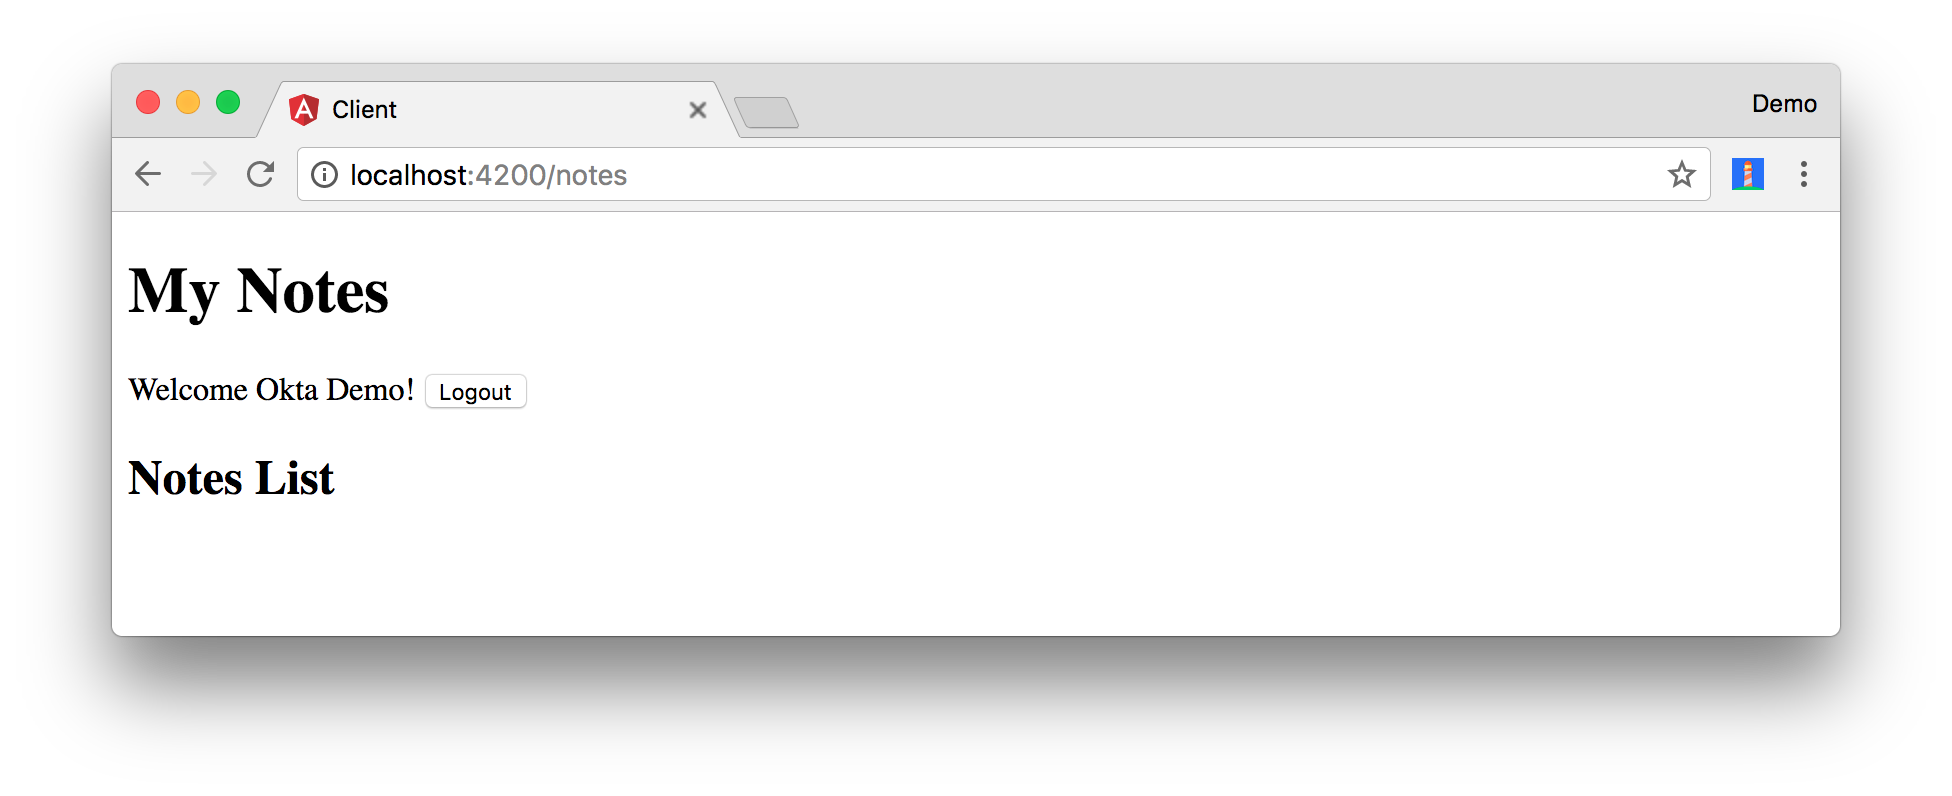
After signing in, you should see the notes list, but no records in it.
To make sure I could add, edit, and delete notes, I wrote a bunch of TypeScript and HTML. I also added Angular Material using yarn add @angular/material@5.0.0 @angular/cdk@5.0.0.
You can see the results in the GitHub repository for this article. In particular, the code in the following files:
- client/src/app/note-list/note-list.component.html
- client/src/app/note-detail/note-detail.component.ts
- client/src/app/note-detail/note-detail.component.html
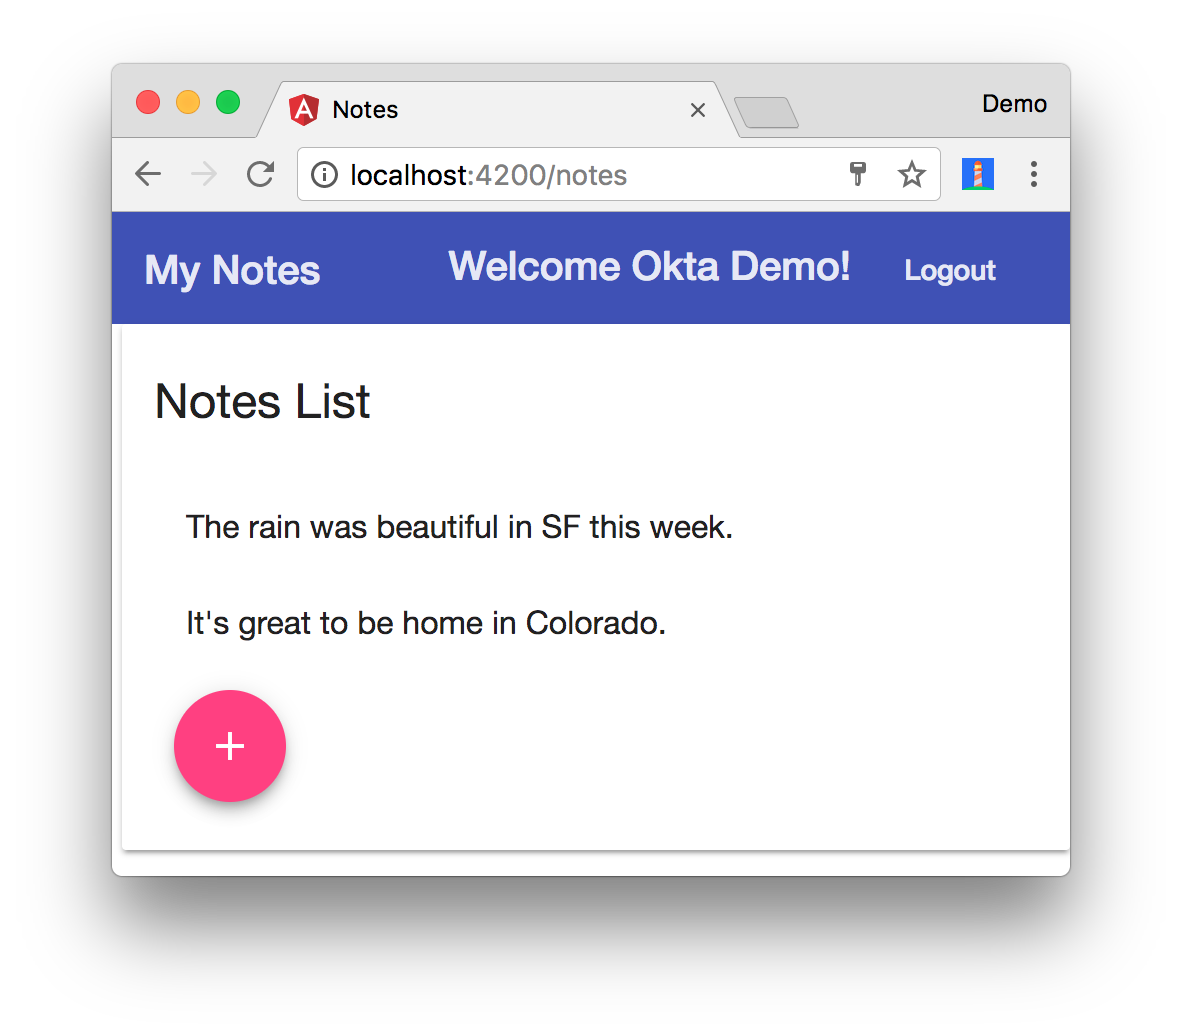
The final client/src/app/app.module.ts shows all the imports needed for Angular Material. Its stylesheets are referenced in client/src/styles.css. If you copy the code from these files into your project, you’ll have a working notes app with authentication!
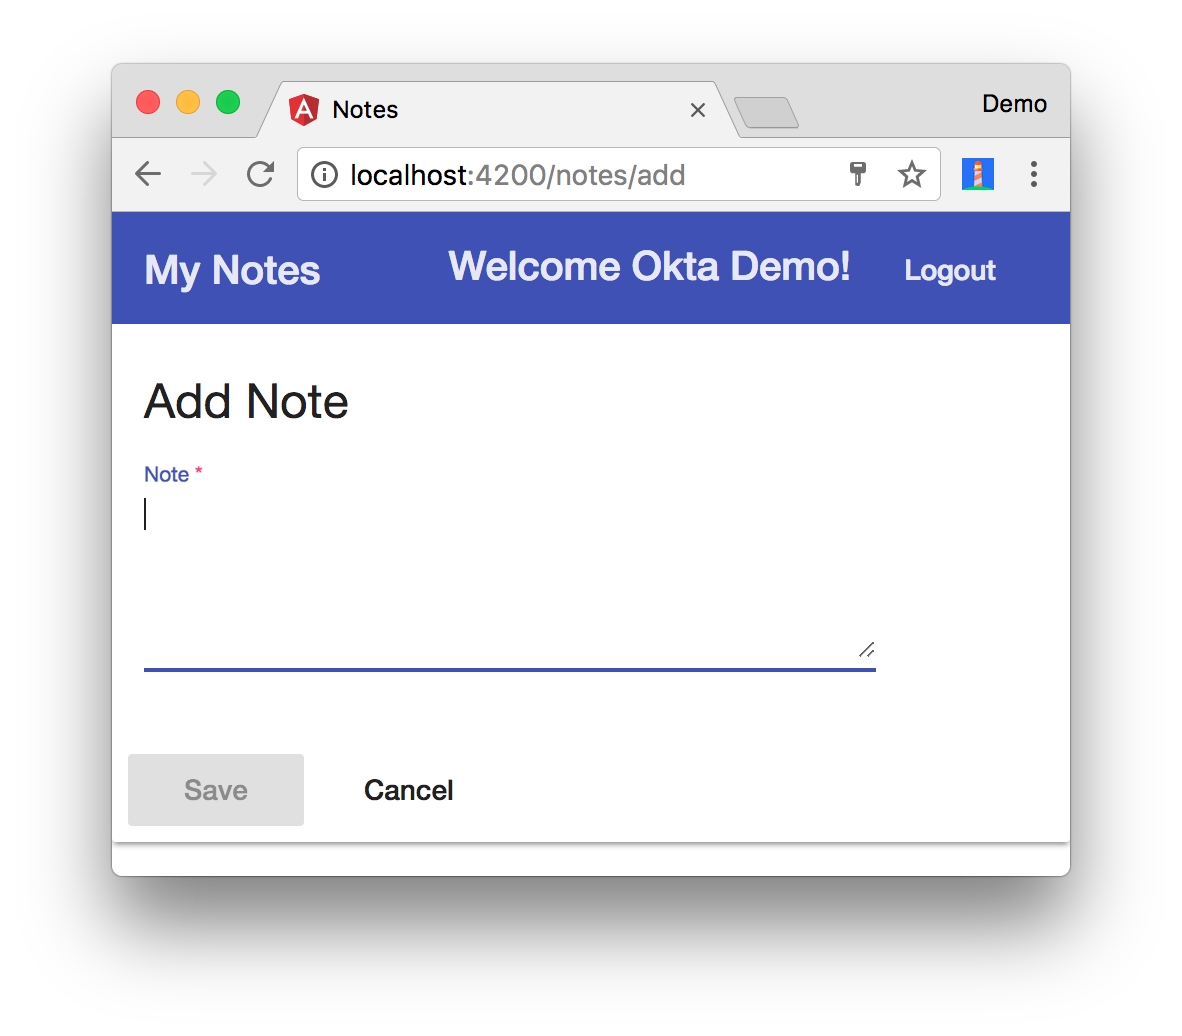
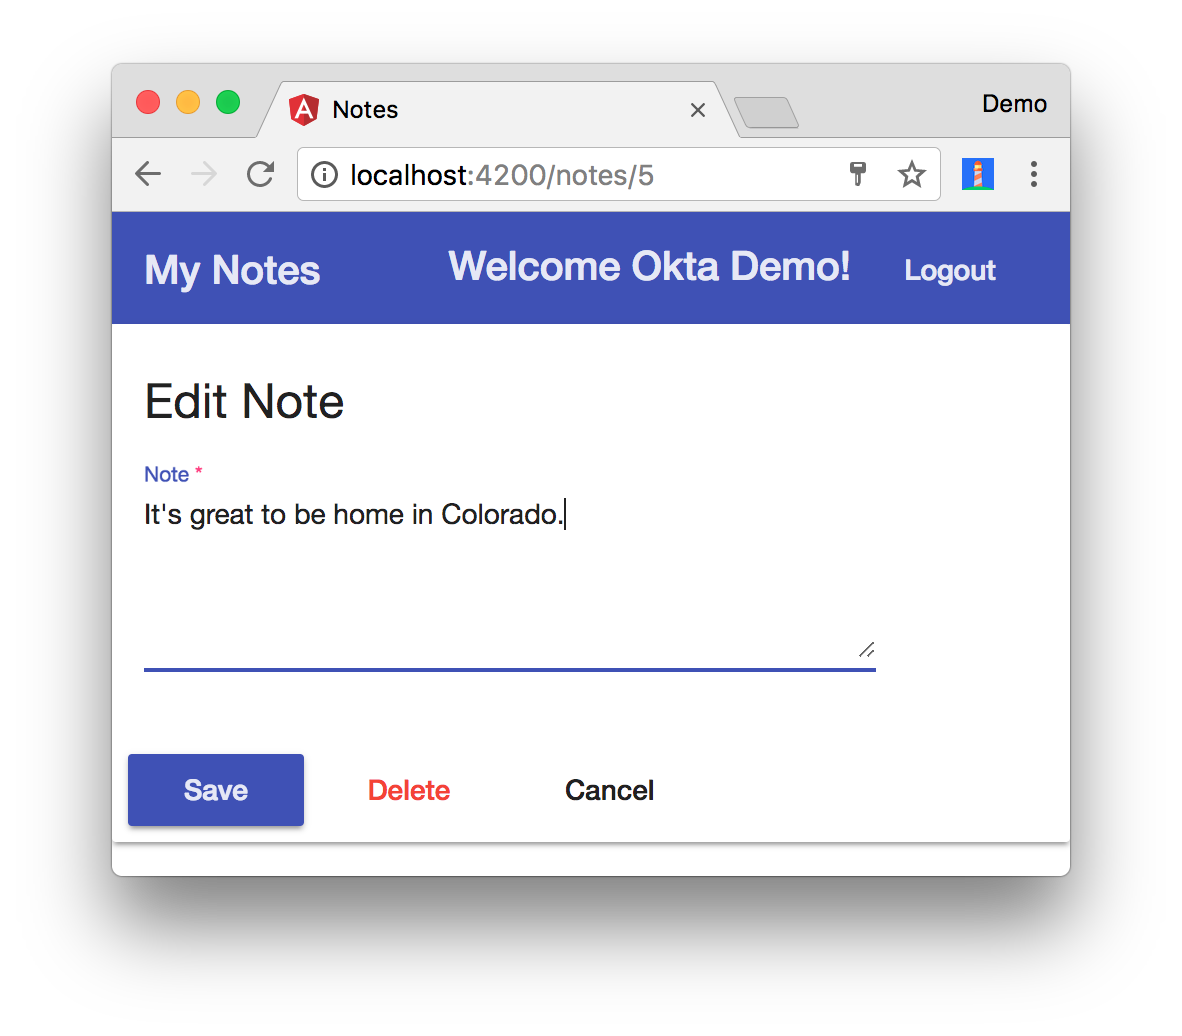
The screenshots below show the fruits of my labor.
NOTE: There’s one issue with Okta’s Sign-In Widget I still haven’t fully figured out. Not every time, but everyone once it in a while, it requires me to move my mouse or click on the screen to make the notes list load after logging in. I opened an issue for this and tried the suggested solution, but it doesn’t work 100% of the time.
You now know how to build an Angular client with TypeScript, using Okta’s Sign-In Widget for authentication.
If you’re ambitious, you could even turn the client into a progressive web app (PWA), enabling offline access and faster load times. There are a couple of posts about developing PWAs on the this blog if you’re interested in learning more.
- Build Your First Progressive Web Application with Angular and Spring Boot
- Add Authentication to Your Angular PWA
- The Ultimate Guide to Progressive Web Applications
My good buddy Josh Long and I recently hosted a live-coding session where we developed a Spring Boot microservices architecture on the backend and an Angular PWA on the front-end. The code we wrote is very similar to the code in this article. You can check the video out for reference on YouTube.
Deploy to Production
It’s cool to see an application running locally, but it’s even better to see it up and running in production.
My platform of choice for deployment is Cloud Foundry. To get started, you’ll need to create an account and install the command line tools.
brew tap cloudfoundry/tap && brew install cf-cli
cf login -a api.run.pivotal.io
Before deploying, you’ll need to create a couple of files to build the application artifacts and tell Cloud Foundry where everything lives. Create a manifest.yml file in the root directory and specify where the files to upload are. Note that this file expects your apps to be in the same directory, with Spring Boot in a server subdirectory and the Angular app in a client subdirectory.
---
applications:

- name: notes-server
  host: notes-by-kotlin
  path: ./server/target/notes-0.0.1-SNAPSHOT.jar
  env :
    FORCE_HTTPS: true

- name: notes-client
  host: notes-with-typescript
  path: ./client/dist/
  env :
    FORCE_HTTPS: true
Then, create a build.sh script that packages the server and client, and replaces the development URLs with the production URLs.
#!/bin/bash

start=`pwd`

# set origin for client on server
sed -i -e "s|http://localhost:4200|https://notes-with-typescript.cfapps.io|g" $start/server/src/main/kotlin/com/okta/developer/notes/NotesApplication.kt

mvn clean package -f $start/server/pom.xml

cd $start/client
rm -rf dist
# set API URL
sed -i -e "s|http://localhost:8080|https://notes-by-kotlin.cfapps.io|g" $start/client/src/app/shared/note/note.service.ts
# set redirectURI to client URI
sed -i -e "s|http://localhost:4200|https://notes-with-typescript.cfapps.io|g" $start/client/src/app/shared/okta/okta.service.ts
yarn && ng build -prod --aot
touch dist/Staticfile

cd $start
cf push

# reset and remove changed files
git checkout $start
rm -rf $start/server/src/main/kotlin/com/okta/developer/notes/NotesApplication.kt-e
rm -rf $start/client/src/app/shared/note/note.service.ts-e
After logging into Cloud Foundry, you can run the build script (using sh build.sh) and deploy everything. If you receive an error about the host name being in use, try a different host name in manifest.yml.
Run cf apps to see the URLs of the applications you deployed.
name           requested state   instances   memory   disk   urls
notes-client   started           1/1         1G       1G     notes-with-typescript.cfapps.io
notes-server   started           1/1         1G       1G     notes-by-kotlin.cfapps.io
When you try to log in, you’ll get a CORS error.
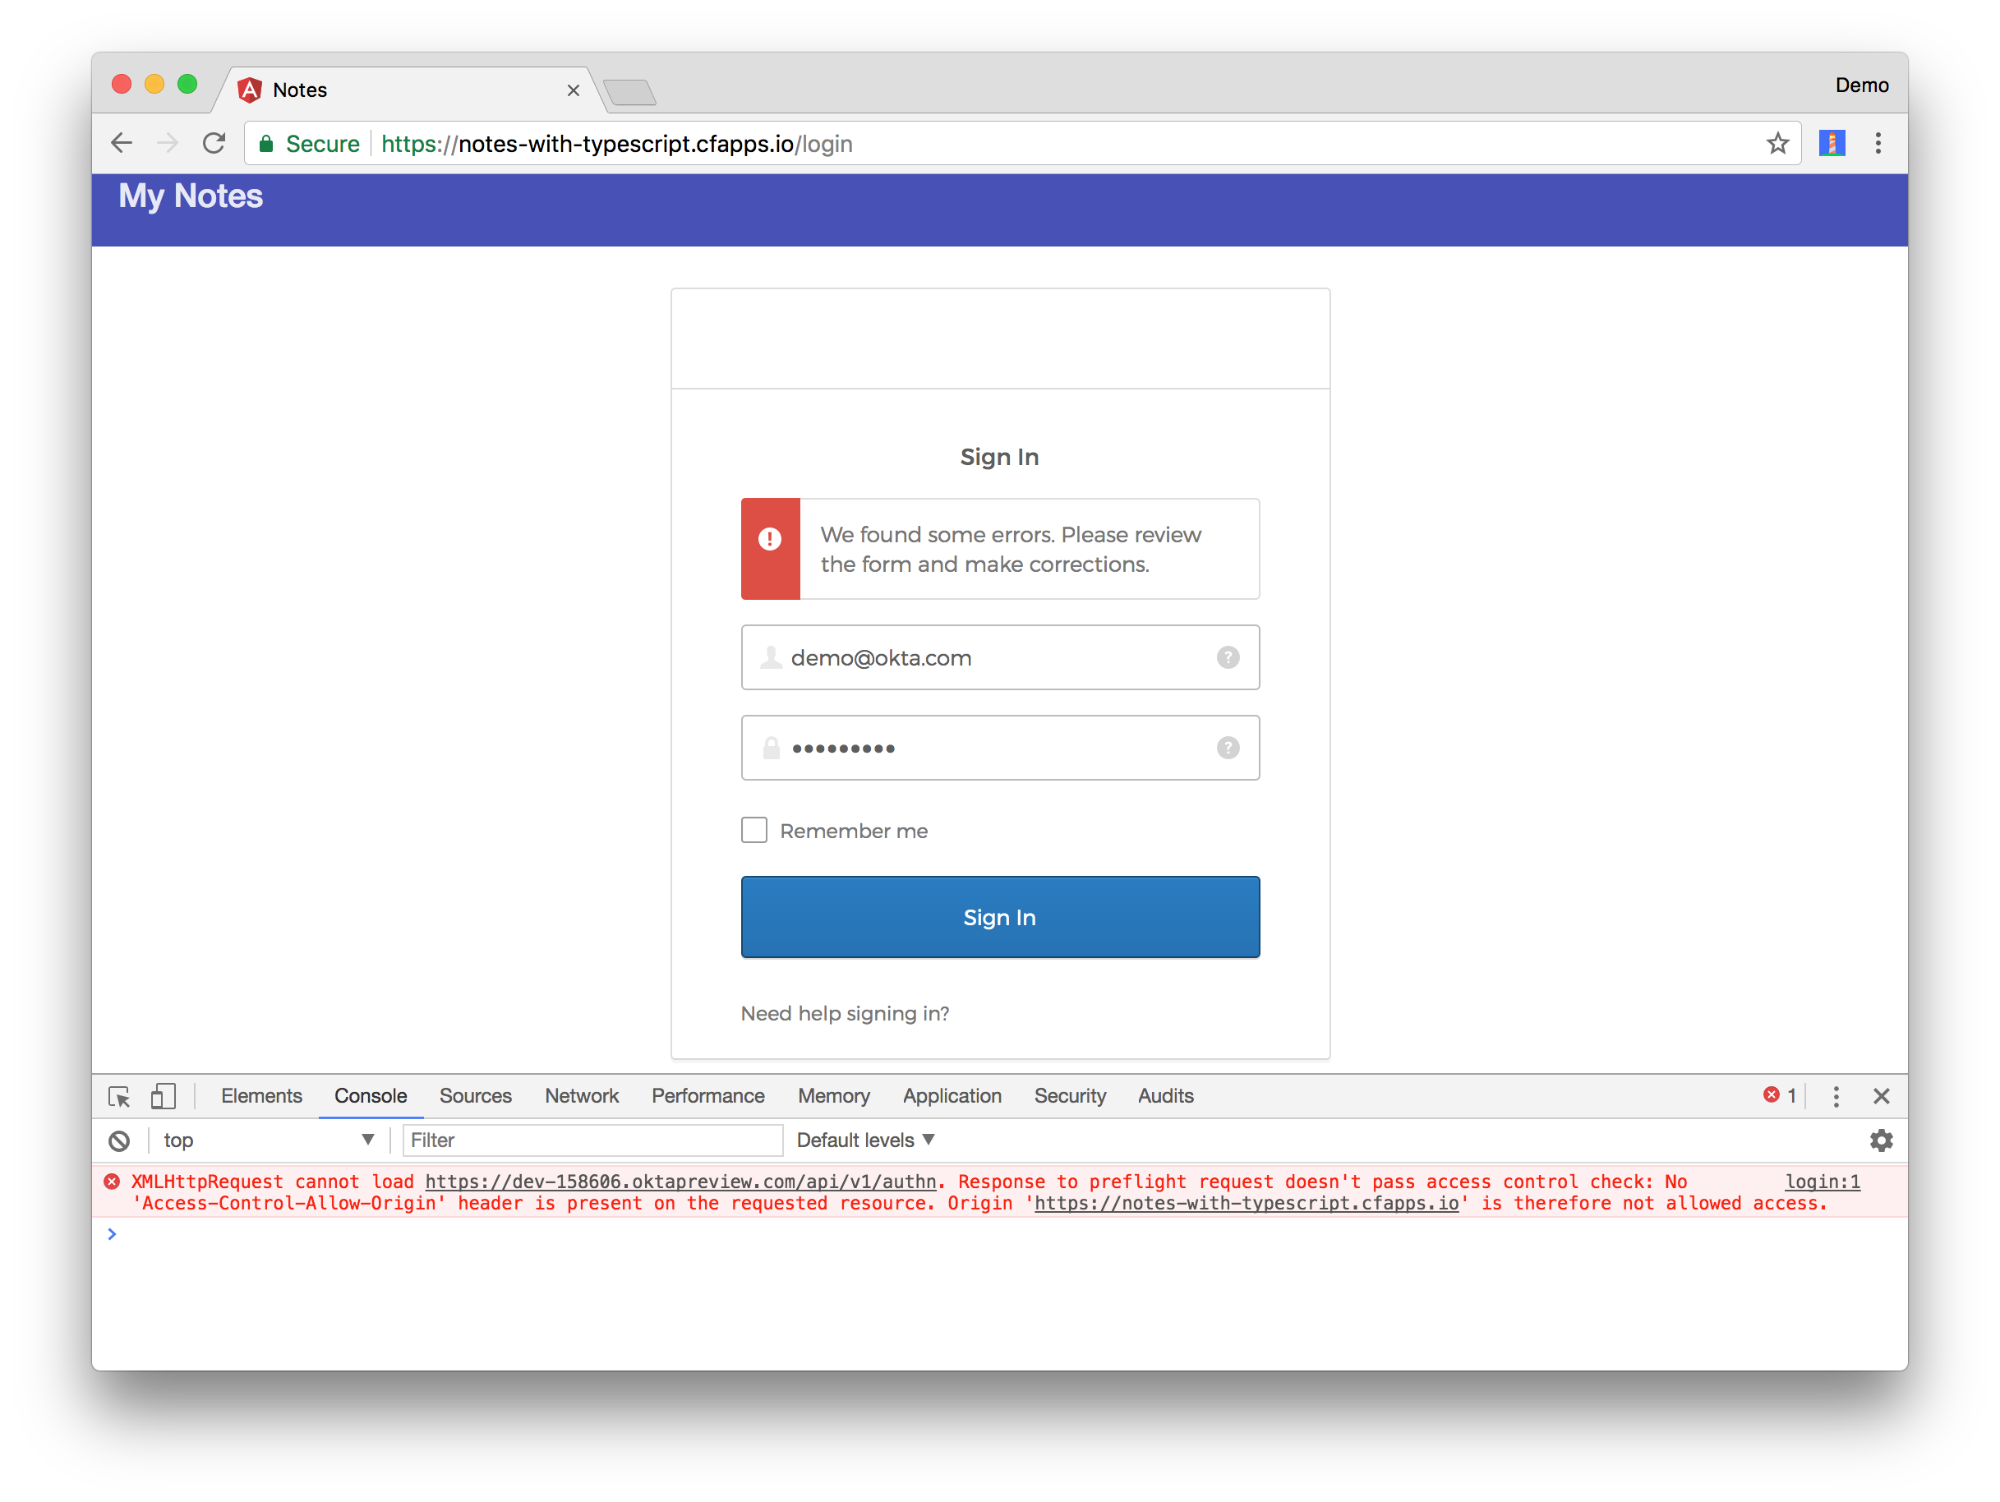
To fix this, log in to your Okta dashboard once more and navigate to API > Trusted Origins. Add https://notes-with-typescript.cfapps.io as an Origin URL with CORs support. You’ll also need to add https://notes-with-typescript.cfapps.io as a Login Redirect URI to your “My OIDC App”.
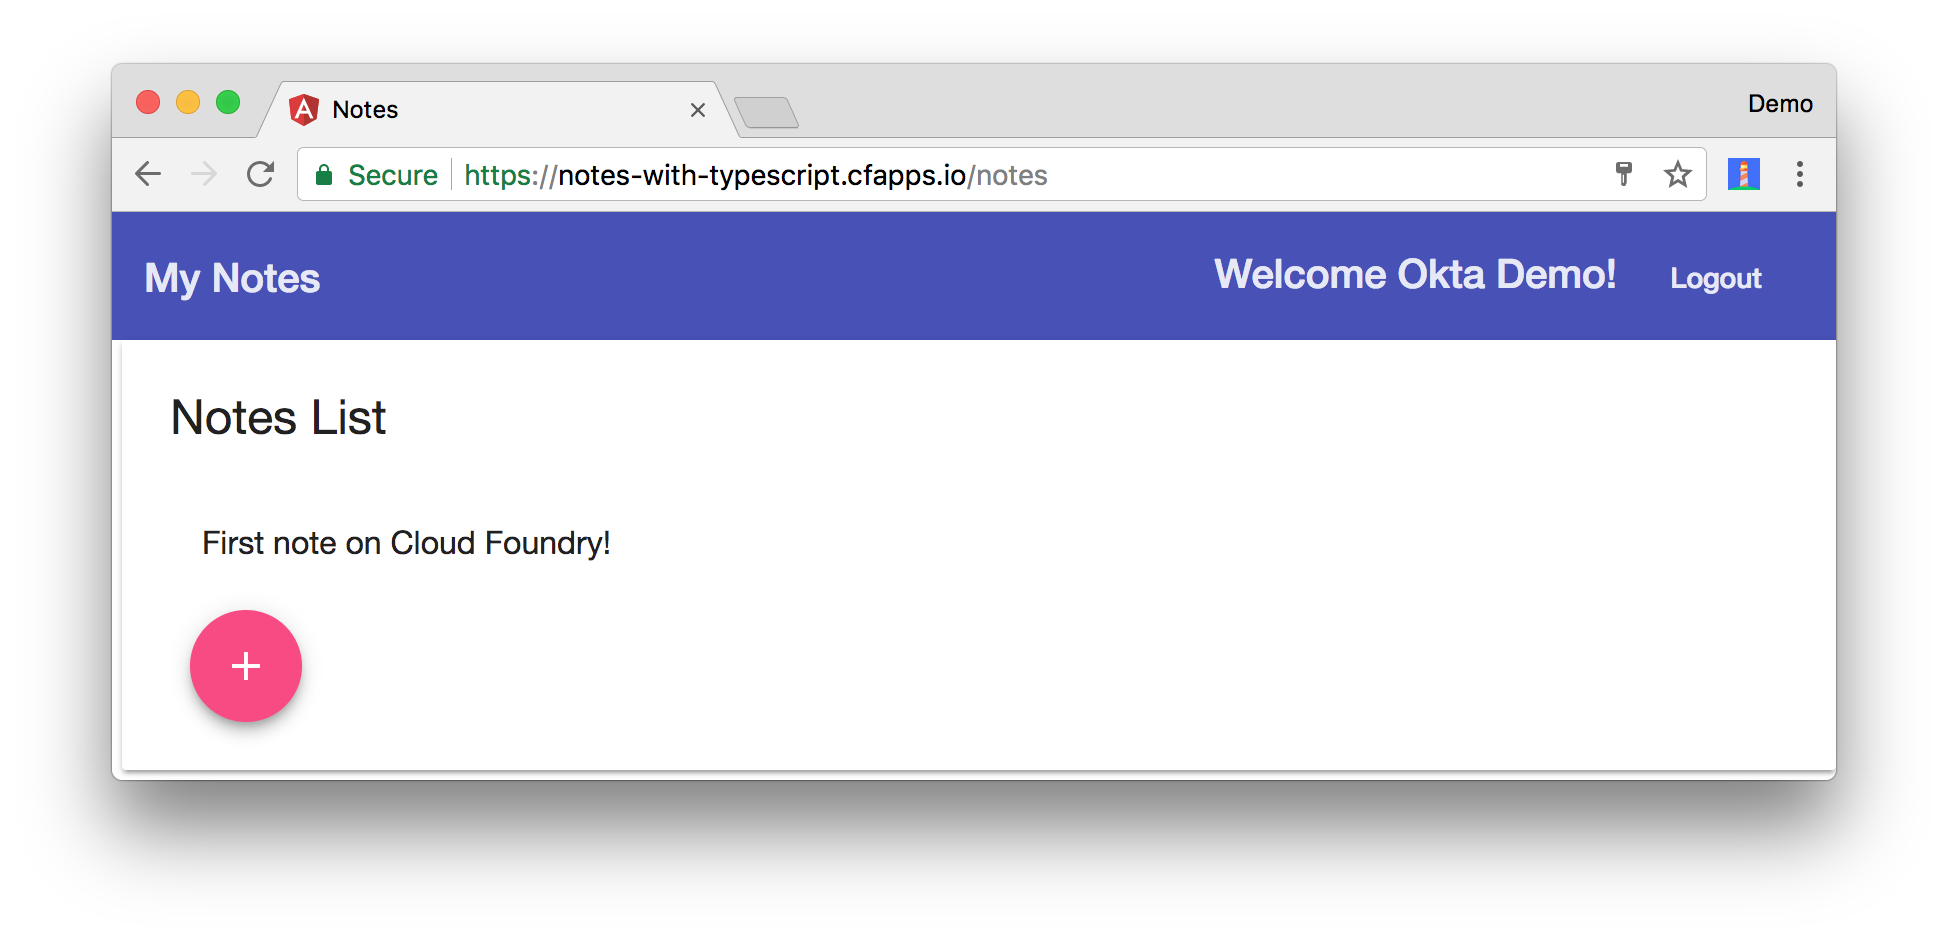
You can now log in and add a note.
Learn More
Congrats! You’re well on your way to becoming a Kotlin and TypeScript developer who understands Spring Boot and Angular. All of the code used in this article is available on GitHub.
If you have questions about this code or technologies you want to see in my next post, let me know on Twitter @mraible!
Changelog:
- Nov 30, 2017: Updated to use Spring Boot 1.5.9, Angular 5.0, Angular CLI 1.5.5, Angular Material 5.0.0-rc.2, and Okta Sign-In Widget 2.5.0. See the code changes in the example app on GitHub. Changes to this article can be viewed in this pull request.
Matt Raible is a well-known figure in the Java community and has been building web applications for most of his adult life. For over 20 years, he has helped developers learn and adopt open source frameworks and use them effectively. He's a web developer, Java Champion, and Developer Advocate at Okta. Matt has been a speaker at many conferences worldwide, including Devnexus, Devoxx Belgium, Devoxx France, Jfokus, and JavaOne. He is the author of The Angular Mini-Book, The JHipster Mini-Book, Spring Live, and contributed to Pro JSP. He is a frequent contributor to open source and a member of the JHipster development team. You can find him online @mraible and raibledesigns.com.
Okta Developer Blog Comment Policy
We welcome relevant and respectful comments. Off-topic comments may be removed.