Use Sass with React to Build Beautiful Apps

When you are developing web applications with React, you know that writing the JavaScript code is only half of the story. The other half is implementing the design using style sheets. When your application becomes larger, using plain CSS style sheets can become tedious and unmaintainable. Sass is one of the most popular alternatives to CSS. It extends the CSS language with variables, mixins, and many other features. It also lets you divide up the style sheets into multiple files.
![]()
Sass source files come in two flavors. The older .sass format has now almost completely replaced by the .scss syntax. The latter is a superset of CSS and lets you paste existing CSS code into the SCSS file without problems. Sass compiles the SCSS source files into a single CSS file with the option of minifying the resulting output. The resulting file can be included in your web page just like any other CSS style sheet.
Many CSS frameworks use Sass to generate their stylesheets. In this tutorial, I will show you how to integrate Zurb’s Foundation framework using Sass mixins. Using this approach keeps the size of your CSS to a minimum. It also gives you the opportunity of more semantic markup.
Note: In May 2025, the Okta Integrator Free Plan replaced Okta Developer Edition Accounts, and the Okta CLI was deprecated.
We preserved this post for reference, but the instructions no longer work exactly as written. Replace the Okta CLI commands by manually configuring Okta following the instructions in our Developer Documentation.
Create Your React Application with Sass
You will be using the Create React App command-line tool to create the application. First of all, make sure that you have installed Node on your system with a version greater than 10. If you are unsure which Node version you have, open a terminal and run the following command.
node -v
Provided your Node version is up to date, the Create React App command-line tool can be run without any installation. In the terminal, navigate to a directory of your choice and run the following command.
npx create-react-app react-calculator
This will create a new folder, react-calculator initialize the React application and download all necessary packages. After a minute or two, once the process has finished, change into the new folder with the command below.
cd react-calculator
Set Up Authentication for Your React App
Any serious web application will need some sort of user authentication. Implementing your own not only takes time and effort but can also introduce security risks if you don’t know exactly what you are doing. Okta lets you set up authentication with just a few commands.
Before you begin, you’ll need a free Okta developer account. Install the Okta CLI and run okta register to sign up for a new account. If you already have an account, run okta login.
Then, run okta apps create. Select the default app name, or change it as you see fit.
Choose Single-Page App and press Enter.
Use http://localhost:3000/callback for the Redirect URI and accept the default Logout Redirect URI of http://localhost:3000.
What does the Okta CLI do?
The Okta CLI will create an OIDC Single-Page App in your Okta Org. It will add the redirect URIs you specified and grant access to the Everyone group. It will also add a trusted origin for http://localhost:3000. You will see output like the following when it’s finished:
Okta application configuration:
Issuer:    https://dev-133337.okta.com/oauth2/default
Client ID: 0oab8eb55Kb9jdMIr5d6
NOTE: You can also use the Okta Admin Console to create your app. See Create a React App for more information.
Set Up Authentication in Your React Sass App
Okta has created a tool to add authentication to React applications in seconds. It uses the Angular Schematics command-line tool to inject code into your skeleton application. Install the Schematics CLI on your system by running the following command in your terminal.
npm i -g @angular-devkit/schematics-cli@0.1102.9
TIP: Depending on your system, you might need to run this command using sudo.
You might be asking why I am telling you to use an Angular tool when you are developing a React application? It turns out that this tool is generic and works for Angular and Vue too! Not only that, but it even has support for Ionic and React Native!
Install OktaDev Schematics:
npm i -D -E @oktadev/schematics@3.4.1
Now, add Okta for authentication to your React application by running the command below.
schematics @oktadev/schematics:add-auth
You will be asked for your issuer’s URL and client ID. You should have these from the OIDC app you created earlier.
Once the questions have been answered, the schematic will insert all the necessary code into your application to provide the authentication flow. Pretty neat, don’t you think?
Implement a React Calculator with Sass
Now it’s time to implement the calculator. This calculator is a nice demonstration of how to use stack operations to process user input and perform mathematical operations. The calculator has four basic operations +, -, *, and /, as well as a % button. It takes care of operator precedence.
Create a new file called src/Calculator.js and paste the following code into it.
import React from 'react';

class Calculator extends React.Component {
  constructor(props) {
    super(props);
    this.state = {
      stack: ['='],
      display: '0'
    }
  }

  numberPressed(val) {
    const s = this.state;
    if (typeof s.stack[s.stack.length - 1] !== 'number') {
      s.display = val;
      s.stack.push(parseInt(s.display, 10));
    } else {
      s.display += val;
      s.stack[s.stack.length - 1] = parseInt(s.display, 10);
    }
    this.setState(s);
  }

  operatorPressed(val) {
    const s = this.state;
    const precedenceMap = {'+': 0, '-': 0, '*': 1, '/': 1};
    this.ensureNumber(s);
    const precedence = precedenceMap[val];
    let reduce = true;
    while (reduce) {
      let i = s.stack.length - 1;
      let lastPrecedence = 100;

      while (i >= 0) {
        if (typeof s.stack[i] === 'string') {
          lastPrecedence = precedenceMap[s.stack[i]];
          break;
        }
        i--;
      }
      if (precedence <= lastPrecedence) {
        reduce = this.reduceLast(s);
      } else {
        reduce = false;
      }
    }

    s.stack.push(val);
    this.setState(s);
  }

  equalPressed() {
    const s = this.state;
    this.ensureNumber(s);
    while (this.reduceLast(s)) {}
    s.stack.pop();
    this.setState(s);
  }

  percentPressed() {
    const s = this.state;
    this.ensureNumber(s);
    while (this.reduceLast(s)) {}
    const result = s.stack.pop() / 100;
    s.display = result.toString(10);
    this.setState(s);
  }

  acPressed() {
    const s = this.state;
    s.stack = ['='];
    s.display = '0';
    this.setState(s);
  }

  cePressed() {
    const s = this.state;
    if (typeof s.stack[s.stack.length - 1] === 'number') { s.stack.pop(); }
    s.display = '0';
    this.setState(s);
  }

  ensureNumber(s) {
    if (typeof s.stack[s.stack.length - 1] === 'string') {
      s.stack.push(parseInt(s.display, 10));
    }
  }

  reduceLast(s) {
    if (s.stack.length < 4) { return false; }
    const num2 = s.stack.pop();
    const op = s.stack.pop();
    const num1 = s.stack.pop();
    let result = num1;
    switch (op) {
      case '+': result = num1 + num2;
        break;
      case '-': result = num1 - num2;
        break;
      case '*': result = num1 * num2;
        break;
      case '/': result = num1 / num2;
        break;
      default:
    }
    s.stack.push(result);
    s.display = result.toString(10);
    return true;
  }

  render() {
    return (
      <div className="calculator-container">
        <div className="calculator">
          <p className="display">{this.state.display}</p>
          <div className="calculator-buttons">
            <button className="reset-button" onClick={this.acPressed.bind(this)}>AC</button>
            <button className="reset-button" onClick={this.cePressed.bind(this)}>CE</button>
            <button className="operator-button" onClick={this.percentPressed.bind(this)}>%</button>
            <button className="operator-button" onClick={this.operatorPressed.bind(this, '/')}>÷</button>
            <button className="number-button" onClick={this.numberPressed.bind(this, '7')}>7</button>
            <button className="number-button" onClick={this.numberPressed.bind(this, '8')}>8</button>
            <button className="number-button" onClick={this.numberPressed.bind(this, '9')}>9</button>
            <button className="operator-button" onClick={this.operatorPressed.bind(this, '*')}>x</button>
            <button className="number-button" onClick={this.numberPressed.bind(this, '4')}>4</button>
            <button className="number-button" onClick={this.numberPressed.bind(this, '5')}>5</button>
            <button className="number-button" onClick={this.numberPressed.bind(this, '6')}>6</button>
            <button className="operator-button" onClick={this.operatorPressed.bind(this, '-')}>-</button>
            <button className="number-button" onClick={this.numberPressed.bind(this, '1')}>1</button>
            <button className="number-button" onClick={this.numberPressed.bind(this, '2')}>2</button>
            <button className="number-button" onClick={this.numberPressed.bind(this, '3')}>3</button>
            <button className="operator-button" onClick={this.operatorPressed.bind(this, '+')}>+</button>
            <button className="number-button" onClick={this.numberPressed.bind(this, '0')}>0</button>
            <button className="number-button" onClick={this.numberPressed.bind(this, '.')}>.</button>
            <button className="equal-button" onClick={this.equalPressed.bind(this)}>=</button>
          </div>
        </div>
        <div className="calculator-stack">
          <h4>Stack</h4>
          <table>
            <tbody>
              {this.state.stack.map(el => (<tr><td>{el}</td></tr>))}
            </tbody>
          </table>
        </div>
      </div>
    );
  }
}

export default Calculator;
You can see that the HTML of the calculator consists of groups of buttons. Each button is linked to a callback function in the Calculator class. To give you an insight into what the stack contains at any time, a separate div contains a table displaying the stack entries.
Now open src/Home.js and remove the import of logo.svg. Add the following import to the top of the file.
import Calculator from './Calculator';
Further down in the file, replace the render() function with the following.
render() {
  const {authenticated} = this.state;
  let body = null;
  if (authenticated) {
    body = (
      <div className="page-body">
        <div className="login-buttons">
          <button onClick={this.logout}>Logout</button>
        </div>
        <Calculator></Calculator>
      </div>
    );
  } else {
    body = (
      <div className="page-body">
        <div className="login-buttons">
          <button onClick={this.login}>Login</button>
        </div>
      </div>
    );
  }

  return (
    <div className="App">
      <h1>Calculator</h1>
      {body}
    </div>
  );
}
Cool! The calculator should be functional. If you run npm start, you should be able to open your browser at http://localhost:3000 and see a Login button. After logging in you will be able to use the calculator. But we haven’t styled it yet, so it won’t look nice.
Style Your Calculator in React With Sass
Back in the days when CSS was all the rage, it came with a promise of a bright future where content and style were completely separated. Your HTML code would only contain the actual content and the markup would be completely semantic. One of the promises was that class names would only relate to the meaning of the content and not the way that it was displayed on the screen.
Then along came CSS frameworks. They introduced CSS classes for creating a responsive grid layout, such as col-md-4. Other classes determined the size of buttons, such as btn-sm. While incredibly useful, this broke the separation of content and design.
Using Sass together with the Foundation CSS framework, it is possible to regain this strict separation. You might have noticed in the code above, that I have used semantic className attributes. The classes tell you what is contained in a div and not how it should be shown on the screen. This actually has an accessibility advantage because screen readers can group the contents in a meaningful way.
To get started with Sass and Foundation, install two more packages. In the terminal run the following command.
npm i -E sass@1.23.7 foundation-sites@6.6.1
There are actually two Sass packages available through npm. node-sass is generally faster but does require a compilation step during installation. I have opted for the more compatible sass package which is a pure JavaScript implementation of the Sass language.
Copy the default settings from the Foundation folder to your src/ folder by running the following command in a terminal.
cp node_modules/foundation-sites/scss/settings/_settings.scss src/
Now open src/_settings.scss and, and change line 63 (@import 'util/util';) to the following:
@import '~foundation-sites/scss/util/util';
If you look through the settings file, you can see that it defines a huge number of Sass variables. Foundation is highly customizable but the default settings provide a good starting point. Now rename src/App.css to src/App.scss and replace its content with the following.
@import 'settings';
@import '~foundation-sites/scss/foundation';

.App {
  text-align: center;
  @include xy-grid-container;
}

.login-buttons {
  display: flex;
  justify-content: flex-end;

  button {
    @include button;
  }
}

.calculator-container {
  @include xy-grid;
}

.calculator {
  @include xy-cell(12);
  @include breakpoint(medium) {
    @include xy-cell(6);
    @include xy-cell-offset(2);
  }

  .display {
    background-color: $light-gray;
    font-size: 48px;
    padding: 8px;
    overflow: hidden;
  }

  .calculator-buttons {
    @include xy-grid-layout(4, 'button');
  }

  button {
    @include button;

    &.reset-button {
      @include button-style($warning-color, auto, auto);
    }

    &.number-button {
      @include button-style($secondary-color, auto, auto);
    }

    &.equal-button {
      width: calc(50% - 1.25rem);
    }
  }
}

.calculator-stack {
  @include xy-cell(12);
  @include breakpoint(medium) {
    @include xy-cell(2);
    @include xy-cell-offset(1);
  }
}

table {
  @include table;
}
In this style sheet, I have used a number of Sass features. I have used a number of @include statements to include mixins from the Foundation framework.
For example @include xy-cell(6); will add styles to the surrounding class to turn it into a 6 column wide cell. Note also, how I have used the $warning-color and $secondary-color variables to define the button style of the reset and the number buttons.
These variables are defined in the src/_settings.scss file. If you want to learn more about the Sass language, the official documentation is a good starting point.
How I Theme My React App With Sass is a good tutorial that teaches you more about the power of mixins.
To include the stylesheet in your application, open Home.js and change the import of App.css to the following.
import './App.scss';
The React scripts installed by the create-react-app command use webpack to compile and package everything. By default, they also install the module loaders for .scss files. By changing the import above, everything should now work out of the box without any further configuration. Simply run the following command and your perfectly styled calculator will be available on http://localhost:3000.
npm start
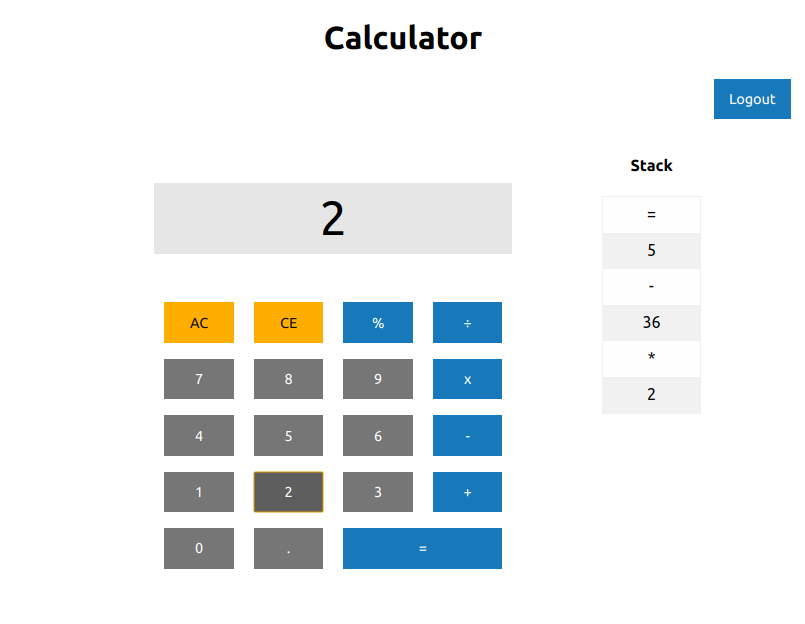
Congratulations, you should now see something like this in your browser.
Learn More About React and Sass
In this tutorial, you learned how to use Sass in a React application. Using the create-react-app command makes it extremely easy to include Sass without any further configuration needed. I also showed you how to achieve truly semantic markup in your application while still using a powerful CSS framework. In this tutorial, I used Zurb’s Foundation as an example. You can achieve a similar effect when using the Bootstrap framework.
You can find the source code for this tutorial on GitHub in the oktadeveloper/okta-react-sass-example repository.
If you want to learn more about Sass, React, or the use of Schematics, feel free to check out the links below.
- A Beginner’s Guide to Redux
- Build a Basic CRUD App with Node and React
- Build a Basic CRUD App with Laravel and React
- Build an iOS App with React Native and Publish it to the App Store
- Use Schematics with React and Add OpenID Connect Authentication in 5 Minutes
Please leave a comment below if you have any questions. If you liked this tutorial, follow @oktadev on Twitter to be notified when we publish new ones. We also have a YouTube channel you might like.
Okta Developer Blog Comment Policy
We welcome relevant and respectful comments. Off-topic comments may be removed.