Kotlin: A Beginner's Guide and Tutorial
Kotlin is a modern, statically typed language within the JVM. Kotlin is a cross-platform, multi-purpose, free and open-source language developed by JetBrains under the Apache 2.0 license and has constructs for both Object Oriented and Functional programming styles, which can be mixed. It can be used for web development, server and client, and mobile development, using most Java IDEs.
Kotlin is an awesome option for Java developers because it is concise, expressive, and safe. According to JetBrains estimates, it can cut the total lines of code in your app by up to 40%. Kotlin also helps prevent NullPointerExceptions as it provides non-nullable types
According to GitHub Octoverse Report 2018, Kotlin is the number one fastest-growing language. With 2.2M users, its popularity increases every month and big companies are using it. Android and JVM developers are falling in love with its features. Let’s learn why.
In this post you will find:
- An overview of Kotlin’s features
- A guide for building a “Hello, World!” app and solving a basic algorithm problem
- A quick step by step for running a Kotlin Spring Boot application with authentication via Okta
In order to complete the full tutorial, you’ll need the following tools:
- Java 8
- Apache Maven
- IntelliJ (or another IDE)
Before we dive into the tutorial, let’s talk a little about why Kotlin might be the right choice for your next project.
![]()
Note: In May 2025, the Okta Integrator Free Plan replaced Okta Developer Edition Accounts, and the Okta CLI was deprecated.
We preserved this post for reference, but the instructions no longer work exactly as written. Replace the Okta CLI commands by manually configuring Okta following the instructions in our Developer Documentation.
Kotlin vs. Java, aka Why this Tutorial?
Kotlin was designed to fix a number of Java’s issues:
Null references: Java allows null reference values, and as seen above, Kotlin type system helps to eliminate the access to a member of a null reference, which would result in the equivalent of a NullPointerException.
Invariant array: In Java, arrays are covariant, and array Integer[] is a subtype of Number[], so the compiler allows assigning a Double to a Number[] reference, but the program might raise an exception at runtime if the instance is Integer[]. Kotlin does not let you assign Array<String> to Array<Any>, preventing runtime failures. Any is the root of the Kotlin class hierarchy.
// Compiles but will raise java.lang.ArrayStoreException
Integer[] intArray = new Integer[1];
Number[] numberArray = intArray;
numberArray = intArray;
numberArray[0] = 1.0;
In Kotlin:
var intArray = arrayOf(1)
var numArray = arrayOf(1.0)
numArray = intArray // Compiler error Type mismatch
Any is the root of the Kotlin class hierarchy, but it is not equivalent to Object. However, java.lang.Object is mapped to kotlin.Any!, and the ! notation means it can be Any or Any? (nullable or not). As Object, other Java types are not used “as is”, but mapped to Kotlin types. A complete list of mappings is available in the Kotlin Reference.
No raw types: There are no raw types in Kotlin, as generics are different. Java raw types, for example List, is converted into star projections List<*>!, which are similar to raw types, but provide runtime safety. How? The compiler will not allow write operations if the type argument is unknown, as it might cause a cast exception when reading. In Java, you can add any object to a raw List, but in Kotlin adding to a start projected list won’t compile
Use-site variance: Java’s type system uses bounded wildcards to increase API flexibility, as generic types are invariant (as opposed to Java arrays, which are covariant), meaning List<String> is not a subtype of List<Object>, but can be assigned to List<? extends Object> type. In Kotlin, instead of bounded wildcards, use-site variance allows to restrict the generic type in the place it is used, with a simpler syntax like Array<out Any>, equivalent to Java’s Array<? extends Object>. The compiler verifies the parameter type is only returned from a method of the instance, but not consumed, to avoid runtime exceptions, for example, if attempting to write a String to Array<Int>.
package com.okta.developer

fun main() {
    val a = arrayOf("uno", "dos", "tres")
    readMethod(a)
}

fun readMethod(a: Array<out Any>) {
    println(a[0])
    a.set(0, 1) // Out-projected type prohibits the use of fun set
}
The example above does not compile in Kotlin, because the readMethod() receives the out-projected array (only read operations allowed) and it is calling the write operation set().
No checked exceptions: Java checked exceptions must be somehow handled for the program to compile, and are many times swallowed by an empty catch block. Kotlin does not have checked exceptions, because it is suggested that in large software projects it decreases productivity.
Proper function types: As opposed to Java SAM (Single Abstract Method) conversions, where a lambda expression is convertible to a SAM type according to some rules, Kotlin uses a family of function types like (Int) -> String, with the special notation corresponding to the signature of the functions (parameters and return values).
A complete list of Kotlin features, not supported in Java, is available at Kotlin Reference.
Java and Kotlin Interoperability
Kotlin is 100% interoperable with Java, Kotlin code can be called from Java and vice versa. Existing Java code can be used with some considerations, for example, Java getters and setters are represented by properties in Kotlin:
val calendar = Calendar.getInstance()
calendar.firstDayOfWeek = Calendar.MONDAY // setFirstOfWeek()
With an IDE like IntelliJ IDEA, you can add Java source code to a Kotlin project just by creating a .java file.
Objects coming from Java, called platform types, have relaxed null-checks for practical reasons, and safety is the same as in Java. Kotlin will not inform a compilation error but the call might fail at runtime. For example, if Kotlin calls Java code that returns an ArrayList, the inferred type in Kotlin will be ArrayList<String!>!, which means the collection can be nullable, and the items as well.
In the Java code below, null is added as an item to the list.
import java.util.ArrayList;

public class ArrayWithNulls {

    public static ArrayList<String> create(){
        ArrayList<String> strings = new ArrayList();
        strings.add(null);
        strings.add("foo");
        return strings;
    }
}
In the Kotlin lines below, we are calling the previous Java code, so the safety is relaxed. The program compiles, but as the first item is null, it will fail at runtime with IllegalStateException.
val list = ArrayWithNulls.create()
val item = list.get(0) // platform type inferred (ordinary Java object)
item.substring(1) // IllegalStateException: item must not be null
Pre-Tutorial: A Taste of Kotlin
To avoid the programmer’s curse, let’s not skip trying a simple “Hello, World!” example with Kotlin. An easy way to get started with Kotlin is to download and install IntelliJ IDEA Community Edition from JetBrains, which is also free. And also install Maven for dependency management and to run the application from the command line.
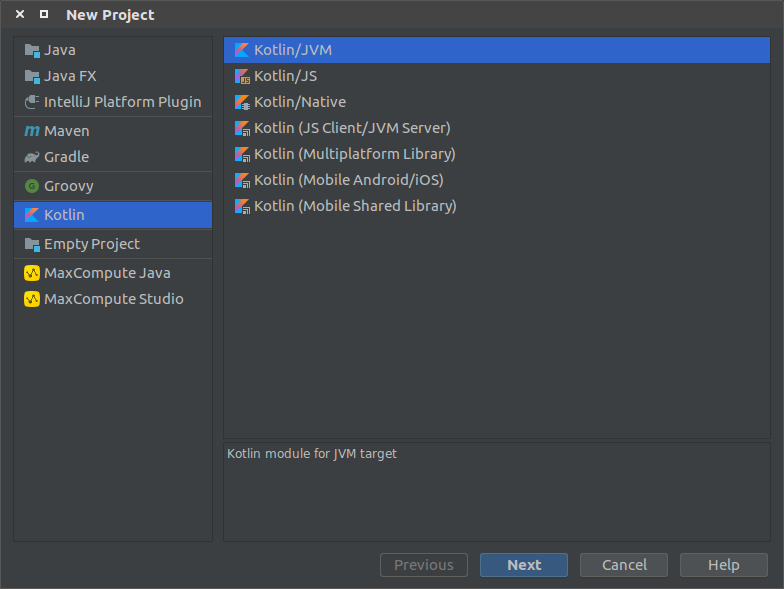
Start IntelliJ IDEA and create a new Kotlin project, choosing Kotlin/JVM.
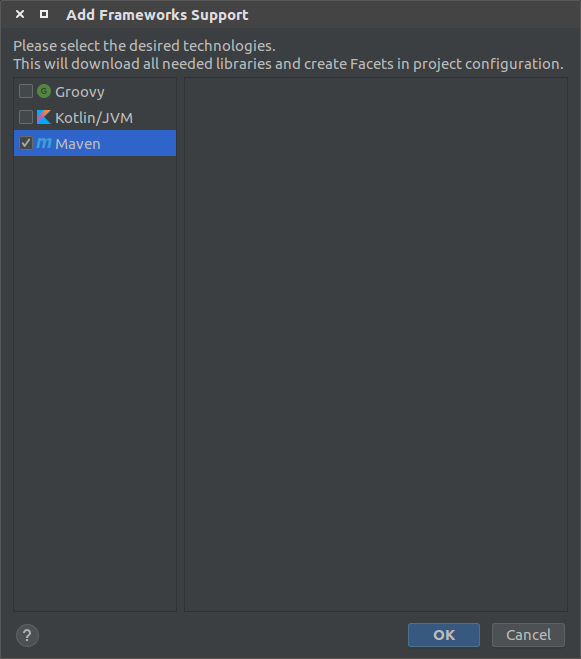
Set the project name, location, and Java 8 SDK. After the project is created, add Maven support by doing a right-click on the project and choosing Add Framework Support. Then select the Maven checkbox and click OK.
Rename src/main/java to src/main/kotlin and src/test/java to src/test/kotlin.
Add a new Kotlin File/Class to the src/main/kotlin folder. Set the file name to app. The IDE will automatically add the extension .kt, which indicates it is a Kotlin file. Add the following code:
package com.okta.developers

fun main() {
    println("Hello, World!")
}
In the lines above, you can see a package declaration, which is optional. If not present, everything goes to the default package. The main function is the entry point to the application and can be declared without parameters (if your program does not need to accept command line arguments) and return nothing. The println function is part of the Kotlin Standard Library and prints the message and the line separator to the standard output stream.
NOTE: In Kotlin, it is not required to match directories and packages. Source files can be placed arbitrarily in the file system, and one file can contain multiple classes. For pure Kotlin projects, the common root package com.okta.developers is omitted in the filesystem.
Edit your pom.xml to add Kotlin dependencies and the Kotlin Maven Plugin.
<?xml version="1.0" encoding="UTF-8"?>
<project xmlns="http://maven.apache.org/POM/4.0.0"
         xmlns:xsi="http://www.w3.org/2001/XMLSchema-instance"
         xsi:schemaLocation="http://maven.apache.org/POM/4.0.0 http://maven.apache.org/xsd/maven-4.0.0.xsd">
    <modelVersion>4.0.0</modelVersion>

    <groupId>com.okta.developers</groupId>
    <artifactId>kotlin-hello-world</artifactId>
    <version>1.0-SNAPSHOT</version>

    <properties>
        <kotlin.version>1.3.50</kotlin.version>
        <junit.version>4.12</junit.version>
        <main.class>com.okta.developer.AppKt</main.class>
    </properties>

    <dependencies>
        <dependency>
            <groupId>org.jetbrains.kotlin</groupId>
            <artifactId>kotlin-stdlib</artifactId>
            <version>${kotlin.version}</version>
        </dependency>
        <dependency>
            <groupId>org.jetbrains.kotlin</groupId>
            <artifactId>kotlin-test-junit</artifactId>
            <version>${kotlin.version}</version>
            <scope>test</scope>
        </dependency>
        <dependency>
            <groupId>junit</groupId>
            <artifactId>junit</artifactId>
            <version>${junit.version}</version>
            <scope>test</scope>
        </dependency>
    </dependencies>

    <build>
        <sourceDirectory>${project.basedir}/src/main/kotlin</sourceDirectory>
        <testSourceDirectory>${project.basedir}/src/test/kotlin</testSourceDirectory>
        <plugins>
            <plugin>
                <groupId>org.jetbrains.kotlin</groupId>
                <artifactId>kotlin-maven-plugin</artifactId>
                <version>${kotlin.version}</version>

                <executions>
                    <execution>
                        <id>compile</id>
                        <goals>
                            <goal>compile</goal>
                        </goals>
                    </execution>

                    <execution>
                        <id>test-compile</id>
                        <goals>
                            <goal>test-compile</goal>
                        </goals>
                    </execution>
                </executions>
            </plugin>
            <plugin>
                <groupId>org.apache.maven.plugins</groupId>
                <artifactId>maven-jar-plugin</artifactId>
                <version>2.6</version>
                <configuration>
                    <archive>
                        <manifest>
                            <addClasspath>true</addClasspath>
                            <mainClass>${main.class}</mainClass>
                        </manifest>
                    </archive>
                </configuration>
            </plugin>
            <plugin>
                <groupId>org.codehaus.mojo</groupId>
                <artifactId>exec-maven-plugin</artifactId>
                <version>1.2.1</version>
                <executions>
                    <execution>
                        <goals>
                            <goal>java</goal>
                        </goals>
                    </execution>
                </executions>
                <configuration>
                    <mainClass>${main.class}</mainClass>
                </configuration>
            </plugin>
        </plugins>
    </build>
</project>
Build and run application with the following Maven command:
mvn package exec:java
It should output the hello message:
Hello, World!
[INFO] ------------------------------------------------------------------------
[INFO] BUILD SUCCESS
[INFO] ------------------------------------------------------------------------
Kotlin Idioms
Now, let’s apply some Kotlin idioms to solve a common interview problem: finding anagrams in substrings. Given a string, find the number of pairs of substrings that are anagrams of each other.
First, update the main function in app.kt to make it scan the string to analyze from the standard input:
package com.okta.developers

fun main() {
    val string = readLine()
    val result = string?.let { Anagrams().count(it) }

    println(result)
}
In the code above, we declare two immutable variables, using the keyword val. Mutable variables must be declared with the keyword var. Kotlin also does type inference, so as you can see, none of the variables declare type. readLine() is a function from the kotlin-stdlib that reads a line from the standard input stream, available for JVM and Native targets.
Then, add a new Kotlin File/Class to the existing project with the name Anagrams in src/main/kotlin. Extend String to add a function that returns a String with the same characters in lexicographic order, appending the following code to Anagrams.kt:
package com.okta.developer

fun String.sort(): List<Char> = this.toList().sorted()
The Extension functions idiom provides a mechanism to extend a class without using inheritance, allowing to write new functions for classes in third party libraries that cannot be modified, even if they are final classes. In the code above, we declare the function sort() as an extension for the String class, with no parameters and return type List<Char>.
The sort() function is a Single-expression function, another Kotlin idiom for writing shorter code, as the return keyword and enclosing brackets are not required.
Below the sort(), define the Anagrams class as follows:
class Anagrams {

    fun count(s: String): Int {
        var count = 0
        for (i in 1 until s.length) {
            var substrings = s.windowed(i,  1)
                .map { it.sort() }
                .toMutableList()
            while (substrings.isNotEmpty()) {
                val substring = substrings.removeAt(0)
                count += substrings.count{ it == substring }
            }
        }
        return count
    }
}
The for loop in count(s: String) function will iterate over i in a half-open range, from 1 to s.length, not including s.length. That way, in each iteration using the windowed function of String, we create all the possible substrings of the current length i . Then sort() all the substrings and create a MutableList, to be able to remove elements later. Each collection type in the Kotlin Standard Library (set, list, map) provides a read-only and a mutable interface that defines write operations.
As the substrings are sorted, they can be compared to each other to find anagrams. Using the List function count() and passing a lambda predicate expressed with the it parameter, the number of matches will be returned. Many times, a lambda expression has only one parameter, and the implicit name of a single parameter it allows a shorter syntax.
Add the following test cases for the Anagram class in a new Kotlin file src/test/kotlin/AnagramsTest.kt:
package com.okta.developers

import org.junit.Test
import kotlin.test.assertEquals

class AnagramsTest {

    val anagrams = Anagrams()

    @Test
    fun `given abba count returns 4`(){
        assertEquals(4, anagrams.count("abba"))
    }

    @Test
    fun `given ifailuhkqq count returns 3`(){
        assertEquals(3, anagrams.count("ifailuhkqq"))
    }
}
Run the test cases with Maven:
mvn test
The test results will show in the console:
-------------------------------------------------------
 T E S T S
-------------------------------------------------------
Running com.okta.developer.AnagramsTest
Tests run: 2, Failures: 0, Errors: 0, Skipped: 0, Time elapsed: 0.083 sec

Results :

Tests run: 2, Failures: 0, Errors: 0, Skipped: 0
Run the program the same way as before, type the string to analyze in the console, then type the enter key. You should see an output like the following:
[INFO] --- exec-maven-plugin:1.2.1:java (default) @ kotlin-hello-world ---
abba
4
[INFO] ------------------------------------------------------------------------
[INFO] BUILD SUCCESS
[INFO] ------------------------------------------------------------------------
Tutorial: Use Kotlin With Spring Boot Securely
Finally, let’s see how easy is to create a Kotlin Spring Boot application with Okta OpenID Connect (OIDC) authentication.
Using the Spring Initializr API, create a Maven project with the following command:
curl https://start.spring.io/starter.zip -d dependencies=web,okta \
-d bootVersion=2.4.5.RELEASE \
-d language=kotlin \
-d type=maven-project \
-d groupId=com.okta.developer \
-d artifactId=kotlin-spring-boot  \
-d name="Kotlin Spring Boot" \
-d description="Demo project of a Kotlin Spring Boot application" \
-d packageName=com.okta.developer \
-o kotlin-spring-boot.zip
Unzip the file:
unzip kotlin-spring-boot.zip -d kotlin-spring-boot
cd kotlin-spring-boot
Secure your Application with OpenID Connect
If you already have an Okta account, see the Create a Web Application in Okta sidebar below. Otherwise, we created a Maven plugin that configures a free Okta developer account + an OIDC app (in under a minute!).
Run the Okta Maven Plugin from your app’s folder:
./mvnw com.okta:okta-maven-plugin:register
Answer a few questions (name, email, and company), and it will generate a new Okta developer account for you. If you already have an Okta account registered, use login instead of register.
Then, configure your Spring Boot application to use Okta for authentication:
./mvnw com.okta:okta-maven-plugin:spring-boot
This will set up a new OIDC application for you and write your Okta settings to your src/main/resources/application.properties file.
NOTE: You can also use the Okta Admin Console to create your app. See Create a Spring Boot App for more information.
Edit KotlinSpringBootApplication located in the package com.okta.developer to add a controller mapping that will print a welcome message in the browser window.
package com.okta.developer

import org.springframework.boot.autoconfigure.SpringBootApplication
import org.springframework.boot.runApplication
import org.springframework.security.core.annotation.AuthenticationPrincipal
import org.springframework.security.oauth2.client.authentication.OAuth2AuthenticationToken
import org.springframework.web.bind.annotation.GetMapping
import org.springframework.web.bind.annotation.RestController

@SpringBootApplication
@RestController
class KotlinSpringBootApplication {

    @GetMapping("/")
    fun hello(@AuthenticationPrincipal authenticationToken: OAuth2AuthenticationToken): String {
        return "Welcome ${authenticationToken.principal.attributes["name"]}"
    }
}

fun main(args: Array<String>) {
    runApplication<KotlinSpringBootApplication>(*args)
}
As you can see, in the hello() function, the authenticated user is passed in the authenticationToken. The @AuthenticationPrincipal annotation from Spring Security helps to resolve the principal to the expected principal type. The welcome message is built using String interpolation, a Kotlin idiom for variable substitution inside strings.
Run the application with the following command:
./mvnw spring-boot:run
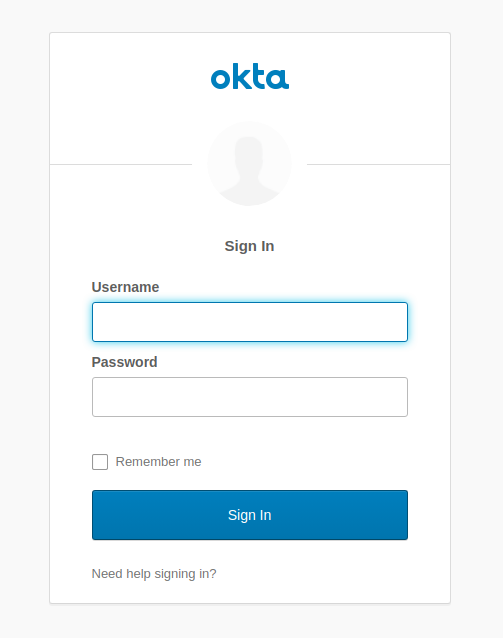
Browse to http://localhost:8080 and the application should start an OAuth 2.0 authentication code flow, redirecting to the Okta login page.
After the login, you should see the welcome message:
Welcome, Jimena Garbarino
You now have a secure application with just a few lines of Kotlin and the help of Spring Boot!
Learn More about Kotlin, Java, and Secure Authentication with these Tutorials
I hope this blog post helped you grasp how succinct and expressive Kotlin is and why developers are loving it. You can find all the tutorial code in repositories kotlin-hello-world and kotlin-spring-boot on GitHub. To learn more about Kotlin, check out the following links:
- Build a CRUD Application with Kotlin and React
- Build a Basic CRUD App in Android with Kotlin
- Build an Application with Spring Boot and Kotlin
- Kotlin Reference
Questions? Requests for a future post? Drop them in the comments! And don’t forget to follow @oktadev on Twitter and subscribe to our YouTube channel.
Changelog:
- Apr 14, 2020: Updated to use Spring Boot 2.4.5 and use the Okta CLI. You can see changes in the example on GitHub; changes in this article are in okta-blog#715.
Okta Developer Blog Comment Policy
We welcome relevant and respectful comments. Off-topic comments may be removed.