Build a Simple Microservice with C# Azure Functions

I’ve always liked microservices because they embrace small, well-encapsulated building blocks. They mitigate deployment hell by treating each component of a software system as its own product, with versions, testing, and releases.
A microservice is “micro” because of the narrow scope of its functionality, not necessarily because the length of its code is very short. A microservice’s functionality, so long as it’s kept to the limited scope, can go as deep as required by the business. By limiting scope, we isolate different bits of logic in our software by vertical niche; our client application can still get to all the functionality it needs, through several small APIs, each of which scales independently. Much better than a single, monolithic API!
Note: In May 2025, the Okta Integrator Free Plan replaced Okta Developer Edition Accounts, and the Okta CLI was deprecated.
We preserved this post for reference, but the instructions no longer work exactly as written. Replace the Okta CLI commands by manually configuring Okta following the instructions in our Developer Documentation.
Prerequisites for C# Azure Functions
In this article we’ll build an authentication microservice that will receive a username and password, and determine whether those credentials are valid. You will need the following for this tutorial:
- Visual Studio 2019
- The .NET 4.6.1 Framework
- An Azure Account
- The Azure Account VS Code Extension
- The Azure Functions VS Code Extension
- An Okta Developer Account Postman
You can find the complete working source code for this article on GitHub.
Create Your C# Azure Function in Visual Studio
Let’s up a .NET project in Visual Studio so you have a full-featured IDE (integrated development environment). Depending on what you want your Azure Function to do and your maintenance needs, you could opt to use the function editor inside the Azure portal.
Open up Visual Studio and create a new project. In the New Project wizard select Azure Function as the type of project. Name your project AuthService and click Create.

On the next screen, select Azure Functions v1 (.NET Framework) from the drop down at the top, then choose Http trigger as the trigger for your new project. Finally, change the access rights to Anonymous and lick OK to create your new Azure Function project.
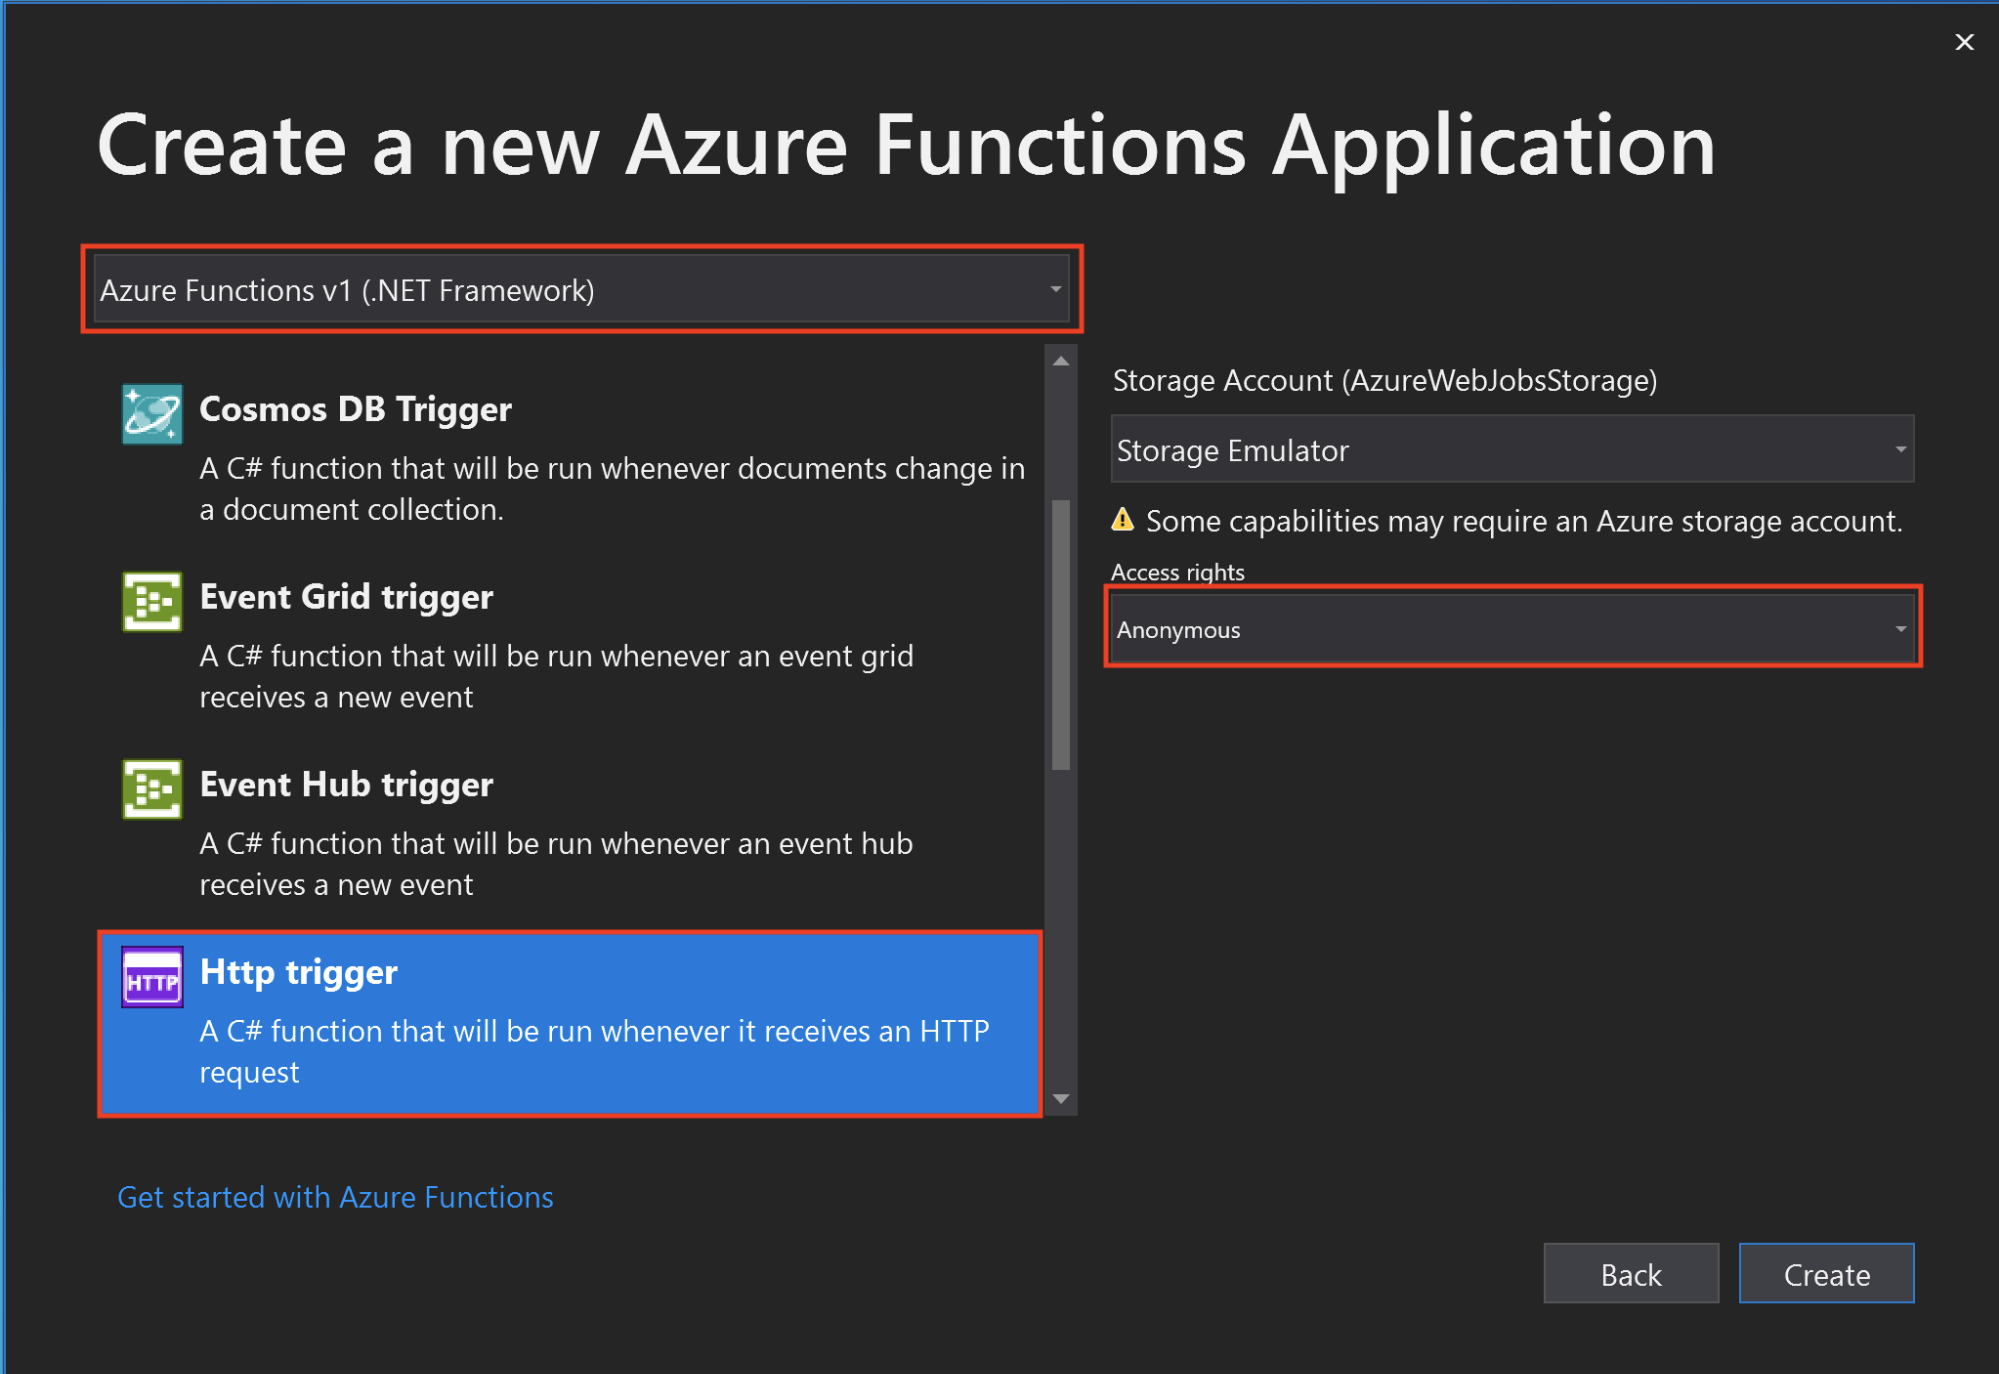
Your new project can be deployed as an Azure Function and in the following sections, you’ll add some custom code to your new project.
Add C# Data Transfer Objects to Your Azure Function
These types will feed data in and out of the Azure Function. Add a class to your project named User.cs. This class holds data about the logged-in user. Paste the following code into the new file:
using System;

namespace AuthService
{
  public class User
  {
    public string Id { get; set; }
    public DateTime PasswordChanged { get; set; }
    public string Login { get; set; }
    public string FirstName { get; set; }
    public string LastName { get; set; }
    public string Locale { get; set; }
    public string TimeZone { get; set; }
  }
}
Add a class to your project named Session.cs. This class is similar to the User class we just created, but holds data related to the user’s active session. Paste the following code into the new file:
using System;

namespace AuthService
{
  public class Session
  {
    public string Token { get; set; }
    public string ExpiresAt { get; set; }
  }
}
Add a class to your project named AuthResponse.cs. This class will be used to return the result of the login operation back to the client. It includes information about the success or failure of the login attempt, and will also provide information about the user and session - if the login was successful. Paste the following code into the new file:
using System;

namespace AuthService
{
  public class AuthResponse
  {
    public bool WasSuccessful { get; set; }
    public string Message { get; set; }

    public Session Session { get; set; }
    public User User { get; set; }
  }
}
Add one more new class named OktaAuthenticationRequest.cs. This class holds the data to send to Okta with the authentication request. Paste the following code into the new file:
using System;

namespace AuthService
{
  public class OktaAuthenticationRequest
  {
    public string username { get; set; }
    public string password { get; set; }
  }
}
Create Your C# Azure Function
Install the Newtonsoft.Json package as shown in the image below. The latest version of the package at the time this article was published is 12.0.2.

Next, add the following statements to the top of Function1.cs.
using System.Text;
using System.Net.Http.Headers;
using Newtonsoft.Json;
In this next step, overwrite the code for the Run() method of Function1. Copy the code below and paste it into your Function1.cs file. Be sure to completely replace the existing code there.
[FunctionName("Function1")]
public static async Task<HttpResponseMessage> Run([HttpTrigger(AuthorizationLevel.Anonymous, "get", "post", Route = null)]HttpRequestMessage req, TraceWriter log)
{
  var OktaDomain = "{yourOktaDomain}";
  var OktaApiToken = "{yourApiToken}";
  Session session = null;
  User user = null;

  //get username
  string publicKey = req.GetQueryNameValuePairs()
    .FirstOrDefault(q => string.Compare(q.Key, "user", true) == 0)
    .Value;

  if (publicKey == null)
    req.CreateResponse<AuthResponse>(new AuthResponse() { WasSuccessful = false, Message = "Must pass `user` as a query string parameter" });

  //get password
  string privateKey = req.GetQueryNameValuePairs()
    .FirstOrDefault(q => string.Compare(q.Key, "password", true) == 0)
    .Value;

  if (privateKey == null)
    req.CreateResponse<AuthResponse>(new AuthResponse() { WasSuccessful = false, Message = "Must pass `password` as a query string parameter" });

  //TODO

  //response
  var wasSuccess = session != null && user != null;
  return req.CreateResponse<AuthResponse>(new AuthResponse()
  {
    WasSuccessful = wasSuccess,
    Message = wasSuccess ? "Success" : "Invalid username and password",
    Session = session,
    User = user
  });
}
This is the meat of the function to authenticate the provided credentials. It first retrieves the user and password input from the HTTP request and validates that both were provided. TODO will be replaced with our authentication code in the next step.
At the end of the function, the response is an instance of AuthResponse that sets WasSuccessful to true when the session and user variables are not null. Based on that evaluation it will also set Message to either “Success” or “Invalid username and password”.
Set Up Your Okta Account
Next, you’ll need a free Okta Developer account.
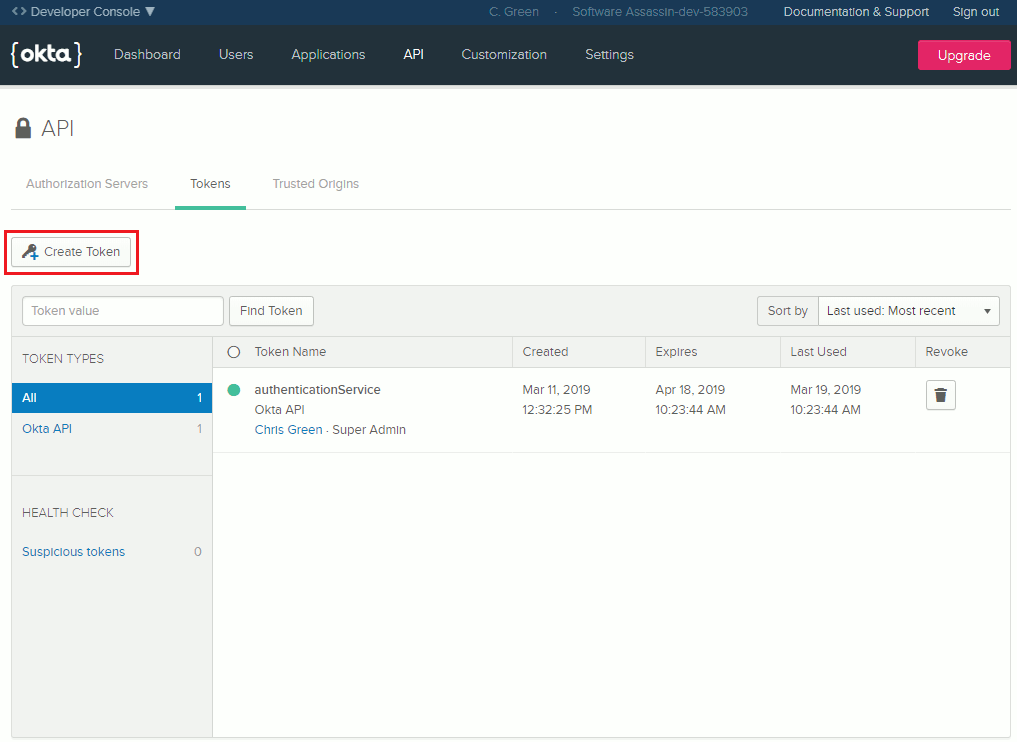
You’ll also need to generate an API token for your account. To keep them secure, API tokens are only displayed once when they’re first generated, so make sure you copy it and keep it safe so that we can use it again later. To generate your API token, log in to your Okta Developer account. Once logged in click API in the main menu, then go to Tokens. When you’re on the Tokens screen, click Create Token near the top of the page. You’ll have to provide a public name for your token, then click Create Token.
Your API token should then display on the screen. Copy the value so that you can use it in the next step.
Set Your API Token
Once you’ve generated your API token, go back to the first two lines of the function we copied earlier. Those first lines define values for your OktaDomain and your OktaApiToken, so replace those values with the settings for your Okta account:
var OktaDomain = "{yourOktaDomain}";
var OktaApiToken = "{yourApiToken}";
Add Your Okta Authentication Code
Now that we have your Okta domain and API token, we are ready to write the code to authenticate users with Okta.
The code below sends your API token, along with the user-provided username and password to the Okta service as a JSON encoded string. It then receives a JSON encoded response (responseJson) with the results from the login attempt. The response is then decoded and stored in the object responseObj where we check the data inside. If the login was a success the response will also provide data about the user and the user’s session.
Replace the TODO in Function1.cs with the following code:
//generate URL for service call using your configured Okta Domain
string url = string.Format("{0}/api/v1/authn", OktaDomain);

//build the package we're going to send to Okta
var data = new OktaAuthenticationRequest() { username = publicKey, password = privateKey };

//serialize input as json
var json = new StringContent(JsonConvert.SerializeObject(data), Encoding.UTF8, "application/json");

//create HttpClient to communicate with Okta's web service
using (HttpClient client = new HttpClient())
{
  //Set the API key
  client.DefaultRequestHeaders.Authorization = new AuthenticationHeaderValue("SSWS", OktaApiToken);

  //Post the json data to Okta's web service
  using (HttpResponseMessage res = await client.PostAsync(url, json))

  //Get the response from the server
  using (HttpContent content = res.Content)
  {
    //get json string from the response
    var responseJson = await content.ReadAsStringAsync();

    //deserialize json into complex object
    dynamic responseObj = JsonConvert.DeserializeObject(responseJson);

    //determine if the returned status is success
    if (responseObj.status == "SUCCESS")
    {
      //get session data
      session = new Session()
      {
        Token = responseObj.sessionToken,
        ExpiresAt = responseObj.expiresAt
      };

      //get user data
      user = new User()
      {
        Id = responseObj._embedded.user.id,
        Login = responseObj._embedded.user.login,
        Locale = responseObj._embedded.user.locale,
        TimeZone = responseObj._embedded.user.timeZone,
        FirstName = responseObj._embedded.user.firstName,
        LastName = responseObj._embedded.user.lastName
      };
    }
  }
}
This code creates a new OktaAuthenticationRequest; and posts that instance, serialized as JSON, to a URL that uses your Okta domain (in the URL) and your Okta API token (in the Authentication header).
OktaAuthenticationRequest then decodes the JSON results and stores (successful) user data in instances of the Session and User DTOs you created. These variables determine whether the operation was a success.
Run Your Azure Function Locally
To run your Azure Function locally, just hit the run button in Visual Studio.
A console window will appear with the Azure Function logo at the top. Just below the logo, on the 2nd printed line, the console will display the URL that the app is listening to. (In the screenshot below, the URL is http://localhost:7071.) Copy the URL.
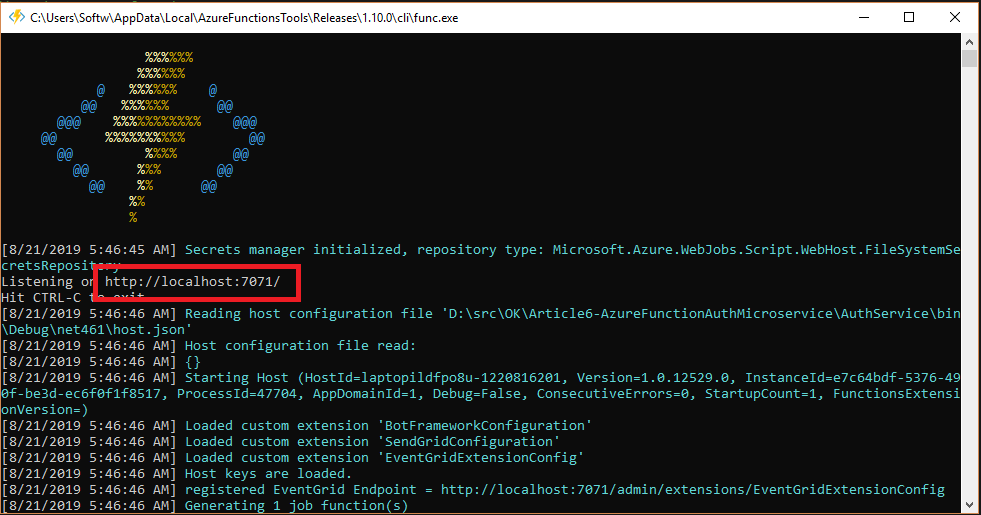
Modify the URL to execute your Azure Function by adding /api/Function1 to the end. Your new URL should look something like this:
http://localhost:7071/api/Function1
Open up Postman and paste your modified URL as the request URL. Select “POST” as the HTTP request method. Then add user and password as keys for two query parameters, and set their values to your actual username and password. These are the credentials that your C# Azure Function will authenticate to execute your Azure Function when the HTTP request is executed.
Click Send to execute the HTTP request.
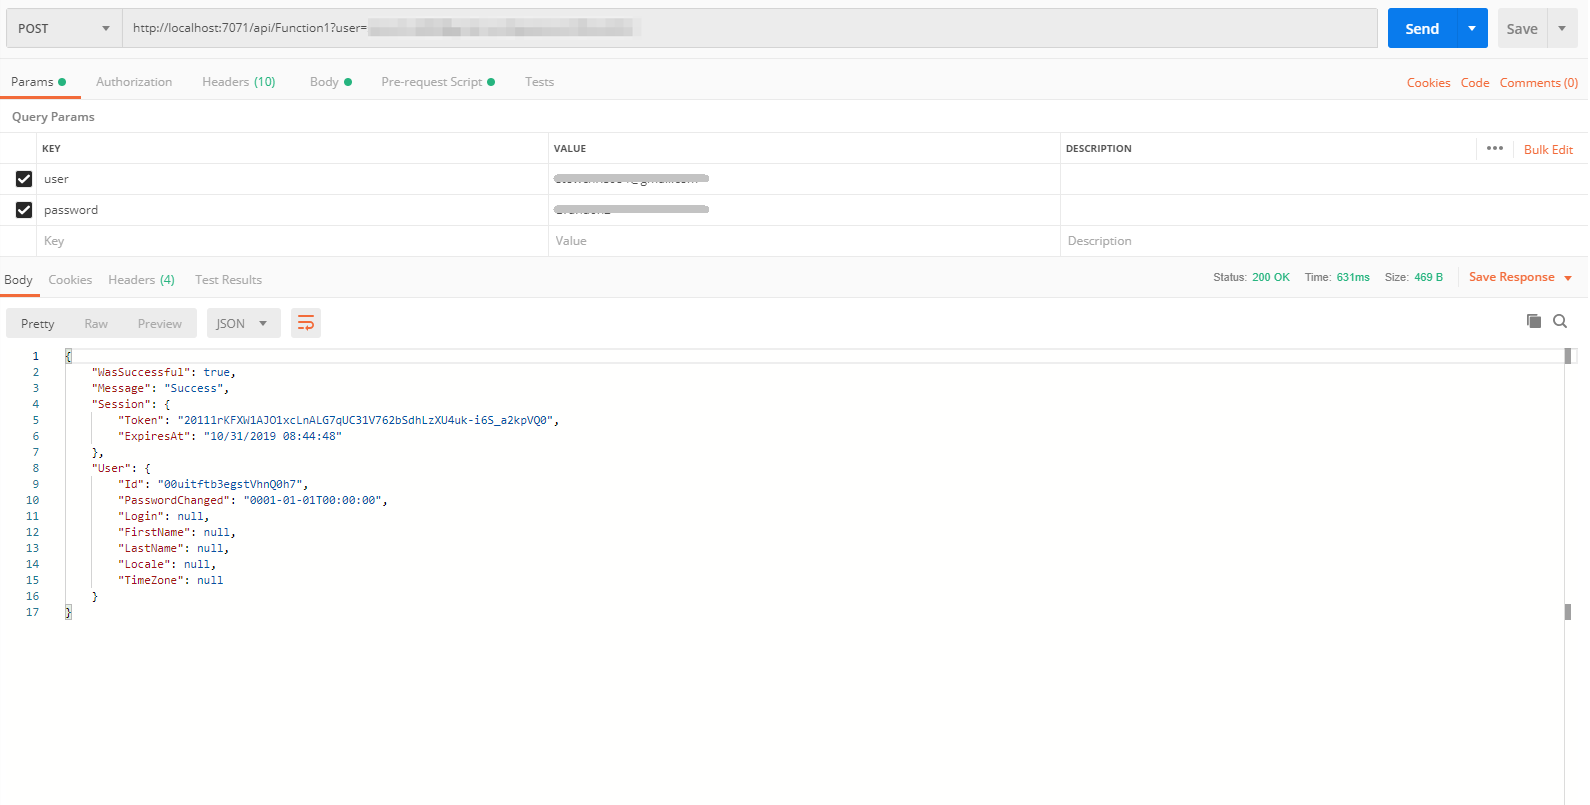
If the credentials you provided were incorrect, then the value for WasSuccessful will be false and the Message will contain a value stating, “Invalid username or password”.
Publish to Azure
Inside Visual Studio, right-click on your AuthService project and select Publish. In the publish wizard select Create New app service.
On the next screen provide a name for your new app service. I have left mine as the default name here. Click Publish when you’re ready to create your service.
It will take a moment for Visual Studio to create your new app service. Once finished, it will show a tab with a URL to your new app service. Click on the URL to open it up in a browser.
Modify the URL in the same way we did your local URL, to call your function. Replace the URL in Postman with your new URL and leave the user and password query params as they are. Click Send to execute your deployed C# Azure Function.
You now have a working authentication service!
Learn More About ASP.NET, Azure Functions, and Microservices
If you’re interested in learning more about Azure Functions and microservices check out the following links:
- Build Secure Microservices with AWS Lambda and ASP.NET
- Build Your First Azure Function in Visual Studio Code
- AWS Lambda vs Azure Functions for C# Serverless
If you have any questions about the post, feel free to leave me a comment below. Don’t forget to follow us on Twitter, Facebook, and YouTube so you never miss any of our killer content!
Okta Developer Blog Comment Policy
We welcome relevant and respectful comments. Off-topic comments may be removed.