Create a React Native App with Login in 10 Minutes

React Native is a mobile app development framework that allows you to use React to build native iOS and Android mobile apps. Instead of using a web view and rendering HTML and JavaScript, it converts React components to native platform components. This means you can use React Native in your existing Android and iOS projects, or you can create a whole new app from scratch.
In this post, I’ll show you how to add a login feature to a React Native application using OAuth 2.0 and OpenID Connect. Authentication and authorization are important parts of most applications as you often need to know who a user is (authentication) and what they’re allowed to do (authorization). OAuth 2.0 is an industry-standard protocol for authorization and OpenID Connect (OIDC) is an authentication layer on top of OAuth 2.0. Integrating with an always-on service like Okta for OAuth makes set up and configuration easy, particularly with React Native and Okta’s React Native SDK.
React Native 0.61 was just released a couple of weeks ago. One of its biggest features is Fast Refresh - a unification of live reloading (reload on save) and hot reloading. Fast Refreshfully supports modern React’s functional components and hooks and recovers after typos and other mistakes. In previous versions of React Native, a common complaint was that “hot reloading” was broken.
Prerequisites:
- Node 10
- Yarn
- Watchman
- Java 8 (for Android)
- An Okta Developer Account
To install these prerequisites on a Mac, Linux, or Windows Subsystem for Linux (WSL), I recommend using Homebrew.
brew install node
brew install yarn
brew install watchman
brew tap AdoptOpenJDK/openjdk
brew cask install adoptopenjdk8
If you’re not using WSL for Windows, you can use Chocolatey to install everything from the command line:
choco install -y nodejs.install python2 jdk8
You’ll also need to download and install IDEs for Android and iOS:
- Android Studio (for Android)
- Xcode (for iOS)
You can sign up for an Okta developer account at developer.okta.com/signup.
If you’d rather watch a video, I created a screencast of this tutorial.
Table of Contents
- Create a React Native Application
- Add Login with OIDC
- Create a Native App in Okta
- Install React Native OIDC Login
- Using a Custom Login Screen with Okta
- Add OIDC Login the Hard Way
- Learn More About React Native and OIDC Login
Note: In May 2025, the Okta Integrator Free Plan replaced Okta Developer Edition Accounts, and the Okta CLI was deprecated.
We preserved this post for reference, but the instructions no longer work exactly as written. Replace the Okta CLI commands by manually configuring Okta following the instructions in our Developer Documentation.
Create a React Native Application
The React Native CLI is a popular way to get started with React Native development. You can create a new application using its init command.
npx react-native@0.64 init ReactNativeLogin
Add Login with OIDC
Okta provides a React Native SDK which conveniently wraps the Okta native Android OIDC and iOS OIDC libraries.
I’m going to show you two ways to add OIDC-based login with Okta: The fast way with a tool I created and the step-by-step instructions.
This tool is based on Schematics and manipulates your project to install and configure everything.
Install Schematics globally.
npm install -g @angular-devkit/schematics-cli@0.1102.5
Create a Native App in Okta
Before you begin, you’ll need a free Okta developer account. Install the Okta CLI and run okta register to sign up for a new account. If you already have an account, run okta login.
Then, run okta apps create. Select the default app name, or change it as you see fit.
Choose Native and press Enter.
Use com.okta.dev-133337:/callback for the Redirect URI and the Logout Redirect URI
(where dev-133337.okta.com is your Okta domain name). Your domain name is reversed to provide a unique scheme to open your app on a device.
What does the Okta CLI do?
The Okta CLI will create an OIDC Native App in your Okta Org. It will add the redirect URIs you specified and grant access to the Everyone group. You will see output like the following when it’s finished:
Okta application configuration:
Issuer:    https://dev-133337.okta.com/oauth2/default
Client ID: 0oab8eb55Kb9jdMIr5d6
NOTE: You can also use the Okta Admin Console to create your app. See Create a Native App for more information.
Install React Native OIDC Login
In a terminal, navigate into your ReactNativeLogin directory and install OktaDev Schematics:
npm i -D @oktadev/schematics@3.4.1
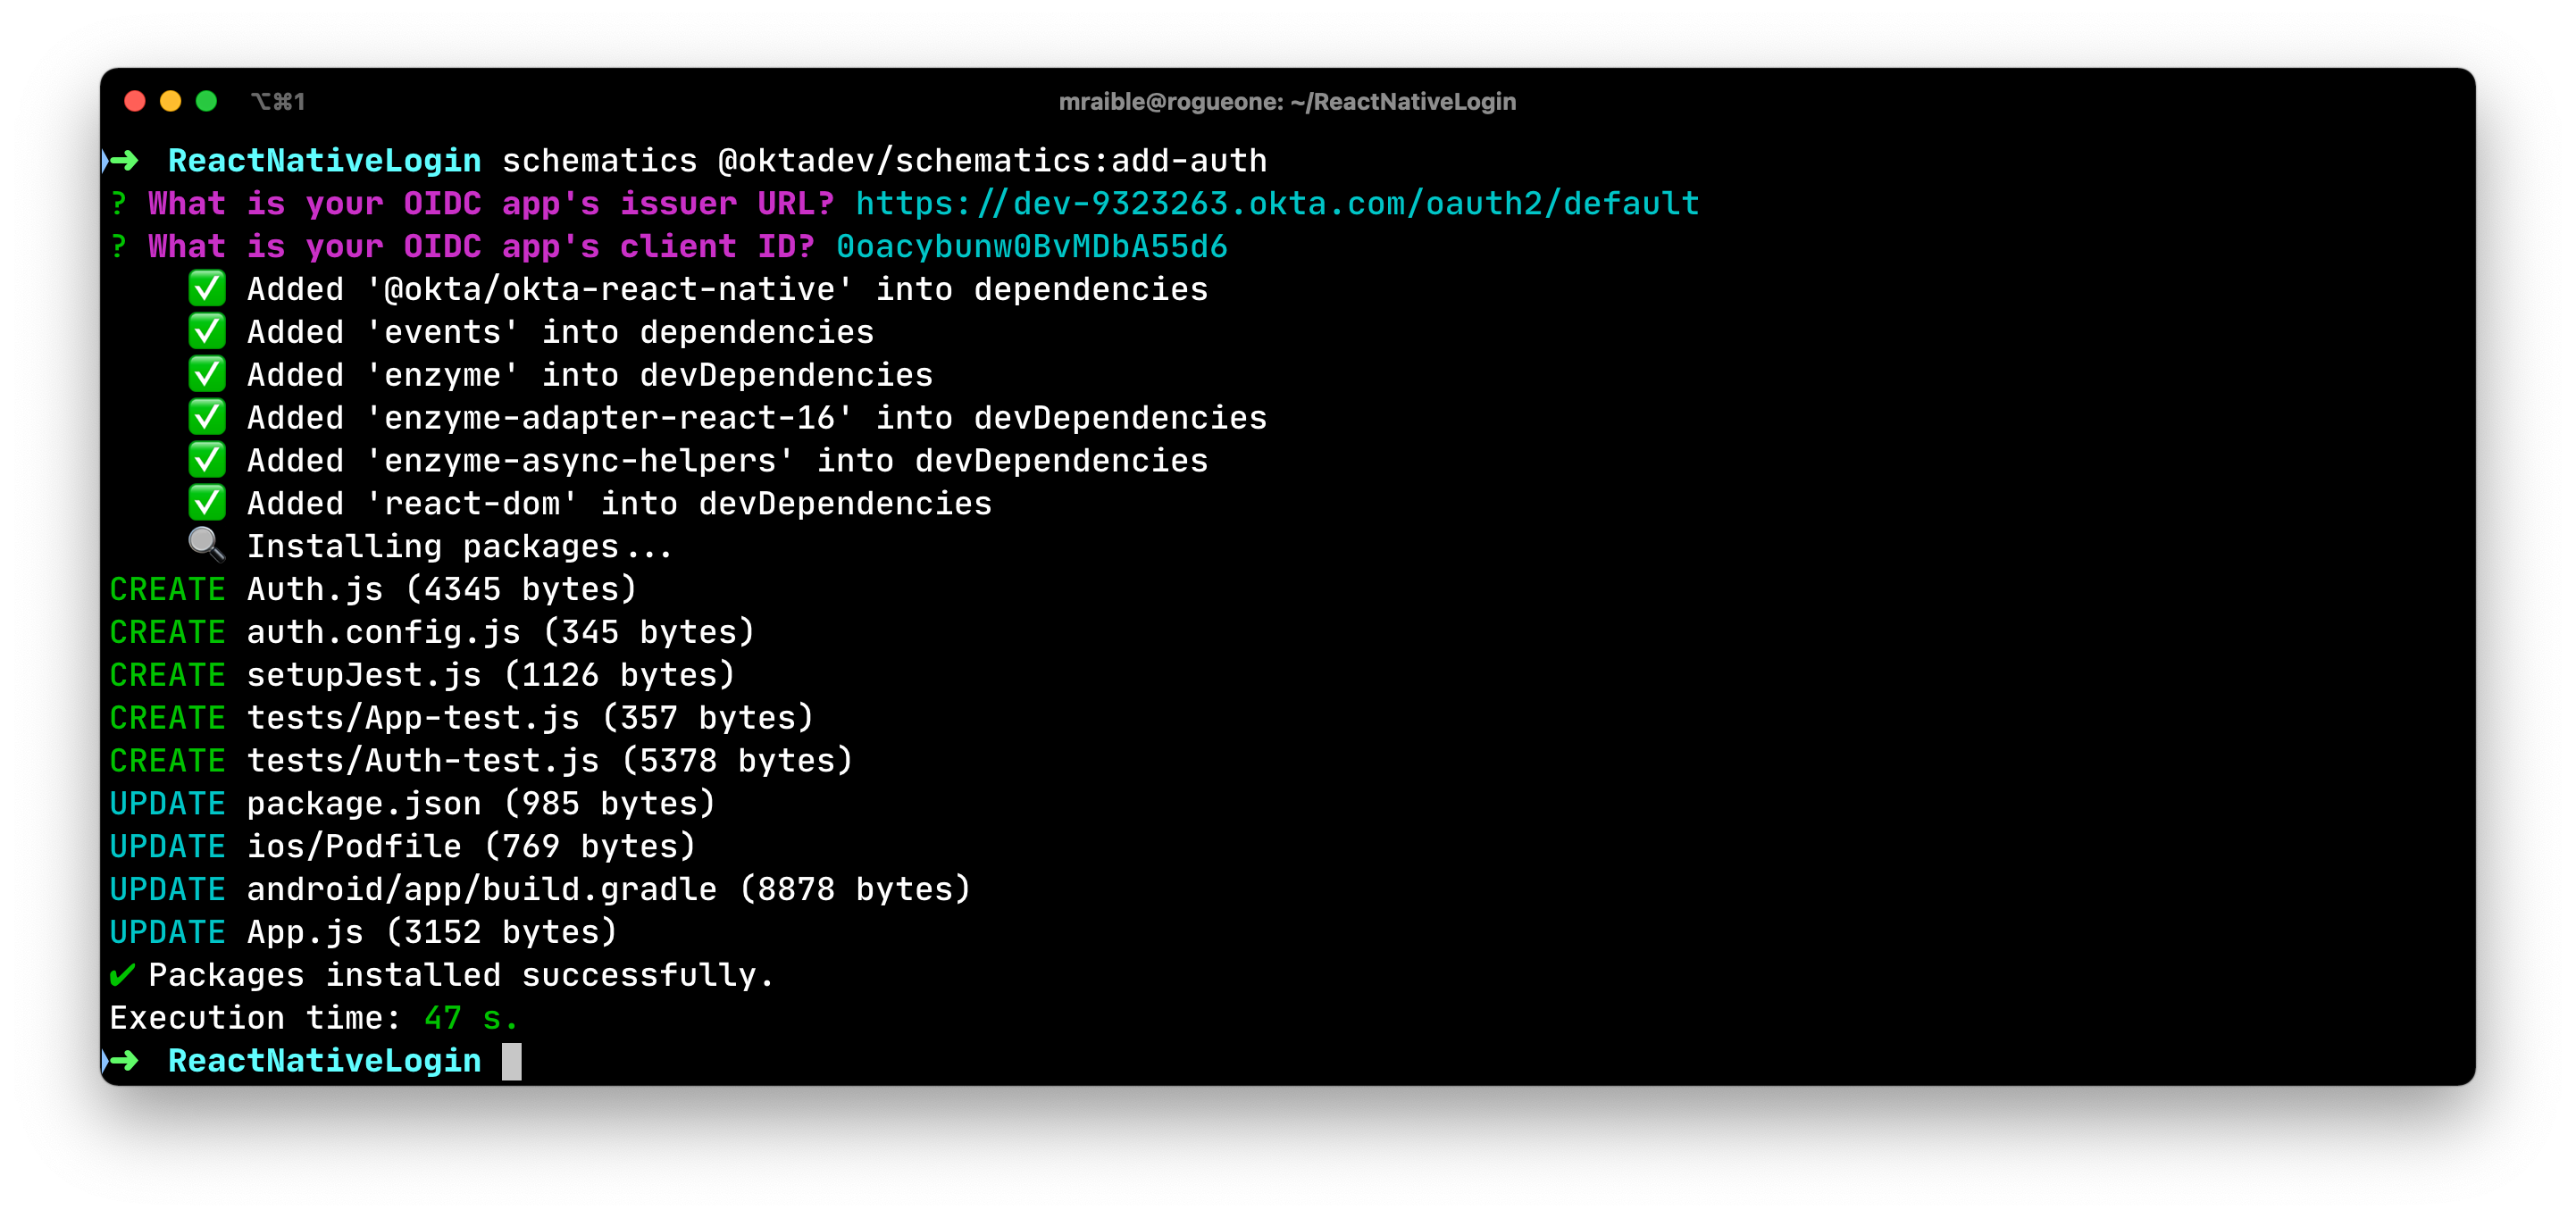
Run the add-auth schematic in your ReactNativeLogin project.
schematics @oktadev/schematics:add-auth
You’ll be prompted for your issuer and clientId.
This process will take a minute to complete.
Then, run pod install --project-directory=ios to install the Okta OIDC iOS SDK.
TIP: If you don’t have CocoaPoads installed, you can install it with gem install cocoapods.
Run Your React Native App on iOS
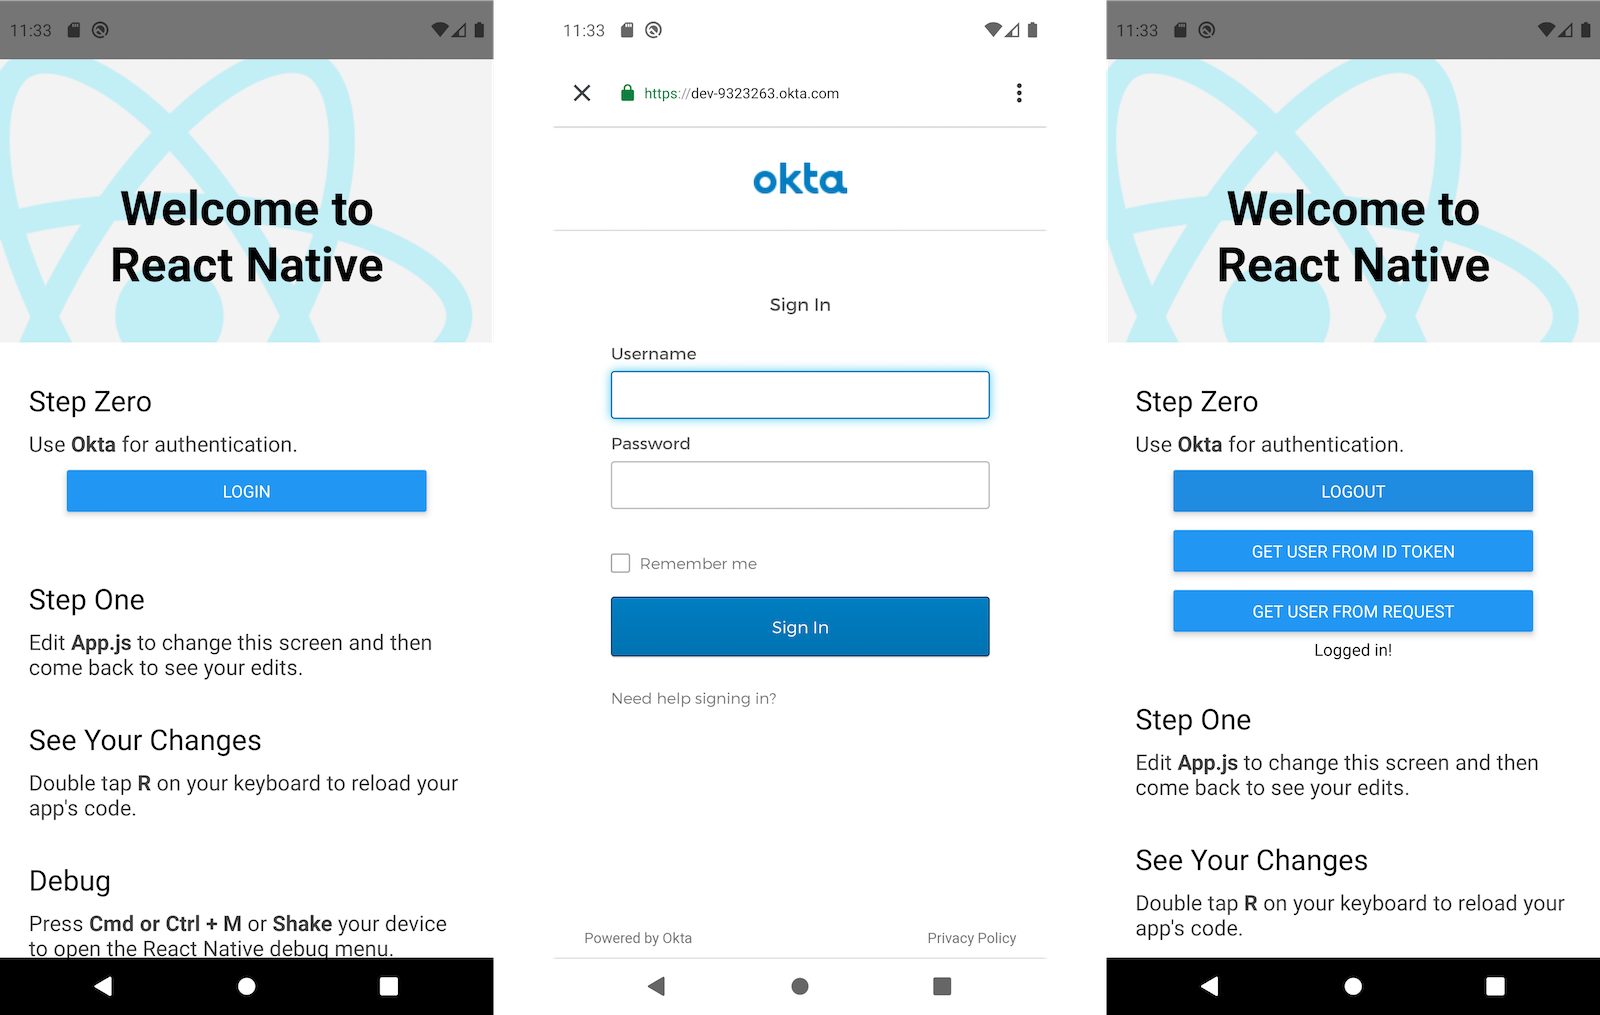
Navigate back to the root directory of your app. Start your app and you should be able to authenticate with Okta. 🎉
npm run ios
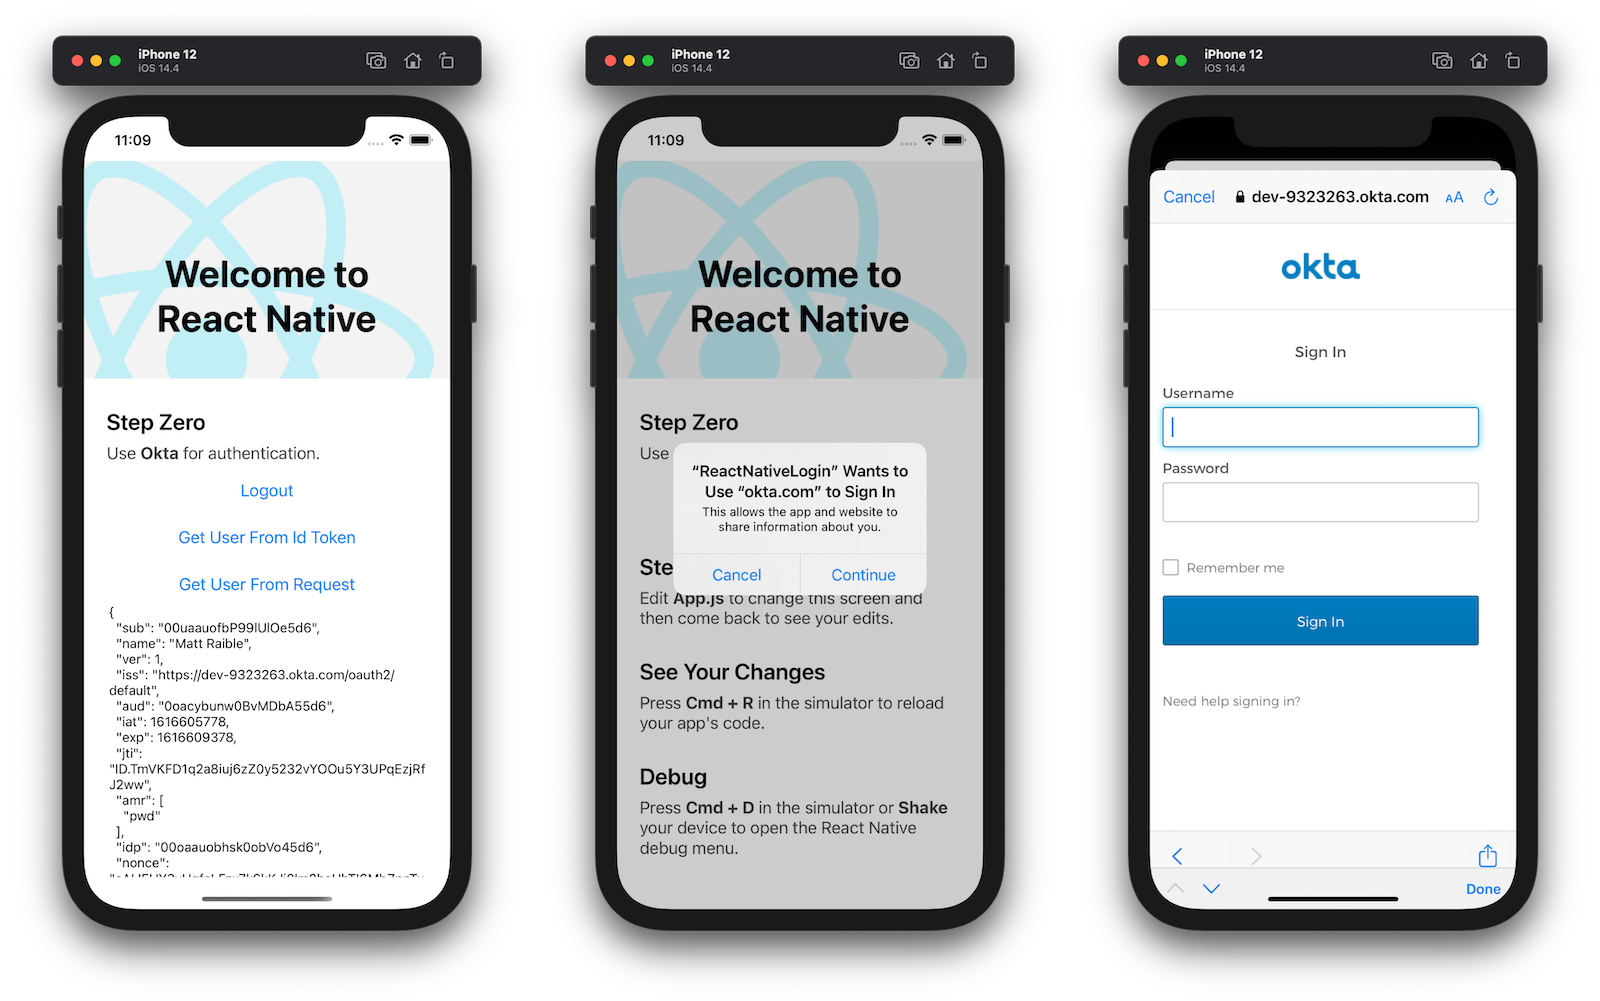
Once you’re signed in, you’ll see options to log out, get the user’s information from an ID token, and get the user’s information from the React Native SDK’s getUser() method (a.k.a. the request).
NOTE: The prompt when you click Login cannot be avoided. This is an iOS safety mechanism. It also pops up when you log out. See this issue for more information.
Run Your React Native App on Android
The schematic you ran modifies all the necessary files for Android; there are no code modifications required!
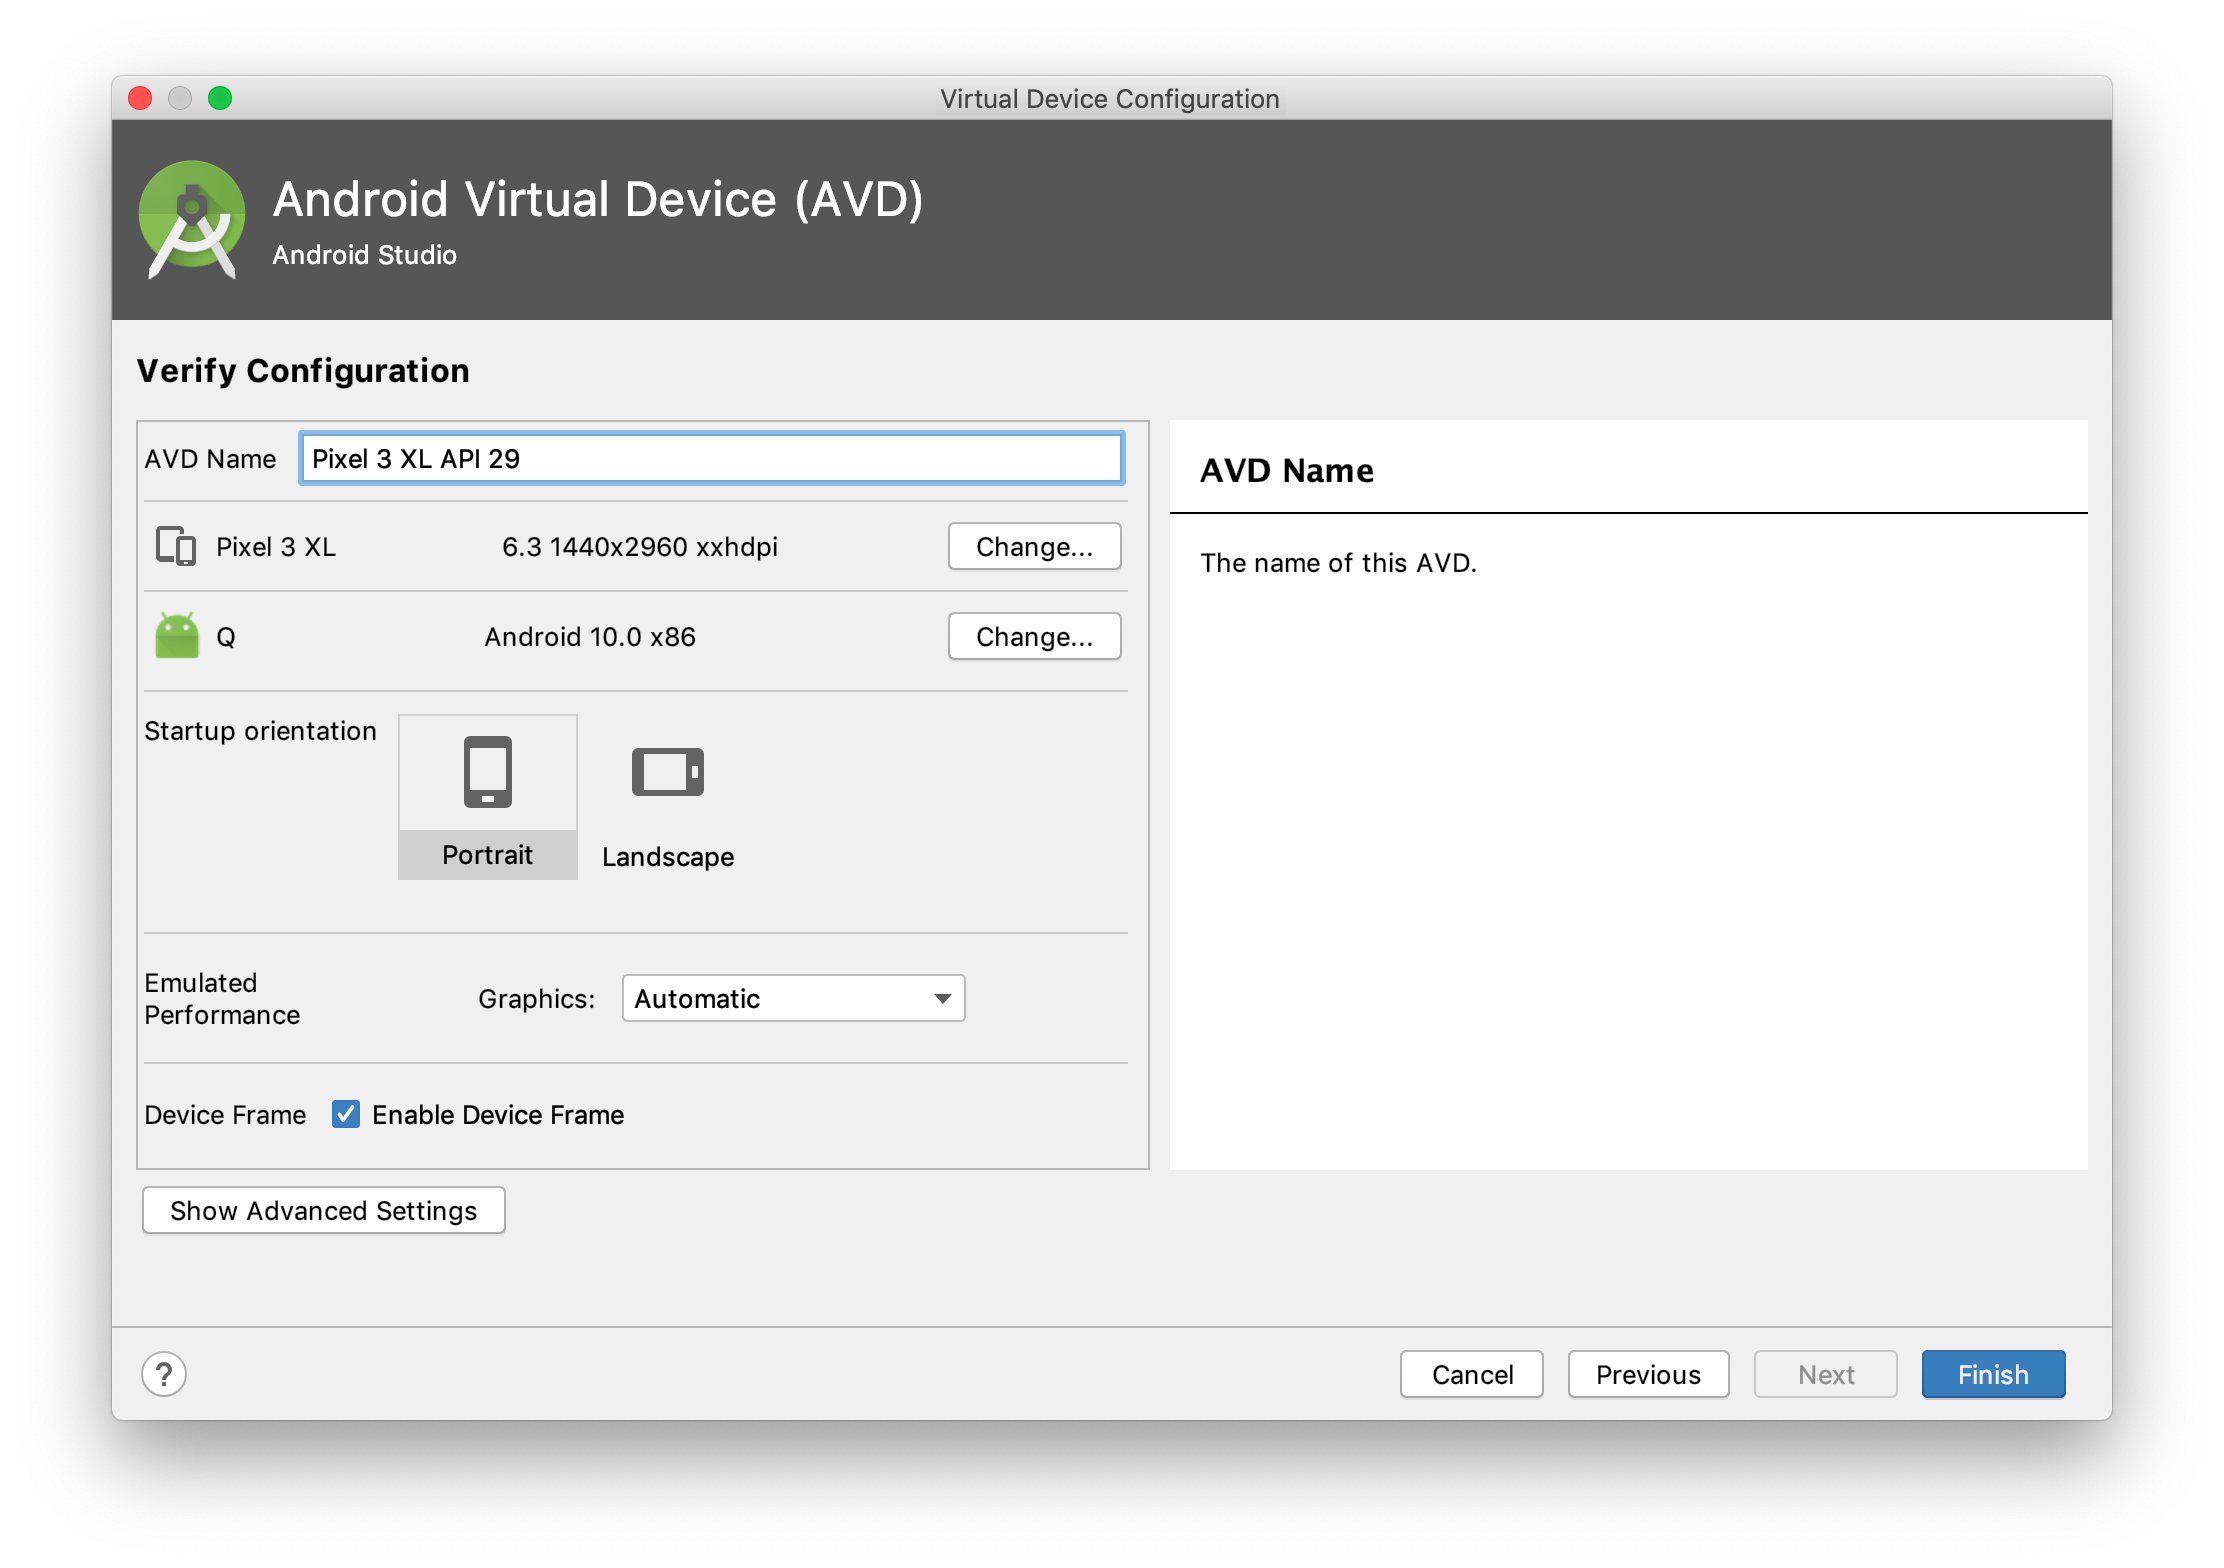
You will need to run an AVD (Android Virtual Device) before starting your app, or you can plug in your Android phone and use that. If you have neither, launch Android Studio and go to Tools > AVD Manager. Click Create Virtual Device at the bottom and select a phone of your choice. I chose a Pixel 3 XL with Android 10.
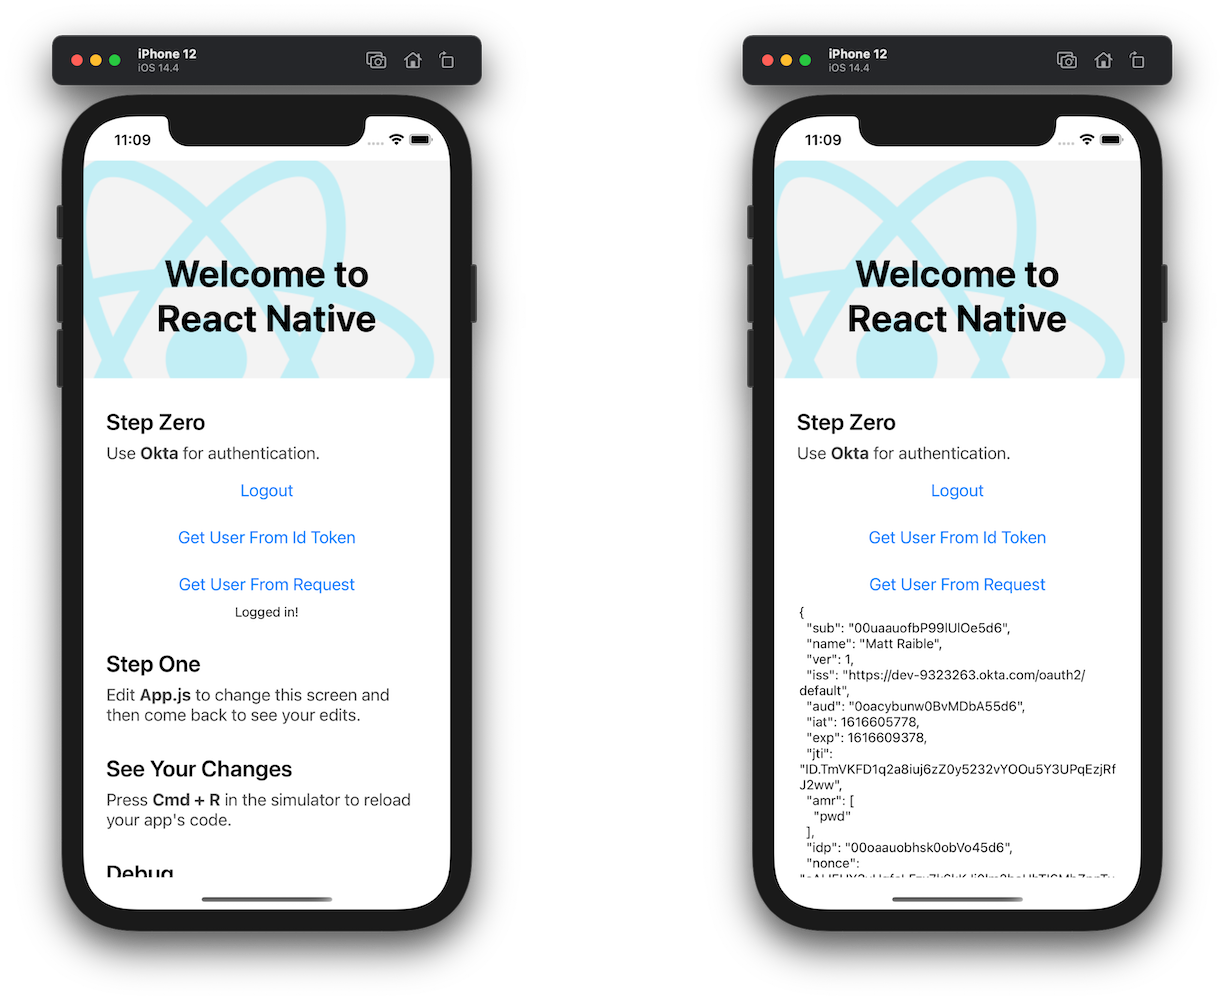
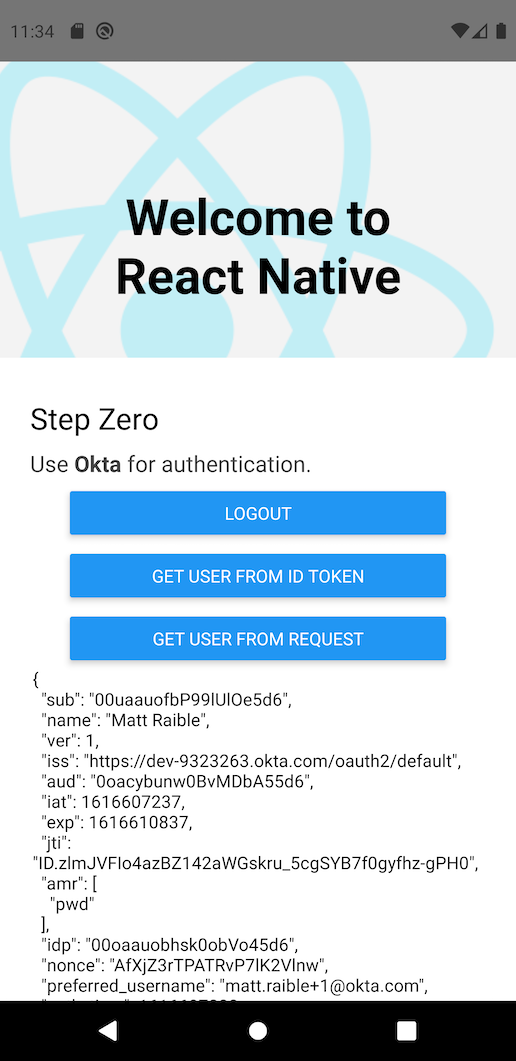
Start your AVD, then your app, and authenticate with Okta. 🎊
npm run android
Click the Get User from ID Token button to confirm you can retrieve the user’s information.
Run Installed React Native Authentication Tests
In addition to integrating login, OktaDev Schematics also installed some tests that verify login and authentication work. Run npm test to see these tests run in your terminal.
Snapshot Summary
 › 1 snapshot written from 1 test suite.

Test Suites: 2 passed, 2 total
Tests:       12 passed, 12 total
Snapshots:   1 written, 1 total
Time:        8.952s
Ran all test suites.
NOTE: OktaDev Schematics puts tests in a tests directory rather than the default __tests__ directory because Angular Schematics uses double underscore as a placeholder.
Using a Custom Login Screen with Okta
This example showed you how to add an OIDC flow that opens a browser when a user logs in and logs out. If you require a smoother login experience that doesn’t pop open a browser, see Okta’s Custom Sign-In Example for example code that shows you how to implement that type of flow.
Add OIDC Login the Hard Way
The previous section showed you how to use OktaDev Schematics to quickly add a login feature (and tests!) to a React Native application. However, you might have an existing React Native application that doesn’t have the same structure as a brand new React Native application.
This section shows you everything that OktaDev Schematics does for you, in detail.
Create a project with React Native CLI and install Okta’s SDK.
npx react-native@0.64 init ReactNativeLogin
cd ReactNativeLogin
npm install @okta/okta-react-native@1.10.0
For iOS, modify ios/Podfile to change it from iOS 10 to iOS 11.
platform :ios, '11.0'
Install iOS native dependencies with CocoaPods.
pod install --project-directory=ios
Add Jest and Enzyme to Test Your React Native Login
Jest is a library for testing JavaScript apps and Enzyme is a library that makes it easier to select and query elements in tests. They’re often used alongside one another.
Install testing dependencies with npm.
npm i enzyme@3.11.0 enzyme-adapter-react-16@1.15.6 \
  enzyme-async-helpers@0.9.1 react-dom@17.0.2 events@3.3.0
Then change your jest key in package.json to match the following:
"jest": {
  "preset": "react-native",
  "automock": false,
  "testEnvironment": "jsdom",
  "transformIgnorePatterns": [
    "node_modules/(?!@okta|@react-native|react-native)"
  ],
  "setupFiles": [
    "./setupJest.js"
  ]
}
Create setupJest.js to polyfill React Native for Okta.
// Required to correctly polyfill React-Native

import { configure } from 'enzyme';
import Adapter from 'enzyme-adapter-react-16';

configure({ adapter: new Adapter() });

global.XMLHttpRequest = jest.fn();
global.fetch = jest.fn();

if (typeof window !== 'object') {
  global.window = global;
  global.window.navigator = {};
}

import * as ReactNative from 'react-native';

jest.doMock('react-native', () => {
  // Extend ReactNative
  return Object.setPrototypeOf(
    {
      NativeModules: {
        ...ReactNative.NativeModules,
        OktaSdkBridge: {
          createConfig: jest.fn(),
          signIn: jest.fn(),
          signOut: jest.fn(),
          getAccessToken: jest.fn(),
          getIdToken: jest.fn(),
          getUser: jest.fn(),
          isAuthenticated: jest.fn(),
          revokeAccessToken: jest.fn(),
          revokeIdToken: jest.fn(),
          revokeRefreshToken: jest.fn(),
          introspectAccessToken: jest.fn(),
          introspectIdToken: jest.fn(),
          introspectRefreshToken: jest.fn(),
          refreshTokens: jest.fn(),
        },
      },
    },
    ReactNative,
  );
});
Create Auth.js to handle your authentication code.
import React, { Component, Fragment } from 'react';

import { SafeAreaView, ScrollView, Button, StyleSheet, Text, View } from 'react-native';
import { createConfig, signIn, signOut, isAuthenticated, getUser, getUserFromIdToken, EventEmitter } from '@okta/okta-react-native';
import configFile from './auth.config';

export default class Auth extends Component {
  constructor() {
    super();
    this.state = {
      authenticated: false,
      context: null,
    };
    this.checkAuthentication = this.checkAuthentication.bind(this);
  }

  async componentDidMount() {
    let that = this;
    EventEmitter.addListener('signInSuccess', function (e: Event) {
      that.setState({authenticated: true});
      that.setContext('Logged in!');
    });
    EventEmitter.addListener('signOutSuccess', function (e: Event) {
      that.setState({authenticated: false});
      that.setContext('Logged out!');
    });
    EventEmitter.addListener('onError', function (e: Event) {
      console.warn(e);
      that.setContext(e.error_message);
    });
    EventEmitter.addListener('onCancelled', function (e: Event) {
      console.warn(e);
    });
    await createConfig({
      clientId: configFile.oidc.clientId,
      redirectUri: configFile.oidc.redirectUri,
      endSessionRedirectUri: configFile.oidc.endSessionRedirectUri,
      discoveryUri: configFile.oidc.discoveryUri,
      scopes: configFile.oidc.scopes,
      requireHardwareBackedKeyStore: configFile.oidc.requireHardwareBackedKeyStore,
    });
    this.checkAuthentication();
  }

  componentWillUnmount() {
    EventEmitter.removeAllListeners('signInSuccess');
    EventEmitter.removeAllListeners('signOutSuccess');
    EventEmitter.removeAllListeners('onError');
    EventEmitter.removeAllListeners('onCancelled');
  }

  async componentDidUpdate() {
    this.checkAuthentication();
  }

  async checkAuthentication() {
    const result = await isAuthenticated();
    if (result.authenticated !== this.state.authenticated) {
      this.setState({authenticated: result.authenticated});
    }
  }

  async login() {
    signIn();
  }

  async logout() {
    signOut();
  }

  async getUserIdToken() {
    let user = await getUserFromIdToken();
    this.setContext(JSON.stringify(user, null, 2));
  }

  async getMyUser() {
    let user = await getUser();
    this.setContext(JSON.stringify(user, null, 2));
  }

  setContext = message => {
    this.setState({
      context: message,
    });
  };

  renderButtons() {
    if (this.state.authenticated) {
      return (
        <View style={styles.buttonContainer}>
          <View style={styles.button}>
            <Button
              onPress={async () => {
                this.getUserIdToken();
              }}
              title="Get User From Id Token"
            />
          </View>
          <View style={styles.button}>
            <Button
              onPress={async () => {
                this.getMyUser();
              }}
              title="Get User From Request"
            />
          </View>
        </View>
      );
    }
  }

  render() {
    return (
      <Fragment>
        <SafeAreaView style={styles.container}>
          <View style={styles.buttonContainer}>
            <View style={styles.button}>
              {this.state.authenticated ? (
                <Button
                  style={styles.button}
                  testID="logoutButton"
                  onPress={async () => { this.logout() }}
                  title="Logout"
                />
              ) : (
                <Button
                  style={styles.button}
                  testID="loginButton"
                  onPress={async () => { this.login() }}
                  title="Login"
                />
              )}
            </View>
          </View>
          {this.renderButtons()}
          <ScrollView
            contentInsetAdjustmentBehavior="automatic"
            style={styles.context}>
            <Text>{this.state.context}</Text>
          </ScrollView>
        </SafeAreaView>
      </Fragment>
    );
  }
}

const styles = StyleSheet.create({
  buttonContainer: {
    flexDirection: 'column',
    justifyContent: 'space-between',
  },
  button: {
    width: 300,
    height: 40,
    marginTop: 10,
  },
  container: {
    flex: 1,
    flexDirection: 'column',
    alignItems: 'center',
  }
});
You might notice it imports a config file at the top.
import configFile from './auth.config';
Create auth.config.js with your OIDC settings from Okta.
export default {
  oidc: {
    clientId: '$yourClientId',
    redirectUri: 'com.okta.dev-#######:/callback',
    endSessionRedirectUri: 'com.okta.dev-#######:/callback',
    discoveryUri: 'https://dev-#######.okta.com/oauth2/default',
    scopes: ['openid', 'profile', 'offline_access'],
    requireHardwareBackedKeyStore: false,
  },
};
NOTE: See the previous section, Create a Native App in Okta, if you need Okta OIDC settings. Use okta apps to see your apps and okta login to see your domain name.
In App.js, import Auth.
import Auth from './Auth';
And use it in a new <View /> before <Section title="Step One">.
<View style={styles.sectionContainer}>
  <Text style={styles.sectionTitle}>Step Zero</Text>
  <Text style={styles.sectionDescription}>
    Use <Text style={styles.highlight}>Okta</Text> for authentication.
  </Text>
  <Auth />
</View>
<Section title="Step One">
...
At this point, your tests will not pass because Okta uses an EventEmitter to communicate between components.
Add React Native Authentication Tests
To mock the native event emitter that Okta uses, add a mock for it in __tests__/App-test.js.
/**
 * @format
 */

import 'react-native';
import React from 'react';
import App from '../App';

// Note: test renderer must be required after react-native.
import renderer from 'react-test-renderer';

jest.mock(
  '../node_modules/react-native/Libraries/EventEmitter/NativeEventEmitter',
);

it('renders correctly', () => {
  renderer.create(<App />);
});
To make sure all the login and authentication logic works, create __tests__/Auth-test.js.
import React from 'react';
import Auth from '../Auth';
import { shallow } from 'enzyme';
import renderer from 'react-test-renderer';
import { waitForState } from 'enzyme-async-helpers';
import { NativeEventEmitter } from 'react-native';

const nativeEmitter = new NativeEventEmitter();

jest
  .mock(
    '../node_modules/react-native/Libraries/Components/StatusBar/StatusBar',
    () => 'StatusBar',
  )
  .mock(
    '../node_modules/react-native/Libraries/Components/ScrollView/ScrollView',
    () => 'ScrollView',
  )
  .mock(
    '../node_modules/react-native/Libraries/EventEmitter/NativeEventEmitter',
  );

global.fetch = jest
  .fn()
  .mockImplementation(() => {
    return new Promise((resolve, reject) => {
      resolve({
        json: () => {
          return {
            user: [{ foo: 'foo', bar: 'bar' }],
          }
        },
        ok: true,
      });
    });
  })
  .mockImplementationOnce(() => {
    return new Promise((resolve, reject) => {
      resolve({
        json: () => {
          return {
            userinfo_endpoint: 'dummy_endpoint',
          }
        },
        ok: true,
      });
    });
  });

describe('auth setup', () => {
  it('should render without crashing', () => {
    const rendered = renderer.create(<Auth />).toJSON();
    expect(rendered).toBeTruthy();
  });

  it('should render correctly', () => {
    const rendered = renderer.create(<Auth />).toJSON();
    expect(rendered).toMatchSnapshot();
  });

  it('should initialize with default state', () => {
    const wrapper = shallow(<Auth />);
    expect(wrapper.state().authenticated).toBe(false);
    expect(wrapper.state().context).toBe(null);
  });

  it('should render login button if not authenticated', () => {
    const wrapper = shallow(<Auth />);
    const loginButton = wrapper.find('Button').get(0);
    expect(loginButton.props.title).toBe('Login');
  });

  it('should render logout and get user info buttons if authenticated', () => {
    const wrapper = shallow(<Auth />);
    wrapper.setState({authenticated: true});
    const logoutButton = wrapper.find('Button').get(0);
    const getUserFromIdButton = wrapper.find('Button').get(1);
    const getUserButton = wrapper.find('Button').get(2);
    expect(logoutButton.props.title).toBe('Logout');
    expect(getUserFromIdButton.props.title).toBe('Get User From Id Token');
    expect(getUserButton.props.title).toBe('Get User From Request');
  });

  it('should not render login button if authenticated', () => {
    const wrapper = shallow(<Auth />);
    wrapper.setState({authenticated: true});
    const loginButton = wrapper.find('Button').get(0);
    expect(loginButton.props.title).not.toBe('Login');
  });

  it('should not render logout and get user info buttons if not authenticated', () => {
    const wrapper = shallow(<Auth />);
    const logoutButton = wrapper.find('Button').get(0);
    const getUserFromIdButton = wrapper.find('Button').get(1);
    const getUserButton = wrapper.find('Button').get(2);
    expect(logoutButton.props.title).not.toBe('Logout');
    expect(getUserFromIdButton).toBe(undefined);
    expect(getUserButton).toBe(undefined);
  });
});

describe('authentication flow', () => {
  it('should detect when the user has logged in', async () => {
    const wrapper = shallow(<Auth />);
    const loginButton = wrapper.find('Button').get(0);
    await loginButton.props.onPress();
    expect(loginButton.props.title).toBe('Login');
    nativeEmitter.emit('signInSuccess');
    expect(wrapper.state().authenticated).toBe(true);
    expect(wrapper.state().context).toBe('Logged in!');
  });

  it('should detect when the user has signed out', async () => {
    const wrapper = shallow(<Auth />);
    wrapper.setState({authenticated: true});
    const logoutButton = wrapper.find('Button').get(0);
    await logoutButton.props.onPress();
    expect(logoutButton.props.title).toBe('Logout');
    nativeEmitter.emit('signOutSuccess');
    expect(wrapper.state().authenticated).toBe(false);
    expect(wrapper.state().context).toBe('Logged out!');
  });

  it('should return user profile information from id token' , async () => {
    const mockGetIdToken = require('react-native').NativeModules.OktaSdkBridge.getIdToken;
    mockGetIdToken.mockImplementationOnce(() => {
      // id_token returns { a: 'b' }
      return {'id_token': 'eyJhbGciOiJIUzI1NiIsInR5cCI6IkpXVCJ9.eyJhIjoiYiJ9.jiMyrsmD8AoHWeQgmxZ5yq8z0lXS67_QGs52AzC8Ru8'};
    });
    const wrapper = shallow(<Auth />);
    wrapper.setState({authenticated: true});
    const profileButton = wrapper.find('Button').get(1);
    await profileButton.props.onPress();
    await waitForState(wrapper, state => state.context !== null);
    expect(profileButton.props.title).toBe('Get User From Id Token');
    expect(wrapper.state().context).toContain('"a": "b"');
  });
});
Run npm test to bask in the fruits of your labor!
To run your app on iOS, use npm run ios.
To run it on Android, you’ll need to modify your Gradle build file to define a redirect scheme that captures the authorization redirect. Under android > defaultConfig, add:
manifestPlaceholders = [ appAuthRedirectScheme: 'com.okta.dev-######' ]
Finally, start a virtual device (or plug in your phone), and run npm run android.
Learn More About React Native and OIDC Login
This tutorial showed you how to add a login feature to a React Native application. You learned that OAuth 2.0 is an authorization protocol and OIDC is an authentication layer on top of it. You also used PKCE (Public Key Code Exchange) in your implementation, which is the more secure way to implement OAuth 2.0 in mobile applications.
I hope you enjoy your React Native development journey and its fast refresh feature!
You can find the source code for this example on GitHub at oktadeveloper/okta-react-native-login-example.
To learn more about React Native, OIDC, and PKCE, check out these posts:
- Build an iOS App with React Native and Publish it to the App Store
- Design and Develop an Android App with React Native and Publish to Google Play Store
- Identity, Claims, & Tokens – An OpenID Connect Primer, Part 1 of 3
- Implement the OAuth 2.0 Authorization Code with PKCE Flow
- Why OAuth API Keys and Secrets Aren’t Safe in Mobile Apps
If you liked this tutorial, follow @oktadev on Twitter and subscribe to our YouTube channel.
Changelog:
- Mar 24, 2021: Updated to use React Native 0.64 and Okta React SDK 1.10.0. You can see the changes in the example app on GitHub. Changes to this article can be viewed in oktadeveloper/okta-blog#624.
Matt Raible is a well-known figure in the Java community and has been building web applications for most of his adult life. For over 20 years, he has helped developers learn and adopt open source frameworks and use them effectively. He's a web developer, Java Champion, and Developer Advocate at Okta. Matt has been a speaker at many conferences worldwide, including Devnexus, Devoxx Belgium, Devoxx France, Jfokus, and JavaOne. He is the author of The Angular Mini-Book, The JHipster Mini-Book, Spring Live, and contributed to Pro JSP. He is a frequent contributor to open source and a member of the JHipster development team. You can find him online @mraible and raibledesigns.com.
Okta Developer Blog Comment Policy
We welcome relevant and respectful comments. Off-topic comments may be removed.