Get Familiar with Android and Gradle

Interested in Android development? Then you should get familiar with Gradle, the only Android development build system that Google officially supports.
Gradle manages all aspects of the Android development process, making it easy to:
- Compile your code
- Solve dependency trees and conflicts between libraries
- Merge your code and resources with those of your libraries
- Cache resources for compilation performance
- Connect it all to the Android SDK
- Finally packaging it into the right format with the appropriate signature
In true Android fashion, you can configure most aspects of Gradle’s behavior by providing Gradle with different configuration options. Going further, lots of freely available plugins add features to Gradle: extended error reporting, custom app icons, integration with other systems, etc. You can also use Groovy or Kotlin to create your own completely custom plugins.
This article will introduce you to the essential aspects of what Gradle does and how you can configure it I’ll also introduce you to a couple more advanced Gradle concepts.
Table of Contents
- Set Up Your Android App to work With Okta and Gradle
- How Gradle Uses Tasks
- How Gradle Builds an Android App
- How to Configure Gradle in Android
- Essential Configuration Options for Gradle in Android
- What You Learned
- Advanced Configuration Options for Gradle in Android
- Learn more about Android + Identity Management
Your App will also use Okta to safely and easily authenticate users, so you can focus on your business while Okta gives you the security you need, plus services like:
- User Authentication and Authorization
- User-data storage
- Social login
- Multi-factor authentication
This article follows an example Android app that authenticates a user with Okta’s SDK for Android and demonstrates Gradle in Android. Please clone and set it up yourself, so you can follow along.
What you will also need:
Let’s get started!
Note: In May 2025, the Okta Integrator Free Plan replaced Okta Developer Edition Accounts, and the Okta CLI was deprecated.
We preserved this post for reference, but the instructions no longer work exactly as written. Replace the Okta CLI commands by manually configuring Okta following the instructions in our Developer Documentation.
Set Up Your Android App to work With Okta and Gradle
First, clone the Okta Android sample app repo and open it with Android Studio:
git clone https://github.com/okta/okta-oidc-android
cd okta-oidc-android
Before you begin, you’ll need a free Okta developer account. Install the Okta CLI and run okta register to sign up for a new account. If you already have an account, run okta login.
Then, run okta apps create. Select the default app name, or change it as you see fit.
Choose Native and press Enter.
Use com.okta.dev-133337:/callback for the Redirect URI and set the Logout Redirect URI to com.okta.dev-133337:/logout
(where dev-133337.okta.com is your Okta domain name). Your domain name is reversed to provide a unique scheme to open your app on a device.
What does the Okta CLI do?
The Okta CLI will create an OIDC Native App in your Okta Org. It will add the redirect URIs you specified and grant access to the Everyone group. You will see output like the following when it’s finished:
Okta application configuration:
Issuer:    https://dev-133337.okta.com/oauth2/default
Client ID: 0oab8eb55Kb9jdMIr5d6
NOTE: You can also use the Okta Admin Console to create your app. See Create a Native App for more information.
Create a config.json file similar to this one in the app module’s /app/res/raw folder:
{
  "client_id": "{clientId}",
  "redirect_uri": "{yourReversedOktaDomain}:/callback",
  "end_session_redirect_uri": "{yourReversedOktaDomain}:/logout",
  "scopes": [
    "openid",
    "profile",
    "offline_access"
  ],
  "discovery_uri": "https://{yourOktaDomain}/oauth2/default"
}
Set a URI Scheme unique to your app in the app module’s /app/build.gradle:
android.defaultConfig.manifestPlaceholders = [
    "appAuthRedirectScheme": "{yourReversedOktaDomain}"
]
Add your Okta domain to your /local.properties file at the root of the project:
authn.orgUrl="https://dev-######.okta.com"
If you want to learn more about Okta, check out the Add Identity Management to Your Android App section of the Okta documentation for Android.
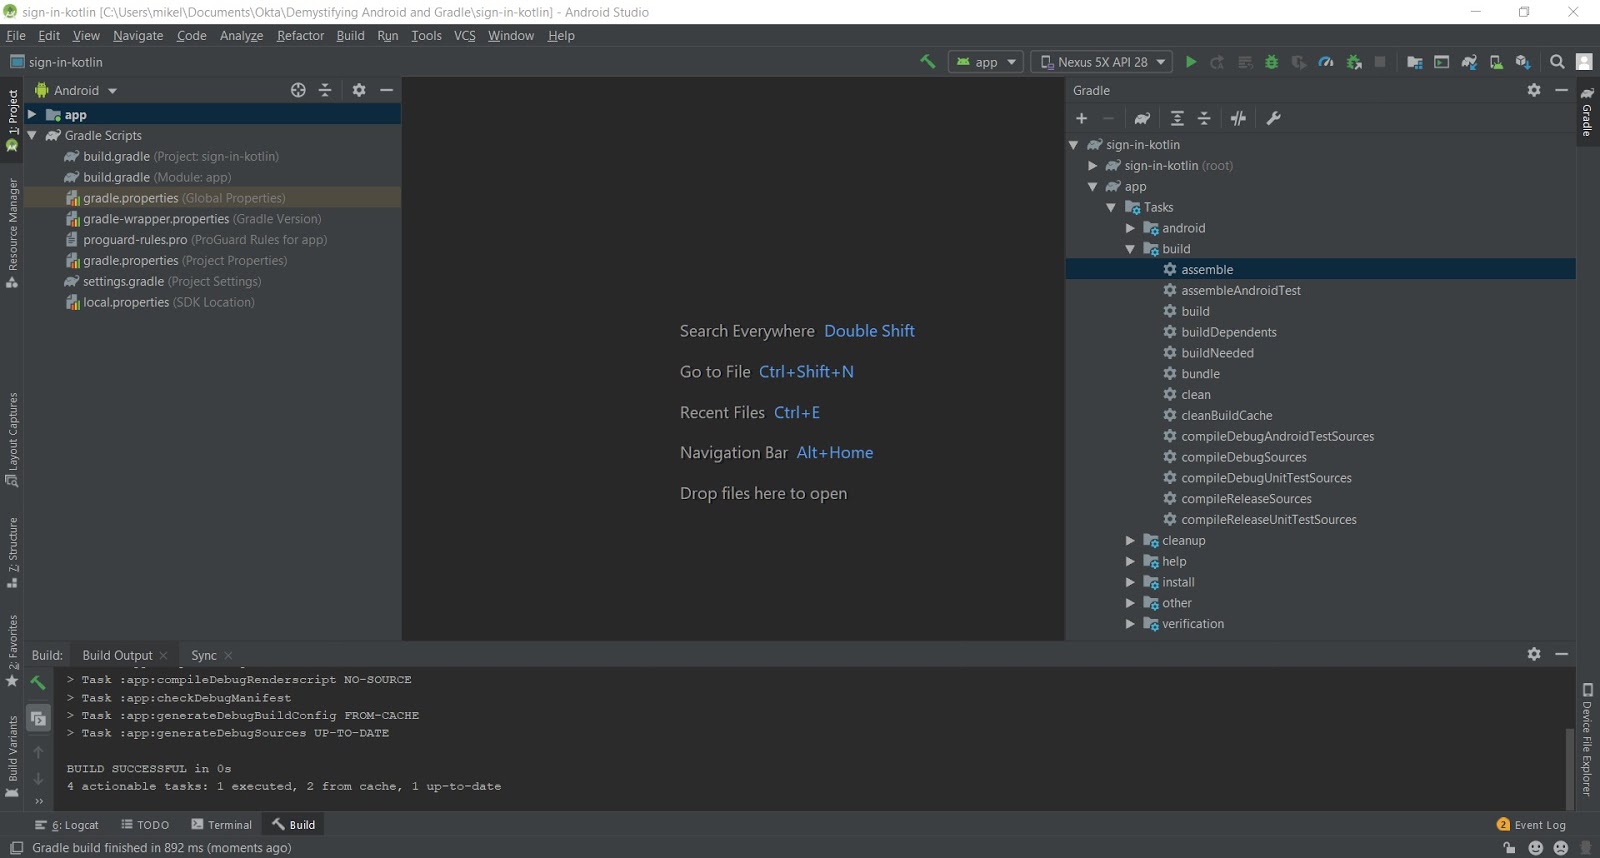
How Gradle Uses Tasks
Any time you use Android Studio to build an app, install an app, or clean a project, it executes a Gradle task, a set of instructions very similar to the functions in your code. Some tasks like clean (which deletes a folder) will execute just a couple of instructions, and some other tasks like assemble (which builds a whole app) will trigger a whole sequence of other tasks.
To see an example of a very simple task, you can find the definition of the clean task in /build.gradle
task clean(type: Delete) {
    delete rootProject.buildDir
}
Android Studio defines some tasks, like clean, by default in our project’s configuration files, but each plugin in our project could come with tasks as well. The simplest Android project already has many Gradle tasks available through the Android plugin.
You can easily get a list of all the Gradle tasks in your project in a few ways. If you like the command-line route, you can execute in the root of your project:
./gradlew tasks
If you use Android Studio 3 or a newer version, you can see all the tasks listed in a tab called Gradle on the right side of your workspace. This will give you a list of nicely categorized tasks you can run with a simple double-click:
Although we won’t dive into the creation of custom tasks, I encourage you to expand your knowledge with Gradle documentation after reading this article.
How Gradle Builds an Android App
Every time you build an app, a progress report in the bottom of Android Studio shows a list of different elements:
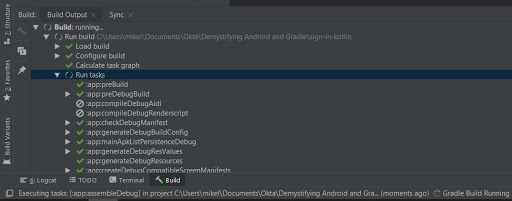
This is the list of tasks Gradle completes to build the app. While Gradle handles these all automatically, it’s worth going through them to get a sense of what we can configure later on.
-
Prepare for the build
First, you can execute a sequence of tasks to make Gradle aware of all the configuration values used during the compilation, to verify the validity of all the tasks we defined or a plugin defined, and to make sure all dependencies/libraries defined in the project can be resolved.
These actions ensure Gradle is properly configured. If you ever wondered what the “Sync Now” prompt does, this is it.

-
Compile the source code
To run Android applications, all source code must be compiled into dex files. This is a type of bytecode specific to Android that is an optimized version of the compiled source code. The tools for converting source code into dex files have changed over time, but Gradle still manages the tools and provides them with the required configuration (which we as developers might decide to modify).
-
Merge manifests, resources, and assets
Every dependency of the project might define its own manifest, resources like drawables, etc. All of them put together generate the final app. This approach allows Android to detect conflicts between resources early on, so it can warn developers.
-
Sign and package
Once all the code, all the dependencies, and all the resources are ready, Gradle will create a single Android Package (apk) from them and sign the result.
The apk file will contain:
- a Manifest describing its contents
- one or multiple dex/bytecode files
- multiple resources
- a list of all those resources
- a signature to verify the authorship of the apk
You can then install the apk in an Android device or an emulator to use your app.
How to Configure Gradle in Android
Android Studio 3.2 introduced a much more advanced version of the Project Structure dialog, which you can use to configure most of the essential Gradle options.
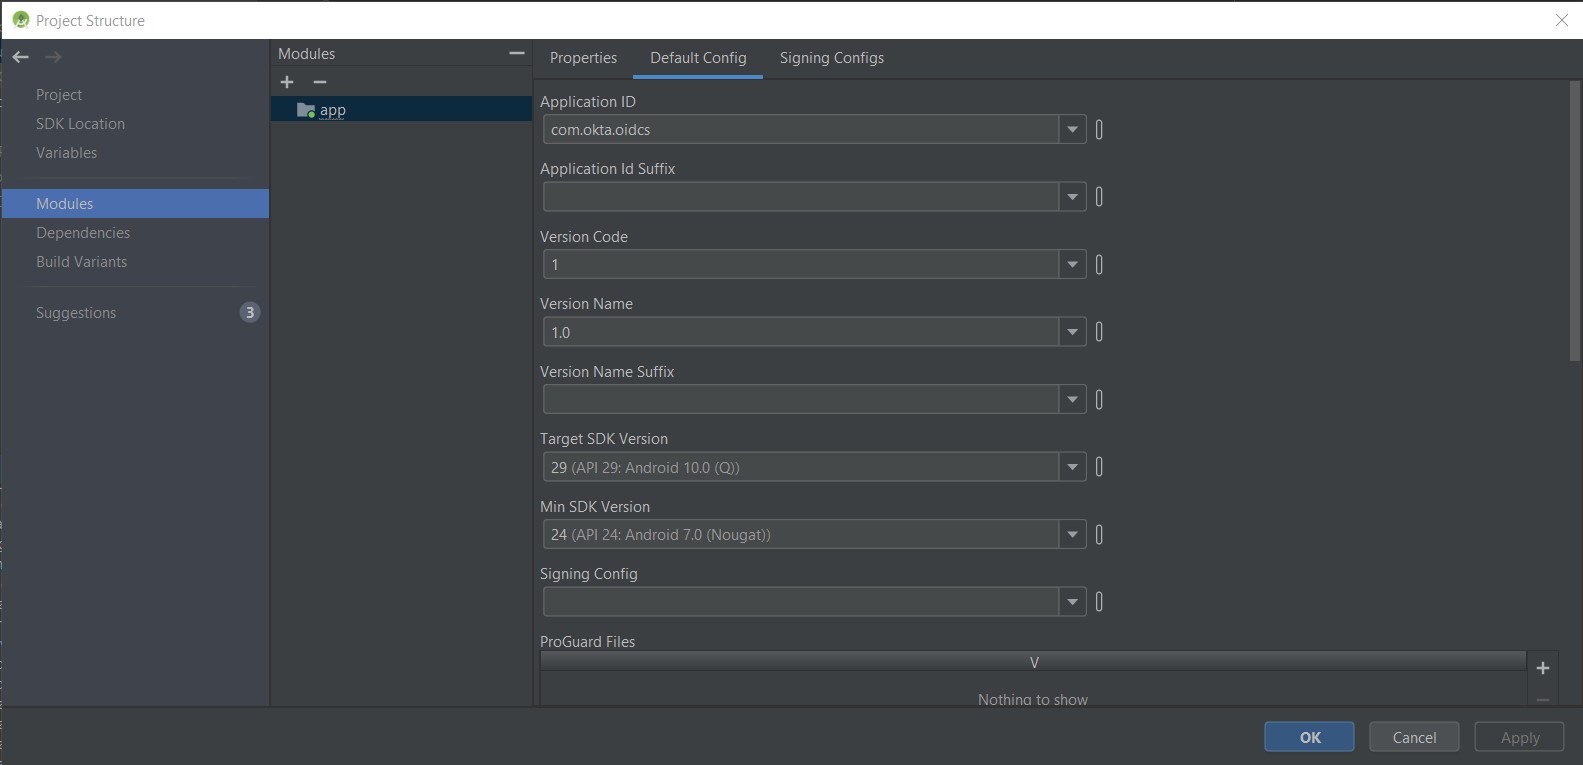
This dialog is still in development and requires you to understand what each of the configuration options implies and even how Gradle organizes projects. Whether you decide to use the Project Structure or the traditional configuration files, the following points will help you understand how to work with either of them.
Gradle Project Structure
Gradle splits projects into modules. In Android’s case, a simple app would be a project with a single module (the app module):
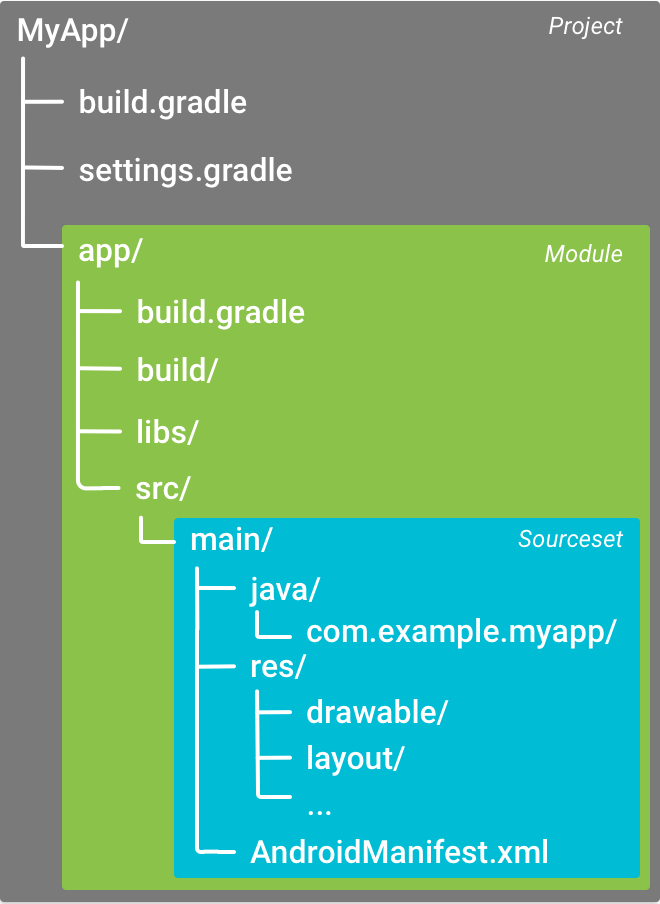
Image from Android Documentation
You can configure the Gradle project by modifying the /build.gradle file at the root of the project. These changes will affect the whole project, including all modules.
Each module can be configured in each module-specific build.gradle file. In our case, for instance, we can modify the /app/build.gradle file to change how Gradle handles the app module.
Essential Configuration Options for Gradle in Android
Android users currently run a wide variety of Android versions. To allow apps built for newer Android versions to run in older Android versions as well, developers must include many “compatibility layers” in apps.
For instance, if an app built for Android 9 runs on an Android 8 device, this device will run the code compiled for Android 9, plus a compatibility layer that translated some of the Android 9 functionality into something Android 8 can understand. As a result, he app will be bigger, it will run more slowly on Android 8 devices, and developers may have to add additional code to support Android 8.
Multiple Gradle configurations allow developers to support as many Android versions as they judge appropriate, all of them configured at a module level. For instance, in our case we have:
android {
    compileSdkVersion 29
    defaultConfig {
        ...
        minSdkVersion 24
        targetSdkVersion 29
        ...
    }
    ...
}
This configuration determines that our app will be compiled using the 29th version of Android (Android 10) and should be compatible with any device running any version of Android between the 24th (Android 7.0) and the 29th. This means that our app will contain multiple compatibility layers to make Android 10 compatible with Android 7.0.
Reference Repositories
Any time we reference external resources like dependencies in our project, Gradle must validate their existence and fetch them into our app. You also must configure Gradle with a list of locations for these repositories, usually defined at a project-level.
In our example, we can have a look at /build.gradle:
buildscript {
    ext.kotlin_version = '1.3.41'
    repositories {
        google()
        jcenter()

    }
    dependencies {
        classpath 'com.android.tools.build:gradle:3.4.2'
        classpath "org.jetbrains.kotlin:kotlin-gradle-plugin:$kotlin_version"
        // NOTE: Do not place your application dependencies here; they belong
        // in the individual module build.gradle files
    }
}

allprojects {
    repositories {
        google()
        jcenter()
    }
}
The repositories{} block in buildscript {} defines which repositories to check to satisfy the dependencies defined in the buildscript { dependencies{} } block. As we will soon learn, these dependencies are Gradle plugins. The repositories{} block in allprojects {} defines which repositories to check to satisfy the dependencies defined in any of the modules of the project.
When multiple repositories are defined in the repositories{} block, Gradle will check them in the order defined. In our case, if both google() and jcenter() contain a copy of the same dependency, Gradle will first find the dependency in google() and never check jcenter(). Both copies should be exactly the same, but that has not always been the case. I recommend keeping google() at the top of the list of repositories.
Gradle Plugins
You can extend the capabilities of the Gradle module by applying a plugin to it. For Android applications, plugins are generally applied in a module.
In our case, our /app/build.gradle applies three plugins to the app module:
apply plugin: 'com.android.application'
apply plugin: 'kotlin-android'
apply plugin: 'kotlin-android-extensions'

android {
    ...
}
The com.android.application plugin defines the module as an Android Application. This will instruct Gradle to compile our code into an apk and allow us to configure the build process using the android{} clause we see in the example.
The other two plugins instruct Gradle to compile the app module to enable Kotlin. Any Kotlin code will be compiled to bytecode and put into a dex file, exactly like Java code.
Plugins are a great way to extend the capabilities of our build process. With more plugins, we can: Connect our apps to error-reporting services Add a ribbon to the launcher icon of our app to identify each build-type Use code-generation tools, Add Gradle tasks that can automatically upload an apk to a distribution service Automatically synchronize our localization files with different services, etc. If you wonder whether a certain plugin exists, both GitHub and the official Gradle Plugins portal are great resources to check.
Build Types
Gradle allows you to build different versions of the same app using a single project. This is very useful when one version must be used by testers with more relaxed security settings, while one version will be released in the Play Store with premium features, and another, free version will be released in the Play Store with limited features. In Android, these versions are called variants and are defined using build types.
Android projects always have a debug and a release type, defined by the Android plugin itself. Many developers customize their configuration to even add more build types.
In our example app, we can see how /app/build.gradle configures the release build type and defines a new build type called blog for the app module:
android {
    defaultConfig {
        applicationId "com.okta.oidcs"
        applicationIdSuffix ""
        ...
    }
    buildTypes {
        blog {
            ...
            applicationIdSuffix ".blog"
        }
        release {
            ...
        }
    }
    ...
}
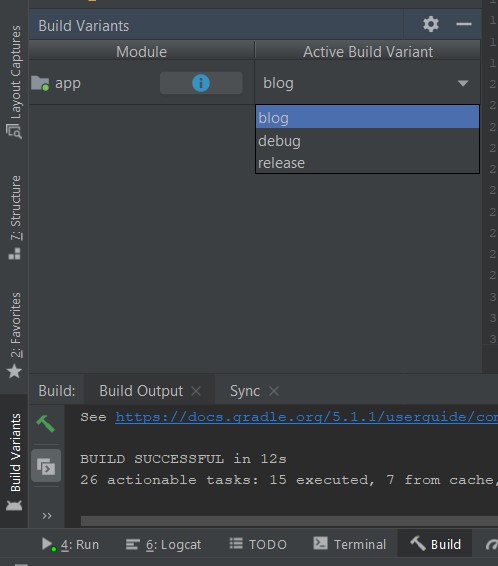
This gives us the option to now choose between three app variants in Android Studio to compile/launch:
The defaultConfig{} block defines configuration options that apply to all build types, unless the build type overwrites it with custom configuration.
For instance, the application-id of an app is the combination of applicationId and applicationIdSuffix. Given that the configuration for the debug variant doesn’t define any of them, the application-id of the debug variant app will be com.okta.oidcs.blog. On the other hand, the configuration for the blog variant defines applicationIdSuffix “.blog”, therefore, the application-id of the blog variant app will be com.okta.oidcs.blog.
Manifest Placeholders
Dependencies often require certain parameters in the AndroidManifest.xml file, for each application module. Additionally, we often need to define different parameters for each build-type. Unfortunately, historical limitations introduced in the Android packaging (way before Gradle) mean there isn’t a way around this.
As we previously discussed, Gradle manages manifest files and merges them if required, so it allows us to set the value of a property in the manifest configuration. The function of the manifestPlaceholders{} block is to define an array of property and values that will be set in the manifest when Gradle builds an app.
For instance, in our example we instruct Gradle to set the value of “appAuthRedirectScheme” in the manifest:
android {
    ...
    defaultConfig {
        ...
        manifestPlaceholders = [
                "appAuthRedirectScheme": "com.okta.example"
        ]
        ...
    }
}
Add Dependencies in Gradle
Adding dependencies in Gradle is a very straightforward action. Just two things have to be taken into account:
- Is the dependency a plugin or not?
- Is the dependency provided by the repositories already defined?
If the dependency is a plugin, the required repository and dependency should be defined at a project level. In our case, as we did in /build.gradle:
buildscript {
    ...
    repositories {
        google()
        jcenter()

    }
    dependencies {
        classpath 'com.android.tools.build:gradle:3.4.2'
        classpath "org.jetbrains.kotlin:kotlin-gradle-plugin:$kotlin_version"
        ...
    }
}
If the dependency is not a plugin, it should be defined at a module level as we did in our /app/build.gradle:
dependencies {
    implementation fileTree(dir: 'libs', include: ['*.jar'])
    implementation 'com.okta.android:oidc-androidx:1.0.2'
    implementation 'com.okta.authn.sdk:okta-authn-sdk-api:1.0.0'
    implementation('com.okta.authn.sdk:okta-authn-sdk-impl:1.0.0') {
        exclude group: 'com.okta.sdk', module: 'okta-sdk-httpclient'
    }
    ...
There are multiple options to include module-level dependencies, based on the module-type, visibility, conflict-resolution, build-type-specificity, etc. It is worth going through the official Android documentation on dependencies to learn more about it.
What You Learned
You have discovered quite a bit through this article:
- We now understand how Gradle builds Android and how we can configure these steps
- We know the essential configuration options that will allow us to start integrating most third- party services
- We can confidently create multiple versions of our app, each with a configuration appropriate to our needs
- We can extend the functionality of Gradle to customize the build process of our app and complete new actions
Gradle is a very powerful tool with a vast and overarching role in Android development. We can now use most essential options offered by Android to configure our build process and match our specific needs, with a clear view of what is happening at all times. We can now also see how simple it is to automate repetitive manual tasks in our development process, create of additional tasks to verify our builds, run code analysis tools, and more.
Advanced Configuration Options for Gradle in Android
Now that we learned the essentials, let’s go a little further. The example app we used contains a few more advanced Gradle configuration options for you to explore and further your expertise. Please inspect the app to find a few more advanced Gradle features like:
- Sourcesets specific to a build-type
- Conditional configuration
- Compilation-time build parameters
- Cxtra properties
Even further, the Android documentation is full of more advanced topics to improve your apps:
- Shrink, obfuscate, and optimize your app to increase security and performance)
- Gradle Tasks to create custom tasks with which you can automatize most aspects of your specific build-needs)
- Add build dependencies to learn how to solve dependency-conflicts and how to create the optimum decoupling in multi-module apps)
- Gradle tips and recipes to make your builds faster and to better organize all your Gradle configuration files
Learn more about Android + Identity Management
Keep learning about Android and how to easily secure your apps with our extensive set of developer guides, our documentation for Identity Management in Android, and these additional resources:
- Build a Basic CRUD App in Android with Kotlin
- Build a One-time Password Token for MFA with Okta
- Android Unit Testing Part I: What Makes Strong Test Automation
- Android Unit Testing Part II: Escaping Dalvik’s Hold
- Android Unit Testing Part III: Disintegration
Feel free to leave comments below. To make sure you stay up to date with our latest developer guides and tips, follow us on Twitter and subscribe to our YouTube Channel!
Okta Developer Blog Comment Policy
We welcome relevant and respectful comments. Off-topic comments may be removed.