Use Angular Schematics to Simplify Your Life

When I first started to learn Angular (it was called Angular 2 at the time), I was appalled by the number of files you needed to create to get a basic "Hello, World" example working. As Angular matured, a lot of this pain went away thanks to Angular CLI. Angular CLI is a command-line tool that generates a basic Angular project for you. In its 7.0 release, it started asking you questions about your application. Based on your responses, it chooses to add routing and determines a stylesheet format.
Did you know that Angular CLI uses Schematics to generate this code? "What the heck is Schematics?", you might ask. Good question. Schematics is a project that was released by the Angular team a little over a year ago (January 2018). In short, it provides an API that allows you to manipulate files and add new dependencies in Angular projects. It can also work in non-Angular projects, but let’s start with Angular.
If you’d rather watch a video, I created a screencast of this tutorial.
Note: In May 2025, the Okta Integrator Free Plan replaced Okta Developer Edition Accounts, and the Okta CLI was deprecated.
We preserved this post for reference, but the instructions no longer work exactly as written. Replace the Okta CLI commands by manually configuring Okta following the instructions in our Developer Documentation.
To see Schematics in action, install Angular CLI:
npm install -g @angular/cli@11Then create a new Angular project:
$ ng new my-cool-app
? Do you want to enforce stricter type checking and stricter bundle budgets in the workspace?
  This setting helps improve maintainability and catch bugs ahead of time.
  For more information, see https://angular.io/strict Yes
? Would you like to add Angular routing? Yes
? Which stylesheet format would you like to use? (Use arrow keys)
❯ CSS
  Sass   [ http://sass-lang.com   ]
  Less   [ http://lesscss.org     ]
  Stylus [ http://stylus-lang.com ]
That’s it! A Schematic can prompt you with questions, make changes based on your responses, and look good while doing it!
Use Schematics to add Authentication to Your Angular App
Want to see something even cooler? You can add Okta support to an Angular CLI-generated app with the following command:
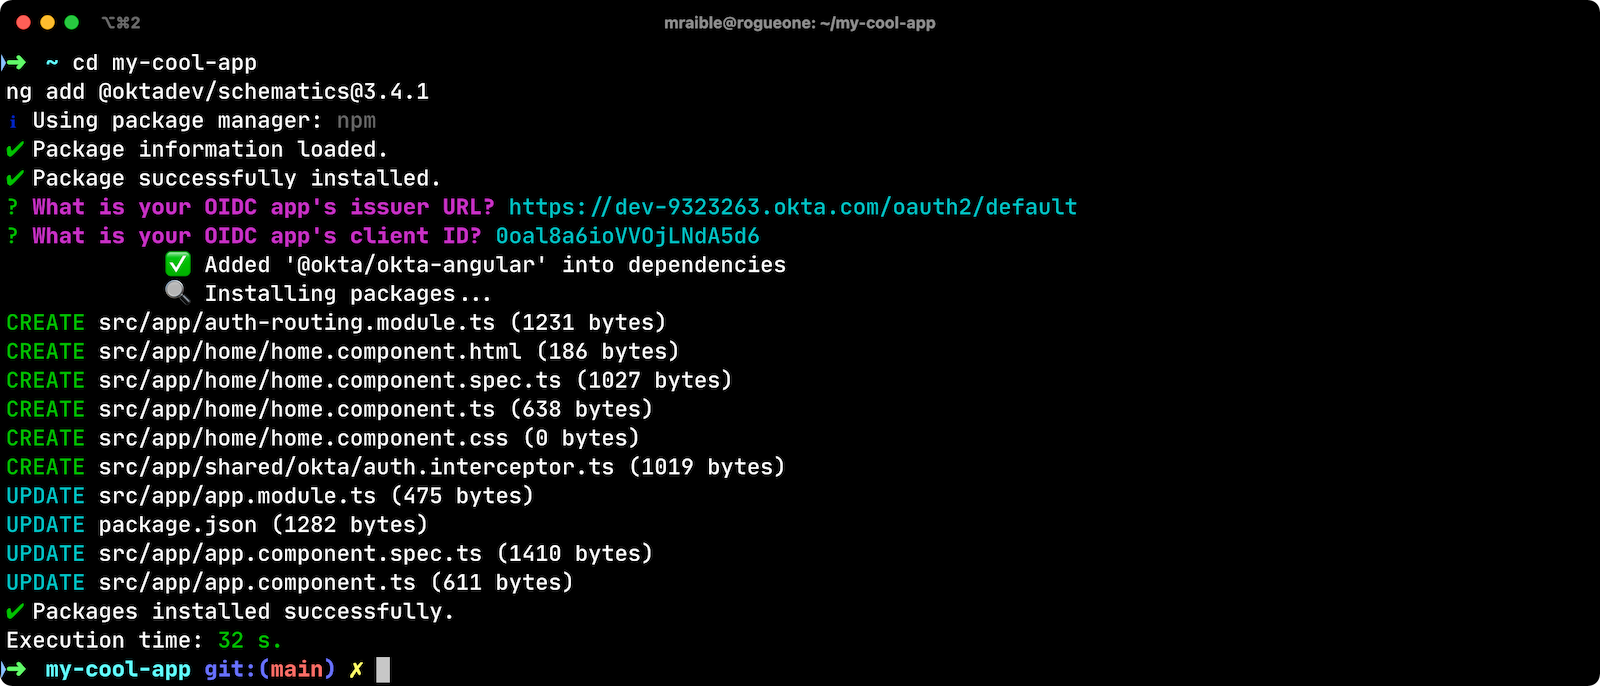
cd my-cool-app
ng add @oktadev/schematics@3.4.1| Make sure you are in an Angular project directory before you run this command. Also, make sure your project is checked into source control before you run it. |
This will prompt you for an OIDC issuer and client ID. Open a new terminal window to continue.
Before you begin, you’ll need a free Okta developer account. Install the Okta CLI and run okta register to sign up for a new account. If you already have an account, run okta login.
Then, run okta apps create. Select the default app name, or change it as you see fit.
Choose Single-Page App and press Enter.
Use http://localhost:4200/callback for the Redirect URI and accept the default Logout Redirect URI of http://localhost:4200.
What does the Okta CLI do?
The Okta CLI will create an OIDC Single-Page App in your Okta Org. It will add the redirect URIs you specified and grant access to the Everyone group. It will also add a trusted origin for http://localhost:4200. You will see output like the following when it’s finished:
Okta application configuration:
Issuer:    https://dev-133337.okta.com/oauth2/default
Client ID: 0oab8eb55Kb9jdMIr5d6
NOTE: You can also use the Okta Admin Console to create your app. See Create an Angular App for more information.
If you haven’t run the ng add @oktadev/schematics command, do it now. For the issuer URL and client ID, use the values from the OIDC app you just created. You can see a screenshot of my values and the process below.
Now you can run your app with ng serve, navigate to http://localhost:4200, and you’ll see a login button at the bottom. Click on it to authenticate with Okta. When you’re redirected back to your app, it’ll be replaced with logout button.
How sweet is that?! Without this schematic, you have to perform the following steps (from Build a Basic CRUD App with Angular 7.0 and Spring Boot 2.1):
-
Run
npm install @okta/okta-angular -
Update
app.module.tsto add config and initialize -
Add callback route to
app-routing.module.ts -
Add and configure an
HttpInterceptorto add anAuthorizationheader -
Add login and logout buttons
-
Add authenticated logic to
app.component.ts -
Generate
HomeComponentand configure with authentication
Instead of having to do these seven steps, our Schematics does it all for you in less than 30 seconds! 🎉😆
Now that you’ve seen the power of Schematics, let’s dive in and learn how to create one.
Angular CLI, Angular Schematics, and Angular DevKit
The Angular CLI can be used to create, manage, build, and test your Angular projects. It’s built on DevKit, which resides in the same monorepo on GitHub. DevKit was built to provide libraries that can be used to manage, develop, deploy, and analyze your code. DevKit has a schematics-cli command line tool that you can use to create your own Schematics.
Create Your First Schematic
To create a Schematics project, first install the Schematics CLI:
npm i -g @angular-devkit/schematics-cli@0.1102.9Then run schematics to create a new blank project:
schematics blank --name=my-component
This will create a number of files for you.
CREATE my-component/README.md (639 bytes)
CREATE my-component/.gitignore (191 bytes)
CREATE my-component/.npmignore (64 bytes)
CREATE my-component/package.json (569 bytes)
CREATE my-component/tsconfig.json (656 bytes)
CREATE my-component/src/collection.json (231 bytes)
CREATE my-component/src/my-component/index.ts (318 bytes)
CREATE my-component/src/my-component/index_spec.ts (503 bytes)
There’s a package.json that handles your project’s dependencies. There’s also a src/collection.json that defines the metadata for your project. If you look at collection.json, you’ll see the following:
{
  "$schema": "../node_modules/@angular-devkit/schematics/collection-schema.json",
  "schematics": {
    "my-component": {
      "description": "A blank schematic.",
      "factory": "./my-component/index#myComponent"
    }
  }
}
You can see that the my-component schematic points to a factory function in my-component/index.ts. Crack that open and you’ll see the following:
import { Rule, SchematicContext, Tree } from '@angular-devkit/schematics';

export function myComponent(_options: any): Rule {
  return (tree: Tree, _context: SchematicContext) => {
    return tree;
  };
}
There’s also a test in my-component/index_spec.ts.
import { Tree } from '@angular-devkit/schematics';
import { SchematicTestRunner } from '@angular-devkit/schematics/testing';
import * as path from 'path';

const collectionPath = path.join(__dirname, '../collection.json');

describe('my-component', () => {
  it('works', () => {
    const runner = new SchematicTestRunner('schematics', collectionPath);
    const tree = runner.runSchematic('my-component', {}, Tree.empty());

    expect(tree.files).toEqual([]);
  });
});
One cool thing about Schematics is they don’t perform any direct actions on your filesystem. Instead, you specify what you’d like to do to a Tree. The Tree is a data structure with a set of files that already exist and a staging area (of files that will contain new/updated code). You can see in the code above that nothing is really happening, the test even proves the tree is empty!
Add a Hello World Example
Let’s do something slightly more interesting than making sure it runs and create a hello.ts file. Modify my-component/index.ts to have a tree.create() command.
import { Rule, SchematicContext, Tree } from '@angular-devkit/schematics';

export function myComponent(_options: any): Rule {
  return (tree: Tree, _context: SchematicContext) => {
    tree.create('hello.ts', 'console.log("Hello, World")');
    return tree;
  };
}
Then update my-component/index_spec.ts to expect this file.
describe('my-component', () => {
  it('works', () => {
    const runner = new SchematicTestRunner('schematics', collectionPath);
    const tree = runner.runSchematic('my-component', {}, Tree.empty());

    expect(tree.files).toEqual(['/hello.ts']);
  });
});
Run npm test and everything should pass. Want to prove it works? Run the following command from the my-component directory.
schematics .:my-componentThis looks like it creates a file, but it does not. This is because schematics runs in debug mode by default. You can bypass by adding --dry-run=false to the command. Run schematics .:my-component --dry-run=false and hello.ts will be created on your hard drive. If you try running the command again, it’ll fail because the file already exists.
schematics .:my-component --dry-run=false
An error occured:
Error: Path "/hello.ts" already exist.
When using Schematics, it’s unlikely you’re going to want to create files and their contents manually. More than likely, you’ll want to copy templates, manipulate their contents, and put them in the project you’re modifying. Luckily, there’s an API for that!
Copy and Manipulate Templates
Create a src/my-component/files/src/app directory to hold your templates.
mkdir -p src/my-component/files/src/app
If you’re on Windows, mkdir -p will only work if you’re using Bash on Windows. If you’re not using Bash, you’ll need to md each directory.
|
Create an app.component.ts file in src/my-component/files/src/app and put the following code in it:
import { Component } from '@angular/core';

@Component({
  selector: 'app-root',
  templateUrl: './app.component.html',
  styleUrls: ['./app.component.css']
})
export class AppComponent {
  name = '<%= name %>';
}| You can ignore any compilation errors you get in this file. It’s just a template and should compile in your target project. |
The <%= name %> variable is an option you’ll pass in when running this Schematic. Create an app.component.html file with some HTML that reads the name variable.
<div style="text-align:center">
  <h1>
   Hello, {{ name }}
  </h1>
</div>

<router-outlet></router-outlet>
After creating these files, your src/my-component directory should look as follows.
src/my-component/
├── files
│   └── src
│       └── app
│           ├── app.component.html
│           └── app.component.ts
├── index.ts
└── index_spec.ts
In order to define the name prompt, create a schema.json file in the src/my-component directory.
{
  "$schema": "http://json-schema.org/schema",
  "id": "SchematicsMyComponent",
  "title": "My Component Schema",
  "type": "object",
  "properties": {
    "name": {
      "type": "string",
      "description": "Your Name",
      "x-prompt": "What is your name?"
    }
  },
  "required": ["name"]
}
Then update src/collection.json to reference this file in a schema property.
{
  "$schema": "../node_modules/@angular-devkit/schematics/collection-schema.json",
  "schematics": {
    "my-component": {
      "description": "A blank schematic.",
      "factory": "./my-component/index#myComponent",
      "schema": "./my-component/schema.json"
    }
  }
}
Modify src/my-component/index.ts so you can get your generated project’s path, and copy templates.
import {
  apply,
  chain,
  MergeStrategy,
  mergeWith,
  move,
  Rule,
  SchematicContext,
  SchematicsException,
  template,
  Tree,
  url
} from '@angular-devkit/schematics';
import { join, normalize } from 'path';
import { getWorkspace } from '@schematics/angular/utility/workspace';

export async function setupOptions(host: Tree, options: any): Promise<Tree> {
  const workspace = await getWorkspace(host);
  if (!options.project) {
    options.project = workspace.projects.keys().next().value;
  }
  const project = workspace.projects.get(options.project);
  if (!project) {
    throw new SchematicsException(`Invalid project name: ${options.project}`);
  }

  options.path = join(normalize(project.root), 'src');
  return host;
}

export function myComponent(_options: any): Rule {
  return async (tree: Tree, _context: SchematicContext) => {
    await setupOptions(tree, _options);

    const movePath = normalize(_options.path + '/');
    const templateSource = apply(url('./files/src'), [
      template({..._options}),
      move(movePath)
    ]);

    return chain([mergeWith(templateSource, MergeStrategy.Overwrite)]);
  };
}
Want to prove it all works? Write a test for it!
Test Your Schematics
To test this that reads from a workspace and gets the project information, you’ll need to run a couple external schematics in your test: one to create a workspace, and one to create a project. You’ll need to install @schematics/angular to make this possible.
npm i -D @schematics/angular@11Then modify src/index_spec.ts to have workspace options, app-generation options, and schema options.
import { SchematicTestRunner, UnitTestTree } from '@angular-devkit/schematics/testing';
import * as path from 'path';

describe('my-component', () => {
  const schematicRunner = new SchematicTestRunner(
    'schematics',
    path.join(__dirname, './../collection.json'),
  );

  const workspaceOptions: any = { (1)
    name: 'workspace',
    newProjectRoot: 'projects',
    version: '0.5.0',
  };

  const appOptions: any = { (2)
    name: 'schematest'
  };

  const schemaOptions: any = { (3)
    name: 'foo'
  };

  let appTree: UnitTestTree;

  beforeEach(async () => { (4)
    appTree = await schematicRunner.runExternalSchematicAsync('@schematics/angular', 'workspace', workspaceOptions).toPromise();
    appTree = await schematicRunner.runExternalSchematicAsync('@schematics/angular', 'application', appOptions, appTree).toPromise();
  });

  it('works', (done) => {
    schematicRunner.runSchematicAsync('my-component', schemaOptions, appTree).toPromise().then(tree => {
      const appComponent = tree.readContent('/projects/schematest/src/app/app.component.ts'); (5)
      expect(appComponent).toContain(`name = '${schemaOptions.name}'`); (6)
      done();
    }, done.fail);
  });
});| 1 | Setup workspace options |
| 2 | Setup app options (any options that Angular CLI accepts) |
| 3 | Setup your schema options |
| 4 | Run external schematics to setup your tree with a new application |
| 5 | Verify the template was copied and contains expected values |
Run npm test and rejoice in your victory!
Run Your Schematics with Angular CLI
Before publishing your Schematics to npm, it’s a good idea to do some basic manual testing with Angular CLI. Create a new project:
ng new my-test-app --strict --routing --style cssThen run npm link /path/to/schematics. I created mine in the same directory as my Schematics project, so the command I ran was:
cd my-test-app
npm link ../my-component
You can also use npm pack in your schematics project, then npm install /path/to/artifact.tar.gz in your Angular project. This mimics npm install more than npm link.
|
Run your schematic with the ng g command.
ng g my-component:my-componentIt will prompt you for your name, then overwrite the existing files.
? What is your name? Matt
UPDATE src/app/app.component.html (119 bytes)
UPDATE src/app/app.component.ts (206 bytes)
Run ng serve. You should see your name displayed when you open http://localhost:4200 in your browser.

Publish Your Schematics to npm
The most important thing to know when publishing your Schematics to npm is that the default .npmignore ignores all TypeScript files. That means if you run npm publish, your compiled Schematic will be published, and your HTML template, but not your TypeScript template!
Modify .npmignore so it doesn’t exclude your template files.
It took me several hours to figure this out. So simple, yet so subtle.
When you’re ready to publish your Schematics to npm, run npm publish. If you want to remove a published package, you can do it within the first 72 hours:
-
Run
npm unpublish <package_name> -fto remove the entire package thanks to the-for force flag -
Use
npm unpublish <package_name>@<version>to remove a specific version
You can learn more about the unpublish command and the Unpublish Policy in npm’s documentation.
Add Support for ng add with Angular CLI
A slick feature of Angular CLI is its ng add command. You can use it to invoke schematics and add features like PWA support and Angular Material to your projects. For example:
ng add @angular/pwa
ng add @angular/material
You can support for ng add $your-schematic too! Open my-component/src/collection.json and add a new ng-add schematic.
{
  "$schema": "../node_modules/@angular-devkit/schematics/collection-schema.json",
  "schematics": {
    "my-component": {
      "description": "A blank schematic.",
      "factory": "./my-component/index#myComponent",
      "schema": "./my-component/schema.json"
    },
    "ng-add": {
      "factory": "./ng-add/index",
      "description": "Add schematic",
      "schema": "./my-component/schema.json"
    }
  }
}
Create src/ng-add/index.ts and add the code necessary for it to invoke the my-component schematic.
import { chain, Rule, schematic, SchematicContext, Tree, } from '@angular-devkit/schematics';

export default function (options: any): Rule {
  return (host: Tree, context: SchematicContext) => {
    return chain([
      schematic('my-component', options)
    ])(host, context);
  };
}
Run npm run build in your my-component project. Now you should be able to run ng add my-component in your my-test-app project. Pretty slick, eh?
Learn More about Angular and Schematics
I hope you’ve enjoyed this quick tutorial about Schematics. I learned a lot about them when developing OktaDev Schematics. I encourage you to check out its source code as well as Angular CLI’s Schematics. In particular, I learned a lot from the PWA Schematic.
Have you read this far? Thanks! In case you missed it, you can create a secure Angular app in minutes! 😉
ng new my-secure-app --routing
cd my-secure-app
// create a SPA app on Okta, copy settings
ng add @oktadev/schematics
After you run these commands, you’ll have the Okta Angular SDK installed and configured in your project. You can learn all about its features in our Angular + Okta documentation.
You can find the source code for the example schematic in this post on GitHub at oktadeveloper/okta-angular-schematics-example.
In the coming months, I hope to add more Schematics that allow easy integration with our React and Vue SDKs.
Update: OktaDev Schematics now has support for React, Vue, and Ionic! See the following blog posts for more information.
We like to write about Angular on this here blog. Here are some of our recent Angular posts:
And here’s a bunch of articles I used to learn about Schematics:
If you liked this post, you’ll probably like future posts! Follow us @oktadev on Twitter to find out when we publish them. We also publish screencasts on our YouTube Channel.
Changelog:
- Apr 15, 2021: Updated to use Angular 11 and OktaDev Schematics v3.4.1. You can see the changes to this post in okta-blog#707; example app changes are in okta-angular-schematics-example#2.
Matt Raible is a well-known figure in the Java community and has been building web applications for most of his adult life. For over 20 years, he has helped developers learn and adopt open source frameworks and use them effectively. He's a web developer, Java Champion, and Developer Advocate at Okta. Matt has been a speaker at many conferences worldwide, including Devnexus, Devoxx Belgium, Devoxx France, Jfokus, and JavaOne. He is the author of The Angular Mini-Book, The JHipster Mini-Book, Spring Live, and contributed to Pro JSP. He is a frequent contributor to open source and a member of the JHipster development team. You can find him online @mraible and raibledesigns.com.
Okta Developer Blog Comment Policy
We welcome relevant and respectful comments. Off-topic comments may be removed.