Modern Token Authentication in Node with Express
Token authentication is the hottest way to authenticate users to your web applications nowadays. There’s a lot of interest in token authentication because it can be faster than traditional session-based authentication in some scenarios, and also allows you some additional flexibility. In this post, I’m going to teach you all about token authentication: what it is, how it works, why you should use it, and how you can use it in your Node applications. Let’s get to it!
Table of Contents
- What Is Token Authentication?
- What are JSON Web Tokens?
- Token Authentication in Node + Express
- Build a Simple App Using Okta for Token Authentication in Node + Express
- Learn More About Token Authentication and Node + Express
Note: In May 2025, the Okta Integrator Free Plan replaced Okta Developer Edition Accounts, and the Okta CLI was deprecated.
We preserved this post for reference, but the instructions no longer work exactly as written. Replace the Okta CLI commands by manually configuring Okta following the instructions in our Developer Documentation.
What Is Token Authentication?
Token authentication is a way to authenticate users into an application using a temporary token (typically a JSON Web Token) instead of actual credentials.
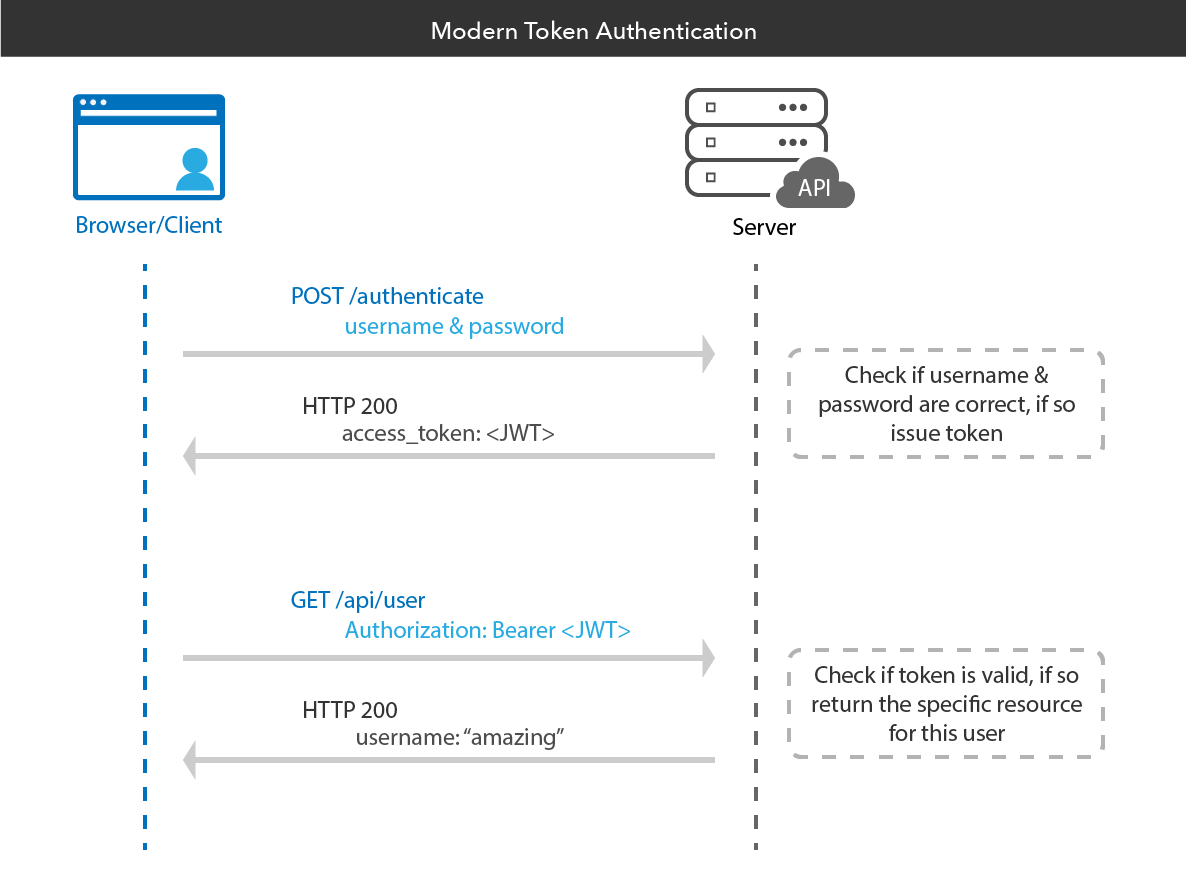
The way this works in the context of web authentication is like so:
- A user wants to log into a website
- A user supplies their email address and password to the website (their credentials)
- The website generates a token for the user
- The user’s browser stores the token
- When the user makes subsequent requests to the website, their token will be sent along with their request
- The website will validate the token and use it to figure out who the user is
The benefit of this approach is that tokens contain embedded information about the user, so the website can receive the token and discover who the user is and what permissions they have without necessarily needing to talk to a central database. This means you may not need to maintain a session store.
Here’s a visualization of what the flow typically looks like:
What are JSON Web Tokens?
Before we talk about JSON Web Tokens, let’s clarify some terms:
Authentication is the process of verifying a user’s identity.
A token is an object that can be used to authenticate a user to a server. Tokens contain embedded user data that is used to identify and authenticate the user.
JSON Web Tokens (JWTs) are an open standard (learn more about JWTs here) that define a secure way to transmit information between parties using a JSON object. JWTs are always cryptographically signed (sometimes encrypted) and can be signed using a secret key (symmetrical) or a public/private key pair (asymmetrical).
JWTs are the most popular type of tokens and are often what people mean when they refer to “token authentication” in general.
Here’s what a typical JWT might look like in it’s compacted, URL-safe form:
eyJraWQiOiJ1dURLVTMxZWRvTi0wd0xMUnl1TW1vbmtBdi1OaFEwejZhWmxjdTN5NU8wIiwiYWxnIjoiUlMyNTYifQ.eyJ2ZXIiOjEsImp0aSI6IkFULnVfT094R3pXd1RjRFlseGZwcDVYXzNxdVIwdlJuc25YbXdMZld0TDFjdG8iLCJpc3MiOiJodHRwczovL2Rldi04MTk2MzMub2t0YXByZXZpZXcuY29tL29hdXRoMi9kZWZhdWx0IiwiYXVkIjoiYXBpOi8vZGVmYXVsdCIsImlhdCI6MTU0NjcyNjIyOCwiZXhwIjoxNTQ2NzI5ODI4LCJjaWQiOiIwb2Fpb3g4Ym1zQktWWGt1MzBoNyIsInNjcCI6WyJjdXN0b21TY29wZSJdLCJzdWIiOiIwb2Fpb3g4Ym1zQktWWGt1MzBoNyJ9.fhZRWThFxhiS6Pgrup6hM08oSqDPd1JrZSDIH_blD5S20c2hQQ3D3RZyhNKMnYclyus_mo-H-mS-Ak3YzM8S0JwZ8m3Vid4smW953peBMnmBNotAE--yE0toc2dIUG3BWQR34hah253bKmp17Yh6bWGwH60oQxnuM_NVUpa-NJMBc6-Mu5ra0lKfr60ne9-jKVFcavd9ZnVTLiug_sXFlhxgaQm4V_hhcvcLSwCXTiIcQsJkI0rP7WuVvjYVyK_sPeW3A44_T5qhyDR_E_mk1rHORlkMYGPg34mcwob5iA7alNZOnzN_7ApcbylDbK5KS1umBqqevtghEyjOEWQQmQ
While this may look complicated and unreadable at first glance, it isn’t actually all that tricky! JWTs consist of three parts, separated by dots (.): xxxxxx.yyyyyy.zzzzzz. These sections represent the JWT header, payload, and signature, respectively.
Let’s analyze one section at a time.
The JSON Web Token Header
The JWT header is a Base64URL-encoded JSON object. It contains information describing the type of the token and the signing algorithm being used, such as HMAC, SHA256, or RSA.
For example:
{
  "typ": "JWT",
  "alg": "HS256"
}
The JWT spec is flexible and allows for different types of algorithms to be used, which is why this header field will always be present.
The JSON Web Token Payload
The JWT payload contains something called claims, which are statements about the entity (typically the user) and additional data. There are three different types of claims: registered, public, and private claims. Claims are the most “interesting” part of a JSON Web Token, as they contain data about the user in question.
A set of predefined claims (RFC 7519) are optional but recommended. Some examples are iss (issuer), exp (expiration time), and sub (subject).
Custom claims (claims you define when creating a token) are used to share information between parties that have access to the token. They are neither registered or public and can be whatever you want them to be.
In our example token above, the payload looks like the following when deserialized:
{
 "ver": 1,
 "jti": "AT.u_OOxGzWwTcDYlxfpp5X_3quR0vRnsnXmwLfWtL1cto",
 "iss": "https://dev-819633.oktapreview.com/oauth2/default",
 "aud": "api://default",
 "iat": 1546726228,
 "exp": 1546729974,
 "cid": "0oaiox8bmsBKVXku30h7",
 "scp": [
  "customScope"
 ],
 "sub": "0oaiox8bmsBKVXku30h7"
}
As you can see, there are various claims defined which the client and/or server may use to “learn” more about the user.
The JSON Web Token Signature
The JWT signature field is created by taking the encoded header, the encoded payload, a secret key, and using the algorithm specified in the header to cryptographically sign these values.
For example, if you are using the standard symmetrical HMAC SHA256 algorithm, the signature will be created by computing:
HMACSHA256(
  base64UrlEncode(header) + "." +
  base64UrlEncode(payload),
  secret
)
This signature field is used by the issuer (usually the web server) to validate the token’s integrity and ensure it hasn’t been tampered with or edited by a third party.
You can use jsonwebtoken.io to play around with JSON Web Tokens and encode and decode them!
Token Authentication in Node + Express
There are many ways to incorporate token authentication into your Node apps. You can use an authentication middleware like Passport, or implement it yourself, manually.
Token Authentication with Passport
Passport is a popular authentication middleware for Node applications. It’s extremely flexible and modular and can be unobtrusively dropped into any Express-based web application. It has a comprehensive set of strategies (authentication mechanisms) support authentication using a username and password, Facebook, Twitter, etc.
If you’d like to start handling token authentication with Passport, I recommend you check out the official documentation.
Add Token Authentication into Your Node + Express App Manually
If you don’t want to use Passport, or if you are building an application that isn’t based on connect-style middleware, you may need to implement token authentication yourself.
One helpful tool is nJWT – a popular JavaScript library for working with JSON Web Tokens directly. If you’d like to learn more about how to use nJWT, we’ve written a thorough article on the topic you should check out.
Build a Simple App Using Okta for Token Authentication in Node + Express
If you’d like to see how to build a real app using token authentication in Node, keep reading. I’ll walk you through building a small Express-based Node app and securing it using token authentication (powered by Okta’s free API service).
If you aren’t already familiar with Okta: it’s a simple API service for storing user accounts and managing user authentication and authorization.
Before you begin, you’ll need a free Okta developer account. Install the Okta CLI and run okta register to sign up for a new account. If you already have an account, run okta login.
Then, run okta apps create. Select the default app name, or change it as you see fit.
Choose Web and press Enter.
Select Other.
Then, change the Redirect URI to http://localhost:8080/authorization-code/callback and accept the default Logout Redirect URI of http://localhost:8080.
What does the Okta CLI do?
The Okta CLI will create an OIDC Web App in your Okta Org. It will add the redirect URIs you specified and grant access to the Everyone group. You will see output like the following when it’s finished:
Okta application configuration has been written to: /path/to/app/.okta.env
Run cat .okta.env (or type .okta.env on Windows) to see the issuer and credentials for your app.
export OKTA_OAUTH2_ISSUER="https://dev-133337.okta.com/oauth2/default"
export OKTA_OAUTH2_CLIENT_ID="0oab8eb55Kb9jdMIr5d6"
export OKTA_OAUTH2_CLIENT_SECRET="NEVER-SHOW-SECRETS"
Your Okta domain is the first part of your issuer, before /oauth2/default.
NOTE: You can also use the Okta Admin Console to create your app. See Create a Web App for more information.
Enable Client Credentials Grant Type
Run okta login and log in to the Okta Admin Console. Navigate to Applications and select your app. Edit its General Settings and check Client Credentials as a grant type. Then, click Save at the bottom of the form.
Add a Custom Scope
Scopes define and limit what access is granted by a token. You must define custom scopes in your authorization server in Okta. To do this:
- In the Okta Admin Console, go to Security > API > Authorization Servers.
- Click on the
defaultserver from the list of servers. - Click on the Scopes tab, then the Add Scope button.
- Enter
customScopeas the name, and add a description, then click Create.
Install HTTPie
HTTPie is a user-friendly command line HTTP client. You’ll need it for the rest of this demo, so go ahead and install if you haven’t yet.
Request a JWT
Now, I’ll walk you through requesting an access token (a JWT) from Okta, which you will later use to authenticate to your Node API.
First, you need to take the Client ID and Client secret values from earlier (your client credentials) and exchange them for a token. To do this, you have to make an OAuth request to the Okta OAuth server.
The way this works is that you need to craft a request that contains an HTTP Authorization header that looks like the following:
Authorization: Basic Base64Encode(<yourClientId>:<yourClientSecret>)
Encode your Client ID and Client secret (join with a : character) to create this header.
You can base64 encode these values manually if you’d like to play around with it, or learn more from the relevant Base64 encoding documentation.
Once you’ve done this, you should have a header field that looks something like this:
Authorization: Basic MG9haW94OGJtc0JLXhIYjNjMWJITVdxVlhrdTMwaDc6MktxRQ1FaTWVhdXBvbWdCOXZiNkNPOXBtMnFjSw
You then need to make a POST API call to your Org URL value (you obtained this in the Okta application setup step) plus /v1/token with the header grant_type=client_credentials.
Using HTTPie in the terminal, this will look like:
http -f POST https://{yourOktaDomain}/oauth2/default/v1/token \
  'Authorization: Basic MG9haW94OGJtc0JLXhIYjNjMWJITVdxVlhrdTMwaDc6MktxRQ1FaTWVhdXBvbWdCOXZiNkNPOXBtMnFjSw' \
  grant_type=client_credentials scope=customScope
You also need to provide the scope=customScope value, otherwise you will see an error saying:
{
  "error": "invalid_scope",
  "error_description": "The authorization server resource does not have any configured default scopes, 'scope' must be provided."
}
Assuming everything works, you should get an HTTP response similar to the following:
{
  "access_token": "eyJraWQiOiJ1dURLVTMxZWRvTi0wd0xMUnl1TW1vbmtBdi1OaFEwejZhWmxjdTN5NU8wIiwiYWxnIjoiUlMyNTYifQ.eyJ2ZXIiOjEsImp0aSI6IkFULjZoZS1fbndIcmpmSHl6bjg3bUhNLWNVUnBUNTg3RVFBT2N6Ym1QRTNkSkkiLCJpc3MiOiJodHRwczovL2Rldi04MTk2MzMub2t0YXByZXZpZXcuY29tL29hdXRoMi9kZWZhdWx0IiwiYXVkIjoiYXBpOi8vZGVmYXVsdCIsImlhdCI6MTU0Njc2NDc4OCwiZXhwIjoxNTQ2NzY4Mzg4LCJjaWQiOiIwb2Fpb3g4Ym1zQktWWGt1MzBoNyIsInNjcCI6WyJjdXN0b21TY29wZSJdLCJzdWIiOiIwb2Fpb3g4Ym1zQktWWGt1MzBoNyJ9.fZCRSMASYjQqH-gnqsQ1tJa7QN8UJZ-iPT4UZE6Voq8YsWefpyjjroMlDzkSJZVRm_V47PGLrSu7sg6ranjZTTpx8f_Qk6zfDBfNTxnWpIqKXaotTE-foial9XBSMiyuArTVsbDtHBrb9EwBSqRzBmlI2uRP92bTggxGbgNMWnQukguD_pCGHiSeDN3Jy7R7EpKgSkDpRBhQXHp0Ly6cByUmjsseWEzZdCCiIVJh_m__KEoqX8vUC6xkUYdMHJ4GWH8kPb0Hcao2jkAJBSKQKose8a5vxDS-WwpWO482NyVxNDvxBgCIfn1tG-qL4Vbdxokw41o2M81MoqgdNZGHQA",
  "expires_in": 3600,
  "scope": "customScope",
  "token_type": "Bearer"
}
You now have an access_token which you can use to authenticate to your Node app (once it has been built)!
Build an API with Node and Express
Let’s build an API server using Express. Start by creating an authapp folder:
mkdir authapp
cd authapp
Initialize the project:
npm init
Keep hitting enter to accept all the default settings.
Install Express:
npm install express@4.17.1
Install the Okta JWT Verifier for Node.js, which you can use to validate Okta access tokens (issued by Okta authorization servers).
npm install @okta/jwt-verifier@2.1.0
Create an index.js file in the folder then copy and paste the following code into the file:
const express = require('express');
const OktaJwtVerifier = require('@okta/jwt-verifier');

const clientId = "{yourClientId}";
const oktaDomain = "{yourOktaDomain}";

const oktaJwtVerifier = new OktaJwtVerifier({
  issuer: `${oktaDomain}/oauth2/default`,
  clientId: clientId
});

const app = express();
const port = 3000;

// public route
app.get('/api/publicInfo', (req, res) => {
  res.status(200).send('You are viewing public info');
});

// protected route
app.get('/api/profile', verifyToken, (req, res) => {
  oktaJwtVerifier.verifyAccessToken(req.token, 'api://default')
    .then(jwt => {
      res.send('You are viewing private profile info');
    })
    .catch(err => {
      res.sendStatus(403);
    });
});

function verifyToken(req, res, next) {
  const bearerHeader = req.headers['authorization'];

  if (bearerHeader) {
    const bearer = bearerHeader.split(' ');
    const bearerToken = bearer[1];
    req.token = bearerToken;
    next();
  } else {
    // Forbidden
    res.sendStatus(403);
  }
}

app.listen(port, () => console.log(`My App listening on port ${port}!`))
Now, let me explain what this code does.
The line that starts with const oktaJwtVerifier = new OktaJwtVerifier created a verifier instance bound to the issuer (authorization server URL) and the Client ID (the Okta application that will use this authorization server).
Then we created two routes /api/publicInfo and /api/profile. /api/publicInfo is public and doesn’t require token authentication. When /api/publicInfo is called, it will respond with the message You are viewing public info. /api/profile is protected and requires token authentication. It calls the function verifyToken to extract the bearer token that passes along the API call header.
The line that starts with oktaJwtVerifier.verifyAccessToken(req.token, 'api://default') takes the token and checks whether the token is valid. If the token is valid, it will respond the message You are viewing private profile info, otherwise it will return 403 which means access is forbidden.
Test Your Node and Express API
Time to test it out! You can start the API server using:
node index.js
Use HTTPie to make a request to the /api/publicInfo endpoint:
http GET :3000/api/publicInfo
You should see the response You are viewing public info.
Now try accessing the protected route:
http GET :3000/api/profile
You should see the response Forbidden.
Now, try again with the access_token you obtained earlier (replace the token part with your token):
http GET :3000/api/profile \
  'Authorization: Bearer eyJraWQiOiJ1dURLVTMxZWRvTi0wd0xMUnl1TW1vbmtBdi1OaFEwejZhWmxjdTN5NU8wIiwiYWxnIjoiUlMyNTYifQ.eyJ2ZXIiOjEsImp0aSI6IkFULjZoZS1fbndIcmpmSHl6bjg3bUhNLWNVUnBUNTg3RVFBT2N6Ym1QRTNkSkkiLCJpc3MiOiJodHRwczovL2Rldi04MTk2MzMub2t0YXByZXZpZXcuY29tL29hdXRoMi9kZWZhdWx0IiwiYXVkIjoiYXBpOi8vZGVmYXVsdCIsImlhdCI6MTU0Njc2NDc4OCwiZXhwIjoxNTQ2NzY4Mzg4LCJjaWQiOiIwb2Fpb3g4Ym1zQktWWGt1MzBoNyIsInNjcCI6WyJjdXN0b21TY29wZSJdLCJzdWIiOiIwb2Fpb3g4Ym1zQktWWGt1MzBoNyJ9.fZCRSMASYjQqH-gnqsQ1tJa7QN8UJZ-iPT4UZE6Voq8YsWefpyjjroMlDzkSJZVRm_V47PGLrSu7sg6ranjZTTpx8f_Qk6zfDBfNTxnWpIqKXaotTE-foial9XBSMiyuArTVsbDtHBrb9EwBSqRzBmlI2uRP92bTggxGbgNMWnQukguD_pCGHiSeDN3Jy7R7EpKgSkDpRBhQXHp0Ly6cByUmjsseWEzZdCCiIVJh_m__KEoqX8vUC6xkUYdMHJ4GWH8kPb0Hcao2jkAJBSKQKose8a5vxDS-WwpWO482NyVxNDvxBgCIfn1tG-qL4Vbdxokw41o2M81MoqgdNZGHQA'
You should now see the response You are viewing private profile info:
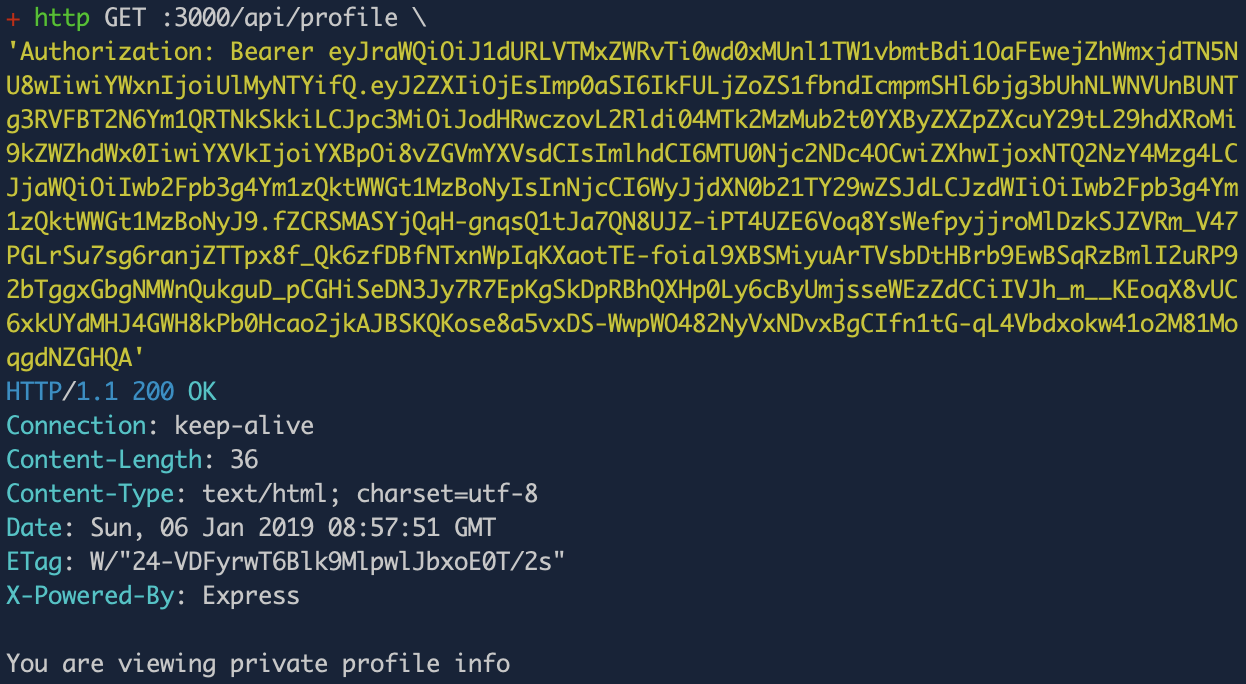
And… That’s it! Good job! You have built an Express app that serves protected API endpoints using token authentication. You used Okta as your OAuth provider which manages your custom scopes (and claims), your tokens, etc. You also used the JWT validation middleware (Okta’s JWT verifier library) which handles validating tokens for you automatically.
Learn More About Token Authentication and Node + Express
I hope you learned something new in this post! If you found token authentication interesting and/or useful and want to learn more about it, here are some other great posts to check out:
- Build User Registration with Node, React, and Okta
- What Happens If Your JWT Is Stolen?
- Build a React Application with User Authentication in 15 Minutes
- Use OpenID Connect to Build a Simple Node.js Website
- Simple Token Authentication for Java Apps
If you have any questions about this post, please add a comment below. For more awesome content, follow @oktadev on Twitter, like us on Facebook, or subscribe to our YouTube channel.
Changelog:
- Apr 5, 2021: Updated Okta JWT Verifier to v2.1.0 and streamlined setup with the Okta CLI. See changes in okta-blog#677.
Okta Developer Blog Comment Policy
We welcome relevant and respectful comments. Off-topic comments may be removed.