Simple Node Authentication
Authenticating users for Node.js/Express.js web apps can be difficult. You have to set up a database, define a user schema (or use something more flexible like NoSQL), write code to handle password hashing, etc. It’s annoying.
Using Okta’s API service, however, you can easily register and log in users to your Node website using our OpenID Connect integration.
Note: In May 2025, the Okta Integrator Free Plan replaced Okta Developer Edition Accounts, and the Okta CLI was deprecated.
We preserved this post for reference, but the instructions no longer work exactly as written. Replace the Okta CLI commands by manually configuring Okta following the instructions in our Developer Documentation.
Set Up Your Node Environment
If you’re new to Node and don’t already have it installed, you’ll need to do that first. To keep things simple, let’s assume a *nix-based environment (e.g. Mac, *nix, or Linux on Windows).
There’s a great tool called nvm, which makes it very simple to install various versions of Node and switch on the fly if you need to test with another version. It will also make sure you have the latest version of node installed and ready to go. Run the following command to install Node via nvm and get your environment fully set up.
curl -o- https://raw.githubusercontent.com/creationix/nvm/v0.33.9/install.sh | bash
If you run into trouble installing, you can find more information on the installation section of the nvm README.
Create a Simple Node Application
Now that you have Node installed, let’s get started writing an app.
NOTE: If you want to skip the tutorial and jump straight to the finished product you can check out this sample app on GitHub.
In the Node ecosystem, the most popular web server is Express. Luckily for you, the Express team has also created a nifty command line tool which helps bootstrap Express web applications. You can always customize the bootstrapped project express-generator generates, but let’s start with that to get up and running quickly.
$ npm i -g express-generator@4.16.0
/Users/bmk/.nvm/versions/node/v9.5.0/bin/express -> /Users/bmk/.nvm/versions/node/v9.5.0/lib/node_modules/express-generator/bin/expr
ess-cli.js
+ express-generator@4.16.0
added 10 packages in 4.175s

$ express -v hbs --git simple-node-authentication

   create : simple-node-authentication/
   create : simple-node-authentication/public/
   create : simple-node-authentication/public/javascripts/
   create : simple-node-authentication/public/images/
   create : simple-node-authentication/public/stylesheets/
   create : simple-node-authentication/public/stylesheets/style.css
   create : simple-node-authentication/routes/
   create : simple-node-authentication/routes/index.js
   create : simple-node-authentication/routes/users.js
   create : simple-node-authentication/views/
   create : simple-node-authentication/views/error.hbs
   create : simple-node-authentication/views/index.hbs
   create : simple-node-authentication/views/layout.hbs
   create : simple-node-authentication/.gitignore
   create : simple-node-authentication/app.js
   create : simple-node-authentication/package.json
   create : simple-node-authentication/bin/
   create : simple-node-authentication/bin/www

   change directory:
     $ cd simple-node-authentication

   install dependencies:
     $ npm install

   run the app:
     $ DEBUG=simple-node-authentication:* npm start

$ cd simple-node-authentication/

$ git init
Initialized empty Git repository in /Users/bmk/code/simple-node-authentication/.git/

$ npm i
npm notice created a lockfile as package-lock.json. You should commit this file.
added 81 packages in 3.09s

$ npm start

> simple-node-authentication@0.0.0 start /Users/bmk/code/simple-node-authentication
> node ./bin/www
npm i -g express-generator: installs the Express Generatorexpress -v hbs --git simple-node-authentication: generates a skeleton for our app- The
-v hbsoption tells the generator to usehandlebarsas the view engine instead ofpug - The
--gitoption will create a.gitignorefile with some useful defaults
- The
cd simple-node-authentication: navigate to the app foldergit init && git add . && git commit -m 'bootstrap with express-generator': make sure to keep track of changes- This will set up a git repository and save all the generated files in the initial commit. From now on, you will just be tracking your changes
npm i: this installs the dependencies to thenode_modulesdirectory. Theicommand is short forinstall- Note: The
node_modulesdirectory can get notoriously large, and there is apackage-lock.jsonfilethat keeps track of the exact versions of each dependency you’re using. Because of this, best practice is to ignore this folder from source control (e.g.echo node_modules/ >> .gitignore). If you ever feel yournode_modulesis corrupted, you can simplyrm -rf node_modules && npm ito restore the dependencies
- Note: The
npm start: This is the Node standard command to start a server- The
startscript is actually defined insidepackage.json. By default it would be the equivalent of runningnode index.js, but in our case, it is really runningnode ./bin/www.
- The
- …
- Profit!
Your server is now running at http://localhost:3000. Right now it’s just a basic “Hello World” app, but you’re going to make it a little more useful in a moment.
Monitor Code Changes in Your Node Application
Having your web server restart automatically each time you make a code change can save you a ton of time as you’re developing your web applications. To accomplish this, you can use nodemon. To add it to the project, type npm i nodemon. Once you’ve installed nodemon, you’ll add a dev script to your package.json:
   "scripts": {
+    "dev": "nodemon node ./bin/www",
     "start": "node ./bin/www"
   },
From now on, instead of running npm start to boot up your development server, you can run npm run dev and any code changes you make will automatically trigger a web server restart.
Configure Code Linting
Linters help catch bugs while you’re coding rather than waiting for them to crop up in production. They also help keep code styling consistent when collaborating with other contributors. One of the most common linters is eslint, which is incredibly configurable. There are many presets out there, but my favorite is called standard. They actually have their own tool, based on eslint, but it’s not possible to customize that, so in this example, I’ll go with eslint and make a few modifications to the standard config.
To do this, create a file in the project root named .eslintrc with the following:
{
  "extends": "standard",
  "rules": {
    "comma-dangle": ["error", "always-multiline"],
    "no-var": ["error"],
    "prefer-const": ["error"]
  }
}
Now you need to install a few dev dependencies (the -D flag is for dev dependencies).
npm i -D eslint eslint-config-standard eslint-plugin-standard eslint-plugin-promise eslint-plugin-import eslint-plugin-node
I added a few rules I like. You can tweak these to your liking:
- comma-dangle is really just a style preference. I like that if I add a new line to the end of a list, the git history won’t show the previously last line as code I modified
- no-var forces us to use the newer
letandconstkeywords for declaring variables. They have proper scoping and tend to be safer to use - prefer-const will have you use
constby default, and only useletif the variable is going to be re-assigned later
You’ll want to add another script to package.json for testing:
   "scripts": {
     "dev": "nodemon node ./bin/www",
+    "test": "eslint . ./bin/www",
     "start": "node ./bin/www"
   },
You can now test your codebase at any time using npm test. The first time around, there will be quite a few errors because the code from express-generator wasn’t written using the same config. To fix them in bulk run ./node_modules/.bin/eslint . ./bin/www --fix from the root of your project.
The . says to check the current directory tree for any .js files. Since ./bin/www doesn’t have a .js extension, but is a JavaScript file as well, you need to add that for it to be scanned.
It turns out bin/www actually has some unreachable code that can’t be automatically fixed. Let’s go fix that real quick. Since process.exit will actually end the node process, the break keywords are a bit redundant, so you can just remove those.
@@ -67,11 +67,9 @@ function onError (error) {
     case 'EACCES':
       console.error(bind + ' requires elevated privileges')
       process.exit(1)
-      break
     case 'EADDRINUSE':
       console.error(bind + ' is already in use')
       process.exit(1)
-      break
     default:
       throw error
   }
There’s pretty good support for using eslint within most text editors which allows you to see the errors as you’re typing the code. Most of the time, you won’t even need to run npm test.
You might need to install a plugin to get this to work. To see if your editor is supported, check here.
Add Authentication With Okta
The Express generator created a skeleton for you to get started. Now, let’s add authentication. Traditionally, there is a lot to think about when it comes to creating a safe, secure application. For example, what are best practices for storing hashed passwords? Do these best practices change often? Should you use multi-factor authentication? To say there’s a lot of research to do this right is an understatement.
Luckily, Okta makes this really easy by offloading authentication and letting you focus on what makes your app unique. To get started sign up for a free Okta Developer account.
You’ll get a link to your own Okta org URL (e.g. https://{yourOktaDomain}). In order to log in, check your email for a temporary password.
After logging into the dev console, click on the Applications tab, then click Add Application. For this example, you should use the Web option.
Express uses port 3000 by default. Here you should name your application and change the ports, but leave all the other settings the same for now. Eventually, you’ll want to add URIs for a custom domain, but localhost is fine for testing.
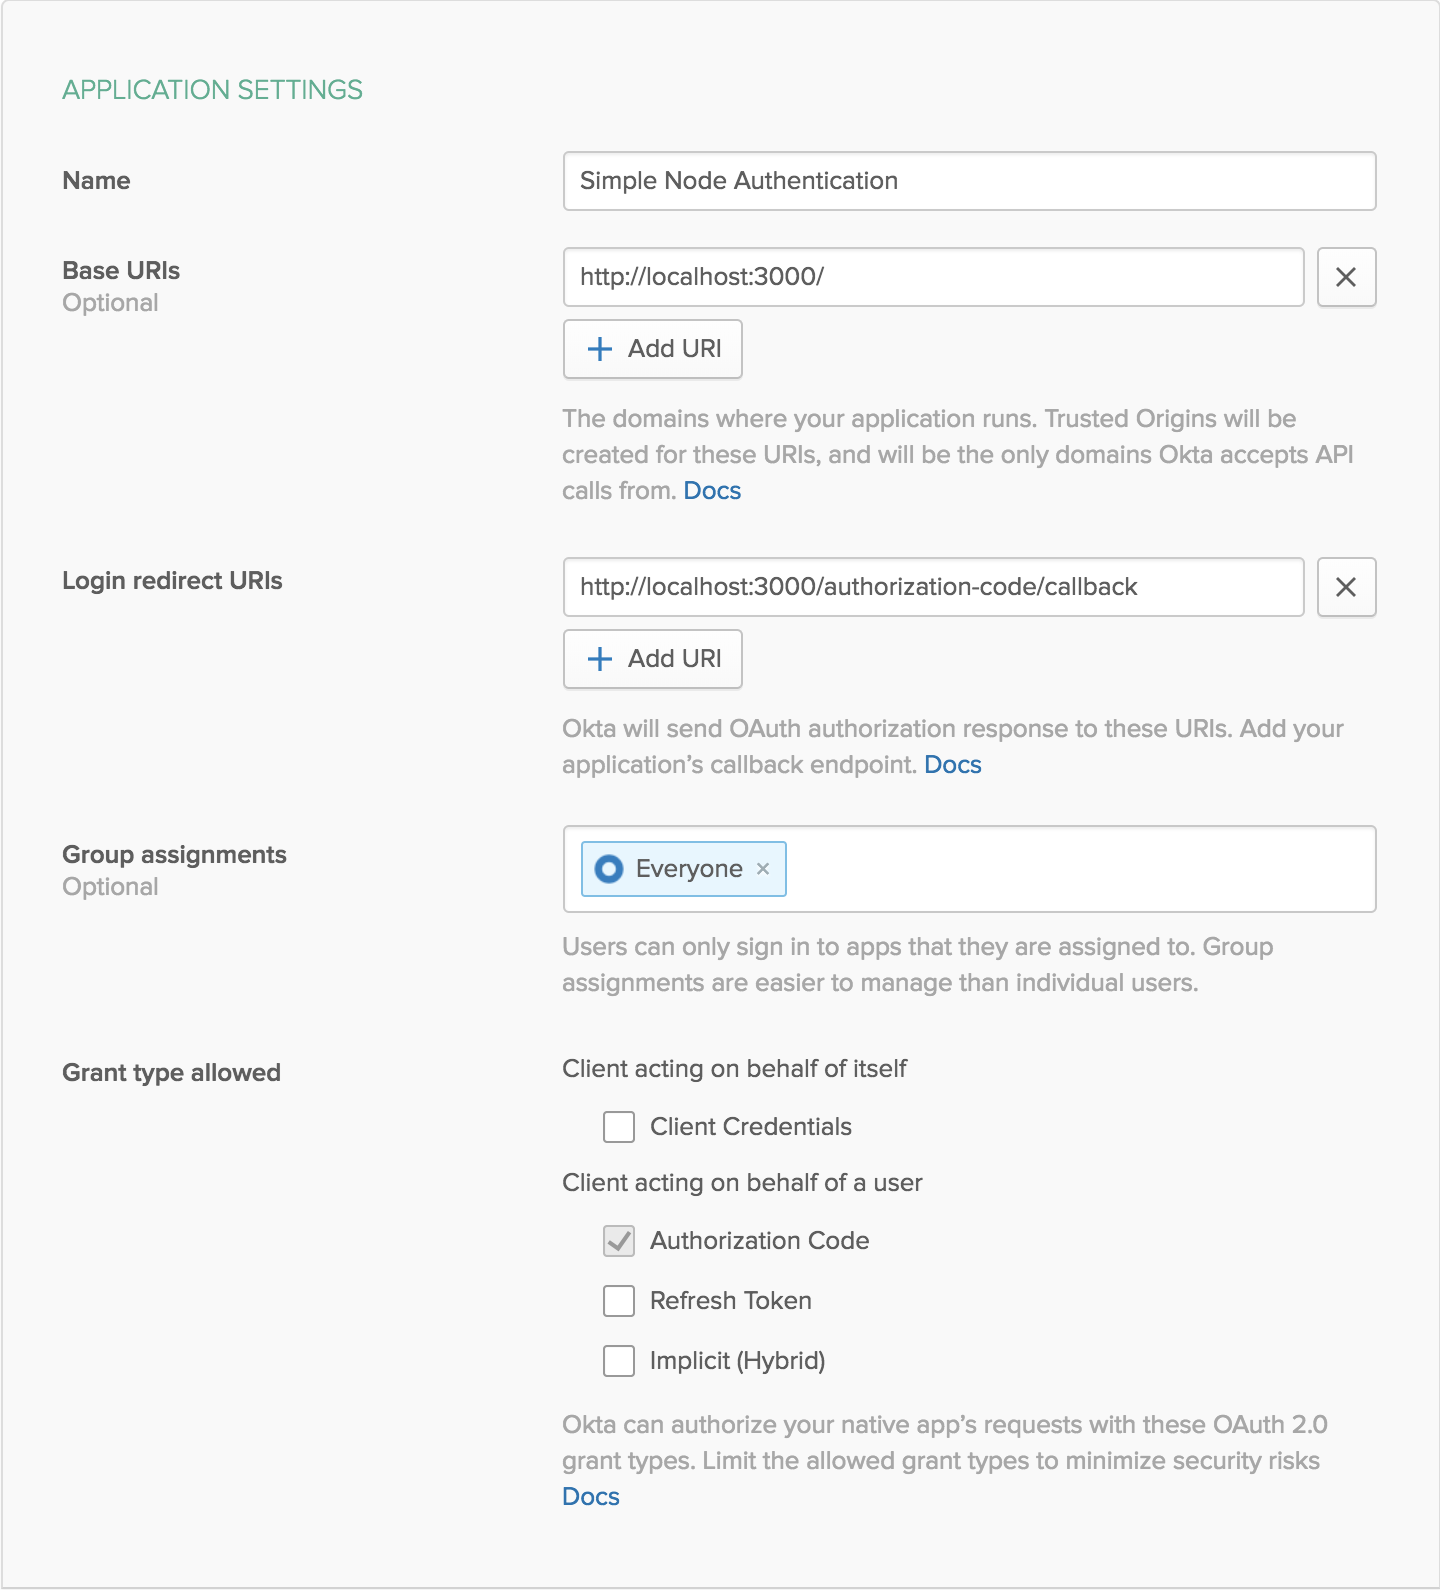
After creating your application, you’ll get access to your client credentials. Save the client ID and client secret for the next step.
Add the OpenID Connect Middleware to Express.js
Now for some real code. Okta provides Express middleware to make authentication simple in Node.
npm i @okta/oidc-middleware@0.1.2 express-session@1.15.6
In your app.js file you’ll want to set up support for sessions and add the OIDC middleware. You’ll need to reference the oidc middleware in the bin/www file, so you should export that as well.
diff --git a/app.js b/app.js
index 1cf250f..f5ad0ab 100644
--- a/app.js
+++ b/app.js
@@ -3,12 +3,22 @@ const express = require('express')
 const path = require('path')
 const cookieParser = require('cookie-parser')
 const logger = require('morgan')
+const session = require('express-session')
+const { ExpressOIDC } = require('@okta/oidc-middleware')

 const indexRouter = require('./routes/index')
-const usersRouter = require('./routes/users')
+const dashboardRouter = require('./routes/dashboard')

 const app = express()

+const oidc = new ExpressOIDC({
+  issuer: `${process.env.ORG_URL}/oauth2/default`,
+  client_id: process.env.CLIENT_ID,
+  client_secret: process.env.CLIENT_SECRET,
+  redirect_uri: `${process.env.HOST_URL}/authorization-code/callback`,
+  scope: 'openid profile',
+})
+
 // view engine setup
 app.set('views', path.join(__dirname, 'views'))
 app.set('view engine', 'hbs')
@@ -19,8 +29,19 @@ app.use(express.urlencoded({ extended: false }))
 app.use(cookieParser())
 app.use(express.static(path.join(__dirname, 'public')))

+app.use(session({
+  secret: process.env.APP_SECRET,
+  resave: true,
+  saveUninitialized: false,
+}))
+
+app.use(oidc.router)
 app.use('/', indexRouter)
-app.use('/users', usersRouter)
+app.use('/dashboard', oidc.ensureAuthenticated(), dashboardRouter)
+app.get('/logout', (req, res) => {
+  req.logout()
+  res.redirect('/')
+})

 // catch 404 and forward to error handler
 app.use(function (req, res, next) {
@@ -38,4 +59,4 @@ app.use(function (err, req, res, next) {
   res.render('error')
 })

-module.exports = app
+module.exports = { app, oidc }
The Okta middleware adds a logout function to the request object, so you can log users out with a call to req.logout(). That was added above as a route, so you just need a link to /logout in order to sign out, which I’ll show you a bit later.
For this example you’re not going to be using the users route that came with the skeleton either, so you can remove that by running git rm routes/users.js.
You might be wondering where all the process.env variables are coming from. It’s a best practice not to store sensitive information in source control, so you can instead use dotenv. This lets you keep things like your client secret in a file that you ignore from source control. It also lets you define different variables depending on whether you’re running in development or production.
For now, install the package with npm i dotenv, then create a .env file in the root of the project.
ORG_URL=https://{yourOktaDomain}
HOST_URL=http://localhost:3000
CLIENT_ID=okta-application-client-id
CLIENT_SECRET=okta-application-client-secret
For APP_SECRET we just need something random, which can be generated with these commands:
npm install -g uuid-cli
echo "APP_SECRET=`uuid`" >> .env
You still need to tell your code to use environment variables via dotenv, and change the way you start the server to work with Okta’s middleware. You need the dotenv import to be the first code your app comes across to make sure the environment variables are set up properly.
These are the changes you need to make in bin/www:
diff --git a/bin/www b/bin/www
index 48c4fc5..414ca9a 100755
--- a/bin/www
+++ b/bin/www
@@ -4,7 +4,8 @@
  * Module dependencies.
  */

-const app = require('../app')
+require('dotenv').config()
+const { app, oidc } = require('../app')
 const debug = require('debug')('simple-node-authentication:server')
 const http = require('http')

@@ -25,7 +26,10 @@ const server = http.createServer(app)
  * Listen on provided port, on all network interfaces.
  */

-server.listen(port)
+oidc.on('ready', () => {
+  server.listen(port)
+})
+oidc.on('error', onError)
 server.on('error', onError)
 server.on('listening', onListening)
Add a Dashboard and Login Page
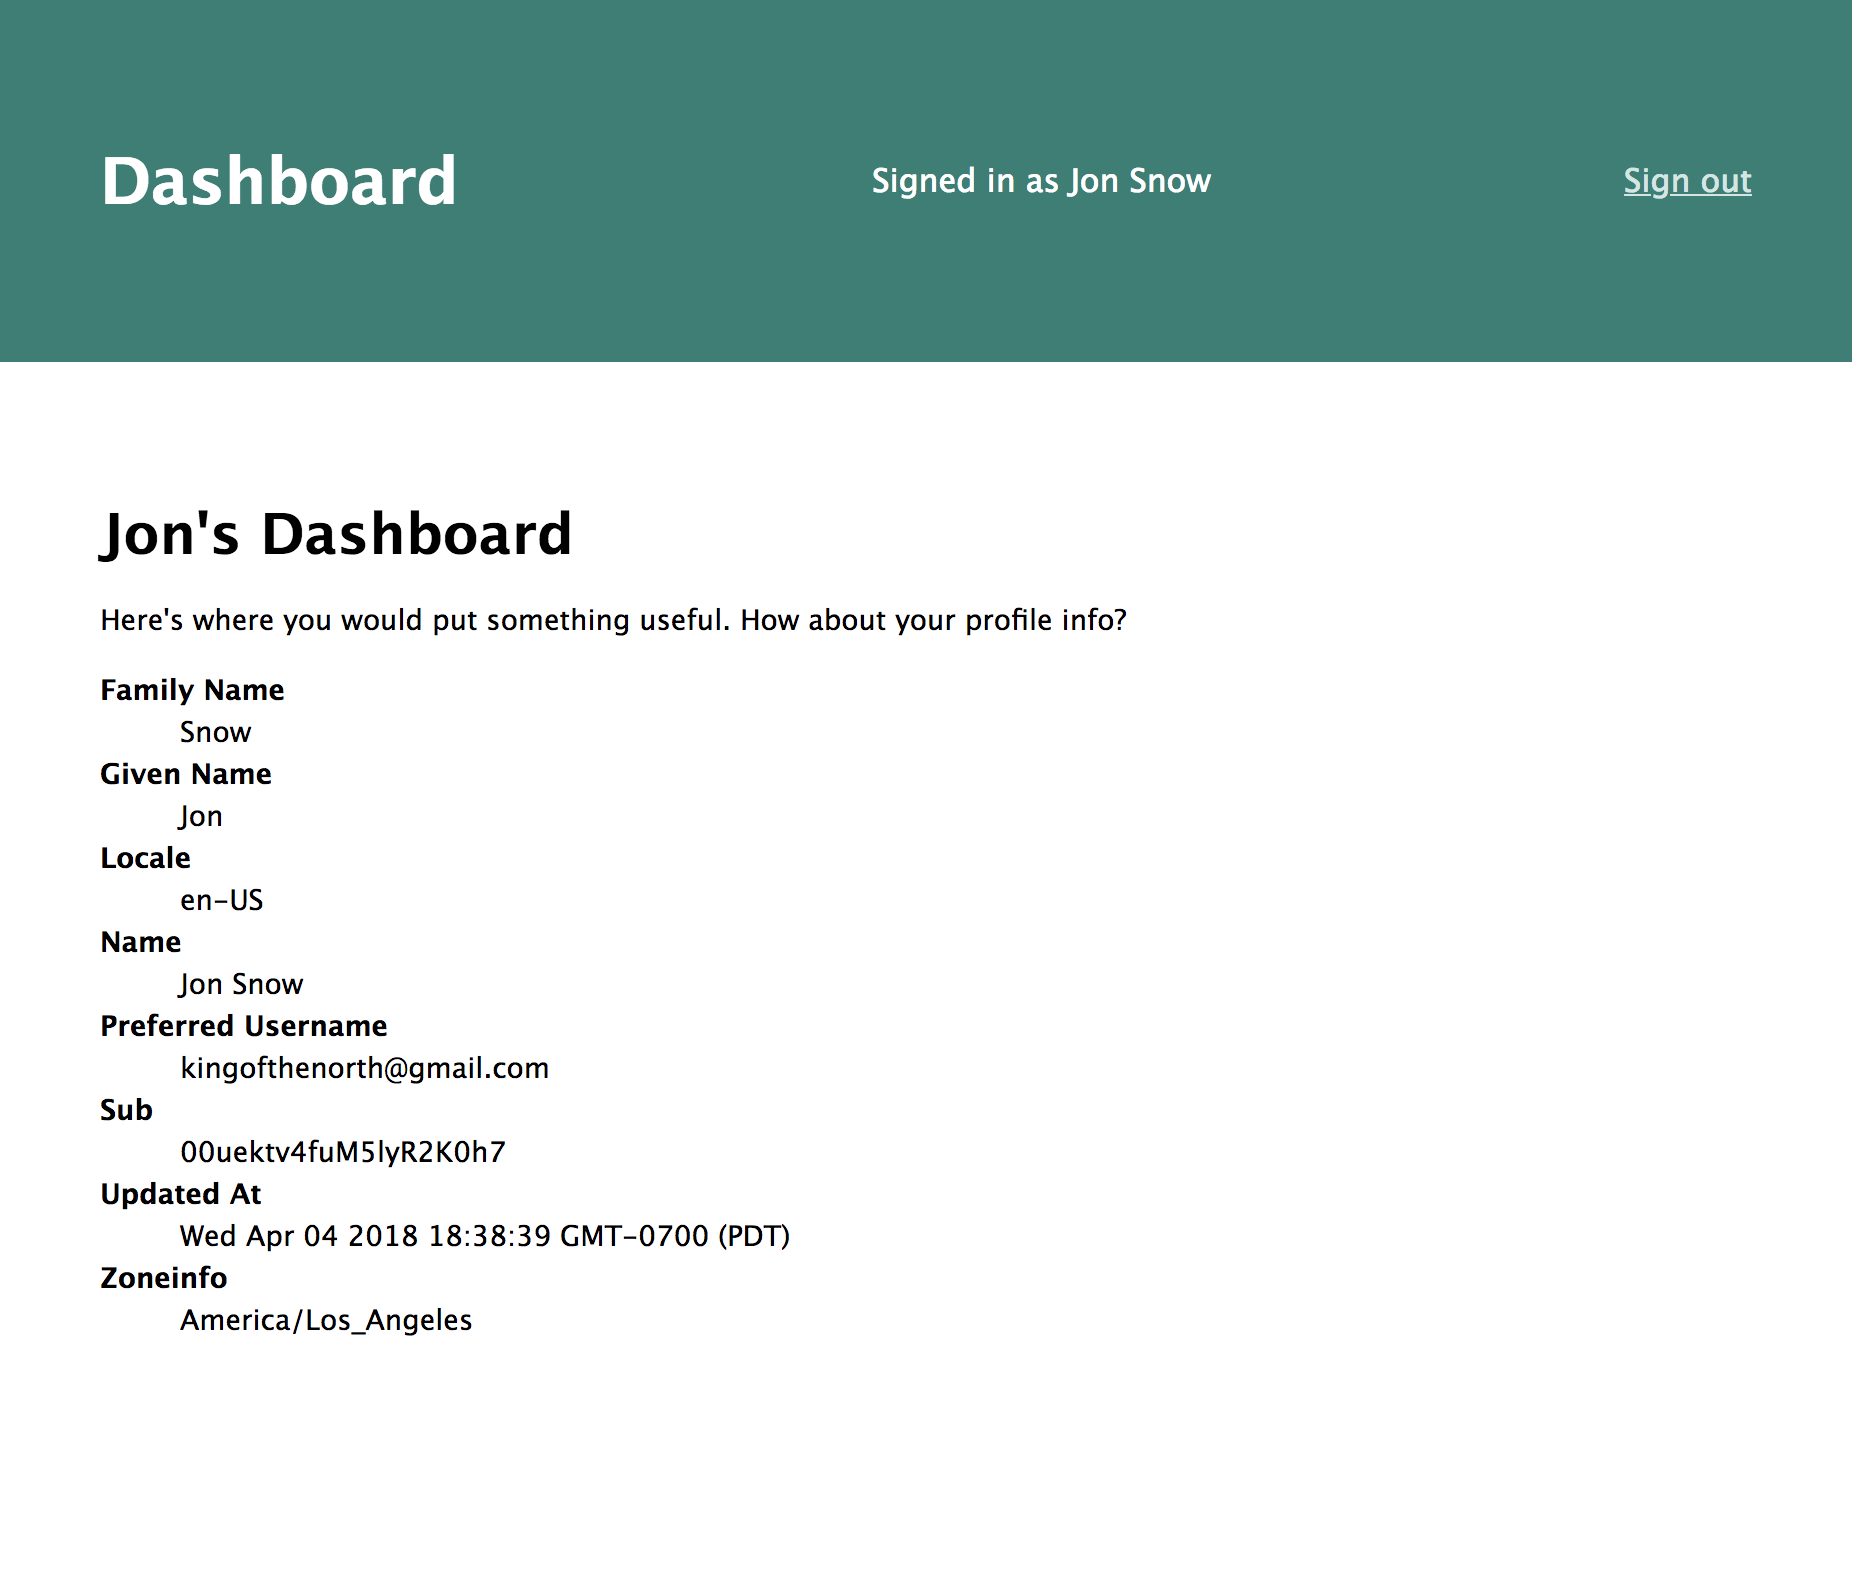
Let’s create a private dashboard that’s only accessible for logged in users. In app.js you already added the reference to your dashboard’s router, so you’ll need to add that in routes/dashboard.js.
const express = require('express')
const { startCase } = require('lodash')

const router = express.Router()

router.get('/', (req, res, next) => {
  const descriptionList = Object.keys(req.userinfo).sort()
    .map(key => ({
      term: startCase(key),
      details: (key === 'updated_at' ? new Date(req.userinfo[key] * 1000) : req.userinfo[key]),
    }))

  res.render('dashboard', {
    title: 'Dashboard',
    descriptionList,
    userinfo,
  })
})

module.exports = router
I added lodash, so you’ll need to install that as a dependency with npm i lodash@4.17.5. You’ll also want to add a view to describe how to render the data in views/dashboard.hbs.
<h1>{{userinfo.given_name}}'s Dashboard</h1>

<p>Here's where you would put something useful. How about your profile info?</p>
<dl>
  {{#each descriptionList}}
    <dt>{{this.term}}</dt>
    <dd>{{this.details}}</dd>
  {{/each}}
</dl>
Clean Up the Styling
You can add a header in views/layout.hbs that will be visible on every page. As long as the routers pass in userinfo to the render function, you’ll know if the user is signed in. You also want to pass in title to set the page’s title and set the header.
<!DOCTYPE html>
<html>
  <head>
    <title>{{title}}</title>
    <link rel='stylesheet' href='/stylesheets/style.css' />
  </head>
  <body>
    <header>
      <h1>{{title}}</h1>
      {{#if userinfo}}
        <div>
          Signed in as {{userinfo.name}}
        </div>
      {{/if}}
      {{#if userinfo}}
        <a href="/logout">Sign out</a>
      {{else}}
        <a href="/login">Sign in</a>
      {{/if}}
    </header>
    <main>
      {{{body}}}
    </main>
  </body>
</html>
The CSS lives in public/stylesheets/style.css. Here’s how mine looks after making a few changes.
body {
  padding: 0;
  margin: 0;
  font: 14px "Lucida Grande", Helvetica, Arial, sans-serif;
}

a {
  color: #208075;
}

header {
  display: flex;
  justify-content: space-between;
  align-items: center;
  background-color: #208075;
  color: white;
  font-size: 16px;
}

header > a {
  color: #d1e5e1;
}

header,
main {
  padding: 50px;
}

dt {
  padding: 4px 0;
  font-weight: bold;
}
Add a Login Page
It turns out there’s not really much to do here. Okta’s middleware adds a /login route for you, so all you really need to do is add a link. In fact, you don’t even need to link to the /login page directly. Since your dashboard page uses the oidc.ensureAuthenticated() middleware, any time a user tries to go to the dashboard, they will first be directed to log in. After logging in, they’ll be redirected back to the intended page.
In routes/index.js you want to know if the user’s authenticated or not, so you can pass that info to the view with req.userinfo. While you’re at it, go ahead and change the default title from Express to the name of your app.
-  res.render('index', { title: 'Express' })
+  res.render('index', {
+    title: 'Simple Node Authentication',
+    userinfo: req.userinfo,
+  })
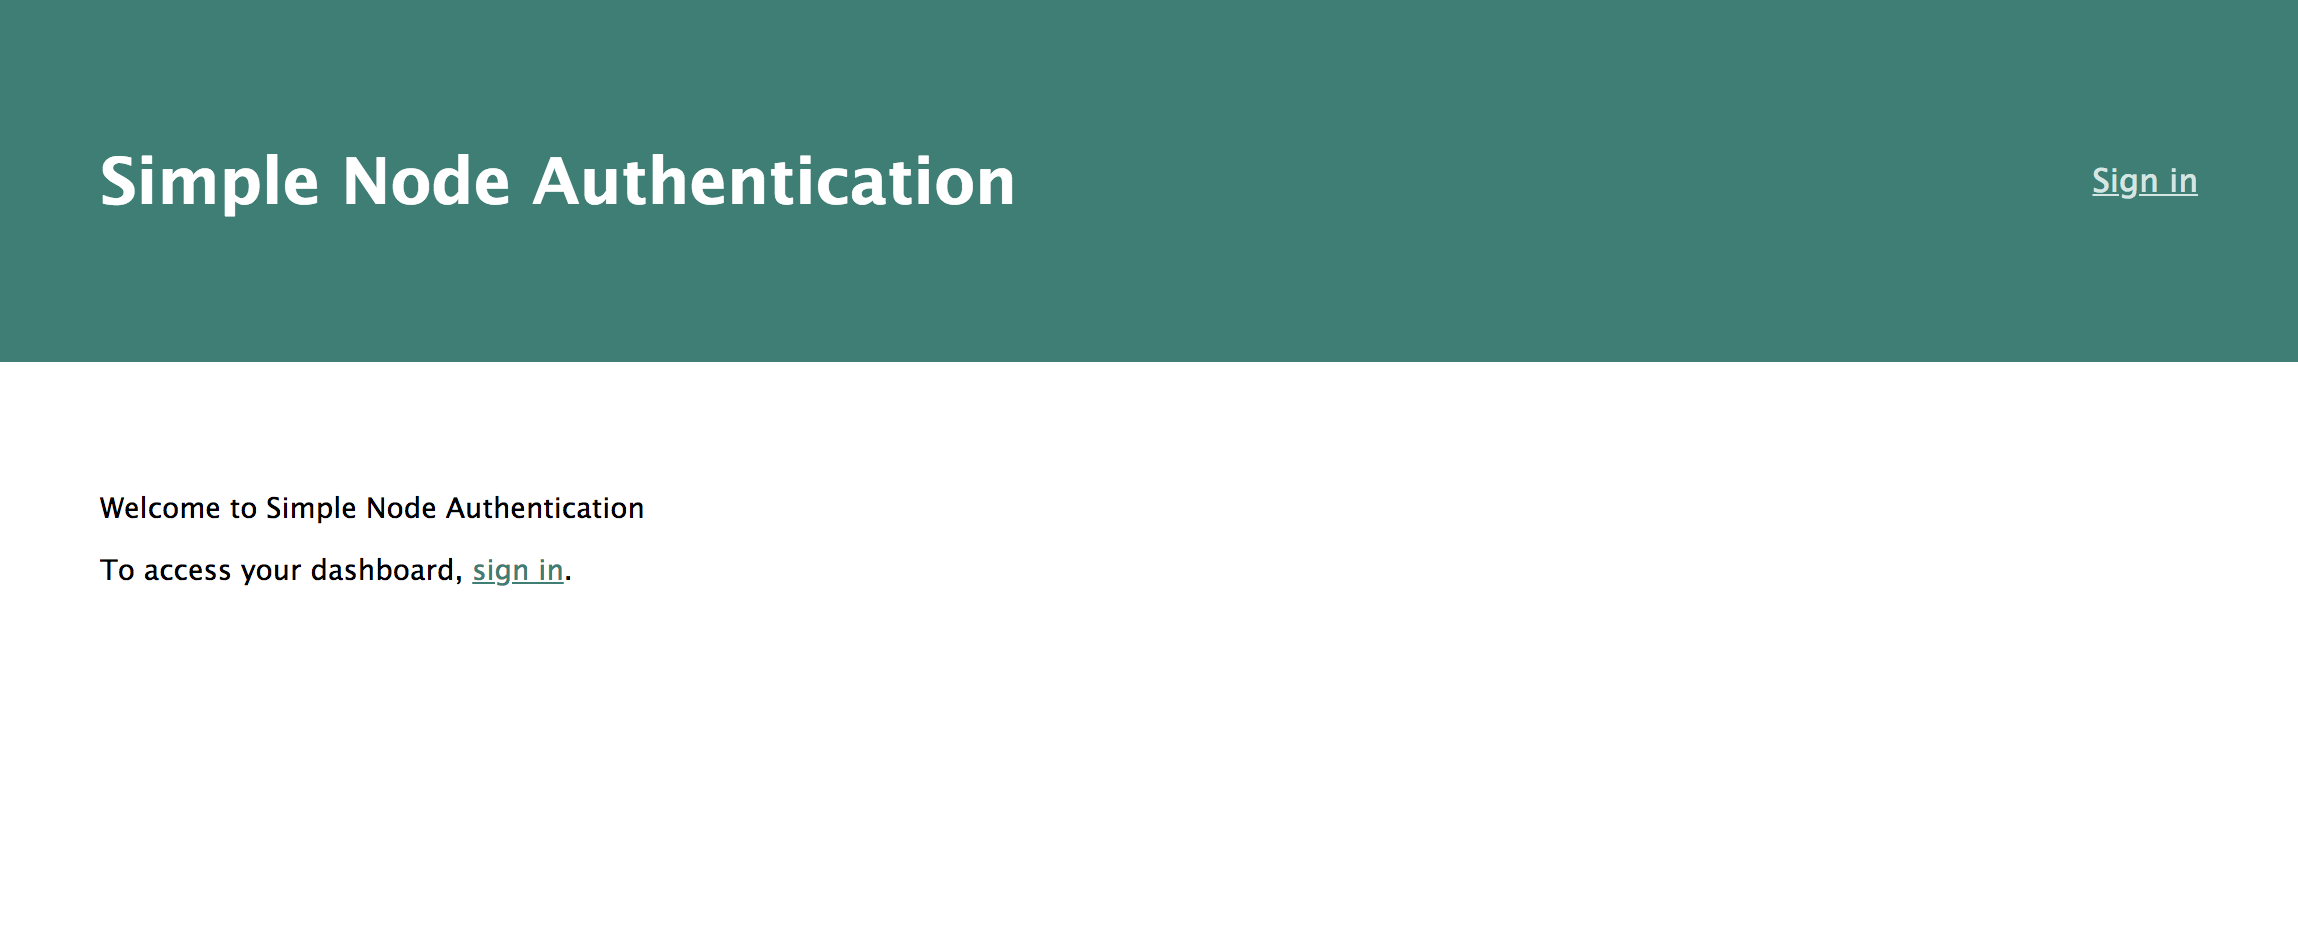
In views/index.hbs, let’s add a link to the dashboard.
<p>Welcome to {{title}}</p>
<p>
  To access your dashboard,
  {{#if userinfo}}
    <a href="/dashboard">click here</a>.
  {{else}}
    <a href="/dashboard">sign in</a>.
  {{/if}}
</p>
Now when you run the app, you get a page that looks like this:
Clicking the log in link will take you to Okta’s sign in page. After signing in, you’ll be directed to a dashboard page with your profile info.
Add User Registration
You should have a functional app now with authentication and protected pages, created with only a few additions to the basic skeleton app. You don’t have any way to add new users though.
Let’s create a simple registration page. For this, we’ll be using the Okta Node.js SDK, which you can install with npm i @okta/okta-sdk-nodejs@1.1.0.
You’ll also need an API token from Okta to be able to create a user. After logging in to your developer console, select API > Tokens from the menu.
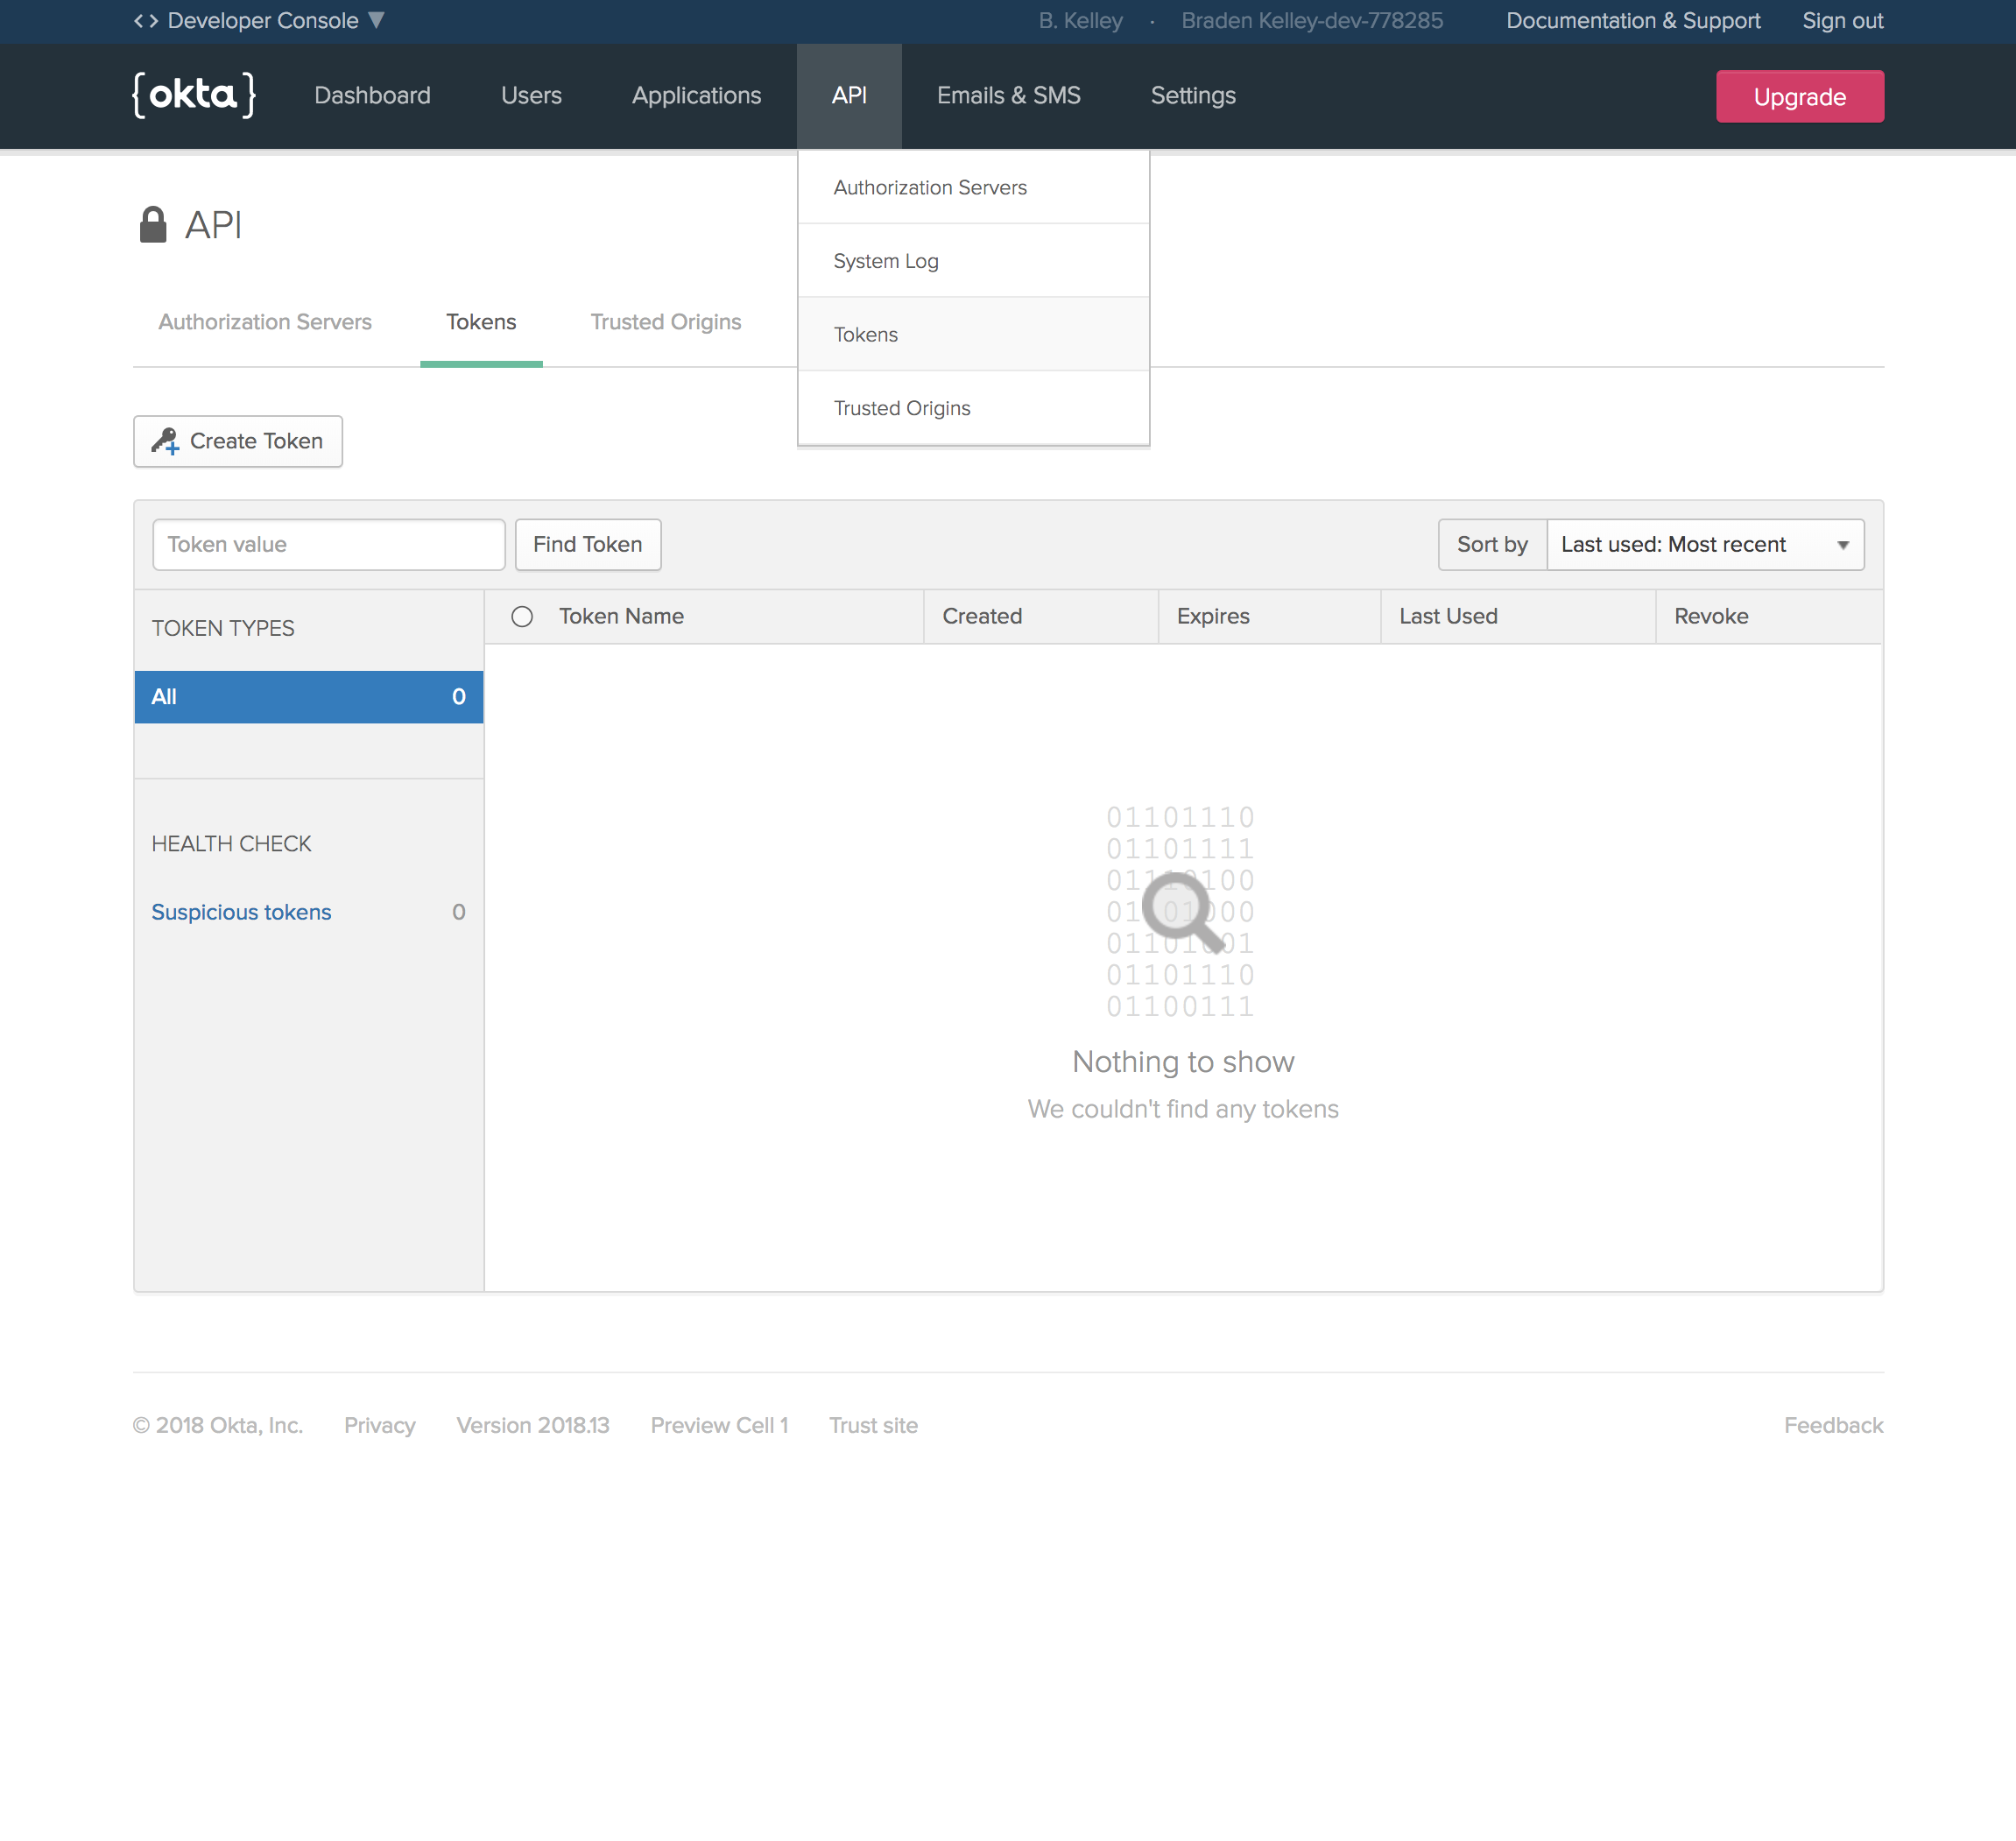
Create a token with a useful name, like registration, then save the value in .env as REGISTRATION_TOKEN. The value of the token will only be displayed once, so if you lose it you’ll need to create a new one.
Now you’ll need to create a view and a router for the registration page.
routes/register.js
const okta = require('@okta/okta-sdk-nodejs')
const express = require('express')

const router = express.Router()

const client = new okta.Client({
  orgUrl: process.env.ORG_URL,
  token: process.env.REGISTRATION_TOKEN,
})

const title = 'Create an account'

router.get('/', (req, res, next) => {
  if (req.userinfo) {
    // Logged in users shouldn't be able to register
    return res.redirect('/')
  }

  res.render('register', { title })
})

router.post('/', async (req, res, next) => {
  try {
    await client.createUser({
      profile: {
        firstName: req.body.firstName,
        lastName: req.body.lastName,
        email: req.body.email,
        login: req.body.email,
      },
      credentials: {
        password: {
          value: req.body.password,
        },
      },
    })

    res.redirect('/dashboard')
  } catch ({ errorCauses }) {
    const errors = errorCauses.reduce((summary, { errorSummary }) => {
      if (/Password/.test(errorSummary)) {
        return Object.assign({ password: errorSummary })
      }

      const [ , field, error ] = /^(.+?): (.+)$/.exec(errorSummary)
      return Object.assign({ [field]: error }, summary)
    }, {})

    res.render('register', { title, errors, body: req.body })
  }
})

module.exports = router
When initially loading the page, the fields will be blank. If the createUser function throws an error, you’ll want to keep the user on the page and display those errors inline. You can pre-populate the fields with the data they entered last time, so they don’t have to type everything in again.
views/register.hbs
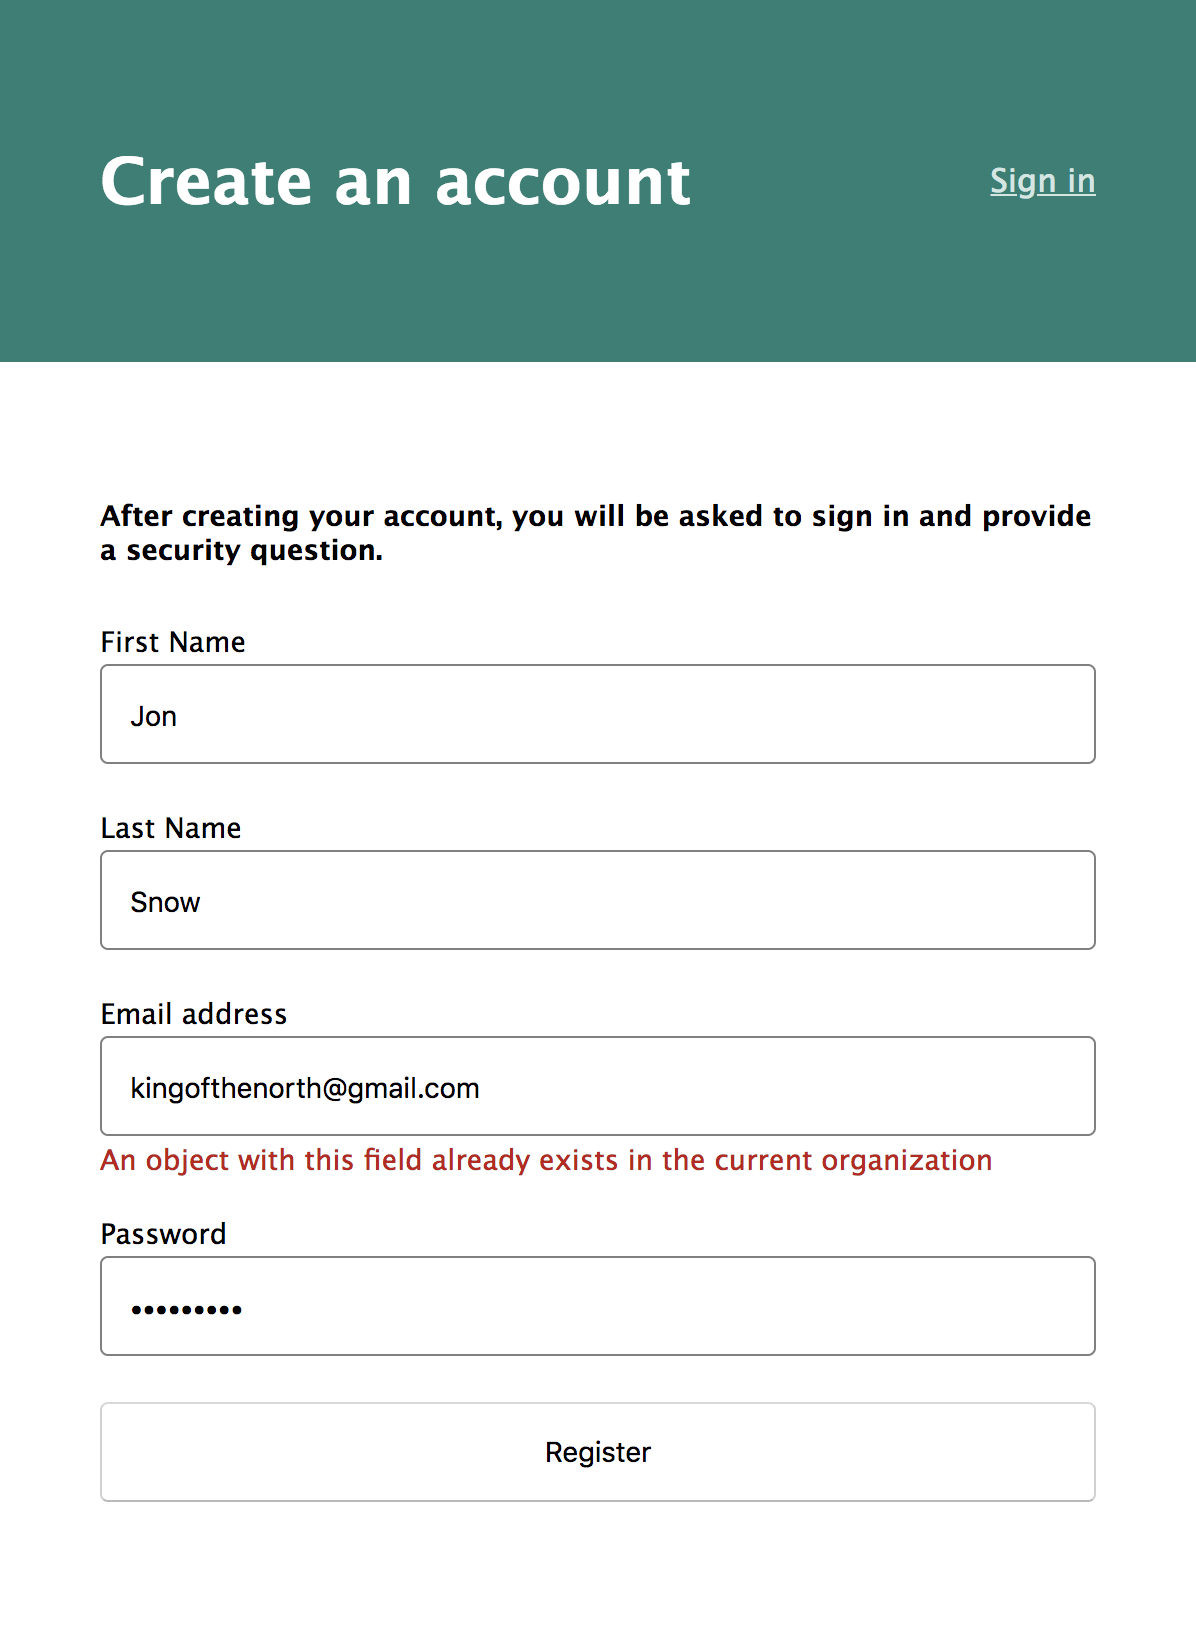
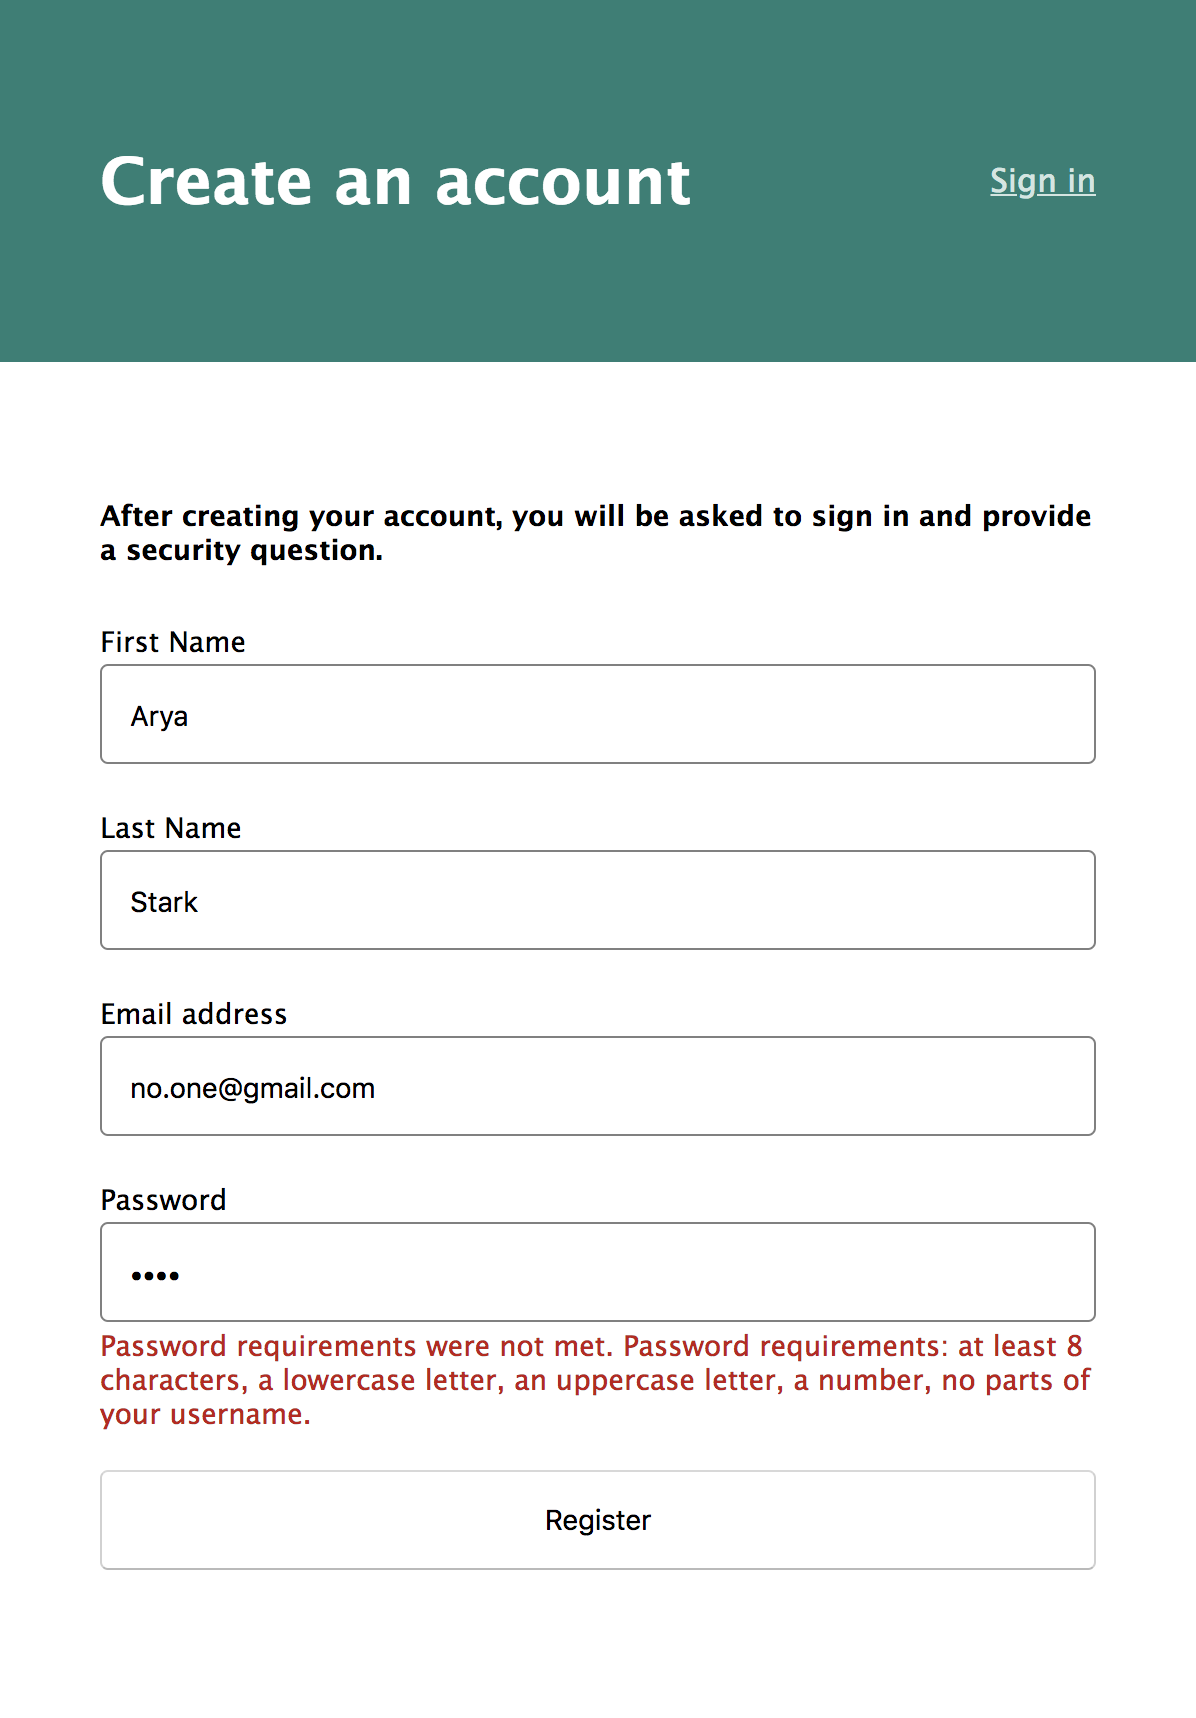
<h4>After creating your account, you will be asked to sign in and provide a security question.</h4>
<form method="post">
  <label for="firstname">
    First Name
    <input id="firstname" name="firstName" required value="{{body.firstName}}" />
    <label class="error">{{errors.firstName}}</label>
  </label>
  <label for="lastname">
    Last Name
    <input id="lastname" name="lastName" required value="{{body.lastName}}" />
    <label class="error">{{errors.lastName}}</label>
  </label>
  <label for="email">
    Email address
    <input type="email" id="email" name="email" required value="{{body.email}}" />
    <label class="error">{{errors.email}}</label>
    <label class="error">{{errors.login}}</label>
  </label>
  <label for="password">
    Password
    <input
      name="password"
      type="password"
      required
      value="{{body.password}}"
    />
    <label class="error">{{errors.password}}</label>
  </label>

  <button type="submit">Register</button>
</form>
You can now add a link to the homepage in views/index.hbs.
     <a href="/dashboard">click here</a>.
   {{else}}
     <a href="/dashboard">sign in</a>.
+  </p>
+  <p>
+    If you don't have an account, you can
+    <a href="/register">register for free</a>.
   {{/if}}
 </p>
Now if you navigate to http://localhost:3000/register, you’ll find a registration page.
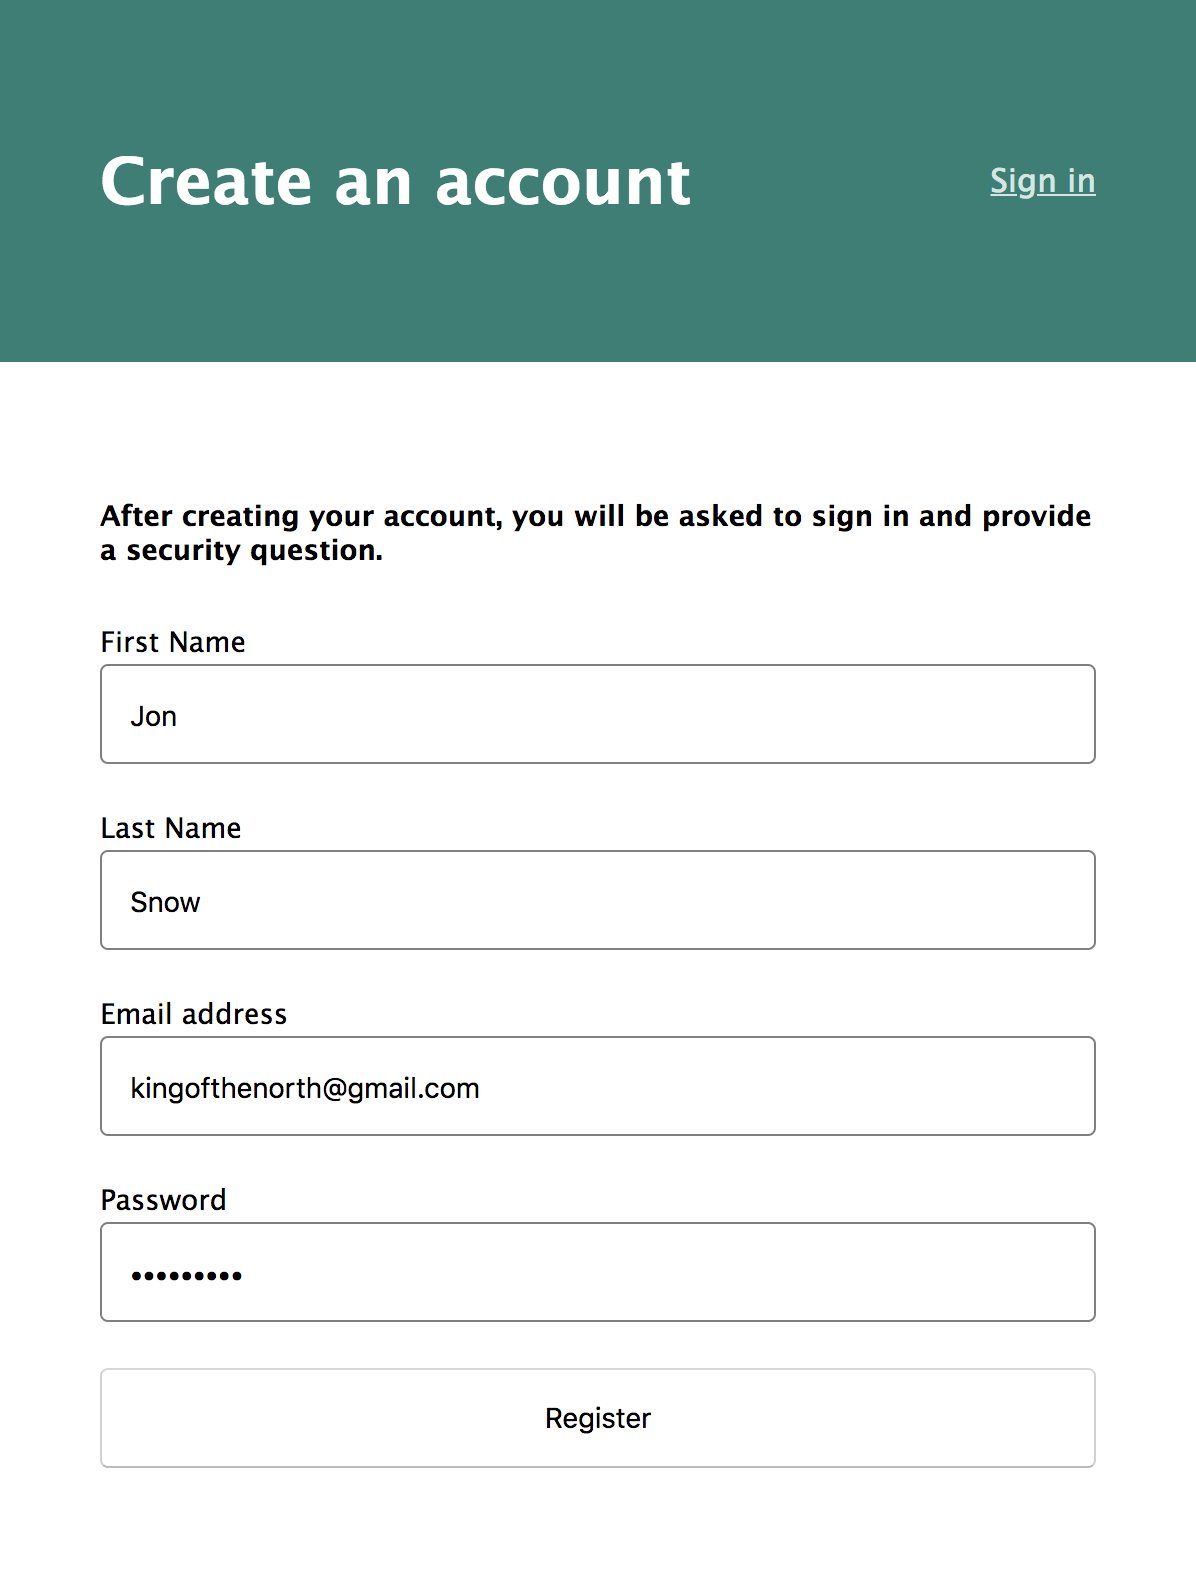
If Okta returns any errors, they will be shown in the form.
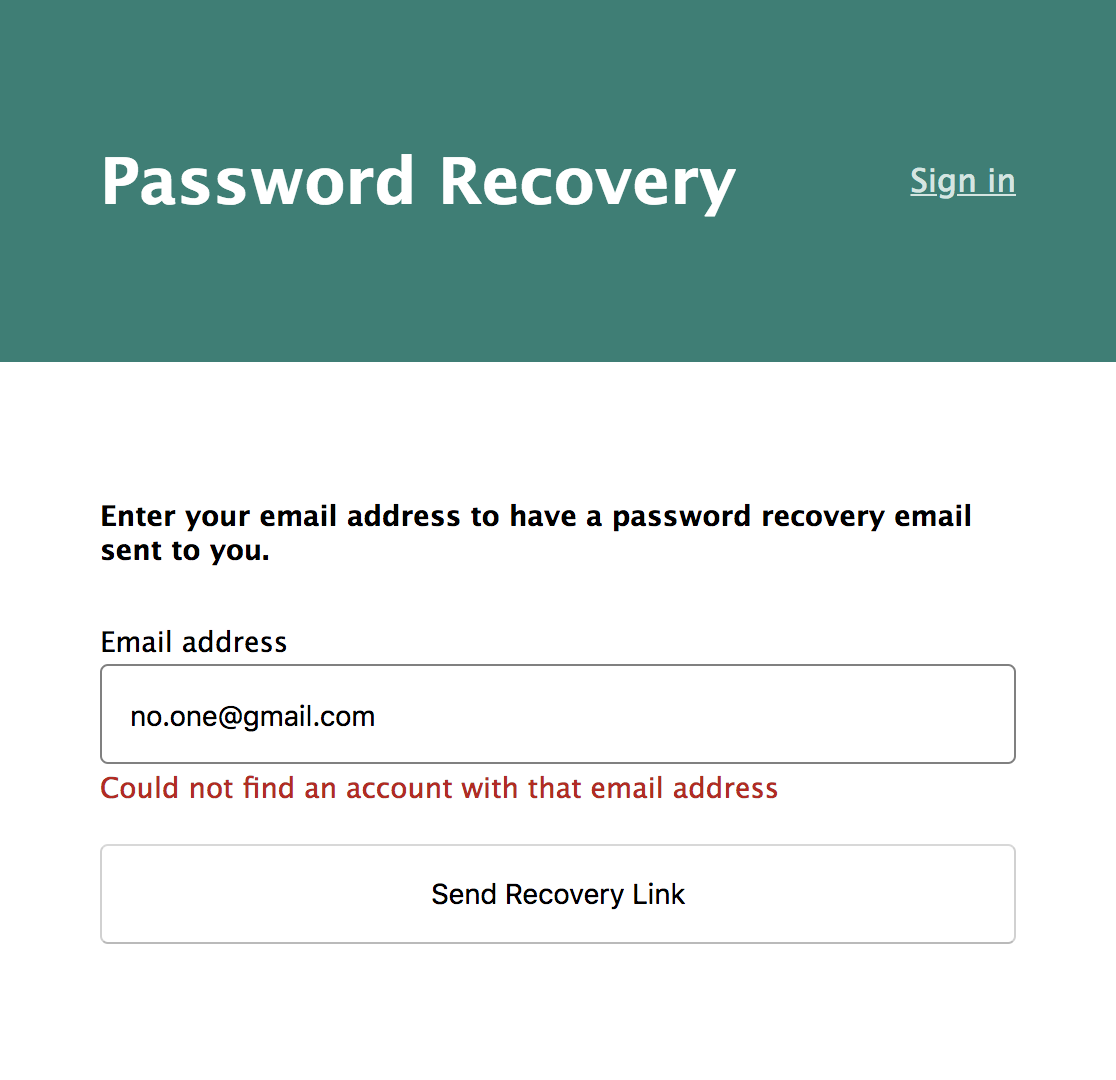
Add Credential Recovery
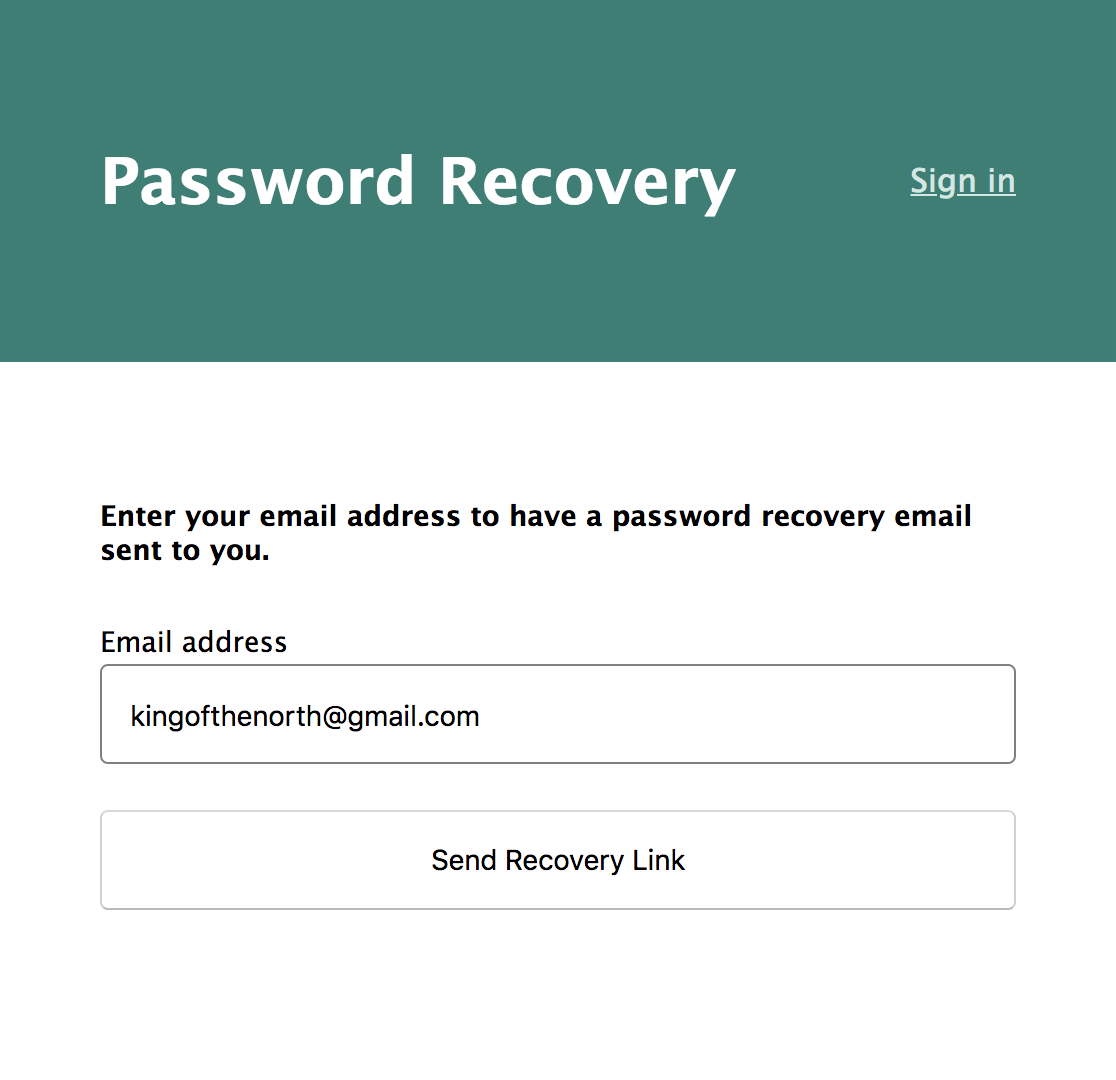
If a user forgets their password, they will need a way to reset it. Okta’s API allows you to send a recovery link to a user’s email address. You just need a simple page to ask the user for their email address.
views/reset-password.hbs
{{#if success}}
  <h4>Please check your inbox for a recovery email!</h4>
{{else}}
  <h4>Enter your email address to have a password recovery email sent to you.</h4>
{{/if}}
<form method="post">
  <label for="email">
    Email address
    <input autofocus type="email" id="email" name="email" required value="{{body.email}}" />
    <label class="error">{{error}}</label>
  </label>

  <button type="submit">Send Recovery Link</button>
</form>
routes/reset-password.js
const okta = require('@okta/okta-sdk-nodejs')
const express = require('express')

const router = express.Router()

const client = new okta.Client({
  orgUrl: process.env.ORG_URL,
  token: process.env.REGISTRATION_TOKEN,
})

const title = 'Password Recovery'

router.get('/', (req, res, next) => {
  res.render('reset-password', { title })
})

router.post('/', async (req, res, next) => {
  try {
    const user = await client.getUser(req.body.email)

    await user.resetPassword()

    res.render('reset-password', { title, success: true })
  } catch (error) {
    res.render('reset-password', {
      title,
      error: 'Could not find an account with that email address',
      body: req.body,
    })
  }
})

module.exports = router
views/index.hbs
   <p>
     If you don't have an account, you can
     <a href="/register">register for free</a>.
+  </p>
+  <p>
+    If you have an account, but forgot your password,
+    <a href="/reset-password">click here</a> to
+    send a recovery link to your email address.
   {{/if}}
 </p>
app.js
@@ -9,6 +9,7 @@ const { ExpressOIDC } = require('@okta/oidc-middleware')
 const indexRouter = require('./routes/index')
 const dashboardRouter = require('./routes/dashboard')
 const registrationRouter = require('./routes/register')
+const resetPassword = require('./routes/reset-password')

 const app = express()

@@ -40,6 +41,7 @@ app.use(oidc.router)
 app.use('/', indexRouter)
 app.use('/dashboard', oidc.ensureAuthenticated(), dashboardRouter)
 app.use('/register', registrationRouter)
+app.use('/reset-password', resetPassword)
 app.get('/logout', (req, res) => {
   req.logout()
   res.redirect('/')
Learn More About Node and Secure User Management with Okta
Now you have a fully functioning web application with user registration, authentication, and credential recovery, without having to hash a single password or manage a single user. You can have your cake, and eat it too!
OK, the cake is a lie, but you can now focus on what makes your application great and unique while offloading the complications of user management to Okta. If you’d like to learn more about Node, Okta, authentication, or application security, I’d encourage you to check out the rest of the Okta developer blog, and specifically these great resources:
- Our Node SDK Documentation
- Okta OIDC Middleware Documentation
- Build User Registration with Node, React, and Okta
- Build a Basic CRUD App with Vue.js and Node
- What the Heck is OAuth?
- VIDEO: OAuth 2.0 and OpenID Connect in Plain English
And as always, we’d love to hear from you. Hit us up with questions or feedback in the comments, or on Twitter @oktadev.
Okta Developer Blog Comment Policy
We welcome relevant and respectful comments. Off-topic comments may be removed.