On this page
Build an API service integration
Build, test, and submit an API service integration to the Okta Integration Network (OIN) for review and publication.
What you need
A service app that needs to access Okta APIs for your customer
Sample code
See How to use Client Credentials flow with Spring Security (opens new window) blog for an example of a Client Credentials flow using the Okta Spring Boot Starter (opens new window) library.
Overview
A service-to-service app where a backend service or a daemon calls Okta management APIs for a tenant (Okta org) can be published in the Okta Integration Network (OIN) as an API service integration. API service integrations access Okta APIs using the OAuth 2.0 Client Credentials flow, where access isn't associated with a user and you can restrict resources with scoped access tokens. Each access token enables the bearer to perform specific actions on specific Okta endpoints, with that ability controlled by which scopes the access token contains.
Note: API service integrations can only use the Org authorization server (Org AS) that is built in with each Okta org. The Org AS supports the OAuth APIs listed in OAuth 2.0 Scopes for Okta Admin Management (opens new window).
Customers can use any API service integration listed in the OIN catalog with their Okta tenant org. Each customer Okta org has its own authorization server that supports the Client Credentials flow. When a customer authorizes your API service integration to access their org, Okta generates a unique set of credentials (client ID and client secret) for that org.
Collect and store these credentials for each customer to allow your integration to work with your customer's Okta org.
API service integration Client Credentials flow
At a high level, the OAuth 2.0 Client Credentials flow for an API service integration has the following steps:
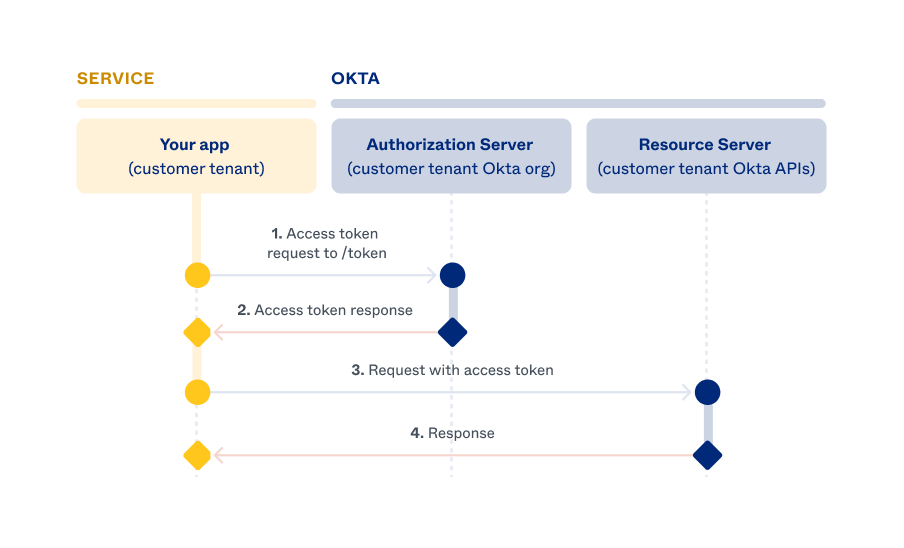
Your customer's service app instance makes an access token request to their Okta authorization server using their client credentials.
Your customer needs to install and authorize your integration in their Okta org so that Okta can accept the access token request. See Add an API Service Integration (opens new window) for customer tenant Admin Console instructions. After installing your integration, the customer obtains their client credentials and passes them to your app. The customer's app instance can now make an access token request to Okta. See Request for access token.
If the credentials in the token request are accurate, Okta responds with an access token.
You set the resource and action scopes allowed for the access token when you register your API service integration through the OIN Wizard. The token request must contain allowed scopes for your API service integration. See Scope selection.
Your customer's service app instance uses the access token to make authorized requests to their Okta org APIs (the resource server). See Make Okta API requests.
The customer's Okta org (resource server) validates the token before responding to the API request.
Build your API service integration
This section outlines the components, artifacts, and requests required to build your API service integration using basic cURL commands. You can use an OAuth 2.0 library in your preferred language to implement the OAuth 2.0 Client Credentials flow.
Note: For an example of how to implement the Client Credentials flow using Spring Boot, see How to use the Client Credentials flow with Spring Security (opens new window). This example uses the Okta Spring Boot Starter (opens new window) library. You can ignore the custom scopes and authorization server parts of the example since they don't apply to the API service integration use case.
Save customer credentials
Okta generates a unique set of credentials (client ID and client secret) for your customer when they install your integration in their Okta org. See Add an API Service Integration (opens new window).
You must store these credentials for each customer to allow your integration to work with the customer's Okta org. To implement the Client Credentials flow in your integration, provide an interface to collect and store these API service integration credentials:
- Okta tenant (organization) domain (for example,
acme.okta.com) - client ID
- client secret
Note: This guide refers to these values as
{customerOktaDomain},{clientId}, and{clientSecret}variables.
Scope selection
Specify the resources and actions that are required in order for your API service app to work. A scope corresponds to a resource that you want to access in the Okta API (users, logs, and so on) and a level of access (read or manage). Use the least-privilege principle and authorize the fewest scopes needed for your app to function correctly. See the list of available Okta OAuth 2.0 Scopes (opens new window).
There are two types of scope: read and manage. Read scopes can only view resources, while manage scopes can read, create, update, and delete resources. You don't need to request a read scope when you request a manage scope because manage scopes already include read access.
| Action | Read scopes | Manage scopes |
|---|---|---|
| Read | Yes | Yes |
| Create | No | Yes |
| Update | No | Yes |
| Delete | No | Yes |
The org authorization server returns all the scopes that you request if you registered those scopes along with your integration. Currently, API service integrations don't support optional scopes. You can request a subset of your integration-supported scopes when requesting an access token from the /token endpoint. For example, if you registered the okta.users.manage, okta.groups.manage, and okta.apps.manage scopes for your integration, but your service only needs to retrieve and update Okta groups for a specific task, then you can specify only the okta.groups.manage scope in your access token request.
Register your API service integration
The OIN Wizard provides a mechanism to register and install your integration in your Okta org (similar to how your customer admins would install your integration) and obtain the credentials to test your Client Credentials flow. Your test integration is available only on your Okta org during the test.
Note: From the OIN Wizard test option, the test install and authorize pages are the same pages that your customers experience when your service integration is in the OIN. After you publish your integration in the OIN catalog, it appears in the Applications > API Service Integrations page of your customer's Admin Console.
To register your API service registration, see Submit an integration with the OIN Wizard (opens new window).
Authorize a test integration
Use the test functionality in the OIN Wizard to obtain test integration credentials:
- In the OIN Wizard, click Applications > Your OIN Integrations.
- Cick the more icon (
 ) next to the integration submission that you want to test and click Test integration.
 - Click Generate instance. The Authorize integration page appears.
- Go to Test integration > Generate instance. The Authorize integration page appears.
- Click Install & Authorize.
- Copy the client secret from the dialog and store it securely.
Note: For security purposes, the client secret is only displayed once and can't be retrieved later.
- Click Done.
- On the General tab, copy the Okta domain and client ID and securely store them for your integration test.
- Configure your app using the Okta domain, client ID, and client secret.
- Perform manual testing to verify your integration.
- Once the testing is complete, click Continue to submission. The Test integration page appears.
- Enable the Test account requirements and API service requirements checkboxes.
- Select the I certify that I have successfully completed required tests checkbox to confirm that the required tests are complete.
- Click Submit integration.
For testing purposes, use the Okta domain, client ID, and client secret obtained from your test integration to make an access token request. Then, make an API request using the access token returned by the first request. See Test your API service flow.
Request an access token
Your service app integration needs to request an access token to access the Okta APIs securely. Use the following configuration variables to form the access token request:
{customerOktaDomain}: Your customer tenant Okta org domain{clientId}: Your customer's integration client ID{clientSecret}: Your customer's integration client secret{scopes}: The resource scopes required for the access token
Note: If you're using an OAuth 2.0 library, you typically need to configure an OAuth client class with a
tokenUriparameter, and theclientIdandclientSecretparameters. Specify thetokenUristring ashttps://{customerOktaDomain}/oauth2/v1/token.
Follow these steps to use a Basic Authorization header in a /token request:
Base64-encode the string and set it in the Authorization header:
Authorization: Basic {Base64({clientId}:{clientSecret})}Make a request to the /token (opens new window) endpoint with these query parameters:
grant_type: set toclient_credentialsscope: set to a space-separated list of the Okta API scopes required by the app. This parameter can't be empty.
Request example:
curl --request POST \
  --url https://{customerOktaDomain}/oauth2/v1/token \
  --header 'Accept: application/json' \
  --header 'Authorization: Basic MG9hY...' \
  --header 'Cache-control: no-cache' \
  --header 'Content-type: application/x-www-form-urlencoded' \
  --data 'grant_type=client_credentials&scope=okta.users.read okta.groups.read'
If the request is successful, the token is returned in the body of the response.
Successful response example:
{
   "token_type": "Bearer",
   "expires_in": 3600,
   "access_token": "eyJraWQiOiJ.....UfThlJ7w",
   "scope": "okta.users.read okta.groups.read"
}
Error response example:
{
   "error": "invalid_client",
   "error_description": "The client secret supplied for a confidential client is invalid."
}
Note: By default, the access token expires in an hour. Request a new access token after your token expires.
Make Okta API requests
When you have an access token, you can use it to make requests to the Okta management APIs. Set the access token as a bearer token in an Authorization header.
Example request:
curl -X GET "https://{customerOktaDomain}/api/v1/users"
    -H "Accept: application/json"
    -H "Authorization: Bearer {accessToken}"
Test your API service flow
Use the credentials from your test integration (Okta domain, client ID, and secret) to test your service app. You can use the interface that you build or enter the credentials manually to configure your service app. Trigger a process from your service app to access Okta endpoints and verify that the process works as intended.
After you complete testing and are satisfied with your API service integration, you can submit it to Okta for verification.
Edit your API service integration submission
To edit your API service integration submission fields:
- In the OIN Wizard, click Applications > Your OIN integrations.
- Select an integration from the list. Click Edit next to your integration submission.
- Edit the fields that you want to modify.
f the fields that you update affect the test integration instance in your Okta org (such as integration name or scopes), click Generate instance to create another test integration instance with the updated fields. The test integration instance is a static snapshot of your integration submission fields at the time that it was created. It isn't updated when you modify your submission. If you want to remove older test integration instances that aren't used, see Remove your test integration instance.
Remove your test integration instance
To remove a test API service integration in your Okta org, click Revoke from the integration details page in your Admin Console. This action revokes the scope grants, client ID, and secret from the test integration installed previously.
Click Generate instance to generate another test integration instance in your Okta org. This action is useful when you update your submission in the OIN Wizard (for example, modifying the scopes or name of the integration) and want to see the updates reflected in the test integration instance.
Submit for review
After you test your API service integration and specify all fields and artifacts in the OIN Wizard, you can submit your integration to Okta. See, Submit your integration section.
Support
Post a question on the Okta Developer Forum (opens new window) if you need help or have an issue.