On this page
Okta email (magic link/OTP) integration guide
Learn how to integrate the Okta Email authenticator into your app with the embedded SDK.
Learning outcomes
- Configure your Okta org to use the email authenticator.
- Enroll and challenge a user with an email one-time passcode (OTP) and magic links.
- Enable OTP only for the email authenticator.
What you need
Sample code
Overview
With the embedded SDK, your app can verify a user's identity using the email authenticator. You can integrate the email enrollment and challenge in your app and complete those flows using
Get started
This guide discusses the email authenticator user journeys for both magic links and OTP. The guide also details how to integrate the email enrollment and challenge flows into your app. For more details, see the following sections in this guide:
Configuration
Update configurations: Set up your org to enable the email authenticator and magic links.
Magic links
- Integrate email challenge with magic links: Integrate the email challenge using magic links with step-by-step instructions.
- Integrate different browser and device scenario with magic links: Integrate the different browser and device scenarios with step-by-step instructions.
OTP
- Integrate email enrollment with OTP: Integrate email enrollment using OTP with step-by-step instructions.
- Enable only OTP for the email authenticator: Update the email templates to only support OTP.
Advanced use cases
Design considerations when customizing magic link for password recovery: Learn about recommended magic link implementations for specific customized password recovery solutions.
Note: This guide uses the sign-in with email use cases to describe how to integrate email enrollment and challenge.
Update configurations
Before you can start using the email authenticator, enable it in your Okta org and create an app sign-in policy that requires it to be used.
Add the email authenticator to your org
First, add the email authenticator to your org and enable it for both authentication and recovery.
- Open the Admin Console for your org.
- Choose Security > Authenticators to show the available authenticators.
- If the Email authenticator isn't in the list:
a. Click Add Authenticator.
b. Click Add on the Email tile.
c. Select the Authentication and recovery option, and then click Save.
If the Email authenticator is in the list:
a. Click the Actions menu for the Email authenticator.
b. Click Edit.
c. Select the Authentication and recovery option, and then click Save. - Select the Enrollment tab.
- Check that Email is set to either Optional or Required in the Eligible Authenticators section of the Default Policy. a. If Email is set to Disabled, click Edit for the Default Policy. b. Select Optional from the dropdown list for the Email authenticator, and then click Update Policy.
Set your app integration to use the email authenticator
New app integrations are automatically assigned the shared default app sign-in policy (opens new window). This policy has a catch-all rule that allows a user access to the app using either one or two factors, depending on your org setup. In production, multiple app integrations can share an app sign-in policy. In testing however, you should create a policy specifically for your test app.
Open the Admin Console for your org and choose Security > Authentication Policies to show the available app sign-in policies.
Click Add a Policy, give the policy a name, and then click Save.
Locate the Catch-all Rule of the new policy and select Actions > Edit.
Select Allowed after successful authentication, and then set User must authenticate with to Password + Another factor.
For Possession factor constraints, do the following: a. Verify that Device Bound isn't selected. b. Verify that Email is listed in the box under Additional factor types. If it isn't listed, verify that the authenticator is enabled using steps 4 and 5 of Add the email authenticator to your org. c. Click Save.
Select the Applications tab for your newly created policy, and then click Add App.
Find your app in the list, click Add next to it, and click Close.
Verify that the app is now listed in the Applications tab of the new policy.
Set up magic links
Enable magic links in your org.
- Open the Admin Console for your Okta org.
- Choose Applications > Applications to show the app integrations that you have already created.
- Click the app that you previously created.
- In the General Settings section on the General tab, click Edit.
- Under EMAIL VERIFICATION EXPERIENCE enter a callback URI for your app. The sample app uses .
- Click Save to save your changes.
Integrate email challenge with magic links
The following instructions detail integrating the email challenge into your app.
Integrate different browser and device scenario with magic links
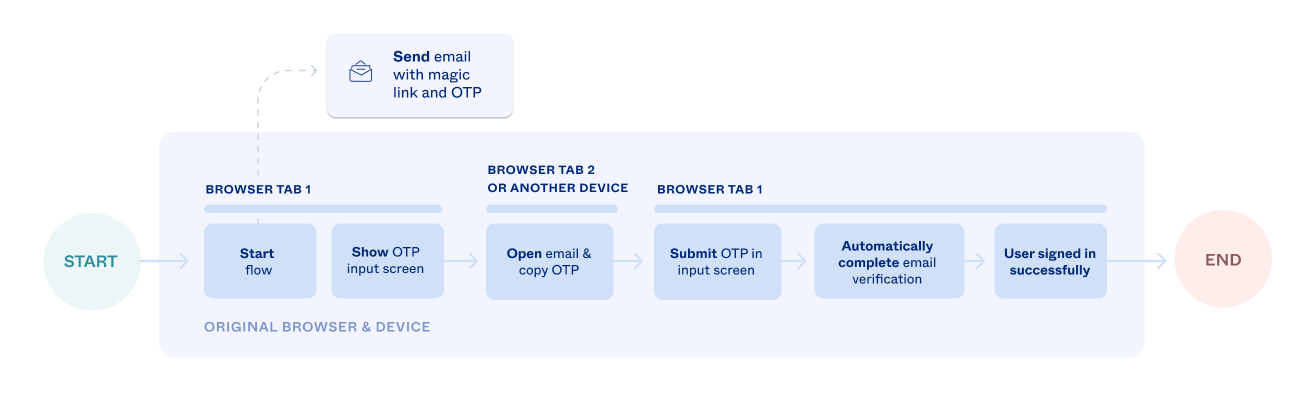
The Email Magic Links feature is designed with security in mind. It only works when there's complete assurance that the person who started the request is the same one who clicked the magic link.
For example, a user who signed in to your app in a web browser must be in the same browser when they click the magic link. If the user's browser or device is different, the magic link is disabled. The user needs to use OTP or return to the original browser to complete the email verification. The following flowchart illustrates this logic.

The following step-by-step instructions detail integrating the different browser scenario using the email challenge.
Integrate email enrollment with OTP
With a one-time passcode (OTP), the user copies an automatically generated numeric string from their email to your application to verify their identity. The following flowchart, which uses the sign-in with email example, illustrates the OTP user journey.
The following instructions detail how to integrate the OTP flow for email enrollment. Even though this is an enrollment example, the OTP integration portion is nearly identical for the email challenge.
Enable only OTP for the email authenticator
Magic links are a secure way to verify users' emails. However, you may want to use only OTP to provide an even higher level of security. Use only OTP to positively prove that the person starting the request is the same person reading the email.
In this case, OTP may be a more compatible solution. For example, if you have a banking app, which shows account information and allows for money transfers, magic links may be too convenient, and OTP may provide a better solution.
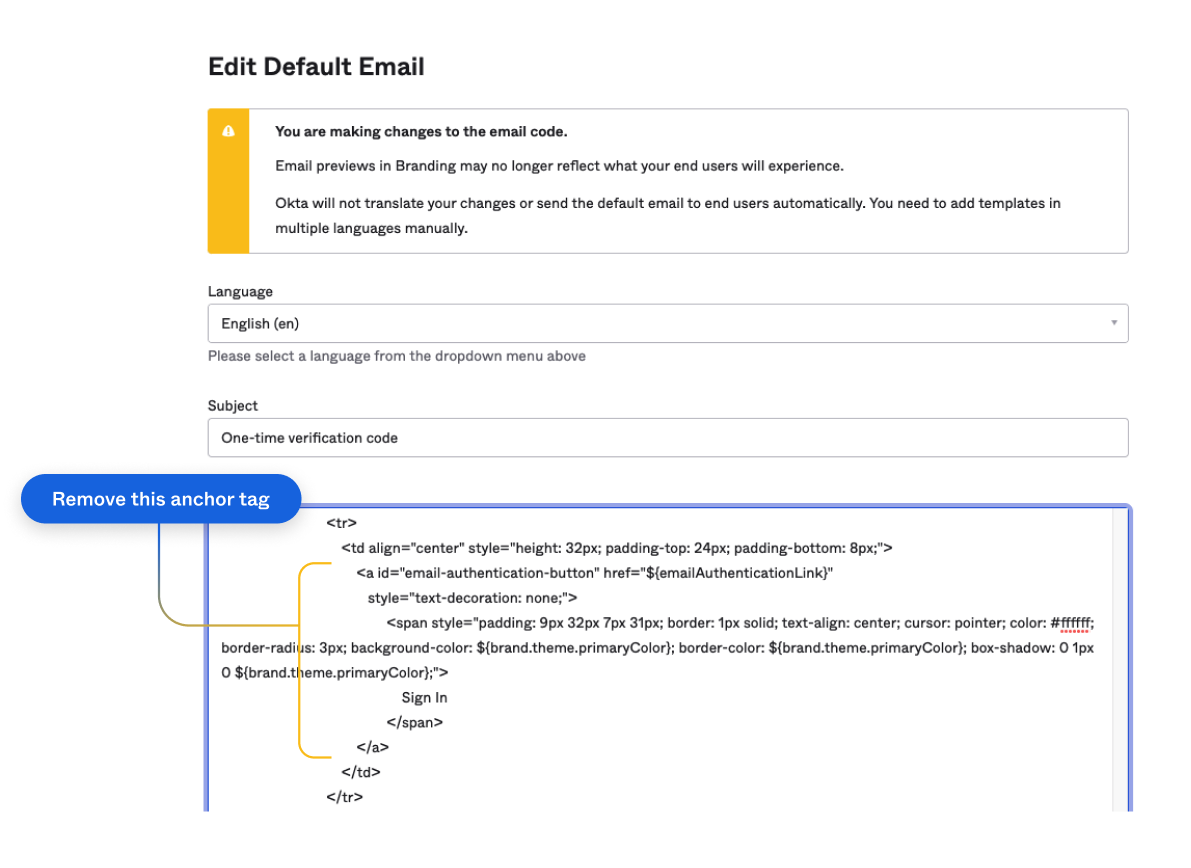
To disable magic link functionality, open the Admin Console and select Customizations > Emails. Now remove the links from the following email templates:
- Other > Email Challenge
- Other > Email Factor Verification
- Password > Forgot password
In each template, find the anchor tag and remove it from the template HTML. The following image identifies the magic link anchor tag (identified by the email-authentication-button ID) for the Email Challenge template.
To learn more about customizing email templates and using the Velocity Template Language, see Customize an email template (opens new window) in the Okta Help Center.
Design considerations when customizing magic link for password recovery
Design overview
If you customize your self-service password recovery (SSPR) solution as described in the
/forgot_password API (opens new window), you need to consider how your users interact with your magic links. Specifically, your design has the following attributes: The magic link
hrefattribute in the Forgot Password template is updated to replace the${resetPasswordLink}variable with a URL string that contains theotpandstateparameters using the${oneTimePassword}and${request.relayState}variables. For example,.Your system supports password recovery using methods other than self-service password recovery. These methods include calling the
/forgot_passwordAPI (opens new window) with thesendEmailparameter sent totrueor enabling password recoveries using the embedded Sign-In Widget. These methods send an email to the user with a magic link that continues the password recovery.
Considerations
In this design, you customize the Forgot Password email template to include the ${oneTimePassword} variable per the
/forgot_password API (opens new window) and Sign-In Widget are used to initiate the password recovery, an email is sent to the user. When the user clicks the magic link, and the request is redirected back to your app, the otp value is missing. This is because password recovery wasn't initiated by the embedded SDK and doesn't have context. Since the otp value is missing, your app can't complete the password reset using the embedded SDK. Two options are available, however, to complete the password reset with this design. Use the resetPasswordLink variable
In this option, you set the magic link in the Forgot Password template to use the ${resetPasswordLink} variable or include logic that sets it to ${resetPasswordLink} if ${oneTimePassword} is empty.
Note: Using
${resetPasswordLink}sends the user to an Okta-hosted page to sign in. If you're looking for a fully branded experience where you control the page experience, then the next option is a better alternative.
Use your own infrastructure to send the password recovery email
In this recommended option, make a call to /forgot_password API (opens new window) and use your infrastructure to notify the user to reset their password.
- Call
/forgot_passwordAPI (opens new window) withsendEmail=false. Instead of sending a recovery email to the user, this returns a URL with a recovery token.
{
  "resetPasswordUrl": "https://{yourOktaDomain}/signin/reset-password/XE6wE17zmphl3KqAPFxO"
}
In the example before this, the recovery token is XE6wE17zmphl3KqAPFxO.
- Parse the recovery token from the URL. Then, send it using your infrastructure (through an out-of-band channel) to the end user's verified email address or SMS phone number. See Authentication API - Recovery Token.