The user clicks the sign-up link
Add a Sign up link to your app's sign-in page. The self-registration flow begins when the user clicks the Sign up link and the browser takes them to the Create Account page.
Note: The account's username is also its email address.
The user submits their profile data
Create a page for the user to enter their basic profile information: their email, first name, and family name. For example:
When the user clicks Sign Up, create a UserProfile object and set its properties to the values entered by the user. Pass this object as a parameter to IdxClient.RegisterAsync().
RegisterAsync() returns a RegisterResponse object. Query its AuthenticationStatus property for the status of the registration process. A status of AwaitingAuthenticatorEnrollment indicates that the user must enroll an authentication factor to verify their identity.
Display a list of required authenticators to enroll
Create a page that displays a list of required authentication factors the user can enroll to verify their identity. They must choose a factor from the list and click Next. If you complete the steps properly in Configuration updates, the only required authenticator is the password factor. This is the sole factor stored in the Authenticators list property.
This page is used several times during the registration flow. Find the names and IDs of the available authenticators in the response object's Authenticators collection to build the list.
The user enrolls their password
When the user selects the password authenticator and clicks Next, create an EnrollAuthenticatorOptions object and assign its AuthenticatorId property to the password authenticator ID. Pass this object as a parameter to IdxClient.EnrollAuthenticatorAsync().
EnrollAuthenticatorAsync() returns an EnrollResponse object with an AuthenticationStatus of AwaitingAuthenticatorVerification. This indicates that the new user needs to verify the authenticator. In this case, this means the user needs to supply a new password.
Create a page that allows the user to supply a new password for verification. For example:
When the user submits their new password, create a VerifyAuthenticatorOptions object and assign its Code property to the new password. Pass this object as a parameter to VerifyAuthenticatorAsync().
Display a list of optional authenticators to enroll
VerifyAuthenticatorAsync() returns a RegisterResponse object with an AuthenticationStatus property of AwaitingAuthenticatorEnrollment. This indicates that the user still has authentication factors to enroll before registration is complete.
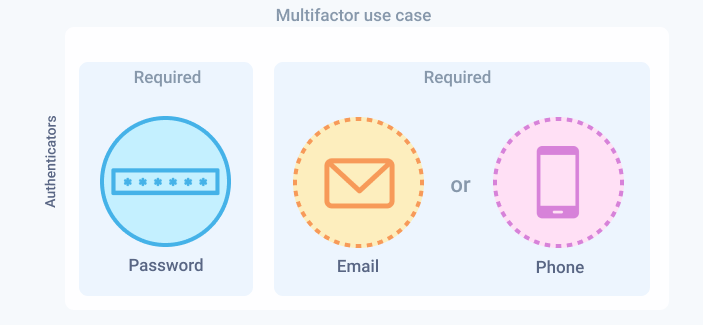
In this scenario, you configure the app's app sign-in policy to require a password and another factor. Therefore, the user must enroll at least one of either the email or phone factors. Redirect them to the list page you created earlier to choose which one.
The following code snippet shows how to handle the response. The authenticator list page loads again (the first time was for password) with the two remaining factors.
Note To learn how to use the CanSkip property to allow users to skip enrolling more optional factors, see Display a second list of optional authenticators to enroll.
The user submits the email authenticator
If the user chooses and submits the email authenticator, create an EnrollAuthenticatorOptions object and assign its AuthenticatorId property to the email authenticator ID. Pass this object as a parameter to IdxClient.EnrollAuthenticatorAsync().
Display OTP input page
If the call is successful, a one-time passcode (OTP) is sent to the user's email. The returned EnrollResponse object has an AuthenticationStatus of AwaitingAuthenticatorVerification. This status indicates that Identity Engine is waiting for the user to check their email and enter the OTP.
Build a form that allows the user to enter the OTP sent to them by email.
The user submits the OTP
The user opens the email and copies the OTP into the form. When the user submits the OTP, create a VerifyAuthenticatorOptions object and assign its Code property to the OTP. Pass this object as a parameter to VerifyAuthenticatorAsync().
Display a second list of optional authenticators to enroll
VerifyAuthenticatorAsync() returns a RegisterResponse object with an AuthenticationStatus property of AwaitingAuthenticatorEnrollment. This indicates that the user still has authentication factors to enroll before registration is complete.
Redirect the user to the list page you created earlier to choose another authentication factor. The code is the same. The page should show only the phone factor. However, since this factor is optional and the user has now enrolled two factors, the CanSkip property is now true meaning that the list page should now also display a Skip button.
The user can either enroll in or skip the phone factor. Your code should handle both scenarios as follows.
The user enrolls the phone authenticator
The user submits the phone authenticator
If the user selects the phone authenticator, create an EnrollAuthenticatorOptions object and assign its AuthenticatorId property to the phone authenticator ID. Pass this object as a parameter to IdxClient.EnrollAuthenticatorAsync().
Display phone number input page
The returned EnrollResponse object has an AuthenticationStatus of AwaitingAuthenticatorEnrollmentData. This status indicates that Identity Engine is waiting for the user for more data before the factor can be enrolled. In this case, the user needs to supply a phone number.
Build a form that allows the user to enter their phone number.
Note: The .NET SDK requires the phone number in the following format: +# ### ### ####, including the beginning plus (+) sign.
The user submits their phone number
When the user submits their phone number, create an EnrollPhoneAuthenticatorOptions object and assign its AuthenticatorId, PhoneNumber, and MethodType properties to the phone authenticator ID, phone number, and AuthenticatorMethodType.Sms respectively. Pass this object as a parameter to EnrollAuthenticatorAsync().
Note: Only SMS is supported for the phone authenticator type.
Display SMS OTP input page
If the call is successful, a one-time passcode (OTP) is sent by SMS to the user's mobile phone. The returned EnrollResponse object has an AuthenticationStatus of AwaitingAuthenticatorVerification. This status indicates that Identity Engine is waiting for the user to check their email and enter the OTP.
Build a form that allows the user to enter the OTP sent to them by SMS. Depending on your implementation, the page can be the same page that verifies the email code. The sample app reuses the same page for both email and phone verification.
The user submits the SMS OTP
The user checks their phone and copies the OTP into the form. When the user submits the OTP, create a VerifyAuthenticatorOptions object and assign its Code property to the OTP. Pass this object as a parameter to VerifyAuthenticatorAsync().
Complete registration
If the SMS OTP is valid, the returned response object has an AuthenticationStatus of Success. This status signifies that no more factors (required or optional) are waiting to be enrolled and verified.
The user is now registered with no more factors to be verified. Store the returned tokens in a session and redirect the user to the app's default signed-in page.
The user skips the phone authenticator
If the user skips phone enrollment, call SkipAuthenticatorSelectionAsync(). This method skips phone enrollment and eliminates the need to verify the factor:
If the returned response object has an AuthenticationStatus of Success, the user is now registered with no more factors to be verified. Redirect the user to the app's default signed-in page.
The method can also throw exceptions for unsuccessful registrations such as the following:
TerminalStateException: an exception inherited from OktaException that's raised when an unexpected message is returned from the Okta API and no further remediation is possible.OktaException: a general base exception that's raised when any Okta client and API exceptions are thrown.
After a successful registration, store the returned tokens in a session and redirect the user to the app's default signed-in page.
Troubleshooting tips
When you test this use case, ensure that you use a new email for each test. If you have a gmail account, you can reuse the same email by adding a plus (+) and extra text (for example, myemail+1@gmail.com, myemail+2@gmail.com, and so on). Ensure that the password that you use meets the minimum security requirements.