On this page
Email Magic Links overview
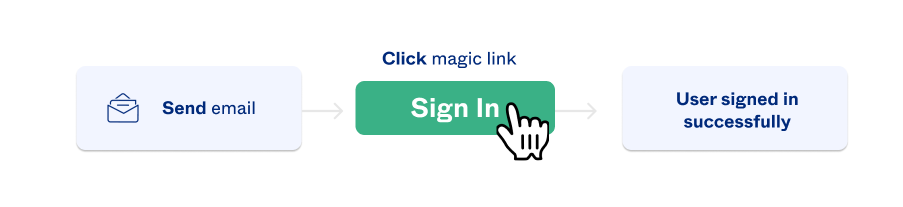
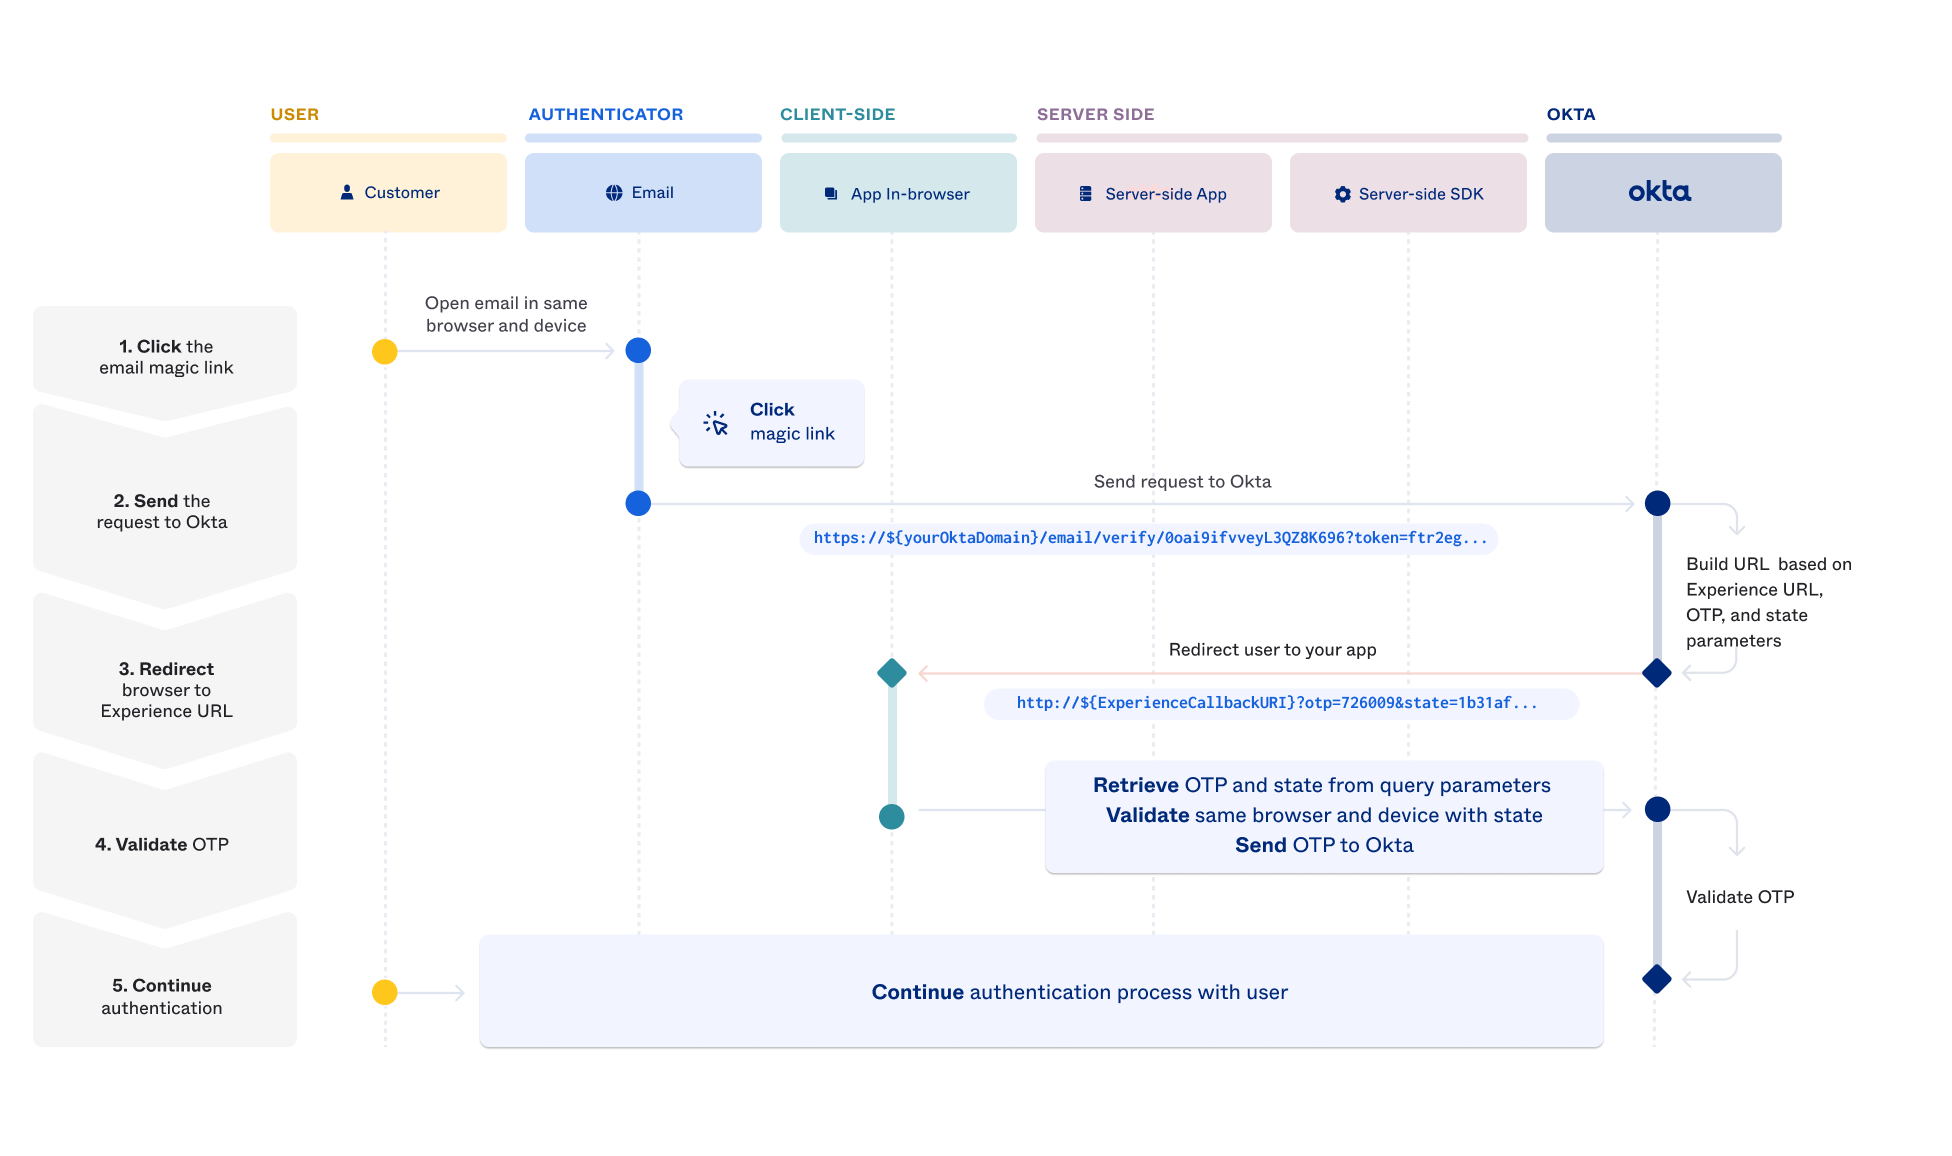
Enable a user to enter a one-time passcode (OTP) in a single step by clicking an embedded email link.
Learning outcomes
- Understand the differences between Email Magic Links (EML) and one-time passcode (OTP).
- Integrate EML into apps using the embedded Sign-In Widget or a supported embedded SDK.
Introduction
When using email to prove their identity, a user can copy an OTP from an email into the app they want to use. EML provides a second option that allows the user to click a hyperlink in the email rather than use the OTP. This results in a quicker, more user-convenient, and still secure experience. However, you must adapt apps based on the embedded Sign-In Widget or an embedded SDK to use EML.
Note: EML is only supported in OIDC-based app integrations.
Email Magic Links vs. one-time passcodes
The Okta email authenticator provides a simple way for a user to authenticate themselves or recover their accounts. It supports two methods for them to validate their credentials as part of those processes. In both methods, an email is sent to their primary email address and either:
- They copy an OTP from the email to their app and submit it to Identity Engine for authentication.
- They click a link in the email that submits the OTP to Identity Engine for authentication on their behalf.
If a valid OTP is submitted within a set time, either the user is authenticated or they continue their authentication process. The following diagram illustrates the user's experience with the two options.
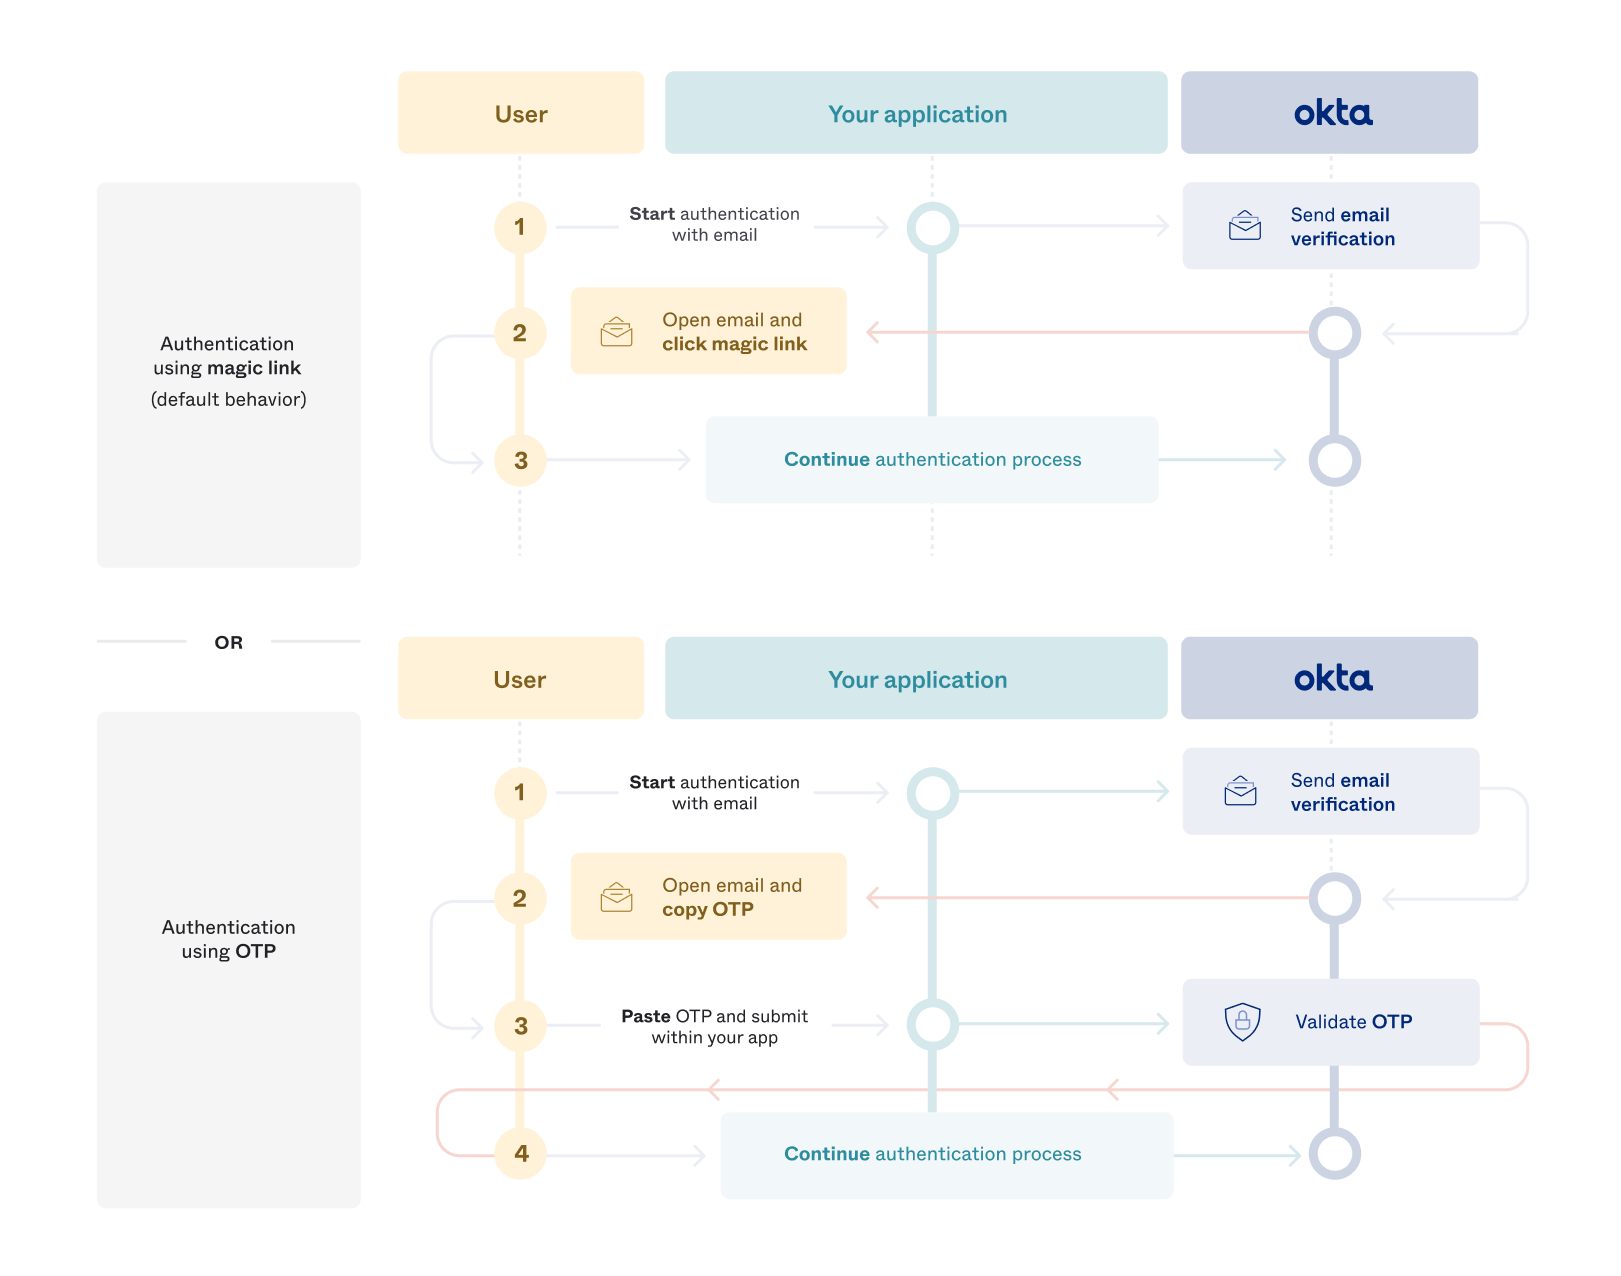
The OTP experience involves an extra step for the user. The user must copy the OTP into the app. This ensures that they return to the same browser to continue their authentication process. The magic link experience, on the other hand, has fewer steps. Clicking the magic link opens a new tab in the user's browser and their authentication process continues.
Same device, same browser only
Magic links only work when there's complete assurance that the person who started the request is the same one who clicked the magic link. This requires a user who signs in to your app in a browser. Then the user needs to be in the same browser on the same device when they click the magic link.
If either their browser or device is different, Okta disables the magic link. They must either return to the original browser to use the magic link or use the OTP instead.
The following diagram illustrates this logic.
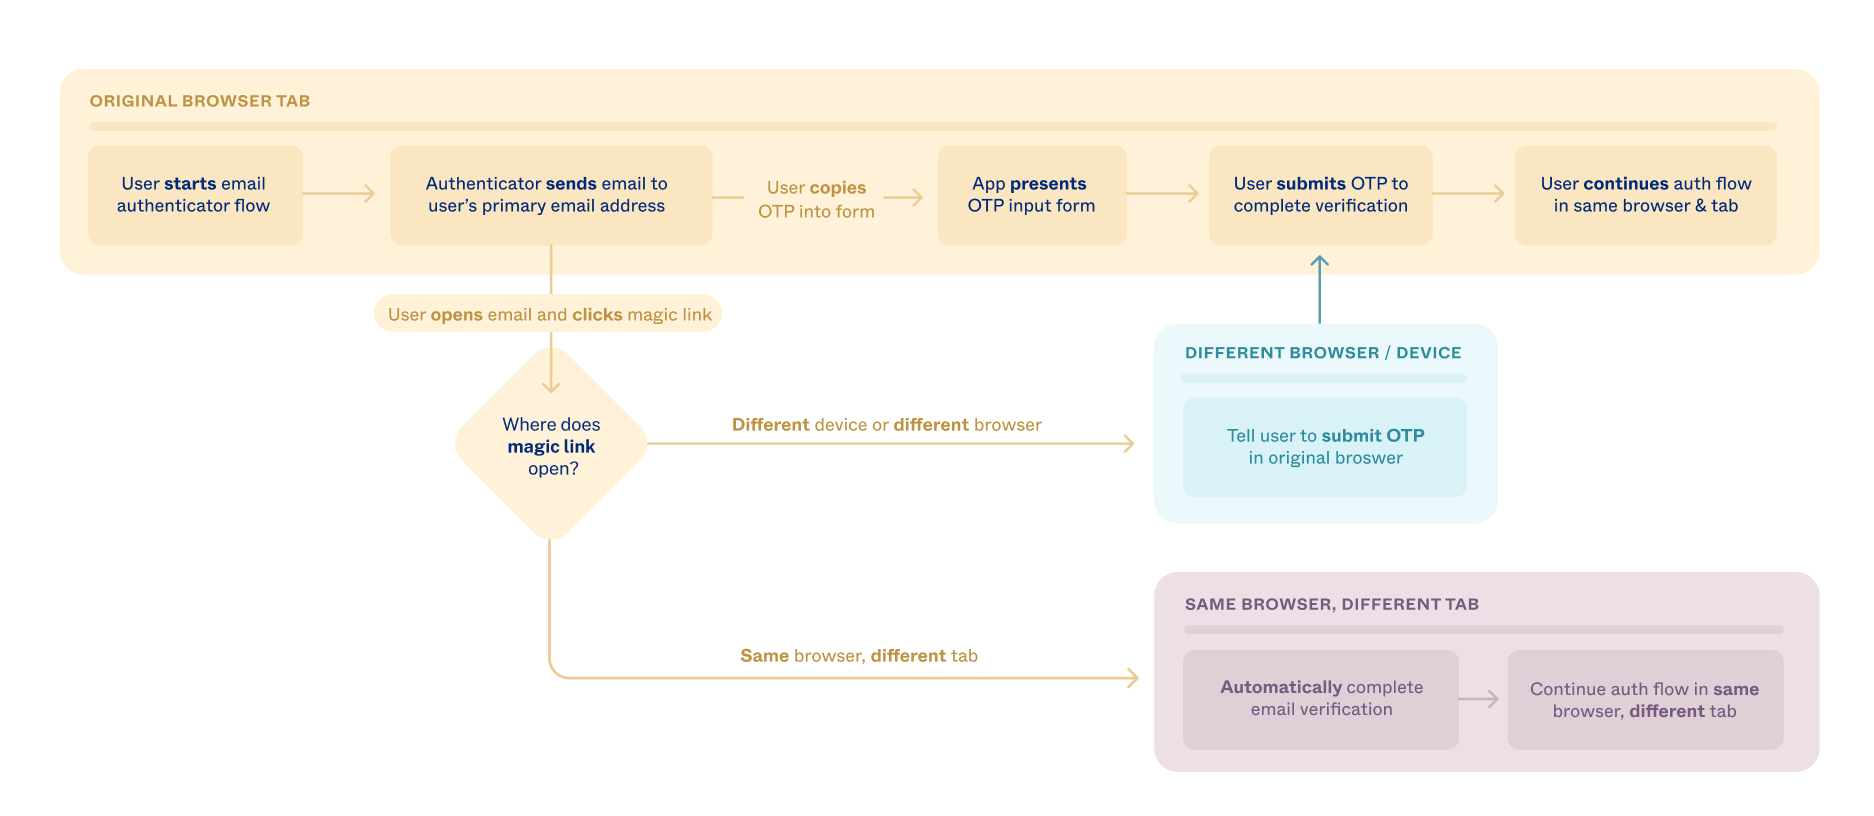
This same browser enforcement also ensures that a user doesn't sign in to apps from non-managed devices. For example, suppose they start the sign-in process on a company laptop. If they click the magic link from a personal device, they must return to the company laptop to complete the process.
Pros and cons of EML
When you evaluate whether to support magic links in addition to OTPs in the email authenticator, consider the following:
- A user has a better sign-in experience from magic links than OTP if they sign in from the same browser on the same device.
- If a user signs in from a different browser or device, the process falls back to using an OTP.
- A user can only access an app by clicking a magic link on a device that already has access to that app.
- Support for both OTP and magic links is provided by the Okta embedded Sign-In Widget and Identity Engine SDKs.
Integrate Magic Links
Integrating EML into your app is a two-step process.
- Create an endpoint for your magic link. This endpoint checks the validity of the OTP and sends it to Identity Engine for validation.
- Use the Admin Console to set that endpoint as the callback URL for magic links for your app.
Create an endpoint for your magic links
Any magic link URL pointing to your app contains two query parameters:
- The OTP that validates the user (
otp) - A state token that uniquely identifies the current authentication process and its state (
state)
For example, http://{yourOktaDomain}?otp=726009&state=1b31fa98b34c45d9a.
Create an endpoint for your app that does the following:
- Retrieves
otpandstatevalues from the query parameters - Matches the state token with the current
statein your user's browser session - Makes any other checks that you deem necessary to ensure that the user is functional in the same browser on the same device
- Requests that the user enter the
otpvalue manually if steps 2 or 3 fail - Sends the
otpvalue to Identity Engine for validation if steps 2 and 3 pass - Redirects the user to a page that continues their authentication process
If your app uses the embedded Sign-In Widget to authenticate the user, pass otp and state to it as you instantiate it on the page.
var searchParams = new URL(window.location.href).searchParams;
var signIn = new OktaSignIn({
   baseUrl: '{yourOktaDomain}',
   baseUrl: '{yourOktaDomain}',
   clientId: '{yourClientId}',
   redirectUri: '{yourSignInRedirectUrl}',
   otp: searchParams.get('otp'),
   state: searchParams.get('state')
});
Important: In Okta Sign-In Widget version 7 and later, Identity Engine is enabled by default. If you're using an earlier version than 7, you must explicitly enable Identity Engine features by setting
useInteractionCodeFlow: truein the precedingOktaSignIn()constructor call. To use Classic Engine rather than Identity Engine when you're using version 7 or later, specifyuseClassicEngine: trueinOktaSignIn().
The code for your endpoint must check that the user is functional from the same device and browser. The Sign-In Widget takes care of the rest. The sign in with email only guide covers how to do this.
Use the
Point your app's magic links to that endpoint
There are two ways to set your app's magic links to the endpoint that you created:
- You can set your app's Email Verification Experience (EVE) value to the endpoint's URL.
- You can customize each of the email templates used by the email authenticator to include the endpoint's URL.
Changing the EVE provides a quick way to enable and test magic links. Customizing the email templates requires more work but results in fewer roundtrips to Identity Engine and a faster user experience.
Use the Email Verification Experience
To enable magic links in your app using the email verification experience (EVE) setting:
- Open the Admin Console for your Okta org.
- Choose Applications > Applications to show the app integrations that you have already created.
- Click the app that you previously created.
- In the General Settings section on the General tab, click Edit.
- Under EMAIL VERIFICATION EXPERIENCE enter the URL for the endpoint that you created. For example,
https://example.com/magiclink/callback. - Click Save to save your changes.
When required, Identity Engine sends an email similar to this one containing an OTP and a link:
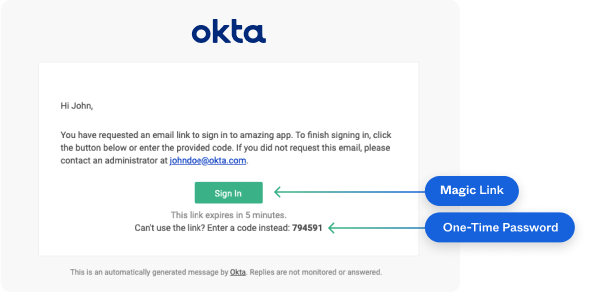
When a user clicks the magic link from the email authenticator, a request is sent to Identity Engine to validate the user. The link has a token parameter and looks something like this:
https://{yourOktaDomain}/email/verify/0oa1esny76wdQqjsg697?token=ftlNKCIYA_4WvR6BPbYhyKisVYIF-QLp2t
Authentication continues at an Okta-hosted page if the EVE setting doesn't have a value. If there's a value, Identity Engine builds a new URL based on the EVE setting and the current otp and state values. Then it redirects the user's browser to that URL. For example:
https://example.com/magiclink/callback?state=1ed1d4de1a50b8f30d87e720bcc1b6a3&otp=439246
After validating the otp and state parameters, the authentication process continues for the user.
The EVE setting offers a quick way to redirect magic links to your app. However, it requires a round trip to the Identity Engine to retrieve the correct URL for the endpoint that you created. Unless you're willing to customize the email templates the email authenticator uses, the user receives only Okta-branded emails.
If your user base is multilingual, consider that the Okta-branded email templates support many languages by default. After you customize an email template, you must create a copy of that template in each language you support.
Use custom email templates
Creating custom authentication email templates allows you to send a fully branded email to a user. This email skips the round trip to Identity Engine and redirects the user straight to your endpoint.
All Okta email templates are written using Velocity Templating Language (VTL) (opens new window) and use predefined variables to insert relevant values into that email. For example, Okta defines three VTL variables specific to the Email Challenge template:
| Variable | Contains |
|---|---|
${verificationToken} | The one-time passcode that Identity Engine generated for the user |
${request.relayState} | The OIDC/OAuth2 state parameter for the current authorization request |
${emailAuthenticationLink} | The Okta-hosted URL that continues the password recovery flow |
By default, the magic link in the template is set to ${emailAuthenticationLink}. If you're using the Email Verification Experience setting for your redirects, you don't need to change this. The magic link works as explained in the Use the Email Verification Experience section.
To point the magic link directly to the endpoint in your app, you must replace ${emailAuthenticationLink} with your custom URL that includes otp and state as query parameters:
In the Admin Console, go to Customizations > Emails.
On the Emails page, find the Other category on the template menu.
Under Other, click Email Challenge.
On the Email Challenge email template page, click Edit.
In the Default Email section, click Edit.
In the Message field, locate the magic link in the field's HTML. The link is in the href attribute of an
<a>tag with theidofemail-authentication-button. It looks like the following:<a id="email-authentication-button" href="${emailAuthenticationLink}" style="text-decoration: none;"> <span style="padding: 9px ...;"> Sign In </span> </a>Replace the
${emailAuthenticationLink}variable with the URL for your endpoint. Append the${verificationToken}and${request.relayState}variables as query parameter values. For example:<a id="email-authentication-button" href="https://example.com/magiclink/callback?otp=${verificationToken}&state=${request.relayState}" style="text-decoration: none;"> <span style="padding: 9px ...;"> Sign In </span> </a>Click Save and close the dialog.
You can customize four email templates this way. These are listed in the table that follows.
- All support redirects through EVE and custom templates.
- All are compatible with apps based on either the embedded Sign-In Widget or a supported embedded SDK.
- To add
otpandstatevariables to the magic link, find the template that you're editing in the table. Then, complete the following steps:- Replace the VTL variable in the magic link variable name column with your custom endpoint URL.
- Set your
otpquery string variable to the VTL variable in the OTP variable name column for the template. - Set your
statequery string variable to${request.relayState}for all templates.
| Template name | Use case | Magic link variable name | OTP variable name |
|---|---|---|---|
| Email challenge | Sign in with email - challenge | ${emailAuthenticationLink} | ${verificationToken} |
| Forgot Password | Self-service password recovery | ${resetPasswordUrl} | ${oneTimePassword} |
| Registration - Activation | Self-service registration | ${registrationActivationLink} | ${oneTimePassword} |
| Email factor verification | Sign in with email - enrollment | ${verificationLink} | ${verificationToken} |
| Self-service Unlock Account | Self-service unlock account | ${unlockAccountLink} | ${oneTimePassword} |
When a user clicks the magic link based on a customized email template, their browser is redirected straight to your app's endpoint:

Compare the options
| EVE + default email templates | EVE + custom email templates | Custom email templates | |
|---|---|---|---|
| Set-up + Maintenance | Requires one change in the Admin Console | Requires editing every email template that uses magic links to point to your new endpoint. | Requires editing every email template that uses magic links to point to your new endpoint. |
| Speed of redirection | Magic link sends a request to Identity Engine for the callback URL. The user is then redirected to the callback URL. | Magic link sends a request to Identity Engine for the callback URL. The user is then redirected to the callback URL. | Magic link sends the browser directly to the callback URL |
| Branding | Default Okta-branded email templates | You can add your brand to a custom email template | You can add your brand to a custom email template |
| Multi-language support | Default email templates support multiple languages | You must create and maintain a version of each custom template in each required language. | You must create and maintain a version of each custom template in each required language. |