Secure OAuth 2.0 Access Tokens with Proofs of Possession
In OAuth, a valid access token grants the caller access to resources and the ability to perform actions on the resources. This means the access token is powerful and dangerous if it falls into malicious hands. The traditional bearer token scheme means the token grants anyone who possesses it access. A new OAuth 2.0 extension specification, Demonstrating Proof of Possession (DPoP), defines a standard way that binds the access token to the OAuth client sending the request elevating access token security.
The high-level overview of DPoP uses public/private keys to create a signed DPoP proof that the authorization and resource server use to confirm the authenticity of the request and requesting client. This way, the token is sender-constrained, and a token thief is less likely to use a compromised access token. Learn more about the problems DPoP solves and how it works by reading:
Protect your OAuth 2.0 access token with sender constraints. Learn about possession proof tokens using DPoP.
The primary use case for DPoP is for public clients, but the spec elevates token security for all OAuth client types. Public clients are applications where authentication code runs within the end user’s browser, such as Single-Page Applications (SPA) and mobile apps. Due to their architecture, public clients inherently have higher risk and less security in authentication and authorization. Public clients can’t leverage a client secret used by application types that can communicate to the authorization server through a “back-channel,” a network connection opaque to users, network sniffing attackers, and nosy developers. Without proper protection, a SPA may store tokens accessible to the end-user and injection-related attacks. DPoP adds an extra protection layer that makes tokens less usable if stolen.
Table of Contents
- Get the starting Angular, React, or Vue project
- Add OAuth 2.0 and OpenID Connect (OIDC) to your application
- Inspect the OAuth 2.0 bearer tokens and request resources manually
- Use secure coding techniques to protect your web apps
- Migrate your SPA to use DPoP
- Trace the token request requiring a DPoP nonce
- Request resources using DPoP headers
- Manually request DPoP-protected resources
- Store cryptographic keys in browser applications
- Use modern evergreen browsers for secure token handling
- Learn more about web security, DPoP, and OAuth 2.0
In this post, you’ll experiment with DPoP and step through migrating a public client application using OAuth bearer tokens compared to DPoP tokens. We’ll build upon the existing OAuth 2.0 Authorization Code flow. Need a refresher? Check out this post:
Authentication and authorization in public clients like single-page applications can be complicated! In this post, we'll walk through the Authorization Code flow with Proof Key for Code Exchange extension to better understand how it works and what do with the auth tokens you get back from the process.
Note
This code project is best for developers with web development experience, knowledge of debugging network requests and responses, and familiarity with OAuth and OpenID Connect (OIDC).
The post uses Angular, but you can follow the concepts and network calls using a sample project in your favorite SPA framework. Check out samples using React or Vue. You’ll need to make a couple of minimal changes to the code. I will call out the changes, but I will not post the specific code or instructions.
Are you following the step-by-step code instructions in Angular? This post assumes you already have Angular knowledge. If you are an Angular newbie, start by building your first Angular app using the tutorial created by the Angular team.
A hands-on project requires tools for local web development.
Prerequisites
You’ll need the following tools:
- Node.js v18 or greater
- A web browser with good debugging capabilities, such as Chrome
- Your favorite IDE. Still looking? I like VS Code and WebStorm because they have integrated terminal windows.
- Terminal window (if you aren’t using an IDE with a built-in terminal)
- Git and an optional GitHub account if you want to track your changes using a source control manager
- An HTTP client that shows the HTTP requests and responses, such as the Http Client VS Code extension or curl
Note: In May 2025, the Okta Integrator Free Plan replaced Okta Developer Edition Accounts, and the Okta CLI was deprecated.
We preserved this post for reference, but the instructions no longer work exactly as written. Replace the Okta CLI commands by manually configuring Okta following the instructions in our Developer Documentation.
Get the starting Angular, React, or Vue project
You’ll use a starter project. These instructions are for the Angular sample project. If you are following along in React or Vue, replace the GitHub repo location with the URL for the sample you’re using.
Open a terminal window and run the following commands to get a local copy of the project in an okta-client-dpop-project directory and install dependencies. Feel free to fork the repo so you can track your changes.
git clone https://github.com/oktadev/okta-angular-dpop-example.git okta-client-dpop-project
cd okta-client-dpop-project
npm ci
Open the project in your favorite IDE. The project includes Okta’s client authentication SDKs, a sign-in button, a profile route that displays user information by calling the OIDC /userinfo endpoint, and a route that makes a call to Okta’s Users API. Both HTTP requests require an access token, so we’ll follow the requests and responses for these two calls.
React and Vue project instructions
React and Vue projects need a couple of changes. Change the profile component to call
oktaAuth.token.getUserInfo()and display the JSON output. Add a call to Okta’s User APIhttps://{yourOktaDomain}/api/v1/users. You’ll replace the domain name later. You may want to create a new Users component (and route) to match the Angular sample.
You need to set up an authentication configuration to serve the project. Let’s do so now.
Add OAuth 2.0 and OpenID Connect (OIDC) to your application
You’ll use Okta to handle authentication and authorization in this project securely. Okta APIs have built-in DPoP support — how secure and handy! We’ll experiment with DPoP in the client application by calling Okta’s APIs.
React and Vue project instructions
Replace the two redirect URIs to match the port and callback route for the application. You’ll find the URI for both in your project’s README file. Follow the instructions in the README to add the issuer and client ID to the app. Use the format
https://{yourOktaDomain}for the issuer. Notice this is different from the starter code.
Before you begin, you’ll need a free Okta developer account. Install the Okta CLI and run okta register to sign up for a new account. If you already have an account, run okta login.
Then, run okta apps create. Select the default app name, or change it as you see fit.
Choose Single-Page App and press Enter.
Use http://localhost:4200/login/callback for the Redirect URI and set the Logout Redirect URI to http://localhost:4200.
What does the Okta CLI do?
The Okta CLI will create an OIDC Single-Page App in your Okta Org. It will add the redirect URIs you specified and grant access to the Everyone group. It will also add a trusted origin for http://localhost:4200. You will see output like the following when it’s finished:
Okta application configuration:
Issuer:    https://dev-133337.okta.com/oauth2/default
Client ID: 0oab8eb55Kb9jdMIr5d6
NOTE: You can also use the Okta Admin Console to create your app. See Create an Angular App for more information.
Note the Issuer and the Client ID. You’ll need those values for your authentication configuration, which is coming soon.
There’s one manual change to make in the Okta Admin Console. Add the Refresh Token grant type to your Okta Application. Open a browser tab to sign in to your Okta Integrator Free Plan Account. Navigate to Applications > Applications and find the Okta Application you created. Select the name to edit the application. Find the General Settings section and press the Edit button to add a Grant type. Activate the Refresh Token checkbox and press Save.
Leave the Okta Admin console open. You’ll continue making changes in there.
I already added Okta Angular and Okta Auth JS libraries to connect our Angular application with Okta authentication.
In your IDE, open src/app/app.config.ts and find the OktaAuthModule.forRoot() configuration. Replace {yourOktaDomain} and {yourClientID} with the values from the Okta CLI.
Configure OAuth scopes for Okta API calls
We’re calling an Okta API, so we must add the required OAuth scopes.
In the Okta Admin Console, navigate to the Okta API Scopes tab in your Okta application. Find the okta.apps.read and okta.users.read.self and press the ✔️ Grant button for each.
Open the src/app/users/users.component.ts and find the call to list users: https://{yourOktaDomain}/api/v1/users. We’re taking shortcuts here, such as calling the API directly in the component for this demonstration project. In production-quality Angular apps, ensure you architect your application following best practices so you can add automated tests and troubleshoot issues quickly.
Replace {yourOktaDomain} with your Okta domain.
React and Vue project instructions
Add the two scopes to the OIDC configuration for the application. Search for “scopes” and change the array to
scopes: ['openid', 'profile', 'email', 'offline_access', 'okta.users.read.self', 'okta.apps.read'],Replace the
{yourOktaDomain}in the Okta Users API call you added in the prior section.
Start the app by running:
npm start
Open a browser tab to view the app. Open the debugging view that shows the console and network requests. Since I am using Chrome, I’ll open DevTools. Enable Preserve log in the Console and Network tabs. For the Console tab, you’ll find the preserve log option after opening the gear menu.
Let’s ensure you can sign in, call the /userinfo endpoint to see your user information, and call Okta Users API. You’ll use the Authorization Code flow and redirect to Okta for the authentication challenge. Once you emerge victorious by assuring the identity provider you are who you claim to be, the authorization server redirects you back to the application. The redirect URI includes the authorization code. Okta’s SDK (the OIDC client library) calls the /token endpoint to exchange the authorization code for tokens.
After you sign in, the Angular app will display routes for “Profile” and “Users.” Navigating these routes calls the /userinfo and Users API. If you can access the routes and don’t see any HTTP request errors, you’re good to go!
Inspect the OAuth 2.0 bearer tokens and request resources manually
After signing in, you have the OAuth 2.0 access token and the OIDC ID token. Okta stores the tokens in browser storage. In DevTools, open the Application tab to view browser storage data. Okta Auth JS defaults to local storage for tokens and is configurable based on your application needs. Expand Local storage, select the application, and expand the okta-token-storage key to see the tokens and token metadata. The tokenType property is Bearer.
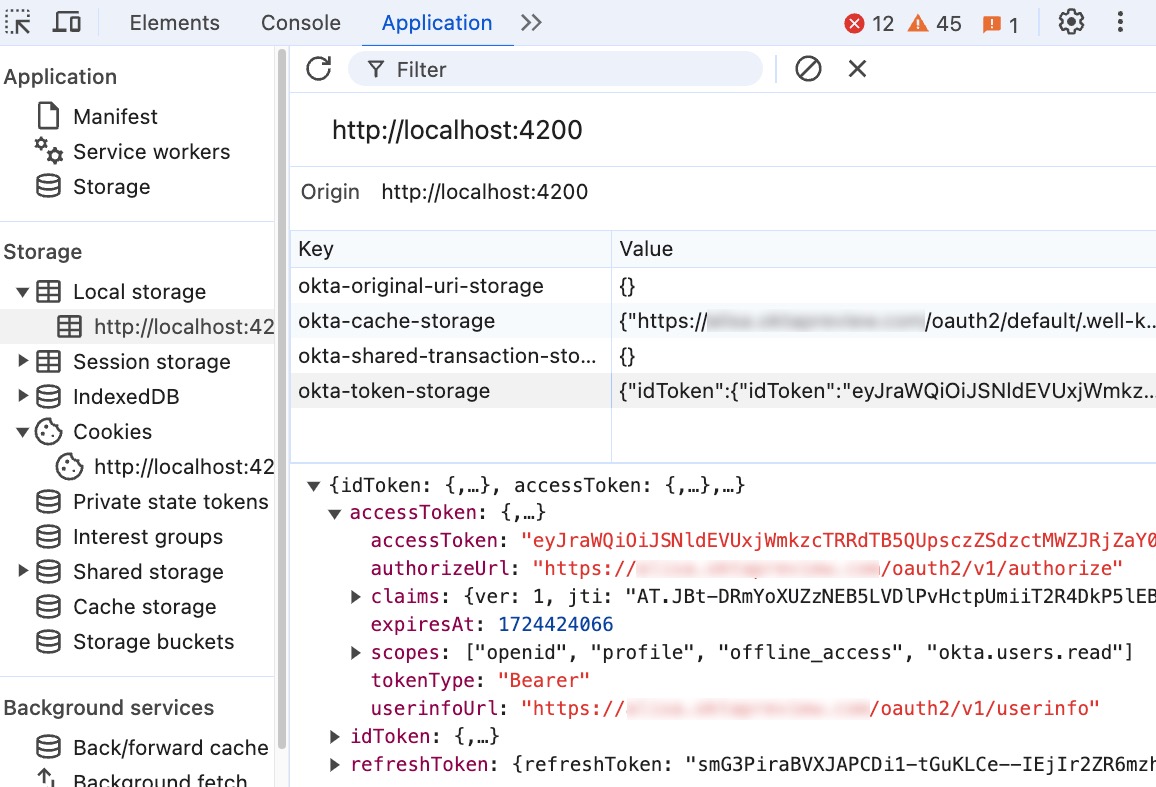
Let’s see the API calls in action in the application. Navigate to both routes. In the Network tab, you see the initial /token, /userinfo, and Users API requests.
Let’s inspect the Users API request.
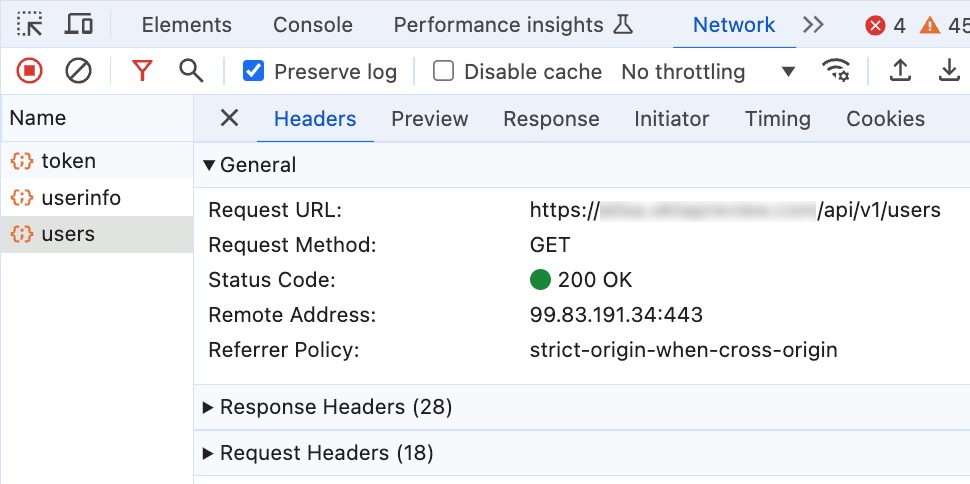
The request includes the Authorization header containing the token scheme and access token. You see the format Bearer <access_token>.

The entity holding the token can legitimately request resources. Let’s try using the token in another client and impersonating the actions an attacker can take if they manage to capture it.
Note
Access tokens expire quickly. If too much time passes in these next steps, you may get a
401 Unauthorized. If you do, repeat the steps with a more recent access token by navigating between the profile and user routes to trigger a call to the API. It prompts the OIDC client (the Okta Auth JS SDK) to update expired tokens.
Copy the token from the browser, and double-check you captured the entire token. Open your HTTP client and run the following HTTP request replacing {yourOktaDomain} and {yourAccessToken}:
GET https://{yourOktaDomain}/api/v1/users HTTP/1.1
Authorization: Bearer {yourAccessToken}
If you use curl, add the verbose flag to see the request and response headers:
curl -v --header "Authorization: Bearer {yourAccessToken}" https://{yourOktaDomain}/api/v1/users
The call succeeds even though the HTTP client isn’t the same client the authorization server issued the token to (the sample app).
Let’s call another endpoint with the same access token, the Okta Applications endpoint. Run the following HTTP request replacing {yourOktaDomain} and {yourAccessToken}:
GET https://alisa.oktapreview.com/api/v1/apps HTTP/1.1
Authorization: Bearer {yourAccessToken}
The call succeeds even though you call from a different client, like you saw in the prior step, calling the Users API. The call succeeds for a privileged user as long as the Okta Application has the okta.apps.read and the OIDC config has the scope. You may say that’s a lot of constraints, and you’re right. Okta adds a lot of guards when making API requests about the resources in the top-level Okta org, such as the list of Okta applications. This example demonstrates how powerful and vulnerable tokens issued for privileged users like admins are. Anyone with the token can make the same request, even if they are an attacker.
Back in the app, sign out to clear the authenticated session and tokens. We’re making changes that require you to sign in from scratch.
Use secure coding techniques to protect your web apps
All web applications must use secure coding techniques to protect from attacks, breaches, and malicious use. Public clients store their tokens within the user’s hardware and require thoughtful security practices. Read more about SPA web security and security practices within Angular in this four-part series:
Learn the basics of web security and how to apply web security foundation to protect your Single Page Applications.
It doesn’t matter if your application uses bearer tokens or DPoP; apps must employ secure coding practices. DPoP doesn’t prevent attackers from stealing your token but constrains its use. DPoP uses asymmetric encryption to prove token ownership, so you must avoid exfiltration or unauthorized use of the keyset. An attacker can create valid proofs if they get a hold of the private key.
Let’s migrate the application to DPoP and try making these HTTP requests again.
Migrate your SPA to use DPoP
Open the Okta Admin Console in the browser and navigate to Applications > Applications. Find the Okta application for this project. In the General tab, find the General Settings section and press Edit. Check the Proof of possession checkbox requiring the DPoP header in token requests. Press Save. Sign out of the Okta Admin Console.
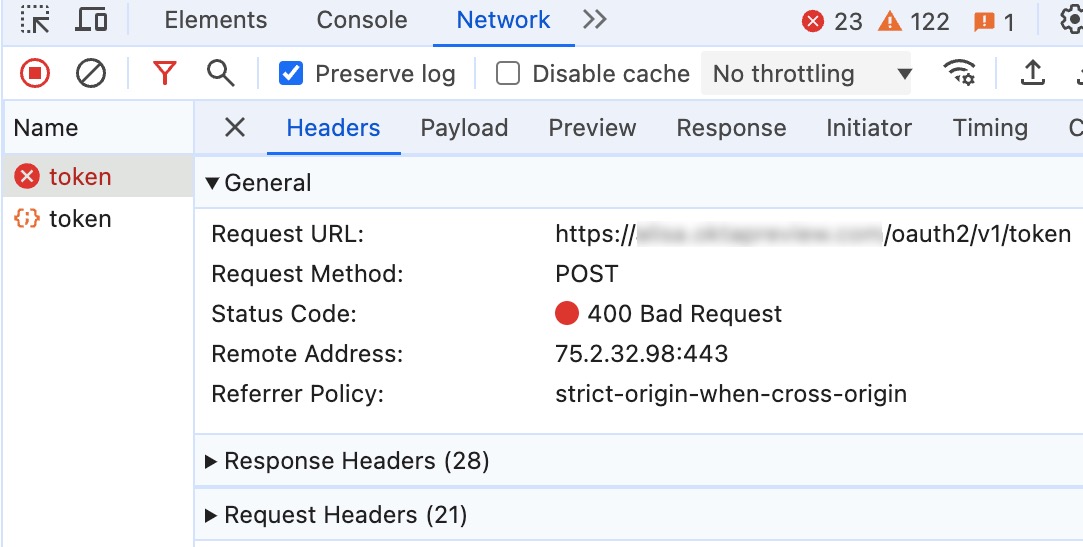
If you try signing in again without making any code changes, you’ll see an error in the Network tab for the /token request:
HTTP/1.1 400 Bad Request

{
    "error": "invalid_dpop_proof",
    "error_description": "The DPoP proof JWT header is missing."
}
All HTTP requests to DPoP-protected resources (including the /token request) require proof. We must enable DPoP in the OIDC configuration.
The Okta Auth JS SDK has a configuration property for DPoP as part of the OIDC config. In your IDE, open src/app/app.config.ts and find the OktaAuthModule.forRoot() configuration. Add the dpop: true property. Your OIDC config will look something like this:
{
  issuer: ...,
  clientId: ...,
  redirectUri: ...,
  scopes: ['openid', 'profile', 'offline_access', 'okta.users.read.self', 'okta.apps.read'],
  dpop: true
}
Once the application rebuilds and reloads in the browser, make sure you have debugging tools open and then sign in.
Trace the token request requiring a DPoP nonce
When you sign in, you’ll see the initial call to the /token endpoint fails.
Take a look at the call’s request headers. You’ll see a header called DPoP, which contains the DPoP proof in JWT format, which means we can decode it and inspect its contents. You can use a trustworthy online tool such as JWT.io debugger or Base64 decode the header and payload sections of the JWT locally. In the JWT format, the content from the beginning up to the first
The header contains the token type, dpop+jwt, the encryption algorithm, and the cryptographic key information tied to this proof. The payload includes minimal HTTP information and other properties to prevent token attack vectors.
{
  "alg": "RS256",
  "typ": "dpop+jwt",
  "jwk": { /* Key information in JSON Web Key format */ }
}

{
  "htm":"POST",
  "htu":"https://{yourOktaDomain}/oauth2/v1/token",
  "iat":1724685617,
  "jti": "e84a...283bbf",
}
Why did the initial call to /token fail? It’s because Okta requires an extra handshake that elevates security. The /token call requires a DPoP nonce that Okta provides included in the DPoP proof. In response to the first /token call, Okta returns the standard DPoP nonce error and the DPoP-Nonce response header containing the nonce the client incorporates into the proof.
HTTP/1.1 400 Bad Request
DPoP-Nonce: "SVD....ubNc"

{
  "error": "use_dpop_nonce",
  "error_description": "Authorization server requires nonce in DPoP proof."
}
Okta’s Auth JS SDK has built-in support for DPoP-Nonce errors. Look at the DPoP proof token’s payload of the successful /token request. The payload includes the nonce returned in the first call.
{
  "htm":"POST",
  "htu":"https://{yourOktaDomain}/oauth2/v1/token",
  "iat":1724685617,
  "jti": "e852...28396",
  "nonce":"SVD....ubNc"
}
The token request succeeds, and we now have a DPoP access token.
Request resources using DPoP headers
In the app, navigating to view your profile succeeds because the SDK supports DPoP resource requests. You’ll see an error when navigating the “Users” route that calls Okta’s User API.
The HTTP response includes information about why the call errored.
HTTP/1.1 400 Bad Request
WWW-Authenticate: Bearer authorization_uri="http://{yourOktaDomain}/oauth2/v1/authorize", realm="http://{yourOktaDomain}", scope="okta.users.read.self", error="invalid_request", error_description="The resource request requires a DPoP proof.", resource="/api/v1/users"
The current code to make the Users API call adds the access token using the Bearer scheme in the Authorization header, but that’s incorrect for DPoP. We must incorporate the DPoP proof and change the scheme in the HTTP request.
Open the auth interceptor in the IDE. You can find the code in the src/app/auth.interceptor.ts file.
React and Vue project instructions
Find the code you added to request Users and incorporate the Angular instructions in the project to add the DPoP proof header and the
DPoPscheme.
The interceptor has a check to ensure it adds the access token to allowed origins only. Change the interceptor code as follows:
export const authInterceptor: HttpInterceptorFn = (req, next, oktaAuth = inject(OKTA_AUTH)) => {
  let request = req;
  const allowedOrigins = ['/api'];
  if (!allowedOrigins.find(origin => req.url.includes(origin))) {
    return next(request);
  }
};
We need the proof and the authorization header. We’ll generate both using Okta Auth JS. The SDK method requires the HTTP method and URI we intend to call. The URI shouldn’t include query parameters or fragments. The SDK method returns an object with properties matching headers and their values, so we can use the spread operator to populate the DPoP-required headers.
Change the interceptor to match the code below.
import { DPoPHeaders } from '@okta/okta-auth-js';
import { defer, map, switchMap } from 'rxjs';

export const authInterceptor: HttpInterceptorFn = (req, next, oktaAuth = inject(OKTA_AUTH)) => {
  // allowed origin check

  const url = new URL(req.url);

  return defer(() => oktaAuth.getDPoPAuthorizationHeaders({url: `${url.origin}${url.pathname}`, method: req.method})).pipe(
    map((dpop: DPoPHeaders) =>  req.clone({
      setHeaders: { ...dpop }
    })),
    switchMap((request) => next(request))
  );
};
Now, if you sign in and call the Users API, you’ll get the list of users in your Okta org using DPoP.
Manually request DPoP-protected resources
Earlier, we pretended to steal the access token to make other resource requests. You called the Okta Apps API using a JWT token to see the list of all the apps your Okta org contains. What happens if we try this again when the API requires DPoP?
In DevTools, open the Network tab and find the /users call. You need both the proof and the access token for your HTTP call. Make an HTTP request:
curl -v --header "Authorization: DPoP {yourAccessToken}" --header "DPoP: {yourDPoPProof}" https://{yourOktaDomain}/api/v1/apps
The API rejected your request! You get back an error stating the DPoP proof isn’t valid:
HTTP/1.1 400 Bad Request
WWW-Authenticate: DPoP algs="RS256 RS384 RS512 ES256 ES384 ES512", authorization_uri="http://{yourOktaDomain}/oauth2/v1/authorize", realm="http://{yourOktaDomain}", scope="okta.apps.read", error="invalid_dpop_proof", error_description="'htu' claim in the DPoP proof JWT is invalid."
If an attacker manages to capture both the proof and the token, they may only be able to make the same request. The proof constrains the calls to the HTTP method and URI, invalidating other HTTP requests.
How about making the same request?
curl -v --header "Authorization: DPoP {yourAccessToken}" --header "DPoP: {yourDPoPProof}" https://{yourOktaDomain}/api/v1/users
The API rejected your request! You still get back an error stating the DPoP proof isn’t valid:
HTTP/1.1 400 Bad Request
WWW-Authenticate: DPoP algs="RS256 RS384 RS512 ES256 ES384 ES512", authorization_uri="http://{yourOktaDomain}/oauth2/v1/authorize", realm="http://{yourOktaDomain}", scope="okta.users.read.self", error="invalid_dpop_proof", error_description="The DPoP proof JWT has already been used.", resource="/api/v1/users"
The proof also has two other protection mechanisms: the JWT unique identifier (jit) and the issued at time (iat). When a resource server enforces the jit claim, it tracks previous calls to prevent proof reuse. So, an attacker can’t replay the proof and the access token they stole. Enforcing the JWT ID isn’t required in the DPoP spec. Another protection mechanism is the proof issue timestamp, the iat claim. Resource servers check the issue time on the proofs, and if it exceeds some threshold determined by the resource server, the server will reject the request.
Store cryptographic keys in browser applications
We must securely store the keyset within the SPA and prevent an attacker from exfiltrating them. If an attacker has the keyset, they can impersonate you and make DPoP-protected calls. Fortunately, Okta SDK uses a few different techniques to mitigate keyset hijacking without any extra coding on your part.
Local and session storage aren’t secure enough; this time, we’ll rely on IndexedDB storage. The typical use case for IndexedDB is storing a large volume of data, but it has some built-in security mechanisms that work well for protecting the keyset. The SubtleCrypto API supports generating non-exportable keys, preventing browser code from turning the private key into a portable format. IndexedDB stores the keys as a CryptoKeyPairs object and DB query results return a reference to the object, not the raw key. IndexedDB protects sensitive private keys but still works with the WebCrypto methods for signing proof.
You can inspect the keys by following the steps:
- Navigate to the Applications tab in DevTools
- Expand IndexedDB under the Storage sidenav
- Expand OktaAuthJs > DPoPKeys
The downside is that the IndexedDB API is more difficult to use than other browser storage APIs. Because IndexedDB data persists, we must clean up the keys when done manually. The SDK handles cleanup if the user explicitly signs out, but we can’t guarantee a user always will. We can clear keys before signing in.
Open src/app/app.component.ts to find the signIn() method.
React and Vue project instructions
Find the code where the project calls the
signInWithRedirect()method and follow the instructions described for Angular projects.
Add the call to clear keys as the first step in the signIn() method:
public async signIn() : Promise<void> {
  await this.oktaAuth.clearDPoPStorage(true);
  await this.oktaAuth.signInWithRedirect();
}
Use modern evergreen browsers for secure token handling
Creating and storing cryptographic keys in JavaScript apps requires a capable browser. Modern, evergreen browsers have the API support required for DPoP. Check browser capability if your app supports users who use less modern, more questionable browsers. The Auth JS SDK has a method to check browser capability, authClient.features.isDPoPSupported(). You can add this check during application bootstrapping or initialization.
Remember, even if you aren’t using DPoP, modern browsers have more built-in security mechanisms. Stay secure, stay updated, and use safe browser practices whenever possible.
Learn more about web security, DPoP, and OAuth 2.0
In this post, you applied DPoP to a SPA and inspected DPoP in action. I hope you enjoyed it! If you want to learn more about the ways you can incorporate authentication and authorization security in your apps, you might want to check out these resources:
- OAuth 2.0 and OpenID Connect overview
- The Identity of OAuth Public Clients
- Add Step-up Authentication Using Angular and NestJS
- Configure OAuth 2.0 Demonstrating Proof-of-Possession
Remember to follow us on Twitter and subscribe to our YouTube channel for more exciting content. We also want to hear from you about topics you want to see and questions you may have. Leave us a comment below!
Alisa Duncan is a Senior Developer Advocate at Okta, a full-stack developer, and a community builder who loves the thrill of learning new things. She is a Google Developer Expert in Angular and organizes coding workshops and community events locally and internationally. Her background is primarily working on enterprise software platforms, and she is a fan of all things TypeScript and JavaScript.
Okta Developer Blog Comment Policy
We welcome relevant and respectful comments. Off-topic comments may be removed.