Get Started with Jetty, Java, and OAuth

Jetty is a small, highly-scalable Java-based web server and servlet engine. It supports HTTP/2, WebSockets, and many other protocols. It powers websites and frameworks, both large and small, such as Google AppEngine. Because it is an Eclipse project, its open source project is called Eclipse Jetty. It is standards-compliant and open source, as well as commercially usable. It is the main alternative to Tomcat when hosting Java applications. Like Tomcat, you can use Jetty both embedded and stand-alone.
By default, Spring Boot creates applications with embedded web servers, which means that the server is embedded within the application code itself, so you don’t have to run a separate web server to publish Java web applications. However, with a little configuration, you can also publish a WAR file to a separate Jetty or Tomcat servlet container (old-school application server style). Spring also uses Tomcat by default, but you can easily change this, as you’ll see.
In this tutorial, you will build a simple web service with Jetty embedded. After that, you will create the same web service in Spring Boot and Jetty. Finally, you’ll add JWT (JSON Web Token) authentication and authorization to the web service using method-level security with Okta as the OAuth/OIDC provider.
Table of Contents
- Install the prerequisites
- Build a simple web service with Java and Jetty
- Build a web service with Gradle and Jetty
- Build a web service with Spring Boot and Jetty
- Deploy the Spring Boot project
- Use the Okta CLI to create an OIDC application
- Configure the Spring Boot app for Okta
- Secure the Spring Boot app with Auth0
- Learn more about Java, Spring Boot, and Spring Security
Note: In May 2025, the Okta Integrator Free Plan replaced Okta Developer Edition Accounts, and the Okta CLI was deprecated.
We preserved this post for reference, but the instructions no longer work exactly as written. Replace the Okta CLI commands by manually configuring Okta following the instructions in our Developer Documentation.
Install the prerequisites
Before you start, please make sure you have the following prerequisites installed (or install them now).
- Java 17: or use SDKMAN! to manage and install multiple versions
- Okta CLI: the Okta command-line interface
- Auth0 CLI: the Auth0 command-line interface
- HTTPie: a simple tool for making HTTP requests from the command line
You will need a free Okta Developer account if you don’t already have one. But you can wait until later in the tutorial and use the Okta CLI to log in or register for a new account.
Start by cloning this tutorial’s GitHub repo:
git clone https://github.com/oktadev/okta-spring-boot-jetty-example.git
The repository has several projects:
maven-jetty: web service using Mavengradle-jetty: web service using Gradlespring-boot-jetty-maven-no-auth: web service using Spring Boot and Mavenspring-boot-jetty-maven-okta: web service using Spring Boot and Maven secured with Oktaspring-boot-jetty-maven-auth0: web service using Spring Boot and Maven secured with Auth0
Build a simple web service with Java and Jetty
In the first part of this tutorial, you’re going to create a simple web service using Maven and then Gradle. In the second half, you’ll see how to upgrade this to a Spring Boot-based web service, to which you’ll add JWT-based authentication and authorization using Okta and Auth0 as the OAuth 2.0 and OIDC providers.
You should have the files from the GitHub repository. Open the folder maven-jetty in your favorite IDE.
First, take a look at the pom.xml file (which is shown below). Notice the Jetty version is set in the properties block. The only project dependency is jakarta.servlet-api. It is scoped as provided because, in deployment, this package will be provided by the server container.
The Servlet API dependency used to be javax-servlet-api, but Java EE is no longer maintained and has been migrated into jakarta.servlet-api. This happened when Java EE moved from Oracle to the Eclipse Foundation and became Jakarta EE. As you’ll see in the servlet code, this package provides the standardized classes and annotations used to build the servlet.
The packaging type for the project is war, not jar, and the Maven War plugin has been included in the build dependencies (maven-war-plugin).
Lastly, the Jetty Maven plugin has also been included. You can peruse the docs here. It is designed to make the development and testing of Jetty servlets easy by adding Maven goals to run and test the app.
<?xml version="1.0" encoding="UTF-8"?>
<project xmlns="http://maven.apache.org/POM/4.0.0" xmlns:xsi="http://www.w3.org/2001/XMLSchema-instance"
         xsi:schemaLocation="http://maven.apache.org/POM/4.0.0 http://maven.apache.org/xsd/maven-4.0.0.xsd">
    <modelVersion>4.0.0</modelVersion>

    <groupId>com.demo</groupId>
    <artifactId>demo</artifactId>
    <version>1.0-SNAPSHOT</version>
    <packaging>war</packaging>
    <name>demo</name>

    <properties>
        <project.build.sourceEncoding>UTF-8</project.build.sourceEncoding>
        <maven.compiler.source>17</maven.compiler.source>
        <maven.compiler.target>17</maven.compiler.target>
        <jettyVersion>11.0.15</jettyVersion>
    </properties>

    <dependencies>
        <!-- Core Servlet Package -->
        <dependency>
            <groupId>jakarta.servlet</groupId>
            <artifactId>jakarta.servlet-api</artifactId>
            <version>6.0.0</version>
            <scope>provided</scope>
        </dependency>
    </dependencies>

    <build>
        <plugins>
            <!-- Maven Jetty Plugin -->
            <plugin>
                <groupId>org.eclipse.jetty</groupId>
                <artifactId>jetty-maven-plugin</artifactId>
                <version>${jettyVersion}</version>
                <configuration>
                    <stopPort>8080</stopPort>
                    <useTestClasspath>false</useTestClasspath>
                    <webAppConfig>
                        <contextPath>/</contextPath>
                    </webAppConfig>
                </configuration>
            </plugin>
            <!-- War Plugin -->
            <plugin>
                <artifactId>maven-war-plugin</artifactId>
                <version>3.3.2</version>
                <configuration>
                    <failOnMissingWebXml>false</failOnMissingWebXml>
                </configuration>
            </plugin>
        </plugins>
    </build>

</project>
The next file to look at is the AhoyServlet class.
src/main/java/com/demo/AhoyServlet.java
package com.demo;

import jakarta.servlet.annotation.WebServlet;
import jakarta.servlet.http.HttpServlet;
import jakarta.servlet.http.HttpServletRequest;
import jakarta.servlet.http.HttpServletResponse;
import java.io.IOException;

@WebServlet(name = "AhoyServlet", urlPatterns = {"ahoy"}, loadOnStartup = 1)
public class AhoyServlet extends HttpServlet {

    protected void doGet(HttpServletRequest request, HttpServletResponse response)
        throws IOException {
        response.getWriter().print("Ahoy!");
    }

}
This file is the most basic, bare-bones web service. In the code, you’re using the @WebServlet annotation to define a web servlet without having to define it in a web.xml file. You can see the docs here for the annotation.
Run the service from a Bash shell using the following command (run from the jetty-maven project root directory).
./mvnw jetty:run
You should see some output that looks like the following.
[INFO] Configuring Jetty for project: demo
[INFO] Classes = /home/.../jetty-update/maven-jetty/target/classes
[INFO] Context path = /
[INFO] Tmp directory = /home/.../jetty-update/maven-jetty/target/tmp
[INFO] web.xml file = null
[INFO] Webapp directory = /home/.../jetty-update/maven-jetty/src/main/webapp
[INFO] Web defaults = org/eclipse/jetty/webapp/webdefault.xml
[INFO] Web overrides =  none
[INFO] jetty-11.0.15; built: 2023-04-11T18:37:53.775Z; git: 5bc5e562c8d05c5862505aebe5cf83a61bdbcb96; jvm 17.0.6+10
[INFO] Session workerName=node0
[INFO] Started o.e.j.m.p.MavenWebAppContext@69364b2d{/,[file:///home/.../jetty-update/maven-jetty/src/main/webapp/],AVAILABLE}{file:///home/.../jetty-update/maven-jetty/src/main/webapp/}
[INFO] Started ServerConnector@4d7cac24{HTTP/1.1, (http/1.1)}{0.0.0.0:8080}
[INFO] Started Server@42e4e589{STARTING}[11.0.15,sto=0] @2490ms
Using HTTPie, test the simple service.
http :8080/ahoy
HTTP/1.1 200 OK
Content-Length: 5
Date: Tue, 25 Apr 2023 15:22:24 GMT
Server: Jetty(11.0.15)

Ahoy!
That’s the simplest case.
A little side note. The Maven Jetty plugin provides two tasks for running the app without building a WAR: jetty:run and jetty:start. The one you want to use is jetty-run. From the Jetty docs:
jetty:runandjetty:startare alike in that they both run an unassembled webapp in Jetty, howeverjetty:runis designed to be used at the command line, whereasjetty:startis specifically designed to be bound to execution phases in the build lifecycle.jetty:runwill pause Maven while Jetty is running, echoing all output to the console, and then stop Maven when Jetty exits.jetty:startwill not pause Maven, will write all its output to a file, and will not stop Maven when Jetty exits.
Now take a look at a more fully-featured web service.
src/main/java/com/demo/HikesTodoServlet.java
package com.demo;

import java.io.IOException;

import jakarta.servlet.annotation.WebServlet;
import jakarta.servlet.http.HttpServlet;
import jakarta.servlet.http.HttpServletRequest;
import jakarta.servlet.http.HttpServletResponse;

import java.util.ArrayList;
import java.util.Arrays;
import java.util.List;

@WebServlet(name = "HikesTodoServlet", urlPatterns = {"hikes"}, loadOnStartup = 1)
public class HikesTodoServlet extends HttpServlet {

    // Not synchronized
    private List<String> hikes = new ArrayList<>(Arrays.asList(
        "Wonderland Trail", "South Maroon Peak", "Tour du Mont Blanc",
        "Teton Crest Trail", "Everest Base Camp via Cho La Pass", "Kesugi Ridge"
    ));

    protected void doGet(HttpServletRequest request, HttpServletResponse response)
        throws IOException {
        response.getWriter().print(String.join("\n", this.hikes));
    }

    protected void doPost(HttpServletRequest request, HttpServletResponse response)
        throws IOException {
        String hike = request.getParameter("hike");
        if (hike == null) {
            response.setStatus(400);
            response.getWriter().print("Param 'hike' cannot be null.");
        } else if (this.hikes.contains(hike)) {
            response.setStatus(400);
            response.getWriter().print("The hike '" + hike + "' already exists.");
        } else {
            this.hikes.add(hike);
            response.getWriter().print(String.join("\n", this.hikes));
        }
    }

    protected void doDelete(HttpServletRequest request, HttpServletResponse response)
        throws IOException {
        String hike = request.getParameter("hike");
        if (hike == null) {
            response.setStatus(400);
            response.getWriter().print("Param 'hike' cannot be null.");
        } else {
            this.hikes.remove(hike);
            response.getWriter().print(String.join("\n", this.hikes));
        }
    }

}
This is a web app that tracks a list of hikes. It demonstrates how to support POST and DELETE operations, as well as simple GETs and some simple error handling.
If your local Jetty server is still running, you can go ahead and test it. Otherwise, start it again using the ./mvnw jetty:run command.
http :8080/hikes
HTTP/1.1 200 OK
...

Wonderland Trail
South Maroon Peak
Tour du Mont Blanc
Teton Crest Trail
Everest Base Camp via Cho La Pass
Kesugi Ridge
POST a new hike:
http -f POST :8080/hikes hike="Pear Lake"
HTTP/1.1 200 OK
...

Wonderland Trail
South Maroon Peak
Tour du Mont Blanc
Teton Crest Trail
Everest Base Camp via Cho La Pass
Kesugi Ridge
Pear Lake
Delete a hike:
http DELETE :8080/hikes hike=="South Maroon Peak"
HTTP/1.1 200 OK
Content-Length: 110
Date: Tue, 25 Apr 2023 15:25:26 GMT
Server: Jetty(11.0.15)

Wonderland Trail
Tour du Mont Blanc
Teton Crest Trail
Everest Base Camp via Cho La Pass
Kesugi Ridge
Pear Lake
Now try to delete a hike that doesn’t exist or send an empty value:
http DELETE :8080/hikes
HTTP/1.1 400 Bad Request
...

Param 'hike' cannot be null.
That’s how you can create a web service using Maven and Jetty. To deploy this, you would typically build the packaged WAR file using mvn package and deploy the WAR to your Jetty server.
Stop the Jetty server by pressing Ctrl-C in the terminal window where it’s running.
NOTE: this is a very naive implementation of a REST service. It uses an in-memory
ArrayListas a data source, which is not synchronized (and thus would run into threading problems in a real web servlet). For anything beyond the scope of this tutorial, you’d need to implement a database backend of some kind. For help on how to do this, see the example blog posts listed at the end of the tutorial. You would typically also add a PUT endpoint and assign each item an ID to use as an index so data can be updated, but that is beyond the scope of this tutorial.
Build a web service with Gradle and Jetty
Next, you’re going to look at how you can accomplish the same thing you did above, but this time with Gradle instead of Maven. Why? Because some people are allergic to XML and love DSLs instead.
The Gradle-based app is located in the gradle-jetty subdirectory.
Gradle is a Groovy-based build system that uses a custom DSL (domain-specific language) for its build files. Because the build script files are essentially Groovy scripts, the build system is incredibly powerful, thus, very flexible.
To run a Jetty server using Gradle, you’ll use the Gretty plugin.
From the Gretty docs:
Gretty is a feature-rich Gradle plugin for running web apps on embedded servlet containers. It supports Jetty versions 10, Tomcat versions 10, multiple web apps, and many more. It wraps servlet container functions as convenient Gradle tasks and configuration DSL
This project uses Gretty plugin version 4.0.3, which uses Jetty version 11.0.11. Since version 4, Gretty requires jakarta imports over javax. You can use Gretty 3 if you want to support non-Jakarta apps (this is explained on the Gretty GitHub page above).
The two Java servlet classes are the same in both projects. I did find that Gretty and Gradle crashed unless I added an empty src/main/webapp directory (this wasn’t necessary with Maven).
The build.gradle file is analogous to the pom.xml file.
plugins {
    id 'java'
    id 'war'
    id 'org.gretty' version '4.0.3'
}

repositories {
    mavenCentral()
}

dependencies {
    providedCompile 'jakarta.servlet:jakarta.servlet-api:6.0.0'
}

gretty {
    contextPath = '/'
}
This is about as simple as it gets. The same Jakarta-based servlet API is included as a provided dependency, and the Gretty plugin is included in the plugins block.
The context path is configured to be the root path. If you want to see the other configuration properties, take a look at the Gretty configuration docs.
You can also look at the Gradle tasks that the plugin adds in the docs.
To run the web app, use the appRun task.
./gradlew appRun
You can test the two endpoints: /hikes and /ahoy.
$ http :8080/hikes
HTTP/1.1 200 OK
...

Wonderland Trail
South Maroon Peak
Tour du Mont Blanc
Teton Crest Trail
Everest Base Camp via Cho La Pass
Kesugi Ridge

$ http :8080/ahoy
HTTP/1.1 200 OK
...

Ahoy!
You’ve seen how to build a web service using Jetty in both Gradle and Maven. Next, you’ll build one using Spring Boot and Maven.
Build a web service with Spring Boot and Jetty
By default, Spring Boot is configured to use an embedded Tomcat server. However, this is easily configurable. The Spring Boot docs on embedded web servers is a good resource. To switch to Jetty, you need to do two things:
- disable the default embedded Tomcat server
- enable an embedded Jetty server
This is done in the pom.xml file by these two dependency configuration blocks. The first removes the Tomcat dependency from spring-boot-starter-web-no-auth, and the second adds the spring-boot-starter-jetty dependency.
<dependency>
    <groupId>org.springframework.boot</groupId>
    <artifactId>spring-boot-starter-web</artifactId>
    <exclusions>
        <!-- Exclude the Tomcat dependency -->
        <exclusion>
            <groupId>org.springframework.boot</groupId>
            <artifactId>spring-boot-starter-tomcat</artifactId>
        </exclusion>
    </exclusions>
</dependency>
<!-- Use Jetty instead -->
<dependency>
    <groupId>org.springframework.boot</groupId>
    <artifactId>spring-boot-starter-jetty</artifactId>
</dependency>
Here is the full pom.xml. Notice the Spring Boot version is 3.0.6 and the Jakarta Servlet version is set to 5.0.0. This is because Jetty does not yet support Servlet 6.0.
<?xml version="1.0" encoding="UTF-8"?>
<project xmlns="http://maven.apache.org/POM/4.0.0" xmlns:xsi="http://www.w3.org/2001/XMLSchema-instance"
         xsi:schemaLocation="http://maven.apache.org/POM/4.0.0 https://maven.apache.org/xsd/maven-4.0.0.xsd">
    <modelVersion>4.0.0</modelVersion>
    <parent>
        <groupId>org.springframework.boot</groupId>
        <artifactId>spring-boot-starter-parent</artifactId>
        <version>3.0.6</version>
        <relativePath/> <!-- lookup parent from repository -->
    </parent>
    <groupId>com.demo</groupId>
    <artifactId>SpringBootJetty</artifactId>
    <version>0.0.1-SNAPSHOT</version>
    <name>SpringBootJetty</name>
    <description>Demo project for Spring Boot</description>
    <properties>
        <java.version>17</java.version>
        <!-- Required since Jetty 11 does not yet support Servlet 6.0 -->
        <jakarta-servlet.version>5.0.0</jakarta-servlet.version>
    </properties>

    <dependencies>
        <dependency>
            <groupId>org.springframework.boot</groupId>
            <artifactId>spring-boot-starter-web</artifactId>
            <exclusions>
                <!-- Exclude the Tomcat dependency -->
                <exclusion>
                    <groupId>org.springframework.boot</groupId>
                    <artifactId>spring-boot-starter-tomcat</artifactId>
                </exclusion>
            </exclusions>
        </dependency>
        <!-- Use Jetty instead -->
        <dependency>
            <groupId>org.springframework.boot</groupId>
            <artifactId>spring-boot-starter-jetty</artifactId>
        </dependency>
        <dependency>
            <groupId>org.springframework.boot</groupId>
            <artifactId>spring-boot-starter-test</artifactId>
            <scope>test</scope>
        </dependency>
    </dependencies>

    <build>
        <plugins>
            <plugin>
                <groupId>org.springframework.boot</groupId>
                <artifactId>spring-boot-maven-plugin</artifactId>
            </plugin>
        </plugins>
    </build>

</project>
In this case, you’re no longer using the @WebServlet annotation. Instead, you’re using the Spring MVC API. The web controller is contained in a class named WebController.
src/main/java/com/demo/WebController.java
package com.demo;

import org.springframework.stereotype.Controller;
import org.springframework.web.bind.annotation.*;

import jakarta.servlet.http.HttpServletResponse;
import java.util.ArrayList;
import java.util.Arrays;
import java.util.List;

@Controller
@RequestMapping(path = "/hikes")
public class WebController {

    private List<String> hikes = new ArrayList<>(Arrays.asList(
        "Wonderland Trail", "South Maroon Peak", "Tour du Mont Blanc",
        "Teton Crest Trail", "Everest Base Camp via Cho La Pass", "Kesugi Ridge"
    ));

    @GetMapping()
    @ResponseBody
    public String indexGet() {
        return String.join("\n", this.hikes);
    }

    @PostMapping()
    @ResponseBody
    public String indexPost(@RequestParam String hike, HttpServletResponse response) {
        if (hike == null) {
            response.setStatus(400);
            return "Param 'hike' cannot be null.";
        } else if (this.hikes.contains(hike)) {
            response.setStatus(400);
            return "The hike '" + hike + "' already exists.";
        } else {
            this.hikes.add(hike);
            return String.join("\n", this.hikes);
        }
    }

    @DeleteMapping()
    @ResponseBody
    public String indexDelete(@RequestParam String hike, HttpServletResponse response) {
        if (hike == null) {
            response.setStatus(400);
            return "Param 'hike' cannot be null.";
        } else {
            this.hikes.remove(hike);
            return String.join("\n", this.hikes);
        }
    }

}
To run the Spring Boot app, open a Bash shell and navigate to the spring-boot-jetty-maven-no-auth subdirectory.
Run the following.
./mvnw spring-boot:run
Wait for it to finish initializing.
...
2023-04-25T09:53:15.228-06:00  INFO 57678 --- [           main] o.s.b.web.embedded.jetty.JettyWebServer  : Jetty started on port(s) 8080 (http/1.1) with context path '/'
2023-04-25T09:53:15.231-06:00  INFO 57678 --- [           main] com.demo.SpringBootJettyApplication      : Started SpringBootJettyApplication in 0.683 seconds (process running for 0.831)
Test it with HTTPie.
http :8080/hikes
HTTP/1.1 200 OK
...

Wonderland Trail
South Maroon Peak
Tour du Mont Blanc
Teton Crest Trail
Everest Base Camp via Cho La Pass
Kesugi Ridge
This web service has the same features as the @WebServlet version: GET, POST, and DELETE, but no PUT.
Deploy the Spring Boot project
You now have a Spring Boot application that runs on an embedded Jetty container. To deploy it to a production server, build an executable jar file using ./mvnw package, copy this jar file (found in the target directory) to the server, and run it using java -jar <your jar file name>.jar. There’s no need for a separate web server since this jar contains an embedded Jetty web server.
For example, for this project. First, build the JAR.
./mvnw package -DskipTests
Now run the JAR.
java -jar target/SpringBootJetty-0.0.1-SNAPSHOT.jar
NOTE: For a more old-school deployment to an application server with multiple separate applications on the same server, you need to build a war file. The Spring docs on how to do this are a great resource. Essentially you need to do two things: 1) add the
warplugin to the project dependencies, and 2) change the Jetty or Tomcat dependency toprovidedRuntimeso it’s not included in the packaged war. Then you build a war file and deploy it to the servlet web app path on the server.
In the next section, you will use Spring Security and Okta to protect the POST and DELETE endpoints.
Use the Okta CLI to create an OIDC application
The first step to securing the app is configuring an OpenID Connect (OIDC) app on Okta. OpenID Connect is an identity authentication protocol built on top of OAuth 2.0, an authorization protocol. In short, OIDC is how the app verifies who the user is, and OAuth 2.0 is how the app verifies what the user is allowed to do. Spring Security provides the client-side implementation and, in this example, you’ll be using Okta as the cloud provider.
You need to run the following commands from the spring-boot-jetty-maven-okta subdirectory.
Before you begin, you’ll need a free Okta developer account. Install the Okta CLI and run okta register to sign up for a new account. If you already have an account, run okta login.
Then, run okta apps create. Select the default app name, or change it as you see fit.
Choose Web and press Enter.
Select Okta Spring Boot Starter.
Then, change the Redirect URI to https://oidcdebugger.com/debug,http://localhost:8080/login/oauth2/code/okta and use https://oidcdebugger.com/,http://localhost:8080/ for the Logout Redirect URI.
What does the Okta CLI do?
The Okta CLI will create an OIDC Web App in your Okta Org. It will add the redirect URIs you specified and grant access to the Everyone group. You will see output like the following when it’s finished:
Okta application configuration has been written to:
  /path/to/app/src/main/resources/application.properties
Open src/main/resources/application.properties to see the issuer and credentials for your app.
okta.oauth2.issuer=https://dev-133337.okta.com/oauth2/default
okta.oauth2.client-id=0oab8eb55Kb9jdMIr5d6
okta.oauth2.client-secret=NEVER-SHOW-SECRETS
NOTE: You can also use the Okta Admin Console to create your app. See Create a Spring Boot App for more information.
NOTE: You will use the oidcdebugger.com redirect URI to create an access token you can use from the command line with HTTPie. The second URI is the default redirect URI that Spring Security uses for Okta when using its OAuth login feature.
Configure the Spring Boot app for Okta
The project uses the Okta Spring Boot Starter to simplify configure Spring Security. Find the following block in the pom.xml file and uncomment it.
<dependency>
    <groupId>com.okta.spring</groupId>
    <artifactId>okta-spring-boot-starter</artifactId>
    <version>3.0.3</version>
</dependency>
Confirm that your issuer URI, client ID, and client secret were added to the src/main/resources/application.properties file.
okta.oauth2.issuer=https://{yourOktaDomain}/oauth2/default
okta.oauth2.clientId={clientId}
okta.oauth2.clientSecret={clientSecret}
The SpringBootJettyApplication class is where the security is configured. It looks like the following. It enables JWT-based OAuth and OIDC security. However, it explicitly allows any request. You are doing this because you are going to use method-level security.
package com.demo;

import org.springframework.boot.SpringApplication;
import org.springframework.boot.autoconfigure.SpringBootApplication;
import org.springframework.context.annotation.Bean;
import org.springframework.context.annotation.Configuration;
import org.springframework.security.config.annotation.web.builders.HttpSecurity;
import org.springframework.security.web.SecurityFilterChain;

@Configuration
@SpringBootApplication
public class SpringBootJettyApplication {

    public static void main(String[] args) {
        SpringApplication.run(SpringBootJettyApplication.class, args);
    }

    @Bean
    public SecurityFilterChain filterChain(HttpSecurity http) throws Exception {
        http.authorizeHttpRequests((authz) -> {
            authz.anyRequest().permitAll();
        });
        http.oauth2ResourceServer().jwt();

        return http.build();
    }

}
Protect the DELETE and POST endpoints
The @PreAuthorize("isAuthenticated") annotation has been added to the indexPost() and indexDelete() methods in the WebController class. This requires that each request to those endpoints be authenticated – that is, a valid user will need to be logged in. Because you are using Okta as your OIDC provider, they will be able to have authenticated with Okta’s servers, typically through a single sign-on.
Update the WebController to the following.
src/main/java/com/demo/WebController.java
package com.demo;

import org.springframework.security.access.prepost.PreAuthorize;
import org.springframework.stereotype.Controller;
import org.springframework.web.bind.annotation.*;

import jakarta.servlet.http.HttpServletResponse;

import java.util.ArrayList;
import java.util.Arrays;
import java.util.List;

@Controller
@RequestMapping(path = "/hikes")
public class WebController {

    private List<String> hikes = new ArrayList<>(Arrays.asList(
        "Wonderland Trail", "South Maroon Peak", "Tour du Mont Blanc",
        "Teton Crest Trail", "Everest Base Camp via Cho La Pass", "Kesugi Ridge"
    ));

    @GetMapping("")
    @ResponseBody
    public String indexGet() {
        return String.join("\n", this.hikes);
    }

    @PostMapping("")
    @ResponseBody
    @PreAuthorize("isAuthenticated")  // <- ***ADDED***
    public String indexPost(@RequestParam String hike, HttpServletResponse response) {
        if (hike == null) {
            response.setStatus(400);
            return "Param 'hike' cannot be null.";
        } else if (this.hikes.contains(hike)) {
            response.setStatus(400);
            return "The hike '" + hike + "' already exists.";
        } else {
            this.hikes.add(hike);
            return String.join("\n", this.hikes);
        }
    }

    @DeleteMapping("")
    @ResponseBody
    @PreAuthorize("isAuthenticated")  // <- ***ADDED***
    public String indexDelete(@RequestParam String hike, HttpServletResponse response) {
        if (hike == null) {
            response.setStatus(400);
            return "Param 'hike' cannot be null.";
        } else {
            this.hikes.remove(hike);
            return String.join("\n", this.hikes);
        }
    }

}
From the spring-boot-jetty-maven-okta subdirectory, open a shell and start the app.
./mvnw spring-boot:run
From a different shell, try to POST a new hike:
http -f POST :8080/hikes hike="Pear Lake"
HTTP/1.1 403 Forbidden
...

{
    "error": "Forbidden",
    "path": "/hikes",
    "status": 403,
    "timestamp": "2023-04-25T16:17:37.214+00:00"
}
Generate a JWT using the OIDC Debugger
To access the protected endpoints, you need to generate an access token JWT. An easy way to get an access token is to generate one using OpenID Connect Debugger. Open the site in a new window or tab. Fill in your client ID, and use https://{yourOktaDomain}/oauth2/default/v1/authorize for the Authorize URI. Select code for the response type and Use PKCE.
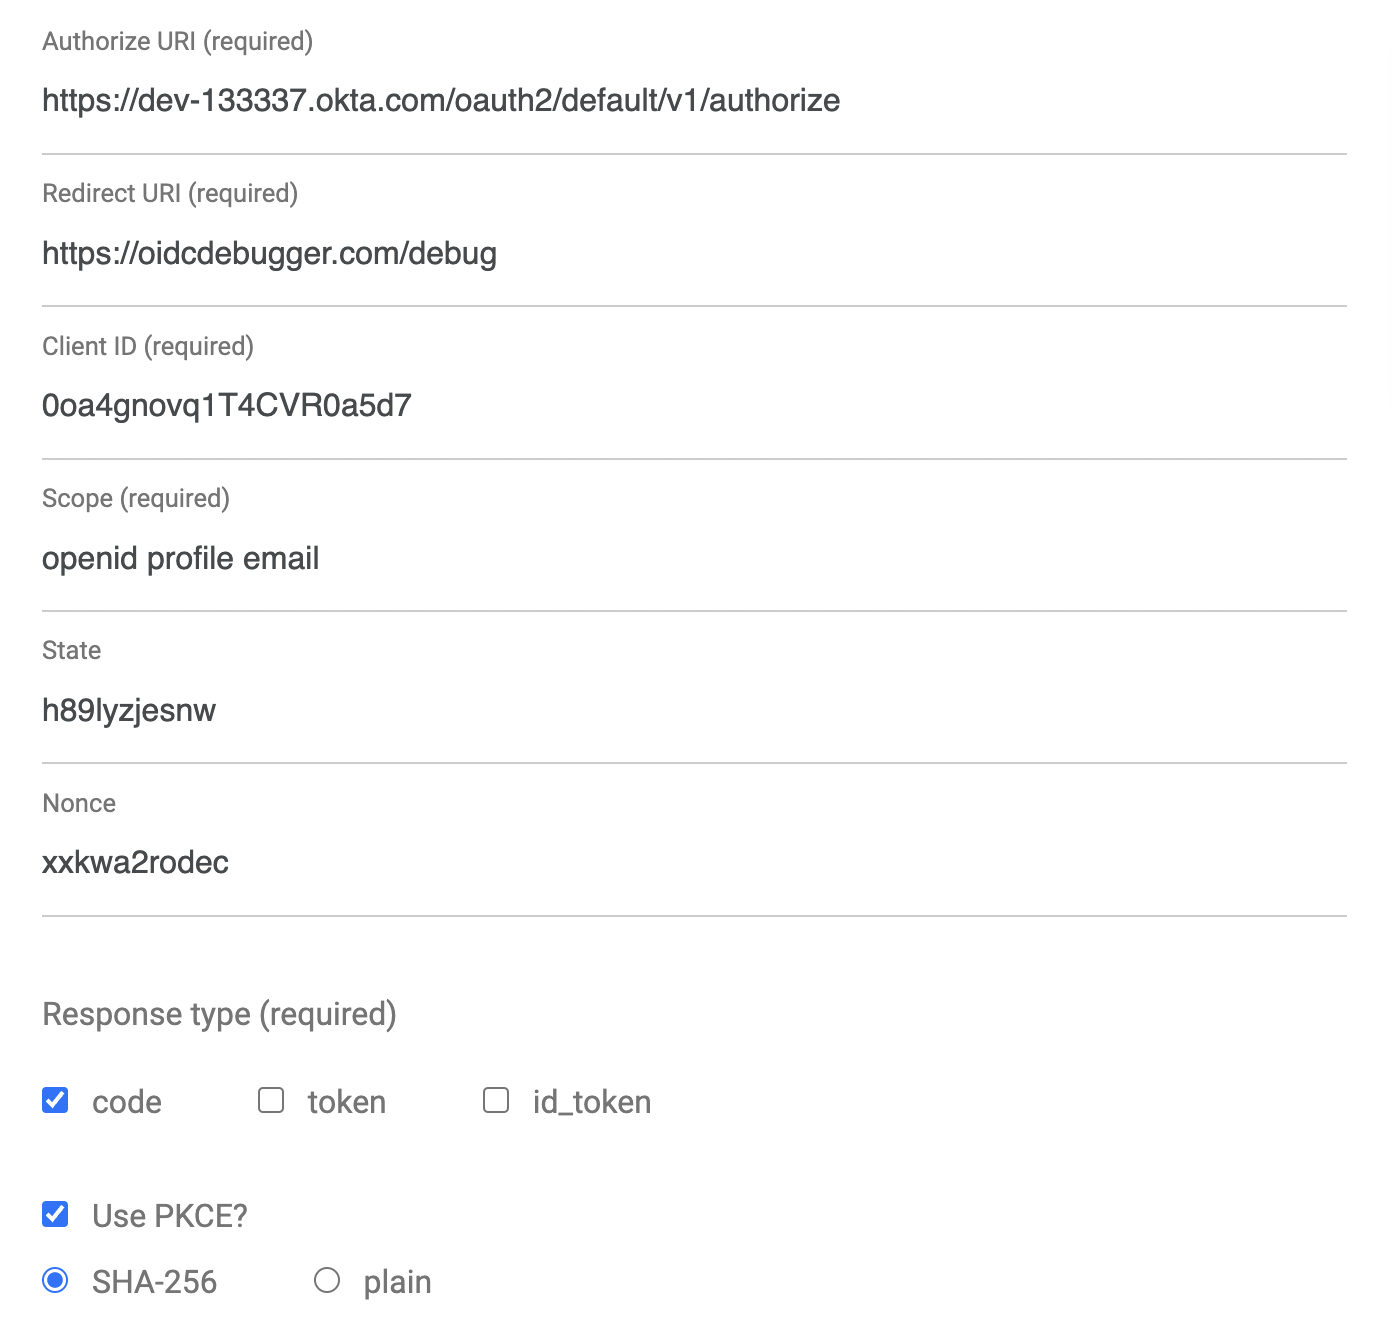
Scroll down and click Send Request.

Copy the access token to your clipboard and store it in a shell variable in the shell window you use to make requests.
TOKEN=eyJraWQiOiJIb05xb01mNE9jREltWnBGRnBINjZGTkFOM0J...
Now try and POST a new hike and then remove it.
http -f POST :8080/hikes hike="Pear Lake" "Authorization: Bearer $TOKEN"
HTTP/1.1 200 OK
...

Wonderland Trail
South Maroon Peak
Tour du Mont Blanc
Teton Crest Trail
Everest Base Camp via Cho La Pass
Kesugi Ridge
Pear Lake
http DELETE :8080/hikes hike=="South Maroon Peak" "Authorization: Bearer $TOKEN"
HTTP/1.1 200 OK
...

Wonderland Trail
Tour du Mont Blanc
Teton Crest Trail
Everest Base Camp via Cho La Pass
Kesugi Ridge
Pear Lake
Secure the Spring Boot app with Auth0
You can also use Auth0 to secure the Spring Boot application. Look at the project in the spring-boot-jetty-maven-auth0 subdirectory. Similar to the Okta project, this project uses the Okta Spring Boot Starter to simplify configuring Spring Security. Find the following block in the pom.xml file and uncomment it.
<dependency>
    <groupId>com.okta.spring</groupId>
    <artifactId>okta-spring-boot-starter</artifactId>
    <version>3.0.3</version>
</dependency>
Support for Auth0 was added in version 3.0.3 of the Okta Spring Boot starter.
If you look in the src/main/resources/application.properties file, you’ll see that there are two properties: the issuer URI and the audience.
okta.oauth2.issuer=https://<your-auth0-domain>/
okta.oauth2.audience=https://<your-auth0-domain>/api/v2/
Install the Auth0 CLI and run auth0 login in a terminal.
You need to find your Auth0 domain. One way to do this is to use the following command.
auth0 tenants list
=== dev-0rb77jrp.us.auth0.com

  AVAILABLE TENANTS
  dev-0rb77jrp.us.auth0.com
Take the above domain and replace the placeholder in the okta.oauth2.issuer property in the src/main/resources/application.properties file. Don’t remove the trailing slash!
okta.oauth2.issuer=https://dev-0rb77jrp.us.auth0.com/
okta.oauth2.audience=https://dev-0rb77jrp.us.auth0.com/api/v2/
The app is configured, and you can go ahead and run it.
./mvnw spring-boot:run
To test the app, you need to open a new Bash shell in the same project subdirectory.
Just like with Okta, you can list the hikes without a JWT.
http :8080/hikes
...
Wonderland Trail
South Maroon Peak
Tour du Mont Blanc
Teton Crest Trail
Everest Base Camp via Cho La Pass
Kesugi Ridge
However, if you try and add or delete a hike, you’ll need a token.
Use the Auth0 CLI to create a valid access token for testing.
auth0 test token -a https://<your-auth0-domain>/api/v2/
Select the Default App [Generic] to continue.
Save the token in a shell variable.
TOKEN=eyJhbGciOiJSUzI1NiIsInR5cCI6IkpXVCIsImtpZ...
Add a new hike using the token.
http -f POST :8080/hikes hike="Pear Lake" "Authorization: Bearer $TOKEN"
HTTP/1.1 200 OK
...
Wonderland Trail
South Maroon Peak
Tour du Mont Blanc
Teton Crest Trail
Everest Base Camp via Cho La Pass
Kesugi Ridge
Pear Lake
That’s it. Auth0 security is working!
Learn more about Java, Spring Boot, and Spring Security
In this tutorial, you saw how to make a simple Java servlet service and run it with Jetty. You also saw how to recreate the same service in Spring Boot, configure it to use Jetty, and simplify your Java code. Finally, you saw how to use a free developer account from Okta to add OAuth/OIDC security to your Spring Boot app. And you also saw how to secure the app with Auth0.
You can find the code for this tutorial on GitHub at oktadev/okta-spring-boot-jetty-example.
Here are some related blog posts:
- Secure Secrets With Spring Cloud Config and Vault
- Build a Simple CRUD App with Spring Boot and Vue.js
- Get Started with Spring Boot and SAML
- Use React and Spring Boot to Build a Simple CRUD App
If you have any questions about this post, please add a comment below. For more awesome content, follow @oktadev on Twitter, follow us on LinkedIn, or subscribe to our YouTube channel.
Okta Developer Blog Comment Policy
We welcome relevant and respectful comments. Off-topic comments may be removed.