Use Thymeleaf Templates with Spring WebFlux to Secure Your Apps

The Thymeleaf library has been around at least for 10 years and it is still actively maintained as of today. It is designed to allow stronger collaboration between design and developer teams for some use cases, as Thymeleaf templates look like HTML and can be displayed in the browser as static prototypes.
In this tutorial you will learn how to create a simple Spring WebFlux application with Thymeleaf and Okta OIDC authentication, addressing the security concerns of preventing CSRF when submitting forms, and protecting functionality based on the user authorities and authentication status.
This tutorial was created with the following frameworks and tools:
Table of Contents
- What is Thymeleaf?
- Create a Spring WebFlux application with Thymeleaf
- Prevent CSRF when submitting forms
- Learn more about Spring Boot and Spring Security
Note: In May 2025, the Okta Integrator Free Plan replaced Okta Developer Edition Accounts, and the Okta CLI was deprecated.
We preserved this post for reference, but the instructions no longer work exactly as written. Replace the Okta CLI commands by manually configuring Okta following the instructions in our Developer Documentation.
What is Thymeleaf?
![]()
Thymeleaf is an open-source server-side Java template engine for standalone and web applications, that was created by Daniel Fernández. The templates look like HTML and can be integrated with Spring MVC and Spring Security among other popular development frameworks. Although documentation about integration with Spring WebFlux is hard to find, it is currently supported and the Thymeleaf starter dependency performs the auto-configuration of the template engine, template resolver and reactive view resolver.
Among its features, Thymeleaf allows you to:
- Work with fragments: only a part of a template will be rendered. This can be useful for updating part of a page from responses in AJAX calls. It also provides a componentization tool, as the fragments can be included in multiple templates.
- Handle forms with model objects containing their fields
- Render variables and externalized text messages through its Standard Expression Syntax
- Perform iterations and conditional evaluations
Create a Spring WebFlux application with Thymeleaf
Create a simple monolithic Spring Boot reactive application, that will use Thymeleaf for page templates. You can use Spring Initializr, from its web UI, or download the starter app with the following HTTPie command:
https -d start.spring.io/starter.zip bootVersion==2.6.4 \
  baseDir==thymeleaf-security \
  groupId==com.okta.developer.thymeleaf-security \
  artifactId==thymeleaf-security \
  name==thymeleaf-security \
  packageName==com.okta.developer.demo \
  javaVersion==11 \
  dependencies==webflux,okta,thymeleaf,devtools
Extract the Maven project and some additional dependencies. The thymeleaf-extras-springsecurity5 dependency is required to include security conditionals in the templates, and
spring-security-test has mock login features that will help when writing controller tests.
<dependency>
    <groupId>org.thymeleaf.extras</groupId>
    <artifactId>thymeleaf-extras-springsecurity5</artifactId>
    <version>3.0.4.RELEASE</version>
</dependency>
<dependency>
    <groupId>org.springframework.security</groupId>
    <artifactId>spring-security-test</artifactId>
    <scope>test</scope>
</dependency>
Add authentication with OpenID Connect
Before you begin, you’ll need a free Okta developer account. Install the Okta CLI and run okta register to sign up for a new account. If you already have an account, run okta login.
Then, run okta apps create. Select the default app name, or change it as you see fit.
Choose Web and press Enter.
Select Okta Spring Boot Starter.
Accept the default Redirect URI values provided for you. That is, a Login Redirect of http://localhost:8080/login/oauth2/code/okta and a Logout Redirect of http://localhost:8080.
What does the Okta CLI do?
The Okta CLI will create an OIDC Web App in your Okta Org. It will add the redirect URIs you specified and grant access to the Everyone group. You will see output like the following when it’s finished:
Okta application configuration has been written to:
  /path/to/app/src/main/resources/application.properties
Open src/main/resources/application.properties to see the issuer and credentials for your app.
okta.oauth2.issuer=https://dev-133337.okta.com/oauth2/default
okta.oauth2.client-id=0oab8eb55Kb9jdMIr5d6
okta.oauth2.client-secret=NEVER-SHOW-SECRETS
NOTE: You can also use the Okta Admin Console to create your app. See Create a Spring Boot App for more information.
The Okta configuration is now in application.properties. Rename it to application.yml and add the following additional properties:
spring:
  thymeleaf:
    prefix: file:src/main/resources/templates/
  security:
    oauth2:
      client:
        provider:
          okta:
            user-name-attribute: email

okta:
  oauth2:
    issuer: https://{yourOktaDomain}/oauth2/default
    client-id: {clientId}
    client-secret: {clientSecret}
    scopes:
      - email
      - openid
Notice the profile scope is not requested for the first test. Only openid is a required scope to perform an OpenID Connect request. The thymeleaf.prefix property enables the hot-reloading of the templates, when the spring-boot-devtools dependency is included in the project.
Add some Thymeleaf templates
Create a src/main/resources/templates folder for the templates you are going to create. Create a home.html template with the following content:
<html xmlns:th="http://www.thymeleaf.org">
<head>
<title>User Details</title>
<!--/*/ <th:block th:include="head :: head"/> /*/-->
</head>
<body id="samples">
<div th:replace="menu :: menu"></div>
<div id="content" class="container">
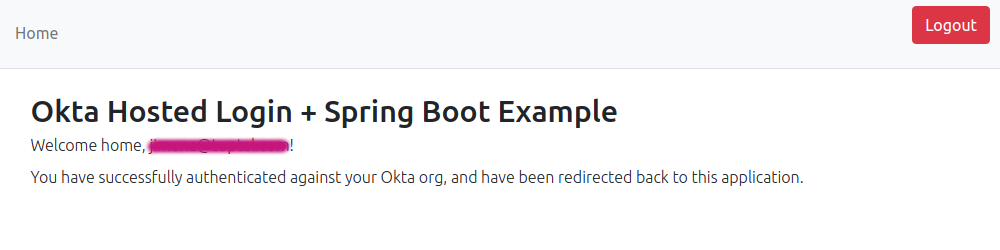
<h2>Okta Hosted Login + Spring Boot Example</h2>
<div th:unless="${#authorization.expression('isAuthenticated()')}" class="text fw-light fs-6 lh-1">
<p>Hello!</p>
<p>If you're viewing this page then you have successfully configured and started this example server.</p>
<p>This example shows you how to use the <a href="https://github.com/okta/okta-spring-boot">Okta Spring Boot
Starter</a> to add the <a
href="https://developer.okta.com/docs/guides/implement-grant-type/authcode/main/">Authorization
Code Flow</a> to your application.</p>
<p>When you click the login button below, you will be redirected to the login page on your Okta org. After you
authenticate, you will be returned to this application.</p>
</div>
<div th:if="${#authorization.expression('isAuthenticated()')}" class="text fw-light fs-6 lh-1">
<p>Welcome home, <span th:text="${#authentication.principal.name}">Joe Coder</span>!</p>
<p>You have successfully authenticated against your Okta org, and have been redirected back to this
application.</p>
</div>
<form th:unless="${#authorization.expression('isAuthenticated()')}" method="get"
th:action="@{/oauth2/authorization/okta}">
<button id="login-button" class="btn btn-primary" type="submit">Sign In</button>
</form>
</div>
</body>
<!--/*/ <th:block th:include="footer :: footer"/> /*/-->
</html>
In the template above, the commented out <th:block/> allows to include a header and footer fragments defined in header.html and footer.html. They contain the Bootstrap dependencies for the templates styling. There is also a menu fragment that will replace the <div th:replace ...> element.
The th:if and th:unless conditionals are used to evaluate the authentication status. If the visitor is not authenticated, the Sign In button will be displayed. Otherwise, a greeting by username will be displayed.
Add a head.html template:
<html xmlns:th="http://www.thymeleaf.org">
<head th:fragment="head">
    <meta charset="utf-8"/>
    <meta http-equiv="X-UA-Compatible" content="IE=edge"/>
    <meta name="viewport" content="width=device-width, initial-scale=1"/>
    <link href="https://cdn.jsdelivr.net/npm/bootstrap@5.1.3/dist/css/bootstrap.min.css" rel="stylesheet"
          integrity="sha384-1BmE4kWBq78iYhFldvKuhfTAU6auU8tT94WrHftjDbrCEXSU1oBoqyl2QvZ6jIW3" crossorigin="anonymous">
    <link rel="stylesheet" href="https://cdn.jsdelivr.net/npm/bootstrap-icons@1.8.1/font/bootstrap-icons.css">
</head>
<body>
<p>Nothing to see here, move along.</p>
</body>
</html>
Create a footer.html template:
<html xmlns:th="http://www.thymeleaf.org">
<head>
</head>
<body>
<p>Nothing to see here, move along.</p>
</body>
<footer th:fragment="footer">
    <script src="https://cdn.jsdelivr.net/npm/bootstrap@5.1.3/dist/js/bootstrap.bundle.min.js"
            integrity="sha384-ka7Sk0Gln4gmtz2MlQnikT1wXgYsOg+OMhuP+IlRH9sENBO0LRn5q+8nbTov4+1p"
            crossorigin="anonymous"></script>
</footer>
</html>
Then, add a menu.html template for the menu fragment:
<html xmlns:th="http://www.thymeleaf.org">

<body id="samples">
<nav class="navbar border mb-4 navbar-expand-lg navbar-light bg-light" th:fragment="menu">
    <div class="container-fluid">
        <button class="navbar-toggler" type="button" data-bs-toggle="collapse"
                data-bs-target="#navbarSupportedContent" aria-controls="navbarSupportedContent"
                aria-expanded="false" aria-label="Toggle navigation">
            <span class="navbar-toggler-icon"></span>
        </button>
        <div class="collapse navbar-collapse" id="navbarSupportedContent">
            <ul class="navbar-nav me-auto mb-2 mb-lg-0">
                <li class="nav-item"><a class="nav-link" th:href="@{/}">Home</a></li>
            </ul>
            <form class="d-flex" method="post" th:action="@{/logout}"
                  th:if="${#authorization.expression('isAuthenticated()')}">
                <input class="form-control me-2" type="hidden" th:name="${_csrf.parameterName}"
                       th:value="${_csrf.token}"/>
                <button id="logout-button" type="submit" class="btn btn-danger">Logout</button>
            </form>
        </div>
    </div>
</nav>
</body>
</html>
Create the first controller class
A Controller is required to access the home page. Add a HomeController class under src/main/java in the com.okta.developer.demo package, with the following content:
package com.okta.developer.demo;

import org.slf4j.Logger;
import org.slf4j.LoggerFactory;
import org.springframework.security.core.Authentication;
import org.springframework.stereotype.Controller;
import org.springframework.web.bind.annotation.GetMapping;
import org.springframework.web.reactive.result.view.Rendering;
import reactor.core.publisher.Mono;

import java.util.List;
import java.util.stream.Collectors;

@Controller
public class HomeController {

    private static Logger logger = LoggerFactory.getLogger(HomeController.class);

    @GetMapping("/")
    public Mono<Rendering> home(Authentication authentication) {
        List<String> authorities = authentication.getAuthorities()
                .stream()
                .map(scope -> scope.toString())
                .collect(Collectors.toList());
        return Mono.just(Rendering.view("home").modelAttribute("authorities", authorities).build());
    }
}
The controller will render the home view and will set the authorities as a model attribute, for security checks that will be added soon.
Tweak the security configuration
The default Okta starter auto-configuration will request authentication to access any page, so to customize the security, add a SecurityConfiguration class in the same package as before.
package com.okta.developer.demo;

import org.springframework.context.annotation.Bean;
import org.springframework.security.config.annotation.method.configuration.EnableReactiveMethodSecurity;
import org.springframework.security.config.annotation.web.reactive.EnableWebFluxSecurity;
import org.springframework.security.config.web.server.ServerHttpSecurity;
import org.springframework.security.web.server.SecurityWebFilterChain;
import org.springframework.security.web.server.authentication.logout.RedirectServerLogoutSuccessHandler;
import org.springframework.security.web.server.authentication.logout.ServerLogoutSuccessHandler;

import java.net.URI;

@EnableWebFluxSecurity
@EnableReactiveMethodSecurity
public class SecurityConfiguration {

    @Bean
    public ServerLogoutSuccessHandler logoutSuccessHandler(){
        RedirectServerLogoutSuccessHandler handler = new RedirectServerLogoutSuccessHandler();
        handler.setLogoutSuccessUrl(URI.create("/"));
        return handler;
    }

    @Bean
    public SecurityWebFilterChain securityWebFilterChain(ServerHttpSecurity http) {
        http
            .authorizeExchange().pathMatchers("/").permitAll().and().anonymous()
            .and().authorizeExchange().anyExchange().authenticated()
            .and().oauth2Client()
            .and().oauth2Login()
            .and().logout().logoutSuccessHandler(logoutSuccessHandler());

        return http.build();
    }
}
In the configuration above, access to the home / page is allowed to all with anonymous authentication, which is required for the authentication expression in the Thymeleaf home.html template to work. An authentication object must be in the security context.
Run the application
Run the application with Maven:
./mvnw spring-boot:run
Go to http://localhost:8080 and you should see the home page and a Sign In button. Click the button and sign in with your Okta credentials. After signing in, you should be redirected back to the home page and see the content for authenticated users.
Protect content areas with authorization
Let’s add a userProfile.html template that will display the claims contained in the ID token returned from Okta, as well as the authorities that Spring Security derives from the token.
<html xmlns:th="http://www.thymeleaf.org">
<head>
    <title>User Details</title>
    <!--/*/ <th:block th:include="head :: head"/> /*/-->
</head>
<body id="samples">
<div th:replace="menu :: menu"></div>

<div id="content" class="container">

    <div>
        <h2>My Profile</h2>
        <p>Hello, <span th:text="${#authentication.principal.attributes['name']}">Joe Coder</span>. Below is the
            information that was read with your <a
            href="https://developer.okta.com/docs/api/resources/oidc.html#get-user-information">ID Token</a>.
        </p>
        <p>This route is protected with the annotation <code>@PreAuthorize("hasAuthority('SCOPE_profile')")</code>,
            which will ensure that this page cannot be accessed until you have authenticated, and have the scope <code>profile</code>.</p>
    </div>
    <table class="table table-striped">
        <thead>
        <tr>
            <th>Claim</th>
            <th>Value</th>
        </tr>
        </thead>
        <tbody>
        <tr th:each="item : ${details}">
              <td th:text="${item.key}">Key</td>
              <td th:id="${'claim-' + item.key}" th:text="${item.value}">Value</td>
          </tr>
        </tbody>
    </table>

    <table class="table table-striped">
        <thead>
        <tr>
            <th>Spring Security Authorities</th>
        </tr>
        </thead>
        <tbody>
        <tr th:each="scope : ${#authentication.authorities}">
              <td><code th:text="${scope}">Authority</code></td>
        </tr>
        </tbody>
    </table>

</div>
</body>
<!--/*/ <th:block th:include="footer :: footer"/> /*/-->
</html>
Add the route mapping in the HomeController:
@GetMapping("/profile")
@PreAuthorize("hasAuthority('SCOPE_profile')")
public Mono<Rendering> userDetails(OAuth2AuthenticationToken authentication) {
    return Mono.just(Rendering.view("userProfile")
        .modelAttribute("details", authentication.getPrincipal().getAttributes())
        .build());
}
The @PreAuthorize annotation allows you to define an authorization predicate that can be written in SpEL (Spring Expression Language). It will be checked before the method execution. Only users with the authority SCOPE_PROFILE can request a display of the userProfile page. This is server-side protection.
For the client-side, add a link in the home.html template to access the userProfile page, below the “You successfully …” paragraph. The link will also only display for users that have the SCOPE_profile authority.
<p>You have successfully authenticated against your Okta org, and have been redirected back to this application.</p>
<p th:if="${#lists.contains(authorities, 'SCOPE_profile')}">Visit the <a th:href="@{/profile}">My Profile</a> page in this application to view the information retrieved with your OAuth Access Token.</p>
IMPORTANT NOTE: The authorization conditional is implemented in this way, because authorization-oriented expressions like ${#authorization.expression('hasRole(''SCOPE_profile'')')} are restricted in WebFlux applications due to a lack of support in the reactive side of Spring Security (as of Spring Security 5.6). Only a minimal set of security expressions is allowed: [isAuthenticated(), isFullyAuthenticated(), isAnonymous(), isRememberMe()].
Run the application again. After signing in, you still won’t see the new link, and if you go to http://localhost:8080/profile, you will get HTTP ERROR 403, which means forbidden. This is because in application.yml, as part of the Okta configuration, only email and openid scopes are requested, and profile scope is not returned in the access token claims. Add the missing scope in the application.yml, restart, and the userProfile view should now be visible:
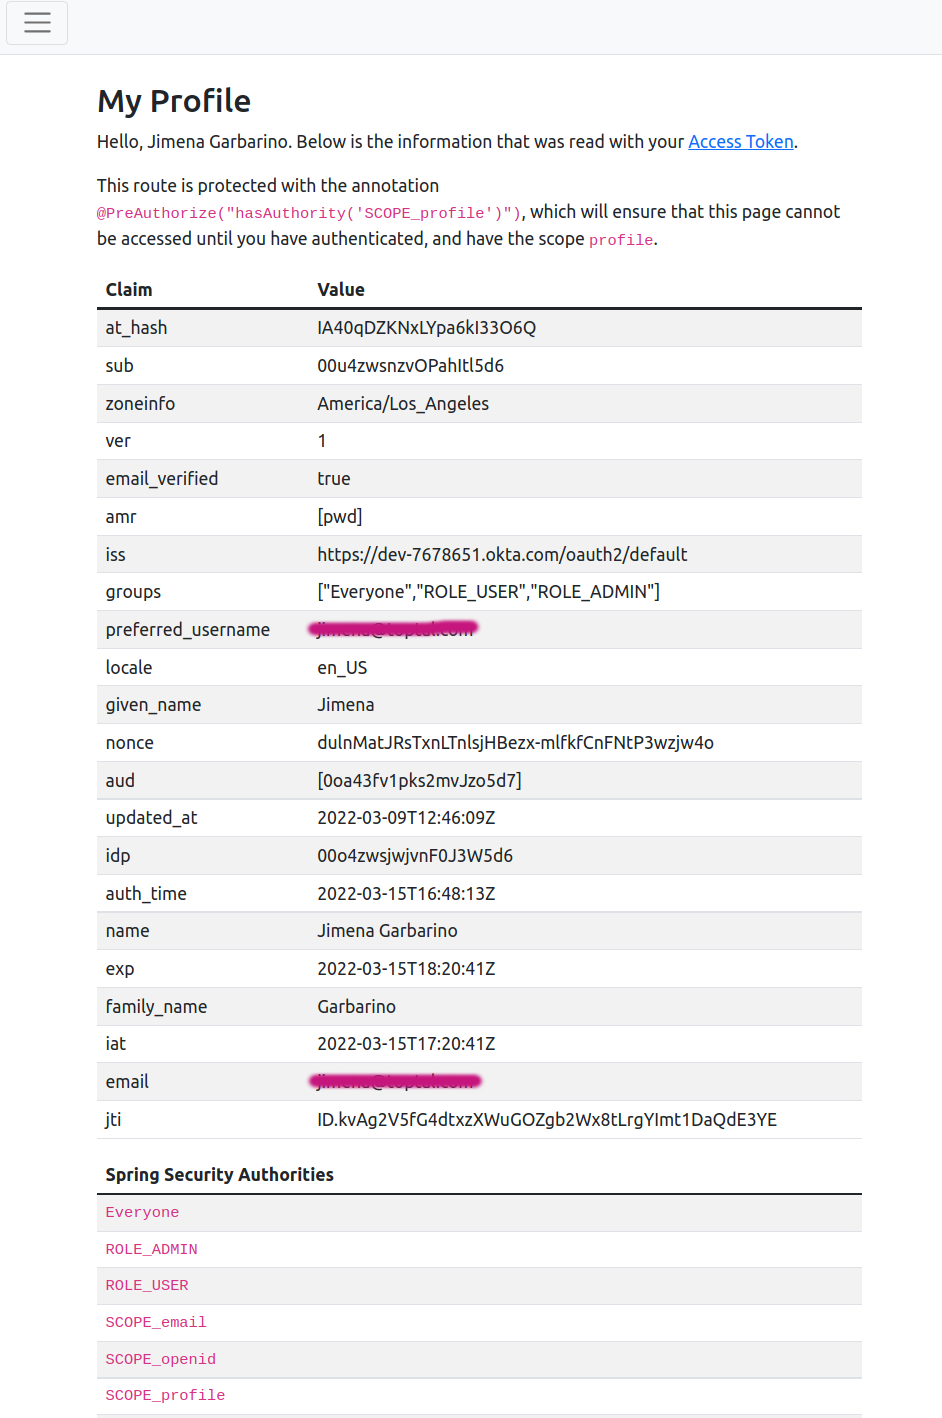
As you can see, Spring Security assigns the groups contained in the claim as well as the requested scopes as authorities. Scopes are prefixed with SCOPE_. ROLE_ADMIN, and ROLE_USER groups are created by default when you create a client application with Okta CLI, and your user is assigned to them.
Prevent CSRF when submitting forms
CSRF stands for Cross-Site Request Forgery, and is a form of cyber-attack through the submission of a form from a malicious site to a known site, exploiting the browser behavior by which the malicious request is sent along with the known site cookies, passing as an authenticated request.
Spring Security CSRF protection is enabled by default for both Servlet and WebFlux applications. The predominant protection mechanism is the Synchronizer Token Pattern, which ensures each HTTP request must contain a secure random generated value, the CSRF token. The token must be required in a part of the request that is not populated automatically by the browser. For example, you can use an HTTP parameter or header.
Let’s verify the CSRF protection is active by creating a quiz form to the application. Create the template quiz.html with the following content:
<html xmlns:th="http://www.thymeleaf.org">
<head>
    <title>Thymeleaf Quiz</title>
    <!--/*/ <th:block th:include="head :: head"/> /*/-->
</head>
<body id="samples">
<div th:replace="menu :: menu"></div>

<div id="content" class="container">
    <div>
        <h2>Select the right answer</h2>
    </div>
    <form action="#" th:action="@{/quiz}" th:object="${quiz}"
          method="post" class="col-md-4 fw-light">
        <ul>
            <li th:errors="*{answer}" />
        </ul>
        <div class="col-md-12">
            <h3>What is Thymeleaf?</h3>
        </div>
        <div class="col-md-12 form-check">
            <input class="form-check-input" type="radio" th:field="*{answer}" value="A" id="check-1-1"/>
            <label class="form-check-label" for="check-1-1">
                <strong>A.</strong> A server-side Java template engine
            </label>
        </div>
        <div class="col-md-12 form-check">
            <input class="form-check-input" type="radio" th:field="*{answer}" value="B" id="check-1-2"/>
            <label class="form-check-label" for="check-1-2">
                <strong>B.</strong> A markup language
            </label>
        </div>
        <div class="col-md-12 form-check">
            <input class="form-check-input" type="radio" th:field="*{answer}" value="C" id="check-1-3"/>
            <label class="form-check-label" for="check-1-3">
                <strong>C.</strong> A web framework
            </label>
        </div>
        <div class="col-md-12 mt-4 mb-4">
            <p>Your CSRF token is: <span th:text="${_csrf.token}"/></p>
        </div>
        <div class="col-md-12">
            <button type="submit" class="btn btn-primary">Submit</button>
        </div>
    </form>
</div>
</body>
<!--/*/ <th:block th:include="footer :: footer"/> /*/-->
</html>
The CSRF token is available as a request attribute and will be displayed in the quiz.html template for learning purposes.
Add a template for the quiz result with the name result.html:
<html xmlns:th="http://www.thymeleaf.org">
<head>
    <title>Thymeleaf Quiz Submission</title>
    <!--/*/ <th:block th:include="head :: head"/> /*/-->
</head>
<body id="samples">
<div th:replace="menu :: menu"></div>
<div class="container" id="content">
    <div class="text-center">
        <i class="bi-balloon-heart-fill" style="font-size: 6rem; color: green;" th:if=${quiz.answer=='A'}></i>
        <i class="bi-x-circle-fill" style="font-size: 6rem; color: red;" th:unless=${quiz.answer=='A'}></i>
        <div class="panel mt-4 text-center">
            <div class="panel-body">
                <h4>Your selected answer is <strong>
                    <span th:text="${quiz.answer}"></span>
                </strong></h4>
                <p th:if=${quiz.answer=='A'}>Good Job!</p>
            </div>
        </div>
        <div class="panel mt-4 text-center" th:unless=${quiz.answer=='A'}>
            <div class="panel-body">
                <p>It is not the right answer</p>
                <p><a th:href="@{/quiz}">Try again!</a></p>
            </div>
        </div>
    </div>
</div>
</body>
<!--/*/ <th:block th:include="footer :: footer"/> /*/-->
</html>
Add a QuizSubmission data class, for holding the quiz answer:
package com.okta.developer.demo;

public class QuizSubmission {

    private String answer;

    public String getAnswer() {
        return answer;
    }

    public void setAnswer(String answer) {
        this.answer = answer;
    }
}
Add a QuizController for displaying the quiz and processing the form submission:
package com.okta.developer.demo;

import org.slf4j.Logger;
import org.slf4j.LoggerFactory;
import org.springframework.http.MediaType;
import org.springframework.security.access.prepost.PreAuthorize;
import org.springframework.stereotype.Controller;
import org.springframework.web.bind.annotation.GetMapping;
import org.springframework.web.bind.annotation.PostMapping;
import org.springframework.web.reactive.result.view.Rendering;
import reactor.core.publisher.Mono;

@Controller
public class QuizController {

    private static Logger logger = LoggerFactory.getLogger(QuizController.class);

    @GetMapping("/quiz")
    @PreAuthorize("hasAuthority('SCOPE_quiz')")
    public Mono<Rendering> showQuiz() {
        return Mono.just(Rendering.view("quiz").modelAttribute("quiz", new QuizSubmission()).build());
    }

    @PostMapping(path = "/quiz", consumes = {MediaType.APPLICATION_FORM_URLENCODED_VALUE})
    @PreAuthorize("hasAuthority('SCOPE_quiz')")
    public Mono<Rendering> saveQuiz(QuizSubmission quizSubmission) {
        return Mono.just(Rendering.view("result").modelAttribute("quiz", quizSubmission).build());
    }
}
In the new controller and templates, the quiz is authorized for users that have SCOPE_quiz authority. Add a protected link to the home.html template, below the profile link:
<p>You have successfully authenticated against your Okta org, and have been redirected back to this application.</p>
<p th:if="${#lists.contains(authorities, 'SCOPE_profile')}">Visit the <a th:href="@{/profile}">My Profile</a> page in this application to view the information retrieved with your OAuth Access Token.</p>
<p th:if="${#lists.contains(authorities, 'SCOPE_quiz')}">Visit the <a th:href="@{/quiz}">Thymeleaf Quiz</a> to test Cross-Site Request Forgery (CSRF) protection.</p>
Before running the application again, let’s verify CSRF protection with a controller test. Add QuizControllerTest to src/test/java under the package com.okta.developer.demo:
package com.okta.developer.demo;

import org.junit.jupiter.api.Test;
import org.springframework.beans.factory.annotation.Autowired;
import org.springframework.boot.test.autoconfigure.web.reactive.WebFluxTest;
import org.springframework.http.MediaType;
import org.springframework.test.web.reactive.server.WebTestClient;

import static org.springframework.security.test.web.reactive.server.SecurityMockServerConfigurers.csrf;
import static org.springframework.security.test.web.reactive.server.SecurityMockServerConfigurers.mockOidcLogin;

@WebFluxTest
public class QuizControllerTest {

    @Autowired
    private WebTestClient client;

    @Test
    void testPostQuiz_noCSRFToken() throws Exception {
        QuizSubmission quizSubmission = new QuizSubmission();
        this.client.mutateWith(mockOidcLogin())
                .post().uri("/quiz")
                .exchange()
                .expectStatus().isForbidden()
                .expectBody().returnResult()
                .toString().contains("An expected CSRF token cannot be found");
    }

    @Test
    void testPostQuiz() throws Exception {
        this.client.mutateWith(csrf()).mutateWith(mockOidcLogin())
                .post().uri("/quiz")
                .contentType(MediaType.APPLICATION_FORM_URLENCODED)
                .exchange().expectStatus().isOk();
    }

    @Test
    void testGetQuiz_noAuth() throws Exception {
        this.client.get().uri("/quiz").exchange().expectStatus().is3xxRedirection();
    }

    @Test
    void testGetQuiz() throws Exception {
        this.client.mutateWith(mockOidcLogin())
                .get().uri("/quiz").exchange().expectStatus().isOk();
    }
}
In the test class above, the first test testPostQuiz_noCSRFToken() verifies the quiz cannot be submitted without the CSRF token, even if the user did sign in. In the second test testPostQuiz(), the CSRF token is added to the mock request with mutateWith(csrf()), so the expected response status is HTTP 200 OK. The third test testGetQuiz_noAuth() verifies a request of the quiz will be redirected (to the Okta sign-in form) if the user is not authenticated. And the last test testGetQuiz() verifies the quiz can be accessed if the user has been authenticated with an OIDC login.
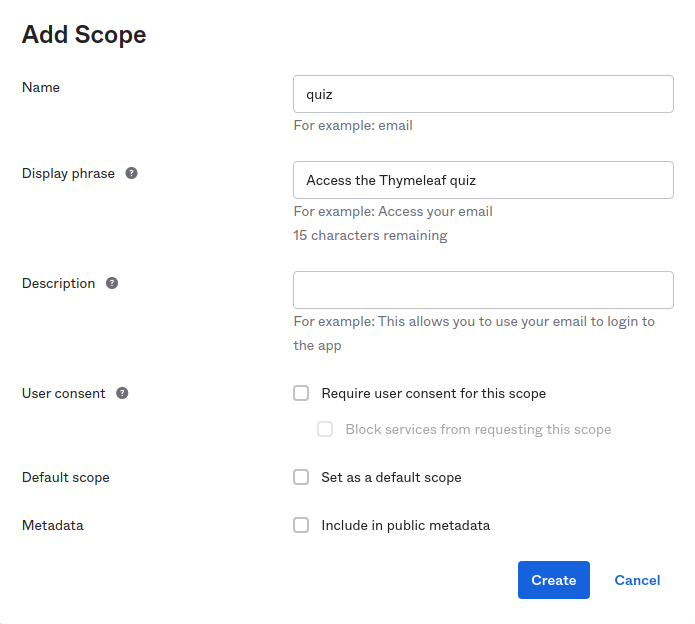
As quiz is not a standard scope or a scope defined in Okta, you have to define it for the default authorization server before running the application. Sign in to the Okta Admin Console, and in the left menu, go to Security > API, the choose the default authorization server. In the Scopes tab, click Add Scope. Set the scope name as quiz and add a description, leave all the remaining fields with default values and click on Create. Now the quiz scope can be required during the OIDC login.
Run the application without adding the quiz scope to the application.yml file, sign in, and you should not see the quiz link yet. If you make a GET request with the browser to http://localhost:8080/quiz, the response will be 403 Forbidden.
Now add quiz to the list of scopes in the Okta configuration in application.yml. The final configuration should look like this:
spring:
  security:
    oauth2:
      client:
        provider:
          okta:
            user-name-attribute: email

okta:
  oauth2:
    issuer: https://{yourOktaDomain}/oauth2/default
    client-id: {clientId}
    client-secret: {clientSecret}
    scopes:
      - email
      - openid
      - profile
      - quiz
Run the application again and you should see the quiz link “Visit the Thymeleaf Quiz to test Cross-Site Request Forgery (CSRF) protection”. Click the link and the quiz will be displayed:

The CSRF token is displayed, but if you turn on developer tools, you can also find it as a hidden attribute <input type="hidden" name="_csrf" value="..."> that Spring Security adds to the form.
You can try the POST request with HTTPie, and you will again verify the POST request is rejected without the CSRF token.
$ http POST http://localhost:8080/

HTTP/1.1 403 Forbidden
Cache-Control: no-cache, no-store, max-age=0, must-revalidate
Content-Type: text/plain
Expires: 0
Pragma: no-cache
Referrer-Policy: no-referrer
X-Content-Type-Options: nosniff
X-Frame-Options: DENY
X-XSS-Protection: 1 ; mode=block
content-length: 38

An expected CSRF token cannot be found
The interesting fact here is that it seems CSRF protection takes precedence over authentication in the Spring Security filter chain.
Learn more about Spring Boot and Spring Security
I hope you enjoyed this brief introduction to Thymeleaf and learned how to secure content and implement authorization on the server-side using Spring Security. You could also experience how fast and easy is to integrate OIDC Authentication using Okta. To learn more about Spring Boot Security and OIDC, check out the following links:
- Learn How to Build a Single-Page App with Vue and Spring Boot
- Kubernetes to the Cloud with Spring Boot and JHipster
- Spring Native in Action with the Okta Spring Boot Starter
You can find the complete source code for this tutorial on GitHub.
Be sure to follow us on Twitter and subscribe to our YouTube Channel so that you never miss any of our excellent content!
Okta Developer Blog Comment Policy
We welcome relevant and respectful comments. Off-topic comments may be removed.