Easy Xamarin Forms Auth with PKCE

OAuth 2.0 is a protocol that controls authorization to access a secured resource such as a native app, web app, or API server. For native applications, the recommended method for controlling access between your application and a resource server is the Authorization Code flow with a Proof Key for Code Exchange (PKCE). In this article, you will learn how to build a basic cross-platform application with Xamarin.Forms and implement Authorization Code flow with PKCE using Okta Xamarin SDK. You will also learn about the Xamarin Community Toolkit - a collection of common elements for mobile development with Xamarin.Forms.
To continue, you will need:
- A basic knowledge of C#
- Visual Studio 2019 or Visual Studio for Mac
- An Okta Developer Account (free forever, to handle your OAuth needs)
- An Android or iPhone device, or an emulator for testing (For the article, we show Android as an example, but this will work for either platform.)
Note: In May 2025, the Okta Integrator Free Plan replaced Okta Developer Edition Accounts, and the Okta CLI was deprecated.
We preserved this post for reference, but the instructions no longer work exactly as written. Replace the Okta CLI commands by manually configuring Okta following the instructions in our Developer Documentation.
Create a Xamarin.Forms App with Xamarin’s Community Toolkit
Xamarin is a framework from Microsoft used to build cross-platform mobile apps from one shared source code; it’s written in C# and compiled for each platform’s runtime. Xamarin.Forms is an abstraction on that, enabling developers to share the UI code as well.
Xamarin.Forms is now included in Visual Studio! Create a new project by clicking File>New Project in Visual Studio, select Mobile App (Xamarin.Forms), and click Next. Name the app MovieExplorer and click Create. On the next window, select Flyout and click Create.

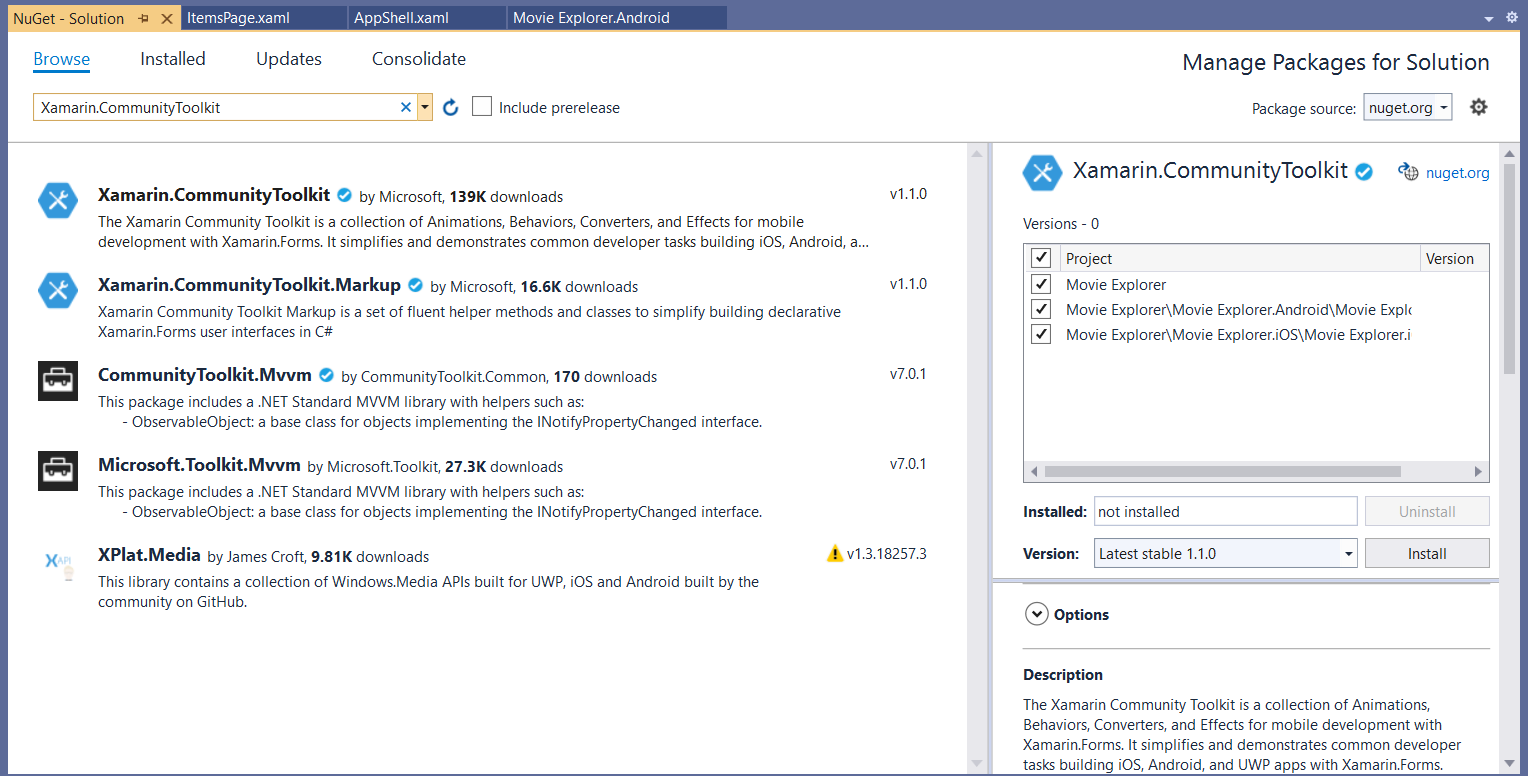
Visual Studio will automatically create a solution with three projects: MovieExplorer.Android for Android, MovieExplorer.iOS for iOS, and MovieExplorer for shared code and user interface. To install Xamarin Community Toolkit, either run Install-Package Xamarin.CommunityToolkit -Version 1.1.0 in all three projects or right-click on the MovieExplorer solution and click Manage Nuget Packages to add the library to each project:
I will also add TMDbLib library to access The Movie Database Api for retrieving movie information.
Explore Movies with Xamarin.Forms and Xamarin Community Toolkit
In the MovieExplorer shared project, rename ItemsPage.xaml to MoviesPage.xaml and replace its content with the following:
<?xml version="1.0" encoding="utf-8" ?>
<ContentPage xmlns="http://xamarin.com/schemas/2014/forms"
          xmlns:x="http://schemas.microsoft.com/winfx/2009/xaml"
          xmlns:xct="http://xamarin.com/schemas/2020/toolkit"
          x:Class="MovieExplorer.Views.MoviesPage"
          Title="{Binding Title}"
          xmlns:local="clr-namespace:MovieExplorer.ViewModels"
          xmlns:views="clr-namespace:MovieExplorer.Views"
          x:Name="BrowseItemsPage">
    <xct:TabView TabStripPlacement="Bottom" TabStripBackgroundColor="Blue" TabStripHeight="60" SelectedIndex="0"
              TabIndicatorColor="Yellow" TabContentBackgroundColor="Gray">

     <xct:TabViewItem Icon="cinema.png" Text="Popular" TextColor="White" TextColorSelected="Yellow" FontSize="12">
         <RefreshView x:DataType="local:ItemsViewModel" Command="{Binding LoadMoviesCommand}" IsRefreshing="{Binding IsBusy, Mode=TwoWay}">
             <CollectionView x:Name="PopularMoviesView" ItemsSource="{Binding PopularMovies}" SelectionMode="None">
                 <CollectionView.ItemTemplate>
                     <DataTemplate>
                         <views:MovieCell />
                     </DataTemplate>
                 </CollectionView.ItemTemplate>
             </CollectionView>
         </RefreshView>
     </xct:TabViewItem>
     <xct:TabViewItem Icon="movie.png" Text="Discover" TextColor="White" TextColorSelected="Yellow" FontSize="12">
         <Grid>
             <Label HorizontalOptions="Center" VerticalOptions="Center" Text="TabContent2" />
         </Grid>
     </xct:TabViewItem>
 </xct:TabView>
</ContentPage>
Note the http://xamarin.com/schemas/2020/toolkit namespace that is necessary in order to use components from Xamarin’s Community Toolkit.
The movies page consists of two tabs: One to show popular movies and a second to search for a movie. The TabView control from Xamarin’s Community Toolkit is a fully customizable control with lots of customization options. The popular movies tab displays items from the PopularMovies collection using the CollectionView control, and it uses RefreshView control for pull to refresh functionality. The layout of each movie is defined in the MovieCell template:
<?xml version="1.0" encoding="UTF-8"?>
<Grid xmlns="http://xamarin.com/schemas/2014/forms"
   xmlns:x="http://schemas.microsoft.com/winfx/2009/xaml"
   xmlns:local="clr-namespace:MovieExplorer.ViewModels"
   xmlns:xct="http://xamarin.com/schemas/2020/toolkit"
   xmlns:tmdb="clr-namespace:TMDbLib.Objects.Search;assembly=TMDbLib"
   x:Class="MovieExplorer.Views.MovieCell"
   Padding="10" x:DataType="tmdb:SearchMovie" ColumnDefinitions="*, *" RowDefinitions="Auto,Auto, Auto, Auto">
 <Image Grid.RowSpan="3" Aspect="Fill"
              Source="{Binding Path=BackdropPath, StringFormat='https://image.tmdb.org/t/p/w500{0}'}"/>
 <Label Grid.Row="0" Grid.Column="1" Text="{Binding Title}"
              FontAttributes="Bold" Style="{DynamicResource TitleStyle}" />
 <xct:Shield Grid.Row="1" Grid.Column="1" HorizontalOptions="Start" Status="{Binding VoteCount}"
                   Subject="{Binding VoteAverage}" StatusTextColor="Black"></xct:Shield>
 <Label Grid.Row="2" Grid.Column="1" Text="{Binding ReleaseDate, StringFormat='Release Date: {0:dd-MM-yyyy}'}" FontSize="16" VerticalOptions="CenterAndExpand"
              VerticalTextAlignment="End"></Label>
 <Label Grid.Row="3" Grid.ColumnSpan="2"
              Text="{Binding Overview}" Style="{DynamicResource SubtitleStyle}" VerticalOptions="End" />
 <Grid.GestureRecognizers>
     <TapGestureRecognizer NumberOfTapsRequired="1"
               Command="{Binding Source={RelativeSource AncestorType={x:Type local:ItemsViewModel}}, Path=ItemTapped}"
               CommandParameter="{Binding .}">
     </TapGestureRecognizer>
 </Grid.GestureRecognizers>
</Grid>
For each movie, the app will show the movie’s backdrop image, title, overview, and release date. It will also use a Shield control to show the movie’s vote average and the number of votes.
Next, rename ItemsViewModel to MoviesViewModel and replace it with this:
public class MoviesViewModel : BaseViewModel
{
  private SearchMovie _selectedItem;

  public ObservableCollection<SearchMovie> PopularMovies { get; }

  public Command LoadMoviesCommand { get; }

  public Command<SearchMovie> ItemTapped { get; }

  public MoviesViewModel()
  {
 Title = "Movies";
 PopularMovies = new ObservableCollection<SearchMovie>();

 LoadMoviesCommand = new Command(async () => await ExecuteLoadMoviesCommand());

 ItemTapped = new Command<SearchMovie>(OnItemSelected);
  }

  async Task ExecuteLoadMoviesCommand()
  {
 IsBusy = true;

 try
 {
   PopularMovies.Clear();
   var popularMovies = await MoviesService.GetPopularMovies();

   foreach (var movie in popularMovies)
   {
     PopularMovies.Add(movie);
   }
 }
 finally
 {
   IsBusy = false;
 }
  }

  public void OnAppearing()
  {
 IsBusy = true;
 SelectedItem = null;
  }

  public SearchMovie SelectedItem
  {
 get => _selectedItem;
 set
 {
   SetProperty(ref _selectedItem, value);
   OnItemSelected(value);
 }
  }

  async void OnItemSelected(SearchMovie item)
  {
 if (item == null)
   return;

 await Shell.Current.GoToAsync($"{nameof(MovieDetailPage)}?{nameof(MovieDetailViewModel.MovieId)}={item.Id}");
  }
}
The BaseViewModel contains common functionality such as INotifyPropertyChanged implementation, IsBusy property, and it exposes MoviesService that LoadMoviesCommand uses to get a list of popular movies.
Finally, open MoviesPage.xaml.cs, and make sure to wire up the MoviesViewModel as a data source for the MoviesPage:
public MoviesPage()
{
  InitializeComponent();

  BindingContext = _viewModel = new MoviesViewModel();
}
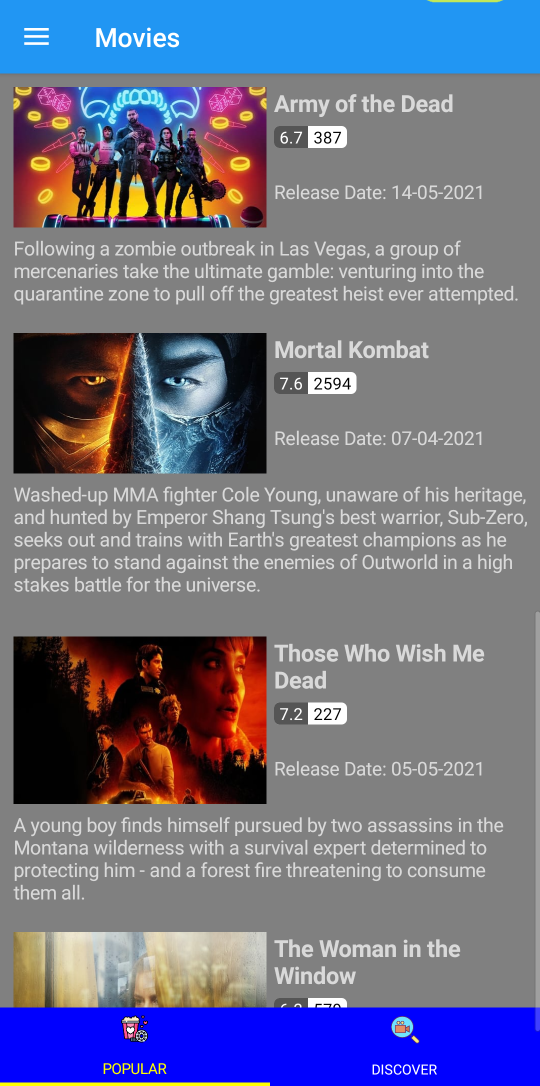
Now, run the app, and you will see a list of popular movies:
Next, let’s add a second tab to search for movies. The second tab will use MoviesViewModel too, so add both a collection for movie search results and a command to search for movies:
public ObservableCollection<SearchMovie> DiscoverMovies { get; }

public Command SearchMoviesCommand { get; }

async Task ExecuteSearchMoviesCommand(string text)
{
  IsBusy = true;

  try
  {
 DiscoverMovies.Clear();

 if (!string.IsNullOrEmpty(text))
 {
   var searchResult = await MoviesService.DiscoverMovies(text);

   foreach (var movie in searchResult)
   {
     DiscoverMovies.Add(movie);
   }
 }
  }
  finally
  {
 IsBusy = false;
  }
}
Next, add the markup for a second tab to the MoviesPage.xaml:
<xct:TabViewItem Icon="movie.png" Text="Discover" TextColor="White" TextColorSelected="Yellow" FontSize="12">
  <StackLayout Orientation="Vertical">
 <SearchBar x:Name="SearchBar" Placeholder="Discover Movies">
   <SearchBar.Behaviors>
     <xct:UserStoppedTypingBehavior
       Command="{Binding SearchMoviesCommand}" CommandParameter="{Binding Text, Source={x:Reference SearchBar}}"
       StoppedTypingTimeThreshold="500" MinimumLengthThreshold="3"
       ShouldDismissKeyboardAutomatically="True" />
     <xct:EventToCommandBehavior EventName="TextChanged"
       Command="{Binding SearchMoviesCommand}" CommandParameter="" />
   </SearchBar.Behaviors>
 </SearchBar>
 <RefreshView x:DataType="local:MoviesViewModel" IsRefreshing="{Binding IsBusy, Mode=TwoWay}">
   <CollectionView x:Name="SearchMoviesView" ItemsSource="{Binding DiscoverMovies}" SelectionMode="None">
     <CollectionView.ItemTemplate>
       <DataTemplate>
         <views:MovieCell />
       </DataTemplate>
     </CollectionView.ItemTemplate>
   </CollectionView>
 </RefreshView>
  </StackLayout>
</xct:TabViewItem>
The SearchBar control is a user input control for initiating a search. I also use UserStoppedTypingBehavior from Xamarin’s Community Toolkit to ensure that the search command executes when the user stops typing for 500 milliseconds and he/she has entered at least three characters.
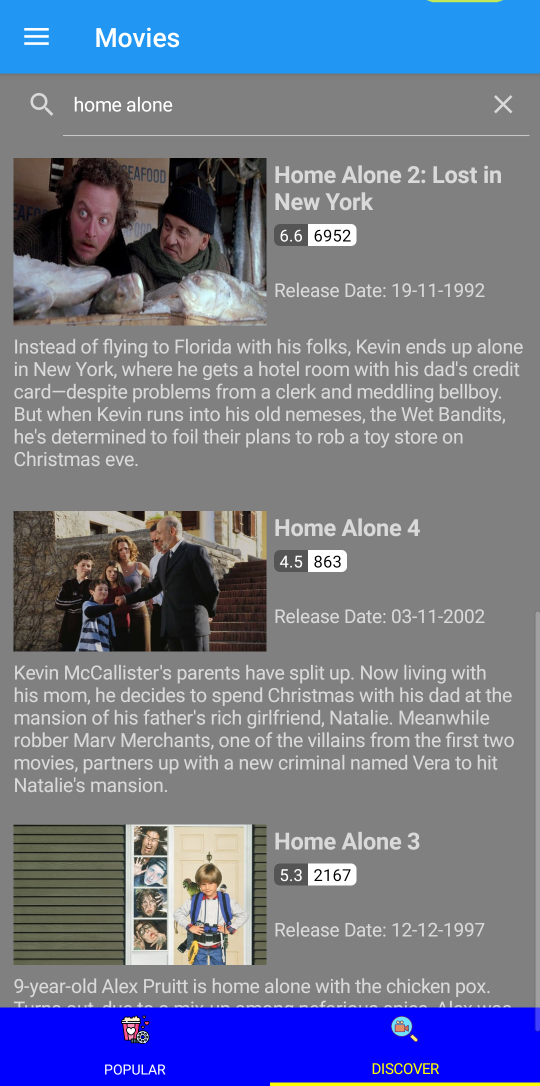
Re-run the app and try searching for movies:
Finally, I will add a page to show movie details when you click on a movie on either of the two tabs.
First, rename ItemDetailPage.xaml and ItemViewModel.cs to MovieDetailPage.xaml and MovieDetailViewModel.cs.
The movie details page will display a poster image of the movie and the cast. It will also let you watch a trailer of the movie (with the help of MediaElement from Xamarin’s Community Toolkit):
<?xml version="1.0" encoding="utf-8" ?>
<ContentPage xmlns="http://xamarin.com/schemas/2014/forms"
    xmlns:x="http://schemas.microsoft.com/winfx/2009/xaml"
    xmlns:views="clr-namespace:Xamarin.CommunityToolkit.UI.Views;assembly=Xamarin.CommunityToolkit"
    xmlns:viewModels="clr-namespace:MovieExplorer.ViewModels;assembly=MovieExplorer"
    xmlns:tmdb="clr-namespace:TMDbLib.Objects.Movies;assembly=TMDbLib"
    x:Class="MovieExplorer.Views.MovieDetailPage"
    x:DataType="viewModels:MovieDetailViewModel"
    Title="{Binding Title}" Padding="5" BackgroundColor="Gray">
  <Grid ColumnDefinitions="*, 2*" RowDefinitions="3*, 2*">
 <CollectionView ItemsSource="{Binding Movie.Credits.Cast}" VerticalOptions="Start">
   <CollectionView.Header>
     <StackLayout>
       <Label HorizontalTextAlignment="Start" Text="Cast:" FontSize="Medium" FontAttributes="Bold" />
     </StackLayout>
   </CollectionView.Header>
   <CollectionView.ItemTemplate>
     <DataTemplate>
       <Label Padding="10,2" x:DataType="tmdb:Cast" Text="{Binding Name}" TextColor="White" FontSize="Medium"></Label>
     </DataTemplate>
   </CollectionView.ItemTemplate>
 </CollectionView>
 <Image Grid.Column="1" Grid.Row="0" VerticalOptions="FillAndExpand" Aspect="Fill" HorizontalOptions="EndAndExpand" Source="{Binding Path=Movie.PosterPath, StringFormat='https://image.tmdb.org/t/p/w500{0}'}"></Image>
 <views:MediaElement Source="{Binding VideoUrl}" Grid.Row="1" Grid.ColumnSpan="2"
           ShowsPlaybackControls="True" AutoPlay="False"/>
  </Grid>
</ContentPage>
The MovieDetailViewModel is simple: it loads the movie details from TMDB and builds a full URL for the trailer:
public class MovieDetailViewModel : BaseViewModel
{
  private int movieId;

  private string videoUrl;
  public string VideoUrl
  {
 get => videoUrl;
 set => SetProperty(ref videoUrl, value);
  }

  public int MovieId
  {
 get
 {
   return movieId;
 }
 set
 {
   movieId = value;
   LoadMovie(value);
 }
  }

  public Movie Movie { get; private set; }

  public async void LoadMovie(int itemId)
  {
 Movie = await MoviesService.GetMovie(itemId);

 Title = Movie.Title;
 OnPropertyChanged(nameof(Movie));

 if (Movie.Videos.Results.Any())
 {
   VideoUrl = await GetYouTubeUrl(Movie.Videos.Results[0].Key);
 }
  }

  public async Task<string> GetYouTubeUrl(string videoId)
  {
 var videoInfoUrl = $"https://www.youtube.com/get_video_info?html5=1&video_id={videoId}";

 using (var client = new HttpClient())
 {
   var videoPageContent = await client.GetStringAsync(videoInfoUrl);
   var videoParameters = HttpUtility.ParseQueryString(videoPageContent);
   var playerInfo = JObject.Parse(WebUtility.HtmlDecode(videoParameters["player_response"]));
   return playerInfo["streamingData"]["formats"][0]["url"].Value<string>();
 }
  }
}
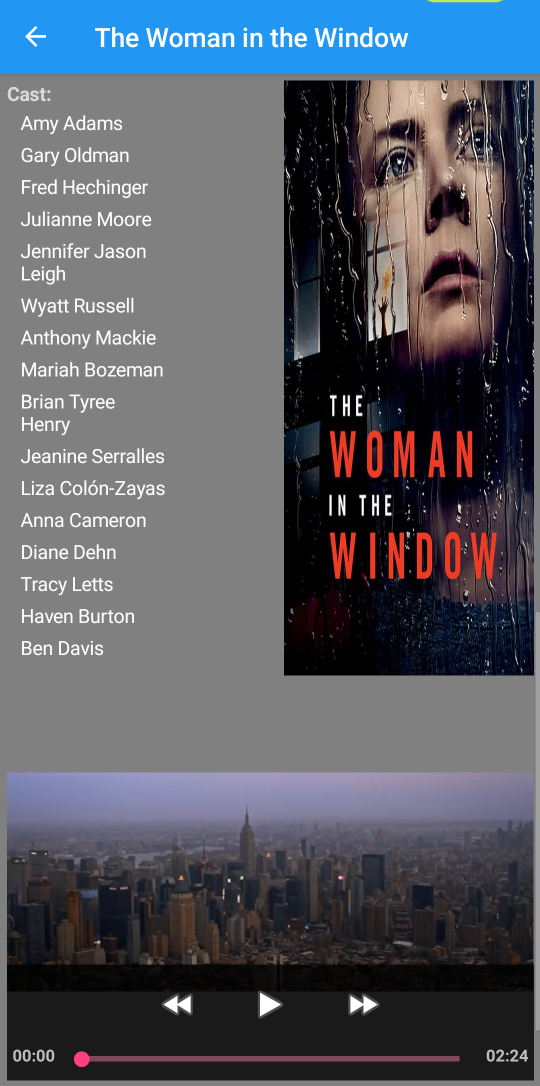
Run the app, click on a movie, and you will be able to watch the trailer in the app:
Finally, it’s time to secure the app with Okta!
Add Authentication with Okta’s Xamarin SDK
I will use Okta to quickly and securely implement user authentication so that I don’t have to implement it from scratch or roll it into my own identity management system. Okta supports user authentication, multi-factor authentication, social authentication, and all OpenID connect flows out of the box - it essentially takes care of any scenario you would ever need!
The Authorization Code flow with PKCE requires us to generate a code verifier - a cryptographically secure random string and a code challenge created from the verifier. The app will open an external browser tab and pass the code challenge to the Okta authorization server, which then stores the challenge, authenticates the user, and redirects the user back to the app with a temporary authorization code. Next, the app requests to exchange the authorization code for tokens and passes the code verifier that is generated. The authorization server generates the code challenge from the verifier, compares it with the stored challenge, and if the two values match, Okta will return access and the ID token to the app.
Okta’s Xamarin SDK implements the Authorization Code flow with PKCE so that you do not need to build it yourself.
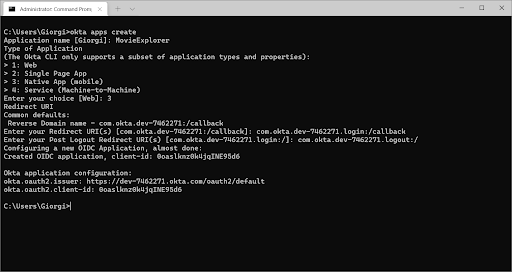
To get started, I will use Okta CLI to set up an Okta application. Run okta apps create if you already have an Okta account, or run okta start to create an account first. Note the OrgUrl, as you will need it in a couple of minutes. Enter MovieExplorer for the app name and select 3: Native App (mobile) for the type of application. For Redirect URI, add .login to the suggested reverse domain name, and add .logout for the Post Logout Redirect URI.
Okta cli will configure a new OIDC application and output its client-id, which you will also need:
Next, add the Okta.Xamarin package to all projects and add Okta.Xamarin.Android and Okta.Xamarin.iOS to your respective projects.
Now, you need to make a platform specific configuration. Create an OktaConfig.xml file in the Assets folder of the Android project, and add the following content:
<?xml version="1.0" encoding="utf-8" ?>
<Okta>
  <ClientId>{ClientId}</ClientId>
  <OktaDomain>https://{yourOktaDomain}</OktaDomain>
  <RedirectUri>com.okta.dev-7462271.login:/callback</RedirectUri>
  <PostLogoutRedirectUri>com.okta.dev-7462271.logout:/</PostLogoutRedirectUri>
</Okta>
Make sure to replace {ClientId} and {yourOktaDomain} with the correct values. Also, RedirectUri and PostLogoutRedirectUri must match the values you’ve entered in the Okta cli when configuring the app.
Next, open the MainActivity.cs and change the MainActivity class to inherit from OktaMainActivity<App>:
public class MainActivity : OktaMainActivity<App>
Override OnSignInCompleted and OnSignOutCompleted methods:
public override async void OnSignInCompleted(object sender, SignInEventArgs signInEventArgs)
{
  await Shell.Current.GoToAsync("//MoviesPage", true);
  var user = await OktaContext.Current.GetUserAsync<UserInfo>();
  ((AppShell) Shell.Current).User = user;
}

public override void OnSignOutCompleted(object sender, SignOutEventArgs signOutEventArgs)
{
  Shell.Current.GoToAsync("//LoginPage", true);
}
Finally, add two new activities to intercept login and logout redirects:
[Activity(Label = "LoginCallbackInterceptorActivity", NoHistory = true, LaunchMode = LaunchMode.SingleInstance)]
[IntentFilter(actions: new[] { Intent.ActionView }, Categories = new[] { Intent.CategoryDefault, Intent.CategoryBrowsable }, DataSchemes = new[] { "com.okta.dev-7462271.login" }, DataPath = "/callback")]
public class LoginCallbackInterceptorActivity : OktaLoginCallbackInterceptorActivity<MainActivity>
{
}

[Activity(Label = "LogoutCallbackInterceptorActivity", NoHistory = true, LaunchMode = LaunchMode.SingleInstance)]
[IntentFilter(actions: new[] { Intent.ActionView }, Categories = new[] { Intent.CategoryDefault, Intent.CategoryBrowsable }, DataSchemes = new[] { "com.okta.dev-7462271.logout" }, DataPath = "/callback")]
public class LogoutCallbackInterceptorActivity : OktaLogoutCallbackInterceptorActivity<MainActivity>
{
}
Again, the values in the DataSchemes must match the values that you entered in the Okta cli when configuring the app.
This concludes the configuration for the Android app. Now, let’s prompt the user to sign in with Okta.
Right click on the Views folder in the shared MovieExplorer project, click Add->New Item, select Content Page, enter StartupPage as a name and click Add. Open StartupPage.cs and add OnAppearing method:
protected override async void OnAppearing()
{
  base.OnAppearing();

  string token = "";
  try
  {
 // should check for valid login instead
 token = OktaContext.Current.GetToken(TokenKind.AccessToken);
  }
  catch (Exception)
  {

  }
  finally
  {
 // only open Login page when no valid login
 if (string.IsNullOrEmpty(token))
 {
   await Shell.Current.GoToAsync($"//{nameof(LoginPage)}");
 }
 else
 {
   await Shell.Current.GoToAsync($"//{nameof(MoviesPage)}");
 }
  }
}
When the StartupPage appears, the user is redirected to the login page if the access token is not present.
The login page contains a login button that invokes the LoginCommand and kicks off the authentication process:
public class LoginViewModel : BaseViewModel
{
  public Command LoginCommand { get; }

  public LoginViewModel()
  {
 LoginCommand = new Command(OnLoginClicked);
  }

  private async void OnLoginClicked(object obj)
  {
 await OktaContext.Current.SignInAsync();
  }
}
When the user signs in, the OnSignInCompleted method fires in MainActivity, and the app will navigate to the MoviesPage.
Next, add the StartupPage to the AppShell.xaml so that it is the first page that the app loads upon launch:
<TabBar>
  <ShellContent Route="StartupPage" Shell.FlyoutBehavior="Disabled" ContentTemplate="{DataTemplate local:StartupPage}" />
</TabBar>
Also, add an event handler to the Logout menu item in AppShell.xaml.cs:
private async void OnMenuItemClicked(object sender, EventArgs e)
{
  await OktaContext.Current.SignOutAsync();
}
Finally, add a header to the AppShell.xaml to display the currently logged in user details:
<Shell.FlyoutHeaderTemplate>
  <DataTemplate>
 <StackLayout>
   <Label Text="{Binding User.Name}" TextColor="Black" Margin="0,5,0,0"
        FontSize="Large" HorizontalTextAlignment="Center" VerticalTextAlignment="Center" />
   <Label Text="{Binding User.PreferredUserName}" TextColor="Black" Margin="0,0,0,10"
        HorizontalTextAlignment="Center" VerticalTextAlignment="Center" />
 </StackLayout>
  </DataTemplate>
</Shell.FlyoutHeaderTemplate>
Run the app, click the Login button and sign in with your Okta credentials. On the Movies page, open the flyout menu, and you should see your user account details:
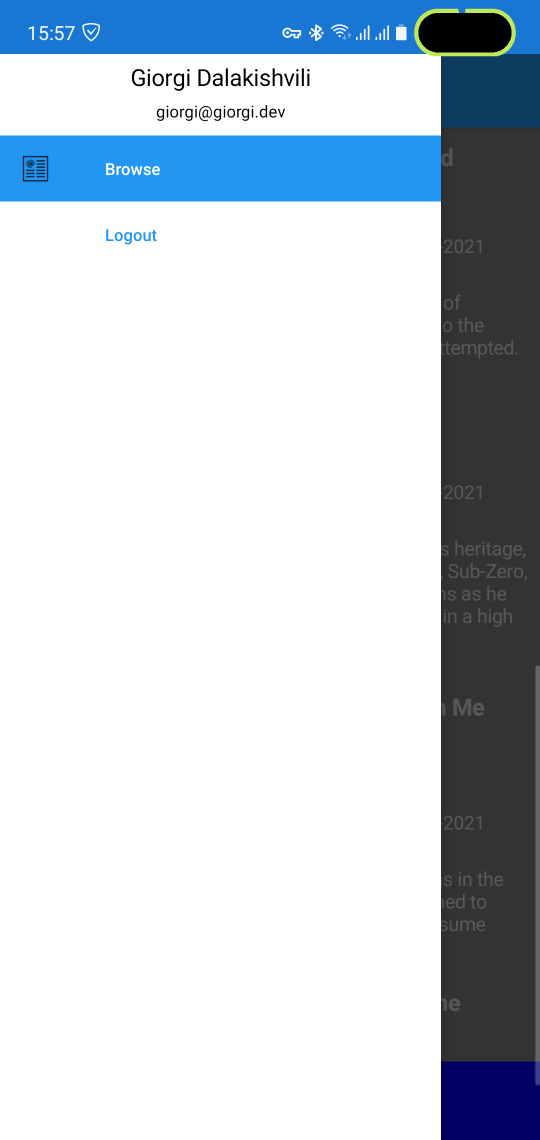
That’s it! Okta’s Xamarin SDK simplifies using Authorization Code flow with PKCE to a couple of method calls.
Learn More About Xamarin, OpenID Connect, and Okta
I hope this tutorial was interesting to you and that you enjoyed it. You can get the full source code of the project from GitHub. For more Xamarin and Okta articles, check out these posts:
- Easy Xamarin Essentials with Web Authenticator
- Build Login in Xamarin with Xamarin.Forms
- Implement the OAuth 2.0 Authorization Code with PKCE Flow
- Okta Xamarin SDK
Make sure to follow us on Twitter and subscribe to our YouTube Channel so that you never miss any excellent content!
Okta Developer Blog Comment Policy
We welcome relevant and respectful comments. Off-topic comments may be removed.