The Ultimate Guide to Password Hashing in Okta

As more of our critical work and personal functions go online, the risk of data and security breaches continues to increase. In 2019, there were over 1400 data breaches reported that exposed nearly 165 million records, many of which included passwords and personal information.
While security specialists bear much of the responsibility in ensuring their organizations are handling sensitive data properly, web developers at all levels must take part as well. By understanding fundamental concepts like hashing and password management, developers can help minimize security risks to their users and businesses.
Hashing is an important but often misunderstood concept in computer programming. In this comprehensive guide, I’ll share everything you need to know about password hashing, generating hashes and salts, storing hashed passwords, and implementing password hashing in Python. Finally, I’ll show you how you can use hashes to validate users locally or with a third-party authentication tool like Okta.
What is a Hash?
If you’ve taken a computer science course on data types, you’ve probably heard of hash tables and hash functions. A hash table (or hash map) is a data storage pattern that maps a calculated hash index to each given key. This allows you to lookup values in a table if you know their key. Python’s dictionary data type is implemented as a hash table, so you are probably already using hash tables without knowing it.
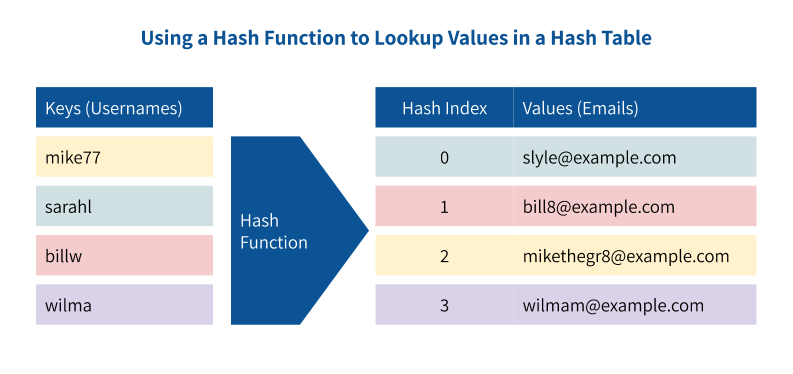
Hash functions are how keys in hash tables are calculated. When hashing a piece of data, the hash function should be able to take an arbitrary length of data and map it to a fixed-length index that is unique to the value. In the context of hash table data storage, a programmer can access stored values by knowing the keys and calling the hash function.
In practice, hash functions are useful for a wide variety of tasks, including compression, data storage, checksums, and password storage. In the rest of this guide, I’ll focus on cryptographic hashes and their role in passwords.
Password Hashes
If you have users logging into your site, you likely ask them to create an account with a password. As a developer, you need a way to verify a user by their password later, but storing the password in plaintext opens you up to massive problems if your database is ever compromised. Attackers could use the passwords to access all the other data you store for your users or gain access to other accounts the user owns, especially if they reuse their passwords.
This is where cryptographic hash functions come in. If you run a plaintext password through one of these functions, it will convert the string into a unique, irreversible, fixed-size bit array. This hashed password can then be stored in your database, and even if attackers gain access to your database, they shouldn’t be able to quickly figure out your users’ passwords.
Unfortunately, no hashing strategy is perfect. Given enough time and access, attackers can still deduce hashed passwords using rainbow tables or brute force attacks. This is why it’s important to use the most up-to-date hashing algorithms and salt your passwords before you hash them. In the next section, I’ll cover salting, and later in this guide, you’ll learn about the various hashing algorithms available and when each might be appropriate.
Salting Hashes
If an attacker gets access to your hashed passwords and figures out which algorithm you used, they can look up the hashes in a rainbow table. If you don’t believe me, just google for a hash like this and see how many results come up that reveal the password to be abc123. While modern hashing algorithms increase the time it takes to generate and lookup data in these tables, once attackers have your database, they can apply as much computing power as they can afford to the job.
Salts are long, randomly generated byte arrays added to each password before they’re hashed and stored. Salting passwords correctly makes rainbow tables virtually useless because each password will have a unique salt that the attacker does not have access to.
While any long, random byte array added to your passwords before hashing improves security, there are a few ways to increase the effectiveness of your salts. For example, you can add a unique salt to the front and back of each password, you can increase the length of your salt, or you can add a separately stored “pepper”’ to each password.
Typically, salts are stored in your database alongside each user’s password. The problem with this approach is that attackers who get your database probably also get your salts. This means they can re-compute rainbow tables using the stolen salts. Even if it takes longer, an attacker might be motivated enough to do it anyway.
In response to this problem, you can create another long, random byte array called a “pepper” and store it in a separate location on your server (outside your database). Then, you can add this pepper to each password in addition to the salts.
Another way to spread out the information attackers would need to figure out your users’ passwords is to apply multiple hashing algorithms to the password. For example, in 2012, Firefox wrote about its two-step hashing process which uses HMAC and bcrypt:
“The local salt is a random value that is stored only on the server, never in the database…If an attacker steals one of our password databases, they would need to also separately attack one of our web servers to get file access in order to discover this local salt value…As a second step, this hashed value (or strengthened password, as some call it) is then hashed again with a slow hashing function called bcrypt.”
Security almost always involves a risk and cost tradeoff. The important takeaway from salting is that spreading out the information attackers would need to deduce your passwords improves security but increases maintenance costs. For example, if your pepper is ever compromised, you’ll need to eventually re-hash all the passwords or ask users to change their passwords immediately.
Hashing in Python
Now that you understand what hashing is and how it is used in conjunction with salting to store passwords securely, you are ready to get specific. In this section, I’ll show you how to apply common hash functions in Python and some of the important considerations you should make when choosing a hash function.
DIY Hashing Algorithms vs. Libraries
While you might think it would be interesting to implement your own hash functions from scratch, this is not a good idea in practice. The OWASP Password Storage Cheat Sheet summarizes the problem:
“Writing custom cryptographic code such as a hashing algorithm is really hard and should never be done outside of an academic exercise. Any potential benefit that you might have from using an unknown or bespoke algorithm will be vastly overshadowed by the weaknesses that exist in it.”
Creating a modern, secure hash function requires quite a lot of esoteric code, and any small error could carry a critical security risk. If you’re curious, though, you can read the Python implementations of MD5 here and SHA1 here.
Fortunately, Python has a robust choice of libraries available that implement cryptographically secure hash functions. In the examples below, you’ll see how two of them bcrypt and hashlib work. Both are open-source and widely recommended by security professionals and software developers alike. While bcrypt is a community-maintained module, hashlib is actually part of Python’s standard library.
I’ll share interactive examples of five of the most common password hashing algorithms in Python in the following sections. All of the Python code below is running in your browser. Feel free to edit and change the code you see! As you go through the code, you’ll see some of the pros and cons to each approach and why some of these algorithms are no longer recommended for password hashing in 2021.
MD5
Created as a general purpose cryptographic hash function, the MD5 algorithm has since been found vulnerable to collisions, making it much easier for attackers to exploit. Because of this, MD5 is no longer recommended for password hashing.
That said, plenty of legacy systems still use the algorithm, so developers are likely to come across it. When you do, you’ll have to decide how you want to upgrade your hashing algorithm, but because MD5 is still so common, I’ll show you a couple of examples here.
Hash Only
First, if you simply want to hash a password using MD5, you need to convert the password string to bytes (here I’m using the bytes function for Python 3+) and then pass it into the md5 function in the hashlib module:
Output:
Because MD5 creates a fixed-length 128-bit value, you have to convert it to a human-readable format if you want to print it. This example uses Python’s json and base64 libraries to print out the hash in the format that Okta uses for loading user hashes into Okta, so you should see output that looks like this::
{
    "algorithm": "MD5",
    "value": "KqqDNf0DDgVKmOOyxYUrNA=="
}
With Salt
While you’ve seen that adding a salt to your passwords before hashing them theoretically increases security, it doesn’t make MD5 any more secure in practice. Your salted passwords are still vulnerable to collisions, and because MD5 hashes can be generated so quickly, rainbow tables can still be used to decipher hashed passwords.
That said, you may see a salted MD5 hash like this in legacy code:
Output:
This example uses the Python secrets module to generate 16 random bytes that are appended to the end of the password before it is hashed.
The output of this salted and hashed password will be a new 128-bit value that, when base64 encoded, will look something like the result below:
{
    "algorithm": "MD5",
    "salt": "R0lGODlhAQABAAAAADs=",
    "saltOrder": "POSTFIX",
    "value": "pqTUVToGARL1yM3/jthCHA=="
}
You’ll notice that the output from the sample code doesn’t match the example above. In fact, every time you make a change to the code, you’ll see that the output changes. This is good and exactly as expected. To get the benefits of salting your passwords, you must use a unique salt for each password!
That said, if you want to see how the output was generated above, you can change the salt to the same value that was used to compute the example by changing line 8 in the example above to look like this:
salt = b"\x47\x49\x46\x38\x39\x61\x01\x00\x01\x00\x00\x00\x00;"
SHA-1
While SHA-1 creates a slightly longer hashed output (160-bit) than MD5, it is no longer considered cryptographically secure either. It’s vulnerable to collisions, and in 2020, researchers estimated that anyone with $45,000 worth of cloud computing power could successfully break SHA-1 signatures used for validating TLS certificates.
Like MD5, there’s still plenty of legacy systems using SHA-1 hashing algorithms, though, so you may see it in older Python code.
Hash Only
While the output is slightly longer (a 40-character hexadecimal string) than MD5, using SHA-1 involves roughly the same process:
Output:
When hashed with SHA-1 and encoded with base64, the password test password will look like this:
{
    "algorithm": "SHA-1",
    "value": "LOsCqF9tTebCiy5Z/aiG1Sba+w0="
}
With Salt
Not much changes when you add a salt to your password before applying SHA-1 hashing. It’s still not significantly more secure, and the process is equivalent to doing the same in MD5:
Output:
The output should look something like this:
{
    "algorithm": "SHA-1",
    "salt": "R0lGODlhAQABAAAAADs=",
    "saltOrder": "POSTFIX",
    "value": "1cijegMYbE7L/WkUxkHjQ+/p1M0="
}
As with the salted MD5 example above, the salt must be unique to each password you hash. However, if you want to get the exact same output as our example output, you can change line 8 in the example code to look like this:
salt = b"\x47\x49\x46\x38\x39\x61\x01\x00\x01\x00\x00\x00\x00;"
SHA-256
As vulnerabilities in SHA-1 and MD5 became apparent in the late 1990s, researchers went to work on the next generation of cryptographic hashing functions. This effort resulted in the NSA’s publication of the SHA-2 algorithms in 2001. SHA-256 is one of these functions and is in widespread use today.
Since SHA-1 was proven insecure for SSL certificate validation, SHA-256 has been adopted. SHA-256 also plays a role in blockchain technology and Bitcoin specifically as a way to hash data and create Bitcoin addresses.
While SHA-256 has valid use cases, it is not really meant to be used in hashing passwords. While collisions have not been proven, and unique salts can make rainbow tables ineffective, high-end hardware can still generate billions of SHA-256 hashes every minute. This allows attackers with access to your hashed passwords to use brute force to look for matches and decipher your users’ passwords.
Hash Only
Despite this inherent weakness, you are still likely to see SHA-256 used for hashing passwords. The implementation is basically the same as SHA-1 using hashlib, but the output will be a base64 encoded 256-bit object:
Output:
The output should look like this:
{
    "algorithm": "SHA-256",
    "value": "C0fGmxAzSY1fM/X32Xu2oxJhNHUWKfTQGFwRXbRMCU4="
}
With Salt
If you are forced to use SHA-256 for some reason, adding salt is essential. This requires attackers to have another piece of data and increases the amount of time required for brute force attacks:
Output:
The output should look something like this:
{
    "algorithm": "SHA-256",
    "salt": "R0lGODlhAQABAAAAADs=",
    "saltOrder": "POSTFIX",
    "value": "6ONMDzdYZltRuM8j0EaG0eUgY0ooPj/m09MqlnGJ3AQ="
}
As with the examples above, the salt must be unique to each password you hash. However, if you want to get the exact same output as our example output, you can change the line in the example code where the salt is defined to look like this:
salt = b"\x47\x49\x46\x38\x39\x61\x01\x00\x01\x00\x00\x00\x00;"
With Salt and Pepper
I mentioned “pepper” above, which adds another layer of entropy and length to your password before hashing. Typically, pepper is stored on your server, independent of your database. Something like an environment variable is common:
Output:
Example output:
{
    "algorithm": "SHA-256",
    "salt": "R0lGODlhAQABAAAAADtCTR4AAAAAAAAAGgAAAAwAAAABAAEAAQAYAAAA/wA=",
    "saltOrder": "POSTFIX",
    "value": "gWVt3W2f5I83NLwYtyf3Ac0uomcY+bymCd6IEaJoS+8="
}
Salt and pepper can be added to the beginning or end of the original password. There’s no substantive difference from a security standpoint, so pick one and obviously, be consistent.
SHA-512
SHA-512 uses the same method as SHA-256 to hash strings into fixed 512-bit objects (128 hexadecimal characters). A longer output size means an even higher resistance to collision and length extension attacks, so while both SHA-256 and SHA-512 are still not known to have any inherent security vulnerabilities when used properly, SHA-512 should, in theory, remain harder to break for longer than SHA-256.
Still, like SHA-256, SHA-512 is primarily meant to be used to establish file authenticity and not for password hashing. It can be done, though, so let’s take a look at the algorithm in Python.
Hash Only
Again, you can use hashlib to hash a string or password with SHA-512:
Output:
The output should look like this:
{
    "algorithm": "SHA-512",
    "value": "Z73OpRFbwfE/zOD3C+OGmlv0j+p77N2+zBeKUgjcFzYuaji1NHGHkP7biq6h11Knn5wJqHAzLLhG+4DTEJMdBQ=="
}
One thing to think about as you use more secure hashing algorithms like SHA-512 is the length of the hashed password. While database storage is cheap (and only getting cheaper), if you put a 64 or 100-character limit on your password field for some reason, using SHA-512 will be a problem. Never truncate a password before or after hashing in an attempt to fit it into your database. Make your database fields appropriate for the length of text you need to store.
With Salt
Like SHA-256, if you’re using SHA-512, you should definitely add a salt to reduce the risk of rainbow table attacks. Fortunately, the process is exactly the same as it is in the cases above:
Output:
The output should look something like this:
{
    "algorithm": "SHA-512",
    "salt": "R0lGODlhAQABAAAAADs=",
    "saltOrder": "POSTFIX",
    "value": "hbLCeyPt0GQtKno0yPjby7NJqjilLH5M/pTlOxN8aNn4GiH12+wYLvCUg1HTaypcd8lLuiCNsKmwtTvKNxo0yw=="
}
Bcrypt
The MD5 and SHA families of hash algorithms are meant to be fast, so they’re primarily used to verify file signatures and certificates where delays would mean a poor user experience. While they’ve been used as password hashing methods in the past, this is no longer considered best practice because algorithms that can generate hashes quickly are inherently more vulnerable to hackers who calculate billions of hashes to perform brute force attacks.
Algorithms like bcrypt were purpose-built to slow down this kind of attack. Bcrypt embeds a salt into each hash and implements a “cost factor” that lets developers increase the security of their hashes (by trading off a longer hash generation time). Adding a half-second delay every time to a user’s login time probably won’t bother your users much, but a half-second delay will slow hackers down dramatically when they’re trying to generate billions of hashes.
Hash with Salt
Unlike the previous algorithms discussed, bcrypt requires a 128-bit salt (which is Radix-64 encoded as 22 characters) to hash a password, so there’s no option to hash without one. Fortunately, most bcrypt packages include helpers that will generate the salt for you.
Python doesn’t include a bcrypt implementation in its standard library, so you’ll need to import one. Here I’m using bcrypt which I installed with pip:
Output:
The output should look something like this:
{
    "algorithm": "BCRYPT",
    "workFactor": 12,
    "salt": "JRTqctXrmURv1zqEjMX8Uu",
    "value": "6FU1hdF4DOr3vbwyEvx8JW9eSKUvvSO",
}
Note that bcrypt encourages the best practice of creating a salt for each password by giving you the bcrypt.gensalt() function. However, like with our other examples, if you want to see how I got the example output above, you can have bcrypt use the same salt as you see in the example.
As you can see, the resulting hash from bcrypt is a little different from the strings generated by previous algorithms. Bcrypt uses a very specific structure for its hashes, which allows you to increase the work factor and define the hash algorithm in the hash itself. This can be useful if later versions of the bcrypt algorithm implement bug fixes or improvements.
Choosing a Password Hashing Algorithm
While bcrypt is a secure and appropriate option for hashing your passwords, there will always be varying opinions on the “best” way to implement password security on the internet. Other viable options include Argon2 or scrypt.
In any case, your password hashing algorithm should:
- Consistently produce the same hash for the same input string
- Be unique to each possible password given
- Work quickly enough for end-users
- Slow down attackers who gain access to your hashed passwords
There may be no such thing as a “perfect” password hashing algorithm for all time, though. As computing power increases and becomes cheaper, researchers will have to continue building stronger hashing algorithms.
Using Hashed Passwords
Now that you understand how to hash a password properly in Python, it’s time to talk about how you’ll actually use these hashed passwords. In practice, there are three typical workflows you might face when dealing with hashed passwords.
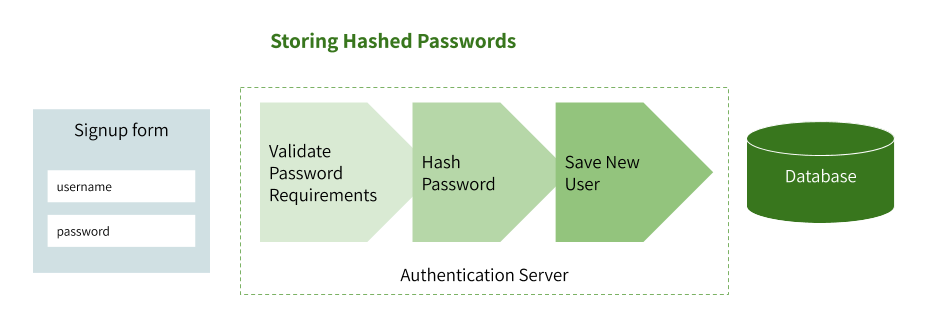
Storing Hashed Passwords
When a user signs up for your service, they will typically enter a username and password in plaintext. When they click “submit,” the username and password are sent to your server (hopefully, over an encrypted SSL connection) where you should:
- Validate that the password meets your password requirements
- Hash the password using your chosen algorithm
- Save the hashed password, salt (if needed), and username to your database
- Return a success message to the user
- Either log the user in immediately or ask to log in using their new password
If you’re using a SQL database, you should store the hashed password as a BINARY(X), where X is the length of the binary generated by your hashing algorithm (60 in bcrypt’s case). Storing the password in binary could be important as CHAR fields in some character encodings do not distinguish between capital and lower-case letters.
It’s also important to note that if you use bcrypt, you don’t need to store your salts as it builds them into the hash.
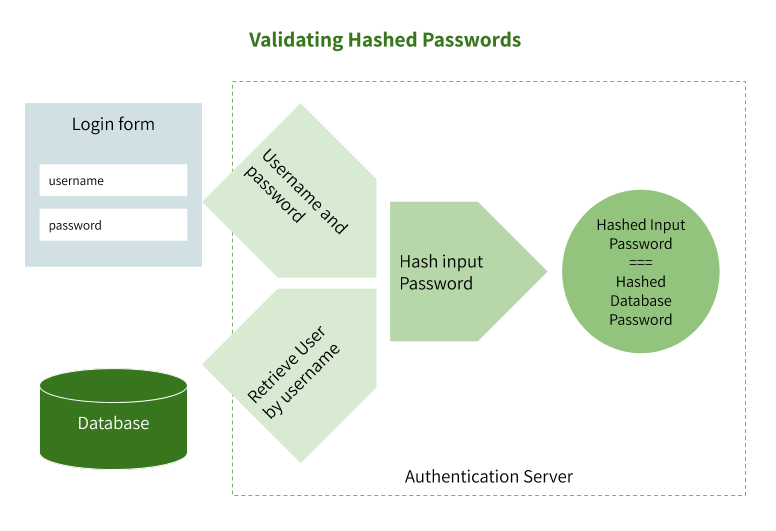
Validating Hashed Passwords
Once you’ve stored a user’s hashed password, you are ready to validate it next time they log in. Typically, the password validation flow looks like this:
- User enters username and password on the login page
- The username and plaintext password is sent to your server over an encrypted SSL connection
- You retrieve a user (with their password and salt) from your database by their unique username
- You hash the plaintext password using the same salt
- You compare the hashed password stored in your database with the one submitted on the login page
- If they match exactly you can safely proceed with user authentication
Many hashing libraries take care of some of these steps for you. For example, bcyrpt includes a checkpw function that compares a binary plaintext password to your stored hash. When available, you should use these built-in functions because they’ll prevent you from making errors in your password validation logic.
Importing Users with Hashed Passwords into Okta
Finally, you may someday need to import user accounts with hashed passwords into a third-party service like Okta’s. User authentication often starts relatively simply, but as you start to build more complex and secure features, you’ll realize that it takes a lot of work to maintain. Okta can handle password resets, forgotten passwords, enterprise SSO, JWTs, and much more for you, making it much easier to maintain a secure and scalable authentication process.
To import existing users with hashed passwords into Okta, you’ll need to make a POST request to their /users endpoint. The payload of your request should include the user’s email, profile information, and details about their password and the algorithm used:
Use this command to create a user in Okta named “Isaac Brock” that has a password with the value of “test password” - note that the value of the “hash” part of the payload exactly matches the example above!
curl -v -X POST \
-H "Accept: application/json" \
-H "Content-Type: application/json" \
-H "Authorization: SSWS ${api_token}" \
-d '{
  "profile": {
    "firstName": "Isaac",
    "lastName": "Brock",
    "email": "isaac.brock@example.com",
    "login": "isaac.brock@example.com",
    "mobilePhone": "555-415-1337"
  },
  "credentials": {
    "password" : {
      "hash": {
        "algorithm": "BCRYPT",
        "workFactor": 12,
        "salt": "HrtURKVYwHEOR/PMBBakyu",
        "value": "51qdkp4j1j0NoqwlXhHhCfiM1dqxUP2"
      }
    }
  }
}' "https://${yourOktaDomain}/api/v1/users?activate=false"
Okta’s API will return a user ID, which you can then store in your database. Now, instead of validating a user’s username and password yourself every time they log in, you can pass the request over to Okta or use an Okta-hosted sign-on screen. Once Okta authenticates the user, you can use their user ID to look up profile data you maintain in your own database.
You can use this same pattern to create users with pre-existing hashed passwords. Just change the value of the “hash” portion of the payload to any password that was hashed using code as you saw in the examples above.
Learn More
While this guide takes you deep into password hashing in Python, there are still many password security topics that I haven’t covered. For example, how do you set strong password requirements? Should you validate that users aren’t reusing compromised passwords? What other password hashing algorithms are out there? Here are a few more resources you should check out:
- Passwords Evolved: Authentication Guidance for the Modern Era by Troy Hunt
- Have I been pwned API
- NIST Digital Identity Guidelines
To learn more about how to create users in Okta with a hashed password, see Okta’s official documentation on how to Create a User with an Imported Hashed Password.
These blog posts are also good resources for learning about other ways to import users into Okta:
As always, if you have any questions please comment below. Never miss out on any of our awesome content by following us on Twitter and subscribing to our channel on YouTube!
And lastly, special thanks to Gabriel Sroka for his help reviewing drafts of this post.
Okta Developer Blog Comment Policy
We welcome relevant and respectful comments. Off-topic comments may be removed.