Unity WebGL + PlayFab Authorization in 20 Minutes
As game creators, we hold a fundamental responsibility to protect and secure any and all data that our players entrust to us. Historically, security in games has not been high on the priority list because games were enjoyed anonymously and offline. But with our society becoming ever more connected, demand for social gaming experiences and online gaming features has increased exponentially. This has led to the development of cloud-based gaming platforms, such as PlayFab, that handle everything from multiplayer server hosting, leaderboard tracking, virtual economy, data/analytics, and much more. Even games that are mostly considered “offline” are seeing increased demand for some connected functionality. As more games are developed in the cloud (or developed with cloud-based platforms) and track an increasingly large amount of user data, security is becoming one of the highest priorities for the games community.

In their 2020 State of the Internet / Security report, Akamai tracked 100 Billion credential stuffing attacks from June 2018 to June 2020 and found that 10 Billion of these attacks were targeted at gamers. It is not just up to the player or the distribution platform to take security seriously. Players expect that the game companies producing the product that they are trusting their data to will also be keeping them secure.
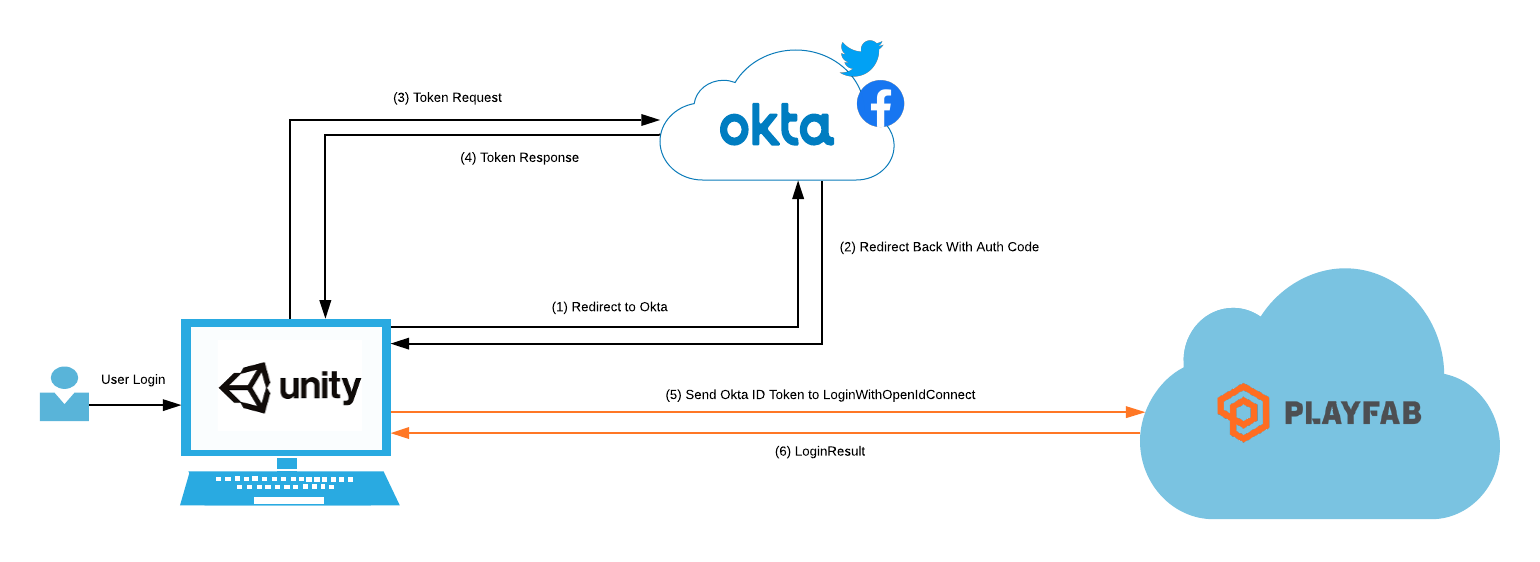
In Identity Security for Games in C# with Unity, we took a look at the extreme basics of storing and authenticating users in a Unity project. That example is a great starting point for the fundamentals, providing a “hello world” concept within the Unity editor. I want to expand upon how the design can change depending on the build target and how to make use of a player’s authorization by passing it into other back-end platforms. To do this, we will be building a WebGL application in Unity that authenticates player’s and authorizes them to Azure Playfab; where their player data will be stored. Here is a conceptual overview of what this will look like:
Note: In May 2025, the Okta Integrator Free Plan replaced Okta Developer Edition Accounts, and the Okta CLI was deprecated.
We preserved this post for reference, but the instructions no longer work exactly as written. Replace the Okta CLI commands by manually configuring Okta following the instructions in our Developer Documentation.
Prerequisites
- Sign up for a free Azure Playfab account.
-
Sign up for a free Azure account.
- Download and install Unity.
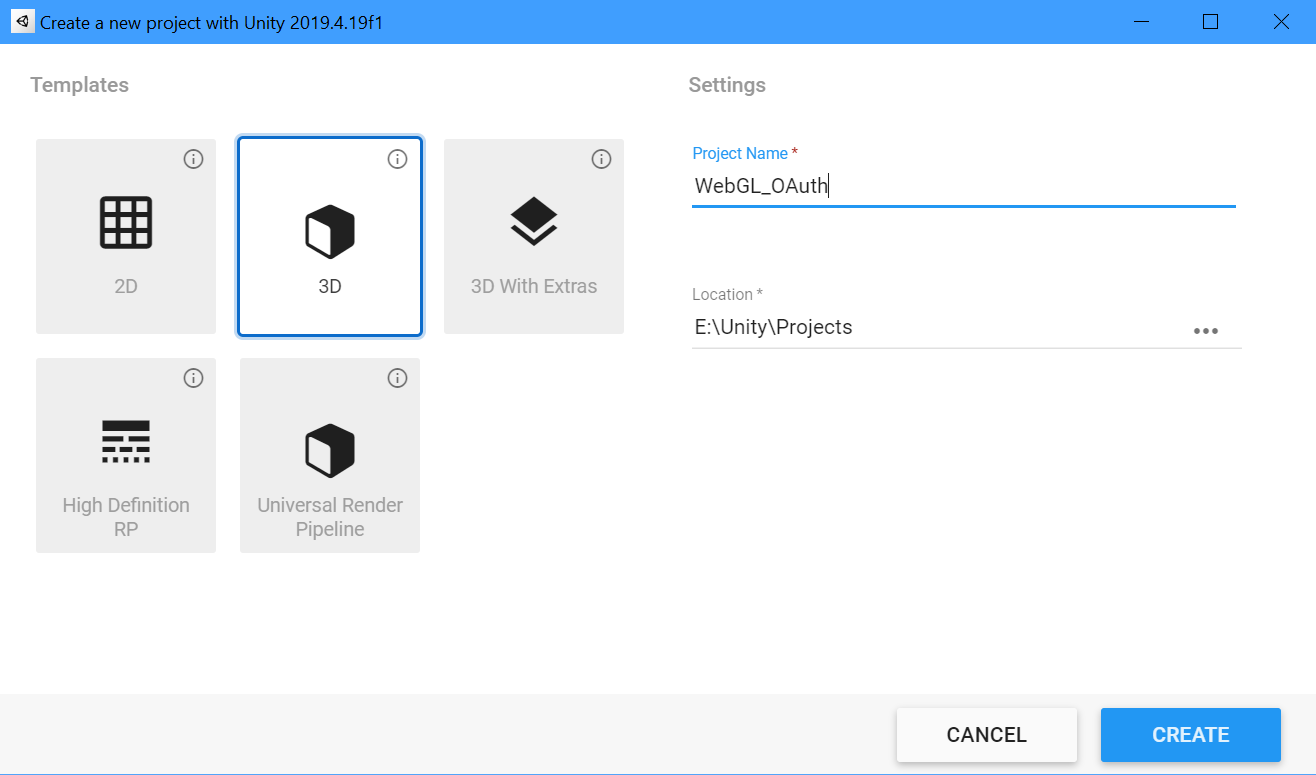
- Create a new Unity project from Unity Hub with the 3D template
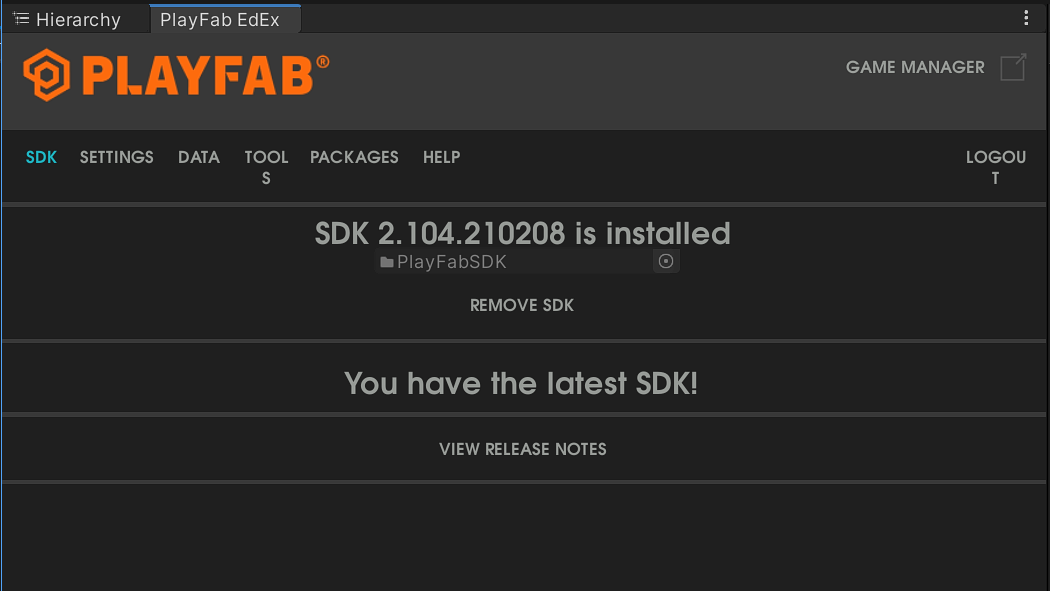
- Download and configure the Playfab Unity SDK and Editor Extensions
Build Target and Design
For this project, I will be targeting Unity WebGL. The build target is important because different platforms will require different means of facilitating user interaction.
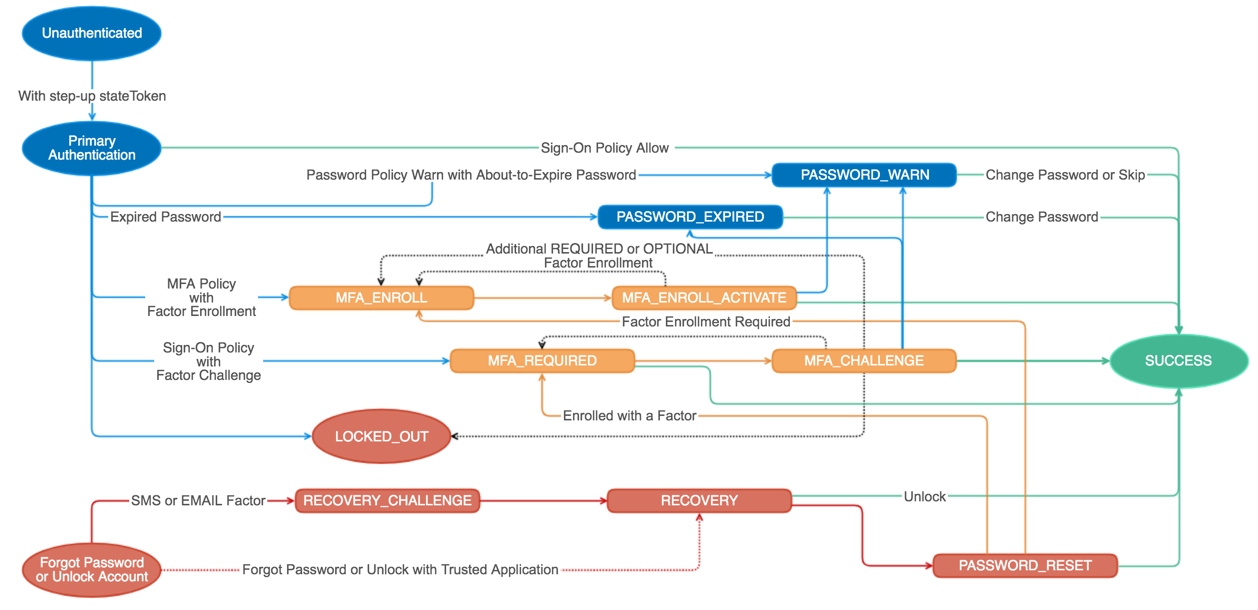
In Identity Security for Games in C# with Unity, I described both native and OAuth design concepts. While building out a user interface for authentication natively in the engine might seem like the best approach because of user experience, it is not the preferred approach for security, and it typically adds much more effort for the developer. This is because it requires the developer to build out logic supporting the entire authentication state machine; securely handling every event, every MFA state, registration, MFA enrollment, user self service (account unlock and password reset), etc.
Prebuilt widgets can simplify the amount of effort in this regard. However, developers would still be asking a player to enter their password into an untrusted UI that the developer is responsible for and typically not able to fully keep secure. This is why OAuth is considered the best practice standard for authorization within the security industry, and utilizing a security platform’s hosted login experience is considered the most secure way to handle authentication. Players will be entering their credentials into a trusted browser window and a trustworthy security platform. Best of all, developers can share the responsibility of keeping the login experience with the security platform, which is much easier and more secure than attempting to do it all themselves.
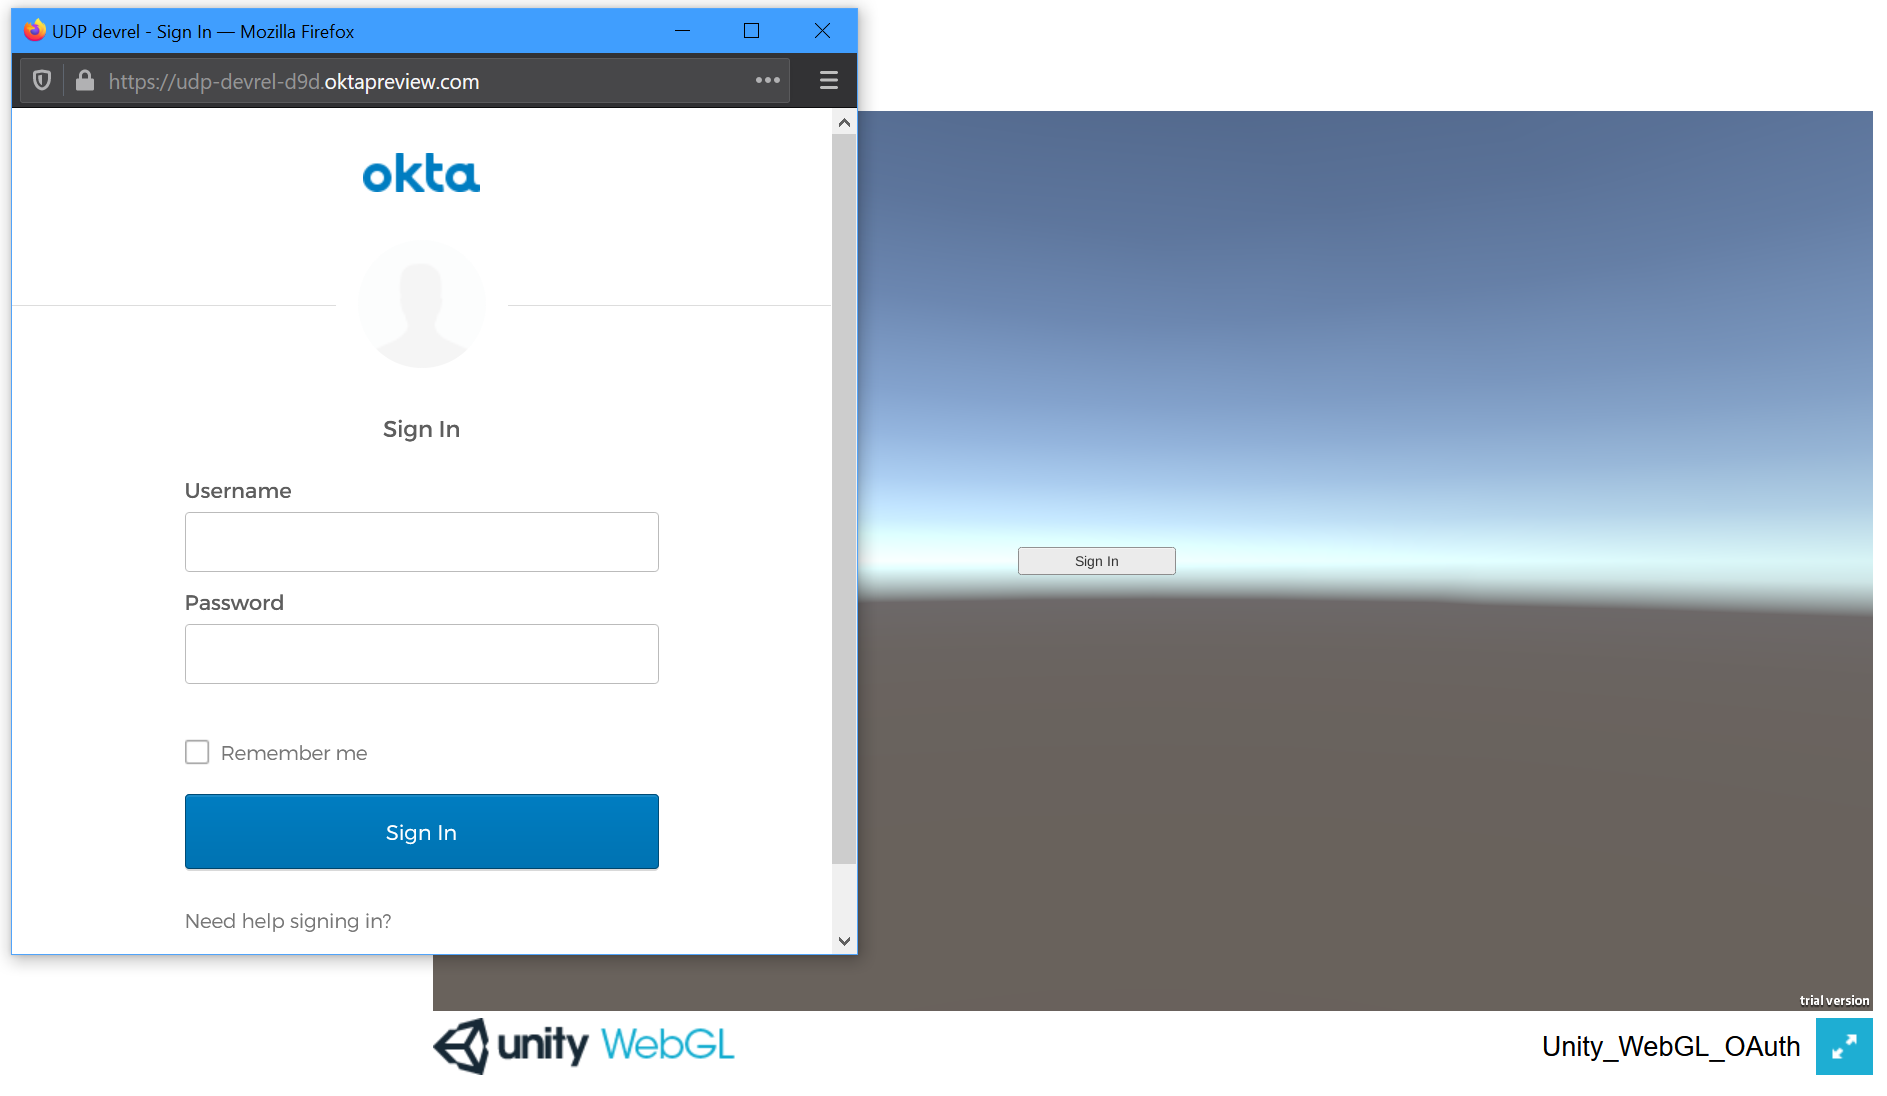
Ok, great. But how does this relate to the build target? The browser. OAuth relies on a browser to facilitate user authentication, which must validate the user identity before providing authorization. Every platform will have a different, platform-specific way of presenting the user with a browser to interact with. For WebGL, the game is already running in a browser, so a simple pop up is all that is needed. But if the build target were Android, Chrome Custom Tabs would instead be needed to embed the browser into the app. Similarly, if the build target was iOS, Safari View Controller would be needed to embed the browser into the app. For full-screen games on a PC, it would be better to use a device code concept, similar to a TV or IoT device, or even authenticate the player before launching the game client; from an external launcher application interacting with the default browser on the operating system. The browser interaction and design will change for every platform and device. When designing the authentication experience, the build target will heavily influence the rest of the design.
The good news is that once the target is defined and the browser interaction decided, the rest of the code should be similar across all platforms. This is thanks to the shared responsibility with a security platform’s hosted login experience and a standardized authorization specification. The job of the developer is to securely provide a platform-preferred browser experience for the user and direct them to the OAuth authorize endpoint. Once the user has authenticated, the browser is closed, and an auth code is captured in client code to be exchanged for tokens behind the scenes. With tokens in hand, user authorization can be passed to all other backend cloud platforms; providing a centralized, and secure, identity security design that drastically simplifies the implementation effort.
With a build target in mind, lets look at how to code this in Unity.
Create the Project
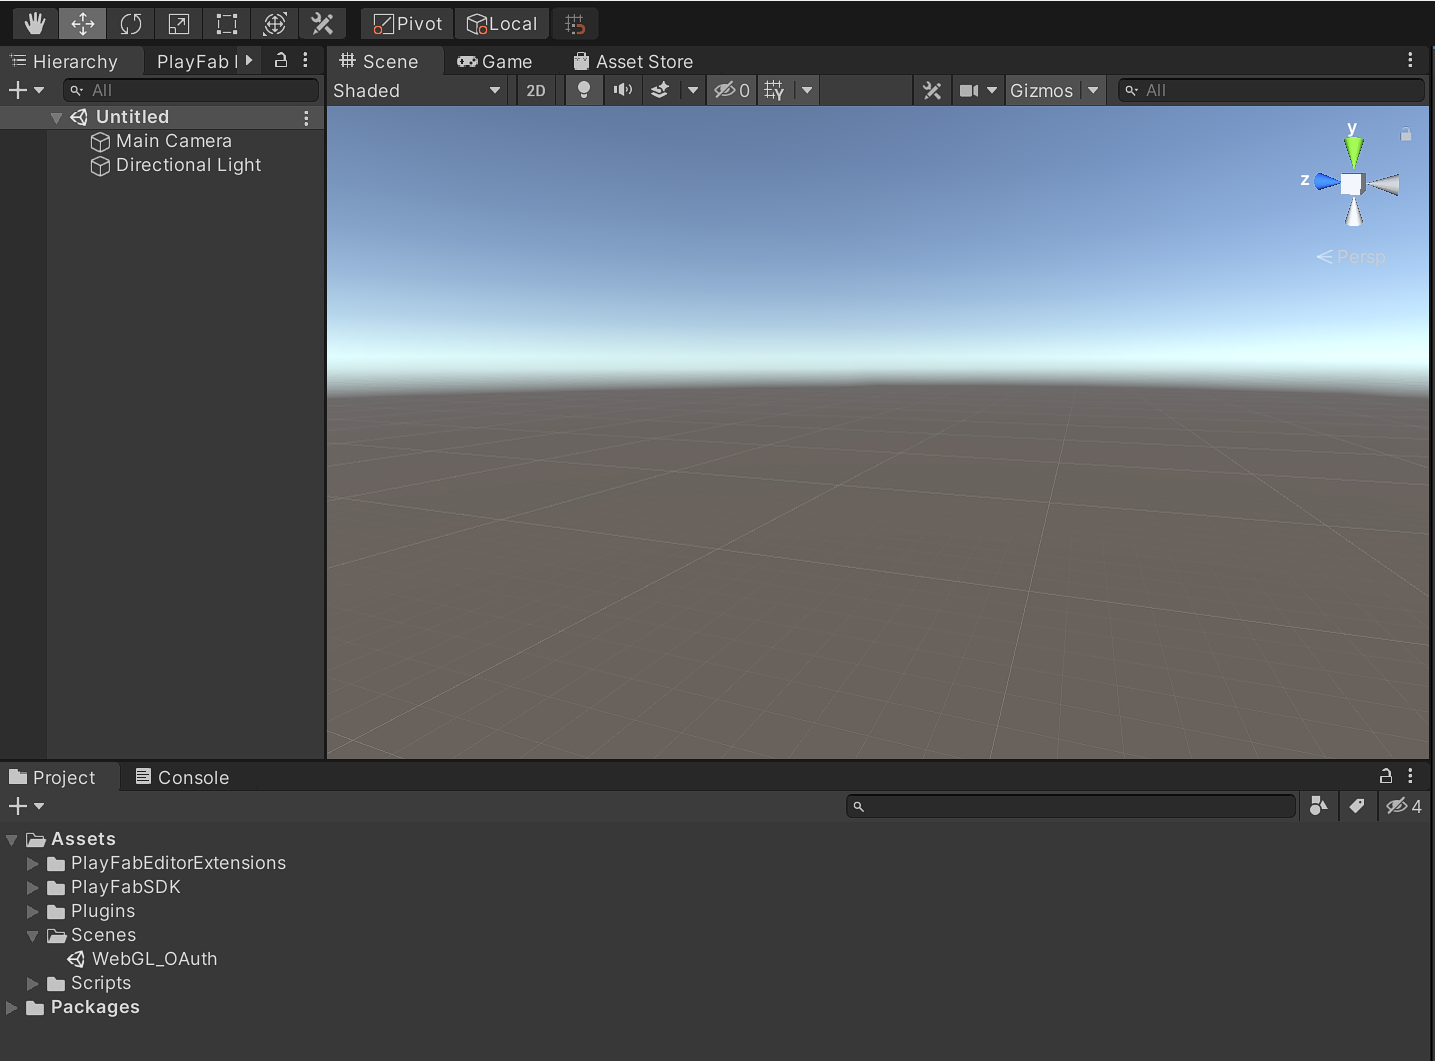
First, if you have not already done so, create a new project from Unity Hub with the 3D template.
Next, configure the Playfab Unity SDK and Editor Extensions using the Unity Quickstart provided by PlayFab.
Create a new scene by clicking File, New Scene and save it in the projects Assets > Scenes folder.
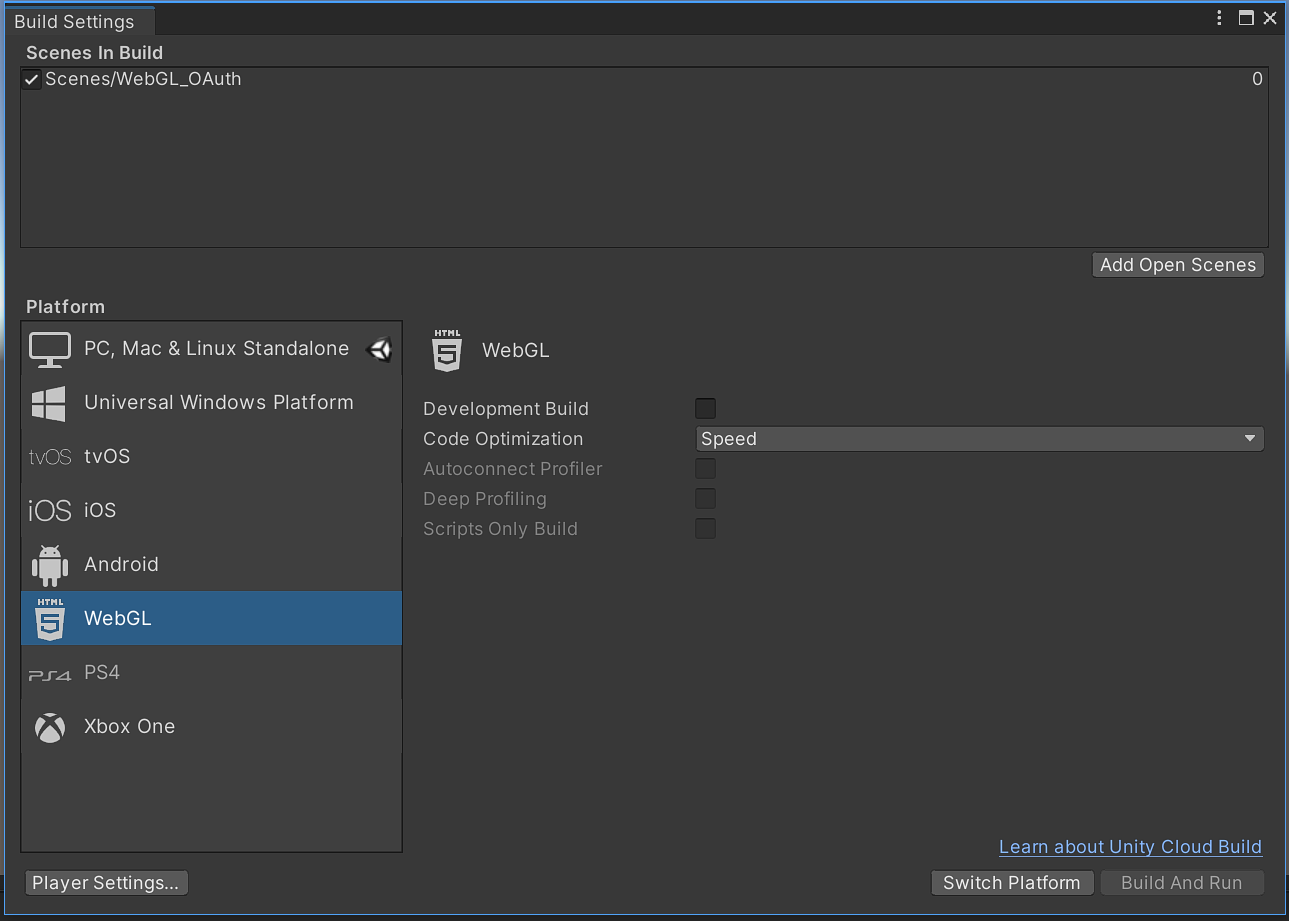
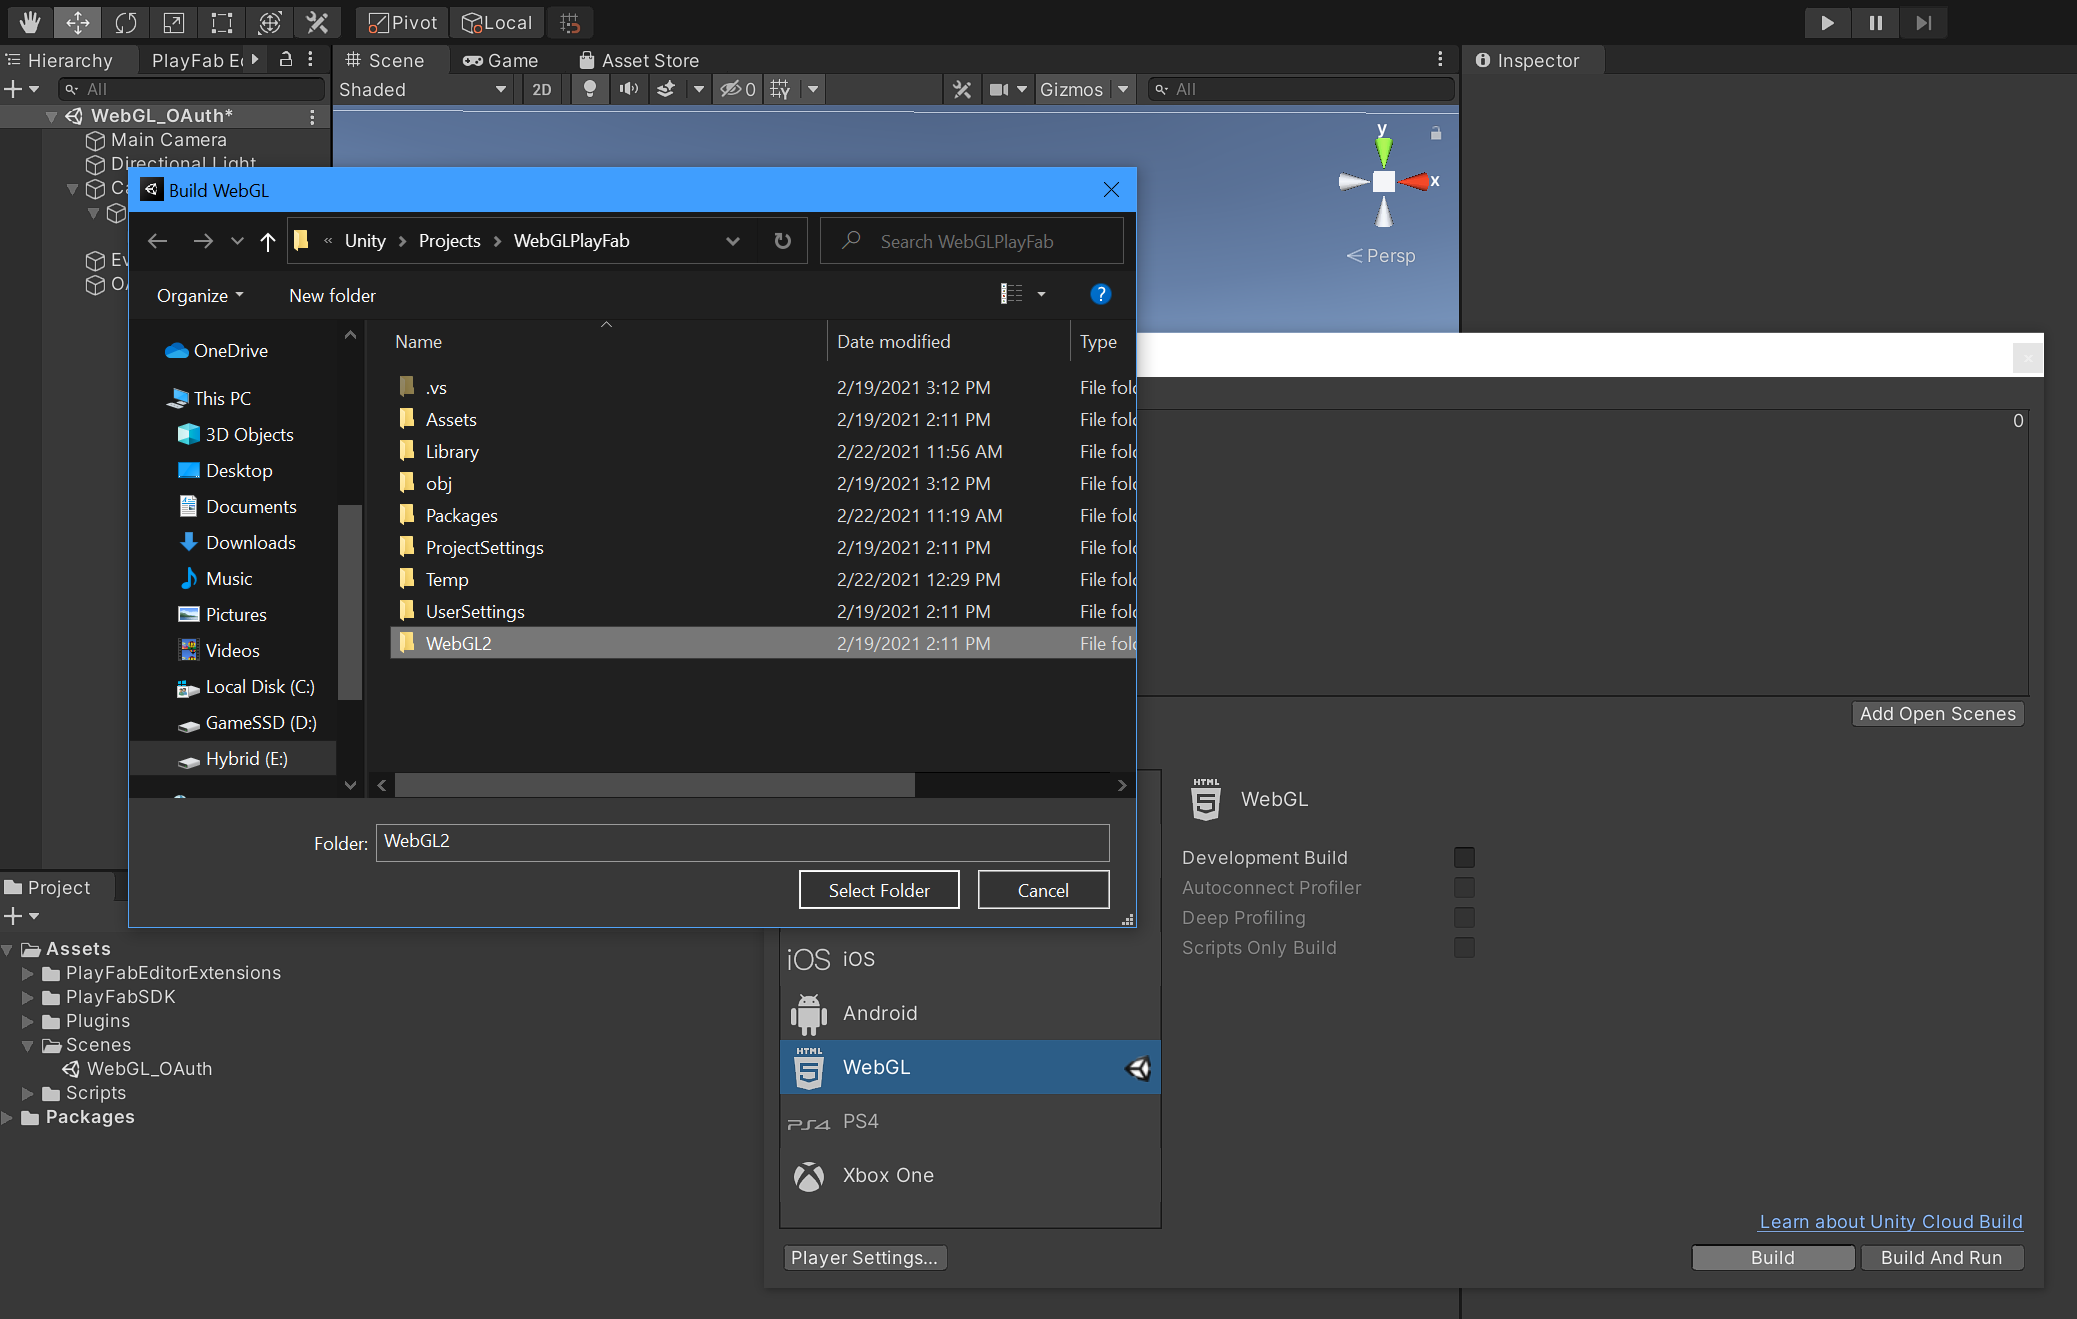
Change the project to targetWebGL by, clicking File, Build Settings, WebGL, and then click Switch Platform.
Note: If you did not install WebGL when you installed this copy of the editor, you would be prompted to do so now.
Make sure that your newly created scene is checked in the Scenes In Build menu, and then close the Build Settings UI.
Note: If you do not see your scene, click the Add Open Scenes button in the bottom right of the
Scenes In Buildmenu.
Right-click in the Scene Hierarchy panel and click UI, Button.
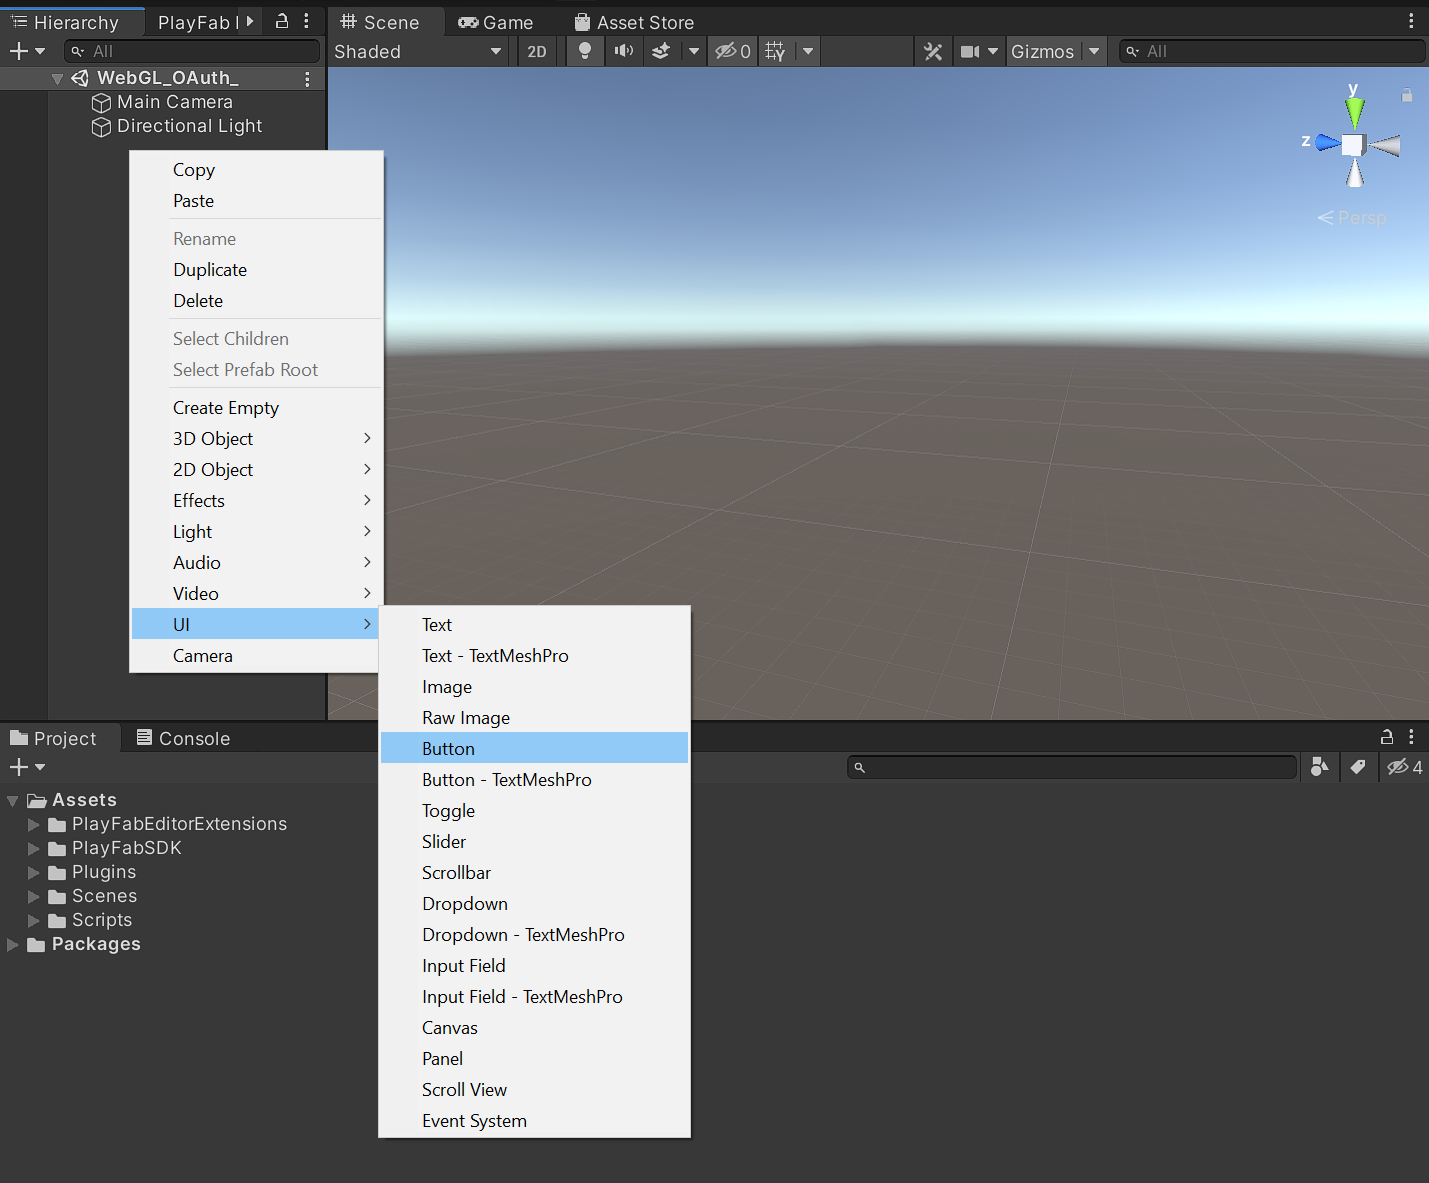
This will be the button that triggers the authentication request.
Right click the button in the Hierarchy panel, click Rename and name the button Sign In.

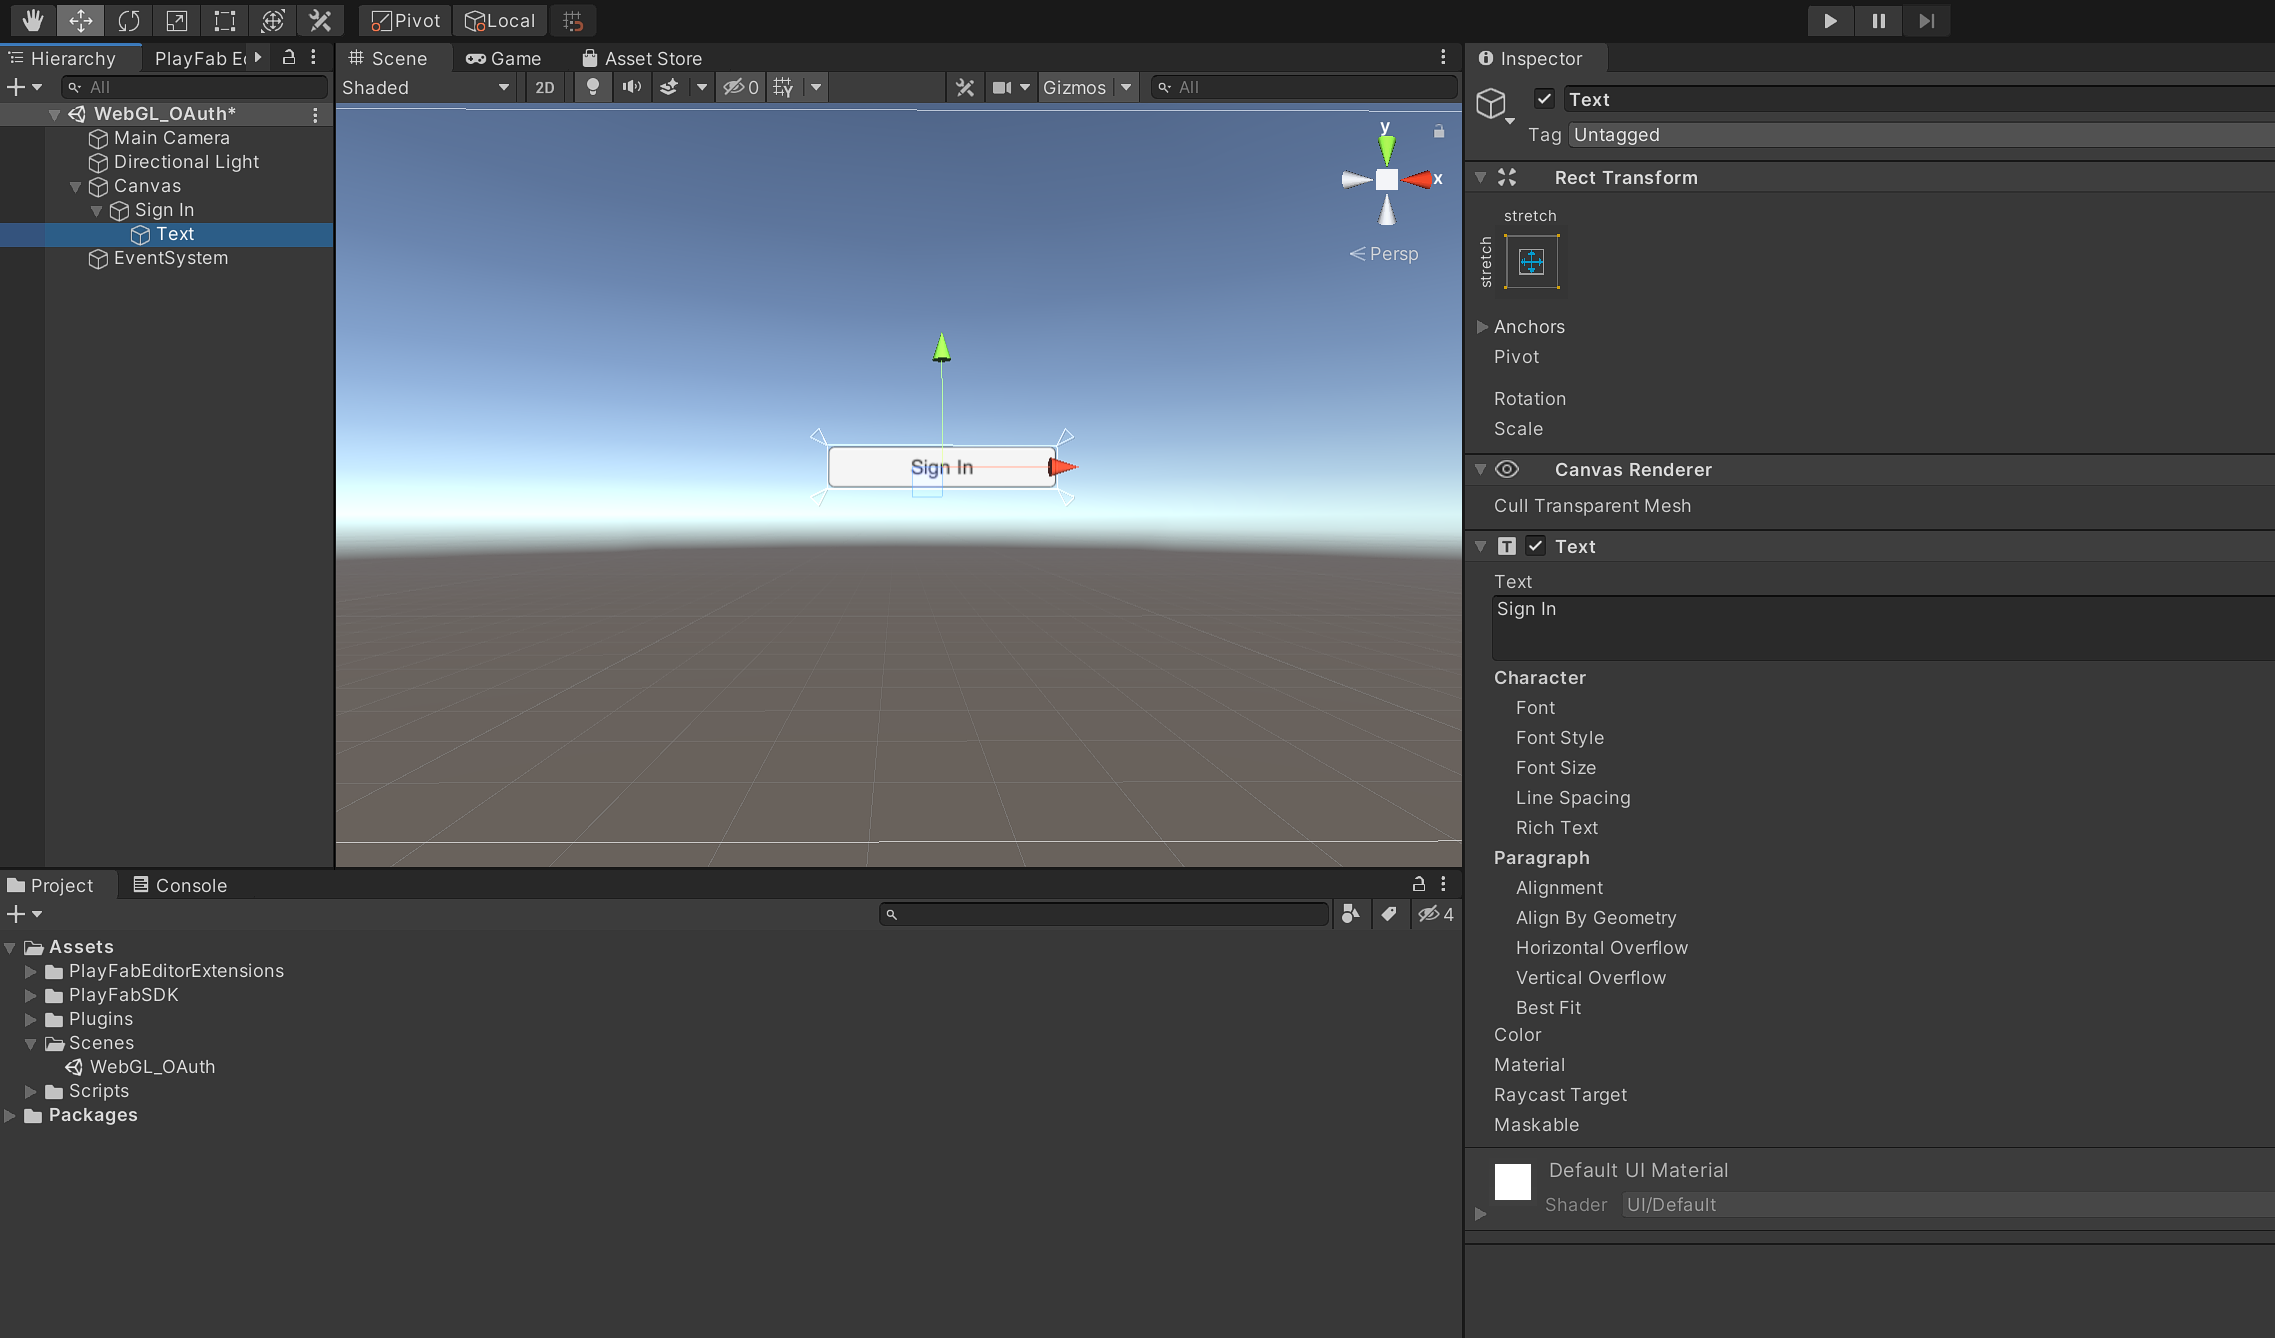
Expand the Sign In button in the Hierarchy panel to expose its text object and select it.
Change the text of the button in the Inspector panel to Sign In.
Interact With the Browser
With the project ready, the next thing needed is a way for the WebGL object to interact with the browser HTML that is holding it. This is because the C# in Unity will be called when the user clicks the Sign In button and that C# code needs to instruct the browser to render a popup window for the user to complete authentication.
To do this, a jslib is used to act as the middleman between the C# in Unity and the JavaScript in the WebGL objects parent page.
Open up a preferred text editor, create a new file called OAuth.jslib, and save it in your project’s Assets > Plugins folder.
Add the following to OAuth.jslib and save it.
mergeInto(LibraryManager.library,
{
        startAuthentication: function (utf8String)
        {
                var authRequest = UTF8ToString(utf8String);
                var authorizationRequest = authRequest;
                startAuth(authorizationRequest);
        }
});
This code very simply takes an OAuth authorization request URI, passed to it from the calling C# in Unity, and passes it to a corresponding startAuth() function in the parent page’s JavaScript. This startAuth() function will instruct the browser to open a popup and redirect to the OAuth authorization URI passed to it by the C# in Unity. The WebGL object calls the jslib which runs in the browser, allowing it to interact with the code running in the browser where the WebGL object cant.
Next, create the startAuth() function in the JavaScript within the WebGL’s parent page so that the C# can interact with it via the OAuth.jslib. To do this, start by building the WebGL project in Unity, which will generate an index.html that renders the WebGL object.
Click File, Build Settings and then click Build.
Select a preferred output folder and then click Select Folder.
Once the build process is complete, open the output folder and then open the index.html file in a preferred text editor. The contents of index.html may vary depending on if you are on Windows or Mac and depending on what version of the editor you are using. The important thing to note in what Unity generates is that there should be a <script> element towards the top of the HTML that contains the following:
<script>
        var unityInstance = UnityLoader.instantiate("unityContainer", "Build/WebGL2.json", {onProgress: UnityProgress});
</script>
unityInstance is the container that holds the WebGL object. This is how the page’s JavaScript will be able to call back to the C# code in Unity using:
unityInstance.SendMessage(objectName, methodName, value);
Find the <body> tags in the HTML and locate the closing </body> tag. Right before the closing tag, at the end of body, add the following:
<script>
function startAuth(authorizationRequest)
{
        window.addEventListener('message', function (e)
        {
                unityInstance.SendMessage("OAuth2", "getAuthResults", data);
        }, false);

        var childwin;
        const childname = "Authenticate";
        childwin = window.open(authorizationRequest, childname, 'height=300px, width=500px');

        childwin.focus();
};
</script>
This is the JavaScript function that the Sign In button in the WebGL object will trigger. The button does this by first calling a function in C# on its click event. That function will then call the OAuth.jslib which will then call this startAuth() function in the page JavaScript. This represents the best way for WebGL to provide browser interaction to the player from within the WebGL object.
window.addEventListener('message', function (e)
{
        unityInstance.SendMessage("OAuth2", "getAuthResults", data);
}, false);
window.addEventListener() creates an event listener that will be called by a child popup window when authentication is complete. The result of authentication will be an Auth Code sent back to the C# in the WebGL object via unityInstance.SendMessage().
var childwin;
const childname = "Authenticate";
childwin = window.open(authorizationRequest, childname, 'height=300px, width=500px');
With the event listener ready, window.open() is used to create a popup window to the OAuth authorization request URI.
Finally, childwin.focus(); ensures that the popup focuses on the user to interact with.
Now that the WebGL’s parent page can initiate the authentication process and wait for a response from the authentication process, the next thing that is needed is a separate callback.html page for the OAuth authorization server to redirect the user back to after authentication. Because the authentication process is happening in the parent pages popup window, the callback.html page will also be rendered after authentication is successful. This will allow the callback.html page to receive the resulting Auth Code and send it back to the parent page via the event listener.
In the same folder as index.html create a new file called callback.html using a preferred text editor. The HTML in this page should be designed based on project needs, but it typically will not be rendered long enough for a player to see it. Add the following and customize the HTML as desired:
 <!DOCTYPE html>
<html lang="en-us">
<head>
    <script>
        //Parse query string helper function
        function getParameterByName(name, url = window.location.href)
        {
                name = name.replace(/[\[\]]/g, '\\$&');
                var regex = new RegExp('[?&]' + name + '(=([^&#]*)|&|#|$)'), results = regex.exec(url);

                if (!results)
                {
                        return null;
                }

                if (!results[2])
                {
                        return '';
                }

                    return decodeURIComponent(results[2].replace(/\+/g, ' '));
        }

        //Get auth code from query string
        var code = getParameterByName('code');
        //Get state from query string
        var state = getParameterByName('state');

        window.opener.postMessage(code + "," + state, "*")

        try
        {
                window.close();
        }
        catch (e) { console.log(e) }

        try
        {
                self.close();
        }
        catch (e) { console.log(e) }
    </script>
</head>
<body>
</body>
</html>
getParameterByName() is a helper function that will parse the Auth Code and OAuth State from the query string.
window.opener.postMessage() sends the State and Auth Code to the parent window’s event listener so that it can send them back to a callback function in the WebGL’s C#.
Finally, the popup window is closed, putting the player back on the parent page where the WebGL object is waiting for authentication to complete.
With the browser portion of the project complete, the next step is to create the OAuth code in Unity that will be called by the Sign In button’s on click event.
Note: Now that customizations have been made to
index.html, it will need to be backed up and replaced every time the project is built because Unity will overwrite it each time.
Adding OAuth
Configure an Authorization Server
Before you begin, you’ll need a free Okta developer account. Install the Okta CLI and run okta register to sign up for a new account. If you already have an account, run okta login.
Then, run okta apps create. Select the default app name, or change it as you see fit.
Choose Single-Page App and press Enter.
Use https://appName.azurewebsites.net/callback.html for the Redirect URI and set the Logout Redirect URI to https://appName.azurewebsites.net/index.html.
The
appNamein the redirect URIs is just meant to be a placeholder. You should replace it with a name that will be used later when deploying the Unity project to Azure App Services.
What does the Okta CLI do?
The Okta CLI will create an OIDC Single-Page App in your Okta Org. It will add the redirect URIs you specified and grant access to the Everyone group. It will also add a trusted origin for https://appName.azurewebsites.net/index.html. You will see output like the following when it’s finished:
Okta application configuration:
Issuer:    https://dev-133337.okta.com/oauth2/default
Client ID: 0oab8eb55Kb9jdMIr5d6
NOTE: You can also use the Okta Admin Console to create your app. See Create a Single-Page App for more information.
Create the OAuth Script
In Unity, install Newtonsoft.Json for Unity using the instructions outlined in the library repo.
Next, create a new folder in the Assets folder and name it Scripts.
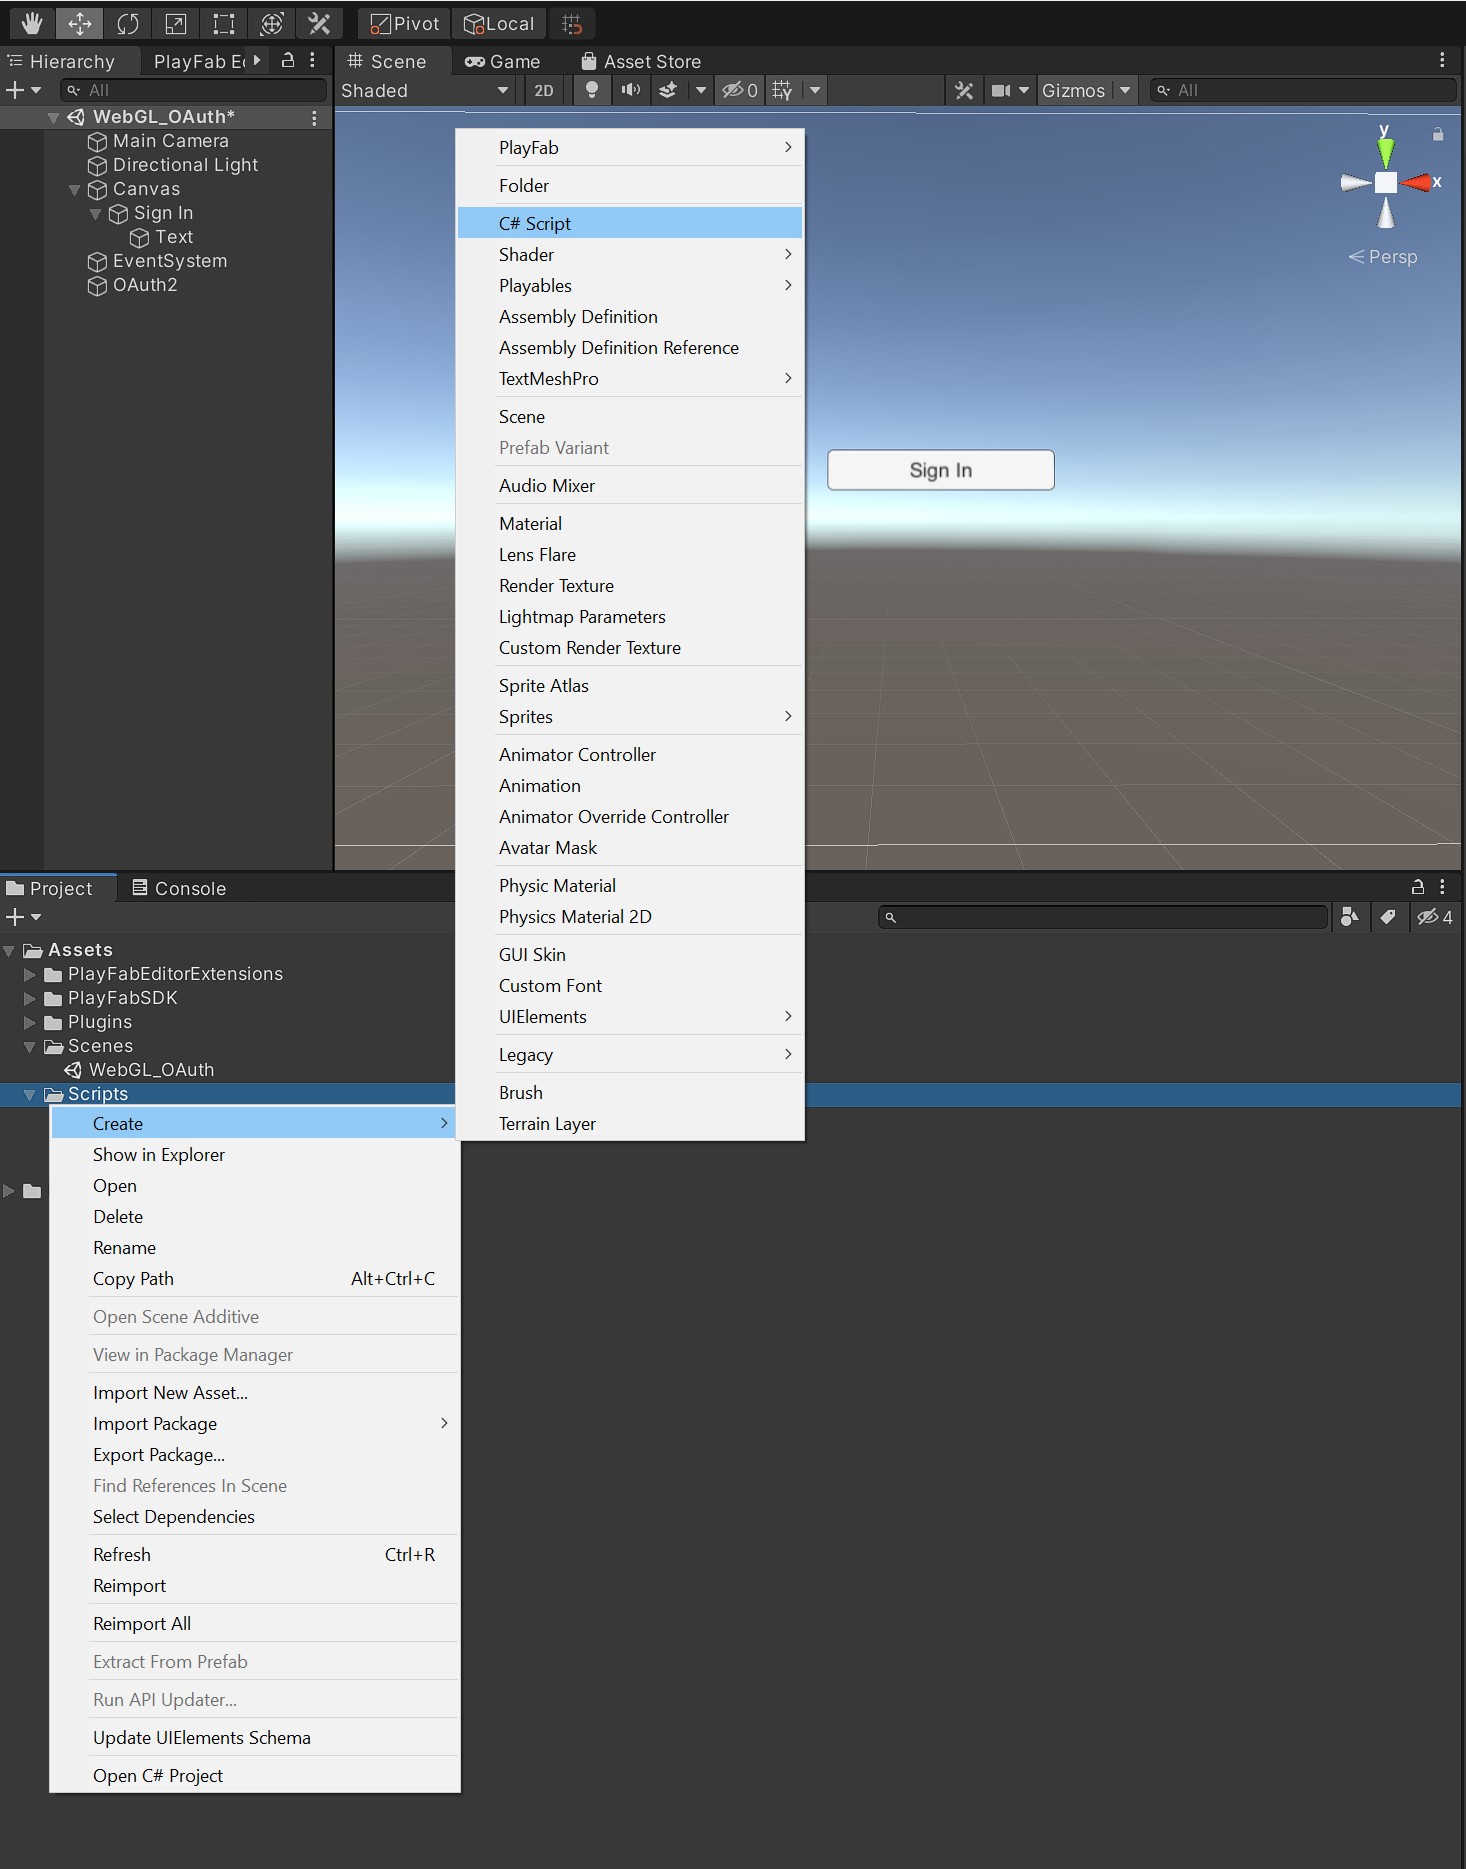
Right Click in the scripts folder, click Create, and then select C# Script. Name the script OAuth and double click to open it in Visual Studio.
Start by referencing the following libraries:
using System.Collections.Generic;
using UnityEngine;
using System;
using System.Text;
using System.Security.Cryptography;
using System.Runtime.InteropServices;
using Newtonsoft.Json;
using UnityEngine.Networking;
Next, create a new class called OAuth and declare the needed instance variables to hold the client’s OAuth configuration.
Note: The instance variables could pull from a preferred configuration solution, or be exposed to the editor for configuration if desired.
public class OAuth2 : MonoBehaviour
{
    [DllImport("__Internal")]
    private static extern void startAuthentication(string authRequest);

    // OAuth2 Client Configuration
    private const string clientID = "{clientId}";
    private const string authorizationEndpoint = "https://{yourOktaDomain}/oauth2/default/v1/authorize";
    private const string tokenEndpoint = "https://{yourOktaDomain}/oauth2/default/v1/token";
    private const string userInfoEndpoint = "https://{yourOktaDomain}/oauth2/default/v1/userinfo";
    private const string redirectURI = "https://appName.azurewebsites.net/callback.html";

    private string state;
    private string code_verifier;
}
Notice DllImport referencing the startAuthentication() function from the jslib at the start of the class. This is importing the jslib so that it can be called from the script.
The OAuth endpoints to be used are defined in the instance variables and the URI to the callback.html.
Enter the Okta Domain for your Okta org where indicated in the code above. Change appName in the redirectURI variable to match the app name used when configuring the approved redirectURI in Okta. Remember, this app name will be used later when hosting the project on Azure App Services.
Create a new function called Authenticate() to be called by the Sign In button’s on click event.
public void Authenticate()
{
        // Generates state and PKCE values.
        state = randomDataBase64url(32);
        code_verifier = randomDataBase64url(32);
        string code_challenge = base64urlencodeNoPadding(sha256(code_verifier));
        const string code_challenge_method = "S256";

        // Creates the OAuth 2.0 authorization request.
        string authorizationRequest = string.Format("{0}?response_type=code&scope=openid%20profile&redirect_uri={1}&client_id={2}&state={3}&code_challenge={4}&code_challenge_method={5}",
            authorizationEndpoint,
            System.Uri.EscapeDataString(redirectURI),
            clientID,
            state,
            code_challenge,
            code_challenge_method);

        startAuthentication(authorizationRequest);
}
The first thing that Authenticate() does is prepare the OAuth Authorization request. This is the request sent to the jslib, and then to the JavaScript running in the browser. The player will be redirected to this URI in a browser popup.
Authorization Code grant with PKCE is the most secure and preferred OAuth grant to use. Historically, OAuth has required a client secret to be passed in the authorization request from the client. This design worked fine for back-end services that could securely store the client secret but is flawed in the case of SPA-type applications that do not have a back end. Proof Key for Code Exchange (PKCE) was created as a way to remove the need for the client secret altogether. A code_verifier is randomly generated by Authenticate() and then hashed with SHA-256 to create a code_challenge. The code challenge is what replaces the client secret and the code verifier is what will be used to validate the request for tokens after authentication.
Next, Authenticate() builds the authorization request URI with all of the required parameters - including the code challenge, a randomly generated state string, and a redirect uri pointing to the callback.html - and passes it to the jslib startAuthentication() function so that it can be passed to the browser for the popup to navigate to.
Once the popup is displayed, the user authenticates and is redirected back to the callback.html page with an OAuth Auth Code and exact copy of the State string that was included in the authorization request. The callback.html uses window.opener.postMessage(code + "," + state, "*") to send the Auth Code and State back to the parent page holding the WebGL object which triggers the event listener to call unityInstance.SendMessage("OAuth2", "getAuthResults", data);. SendMessage() needs to call a function in the OAuth2 class called getAuthResults(), which will process the authorization results and exchange the auth code for tokens. Add the following code to OAuth.cs:
public void getAuthResults(string authResult)
{
        string[] s = authResult.Split(',');

        string code = s[0]; // Auth code from javascript
        string incoming_state = s[1]; //state from javascript

        Debug.Log(code);
        Debug.Log(state);

        if (incoming_state != state)
        {
                Debug.Log(String.Format("Received request with invalid state ({0})", incoming_state));
                return;
        }

        performCodeExchange(code, code_verifier, redirectURI);
}
This function simply receives the results from the authorization request and parses them. The next step is to exchange the Auth Code for an OAuth Access Token and ID Token.
void performCodeExchange(string code, string code_verifier, string redirectURI)
{
        Debug.Log("Exchanging code for tokens...");

        //Generate token request
        string tokenRequestBody = string.Format("code={0}&redirect_uri={1}&client_id={2}&code_verifier={3}&scope=openid&grant_type=authorization_code",
            code,
            System.Uri.EscapeDataString(redirectURI),
            clientID,
            code_verifier);

        UnityWebRequest uwr = new UnityWebRequest(tokenEndpoint, "POST");
        var contentBytes = new UTF8Encoding().GetBytes(tokenRequestBody);
        uwr.uploadHandler = new UploadHandlerRaw(contentBytes);
        uwr.downloadHandler = new DownloadHandlerBuffer();

        uwr.SetRequestHeader("content-type", "application/x-www-form-urlencoded");

        Debug.Log("TOKEN REQUEST BODY: " + tokenRequestBody);

        UnityWebRequestAsyncOperation async = uwr.SendWebRequest();
        async.completed += (AsyncOperation op) => { GetTokenExchangeResponse(async); };
}
A token request is created using the auth code and code verifier. UnityWebRequest() is used to handle the token request, and the response is sent to a function called GetTokenExchangeResponse() once complete. Create GetTokenExchangeResponse() by adding the following code:
private void GetTokenExchangeResponse(UnityWebRequestAsyncOperation op)
{
        Debug.Log("Got Token Response");
        string responseText = op.webRequest.downloadHandler.text;
        Dictionary<string, string> tokenEndpointDecoded = JsonConvert.DeserializeObject<Dictionary<string, string>>(responseText);
        string access_token = tokenEndpointDecoded["access_token"];
        string idToken = tokenEndpointDecoded["id_token"];

        PlayFabInterface.Instance.LoginWithOpenIdConnect(idToken);
}
GetTokenExchangeResponse() simply parses the OAuth Access Token and OAuth ID Token from the response to the token request made by performCodeExchange(). The last line of the function sends the OAuth ID Token to PlayFabInterface.Instance.LoginWithOpenIdConnect() so that it can be used to log the player into PlayFab, which is the last step in this project before it can be deployed.
Finally, Authenticate() referenced a few helper functions for generating the code challenge\verifier, encryption, and encoding.
/// <summary>
/// Returns URI-safe data with a given input length.
/// </summary>
/// <param name="length">Input length (nb. output will be longer)</param>
/// <returns></returns>
public static string randomDataBase64url(uint length)
{
        RNGCryptoServiceProvider rng = new RNGCryptoServiceProvider();
        byte[] bytes = new byte[length];
        rng.GetBytes(bytes);
        return base64urlencodeNoPadding(bytes);
}

/// <summary>
/// Returns the SHA256 hash of the input string.
/// </summary>
/// <param name="inputString"></param>
/// <returns></returns>
public static byte[] sha256(string inputString)
{
        byte[] bytes = Encoding.ASCII.GetBytes(inputString);
        SHA256Managed sha256 = new SHA256Managed();
        return sha256.ComputeHash(bytes);
}

/// <summary>
/// Base64url no-padding encodes the given input buffer.
/// </summary>
/// <param name="buffer"></param>
/// <returns></returns>
public static string base64urlencodeNoPadding(byte[] buffer)
{
        string base64 = Convert.ToBase64String(buffer);

        // Converts base64 to base64url.
        base64 = base64.Replace("+", "-");
        base64 = base64.Replace("/", "_");
        // Strips padding.
        base64 = base64.Replace("=", "");

        return base64;
}
Log Into PlayFab
Configure PlayFab OIDC
Before PlayFab can accept authorization tokens from Okta, a new Open ID Connection will need to be created. This is the connection that will give PlayFab the needed information to validate the player’s ID Token.
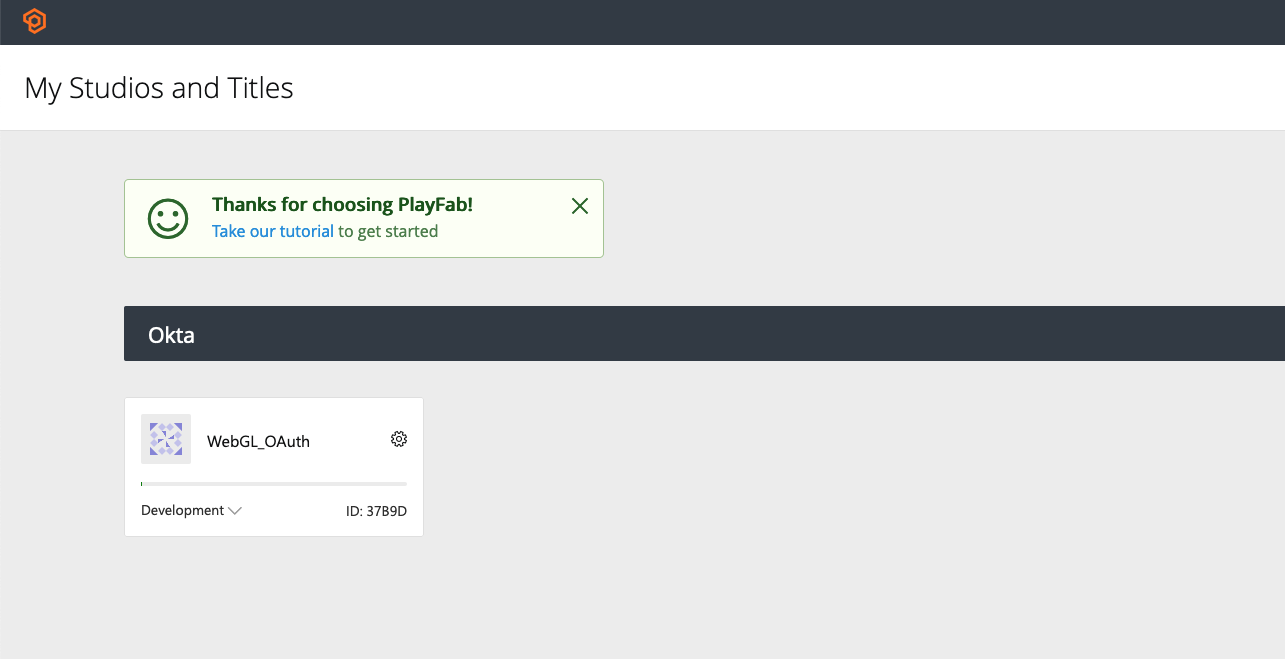
Log into your PlayFab portal and click on the title for your project. If you do not have a Studio or Title created, create them now. The studio and title would have been needed for the PlayFab Unity SDK setup.
Next, click the gear next to the title name in the top left and select Title Settings.
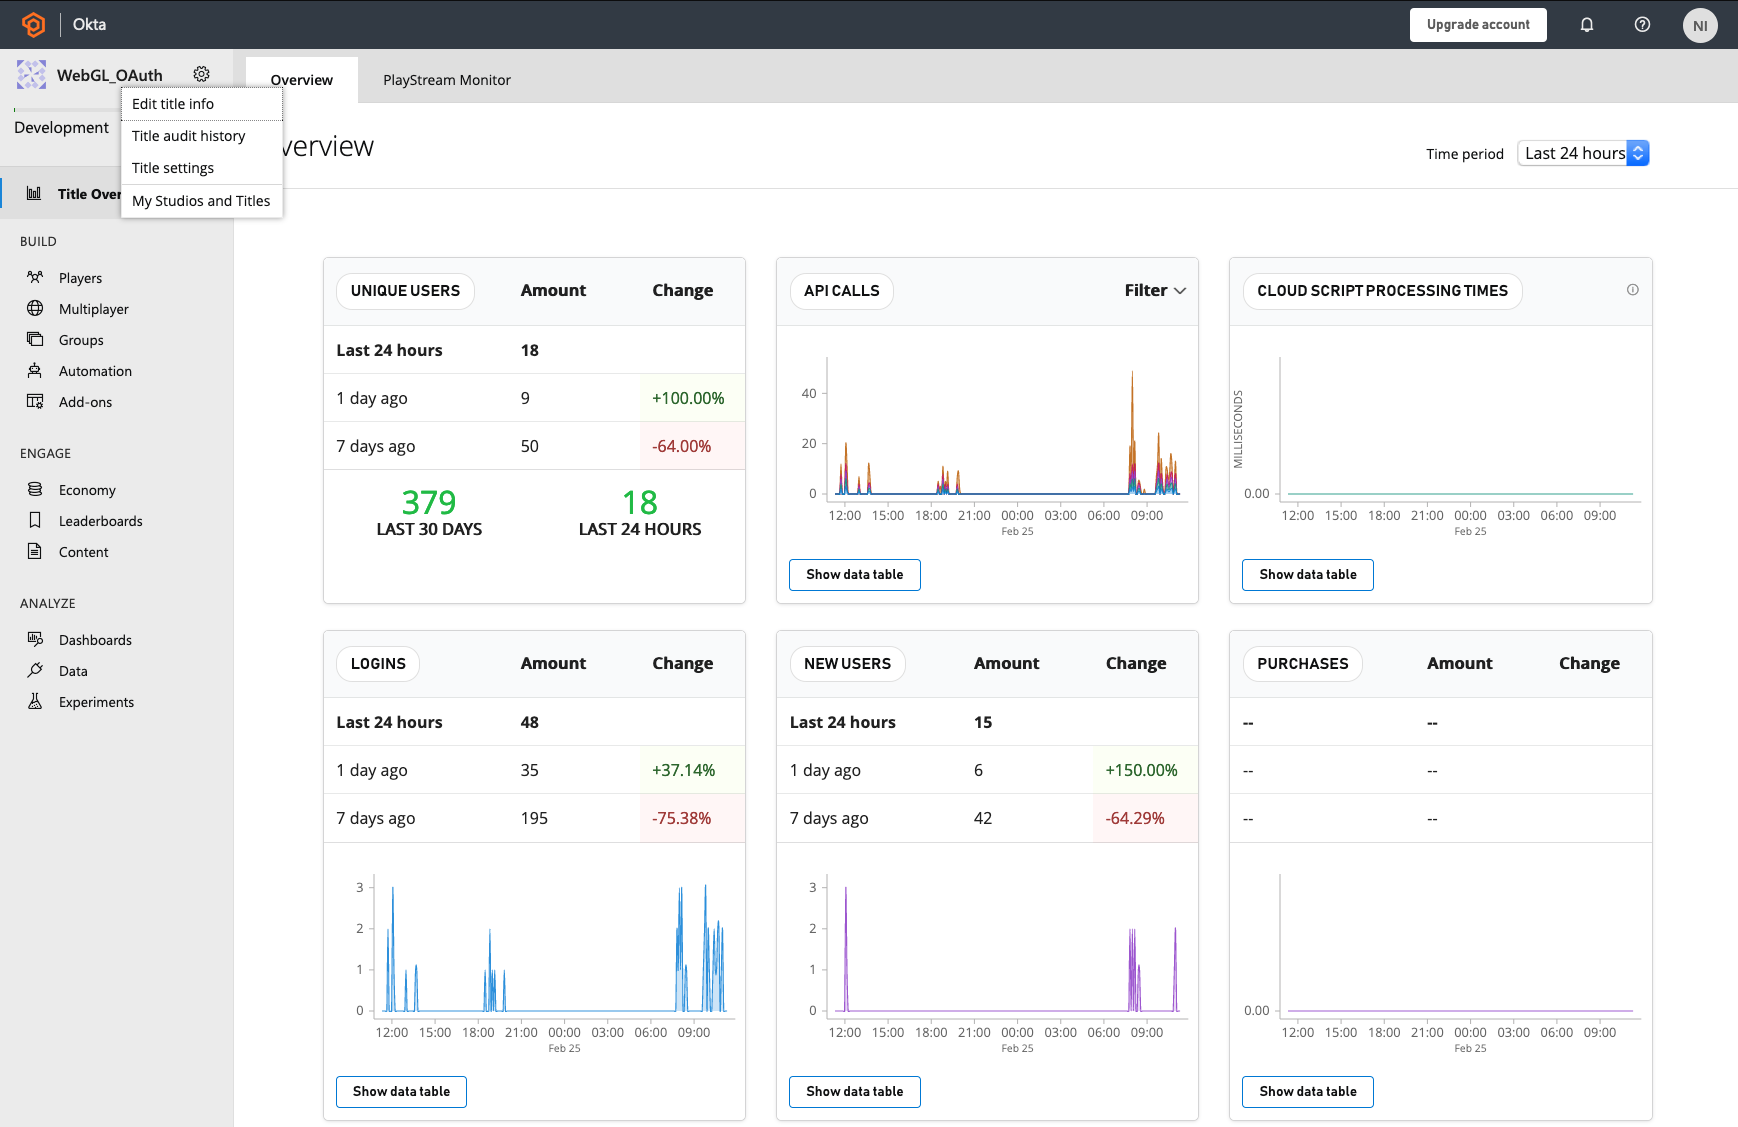
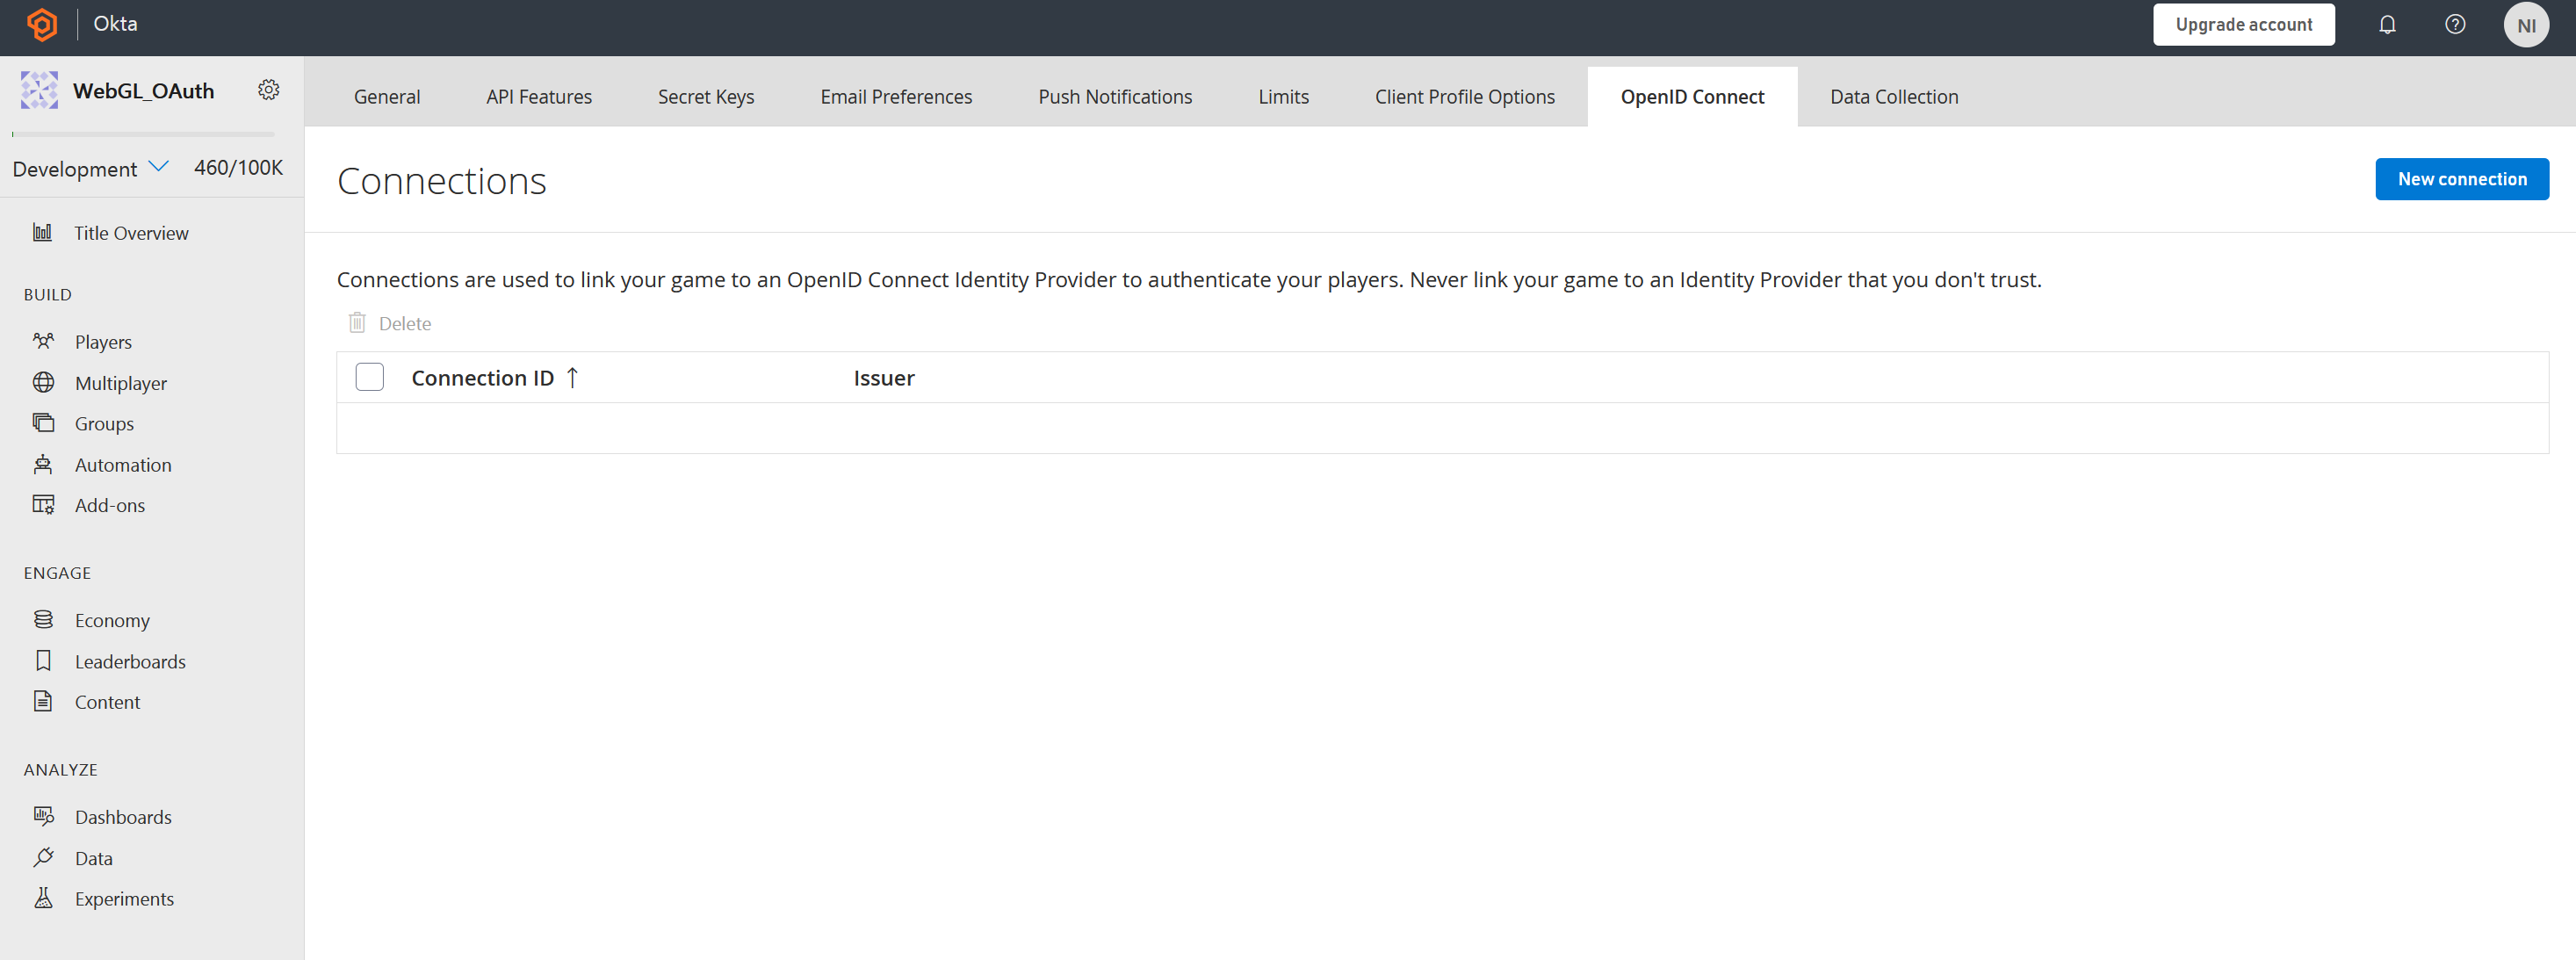
Click the Open ID Connect tab and select New Connection
In the New Connection menu, name the Connection ID Okta and enter the Client ID and Issuer from the app set up by the Okta CLI. Client Secret is not used because of PKCE, so enter any random string into the Client Secret box in PlayFab. Finally, PlayFab is just validating an ID Token from an external authorization server so nonce is not needed here. Check Ignore nonce and click Save Connection.
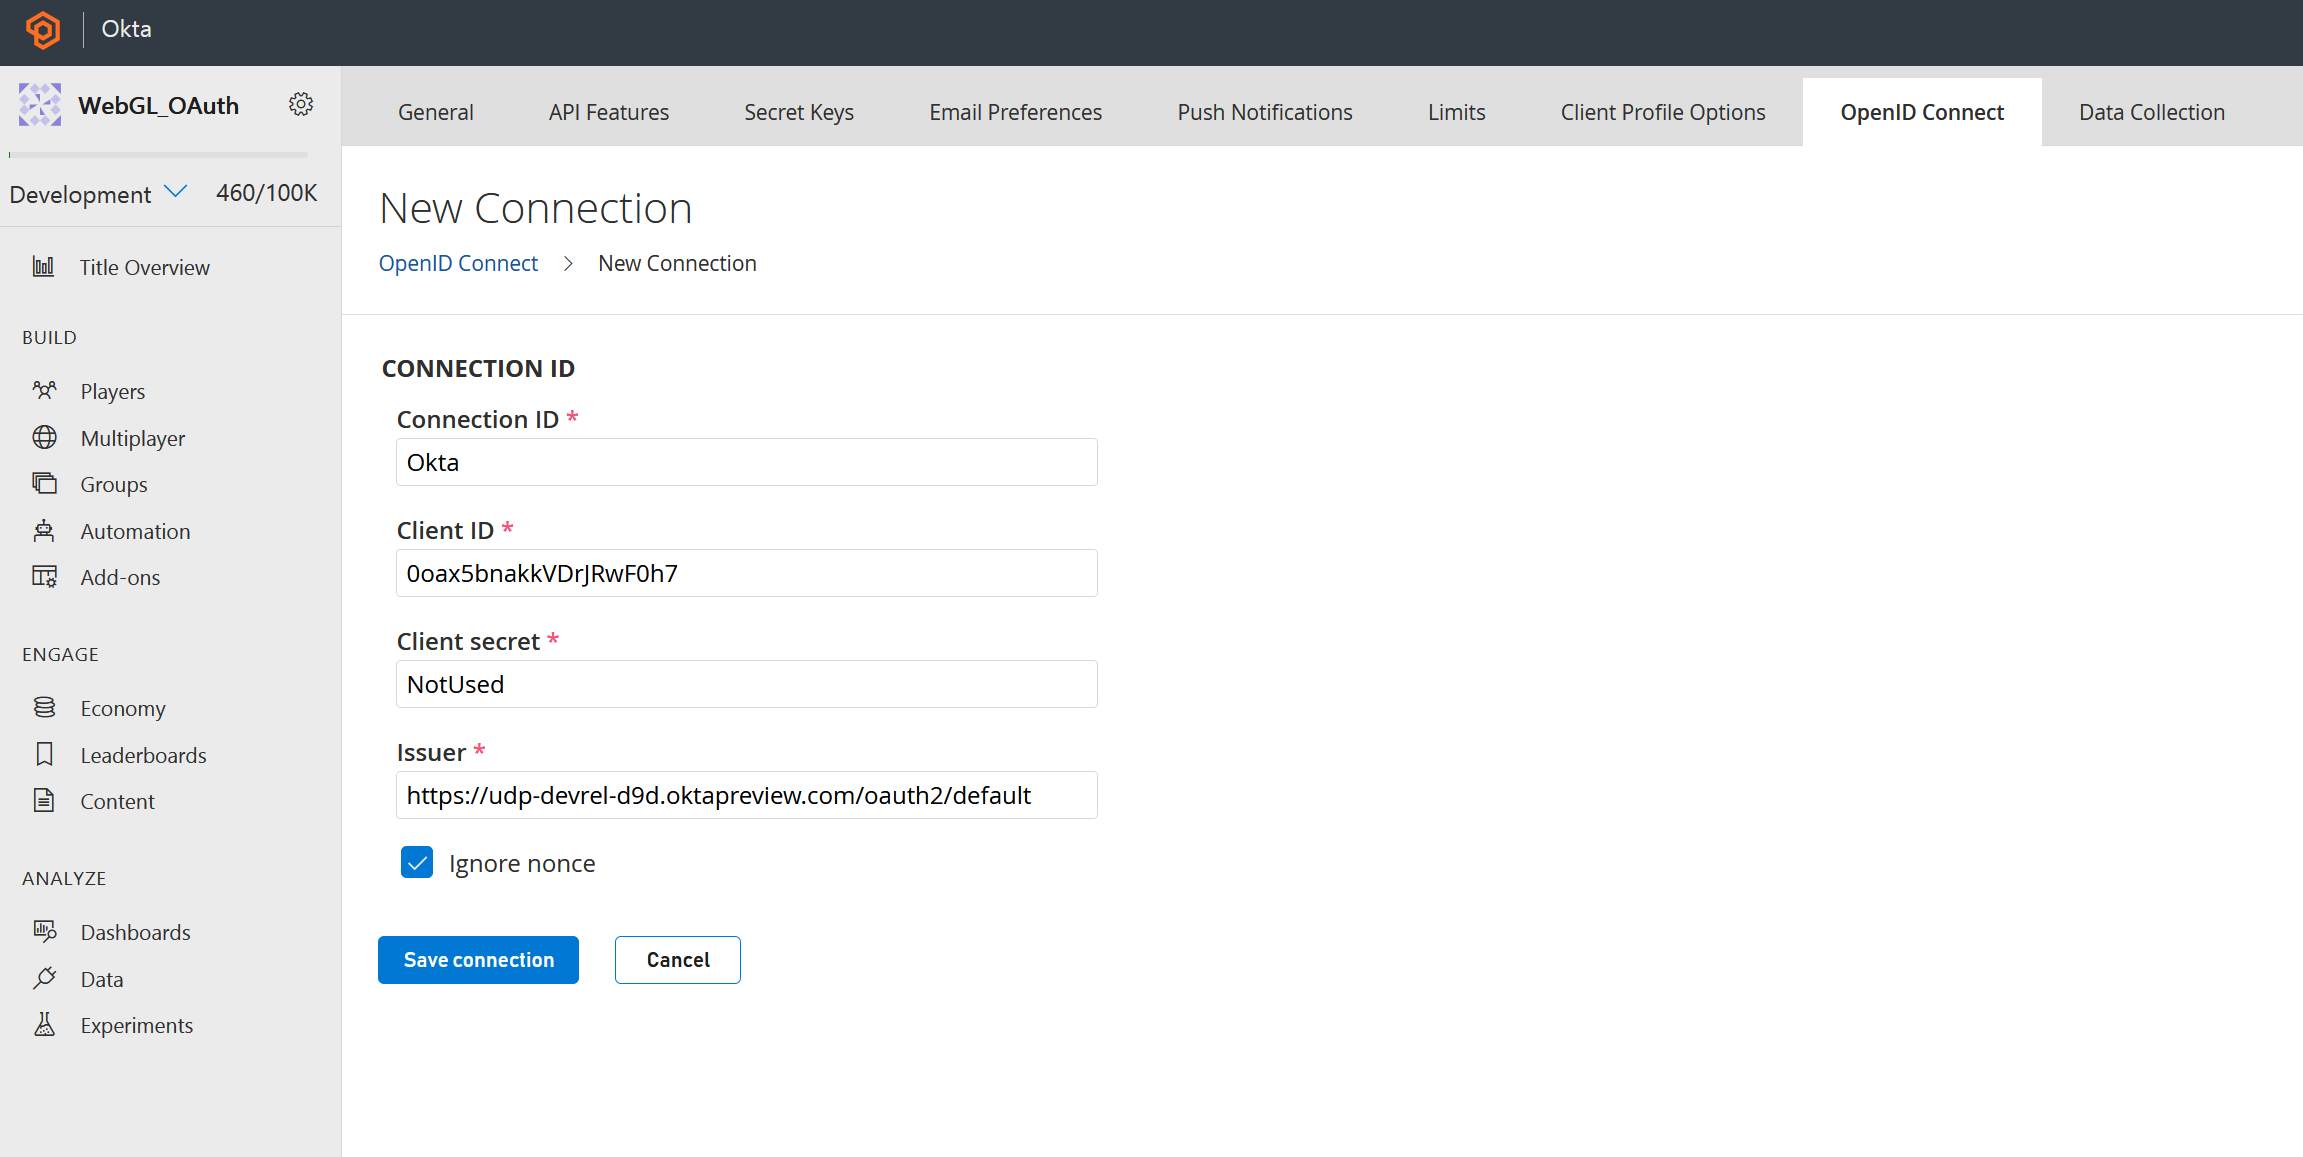
PlayFab is now able to validate ID Tokens from the OAuth Authorization Server in Okta.
Create the PlayFab Interface Script
Now that the player has successfully authenticated, the last step is to authorize the player to PlayFab using the ID token received after authentication.
In Unity, right click in the Assets > Scripts folder and select Create, C# Script. Name the script PlayFabInterface.cs and double click to open the script in Visual Studio.
Start the script with the following using statements:
using UnityEngine;
using PlayFab;
using PlayFab.ClientModels;
Next, create a new class called PlayFabInterface:
public class PlayFabInterface : MonoBehaviour
{
}
Create the LoginWithOpenIdConnect() function:
public void LoginWithOpenIdConnect(string _idToken)
{
        Debug.LogError("LoginWithOpenIDConnect Start! Token: " + _idToken);
        var request = new LoginWithOpenIdConnectRequest();
        request.ConnectionId = "Okta";
        request.IdToken = _idToken;
        request.CreateAccount = true;

        PlayFabClientAPI.LoginWithOpenIdConnect(request, OIDCLoginSuccess, OIDCLoginFailure, _idToken);
}
Finally, handle the results:
public void OIDCLoginSuccess(LoginResult _result)
{
        Debug.Log("Login With OIDC Success");
}

public void OIDCLoginFailure(PlayFabError _error)
{
        Debug.LogError("Login With OIDC Failure");
        Debug.LogError(_error.GenerateErrorReport());
}
The user will now log into PlayFab using their ID Token from the OAuth Authorization Server in Okta.
Wire It Up
Now that the authentication logic exists, it just needs to be triggered. The Sign In button created earlier will need to call the Authenticate() function from its on-click event. The OAuth.cs and PlayFabInterface.cs scripts will also need to be added to a game object in the scene.
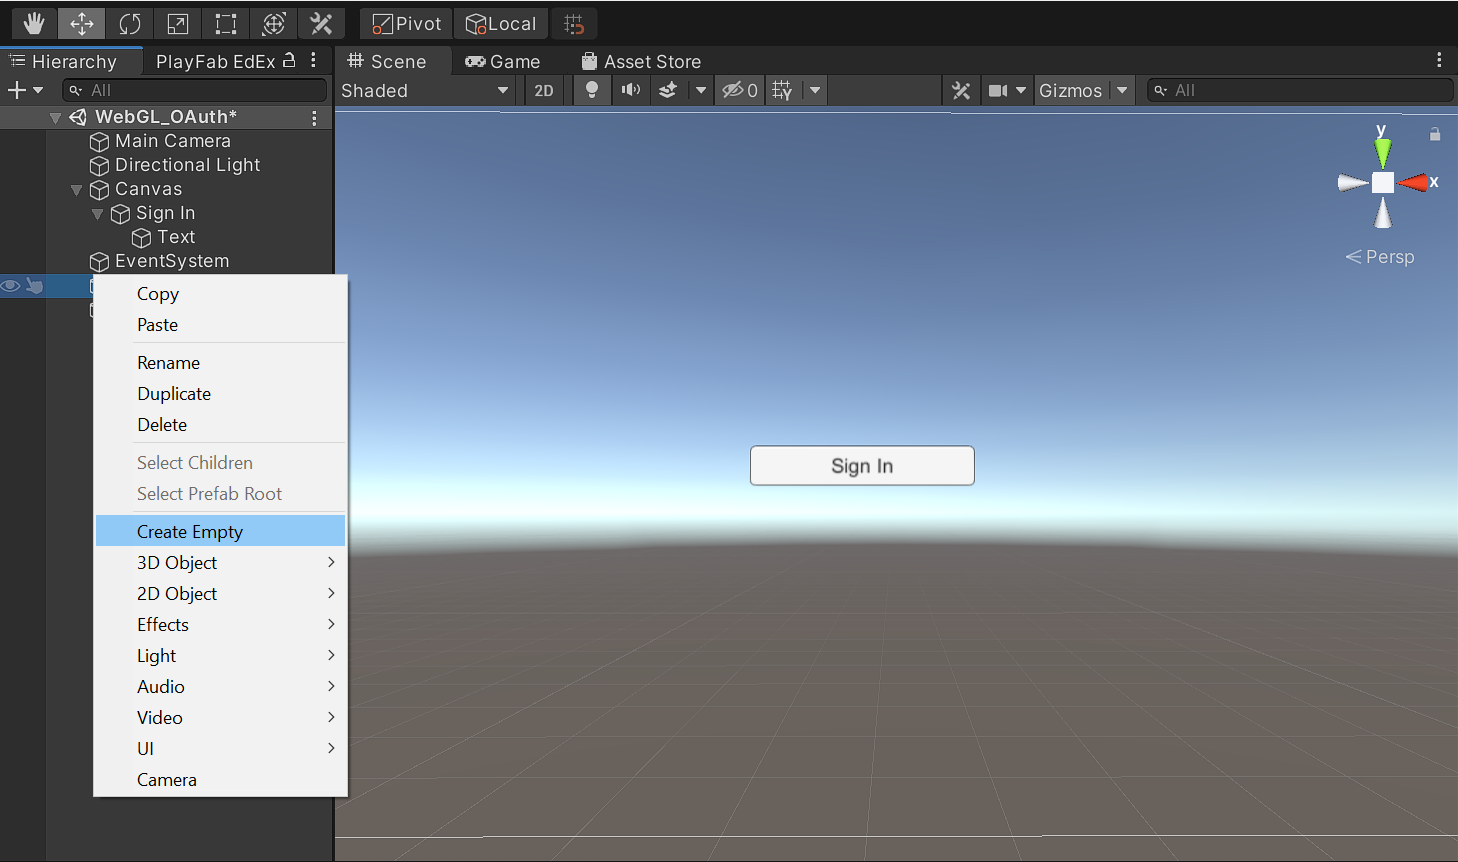
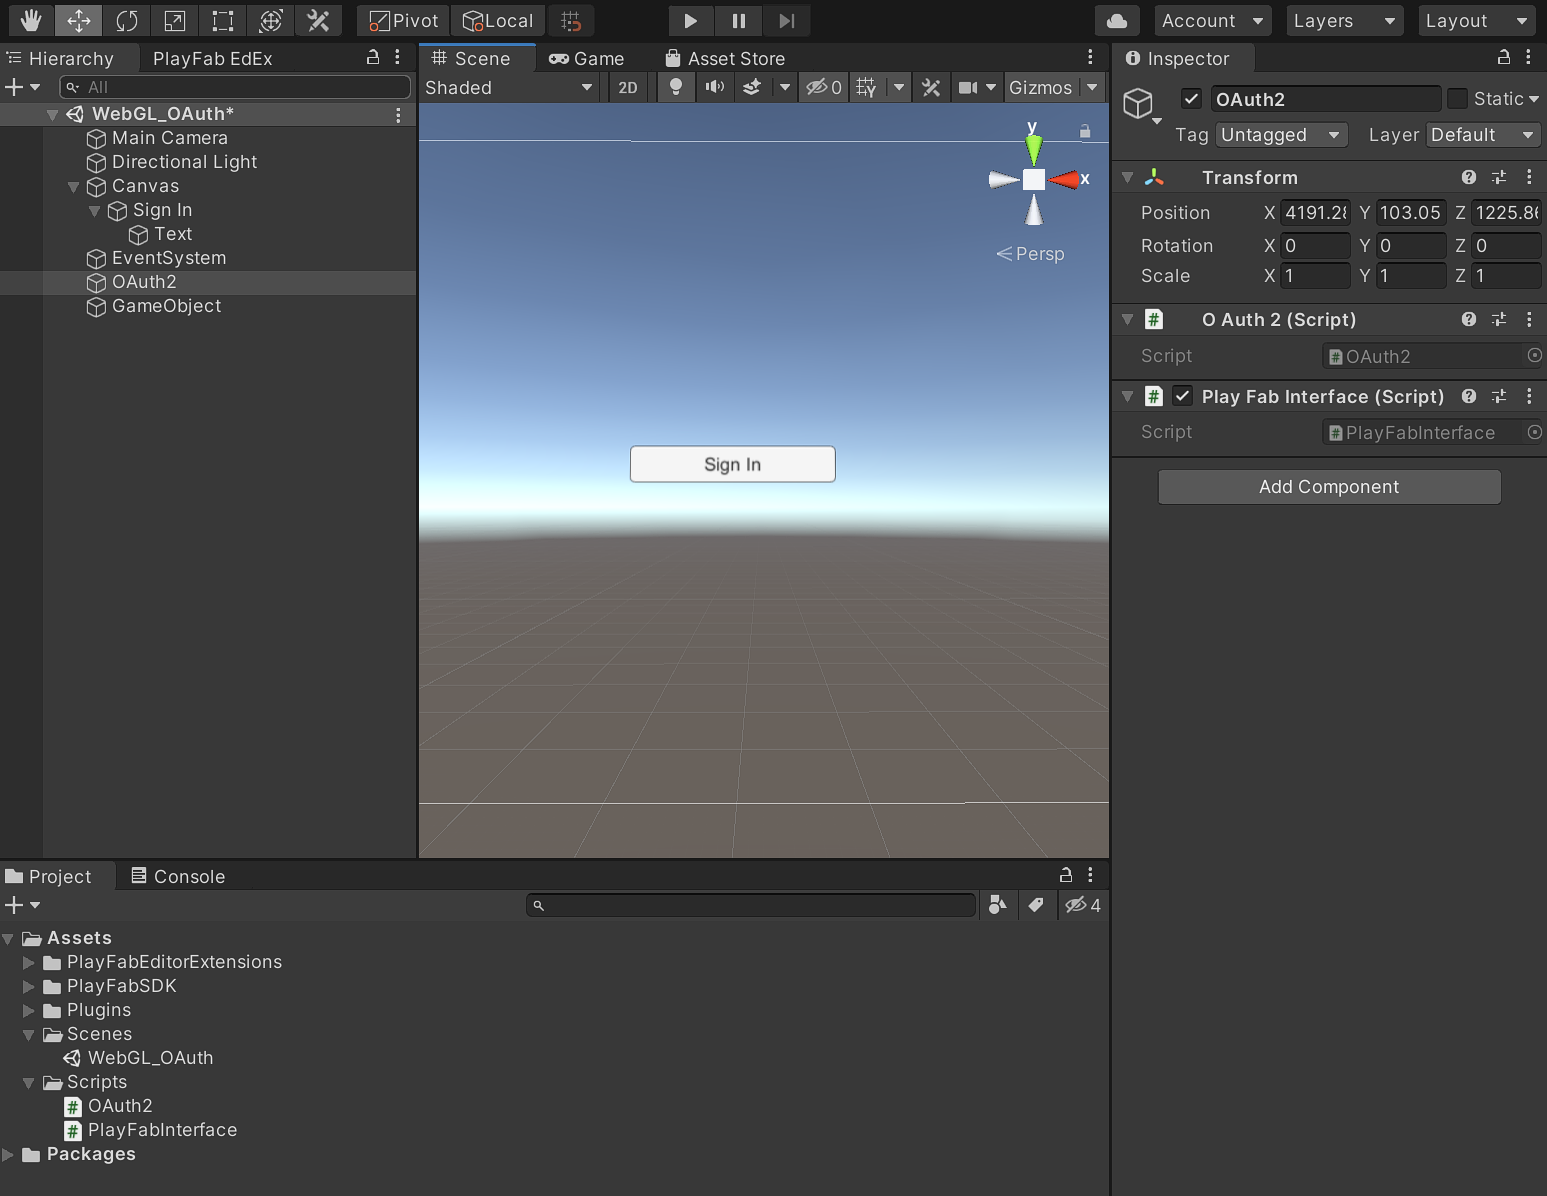
In Unity, right-click in the scene Hierarchy panel and then click Create Empty. Rename the game object to OAuth.
Drag the OAuth.cs and PlayFabInterface.cs scripts from the Scripts folder and onto the empty game object in the Hierarchy panel.
In the Hierarchy panel, expand the Canvas object holding your Sign In button, and then select the Sign In button.
In the Inspector panel, find the On Click() box and drag the OAuth game object onto it. Select the function dropdown, click OAuth2, and then click Authenticate().
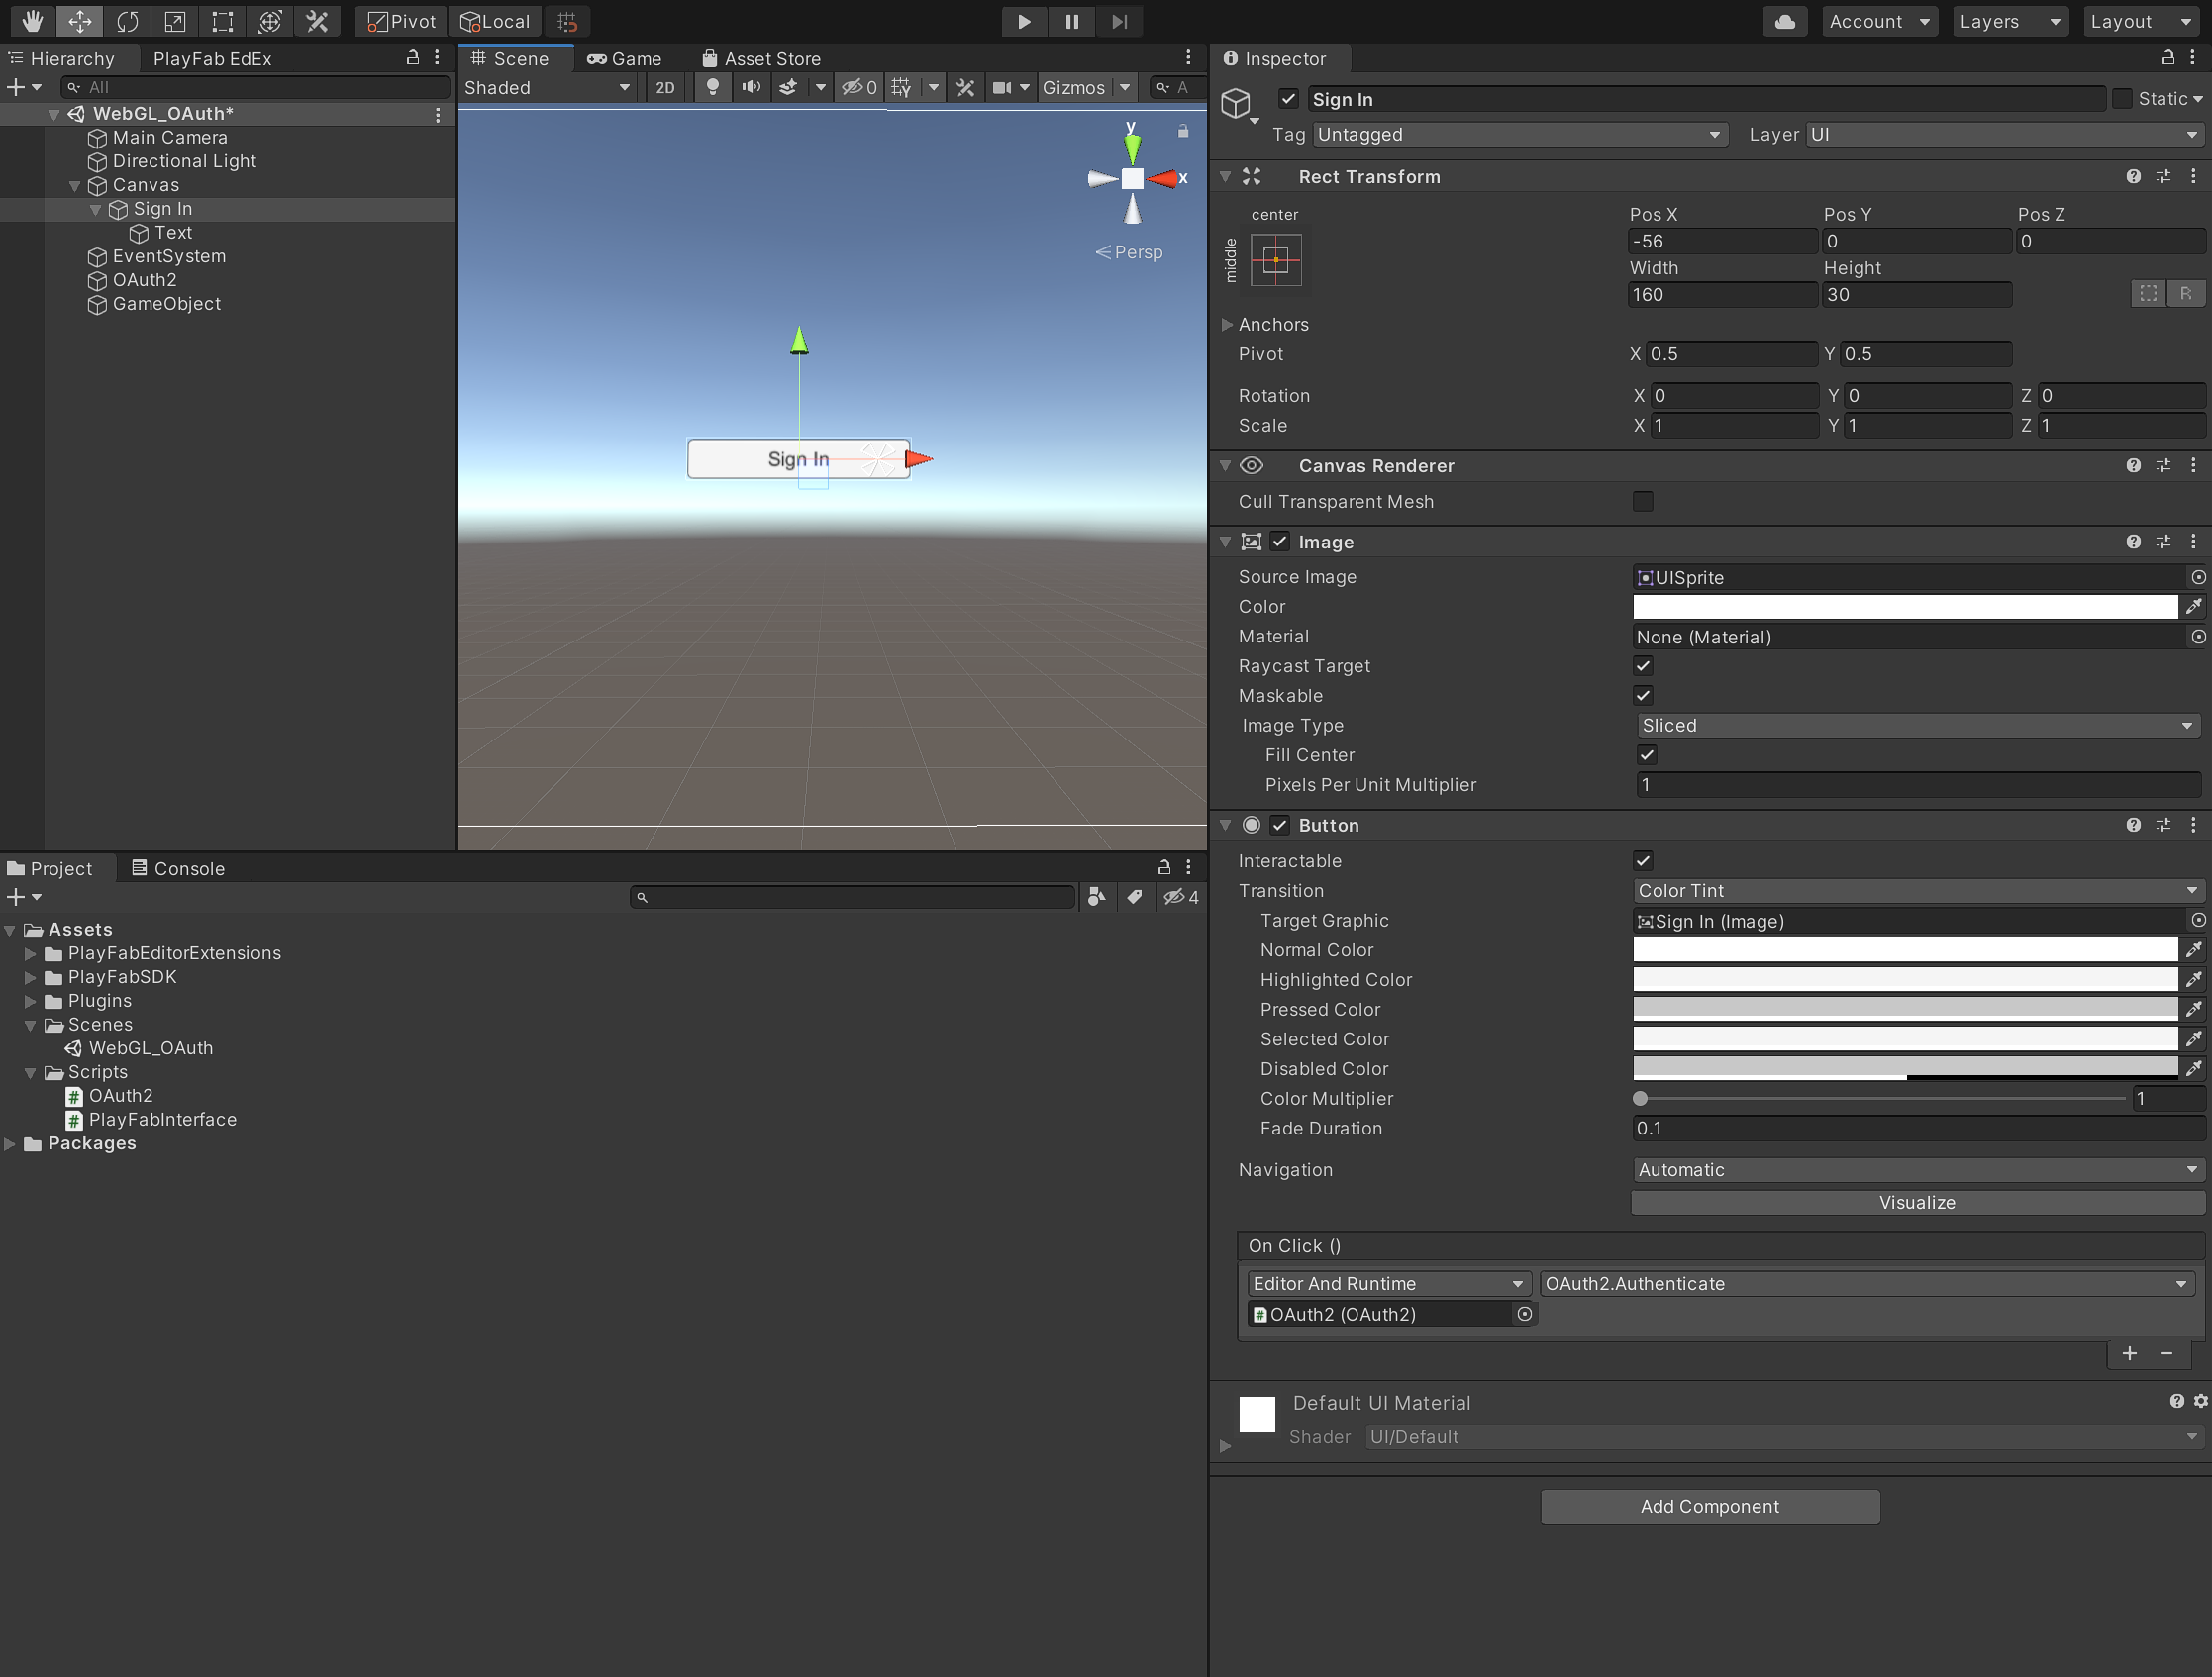
The button will now call the Authenticate() function in OAuth.cs when the player clicks it.
Deploy to Azure App Services
Because of the jslib and browser code’s complexity, this project cannot be run from the editor directly. Azure App Services makes the deployment of the entire project easy.
First, back up your index.html and callback.html files.
In Unity, click File, Build Settings and then click Build to rebuild the project. Select the desired output folder and click Select Folder.
Navigate to the output folder selected and overwrite the index.html and callback.html files with the ones you backed up previously.
Open a preferred text editor, create a new file in the output folder called web.config, and add the following:
<configuration>
  <system.webServer>
    <staticContent>
      <mimeMap fileExtension=".unityweb" mimeType ="TYPE/SUBTYPE" />
    </staticContent>
  </system.webServer>
</configuration>
This web config file will make sure that the WebGL object is properly loaded when hosted.
Next, open Visual Studio and click Continue without code from the startup wizard.

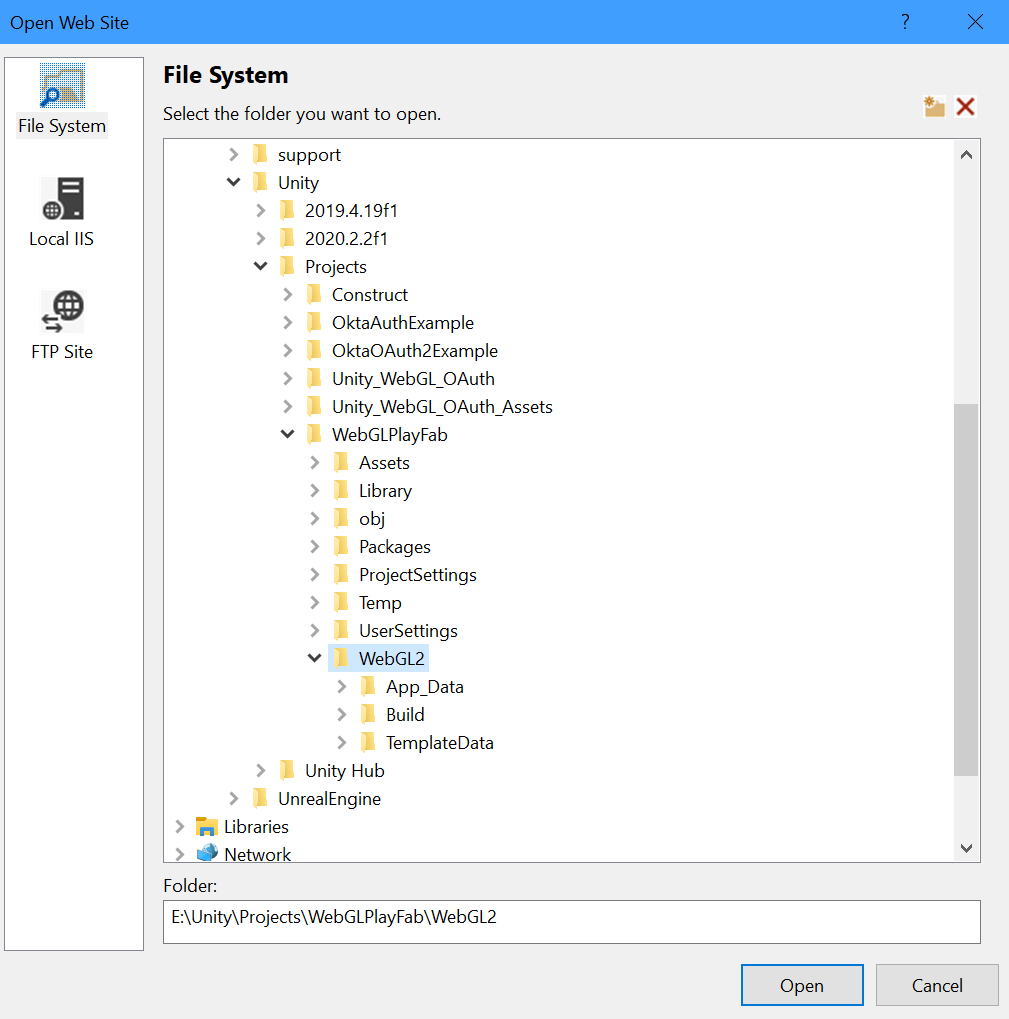
Click File, Open, Web Site and select the output folder where the index.html and callback.html are located.
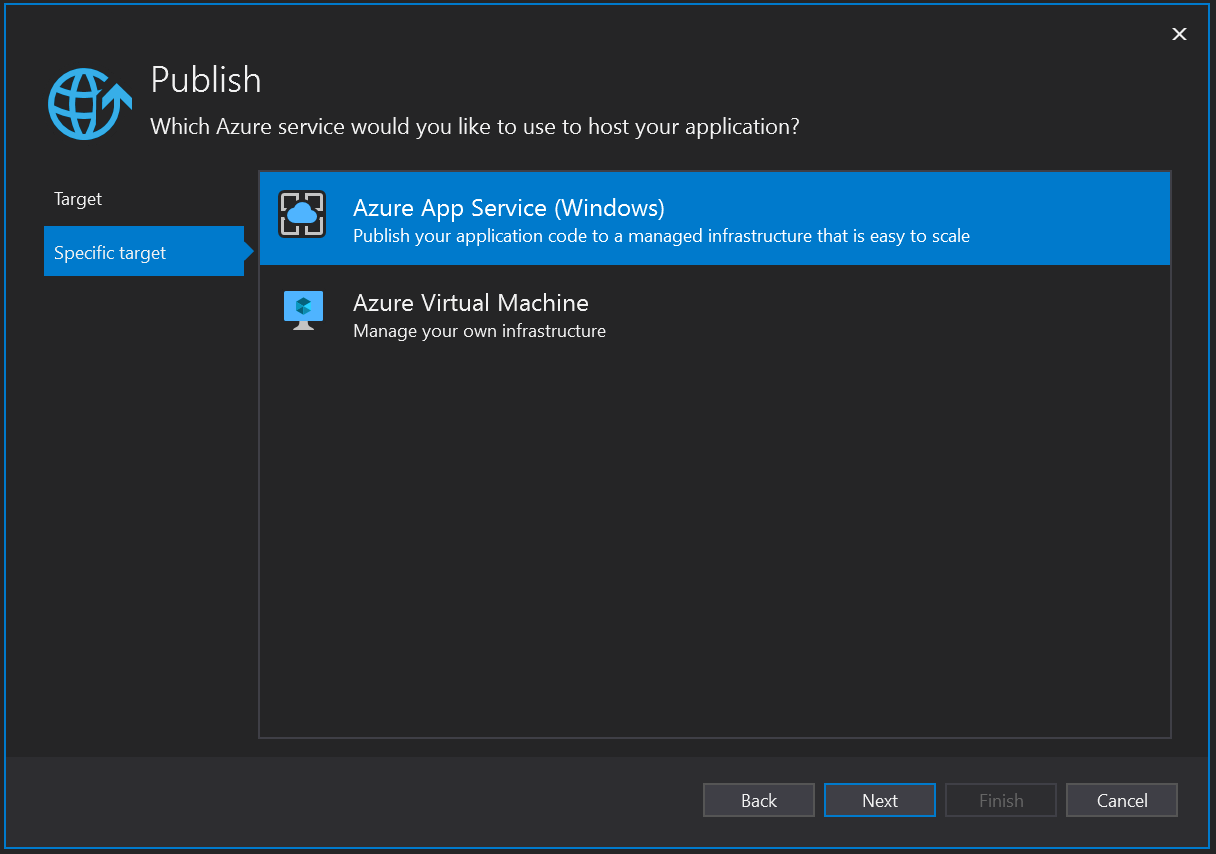
Next, click Build, Publish Web App, and then click Start on the Publish tab. Select Azure and click Next.
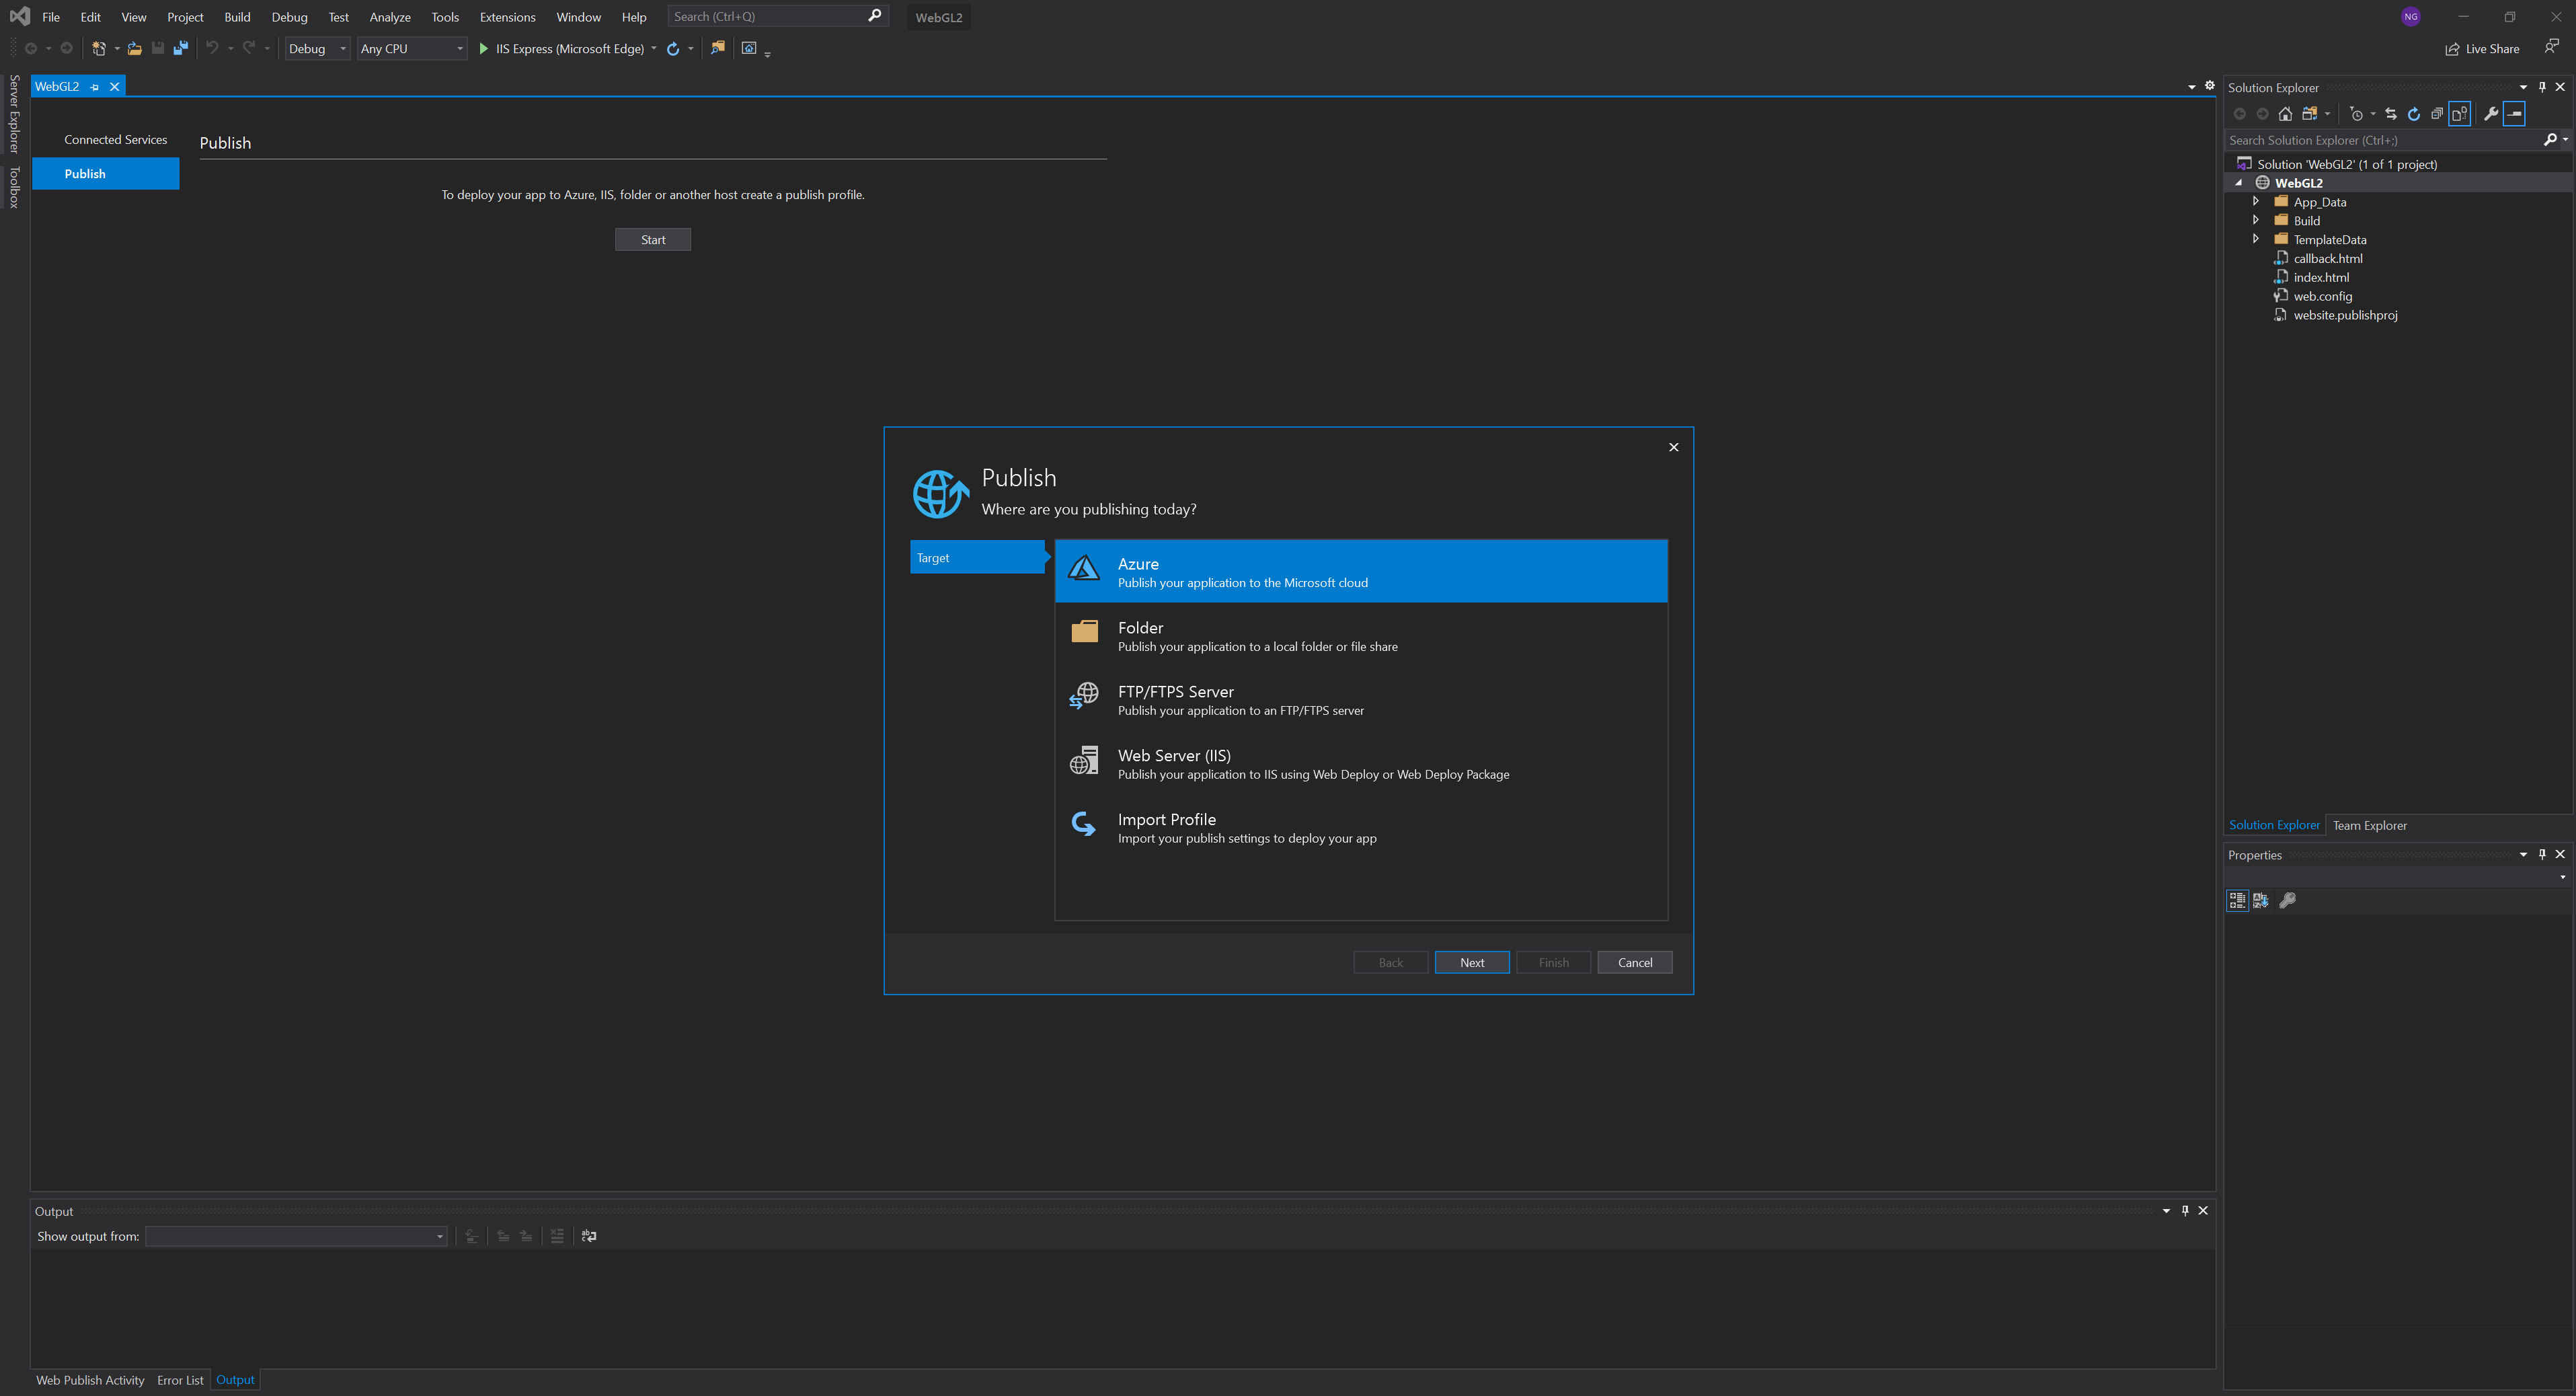
Select Azure App Service and click Next.
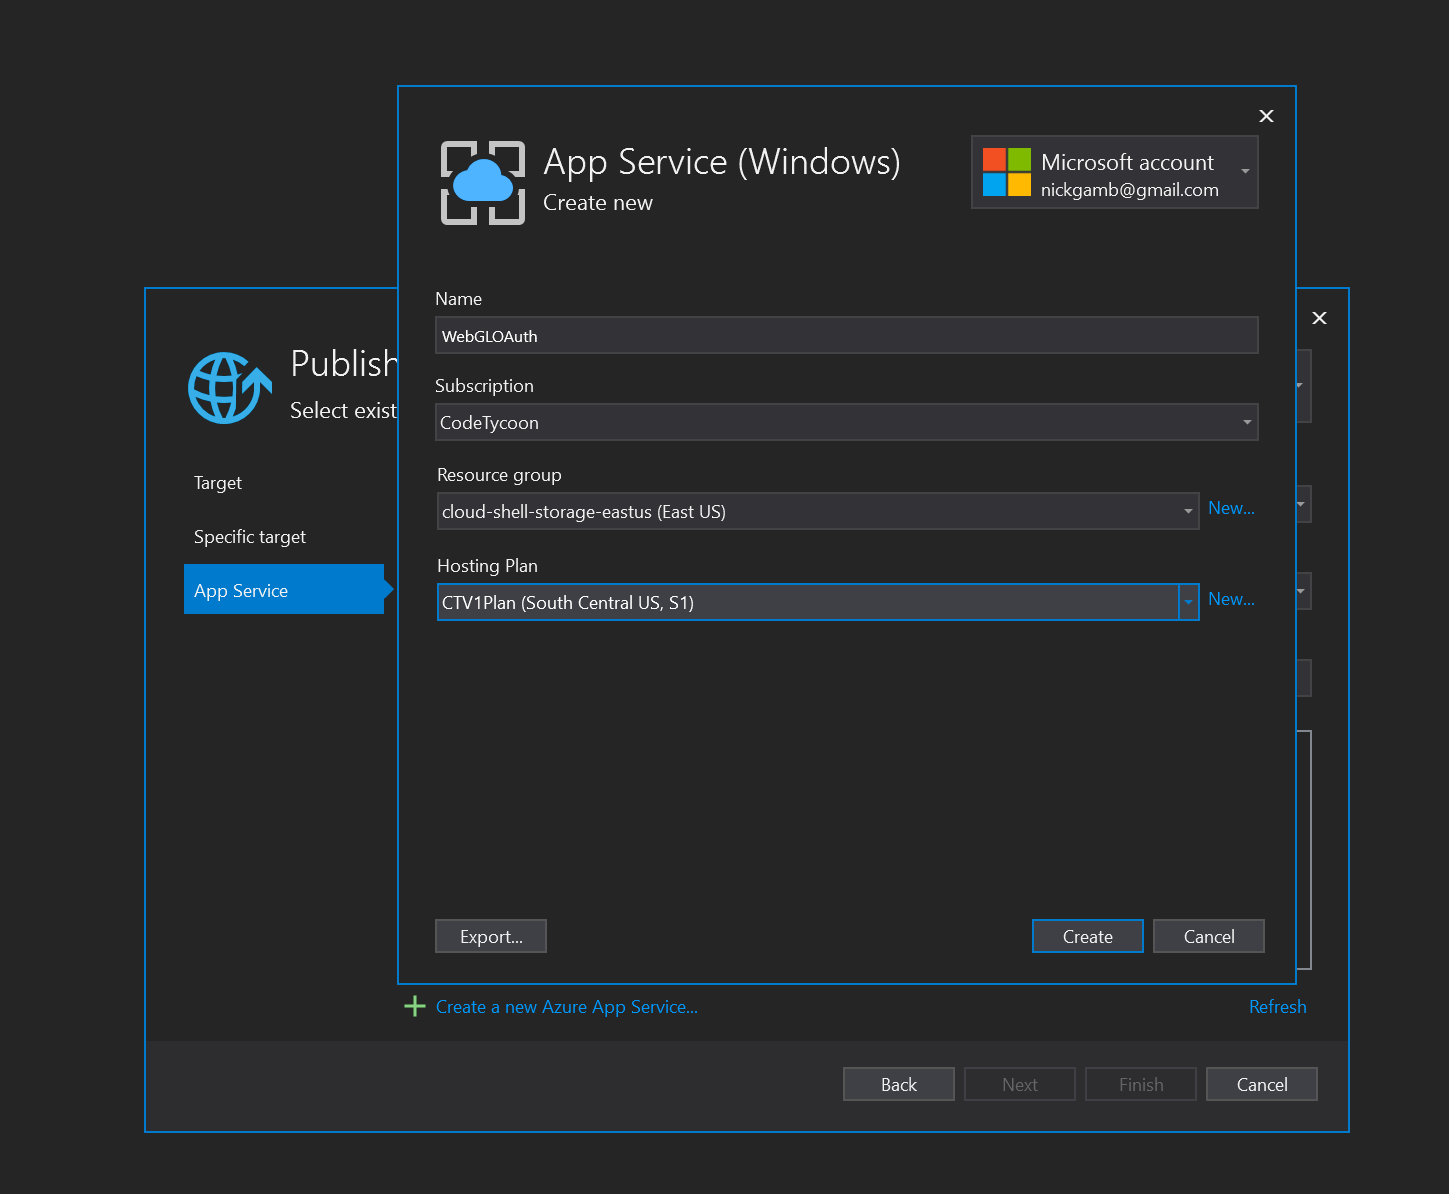
Click Create New Azure App Service.
Give the app the name used when setting up the Redirect URI in the Okta CLI where the placeholder was appName. This example used https://webgloauth.azurewebsites.net/, so the app name to use in Azure is WebGLOAuth.
Select a valid subscription, click New to create a new resource group, click New to create a new hosting plan, and then click Create.
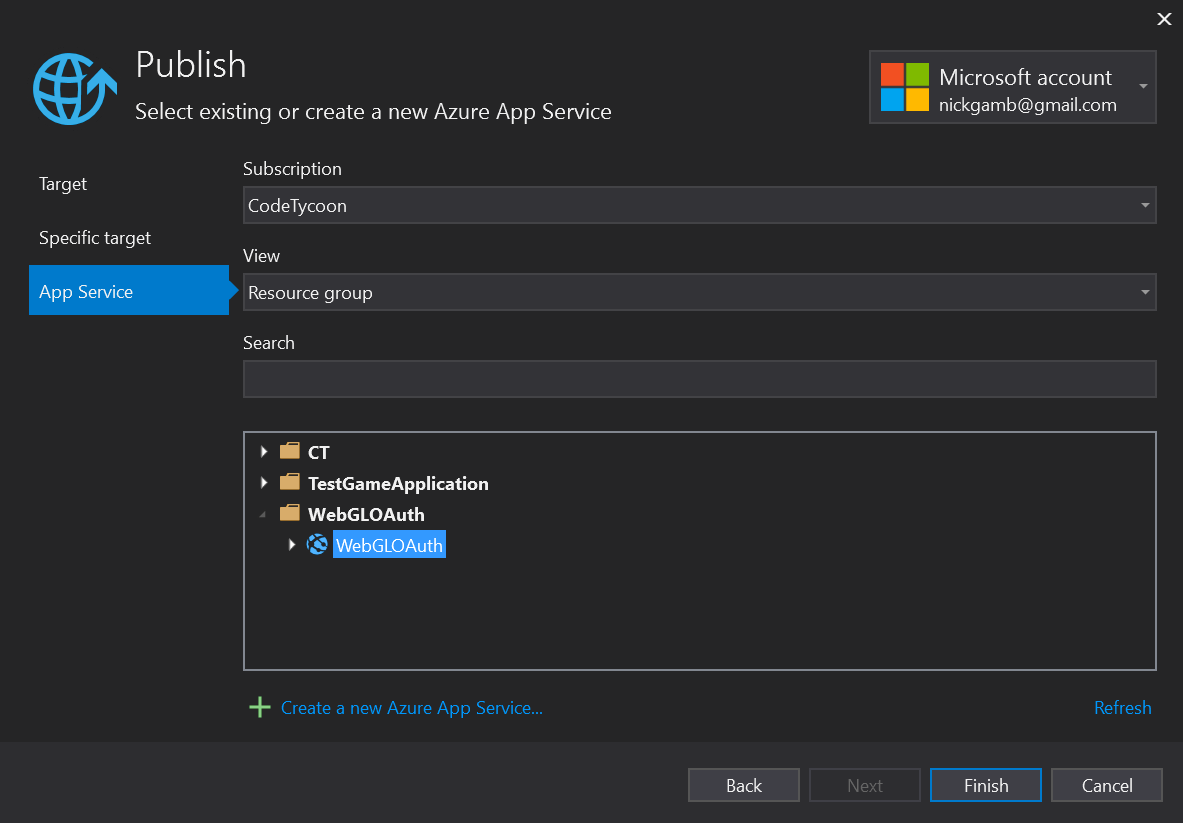
With the new app selected in the publish menu, click Finish.
Note: Before clicking
Publish,make sure that theSite URLin theSummarysection matches the DNS that was defined in the Okta CLI during the app setup for the callback URI. This example usedhttps://webgloauth.azurewebsites.net/andhttps://webgloauth.azurewebsites.net/callback.htmlwhich matches theSite URLin Visual Studio. This same callback URI also needs to be correctly defined in the instance variables in theOAuth.csscript in Unity.
Finally, click Publish to deploy the application to Azure App Services.
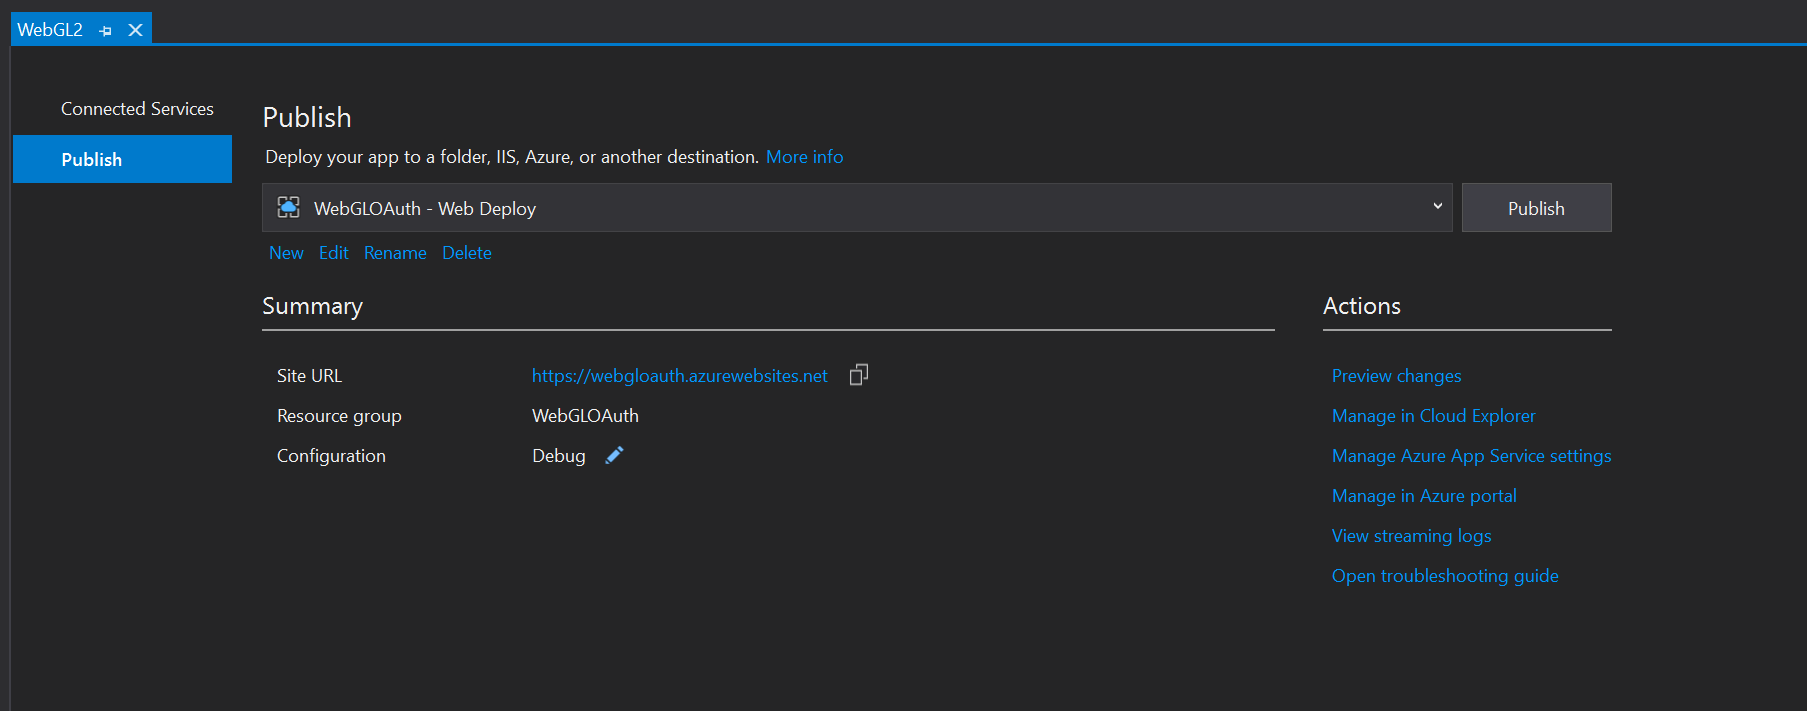
Once publishing is complete, click the Site URL to navigate to the application and test it out.
Conclusion
Player security is quickly becoming one of the most critical aspects of game development today. More development is being done in the cloud, and more player data is being collected than ever before. While best practice for authentication and authorization is to use OAuth and a trusted security platform’s hosted login experience, the design to do this changes from one target platform to another. For Unity WebGL, you were able to interact with the WebGL’s parent page to render a popup that facilitated user authentication via your trusted cloud security platform, Okta. The resulting auth code was exchanged for tokens that can authorize the player to backend cloud platforms that your project is using; in this case, Azure PlayFab. Finally, you were able to host the project entirely on Azure App Services. The OAuth tokens used with PlayFab can authorize the user to other backend cloud platforms as needed, allowing for a convenient, centralized security design. The method used to facilitate browser interaction for WebGL will change with other target platforms, but the rest of the design would continue to be similar across all platforms.
Learn More About OAuth and Security in Unity
To keep learning, check out some of our other great guides and tips:
- Identity Security for Games in C# with Unity
- An Illustrated Guide to OAuth and OpenID Connect
- Implement the OAuth 2.0 Authorization Code with PKCE Flow
- What the Heck is OAuth?
- Nobody Cares About OAuth or OpenID Connect
Comment below if you have any questions. Be sure to follow @oktadev on Twitter, follow us on Twitch, like us on Facebook and subscribe to our YouTube Channel for more!
Okta Developer Blog Comment Policy
We welcome relevant and respectful comments. Off-topic comments may be removed.