Build Your First NestJS Application
NestJs is a popular Node.js framework that is built with typescript and makes use of object-oriented programming, functional programming, and functional reactive programming. NestJs boasts that it provides a framework for building scalable server-side applications.
NestJs integrates nicely with Okta’s single sign-on provider. Okta makes securing a web service, such as the one you will build, quick and easy.
Note: In May 2025, the Okta Integrator Free Plan replaced Okta Developer Edition Accounts, and the Okta CLI was deprecated.
We preserved this post for reference, but the instructions no longer work exactly as written. Replace the Okta CLI commands by manually configuring Okta following the instructions in our Developer Documentation.
Create Your Okta Application with the CLI
The first thing you will need to do is sign up for an Okta developer account if you don’t already have one. This account is free forever and allows you to start building applications secured with Okta immediately. To do this you will use the Okta CLI. If you haven’t worked with the CLI yet you can check out the full documentation here.
Start by opening the terminal application of your choice. In the terminal, use the command okta register. This command will ask you for your name and email and then create an Okta developer account for you. If you already have an Okta developer account, you can use the okta login command and follow the on-screen instructions to log in to your organization. Once the CLI is set up for your organization, run the command okta apps create and give the application a meaningful name. I named mine library-api but you can name yours whatever you like. Select Single Page App as the application type. Even though you are creating an API in this tutorial, you will be using Postman as the “application” that will consume the API. This can be even more beneficial if you actually create a single-page application later. You’ll be able to use this client ID and issuer in that application.
Since you are going to use Postman to test, enter https://oauth.pstmn.io/v1/callback as your Login Redirect URL. Set the Logout Redirect URI to https://oauth.pstmn.io/. If your organization has multiple authorization servers, you can use default for this tutorial. After the CLI runs, it will return your Issuer and Client ID. Make note of these as you will need them in your application.
Create Your NestJs Application
Next, you can create your Nest.js application. If you haven’t installed the nest.js CLI yet then you should do that before beginning. Run the command npm i -g @nestjs/cli@7.5.4. Once that completes, run nest new library-api to create a new application called library-api.
Next, you need to install some dependencies you will need. First, you will want to install dotenv for your environment variables.
npm i dotenv@8.2.0
Next, you will need to install the passport and Okta libraries that will help set up your auth module.
npm i passport@0.4.1
npm i passport-http-bearer@1.0.1
npm i @nestjs/passport@7.1.5
npm i @okta/jwt-verifier@2.0.0
Now you can create a new folder in your root directory called .env. Add the following values to it.
OKTA_CLIENTID={yourClientId}
OKTA_ISSUER={yourOktaIssuer}
OKTA_AUDIENCE=api://default
Now you can begin the work of setting up your application. Nest uses a few concepts that it’s important to discuss at this point. The first is controllers. Controllers are responsible for handling requests from the client.
Next is providers. The name “providers” is a bit of a catch-all term for services, repositories, factories, and many other types of classes. Providers can be injected into other classes using the @Injectable() decorator.
Finally, there are modules. The role of the module is to organize the application structure. Modules are decorated with the @Module() decorator.
With that work in mind, you can begin to create your auth module. First, create a new folder in your src folder called auth. Add a file to this folder called http.strategy.ts and add the following code.
import { HttpException, Injectable } from '@nestjs/common';
import { PassportStrategy } from '@nestjs/passport';
import { Strategy } from 'passport-http-bearer';

import { AuthService } from './auth.service';

@Injectable()
export class HttpStrategy extends PassportStrategy(Strategy) {
  constructor(private readonly authService: AuthService) {
	super();
  }

  async validate(
	token: string,
	done: (error: HttpException, value: boolean | string) => any,
  ) {
	try {
  	return await this.authService.validateToken(token);
	} catch (error) {
  	done(error, 'The token is not valid');
	}
  }
}
This provider will look for an injected AuthService provider to do the heavy authentication lifting. You can define the AuthService logic in a new file called auth.service.ts in the same folder.
import { Injectable } from '@nestjs/common';
import * as OktaJwtVerifier from '@okta/jwt-verifier';

import { ConfigService } from '../config/config.service';

@Injectable()
export class AuthService {
  private oktaVerifier: any;
  private audience: string;

  constructor(private readonly config: ConfigService) {
	this.oktaVerifier = new OktaJwtVerifier({
  	issuer: config.get('OKTA_ISSUER'),
  	clientId: config.get('OKTA_CLIENTID'),
	});

	this.audience = config.get('OKTA_AUDIENCE');
  }

  async validateToken(token: string): Promise<any> {
	const jwt = await this.oktaVerifier.verifyAccessToken(token, this.audience);
	return jwt;
  }
}
This implementation of the AuthService using the oktaVerifier to verify an incoming token.
Finally, you can tie these two providers together in one module by adding a file called auth.module.ts.
import { Module } from '@nestjs/common';

import { ConfigModule } from '../config/config.module';
import { AuthService } from './auth.service';
import { HttpStrategy } from './http.strategy';

@Module({
  imports: [ConfigModule],
  providers: [HttpStrategy, AuthService],
})
export class AuthModule {}
The HttpStrategy and AuthService get listed as providers in the AuthModule. You are also importing the ConfigModule but that hasn’t been implemented yet. Go ahead and do that now.
First, add a folder under src called config. Add a new file for config.service.ts. The code for that follows.
import * as dotenv from 'dotenv';
import * as fs from 'fs';

export class ConfigService {
  private readonly envConfig: { [key: string]: string };

  constructor(filePath: string) {
	this.envConfig = dotenv.parse(fs.readFileSync(filePath));
  }

  get(key: string): string {
	return this.envConfig[key];
  }
}
The implementation here uses dotenv to read the parameters from the .env file. It exposes a get function that will get the appropriate value from the file.
Next, add a file to the config folder named config.module.ts. Add the following code to it.
import { Module } from '@nestjs/common';
import { ConfigService } from './config.service';

@Module({
  providers: [
	{
  	provide: ConfigService,
  	useValue: new ConfigService(`${process.env.NODE_ENV || ''}.env`),
	},
  ],
  exports: [ConfigService],
})
export class ConfigModule {}
This module takes the ConfigService and packages it as an export. This makes it available for your AuthModule to use.
You can now create your controller. Open the app.service.ts and replace the existing code with the following.
import { Injectable } from '@nestjs/common';

@Injectable()
export class AppService {
  books = [
	{
  	id: 1,
  	title: 'The Hobbit',
  	author: 'J. R. R. Tolkien',
  	status: 'Checked-in',
	},
	{
  	id: 2,
  	title: 'Do Androids Dream of Electric Sheep?',
  	author: 'Philip K. Dick',
  	status: 'Checked-out',
	},
	{
  	id: 3,
  	title: 'Brave New World',
  	author: 'Aldous Huxley',
  	status: 'Checked-out',
	},
  ];

  getAllBooks(): any[] {
	return this.books;
  }

  getBook(params: any): any {
	return this.books.filter((r) => r.id == params.id)[0];
  }

  updateBook(book: any): any {
	return book;
  }
}
This file provides some stubbed methods for getting and updating books. Next, open app.module.ts and replace the code there with the following.
import { Module } from '@nestjs/common';
import { AppController } from './app.controller';
import { AppService } from './app.service';
import { AuthModule } from './auth/auth.module';

@Module({
  imports: [AuthModule],
  controllers: [AppController],
  providers: [AppService],
})
export class AppModule {}
The only change here from the boilerplate code is the addition of the AuthModule as an import. You will use this in a moment.
Finally, open app.controller.ts and replace the code there with the following controller code.
import { Controller, Get, Post, Param, UseGuards, Body } from '@nestjs/common';
import { AppService } from './app.service';
import { AuthGuard } from '@nestjs/passport';

@Controller('books')
export class AppController {
  constructor(private readonly appService: AppService) {}

  @Get()
  @UseGuards(AuthGuard('bearer'))
  getAllBooks(): any[] {
	const books = this.appService.getAllBooks();
	return books;
  }

  @Get(':id')
  @UseGuards(AuthGuard('bearer'))
  getBook(@Param() id): any {
	return this.appService.getBook(id);
  }

  @Post()
  @UseGuards(AuthGuard('bearer'))
  updateBook(@Body() book: any): any {
	return this.appService.updateBook(book);
  }
}
Here you are using the AuthGuard to ensure your user is authenticated. You have also defined methods for get/:id, get, and post. In your @Controller() decorator you have named the controller books meaning that your routes will be books/GET, books/:id/GET, and books/POST.
Testing Your NestJS Application
You are now ready to test your application. As I said above, I will be using Postman for the instructions below. But you can use Advanced Rest Client or another application to test your Nest.js application. You can even build your own React front end for it.
In your terminal, run the command npm run start to start your application. While that is booting up, open Postman. Start a new request and head to the Authorization tab. Select OAuth 2.0 in the Type dropdown, then in the Current Token section on the right, set your header prefix to bearer. Under the Configure New Token section, select Authorization Code (With PKCE) as the grant type. Next, check the Authorize using browser checkbox. Populate your Auth URL, Access Token URL, and Client ID from your Okta developer’s console as follows:
- Auth URL: {yourOktaDomain}/oauth2/default/v1/authorize
- Access Token URL: {yourOktaDomain}/oauth2/default/v1/token
- Client ID: {yourClientId}
In the Scope field type in openid email profile and in the State field, put any alphanumeric string you wish. Click Get New Access Token and complete the Okta login. Once you have done that, click Use Token the Access Token should be populated automatically in the Current Token section.

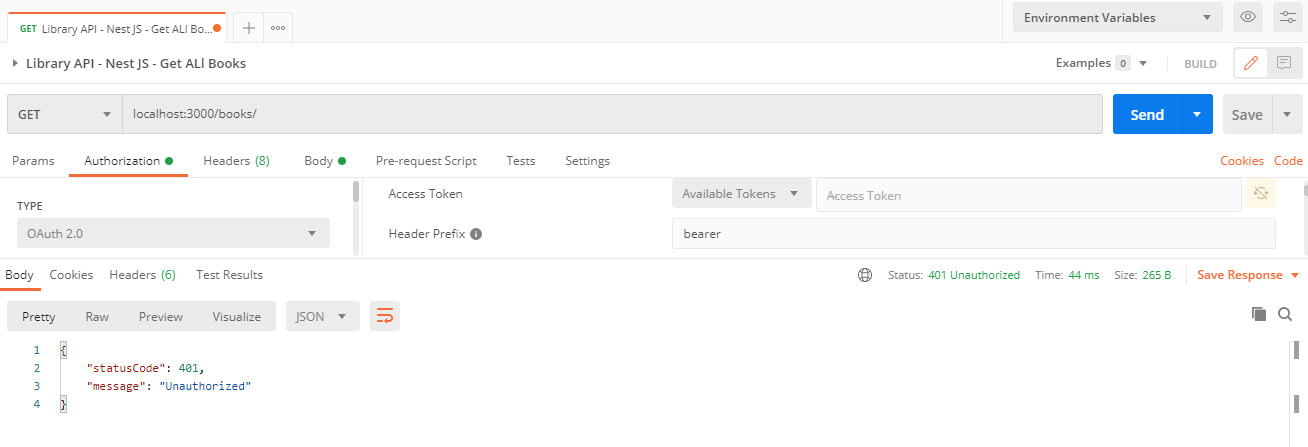
In the URL bar of your request, type in localhost:3000/books/ and hit Send.
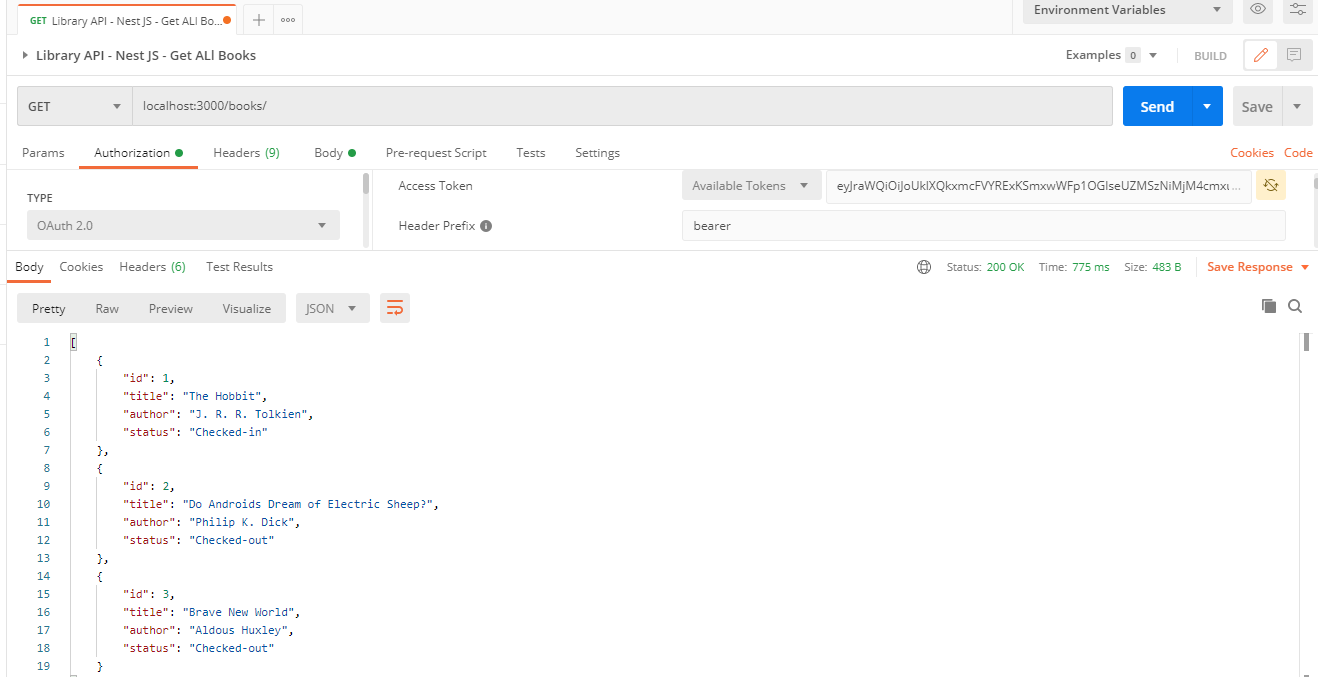
You should see the full list of books returned to you. You can further experiment with this by trying the URI localhost:3000/books/1 or attempting to post to the books endpoint. You can also remove the access token from the Current Token section and see the 401 Unauthorized message.
Nest.JS is an exciting framework that makes writing clean and scalable Node.js applications quick and easy. Combined with the simplicity and security of Okta you will be able to build secure applications in no time.
Learn More About NestJS and NodeJS
If you liked this post, check out some other posts on NestJS and NodeJS.
- Build a Secure NestJS API with Postgres
- Build a NodeJS App with TypeScript
- Node.js Login with Express and OIDC
Make sure you follow us on Twitter and subscribe to our YouTube channel. If you have any questions, or you want to share what tutorial you’d like to see next, please comment below.
Okta Developer Blog Comment Policy
We welcome relevant and respectful comments. Off-topic comments may be removed.