Tutorial: Chef and Account Automation with Okta
Tip: This tutorial is part of our series on integrating Okta with popular infrastructure as a code solution. If you’re not into Chef, check out our Ansible, Puppet, and Terraform tutorials.
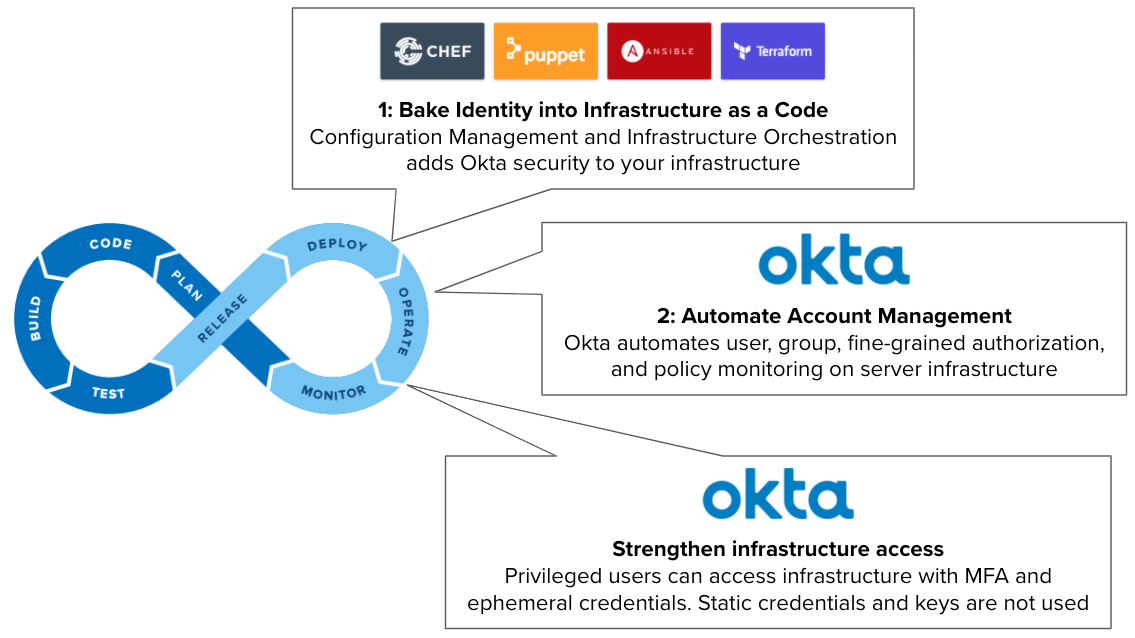
Chef cookbooks are a great way to manage infrastructure at scale. However, like other configuration management tools, Chef works best when cookbooks don’t change often. This is easy to accomplish in typical server setup and configuration tasks like install Nginx and tweak conf file. However, it can get tricky with server managing server accounts and credentials as people join or leave your ops team and as you need to rotate server keys.
To tackle identity in servers with automation, Ops teams usually take two approaches: push SSH keys for every user or integrate servers with an LDAP or AD.
Pushing SSH Keys for every admin on every server has significant security implications and requires a lot of effort when an admin leaves the company or when keys need to be rotated. And that can go bad as soon as someone accidentally shares a secret key.
Integrating a large server infrastructure with LDAP or AD – usually done using PAM modules – requires a lot of work. LDAP and AD are monolithic – built to run on the intranet – and not good when you have servers in multiple places, requiring site-to-site VPNs, among other hoops. Do you want to run an HA middleware service blocking your ability to scale in the cloud? This is a pain point no Ops Engineer wants.
However, there’s a third approach: integrate Cloud SSO to secure servers. In this tutorial, we will do that by seamlessly injecting Okta into your Chef Infrastructure as Code to effectively Shift Identity Left:
Note: To follow this tutorial, you need to have an Advanced Server Access (ASA) team provisioned from your Okta Org. If you don’t have an existing ASA team, you can sign up for free here, which requires an Okta Administrator to configure.
Create a project and get an enrollment token in ASA
In Okta ASA, projects work as a collection of servers that share the same access and authorization controls. In a project, you define which users and groups from Okta can access your servers, when they can do so, and what they are allowed to do in the server (i.e. run only certain commands). Any changes in your project (users, group assignments, authorization) are periodically updated in your servers (providing idempotency for identity and access management).
Servers enroll in your project to apply the same security configuration using an ASA agent with a project enrollment token. The ASA agent periodically checks for updates in Okta to update the server configuration.
To get your servers running with Okta, let’s create a project and get an enrollment token:
- Access Okta ASA as Administrator.
- Click Projects and then select or create a new project.
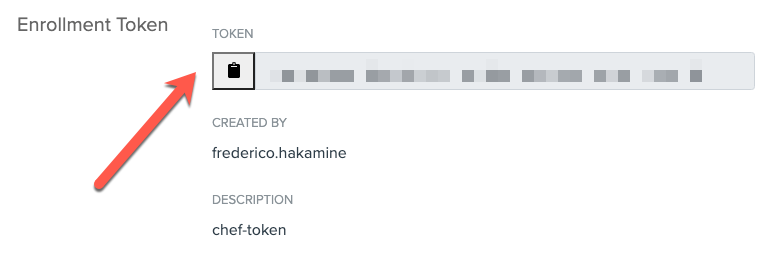
- Click Enrollment > Create Enrollment Token.
- Enter a name (i.e.
chef-token) and click Submit. - Copy the enrollment token:
Download and configure cookbook
In your terminal, navigate to your chef home and clone our sample cookbook:
cd $CHEF_REPO/cookbooks
git clone https://github.com/okta-server-asa/asa-chef-example.git
cd asa-chef-example
Optionally, review the cookbook contents:
- The
recipes/install-asa.rbis the default recipe of the cookbook. It:- Installs the ASA server agent using the appropriate package for your distro (
node['platform_family']) - Defines the name of your server in ASA (canonical name)
- Enrolls your server into the ASA project using the enrollment token you got in the previous section
- Starts the ASA server agent
- Installs the ASA server agent using the appropriate package for your distro (
- The
recipes/uninstall-asa.rbuninstalls the ASA server agent from your machine. - The
kitchen.ymlprovides specs for testing this sample cookbook in Chef’s Kitchen (with VirtualBox and Vagrant). - The
test/integration/default/default_test.rbprovides specs for validating the sample cookbook. - The
attributes/default.rbfile stores the enrollment token for registration in ASA.
Edit the attributes/default.rb file, replacing ENROLLMENT_TOKEN with the token from ASA:
default['asa_enrollment_token'] = 'ENROLLMENT_TOKEN'
To confirm your configuration has no typos, enter cookstyle attributes/default.rb:
# cookstyle attributes/default.rb
Inspecting 1 file
1 file inspected, no offenses detected
Test cookbook
Now that we have the cookbook set, let’s see it in action. To do this, I’ll use Chef Test Kitchen as a harness environment, and apply the cookbook to multiple Virtual Machines.
Tip: The sample cookbook has a script (kitchen.yml) that sets our test environment automatically using VirtualBox VMs managed with Vagrant.
Launch test kitchen
In your environment with Chef workstation, install VirtualBox and Hashicorp Vagrant. (If you have a mac and homebrew, you can run the commands):
brew install virtualbox --cask
brew install vagrant --cask
Enter VBoxManage list bridgedifs | grep Name to get your computer network interface name that will be used by the test VMs (ideally, a network interface with the internet. In my case, its en0: Wi-Fi (AirPort):
# VBoxManage list bridgedifs | grep Name
Name:            en0: Wi-Fi (AirPort)
Name:            bridge0
VBoxNetworkName: HostInterfaceNetworking-bridge0
Name:            llw0
VBoxNetworkName: HostInterfaceNetworking-llw0
Name:            en12: USB 10/100/1000 LAN
VBoxNetworkName: HostInterfaceNetworking-en12
Edit and save the kitchen.yml file:
- In lines 25-29, define the list of servers/VMs you want to test. You can remove a specific server or distro by adding a comment (
#+ space). Example:# - name: centos-7. - In line 35, paste the network interface name that will be used to bridge network connections. For example:
- ["public_network", { bridge: "en0: Wi-Fi (AirPort)" }]
To set up your kitchen, enter: kitchen create
Chef Test Kitchen will download and launch all VMs in VirtualBox. This may take some time.
To confirm your kitchen is running, enter: kitchen list
The list will show you the VMs with the last action Created:
# kitchen list
Instance                    Driver   Provisioner  Verifier  Transport  Last Action  Last Error
asa-chef-ubuntu-1804        Vagrant  ChefZero     Inspec    Ssh        Created      <None>
asa-chef-centos-7           Vagrant  ChefZero     Inspec    Ssh        Created      <None>
asa-chef-debian-107         Vagrant  ChefZero     Inspec    Ssh        Created      <None>
asa-chef-opensuse-leap-152  Vagrant  ChefZero     Inspec    Ssh        Created      <None>
asa-chef-oracle-82          Vagrant  ChefZero     Inspec    Ssh        Created      <None>
Run cookbook in the test kitchen
To install and enroll your servers on ASA, enter kitchen converge.
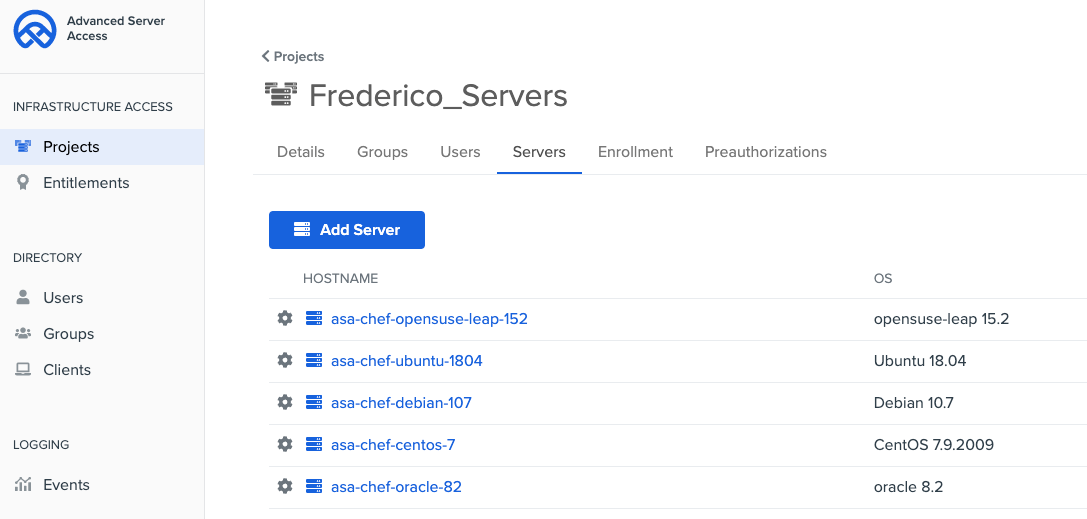
Chef will execute the cookbook and enroll all your servers in ASA.
In ASA, you will see your server enrolled in your project:
To confirm the recipe worked, enter kitchen verify:
-----> Verifying <asa-chef-oracle-82>...
       Loaded tests from {:path=>".asa-chef-example.test.integration.default"}

Profile: tests from {:path=>"/asa-chef-example/test/integration/default"} (tests from {:path=>"asa-chef-example.test.integration.default"})
Version: (not specified)
Target:  ssh://vagrant@127.0.0.1:2203

  Service sftd
     ✔  is expected to be installed
     ✔  is expected to be enabled
     ✔  is expected to be running

Test Summary: 3 successful, 0 failures, 0 skipped
       Finished verifying <asa-chef-oracle-82> (0m1.09s).
At this moment, your servers are enrolled in ASA. That means you can access your servers with users and groups from Okta associated with your project.
Test access to servers with Okta
Now that all servers are enrolled in Okta, let’s access the servers as a user:
Install the ASA agent in your workstation (required to access servers as a user): brew install okta-advanced-server-access --cask
To set up the ASA agent, enter sft enroll and follow the instructions in the screen.
To see your servers, enter sft list-servers.
# sft list-servers
Waiting on browser...
Browser step completed successfully.
HOSTNAME                    OS_TYPE  PROJECT_NAME         ACCESS_ADDRESS
asa-chef-ubuntu-1804        linux    Frederico_Servers    192.168.0.101
asa-chef-centos-7           linux    Frederico_Servers    192.168.0.102
asa-chef-debian-107         linux    Frederico_Servers    192.168.0.103
asa-chef-opensuse-leap-152  linux    Frederico_Servers    192.168.0.104
asa-chef-oracle-82          linux    Frederico_Servers    192.168.0.105
To ssh into your server, enter sft ssh <name-of-your-server>:
# sft ssh asa-chef-ubuntu-1804
/home/frederico_hakamine #
Note: Wait… what Okta ASA does for the login?
- Okta ASA secures access to Linux and Windows servers in SSH and RDP connections using the server agent (the same one that enrolled the server in your project earlier).
- The ASA server agent, in addition to subscribing your server to a project, also works alongside native OS features such as sudo, users, and openssh to control access during runtime and to capture any login events for audit inspection.
- Because the agent is light and does not require firewalls and monolith LDAP or privileged access servers, it can be easily distributed across any infrastructure (IaaS, VM, or physical) and embedded in your DevOps tools.
- To grant users access to servers, ASA operates a programmable Certificate Authority service as part of its SaaS, that issues ephemeral SSH Client Certificates for each authenticated and authorized request. The keys are issued only after ensuring both user and his/her device complies with the organization’s security policies.
- The use of ephemeral keys provides many benefits. It eliminates the use of static keys and credentials for server access, ensures that both users and machines are audited before any new ssh connection, simplifies access revocation, eliminates the risk of “super account overuse”, and simplifies access audit.
What’s next?
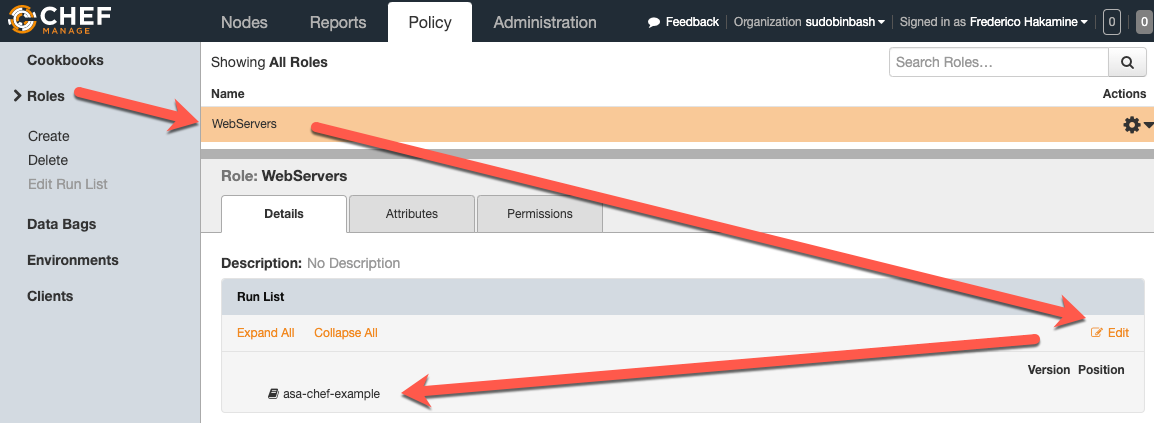
After testing the cookbook on your Chef Kitchen, you can use it in your Chef Infra. To do so, tweak the cookbook (i.e. store the enrollment token on chef-vault or a data-bag), upload (knife upload asa-chef-example), and add the cookbook to specific roles and environments within your infrastructure:
You can also turn on additional features in Okta ASA, such as setup sudo grants, time-based access, use of bastion hosts, and SSH session capture just to name a few. All these features reduce the load on your cookbooks and allow provide consistent account configuration across multiple servers.
If you’d like to see more information like this, consider following us on Twitter, subscribing to our YouTube channel, or reading through some of our other DevOps articles!
- A Developer’s Guide to Docker
- Container Security: A Developer Guide
- Add Docker to Your Spring Boot Application
- Build a Simple .NET Core App on Docker
- Using Okta Advanced Server Access & Terraform to Automate Identity & Infrastructure as Code
- Tutorial: Ansible and Account Automation with Okta
- Tutorial: Puppet and Account Automation with Okta
Okta Developer Blog Comment Policy
We welcome relevant and respectful comments. Off-topic comments may be removed.