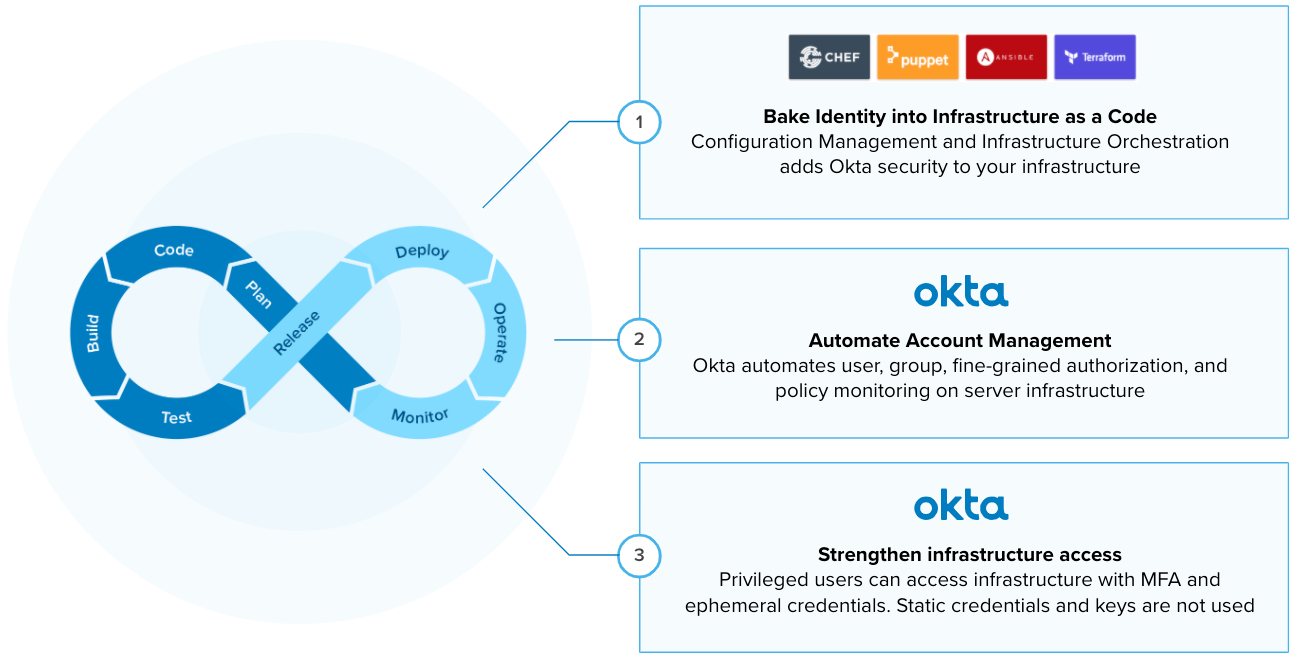
Tutorial: Puppet and Account Automation with Okta
If you use Puppet to automate configuration management across dynamic server fleets, there’s a question about identity & access management – how do you get accounts and credentials on the machines?
A common practice is to push SSH Keys for every admin user to every server. This has major security implications, however. What happens when an administrator leaves the company? It is usually up to someone to clear out those keys on each machine, oftentimes a manual process.
Another common practice is to front your servers with an LDAP interface, configuring a local PAM module on each machine to sync local server accounts with an upstream Identity Provider. This leaves a significant operational burden, however. Do you want to run an HA middleware service blocking your ability to scale in the cloud? I doubt you do.
In this tutorial, we will overcome both issues by seamlessly injecting Okta into your Puppet Infrastructure as Code to effectively Shift Identity Left:
Note: To follow this tutorial, you need to have an Advanced Server Access (ASA) team provisioned from your Okta Org. If you don’t have an existing ASA team, you can sign up for free here, which requires an Okta Administrator to configure.
Create your Puppet project and get an enrollment token in ASA
In Okta ASA, projects work as a collection of servers that share the same access and authorization controls. In a project, you define which users and groups from Okta can access your servers, when they can do so, and what they are allowed to do in the server (i.e. run only certain commands). Any changes in your project (users, group assignments, authorization) are periodically updated in your servers (providing idempotency for identity and access management).
Servers enroll in your project to apply the same security configuration using an ASA agent with a project enrollment token. The ASA agent periodically checks for updates in Okta to update the server configuration.
To get your servers running with Okta, let’s create a project and get an enrollment token:
- Access Okta ASA as Administrator.
- Click Projects and then select or create a new project.
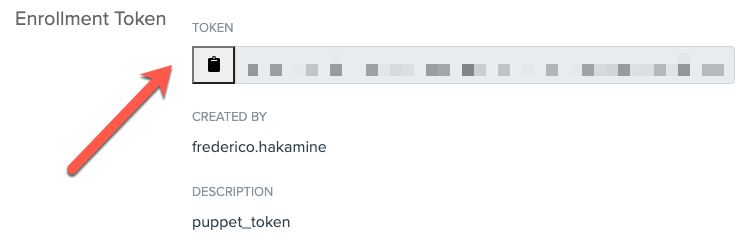
- Click Enrollment > Create Enrollment Token.
- Enter a name (i.e.
puppet_token) and click Submit. - Copy the enrollment token:
Download and configure the sample puppet code
Clone our sample code git clone https://github.com/okta-server-asa/asa-puppet-example.git
Optionally, review the okta-asa-sample.pp contents
This code first installs the Okta ASA server agent binaires. It supports multiple Linux distros using the server distro family to identify the ideal installation tasks:
#Class for installing ASA
class asa_setup {
    if $facts['os']['family'] == 'Debian' {
        notice("This is: ${::osfamily} - ${::fqdn}")
        include install_deb
    }
    elsif $facts['os']['family'] == 'RedHat' {
        notice("This is: ${::osfamily} - ${::fqdn}")
        include install_rpm
    }
    elsif $facts['os']['family'] == 'Suse' {
        notice("This is: ${::osfamily} - ${::fqdn}")
        include install_rpm
    }
    else {
        notice("This sample doesn't work yet on: ${::osfamily} - ${::fqdn}")
    }
}
After installing the agent binaries, the okta-asa-sample.pp code:
- Defines the name of your server in ASA (canonical name),
- Enrolls your server into the ASA project using the enrollment token you got in the previous section
- Starts the ASA server agent
Edit the okta-asa-sample.pp file and update line 2, with the asa enrollment token.
# ASA Enrollment token
$asa_enrollment_token = "ENROLLMENT_TOKEN_HERE"
Validate the example syntax: puppet parser validate okta-asa-sample.pp
Validate the example in the primary server (without executing the change): puppet apply okta-asa-sample.pp --noop
Test the sample code of your Puppet Project
It’s time to test the code. To do this, apply the sample on your Puppet primary server to enroll this server in Okta ASA.
Tip: For this tutorial, I’m using a test environment. For use in production, we recommend tests isolated in a new puppet client before running on production clients and primary servers.
To test the sample code Puppet primary server in ASA, enter puppet apply okta-asa-sample.pp
To confirm the primary server is enrolled, check the list of servers in ASA:

With the primary server enrolled, let’s move to the clients.
Copy the sample manifest to the environment folder. For example: cp okta-asa-sample.pp /etc/puppetlabs/code/environments/production
Access your puppet clients and execute the command puppet agent -tv (or wait until the clients fetch the new configuration from the primary server).
The Puppet client will fetch the manifest, install and configure ASA, and return the following:
root@cicd-puppet-3-ubuntu:~# puppet agent -tv
Info: Using configured environment 'production'
Info: Retrieving pluginfacts
Info: Retrieving plugin
Info: Loading facts
Info: Caching catalog for cicd-puppet-3-ubuntu.acme.com
Info: Applying configuration version '1608162283'
Notice: /Stage[main]/Enroll_server/File[/var/lib/sftd/enrollment.token]/ensure: defined content as '{sha256}123e122e122we2e'
Info: /Stage[main]/Enroll_server/File[/var/lib/sftd/enrollment.token]: Scheduling refresh of Service[sftd]
Notice: /Stage[main]/Enroll_server/Service[sftd]: Triggered 'refresh' from 1 event
In ASA, you will see the servers enrolled in your project:
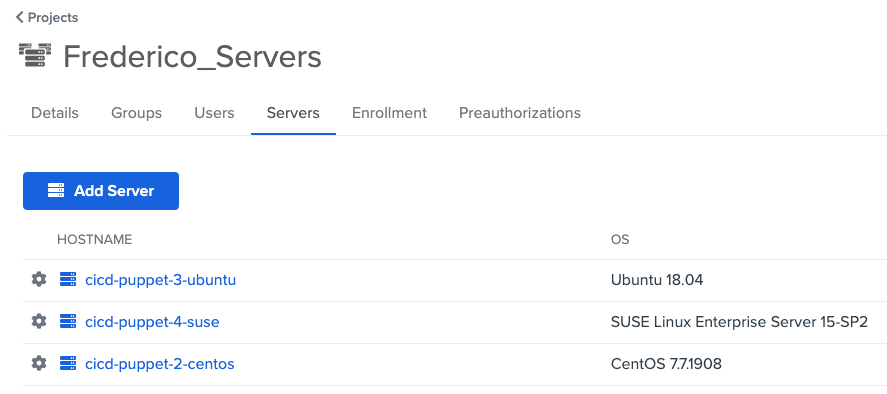
At this moment, your servers are enrolled in ASA. That means you can access your servers with users and groups from Okta associated with your project.
Test access to servers with Okta
Now that all servers are enrolled in Okta, let’s access the servers as a user:
Install the ASA agent in your workstation (required to access servers as a user): brew install okta-advanced-server-access --cask
To set up the ASA agent, enter sft enroll and follow the instructions
To see your servers, enter sft list-servers
# sft list-servers
Waiting on browser...
Browser step completed successfully.
HOSTNAME                    OS_TYPE  PROJECT_NAME         ACCESS_ADDRESS
asa-puppet-1-main           linux    Frederico_Servers    192.168.0.101
asa-puppet-2-centos         linux    Frederico_Servers    192.168.0.102
asa-puppet-3-ubuntu         linux    Frederico_Servers    192.168.0.103
asa-puppet-4-suse           linux    Frederico_Servers    192.168.0.104
To ssh into your server, enter sft ssh <name-of-your-server>:
# sft ssh asa-puppet-3-ubuntu
/home/frederico_hakamine #
Note: Wait… What Okta ASA does for the login?
- Okta ASA secures access to Linux and Windows servers in SSH and RDP connections using the server agent (the same one that enrolled the server in your project earlier). - The ASA server agent, in addition to subscribing your server to a project, also works alongside native OS features such as sudo, users, and openssh to control access during runtime and to capture any login events for audit inspection.
- Because the agent is light and does not require firewalls and monolith LDAP or privileged access servers, it can be easily distributed across any infrastructure (IaaS, VM, or physical) and embedded in your DevOps tools.
- To grant users access to servers, ASA operates a programmable Certificate Authority service as part of its SaaS, that issues ephemeral SSH Client Certificates for each authenticated and authorized request. The keys are issued only after ensuring both user and his/her device complies with the organization’s security policies.
- The use of ephemeral keys provides many benefits. It eliminates the use of static keys and credentials for server access, ensures that both users and machines are audited before any new ssh connection, simplifies access revocation, eliminates the risk of “super account overuse”, and simplifies access audit.
What’s next?
After testing the sample on some clients, you may expand to the rest of your infrastructure and tweak the sample to take full advantage of your Puppet environment – i.e. Bolt, Hiera, secret management tools, and best practices.
You can also turn on additional features in Okta ASA, such as setup sudo grants, time-based access, use of bastion hosts, and SSH session capture just to name a few. All these features reduce the load on your catalogs and allow consistent account configuration across multiple servers.
If you’d like to see more information like this, consider following us on Twitter, subscribing to our YouTube channel, or reading through some of our other DevOps articles!
Okta Developer Blog Comment Policy
We welcome relevant and respectful comments. Off-topic comments may be removed.